今回は、RoboDK と Beckhoff TwinCAT を使って Etherent/IP ネットワークを構築してみます。スキャナ側がRoboDKで、TwinCAT側がAdapterになります。なお、この記事で紹介しているものはデモですので、実際の用途に適しているかどうかは、ご自身で評価してください。
よろしくお願いします。

RoboDK Side
Configure the Station and Program
RoboDK Softwareを起動し、Stationを作成します。

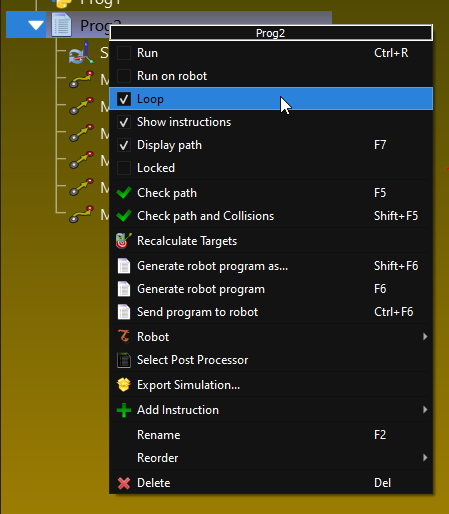
Configure it as Loop
いくつかポイントを教え、プログラムに追加したら、プログラムを右クリックし、Loop Option使用し無限Loopさせます。
Test it First
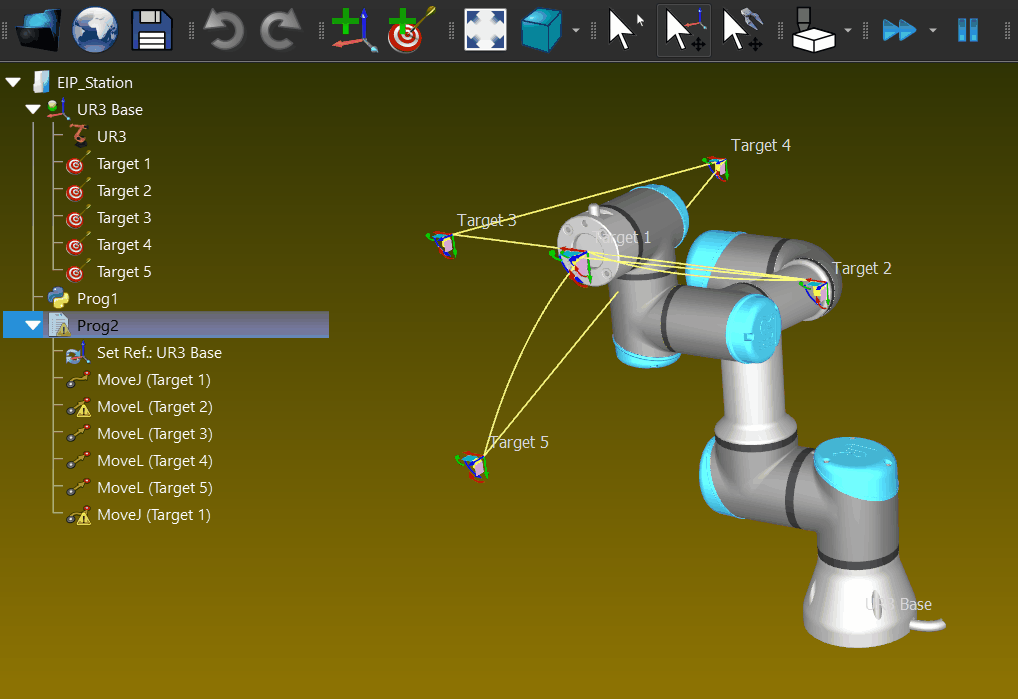
作成したステーションはこちらです。
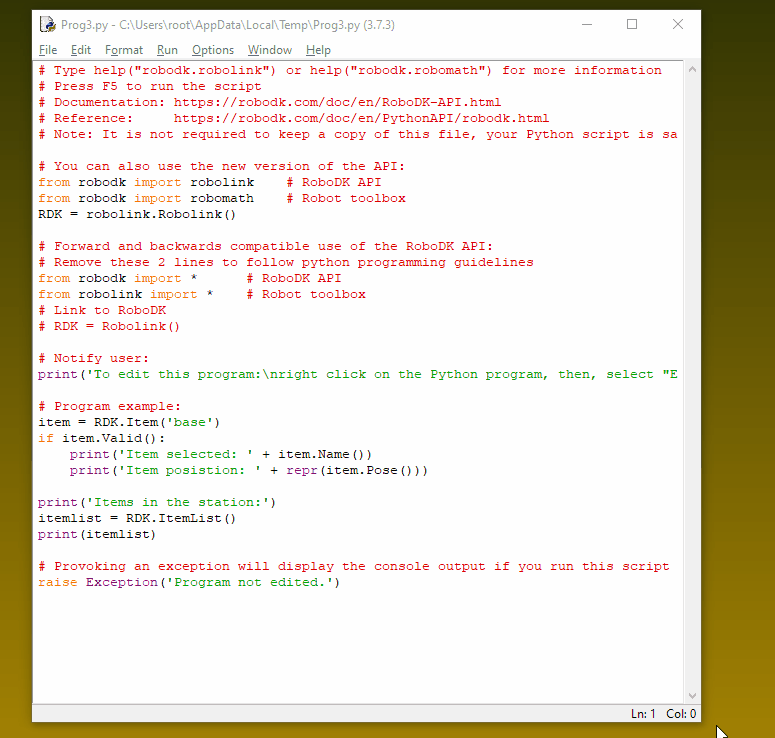
Python Script
RoboDKは非常に優れたAPIも提供し、ユーザーがステーション内で独自のPythonスクリプトを作成し、アプリケーションに基づいてそれを実行することができます。
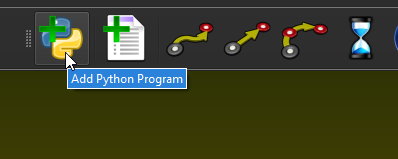
Add a new Python Program
RoboDK の Python アイコンを押して、Add new Python program を実行します。
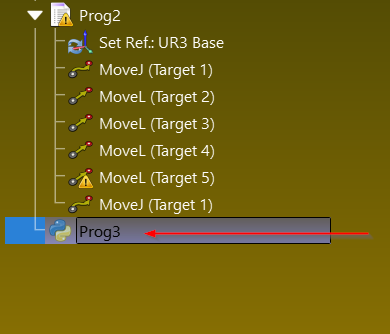
ステーションの末尾にPythonスクリプトが挿入されているのがわかると思います。
Python Scriptを右クリック>「Edit Python Script」を選択するだけで、プログラムを編集することができます。

RoboDK ソフトウェアから Python スクリプトを生成する場合、必要なライブラリもすでにImportされたテンプレートとして作成されます。
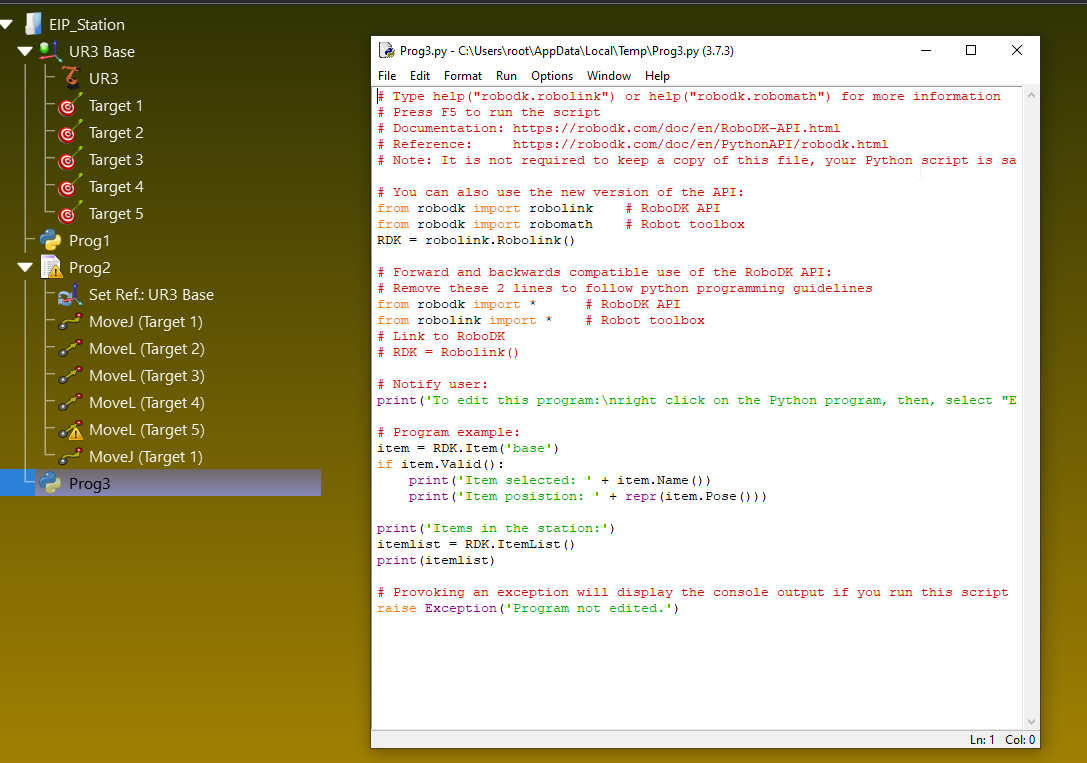
Run>Runモジュールをクリックするだけで、Pythonスクリプトを実行してみます。

Done!
EIP Module
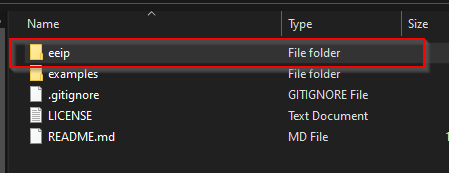
こちらは今回の記事で使用するライブラリです。

eeipライブラリは、こちらのGithubリンクからダウンロードできます。
https://github.com/rossmann-engineering/eeip.py


eeipはこのチュートリアルで使用するライブラリです。
Program it!
こちらはPython Scriptです。
| # Type help(“robodk.robolink”) or help(“robodk.robomath”) for more information # Press F5 to run the script # Documentation: https://robodk.com/doc/en/RoboDK-API.html # Reference: https://robodk.com/doc/en/PythonAPI/robodk.html # Note: It is not required to keep a copy of this file, your Python script is saved with your RDK project # You can also use the new version of the API: import sys sys.path.append(r”C:\Users\root\Desktop\eeip.py-master\eeip.py-master”) from eeip import * from robodk import robolink # RoboDK API from robodk import robomath # Robot toolbox RDK = robolink.Robolink() # Forward and backwards compatible use of the RoboDK API: # Remove these 2 lines to follow python programming guidelines from robodk import * # RoboDK API from robolink import * # Robot toolbox # Link to RoboDK # RDK = Robolink() import struct # Notify user: print(‘To edit this program:\nright click on the Python program, then, select “Edit Python script”‘) print(‘Creating EEIP..’) eeipclient=EEIPClient() print(‘Register session…’) eeipclient.register_session(‘192.168.3.240’) #Parameters from Originator -> Target eeipclient.o_t_instance_id = 0x82 eeipclient.o_t_length = 44 eeipclient.o_t_requested_packet_rate = 100000 #Packet rate 100ms (default 500ms) eeipclient.o_t_realtime_format = RealTimeFormat.HEADER32BIT eeipclient.o_t_owner_redundant = False eeipclient.o_t_variable_length = False eeipclient.o_t_connection_type = ConnectionType.POINT_TO_POINT #Parameters from Target -> Originator eeipclient.t_o_instance_id = 0x81 eeipclient.t_o_length = 44 eeipclient.t_o_requested_packet_rate = 100000 #Packet rate 100ms (default 500ms) eeipclient.t_o_realtime_format = RealTimeFormat.MODELESS eeipclient.t_o_owner_redundant = False eeipclient.t_o_variable_length = False eeipclient.t_o_connection_type = ConnectionType.POINT_TO_POINT eeipclient.configuration_assembly_instance_id=0x80 eeipclient.forward_open() item = RDK.Item(‘UR3’) Joints = bytearray(struct.pack(“f”, value)) try: while 1: # Program example: if item.Valid(): print(‘Item selected: ‘ + item.Name()) print(‘Item posistion: ‘ + repr(item.Pose())) print(‘Items in the station:’) print(‘State of the first Input byte: {0}’.format(eeipclient.t_o_iodata)) joints=item.Joints().list() count=4 for joint in joints: print(count) barray=bytearray(struct.pack(“f”, joint)) eeipclient.o_t_iodata[count]=barray[0] eeipclient.o_t_iodata[count+1]=barray[1] eeipclient.o_t_iodata[count+2]=barray[2] eeipclient.o_t_iodata[count+3]=barray[3] count+=4 print(‘State of the second output byte: {0}’.format(eeipclient.o_t_iodata)) print(type(eeipclient.o_t_iodata)) time.sleep(0.1) except KeyboardInterrupt: print(“Keyboard interrupt exception caught”) print(‘forword close..’) eeipclient.forward_close() eeipclient.unregister_session() |
Explanation
python sys パッケージをインポートして、ライブラリディレクトリの絶対パスを追加します。私の場合はC: \Users\Desktop\ip.py-master\Masterです。
| import sys sys.path.append(r”C:\Users\root\Desktop\eeip.py-master\eeip.py-master”) from eeip import * |
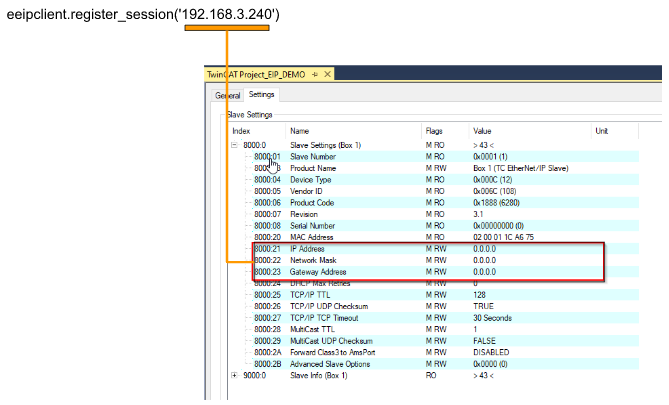
192.168.3.240 は、Ethernet/IP Adapter の IP アドレスです。
| eeipclient.register_session(‘192.168.3.240’) |
ここでは、OriginatorからTargetへの接続経路を設定するプログラムになります。これらのパラメータをどのように合わせるか、Beckhoff TwinCAT3側が説明しますので心配しないでください。
| #Parameters from Originator -> Target eeipclient.o_t_instance_id = 0x82 eeipclient.o_t_length = 44 eeipclient.o_t_requested_packet_rate = 100000 #Packet rate 100ms (default 500ms) eeipclient.o_t_realtime_format = RealTimeFormat.HEADER32BIT eeipclient.o_t_owner_redundant = False eeipclient.o_t_variable_length = False eeipclient.o_t_connection_type = ConnectionType.POINT_TO_POINT |
ここでは、TargetからOriginatorへの接続経路を設定するプログラムを紹介します。これらのパラメータをどのように合わせるか、Beckhoff TwinCAT3側が説明しますので心配しないでください。
| #Parameters from Target -> Originator eeipclient.t_o_instance_id = 0x81 eeipclient.t_o_length = 44 eeipclient.t_o_requested_packet_rate = 100000 #Packet rate 100ms (default 500ms) eeipclient.t_o_realtime_format = RealTimeFormat.MODELESS eeipclient.t_o_owner_redundant = False eeipclient.t_o_variable_length = False eeipclient.t_o_connection_type = ConnectionType.POINT_TO_POINT |
以下は、コンフィギュレーションインスタンスIDを設定するプログラムです。これらのパラメータをどのように合わせるか、Beckhoff TwinCAT3側が説明しますので心配しないでください。
| eeipclient.configuration_assembly_instance_id=0x80 |
Ethernet/IP Adpater(このチュートリアルではBeckhoff TwinCAT3)にforward_openリクエストを送信し、接続を確立します。
| eeipclient.forward_open() |
RoboDK は非常に優れた Python API を提供しており、RoboDK のデータに簡単にアクセスすることができます。ここでは、API を介して UR ロボットの 6 つの関節の値を取得するリクエストです。
| joints=item.Joints().list() count=4 for joint in joints: print(count) barray=bytearray(struct.pack(“f”, joint)) eeipclient.o_t_iodata[count]=barray[0] eeipclient.o_t_iodata[count+1]=barray[1] eeipclient.o_t_iodata[count+2]=barray[2] eeipclient.o_t_iodata[count+3]=barray[3] count+=4 print(‘State of the second output byte: {0}’.format(eeipclient.o_t_iodata)) print(type(eeipclient.o_t_iodata)) time.sleep(0.1) |
例外が発生している間に、forward_closeリクエストとunregisterリクエストをアダプターに送信するようにする必要があるので、Exceptionを書くことを忘れないでください。
| except KeyboardInterrupt: print(“Keyboard interrupt exception caught”) |
forward_close request()とunregister_session()を送信するスクリプトです。
| eeipclient.forward_close() eeipclient.unregister_session() |
TwinCAT Side
次はTwinCAT Sideのコンフィギュレーションを行います。
Add Ethernet/IP Adapter
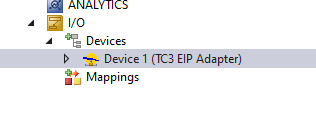
I/O>Devices>Add New Itemで、新しいDeviceを追加します。
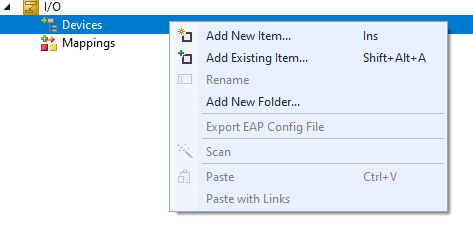
EtherNet/IP>EtherNet/IP Adapter[Slave]>Okを選択します。

プロジェクト内にTC3 EIP Adapterが作成されます。
Configure the Adapter
Ethernet/IP Adapterを開き、AdapterタブでSearchボタンを押すと、IPCで使用可能なネットワークアダプターが表示されます。

IPCで使用できるネットワークアダプターが表示されます。

Configure the Task
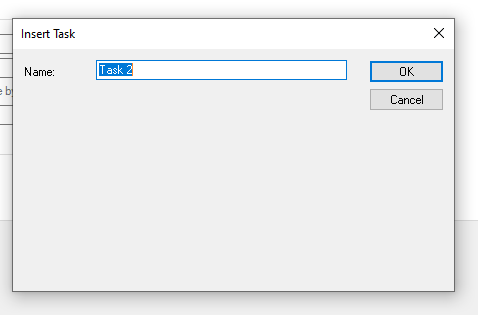
Sync Taskタブを開き、Special Sync Taskを選択し、Create new I/O Taskを選択します。

新しいタスクの名前を入力します。
IP Address
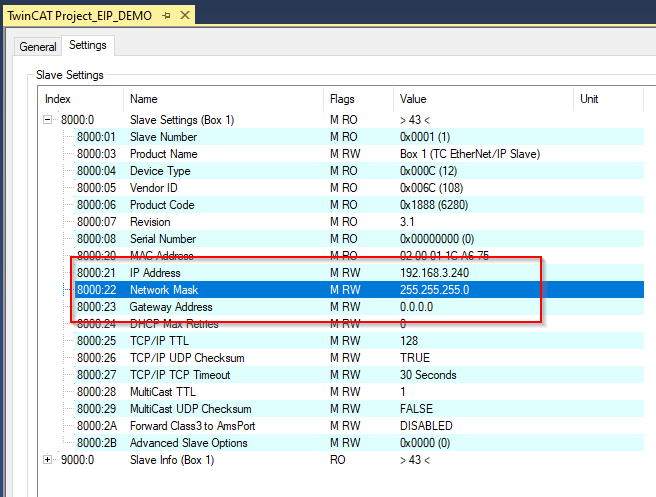
Ethernet/IPアダプタのデバイスを展開する>Box1(TC EtherNet/IPスレーブ)を開き、Settingsタブから8000:21、8000:22、8000:23でNetwork Settingを行います。


先程RoboDK Sideで紹介したように、ip addressのパラメータはeeipclinet.register_session(”)のMethodと一致させる必要があります。
IPアドレス=192.168.3.240、ネットワークマスク=255.255.255.0を設定しました
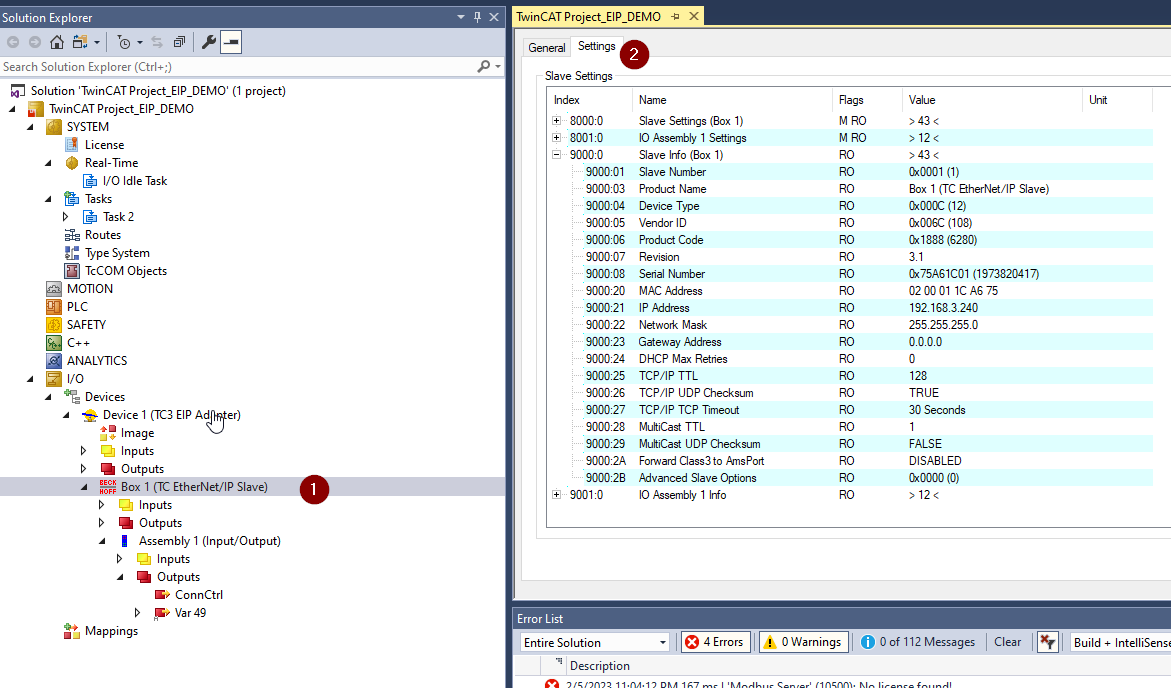
Append IO Assembly
Box1を右クリックし、”Append IO Assembly “を選択します。
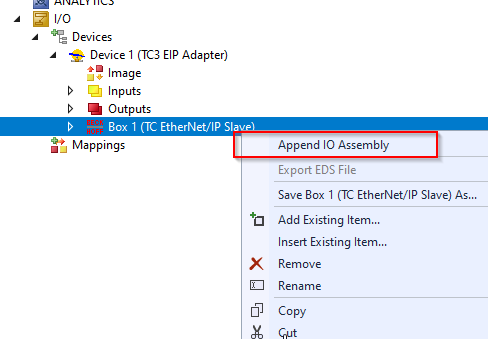
Ethernet/IP Adapterに新しい Assemblyが作成されました。
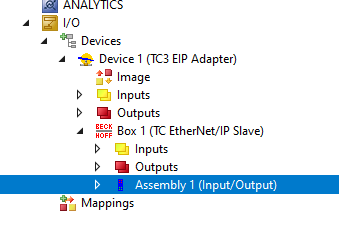
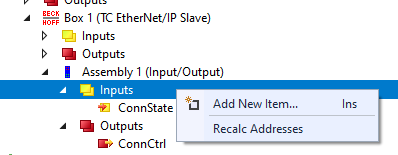
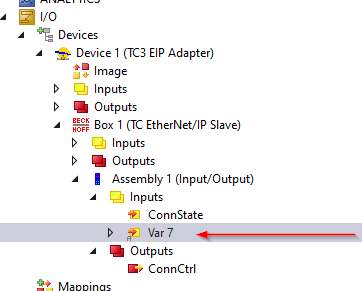
Inputs Data
Inputsを右クリックし、Add New Itemを選択します。
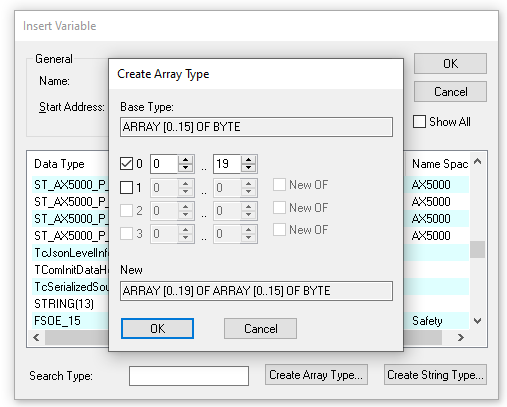
データ型としてBYTEを選択し、”Create Array Type”をクリックし配列型の変数を作成します。

0 “を選択して1D 配列を定義し、データ長を0…23を入力します。RoboDK の API を使って実際のロボット関節位置を取得するため、各関節位置は 32ビット(6×4=24 バイト)の値だからです。
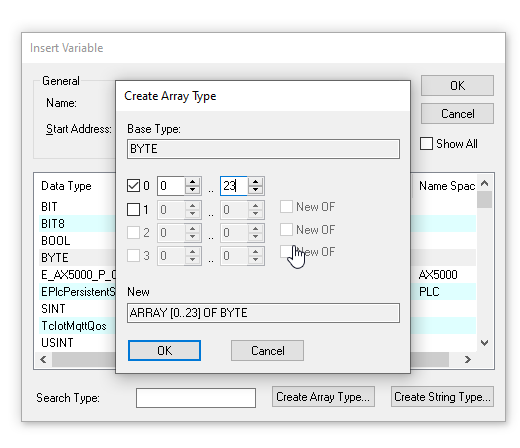
ロボット関節位置用のInput Dataが定義されました.
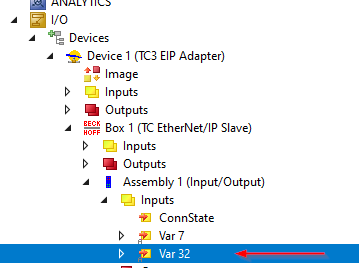
同じ操作でもう1つのInputs Dataを追加します。
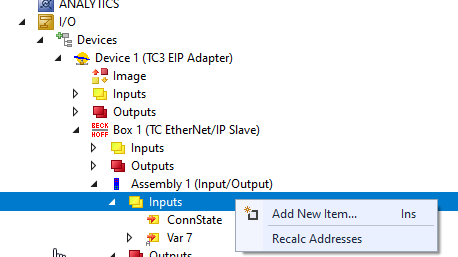
データ型としてByteを選択し、”Create Array Type”ボタンを押します。
0 “を選択して1D 配列を定義し、データ長をを0…15で入力します。このチュートリアルでは、入力データの合計サイズが40バイトなので、前のステップでは24バイトのデータが定義されています。ここでは、40-24=16なので、16バイトの配列を定義します。

Done!
Outputs Data
出力データも同様に、出力フィールドを右クリックし、新しいOutput Dataを追加してください。
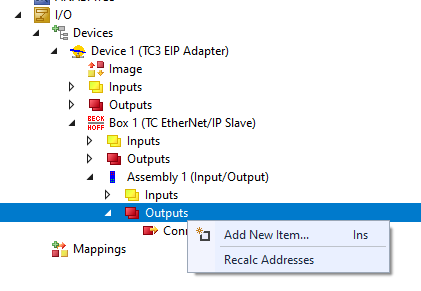
データ型としてByteを選択し、”Create Array Type”ボタンを押します。
長さ20のByte配列を定義します。
先程と同じ操作で40Bytesを揃えるようにしてください。

Match the Setting between TwinCAT and RoboDK
PythonスクリプトとTwinCATコンフィギュレーションとの間で、設定を一致させるため、Ethernet/IP Boxをクリックし、Settings Tabに移動します。
Parameters from Originator -> Target
o_t_Instance_id
出力インスタンスが、TwinCAT側のインスタンス番号は130でHex = 0x82です。
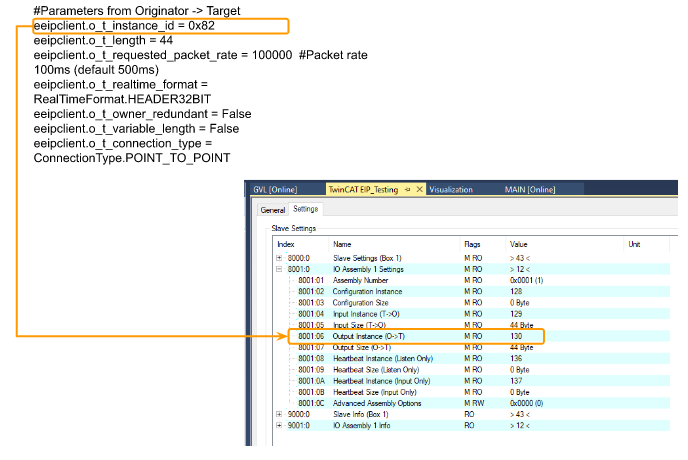
o_t_length
リアルタイムフォーマットでは4バイトのヘッダがあるため、t_lengthは44となる(ただし、ユーザデータのサイズは合計で40バイトである)。
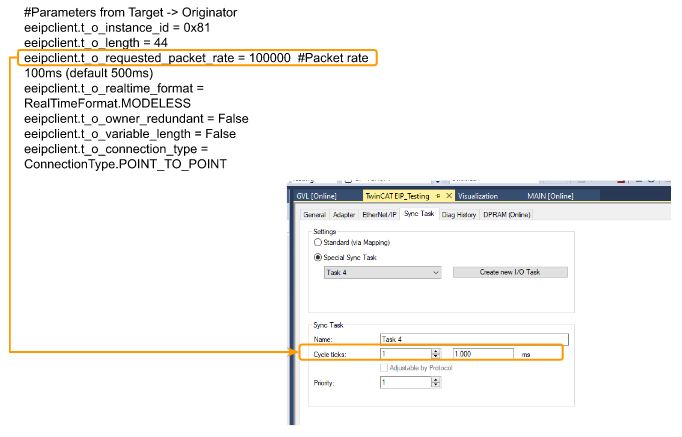
o_t_requested_packet_rate
RPIがTwinCATのSync Taskのサイクルタイムより大きいことを確認してください。

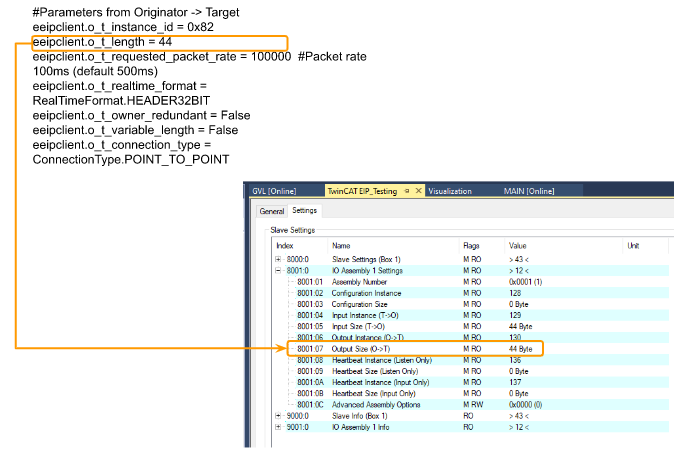
Parameters from Target -> Originator
t_o_Instance_id
Inputインスタンスの場合、TwinCAT側のInstance番号は、129でHex = 0x82となります。
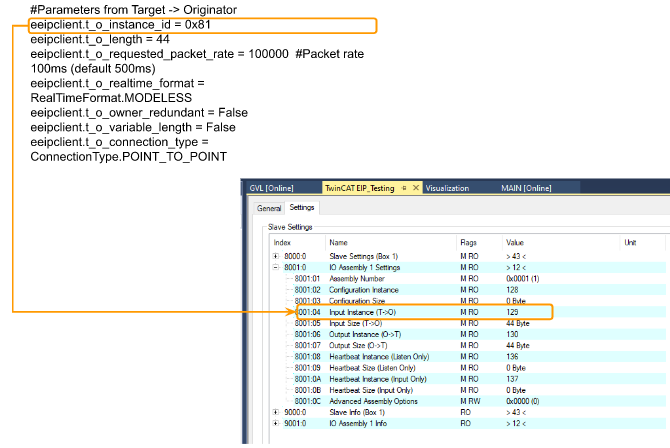
t_o_length
Modelessの4バイトのヘッダがあるので、t_lengthは44になります。

t_o_requested_packet_rate
RPIがTwinCATのSync Taskのサイクルタイムより大きいことを確認してください。
Add PLC
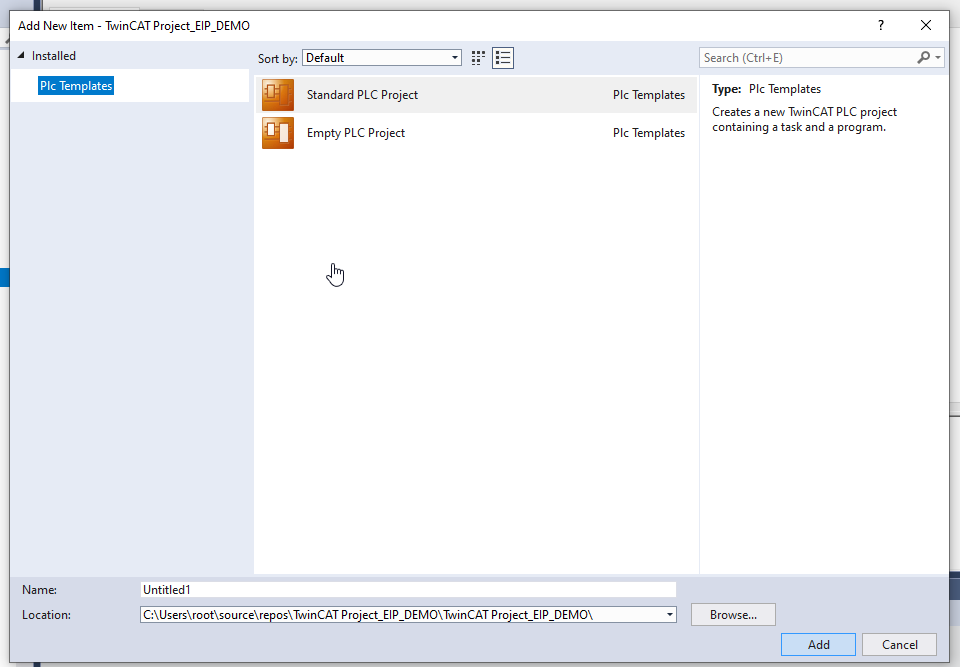
最後に、TwinCATプロジェクトに新しいPLCを追加する必要があります。PLCを右クリックし、Add New Itemを選択します。

Standard PLC Projectを選び>Addします。
Done!

GVL
Global Variable Listを作成し、 process input/outputの入出力データを定義する。
| {attribute ‘qualified_only’} VAR_GLOBAL Inputs AT %I* :ARRAY[0..23]OF BYTE; Outputs AT %Q*:ARRAY[0..19]OF BYTE; END_VAR |
MAIN Program
MEMMOVE関数を使用しRoboDKから受信したデータの一部(関数データ)を一括で実数の配列に転送します。
| PROGRAM MAIN VAR i:INT; r32:ARRAY[0..5] OF real; END_VAR FOR i :=0 TO 19 DO GVL.Outputs[i]:=INT_TO_BYTE(i+10); END_FOR MEMMOVE( destAddr:=ADR(r32[0]) ,srcAddr:=ADR(GVL.Inputs[0]) ,n:=24) |
;
Mapping
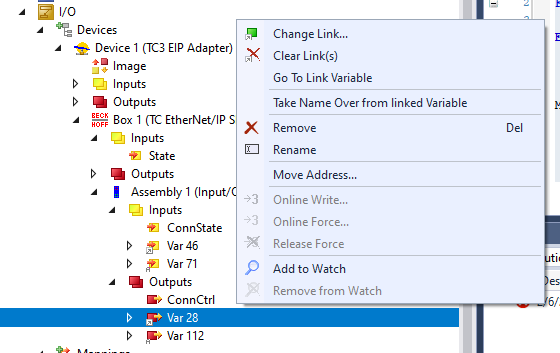
User programの変数とProcess IO Mappingは忘れずに。
Inputs

Outputs
Visualization
簡単な画面を作成し軸の座標を表示します。

Result
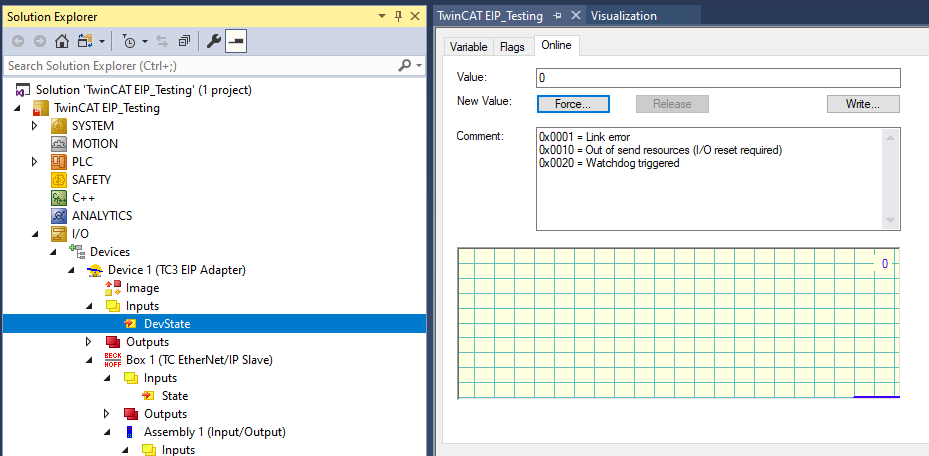
DevState=0、Ethernet/IP Adapter自体は問題なし。
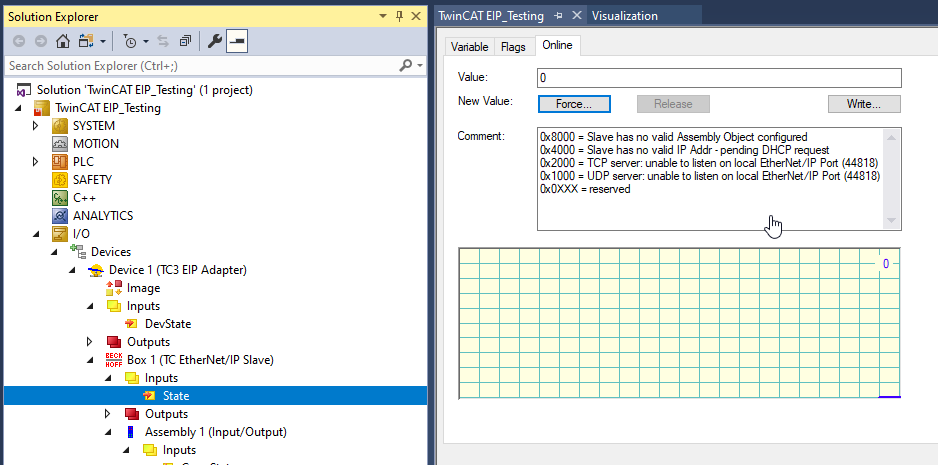
State=0、 Ethernet/IP slaveにもエラーなし。
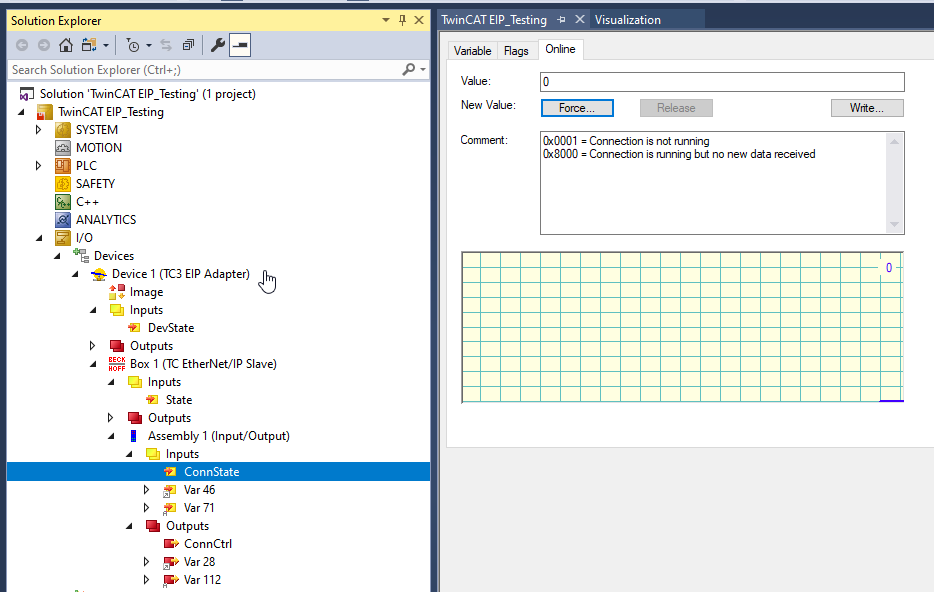
ConnState=0、 Scannerと接続してることを示しています。
192.168.3.42はRoboDKがインストールされたPCのIPアドレスです。WiresharkからForward Openのリクエストが送信され、192.168.3.240(TwinCAT3 Ethernet/IP adpater)がSuccessの返信がReturnしました。

Point to Point Data data exchange packages can be found from wireshark.
WiresharkからPoint to Pointのデータ交換Packagesがみえました。

こちらのLinkから動作確認できます。