今回の記事ではPythonを使用してctrlX PLC Engineering APIを操作する方法を紹介します。ctrlX PLC Engineering APIは、ctrlX CORE PLCプロジェクトを生成および編集するために用意されている便利なツールです。
Where can you find the documents?
ctrlX PLC Engineering APIのドキュメントはctrlX PLC Engineering>Help>API-referenceから一覧できます。
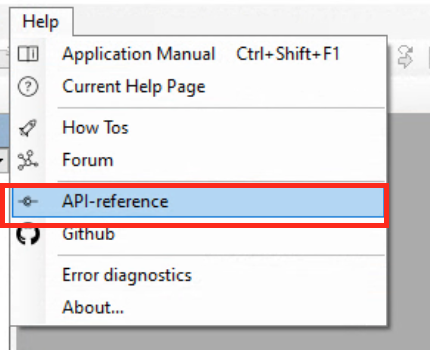
Browserが自動的に起動され、APIのリクエストリングとAPIのExampleが見えます。

Install packages
今回はrequests というパッケージを使用しますので、pipでrequestsをインストールします。GET/POST/PUT/DELETEのリクエストを送信しプロジェクトの操作を行い、結果はJSON Formatに戻します。
| pip install requests |
Example1 Test by yourself
最初にAPIドキュメントからリクエストをテストしてみます。それは各リクエストでもAPIドキュメントにテストできる、すごく優しい機能がついています。
下の矢印をクリックします。
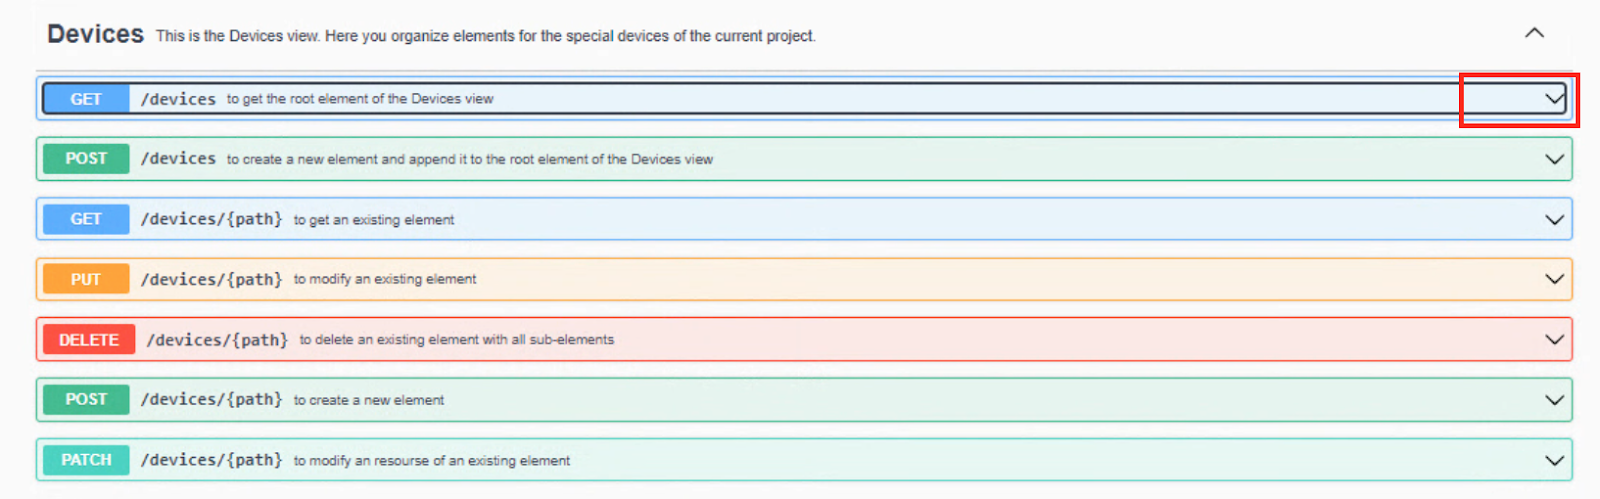
各リスボンのJSON返事例もリストアップされています。

Try it outのボタンをクリックします。

Executeのボタンが表示され、そのボタンをクリックすればリクエストが実行されます。
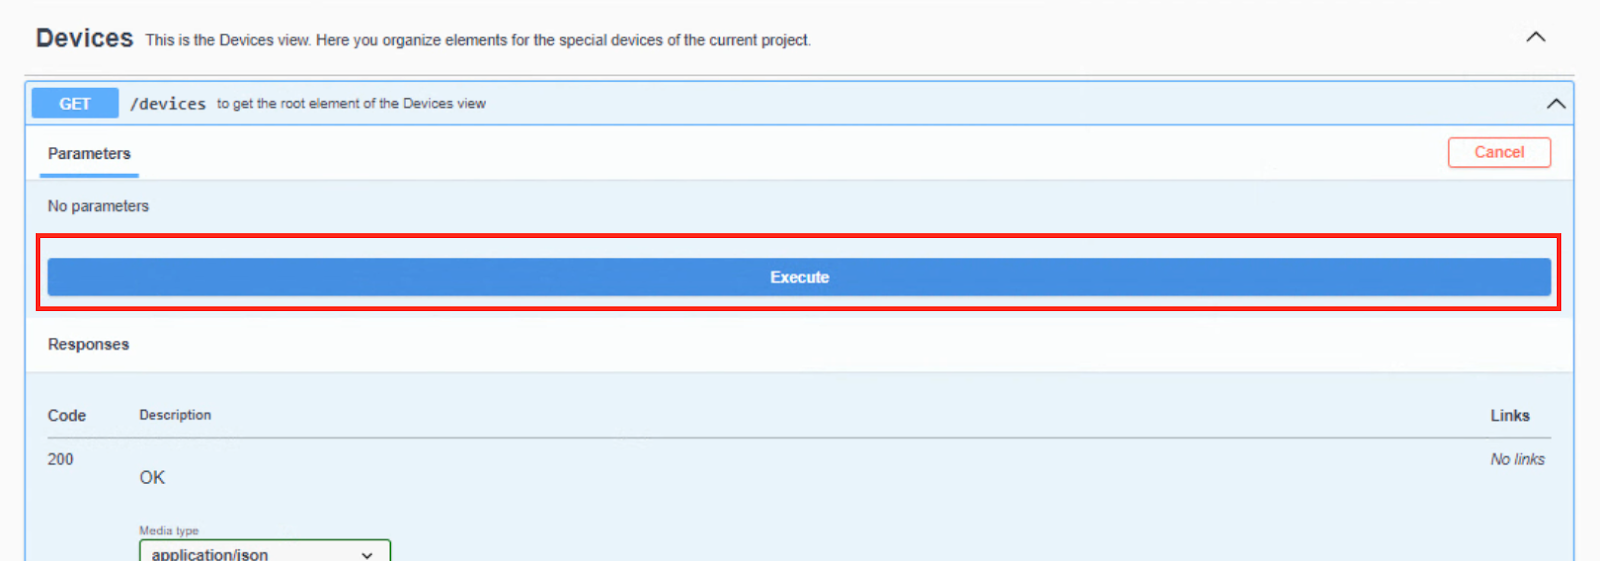
Done!200が返ってきましたね。つまりリクエストが正常に届き処理されました。

Example2 Get Device from Python
次はPythonのrequestsライブラリを使用しDevices情報を取ります。
リクエストはhttp://localhost:9002/plc/engineering/api/v2/devicesです。
| import requests #The base URL that you can find in the API Reference CTRLX_URL_Basic=’http://localhost:9002/plc/engineering/api/v2′ #Send devices r=requests.get(CTRLX_URL_Basic+’%s’%(‘/devices’)) #Get Status Code print(‘Status Code=%s’%(r.status_code)) #Get json Data data=r.json() #Output print(‘—-Data—-‘) for k,v in data.items(): print(‘key:%s , value:%s’%(k,v)) |
Result
Status Code=200、JSON Formatのデバイス情報も届きました。
| Status Code=200 —-Data—- key:name , value:Devices root node key:elementType , value:DevicesTopLevel key:id , value:None key:children , value:[‘VirtualControl_1’] |
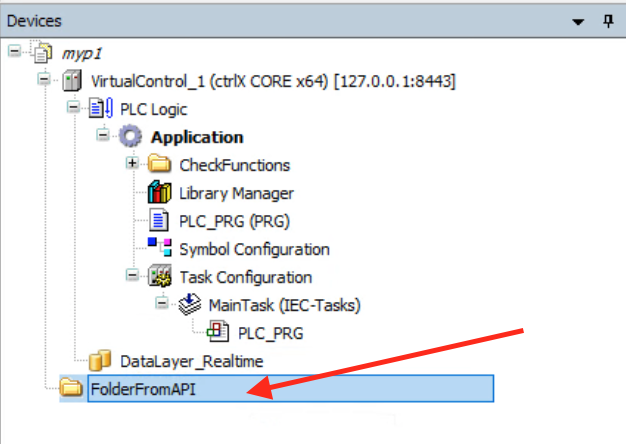
Example 3 Create Folder
次はプロジェクトでFolderを作成してみます。
リクエストはhttp://localhost:9002/plc/engineering/api/v2/devicesです。
| import requests #The base URL that you can find in the API Reference CTRLX_URL_Basic=’http://localhost:9002/plc/engineering/api/v2′ #Post Content postData=”’ { “name”: “%s”, “elementType”: “Folder”, “elementProperties”: { “build”: { “excludeFromBuild”: false, “external”: false, “enableSystemCall”: false, “linkAlways”: false, “compilerDefines”: “” }, “documentation”: “Folder Documentation @123” } } ”’%(‘FolderFromAPI’) #Send devices r=requests.post(CTRLX_URL_Basic+’%s’%(‘/devices’),data=postData) #Get Status Code print(‘Status Code=%s’%(r.status_code)) #Get json Data data=r.json() #Output print(‘—-Data—-‘) for k,v in data.items(): print(‘key:%s , value:%s’%(k,v)) |
Result
Done!プロジェクトmyp1の下にFolderFromAPIが作成されました。
Example 4 Create GVL
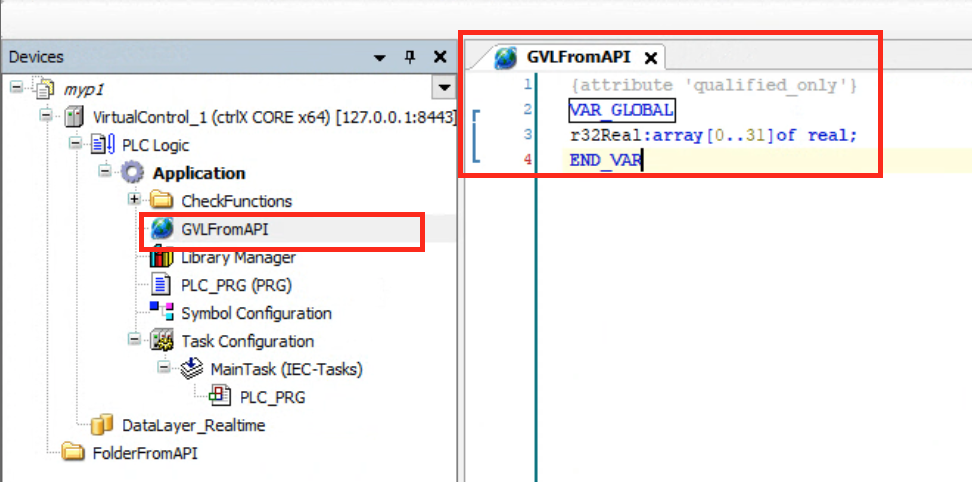
Example3ではプロジェクトの下に直接Folderを作るのは使い道があまりないので、Applicationの中にGVLを作ってみます。
GVL内部の変数宣言はいつも通りの宣言方法でOKです。
\nVAR_GLOBAL\nr32Real:array[0..31]of real;\nEND_VA
リクエストはhttp://localhost:9002/plc/engineering/api/v2/devices//VirtualControl_1/PLC Logic/Applicationです。
| import requests #The base URL that you can find in the API Reference CTRLX_URL_Basic=’http://localhost:9002/plc/engineering/api/v2′ #Post Content postData=”’ { “name”: “%s”, “elementType”: “GVL”, “elementProperties”: { “build”: { “excludeFromBuild”: false, “external”: false, “enableSystemCall”: false, “linkAlways”: false, “compilerDefines”: “” } }, “declaration”: “{attribute ‘qualified_only’}\nVAR_GLOBAL\nr32Real:array[0..31]of real;\nEND_VAR” } ”’%(‘GVLFromAPI’) #Send devices r=requests.post(CTRLX_URL_Basic+’%s’%(‘/devices/VirtualControl_1/PLC Logic/Application’),data=postData) #Get Status Code print(‘Status Code=%s’%(r.status_code)) #Get json Data data=r.json() #Output print(‘—-Data—-‘) for k,v in data.items(): print(‘key:%s , value:%s’%(k,v)) |
/VirtualControl_1/PLC Logic/ApplicationのPathを示すのはこちらです。なので、このExampleはApplicationの下にGVLを作成します。

Result
Done! GVLが作成されました。
Example5 Get Current Project Info
最後に例では現在のプロジェクト情報を出力します。
| import requests #The base URL that you can find in the API Reference CTRLX_URL_Basic=’http://localhost:9002/plc/engineering/api/v2′ def printData(r): #Get Status Code print(‘Status Code=%s’%(r.status_code)) #Get json Data data=r.json() #Output print(‘—-Data—-‘) for k,v in data.items(): print(‘key:%s , value:%s’%(k,v)) #Send devices r=requests.get(CTRLX_URL_Basic+’%s’%(‘/product/info’)) printData(r) r=requests.get(CTRLX_URL_Basic+’%s’%(‘/projects/current’)) printData(r) |
Result
Done!PLC Runtimeのバージョンや作成の日付・保存先なども取得できました。
| Status Code=200 —-Data—- key:versionText , value:WRK-V-0118.1 Status Code=200 —-Data—- key:name , value:myp1 key:path , value:C:\Users\root\Documents\My ctrlX\myp1.project key:creationTime , value:2023-04-03T15:16:24.3155778-07:00 key:lastModifiedTime , value:2023-04-03T15:16:12.8231485-07:00 key:lastAccessTime , value:2023-04-03T15:16:25.3760566-07:00 key:profileName , value:ctrlX PLC 1.18.0 key:compilerVersion , value:3.5.18.30 key:visualisationProfile , value:CODESYS Visualization 4.2.0.0 |
Download
下記のLinkからExampleをDownloadできます。
https://github.com/soup01Threes/Ctrlx/blob/main/Ctrlx%20PLC%20Enginnering%20APi%20Example.7z