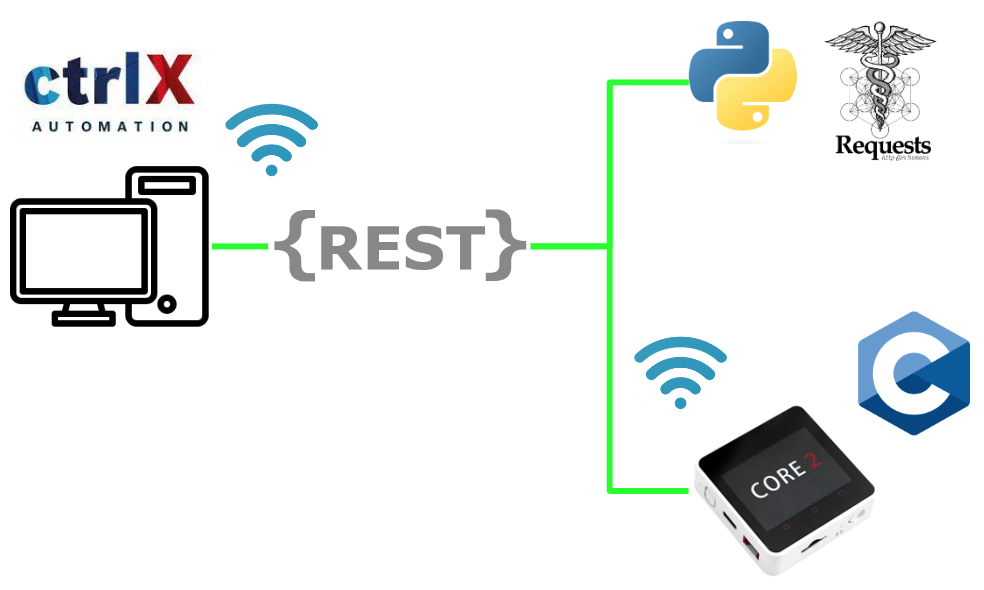
今回の記事ではctrlX CORE または ctrlX COREvirtual の REST API を使用して ctrlX Data Layer のデータを読み書きする方法を紹介しています。記事の中でPython・RequestとM5Stack Core2・Cで、2つの構成で説明します。よろしくおねがいします。
前書き
いつも私の技術ブログとYouTubeチャンネルをご覧いただき、心より感謝申し上げます。また、いまFullさん(full@桜 八重 (@fulhause) / X)と共に毎週水曜日の夜にお届けしている「高橋クリス」ラジオ番組を運営しています。
現在、私達の活動はほぼ無償で続けており、より多くのコンテンツを提供するためには、皆様の温かいご支援が大変重要です。もし可能であれば、以下のリンクから応援していただけると大変嬉しく思います。
高橋クリスのメンバーシップ
こちらはFullさん(full@桜 八重 (@fulhause) / X)と共にやっているラジオにメンバーシップを登録いただけます。
https://note.com/fulhause/membership/join
AMAZON ギフトリスト
こちらは自分のブログのコンテンツ制作や設備の充実に大いに役立てさせていただきます。
https://www.amazon.co.jp/hz/wishlist/ls/H7W3RRD7C5QG?ref_=wl_share
Patreon
こちらは自分のブログのコンテンツ制作や設備の充実に対する小さな応援の気持ちのPatreonです。
https://www.patreon.com/user?u=84249391
皆様のサポートが、私たちの活動をより充実させる力となります。
どうぞよろしくお願いします。
メールアドレス(*=@)
X
API?
アプリケーション プログラミング インターフェイス (API) は、外部アプリケーションがアプリケーション自体と対話する方法を定義する一連のルールまたはメソッドです。多くの場合、元のアプリケーションはサーバーになります。
API は、どのデータにアクセスできるか、変更できるかどうかなど、およびこれらのそれぞれの方法定義や操作が実行されます。そしてクライアントによって行われる可能性のある一連の要求を定義し、Interfaceを作ります。
この機能の定義である API を、Serverから提供されたライブラリを使用するケースが多いです。これによって大きな問題や混乱が生じることはありません。
Why REST?
現在はほぼすべてのプログラミング言語は、ユーザーが Web サーバーにREST API経由でアクセスできるようにする機能をサポートしています。もちろん今回の記事で紹介するCtrlX RuntimeもSupportしており、REST API使用しRuntimeから様々な情報を取得可能です。

Addresses
各ノード には、ctrlX データ層にアドレスがあります。そのアドレスは、ノードへの階層パスというイメージです。パスのコンポーネントに/で区切られます。これにより、すべてのデータが階層的に構造化されます。
Example
| plc/app/Application/realtime_data/GVL/data/r32Real datalayer/nodes plc/admin/cmd/start motion/axes/1/cur-values/cur-pos |
Reference Link
Ctrlx
http://soup01.com/ja/category/bosch/ctrlx/
M5Stack
http://soup01.com/ja/category/m5stack-ja/
Other Post with REST
http://soup01.com/ja/category/protocol/https-rest/
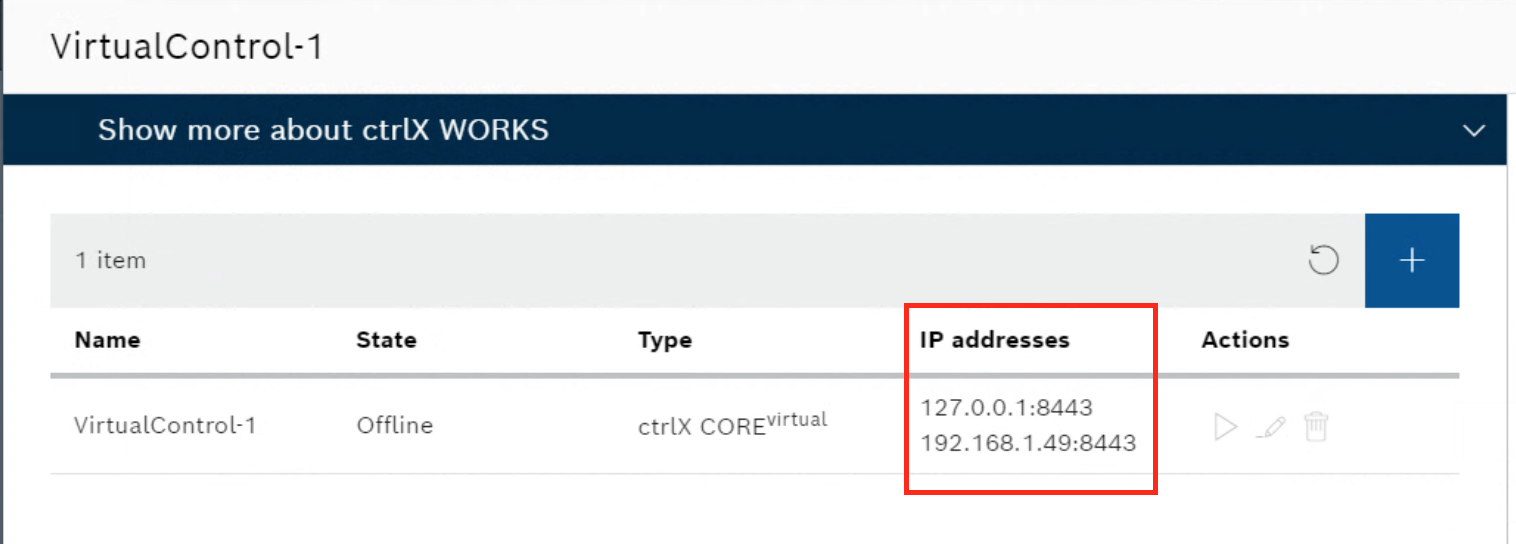
Configure your Network
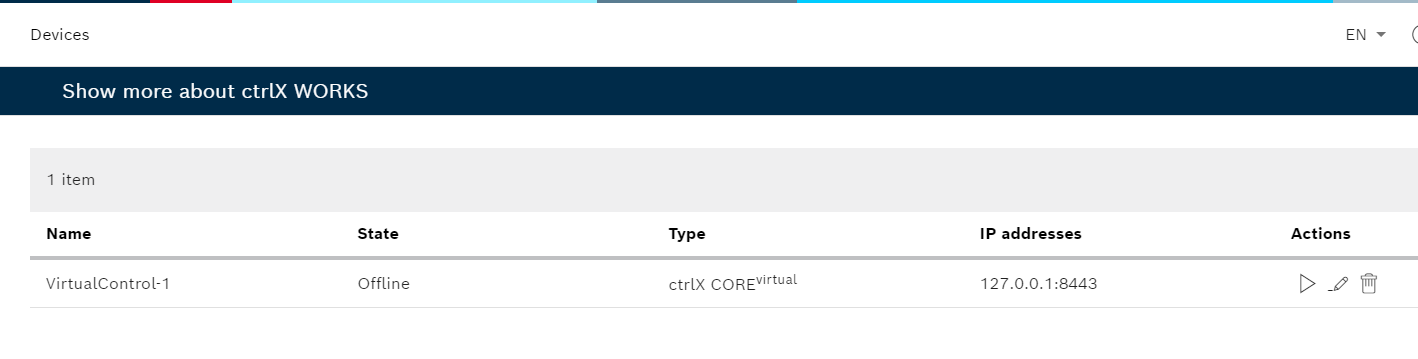
CtrlxWorksからVirtualCoreの設定を変更します。
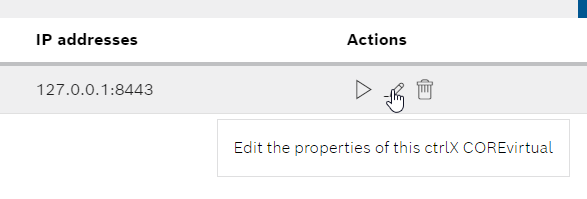
Action>Edit the properties of the ctrlx COREvirtualを選択してください。
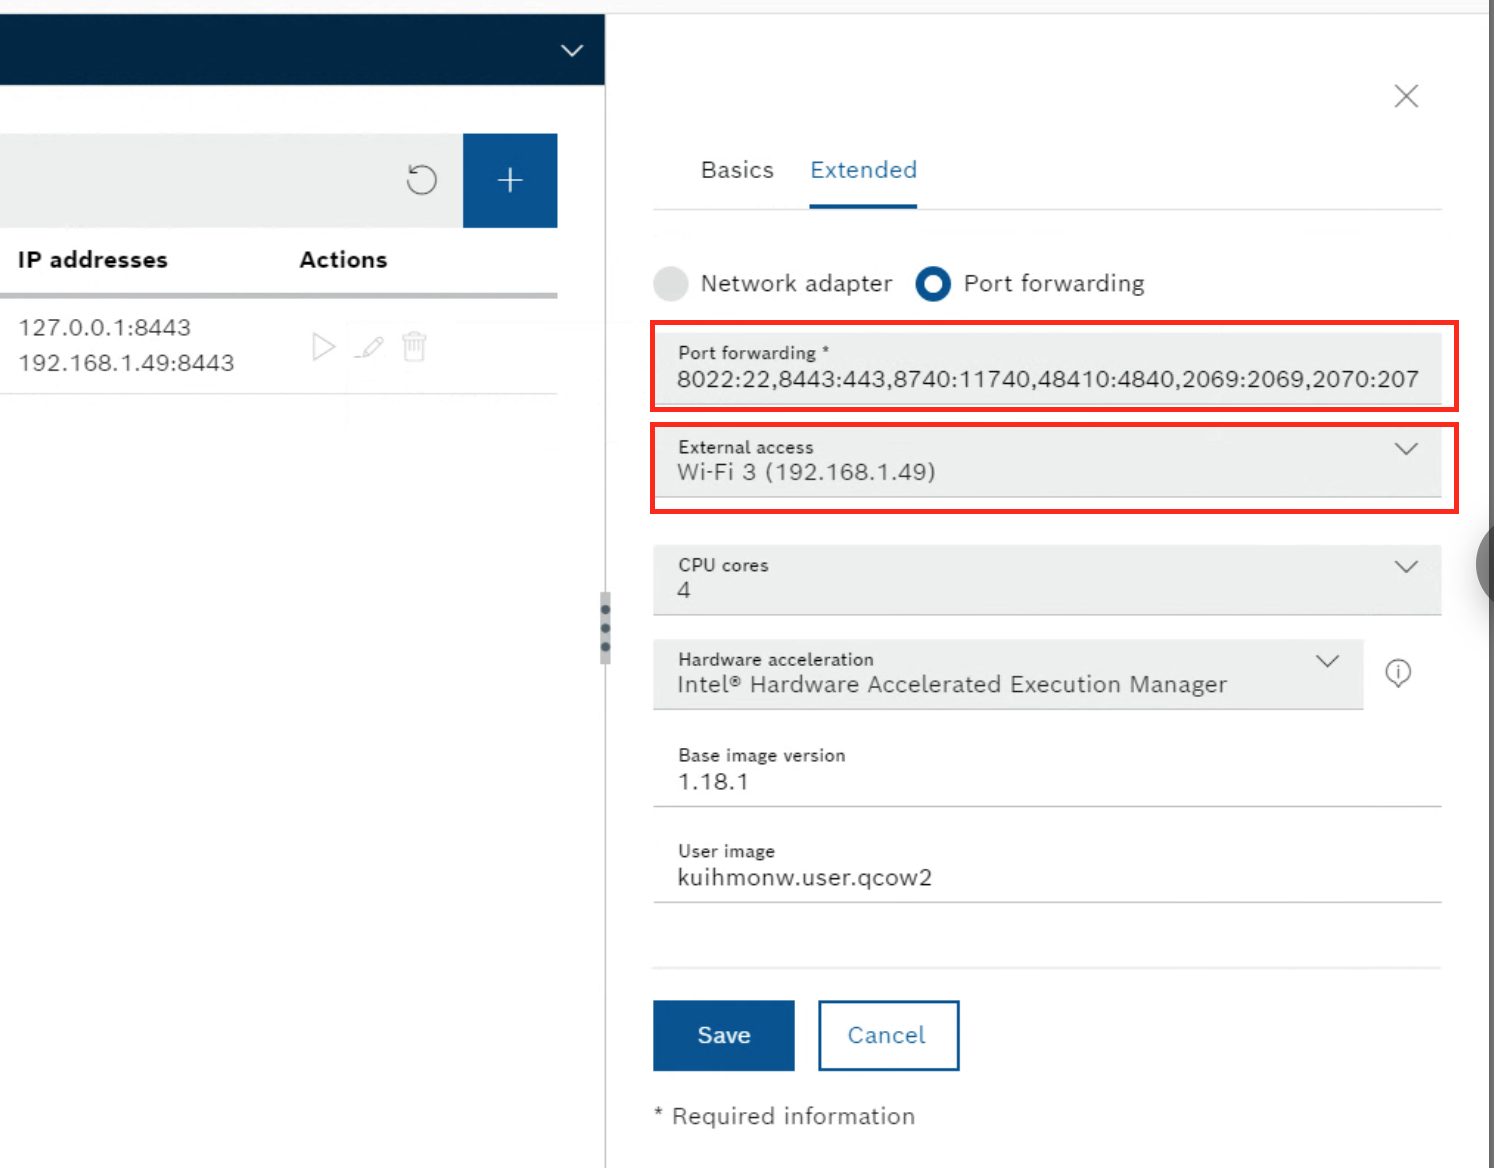
Extendを選び>Port Forwardingを設定し、External accessからWI-FI Interfaceを設定していただければOkです。
Done!
Implementation with Python
最初はPythonとRequestを使用した実装例を紹介します。
Example1
ctrlX RuntimeとREST API接続するにはまずRuntimeからSession Tokenを取得する必要があります。Example1ではそのコードの取得を紹介します。
Code
以下はプログラムです。requestsを使用しPostリクエストをctrlX Runtimeに送信します。
UsernameとPasswordはWebserverとログイン情報と同じです。
注意するのはSession TokenはPOST Methodを使用する必要があります。
| import requests #The base URL that you can find in the API Reference “”” please find more information from this link: https://developer.community.boschrexroth.com/t5/Store-and-How-to/Using-REST-API-of-ctrlX-CORE/ba-p/12490 VirtualCore is used in the example:127.0.0.1:8443 is the default URL. Authorization Link:https://127.0.0.1:8443/identity-manager/api/v1/auth/token CTRLX REST Basic Link:https://127.0.0.1:8443/automation/api/v1 you Should get the response from CtrlX Virtual Core like this: key:access_token , value:XXXXXXXXXXXXXXXXXXXXXXXXXXX key:token_type , value:Bearer “”” USERNAME='”boschrexroth”‘ PASSWORD='”boschrexroth”‘ #Url Configuration Auth_URL=’https://127.0.0.1:8443/identity-manager/api/v1/auth/token’ #Post Content postData=”’ {“name”:%s,”password”:%s} ”’%(USERNAME,PASSWORD) #Send Request r=requests.post(Auth_URL,postData) #Get Status Code #if 201 is return, it means the request is done without error. print(‘Status Code=%s’%(r.status_code)) #Get json Data data=r.json() #Output print(‘—-Data—-‘) for k,v in data.items(): print(‘key:%s , value:%s’%(k,v)) import requests #The base URL that you can find in the API Reference “”” please find more information from this link: https://developer.community.boschrexroth.com/t5/Store-and-How-to/Using-REST-API-of-ctrlX-CORE/ba-p/12490 VirtualCore is used in the example:127.0.0.1:8443 is the default URL. Authorization Link:https://127.0.0.1:8443/identity-manager/api/v1/auth/token CTRLX REST Basic Link:https://127.0.0.1:8443/automation/api/v1 you Should get the response from CtrlX Virtual Core like this: key:access_token , value:XXXXXXXXXXXXXXXXXXXXXXXXXXX key:token_type , value:Bearer “”” USERNAME='”boschrexroth”‘ PASSWORD='”boschrexroth”‘ #Url Configuration Auth_URL=’https://127.0.0.1:8443/identity-manager/api/v1/auth/token’ #Header Configuration #Additionally the “Content-Type” “application/json” has to be added to the request header to tell the server how data should be interpreted. headers={‘Content-type’: ‘application/json’} #Post Content postData=”’ {“name”:%s,”password”:%s} ”’%(USERNAME,PASSWORD) #Send Request r=requests.post(Auth_URL,postData,verify=False,headers=headers) #Get Status Code #if 201 is return, it means the request is done without error. print(‘Status Code=%s’%(r.status_code)) #Get json Data data=r.json() #Output print(‘—-Data—-‘) for k,v in data.items(): print(‘key:%s , value:%s’%(k,v)) |
Error-1
エラーが出てきましたね。CtrlX Runtimeに接続拒否されました。
| Max retries exceeded with url: /identity-manager/api/v1/auth/token (Caused by NewConnectionError(‘<urllib3.connection.HTTPSConnection object at 0x0000026120C9E510>: Failed to establish a new connection: [WinError 10061] No connection could be made because the target machine actively refused it’)) |
Modification-1
ではPOSTリクエストするときverify=Falseを追加してきます。
| r=requests.post(Auth_URL,postData,verify=False) |
Code
こちらは修正後のコードです。
| import requests #The base URL that you can find in the API Reference “”” please find more information from this link: https://developer.community.boschrexroth.com/t5/Store-and-How-to/Using-REST-API-of-ctrlX-CORE/ba-p/12490 VirtualCore is used in the example:127.0.0.1:8443 is the default URL. Authorization Link:https://127.0.0.1:8443/identity-manager/api/v1/auth/token CTRLX REST Basic Link:https://127.0.0.1:8443/automation/api/v1 you Should get the response from CtrlX Virtual Core like this: key:access_token , value:XXXXXXXXXXXXXXXXXXXXXXXXXXX key:token_type , value:Bearer “”” USERNAME='”boschrexroth”‘ PASSWORD='”boschrexroth”‘ #Url Configuration Auth_URL=’https://127.0.0.1:8443/identity-manager/api/v1/auth/token’ #Post Content postData=”’ {“name”:%s,”password”:%s} ”’%(USERNAME,PASSWORD) #Send Request r=requests.post(Auth_URL,postData,verify=False) #Get Status Code #if 201 is return, it means the request is done without error. print(‘Status Code=%s’%(r.status_code)) #Get json Data data=r.json() #Output print(‘—-Data—-‘) for k,v in data.items(): print(‘key:%s , value:%s’%(k,v)) |
Error-2
今度はCtrlx Runtimeと接続成功しましたが、Status Code400の返答がきました。400は無効なリクエストだと示しています。
| C:\Users\root\AppData\Local\Programs\Python\Python311\Lib\site-packages\urllib3\connectionpool.py:1045: InsecureRequestWarning: Unverified HTTPS request is being made to host ‘127.0.0.1’. Adding certificate verification is strongly advised. See: https://urllib3.readthedocs.io/en/1.26.x/advanced-usage.html#ssl-warnings warnings.warn( Status Code=400 —-Data—- key:code , value:400 key:message , value: key:moreInfo , value:Authentication failed |
Modification-2
おそらくHeaderが足りないのかなと思っています。今度POSTリクエストを送信するときにheaders 情報も一緒に追記してきます。
| headers={‘Content-type’: ‘application/json’} r=requests.post(Auth_URL,postData,verify=False,headers=headers) |
Code
こちらは修正後のコードです。
| import requests #The base URL that you can find in the API Reference “”” please find more information from this link: https://developer.community.boschrexroth.com/t5/Store-and-How-to/Using-REST-API-of-ctrlX-CORE/ba-p/12490 VirtualCore is used in the example:127.0.0.1:8443 is the default URL. Authorization Link:https://127.0.0.1:8443/identity-manager/api/v1/auth/token CTRLX REST Basic Link:https://127.0.0.1:8443/automation/api/v1 you Should get the response from CtrlX Virtual Core like this: key:access_token , value:XXXXXXXXXXXXXXXXXXXXXXXXXXX key:token_type , value:Bearer “”” USERNAME='”boschrexroth”‘ PASSWORD='”boschrexroth”‘ #Url Configuration Auth_URL=’https://127.0.0.1:8443/identity-manager/api/v1/auth/token’ #Header Configuration #Additionally the “Content-Type” “application/json” has to be added to the request header to tell the server how data should be interpreted. headers={‘Content-type’: ‘application/json’} #Post Content postData=”’ {“name”:%s,”password”:%s} ”’%(USERNAME,PASSWORD) #Send Request r=requests.post(Auth_URL,postData,verify=False,headers=headers) #Get Status Code #if 201 is return, it means the request is done without error. print(‘Status Code=%s’%(r.status_code)) #Get json Data data=r.json() #Output print(‘—-Data—-‘) for k,v in data.items(): print(‘key:%s , value:%s’%(k,v)) |
Result
Done! access_tokenとtoken_typeが返答してきました。この情報は次のExampleで使用します。
| C:\Users\root\AppData\Local\Programs\Python\Python311\Lib\site-packages\urllib3\connectionpool.py:1045: InsecureRequestWarning: Unverified HTTPS request is being made to host ‘127.0.0.1’. Adding certificate verification is strongly advised. See: https://urllib3.readthedocs.io/en/1.26.x/advanced-usage.html#ssl-warnings warnings.warn( {‘access_token’: ‘eyJhbGciOiJFUzM4NCIsInR5cCI6IkpXVCJ9.eyJleHAiOjE2ODEzOTA3NDgsImlhdCI6MTY4MTM2MTk0OCwiaWQiOiIxMDAwIiwibmFtZSI6ImJvc2NocmV4cm90aCIsIm5vbmNlIjoiMjFiZWMwZTYtY2QwZS00NjgzLWJiZDgtNWE4MzNiYzg3OGRkIiwicGxjaGFuZGxlIjoxNDE2NzA1MDMzODY2MzQxNjg5NSwicmVtb3RlYXV0aCI6IiIsInNjb3BlIjpbInJleHJvdGgtZGV2aWNlLmFsbC5yd3giXX0.JKQ1G3c8yGKNG4yLEMwWAtNkift7NoFb94XTBUbbvZZgLKbK5-e6fEJ66LtD9bRP_fxz0lRkRZwRMPq07_EFafoZNQkst9uY28oRsd9lU8oPNtGUcgFrLyG8lzhpr7hl’, ‘token_type’: ‘Bearer’} —-Data—- key:access_token , value:eyJhbGciOiJFUzM4NCIsInR5cCI6IkpXVCJ9.eyJleHAiOjE2ODEzOTA3NDgsImlhdCI6MTY4MTM2MTk0OCwiaWQiOiIxMDAwIiwibmFtZSI6ImJvc2NocmV4cm90aCIsIm5vbmNlIjoiMjFiZWMwZTYtY2QwZS00NjgzLWJiZDgtNWE4MzNiYzg3OGRkIiwicGxjaGFuZGxlIjoxNDE2NzA1MDMzODY2MzQxNjg5NSwicmVtb3RlYXV0aCI6IiIsInNjb3BlIjpbInJleHJvdGgtZGV2aWNlLmFsbC5yd3giXX0.JKQ1G3c8yGKNG4yLEMwWAtNkift7NoFb94XTBUbbvZZgLKbK5-e6fEJ66LtD9bRP_fxz0lRkRZwRMPq07_EFafoZNQkst9uY28oRsd9lU8oPNtGUcgFrLyG8lzhpr7hl key:token_type , value:Bearer |
Example2
Check the Path
Runtimeの変数にアクセスするには該当する変数のPathを知る必要があります。WebServerを開いてSettings>Data Layerをクリックします。
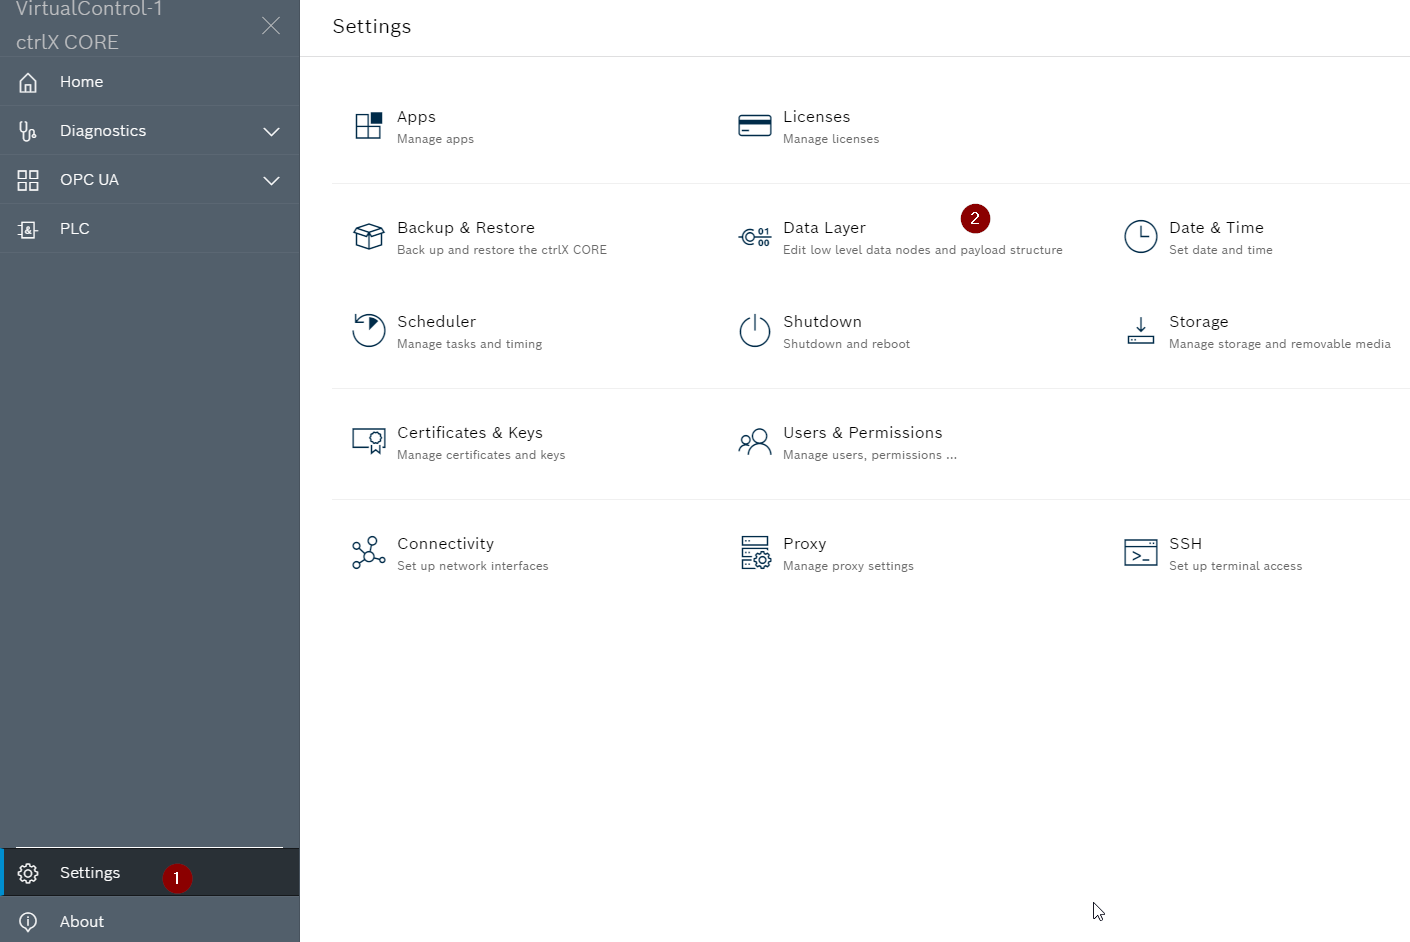
Example2はPLC RuntimeのTask情報を取得したいのでplc>app>Application>admin>taskを開きます。そうするといまのPLC Task情報が右側に表示されます。

そのTask変数のPathを知る前にCopies pathのボタンをクリックしてください。

このような文字列がCopyされます。
| plc/app/Application/admin/task |
Code
こちらはプログラムです。
| import requests import sys #The base URL that you can find in the API Reference “”” please find more information from this link: https://developer.community.boschrexroth.com/t5/Store-and-How-to/Using-REST-API-of-ctrlX-CORE/ba-p/12490 VirtualCore is used in the example:127.0.0.1:8443 is the default URL. Authorization Link:https://127.0.0.1:8443/identity-manager/api/v1/auth/token CTRLX REST Basic Link:https://127.0.0.1:8443/automation/api/v1 you Should get the response from CtrlX Virtual Core like this: key:access_token , value:XXXXXXXXXXXXXXXXXXXXXXXXXXX key:token_type , value:Bearer Script Result: key:info , value:[ {‘name’: ‘MainTask’, ‘priority’: 30, ‘watchdog’: False, ‘watchdogTime’: 0, ‘cycleTime’: 24, ‘averageCycleTime’: 60, ‘maxCycleTime’: 15280, ‘minCycleTime’: 9, ‘cycleCount’: 2042, ‘watchdogSensitivity’: 1, ‘interval’: 200000, ‘taskType’: ‘CYCLIC’, ‘osHandle’: 139832806885120}] “”” USERNAME='”boschrexroth”‘ PASSWORD='”boschrexroth”‘ #Url Configuration Auth_URL=’https://127.0.0.1:8443/identity-manager/api/v1/auth/token’ CTRLX_URL_Basic=’https://127.0.0.1:8443/automation/api/v1/’ #Header Configuration #Additionally the “Content-Type” “application/json” has to be added to the request header to tell the server how data should be interpreted. headers={‘Content-type’: ‘application/json’} #Post Content postData=”’ {“name”:%s,”password”:%s} ”’%(USERNAME,PASSWORD) #Send Request r=requests.post(Auth_URL,postData,verify=False,headers=headers) #Get Status Code #if 201 is return, it means the request is done without error. print(‘Status Code=%s’%(r.status_code)) data=r.json() if r.status_code != 201: for k,v in data.items(): print(‘key:%s , value:%s’%(k,v)) print(‘Exit..’) sys.exit(); # AuthHeader={‘Content-type’: ‘application/json’,’Authorization’:’Bearer ‘+data[‘access_token’]} r=requests.get( CTRLX_URL_Basic+’%s’%(‘/plc/app/Application/admin/task/’) ,verify=False ,headers=AuthHeader) data=r.json() for k,v in data.items(): print(‘key:%s , value:%s’%(k,v)) |
Ctrlx Request Basic Link
Ctrlx RuntimeのREST APIリングは以下になります。ちなみに自分がVirtualcoreを使用していますので、Port番号は8443になります。
| CTRLX_URL_Basic=’https://127.0.0.1:8443/automation/api/v1/’ |
Header
Header情報は先ほどExample1で取得したKeyと一緒に送信しましょう。
| AuthHeader={‘Content-type’: ‘application/json’,’Authorization’:’Bearer ‘+data[‘access_token’]} |
Request
/plc/app/Application/admin/task/はPLC RuntimeのTask情報を取得するLINKです。
| r=requests.get( CTRLX_URL_Basic+’%s’%(‘/plc/app/Application/admin/task/’) ,verify=False ,headers=AuthHeader) |
Result
Done!Ctrlx Runtimeのplc cycle 情報が取得しました。
| C:\Users\root\AppData\Local\Programs\Python\Python311\Lib\site-packages\urllib3\connectionpool.py:1045: InsecureRequestWarning: Unverified HTTPS request is being made to host ‘127.0.0.1’. Adding certificate verification is strongly advised. See: https://urllib3.readthedocs.io/en/1.26.x/advanced-usage.html#ssl-warnings warnings.warn( key:info , value:[{‘name’: ‘MainTask’, ‘priority’: 30, ‘watchdog’: False, ‘watchdogTime’: 0, ‘cycleTime’: 24, ‘averageCycleTime’: 81, ‘maxCycleTime’: 91737, ‘minCycleTime’: 8, ‘cycleCount’: 19598, ‘watchdogSensitivity’: 1, ‘interval’: 200000, ‘taskType’: ‘CYCLIC’, ‘osHandle’: 139832806885120}] |
Exaxmple3
次は実際にPLC Runtimeにある変数にアクセスします。Example3は変数の現在値を読み取ります。
Reference Link
Add GVL
プロジェクトにGlobal Variable Listを追加し、変数を定義し、RuntimeにDownloadします。

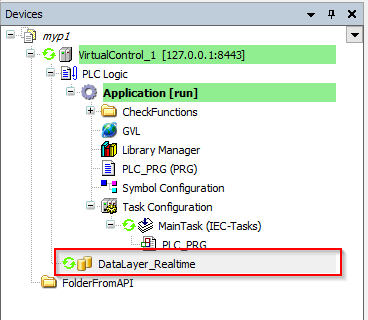
Configure Data Layer
DataLayer_Realtimeという項目があります。
Refreshで現在のConfigurationを更新します。

Add PLC real-time data
DataLayer_Realtime右クリック>Add>PLC real-time dataをクリックします。
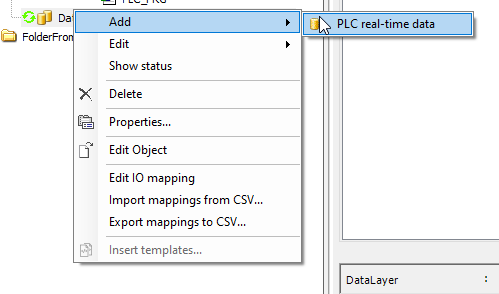
plc_app_Application_realtime_dataが追加されました。

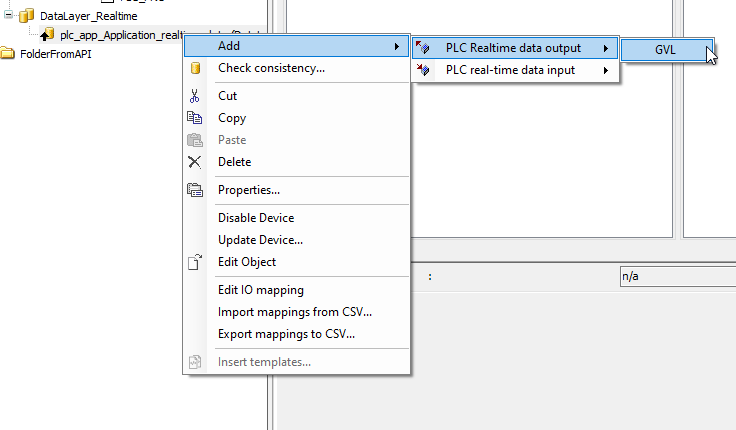
Add PLC RealTime data output
次はPLC Realtime data outputを追加します。注意するのはそのInput/Outputの表現はPLC Runtimeの視点から成立したので、REST APIにとってはPLC Realtime data outputは入力で、つまり上書きできません。
plc_app_Application_realtime>右クリック>Add>PLC Realtime data output>GVLを選択します。GVLは先程追加したGlobal Variable Listのことに該当します。
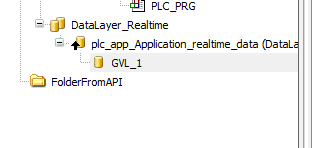
DataLayerNode I/O Mapping TabにMappingされた変数を一覧できます。Addressのところに%Qだと表示してるのでそれらの変数はPLC Runtimeの出力だとわかります。
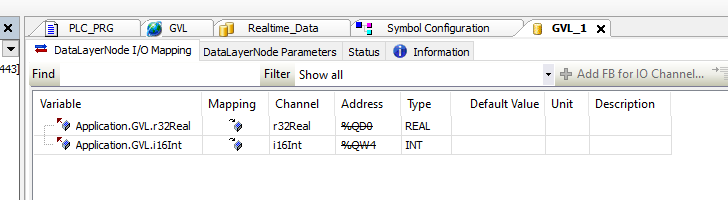
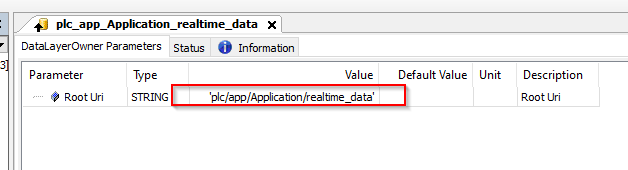
plc_app_Application_realtime_dataのTabを開くとRoot Uriの変数があり、その現在値が変数のアクセス基本Pathが格納されています。
View Data
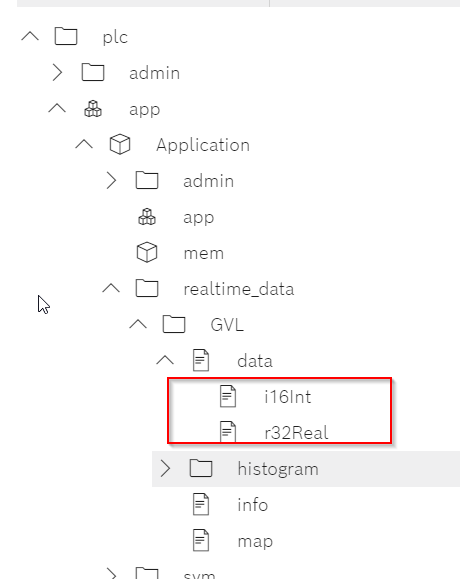
もう一度Webserverを開くと、今度はrealtime_dataというFolderが生成されました。GVLは先程私たちが作成したGlobal Variable Listのことです。

dataを開くと、Real time layerに追加されたi16Int とr32Real変数がありました。
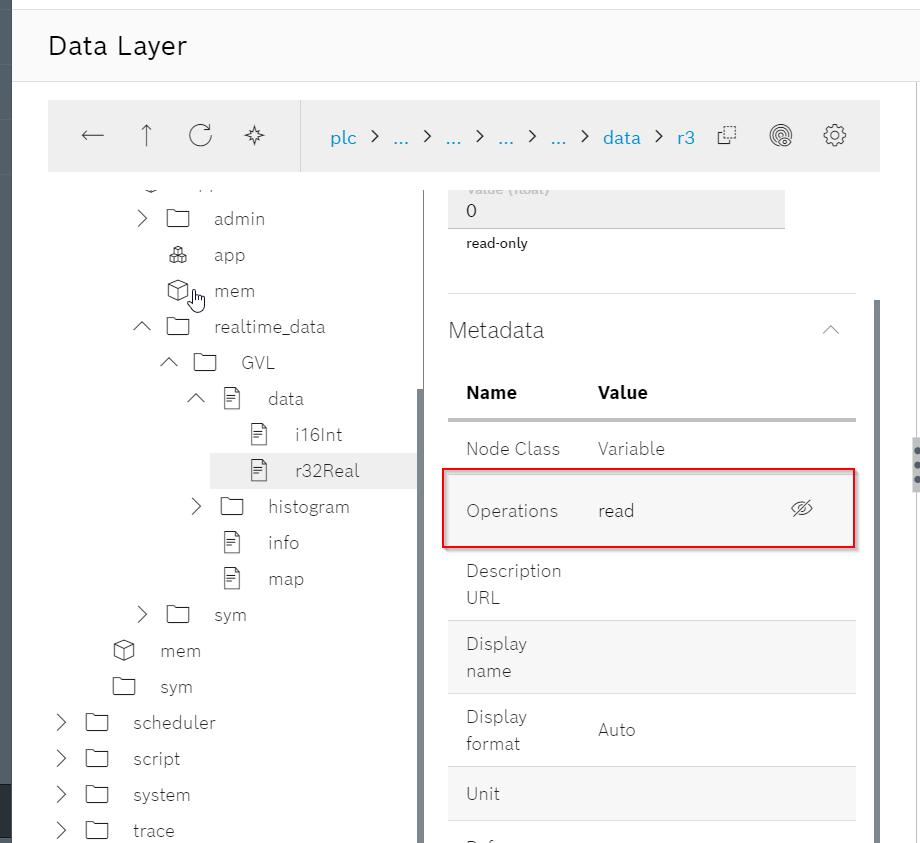
Operations Level
Operationsの項目に該当する変数が操作できるレベルを示しています。readだけだと読み取り専用です。
Monitor Value
実際PLC Runtimeと比べると現在値は常に反映されています。


View All Operations Level
隣の目ICONをクリックすると全ての権限を一覧できます・
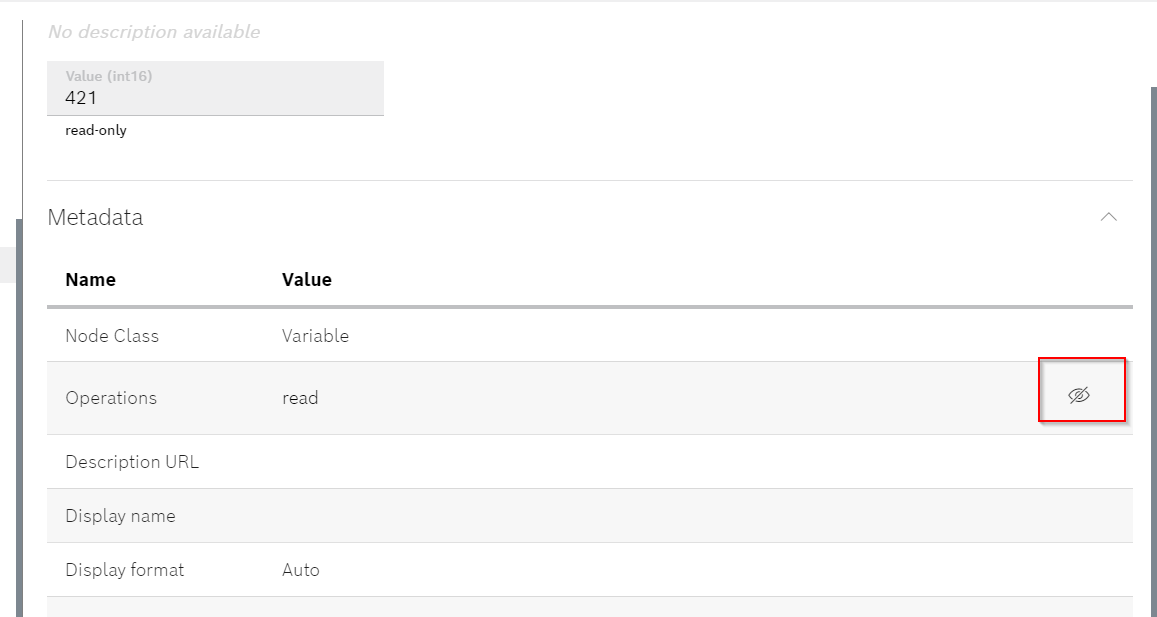
浅い灰色になったのは無効な権限になります。

Add to watchlist
右上にあるAdds to watchlistボタンをクリックすると該当する変数をWatch Listに追加できます。

watchlistをクリックします。
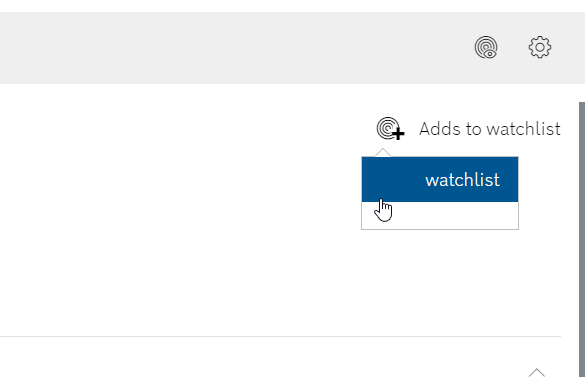
ItemがWatch Listに追加されたのメッセージが表示されます。

Open watchlist
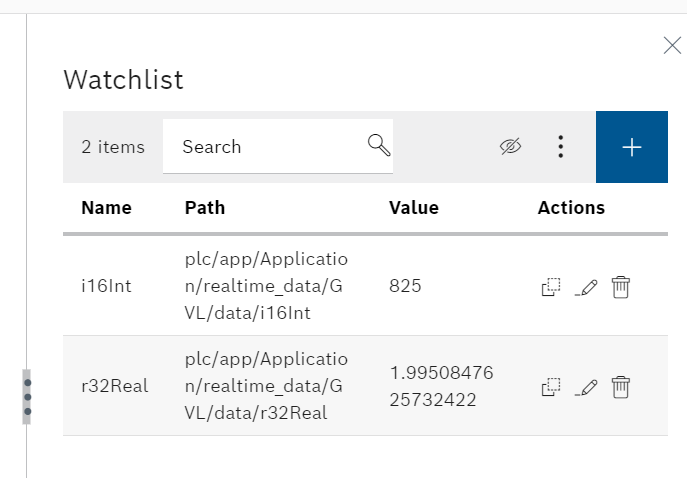
次は隣のぐるぐるICONでWatchlistを開けます。

いまWatchlistに登録された変数を一覧できます。
Code
こちらはプログラムです。Example2とあまり変わらなく、ただリクエストするLINKが変わっただけです。
| import requests import sys #The base URL that you can find in the API Reference “”” please find more information from this link: https://developer.community.boschrexroth.com/t5/Store-and-How-to/Using-REST-API-of-ctrlX-CORE/ba-p/12490 VirtualCore is used in the example:127.0.0.1:8443 is the default URL. Authorization Link:https://127.0.0.1:8443/identity-manager/api/v1/auth/token CTRLX REST Basic Link:https://127.0.0.1:8443/automation/api/v1 you Should get the response from CtrlX Virtual Core like this: key:access_token , value:XXXXXXXXXXXXXXXXXXXXXXXXXXX key:token_type , value:Bearer Script Result: key:type , value:int16 key:value , value:1193 key:type , value:float key:value , value:2.8821022510528564 “”” USERNAME='”boschrexroth”‘ PASSWORD='”boschrexroth”‘ #Url Configuration Auth_URL=’https://127.0.0.1:8443/identity-manager/api/v1/auth/token’ CTRLX_URL_Basic=’https://127.0.0.1:8443/automation/api/v1/’ #Header Configuration #Additionally the “Content-Type” “application/json” has to be added to the request header to tell the server how data should be interpreted. headers={‘Content-type’: ‘application/json’} #Post Content postData=”’ {“name”:%s,”password”:%s} ”’%(USERNAME,PASSWORD) #Send Request r=requests.post(Auth_URL,postData,verify=False,headers=headers) #Get Status Code #if 201 is return, it means the request is done without error. print(‘Status Code=%s’%(r.status_code)) data=r.json() if r.status_code != 201: for k,v in data.items(): print(‘key:%s , value:%s’%(k,v)) print(‘Exit..’) sys.exit(); # AuthHeader={‘Content-type’: ‘application/json’,’Authorization’:’Bearer ‘+data[‘access_token’]} r=requests.get( CTRLX_URL_Basic+’%s’%(‘plc/app/Application/realtime_data/GVL/data/i16Int’) ,verify=False ,headers=AuthHeader) data=r.json() for k,v in data.items(): print(‘key:%s , value:%s’%(k,v)) r=requests.get( CTRLX_URL_Basic+’%s’%(‘plc/app/Application/realtime_data/GVL/data/r32Real’) ,verify=False ,headers=AuthHeader) data=r.json() for k,v in data.items(): print(‘key:%s , value:%s’%(k,v)) |
Result
Done!Ctrlx VirtualCoreからJson Formatのデータが返ってきました。
| C:\Users\root\AppData\Local\Programs\Python\Python311\Lib\site-packages\urllib3\connectionpool.py:1045: InsecureRequestWarning: Unverified HTTPS request is being made to host ‘127.0.0.1’. Adding certificate verification is strongly advised. See: https://urllib3.readthedocs.io/en/1.26.x/advanced-usage.html#ssl-warnings warnings.warn( key:type , value:int16 key:value , value:23470 C:\Users\root\AppData\Local\Programs\Python\Python311\Lib\site-packages\urllib3\connectionpool.py:1045: InsecureRequestWarning: Unverified HTTPS request is being made to host ‘127.0.0.1’. Adding certificate verification is strongly advised. See: https://urllib3.readthedocs.io/en/1.26.x/advanced-usage.html#ssl-warnings warnings.warn( key:type , value:float key:value , value:15426665472.0 |
Example4
Example4ではPLC Runtimeの変数の現在値を上書きします。
Add GVL Again
新しいGlobal Variable List GVL_ReadDataを追加します。DataLayer_RealtimeはGVL単位で読み書きの権限設定を行うためのものです。
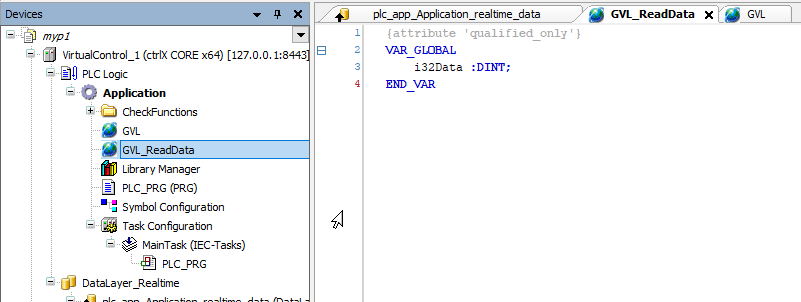
plc_app_Application_realtime_dataを右クリック>PLC real-time data input>先程追加したGVL_ReadDataを追加します。

Done!新しいReal timeが追加されました。

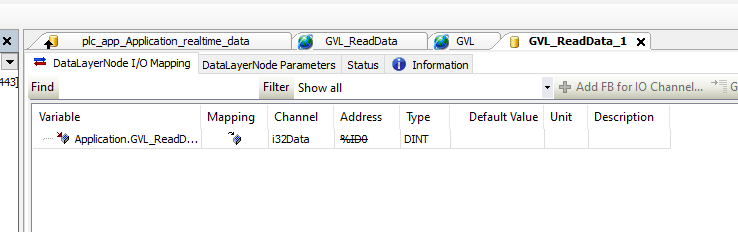
DataLayerNode I/O MappingのTabを開くとAddressのデバイスが%I になり、つまりPLC Runtimeにとってこの変数は入力です。
Check into WebServer
Ctrlx VirtualCoreのWeb ServerにアクセスしData LayerからOperations権限を確認しましょう。read・writeもできますね。

Code
こちらはプログラムです。Example3と似ててCtrlx VirtualCore RuntimeにGETリクエストではなくPUTリクエストを使用します。
| import requests import sys #The base URL that you can find in the API Reference “”” please find more information from this link: https://developer.community.boschrexroth.com/t5/Store-and-How-to/Using-REST-API-of-ctrlX-CORE/ba-p/12490 VirtualCore is used in the example:127.0.0.1:8443 is the default URL. Authorization Link:https://192.168.1.194:8443/identity-manager/api/v1/auth/token CTRLX REST Basic Link:https://192.168.1.194:8443/automation/api/v1 you Should get the response from CtrlX Virtual Core like this: key:access_token , value:XXXXXXXXXXXXXXXXXXXXXXXXXXX key:token_type , value:Bearer Script Result: key:type , value:int16 key:value , value:1193 key:type , value:float key:value , value:2.8821022510528564 “”” USERNAME='”boschrexroth”‘ PASSWORD='”boschrexroth”‘ #Url Configuration Auth_URL=’https://127.0.0.1:8443/identity-manager/api/v1/auth/token’ CTRLX_URL_Basic=’https://127.0.0.1:8443/automation/api/v1/’ #Header Configuration #Additionally the “Content-Type” “application/json” has to be added to the request header to tell the server how data should be interpreted. headers={‘Content-type’: ‘application/json’} #Post Content postData=”’ {“name”:%s,”password”:%s} ”’%(USERNAME,PASSWORD) #Send Request r=requests.post(Auth_URL,postData,verify=False,headers=headers) #Get Status Code #if 201 is return, it means the request is done without error. print(‘Status Code=%s’%(r.status_code)) data=r.json() if r.status_code != 201: for k,v in data.items(): print(‘key:%s , value:%s’%(k,v)) print(‘Exit..’) sys.exit(); # AuthHeader={‘Content-type’: ‘application/json’,’Authorization’:’Bearer ‘+data[‘access_token’]} postData=”’ {“type”:”%s”,”value”:%d} ”’%(‘int32’,1234) r=requests.put( CTRLX_URL_Basic+’%s’%(‘plc/app/Application/realtime_data/GVL_ReadData/data/i32Data’) ,verify=False ,headers=AuthHeader ,data=postData ) data=r.json() for k,v in data.items(): print(‘key:%s , value:%s’%(k,v)) |
PUT Data
PUTリクエストの中身は書き込みのデータタイプとその更新値になります。
| postData=”’ {“type”:”%s”,”value”:%d} ”’%(‘int32’,1234) |
Request
Runtimeの変数を上書きするにはPUTリクエストが必要です。
| r=requests.put( CTRLX_URL_Basic+’%s’%(‘plc/app/Application/realtime_data/GVL_ReadData/data/i32Data’) ,verify=False ,headers=AuthHeader ,data=postData ) |
Result
Done!PLC Engineeringで現在値を確認しておきましょう。
| C:\Users\root\Desktop\WORKS\Ctrlx api\script\REST>python Example004_WriteRealTimeData.py C:\Users\root\AppData\Local\Programs\Python\Python311\Lib\site-packages\urllib3\connectionpool.py:1045: InsecureRequestWarning: Unverified HTTPS request is being made to host ‘127.0.0.1’. Adding certificate verification is strongly advised. See: https://urllib3.readthedocs.io/en/1.26.x/advanced-usage.html#ssl-warnings warnings.warn( Status Code=201 C:\Users\root\AppData\Local\Programs\Python\Python311\Lib\site-packages\urllib3\connectionpool.py:1045: InsecureRequestWarning: Unverified HTTPS request is being made to host ‘127.0.0.1’. Adding certificate verification is strongly advised. See: https://urllib3.readthedocs.io/en/1.26.x/advanced-usage.html#ssl-warnings warnings.warn( key:type , value:int32 key:value , value:1234 |
Session
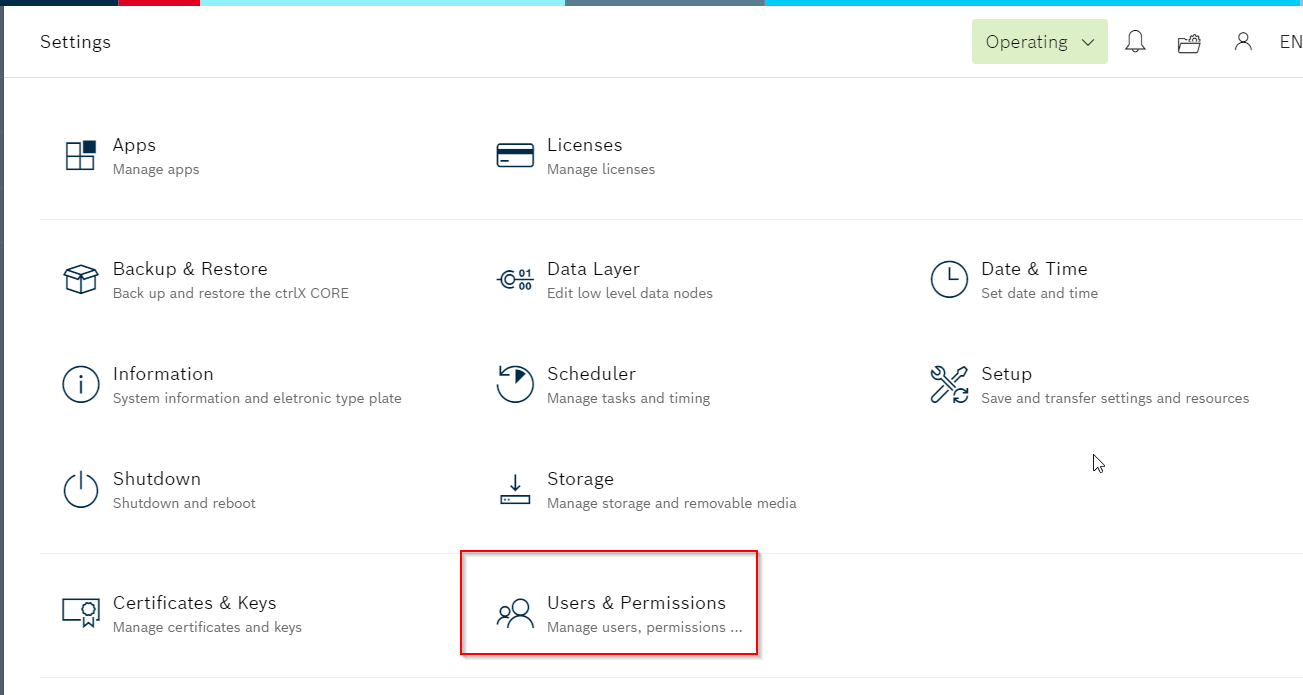
先程POSTリクエストを使用しAccess_Tokenを取得しましたね。ではSessionが実際どこで管理されているでしょうか。Web Server>Setting>User & Permissionsをクリックします。
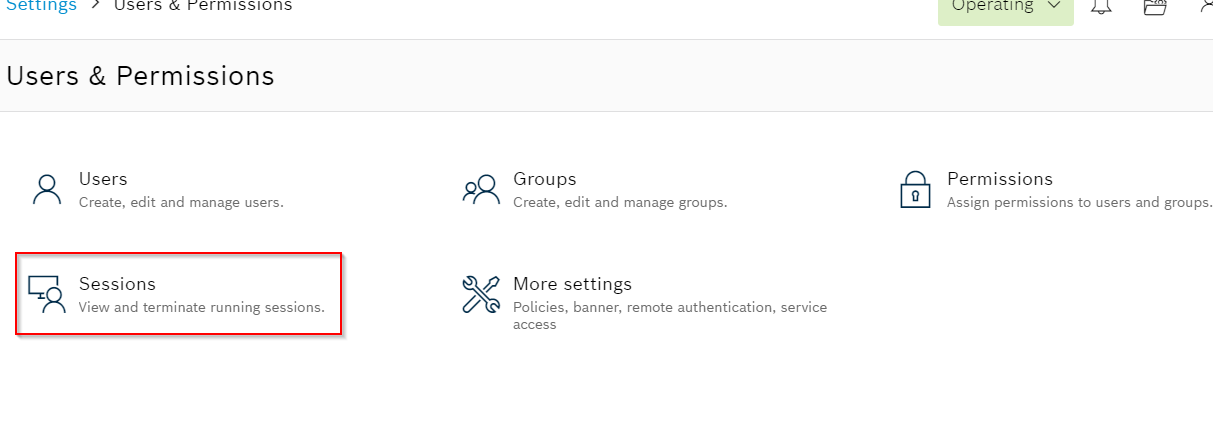
Sessionsを開きます。
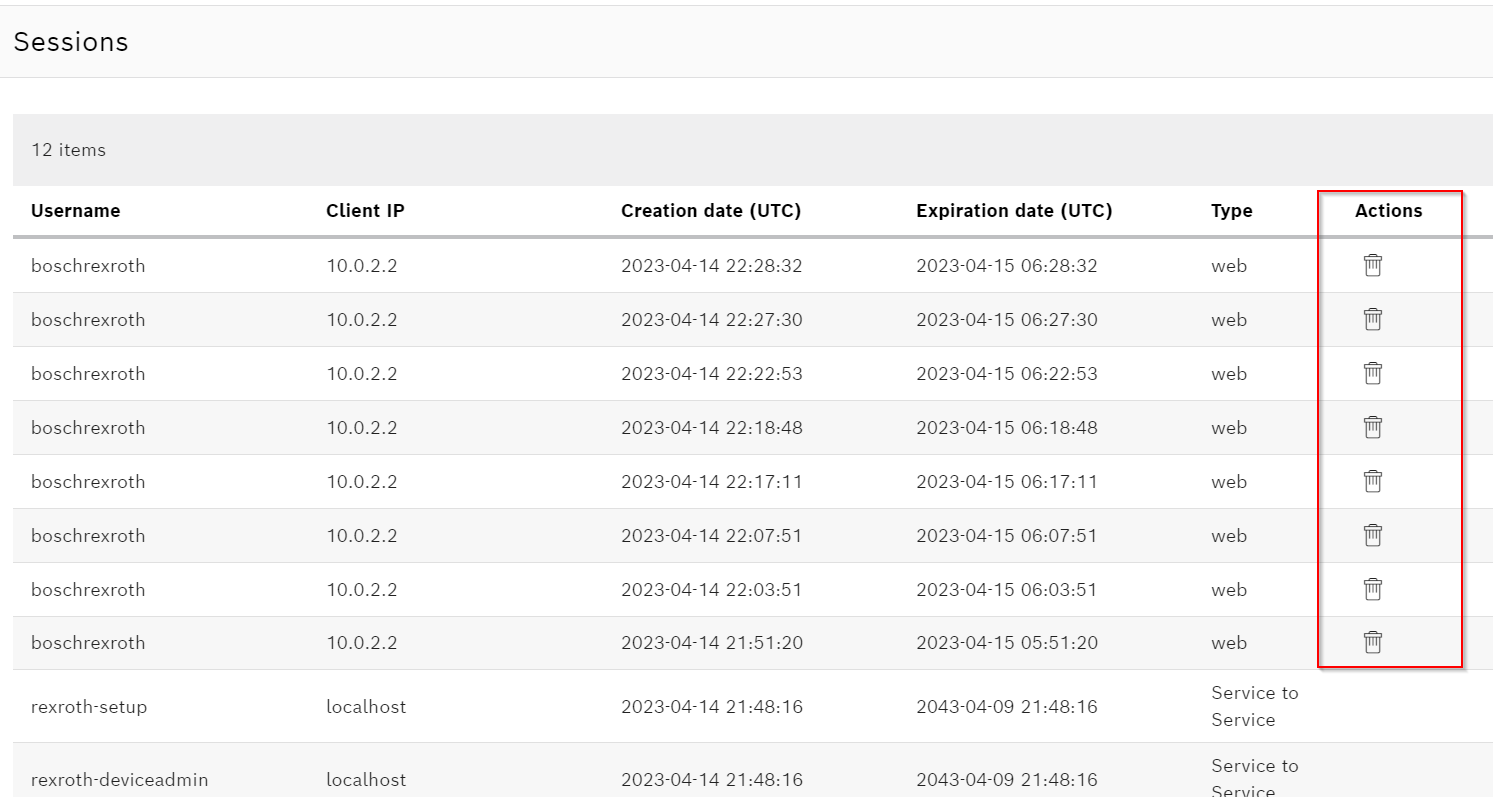
現在のSessionを一覧できます。

Delete Session
右側にあるゴミ箱のICONをクリックするとSessionを削除できます。
Check Details
確認したいSessionをクリックすると詳しい情報を確認できます。

例えばこのSessionはいつ・誰が作成されたかなどの一覧も可能です。

Implementation with M5Stack
次はM5Stackの実装例を紹介します。

Code
こちらはプログラムです。
| #include <HTTPClient.h> #include <WiFi.h> #include <M5Core2.h> #include “Arduino.h” #include <WiFiClientSecure.h> #include <Arduino_JSON.h> #ifndef WIFI_SSID #define WIFI_SSID “XXXXX” // WiFi SSID (2.4GHz only) #endif #ifndef WIFI_PASSWORD #define WIFI_PASSWORD “YYYYYYY” // WiFi Password #endif // Set your Static IP address IPAddress local_IP(192, 168, 1, 184); // Set your Gateway IP address IPAddress gateway(192, 168, 1, 1); IPAddress subnet(255, 255, 0, 0); HTTPClient http; WiFiClientSecure client; JSONVar obj1; JSONVar MyAuthInfo; bool getAuth =false; String Token; String url = “https://192.168.1.49:8443/identity-manager/api/v1/auth/token”; String CtrlxBasicUrl=”https://192.168.1.49:8443/automation/api/v1/”; String Url1r32Real=CtrlxBasicUrl+”plc/app/Application/realtime_data/GVL/data/r32Real”; String Url1i16Int=CtrlxBasicUrl+”plc/app/Application/realtime_data/GVL/data/i16Int”; void setup() { Serial.begin(115200); M5.begin(); M5.Lcd.fillScreen(BLACK); M5.Lcd.setCursor(10, 10); M5.Lcd.setTextColor(WHITE); M5.Lcd.setTextSize(1.9); M5.Lcd.printf(“Ethernet Interface:inited:)!\n”); WiFi.mode(WIFI_STA); delay(500); WiFi.config(local_IP, gateway, subnet); WiFi.begin(WIFI_SSID, WIFI_PASSWORD); while (WiFi.status() != WL_CONNECTED) { delay(1000); Serial.println(“Connecting…”); } M5.Lcd.printf(“IP is 192.168.1.184\n”); } void loop() { client.setInsecure(); M5.Lcd.fillRect(0,0,300,300,BLACK); if (!getAuth){ obj1[“name”]=”boschrexroth”; obj1[“password”]=”boschrexroth”; String result=JSON.stringify(obj1); Serial.println(result); M5.Lcd.drawString(“[HTTP] begin…\n”,0,0); http.addHeader(“Content-Type”, “application/json”); http.begin(client,url); int responseCode = http.POST(result); M5.Lcd.drawString(“[HTTP] POST…\n”,0,20); M5.Lcd.drawString(responseCode+”\n”,0,40); if (responseCode == 201){ getAuth=true; String body = http.getString(); Serial.println(body); JSONVar AuthInfo; AuthInfo=JSON.parse(body); String Token=AuthInfo[“access_token”]; MyAuthInfo[“Authorization”]=Token; } Serial.println(responseCode); http.end(); ; } bool Error=false; if (getAuth){ M5.Lcd.fillRect(0,0,300,300,BLACK); String s3=MyAuthInfo[“Authorization”]; String myToken=”Bearer “+s3; http.addHeader(“Authorization”, myToken); String url1=Url1r32Real; http.begin(client,url1); int responseCode = http.GET(); M5.Lcd.setTextColor(ORANGE); M5.Lcd.drawString(“[HTTP] GET…\n”,0,0); M5.Lcd.drawString(“r32Real\n”,0,10); M5.Lcd.drawString(String(responseCode)+”\n”,0,20); if (responseCode == 200){ String data = http.getString(); Serial.println(data); Serial.println(“Sent1”); M5.Lcd.drawString(data,0,40); } else{ getAuth=false; Error=true; } if (!Error){ String url2=Url1i16Int; http.begin(client,url2); Serial.println(“Sent2”); responseCode = http.GET(); M5.Lcd.setTextColor(YELLOW); M5.Lcd.drawString(“[HTTP] GET…\n”,0,60); M5.Lcd.drawString(“i16Int\n”,0,70); M5.Lcd.drawString(String(responseCode)+”\n”,0,80); if (responseCode == 200){ String data = http.getString(); M5.Lcd.drawString(data,0,100); Serial.println(data); } } } delay(1000); http.end(); } |
Define library
最初はプログラムに必要なライセンスをImportします。
| #include <HTTPClient.h> #include <WiFi.h> #include <M5Core2.h> #include “Arduino.h” #include <WiFiClientSecure.h> #include <Arduino_JSON.h> |
Define WIFI SSID/PASSWORD
次はAccess Pointに接続してSSIDとPASSWORDを定義します。
| #ifndef WIFI_SSID #define WIFI_SSID “XXXXX” // WiFi SSID (2.4GHz only) #endif #ifndef WIFI_PASSWORD #define WIFI_PASSWORD “YYYYYYY” // WiFi Password #endif |
Configure IP
M5Stack Core2のWireless IPアドレスを設定します。
| // Set your Static IP address IPAddress local_IP(192, 168, 1, 184); // Set your Gateway IP address IPAddress gateway(192, 168, 1, 1); IPAddress subnet(255, 255, 0, 0); |
Object
今回MainのObjectHTTPClientとWiFiClientSecureを定義します。
| HTTPClient http; WiFiClientSecure client; |
JSON Object
Ctrlx VirtualCoreから返答や送信するJSON データを処理するObjectです。
| JSONVar obj1; JSONVar MyAuthInfo; |
Auth Operation Flag
Access_Tokenが正常に取得した場合はTrueになり、Ctrlx VirtualCore RuntimeにAccess_TokenのPOSTリクエストを送信しないようにする。
| bool getAuth =false; |
URL
Tokenの変数やCtrlx VirtualCore Runtime REST APIに送信するURLを定義します。
| String Token; String url = “https://192.168.1.49:8443/identity-manager/api/v1/auth/token”; String CtrlxBasicUrl=”https://192.168.1.49:8443/automation/api/v1/”; String Url1r32Real=CtrlxBasicUrl+”plc/app/Application/realtime_data/GVL/data/r32Real”; String Url1i16Int=CtrlxBasicUrl+”plc/app/Application/realtime_data/GVL/data/i16Int”; |
Setup Loop
WiFiを立ち上げてAccess Pointと接続し、あとはM5Stackの画面初期化などの初期処理を行います。
| void setup() { Serial.begin(115200); M5.begin(); M5.Lcd.fillScreen(BLACK); M5.Lcd.setCursor(10, 10); M5.Lcd.setTextColor(WHITE); M5.Lcd.setTextSize(1.9); M5.Lcd.printf(“Ethernet Interface:inited:)!\n”); WiFi.mode(WIFI_STA); delay(500); WiFi.config(local_IP, gateway, subnet); WiFi.begin(WIFI_SSID, WIFI_PASSWORD); while (WiFi.status() != WL_CONNECTED) { delay(1000); Serial.println(“Connecting…”); } M5.Lcd.printf(“IP is 192.168.1.184\n”); } |
Main Loop
Get Token
Access_TokenをCtrlx VirtualCore Runtimeから取得します。もしResponseが201なら取得成功でそのデータを保存します。
| client.setInsecure(); M5.Lcd.fillRect(0,0,300,300,BLACK); if (!getAuth){ obj1[“name”]=”boschrexroth”; obj1[“password”]=”boschrexroth”; String result=JSON.stringify(obj1); Serial.println(result); M5.Lcd.drawString(“[HTTP] begin…\n”,0,0); http.addHeader(“Content-Type”, “application/json”); http.begin(client,url); int responseCode = http.POST(result); M5.Lcd.drawString(“[HTTP] POST…\n”,0,20); M5.Lcd.drawString(responseCode+”\n”,0,40); if (responseCode == 201){ getAuth=true; String body = http.getString(); Serial.println(body); JSONVar AuthInfo; AuthInfo=JSON.parse(body); String Token=AuthInfo[“access_token”]; MyAuthInfo[“Authorization”]=Token; } Serial.println(responseCode); http.end(); ; } |
Send Request
最後は先程取得したAccess_Token Keyと一緒にGET リクエストを送信し、JSONデータをM5 Stack画面に表示します。
| bool Error=false; if (getAuth){ M5.Lcd.fillRect(0,0,300,300,BLACK); String s3=MyAuthInfo[“Authorization”]; String myToken=”Bearer “+s3; http.addHeader(“Authorization”, myToken); String url1=Url1r32Real; http.begin(client,url1); int responseCode = http.GET(); M5.Lcd.setTextColor(ORANGE); M5.Lcd.drawString(“[HTTP] GET…\n”,0,0); M5.Lcd.drawString(“r32Real\n”,0,10); M5.Lcd.drawString(String(responseCode)+”\n”,0,20); if (responseCode == 200){ String data = http.getString(); Serial.println(data); Serial.println(“Sent1”); M5.Lcd.drawString(data,0,40); } else{ getAuth=false; Error=true; } if (!Error){ String url2=Url1i16Int; http.begin(client,url2); Serial.println(“Sent2”); responseCode = http.GET(); M5.Lcd.setTextColor(YELLOW); M5.Lcd.drawString(“[HTTP] GET…\n”,0,60); M5.Lcd.drawString(“i16Int\n”,0,70); M5.Lcd.drawString(String(responseCode)+”\n”,0,80); if (responseCode == 200){ String data = http.getString(); M5.Lcd.drawString(data,0,100); Serial.println(data); } } } delay(1000); http.end(); } |
Result
こちらの動画から結果を確認できます。
Useful Link
https://github.com/arduino-libraries/ArduinoHttpClient/blob/master/src/HttpClient.h
https://arduinogetstarted.com/tutorials/arduino-http-request
https://requests.readthedocs.io/en/latest/user/quickstart/
Source Code
Please Download the source code from my github:
https://github.com/soup01Threes/Ctrlx/tree/main/Example%20with%20Ctrlx%20Runtime%20REST%20API