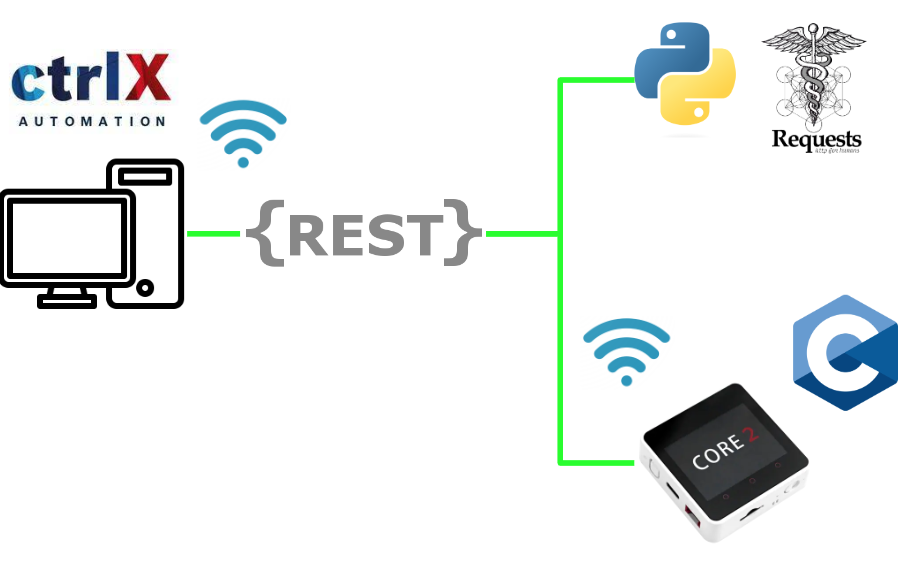
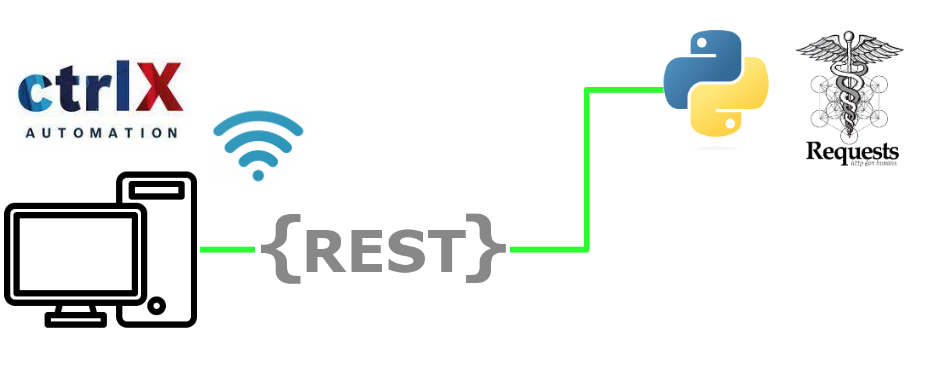
This article introduces how to read and write data from the ctrlX Data Layer using the REST API of ctrlX CORE or ctrlX COREvirtual. The article explains the process using two configurations: Python with Requests and M5Stack Core2 with C. Let’s Start!
API?
An Application Programming Interface (API) is a set of rules or methods that define how external applications can interact with an application. Often, the original application acts as the server.
The API defines which data can be accessed, whether it can be modified, and the respective methods or operations that are performed. It creates an interface that defines a set of requests that may be made by clients.
It is common to use a library provided by the server to implement the API definition. This helps avoid major issues or confusion.
Why REST?
Almost all programming languages currently support the ability for users to access web servers via REST API. Of course, as mentioned in this article, CtrlX Runtime also supports this and allows users to retrieve various information from the runtime using REST API.

Addresses
Each node has an address in the CtrlX data layer. This address can be thought of as a hierarchical path to the node. The components of the path are separated by /, which organizes all data in a hierarchical structure.
Example
| plc/app/Application/realtime_data/GVL/data/r32Real datalayer/nodes plc/admin/cmd/start motion/axes/1/cur-values/cur-pos |
Reference Link
Ctrlx
http://soup01.com/en/category/bosch_en/ctrlx-en/
M5Stack
http://soup01.com/en/category/m5stack_en/
Other Post with REST
http://soup01.com/en/category/protocol-en/https-rest-en/
Configure your Network
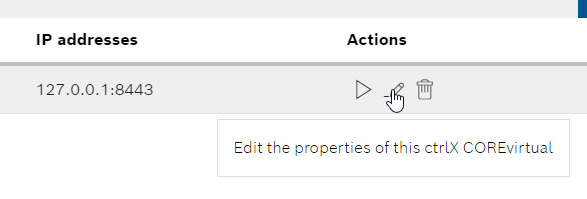
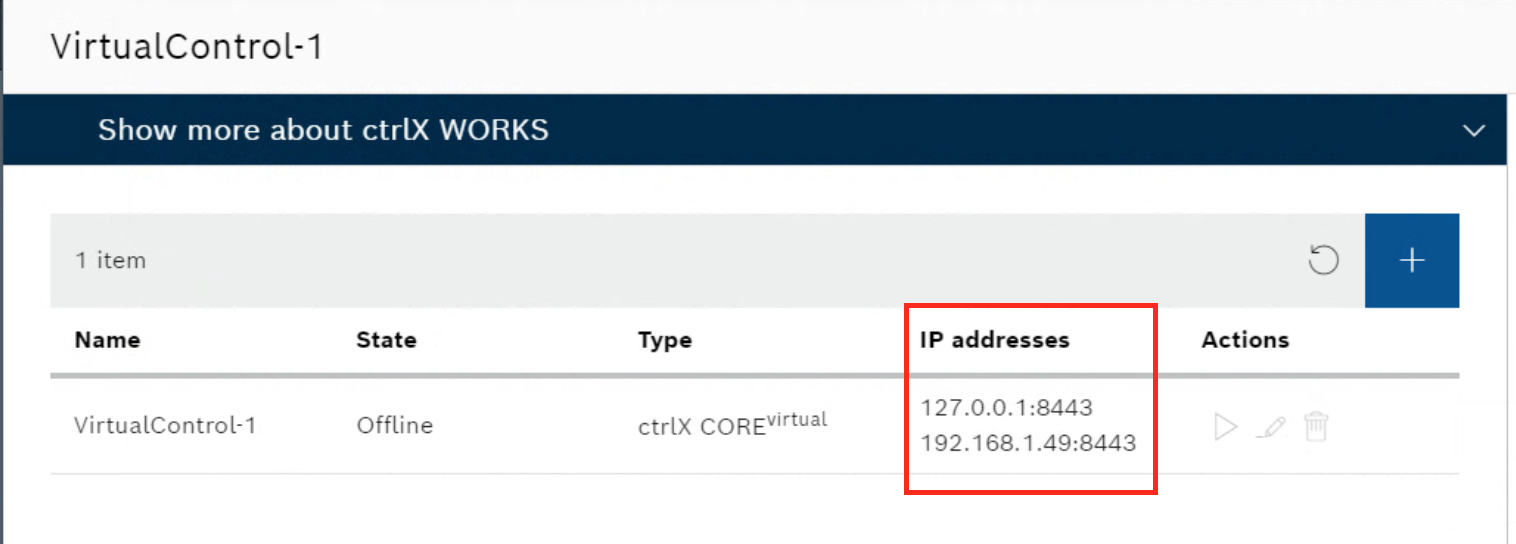
Please change your ctrlX COREvirtual ‘s network configuration from ctrlXWorks.
Go to Actions>Edit the properties of the ctrlX COREvirtual.

Select the Extend Tab and choose Port Forwarding and change the Wi-Fi Interface as the External access option.
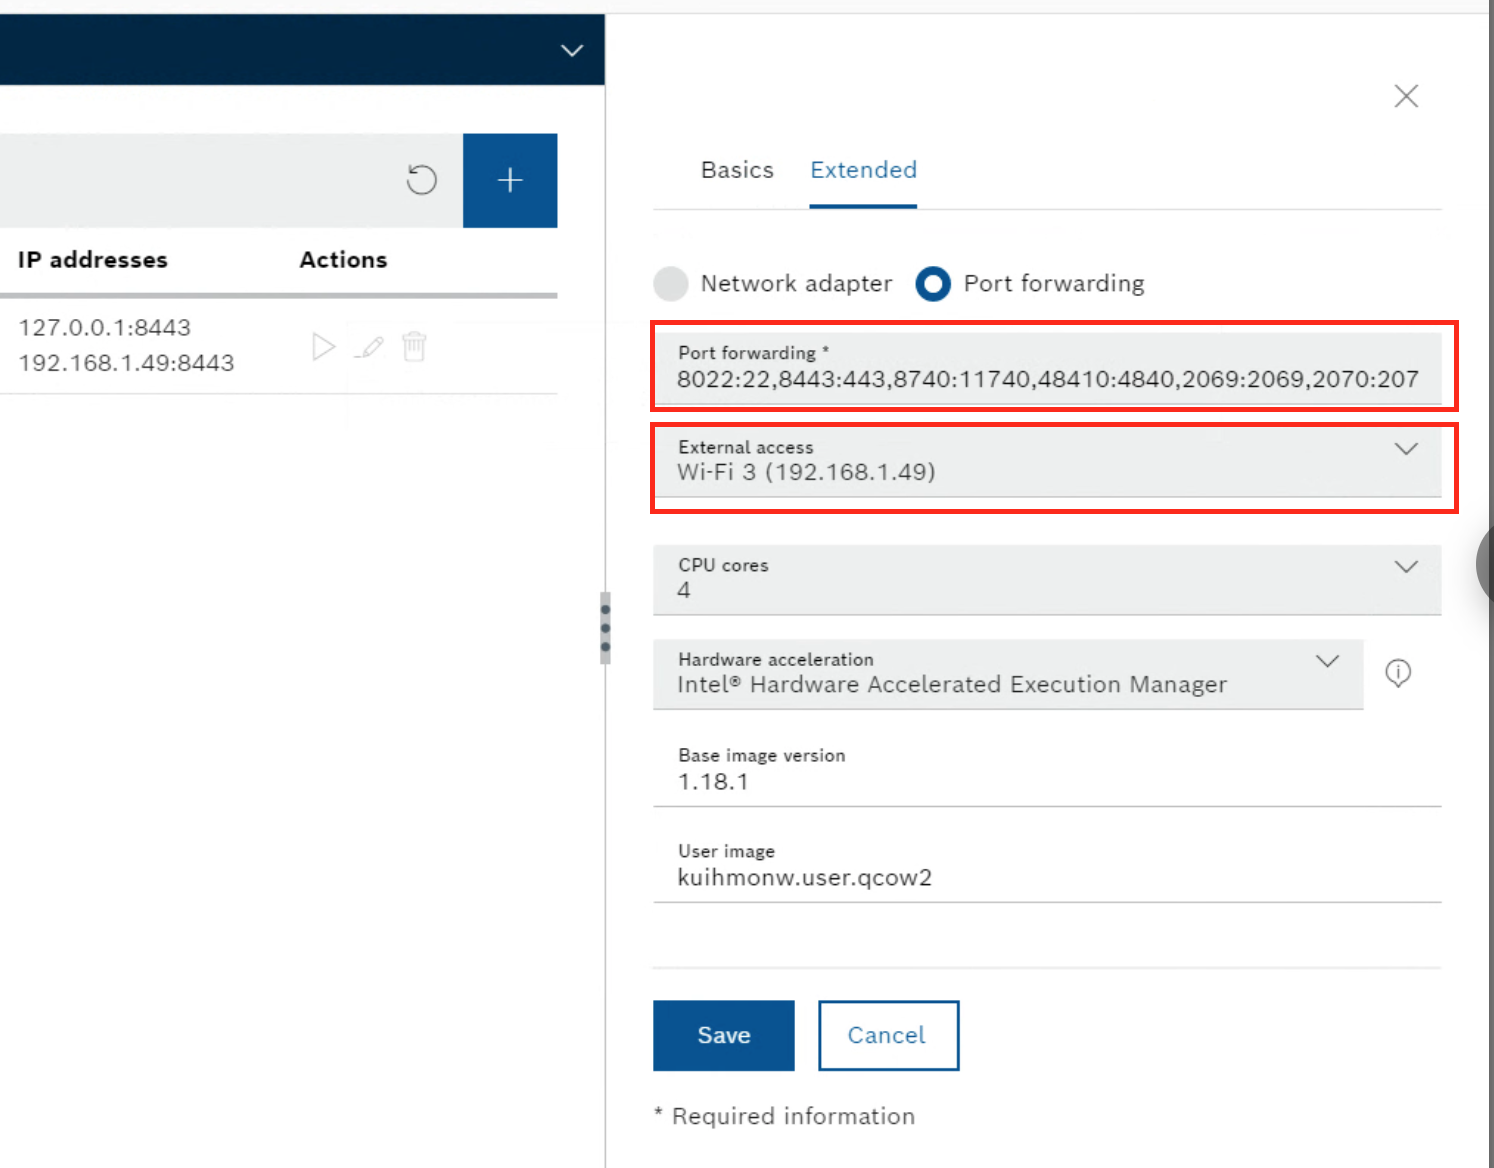
Done!
Implementation with Python
In the first Implementation I will show you how to use python to build the communication.
Example1
In order to connect to the ctrlX Runtime with the REST API, you must first obtain a Session Token from the Runtime.
Code
The following is a program that uses requests to send Post requests to the ctrlX Runtime.
The Username and Password are the same as the web server ‘s login information.
Note that the Session Token must use the POST Method.
| import requests #The base URL that you can find in the API Reference “”” please find more information from this link: https://developer.community.boschrexroth.com/t5/Store-and-How-to/Using-REST-API-of-ctrlX-CORE/ba-p/12490 VirtualCore is used in the example:127.0.0.1:8443 is the default URL. Authorization Link:https://127.0.0.1:8443/identity-manager/api/v1/auth/token CTRLX REST Basic Link:https://127.0.0.1:8443/automation/api/v1 you Should get the response from CtrlX Virtual Core like this: key:access_token , value:XXXXXXXXXXXXXXXXXXXXXXXXXXX key:token_type , value:Bearer “”” USERNAME='”boschrexroth”‘ PASSWORD='”boschrexroth”‘ #Url Configuration Auth_URL=’https://127.0.0.1:8443/identity-manager/api/v1/auth/token’ #Post Content postData=”’ {“name”:%s,”password”:%s} ”’%(USERNAME,PASSWORD) #Send Request r=requests.post(Auth_URL,postData) #Get Status Code #if 201 is return, it means the request is done without error. print(‘Status Code=%s’%(r.status_code)) #Get json Data data=r.json() #Output print(‘—-Data—-‘) for k,v in data.items(): print(‘key:%s , value:%s’%(k,v)) import requests #The base URL that you can find in the API Reference “”” please find more information from this link: https://developer.community.boschrexroth.com/t5/Store-and-How-to/Using-REST-API-of-ctrlX-CORE/ba-p/12490 VirtualCore is used in the example:127.0.0.1:8443 is the default URL. Authorization Link:https://127.0.0.1:8443/identity-manager/api/v1/auth/token CTRLX REST Basic Link:https://127.0.0.1:8443/automation/api/v1 you Should get the response from CtrlX Virtual Core like this: key:access_token , value:XXXXXXXXXXXXXXXXXXXXXXXXXXX key:token_type , value:Bearer “”” USERNAME='”boschrexroth”‘ PASSWORD='”boschrexroth”‘ #Url Configuration Auth_URL=’https://127.0.0.1:8443/identity-manager/api/v1/auth/token’ #Header Configuration #Additionally the “Content-Type” “application/json” has to be added to the request header to tell the server how data should be interpreted. headers={‘Content-type’: ‘application/json’} #Post Content postData=”’ {“name”:%s,”password”:%s} ”’%(USERNAME,PASSWORD) #Send Request r=requests.post(Auth_URL,postData,verify=False,headers=headers) #Get Status Code #if 201 is return, it means the request is done without error. print(‘Status Code=%s’%(r.status_code)) #Get json Data data=r.json() #Output print(‘—-Data—-‘) for k,v in data.items(): print(‘key:%s , value:%s’%(k,v)) |
Error-1
an error: connection refused by CtrlX Runtime is happened.
| Max retries exceeded with url: /identity-manager/api/v1/auth/token (Caused by NewConnectionError(‘<urllib3.connection.HTTPSConnection object at 0x0000026120C9E510>: Failed to establish a new connection: [WinError 10061] No connection could be made because the target machine actively refused it’)) |
Modification-1
Now I’ll go add verify=False when making a POST request.
| r=requests.post(Auth_URL,postData,verify=False) |
Code
Here is the code after modification.
| import requests #The base URL that you can find in the API Reference “”” please find more information from this link: https://developer.community.boschrexroth.com/t5/Store-and-How-to/Using-REST-API-of-ctrlX-CORE/ba-p/12490 VirtualCore is used in the example:127.0.0.1:8443 is the default URL. Authorization Link:https://127.0.0.1:8443/identity-manager/api/v1/auth/token CTRLX REST Basic Link:https://127.0.0.1:8443/automation/api/v1 you Should get the response from CtrlX Virtual Core like this: key:access_token , value:XXXXXXXXXXXXXXXXXXXXXXXXXXX key:token_type , value:Bearer “”” USERNAME='”boschrexroth”‘ PASSWORD='”boschrexroth”‘ #Url Configuration Auth_URL=’https://127.0.0.1:8443/identity-manager/api/v1/auth/token’ #Post Content postData=”’ {“name”:%s,”password”:%s} ”’%(USERNAME,PASSWORD) #Send Request r=requests.post(Auth_URL,postData,verify=False) #Get Status Code #if 201 is return, it means the request is done without error. print(‘Status Code=%s’%(r.status_code)) #Get json Data data=r.json() #Output print(‘—-Data—-‘) for k,v in data.items(): print(‘key:%s , value:%s’%(k,v)) |
Error-2
This time the connection with Ctrlx Runtime was successful, but I received a response with Status Code 400, where 400 indicates an invalid request.
| C:\Users\root\AppData\Local\Programs\Python\Python311\Lib\site-packages\urllib3\connectionpool.py:1045: InsecureRequestWarning: Unverified HTTPS request is being made to host ‘127.0.0.1’. Adding certificate verification is strongly advised. See: https://urllib3.readthedocs.io/en/1.26.x/advanced-usage.html#ssl-warnings warnings.warn( Status Code=400 —-Data—- key:code , value:400 key:message , value: key:moreInfo , value:Authentication failed |
Modification-2
I am thinking that the Header is missing.Let’s add the headers information with the POST request.
| headers={‘Content-type’: ‘application/json’} r=requests.post(Auth_URL,postData,verify=False,headers=headers) |
Code
Here is the code after modification.
| import requests #The base URL that you can find in the API Reference “”” please find more information from this link: https://developer.community.boschrexroth.com/t5/Store-and-How-to/Using-REST-API-of-ctrlX-CORE/ba-p/12490 VirtualCore is used in the example:127.0.0.1:8443 is the default URL. Authorization Link:https://127.0.0.1:8443/identity-manager/api/v1/auth/token CTRLX REST Basic Link:https://127.0.0.1:8443/automation/api/v1 you Should get the response from CtrlX Virtual Core like this: key:access_token , value:XXXXXXXXXXXXXXXXXXXXXXXXXXX key:token_type , value:Bearer “”” USERNAME='”boschrexroth”‘ PASSWORD='”boschrexroth”‘ #Url Configuration Auth_URL=’https://127.0.0.1:8443/identity-manager/api/v1/auth/token’ #Header Configuration #Additionally the “Content-Type” “application/json” has to be added to the request header to tell the server how data should be interpreted. headers={‘Content-type’: ‘application/json’} #Post Content postData=”’ {“name”:%s,”password”:%s} ”’%(USERNAME,PASSWORD) #Send Request r=requests.post(Auth_URL,postData,verify=False,headers=headers) #Get Status Code #if 201 is return, it means the request is done without error. print(‘Status Code=%s’%(r.status_code)) #Get json Data data=r.json() #Output print(‘—-Data—-‘) for k,v in data.items(): print(‘key:%s , value:%s’%(k,v)) |
Result
Done! access_token and token_type have been returned. This information will be used in the next Example.
| C:\Users\root\AppData\Local\Programs\Python\Python311\Lib\site-packages\urllib3\connectionpool.py:1045: InsecureRequestWarning: Unverified HTTPS request is being made to host ‘127.0.0.1’. Adding certificate verification is strongly advised. See: https://urllib3.readthedocs.io/en/1.26.x/advanced-usage.html#ssl-warnings warnings.warn( {‘access_token’: ‘eyJhbGciOiJFUzM4NCIsInR5cCI6IkpXVCJ9.eyJleHAiOjE2ODEzOTA3NDgsImlhdCI6MTY4MTM2MTk0OCwiaWQiOiIxMDAwIiwibmFtZSI6ImJvc2NocmV4cm90aCIsIm5vbmNlIjoiMjFiZWMwZTYtY2QwZS00NjgzLWJiZDgtNWE4MzNiYzg3OGRkIiwicGxjaGFuZGxlIjoxNDE2NzA1MDMzODY2MzQxNjg5NSwicmVtb3RlYXV0aCI6IiIsInNjb3BlIjpbInJleHJvdGgtZGV2aWNlLmFsbC5yd3giXX0.JKQ1G3c8yGKNG4yLEMwWAtNkift7NoFb94XTBUbbvZZgLKbK5-e6fEJ66LtD9bRP_fxz0lRkRZwRMPq07_EFafoZNQkst9uY28oRsd9lU8oPNtGUcgFrLyG8lzhpr7hl’, ‘token_type’: ‘Bearer’} —-Data—- key:access_token , value:eyJhbGciOiJFUzM4NCIsInR5cCI6IkpXVCJ9.eyJleHAiOjE2ODEzOTA3NDgsImlhdCI6MTY4MTM2MTk0OCwiaWQiOiIxMDAwIiwibmFtZSI6ImJvc2NocmV4cm90aCIsIm5vbmNlIjoiMjFiZWMwZTYtY2QwZS00NjgzLWJiZDgtNWE4MzNiYzg3OGRkIiwicGxjaGFuZGxlIjoxNDE2NzA1MDMzODY2MzQxNjg5NSwicmVtb3RlYXV0aCI6IiIsInNjb3BlIjpbInJleHJvdGgtZGV2aWNlLmFsbC5yd3giXX0.JKQ1G3c8yGKNG4yLEMwWAtNkift7NoFb94XTBUbbvZZgLKbK5-e6fEJ66LtD9bRP_fxz0lRkRZwRMPq07_EFafoZNQkst9uY28oRsd9lU8oPNtGUcgFrLyG8lzhpr7hl key:token_type , value:Bearer |
Example2
Check the Path
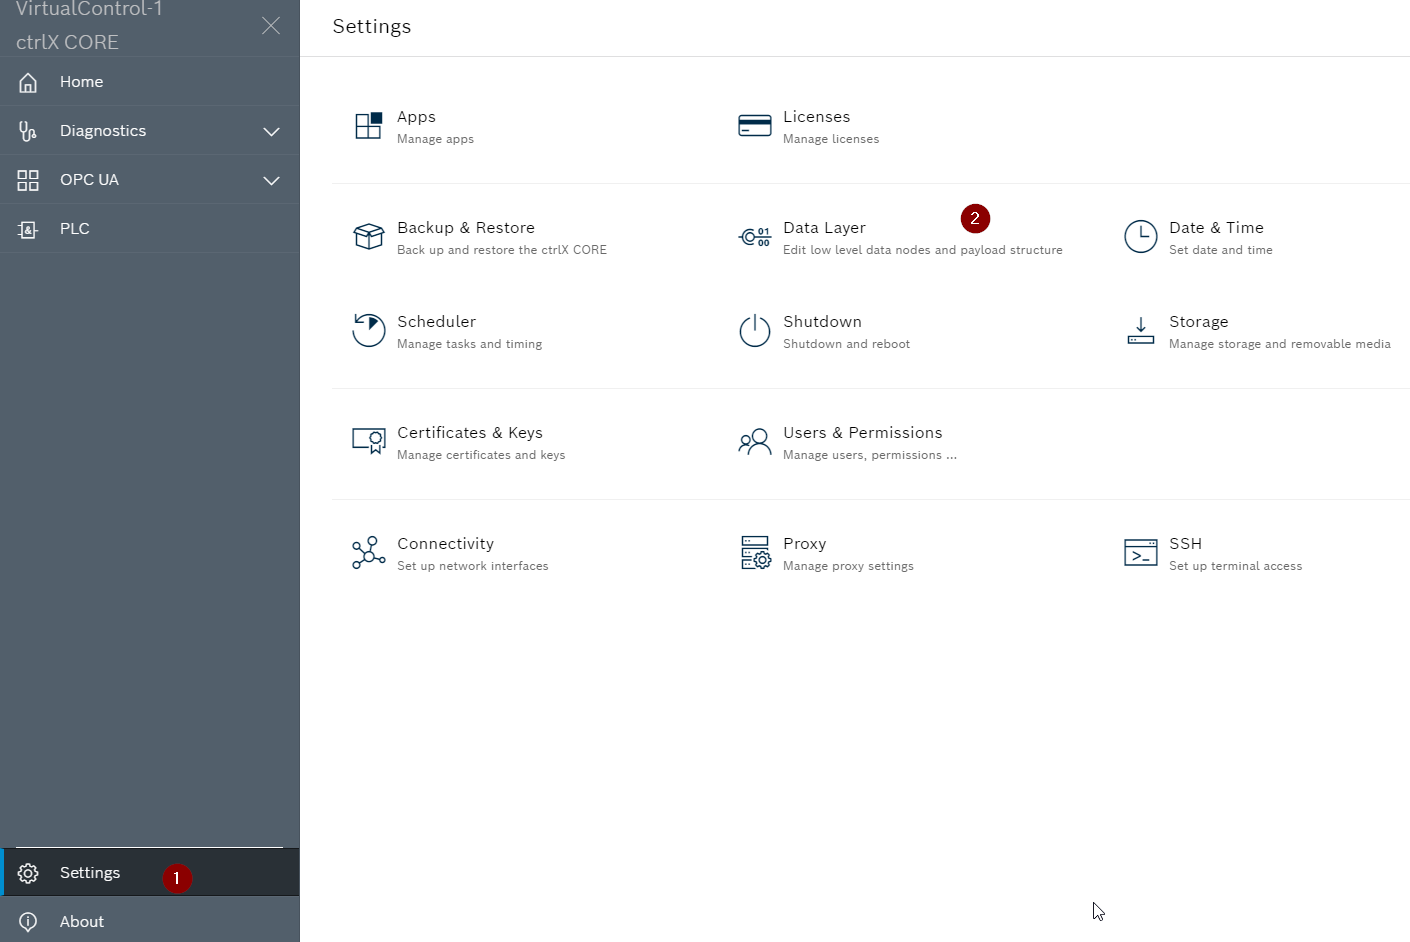
To access a variable in Runtime, you need to know the Path of the variable by open the WebServer and click on Settings>Data Layer.
Open plc>app>Application>admin>task to get the Task information of PLC Runtime. Then the current PLC Task information will be displayed on the right side.
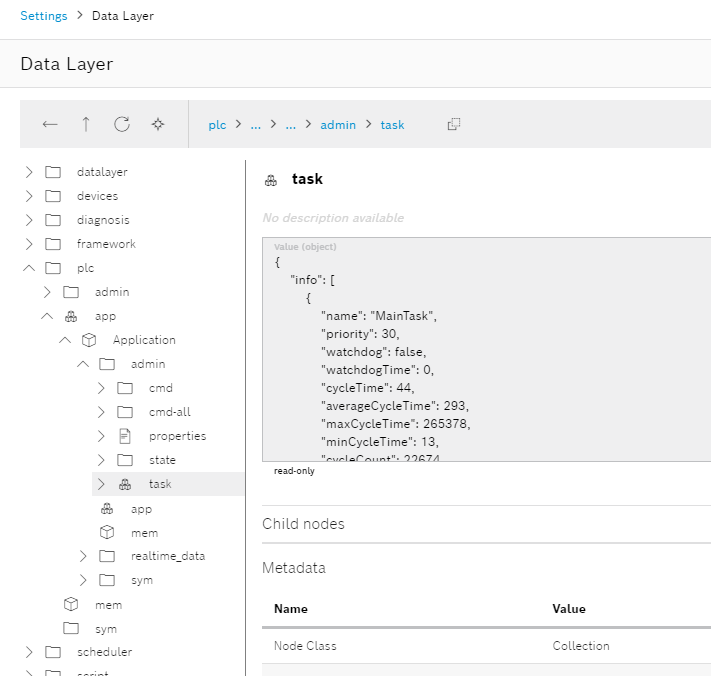
Click on the Copies path button to get the Path of that Task variable.

Such a string will be Copied.
| plc/app/Application/admin/task |
Code
Here is the program.
| import requests import sys #The base URL that you can find in the API Reference “”” please find more information from this link: https://developer.community.boschrexroth.com/t5/Store-and-How-to/Using-REST-API-of-ctrlX-CORE/ba-p/12490 VirtualCore is used in the example:127.0.0.1:8443 is the default URL. Authorization Link:https://127.0.0.1:8443/identity-manager/api/v1/auth/token CTRLX REST Basic Link:https://127.0.0.1:8443/automation/api/v1 you Should get the response from CtrlX Virtual Core like this: key:access_token , value:XXXXXXXXXXXXXXXXXXXXXXXXXXX key:token_type , value:Bearer Script Result: key:info , value:[ {‘name’: ‘MainTask’, ‘priority’: 30, ‘watchdog’: False, ‘watchdogTime’: 0, ‘cycleTime’: 24, ‘averageCycleTime’: 60, ‘maxCycleTime’: 15280, ‘minCycleTime’: 9, ‘cycleCount’: 2042, ‘watchdogSensitivity’: 1, ‘interval’: 200000, ‘taskType’: ‘CYCLIC’, ‘osHandle’: 139832806885120}] “”” USERNAME='”boschrexroth”‘ PASSWORD='”boschrexroth”‘ #Url Configuration Auth_URL=’https://127.0.0.1:8443/identity-manager/api/v1/auth/token’ CTRLX_URL_Basic=’https://127.0.0.1:8443/automation/api/v1/’ #Header Configuration #Additionally the “Content-Type” “application/json” has to be added to the request header to tell the server how data should be interpreted. headers={‘Content-type’: ‘application/json’} #Post Content postData=”’ {“name”:%s,”password”:%s} ”’%(USERNAME,PASSWORD) #Send Request r=requests.post(Auth_URL,postData,verify=False,headers=headers) #Get Status Code #if 201 is return, it means the request is done without error. print(‘Status Code=%s’%(r.status_code)) data=r.json() if r.status_code != 201: for k,v in data.items(): print(‘key:%s , value:%s’%(k,v)) print(‘Exit..’) sys.exit(); # AuthHeader={‘Content-type’: ‘application/json’,’Authorization’:’Bearer ‘+data[‘access_token’]} r=requests.get( CTRLX_URL_Basic+’%s’%(‘/plc/app/Application/admin/task/’) ,verify=False ,headers=AuthHeader) data=r.json() for k,v in data.items(): print(‘key:%s , value:%s’%(k,v)) |
Ctrlx Request Basic Link
The REST API link for Ctrlx Runtime is below. Note that I am using Virtualcore, so the Port number is 8443.
| CTRLX_URL_Basic=’https://127.0.0.1:8443/automation/api/v1/’ |
Header
Header information should be sent together with the Key obtained earlier in Example 1.
| AuthHeader={‘Content-type’: ‘application/json’,’Authorization’:’Bearer ‘+data[‘access_token’]} |
Request
/plc/app/Application/admin/task/ is a LINK to get Task information for PLC Runtime.
| r=requests.get( CTRLX_URL_Basic+’%s’%(‘/plc/app/Application/admin/task/’) ,verify=False ,headers=AuthHeader) |
Result
Done!Ctrlx Runtime plc cycle information retrieved.
| C:\Users\root\AppData\Local\Programs\Python\Python311\Lib\site-packages\urllib3\connectionpool.py:1045: InsecureRequestWarning: Unverified HTTPS request is being made to host ‘127.0.0.1’. Adding certificate verification is strongly advised. See: https://urllib3.readthedocs.io/en/1.26.x/advanced-usage.html#ssl-warnings warnings.warn( key:info , value:[{‘name’: ‘MainTask’, ‘priority’: 30, ‘watchdog’: False, ‘watchdogTime’: 0, ‘cycleTime’: 24, ‘averageCycleTime’: 81, ‘maxCycleTime’: 91737, ‘minCycleTime’: 8, ‘cycleCount’: 19598, ‘watchdogSensitivity’: 1, ‘interval’: 200000, ‘taskType’: ‘CYCLIC’, ‘osHandle’: 139832806885120}] |
Exaxmple3
The next step is to access the variables in the PLC Runtime;In the Example 3 we will read the current value of the variable.
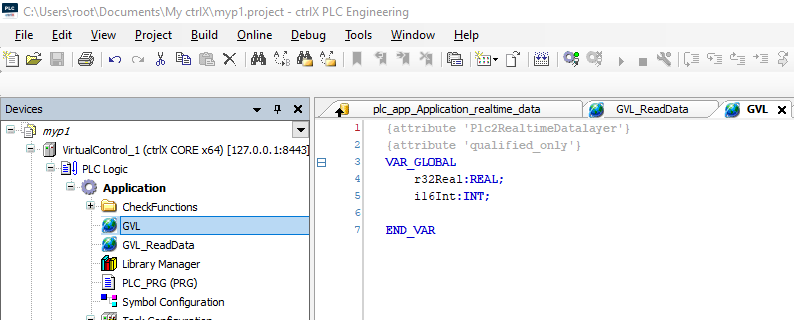
Add GVL
Add Global Variable List to the project, define variables, and Download to Runtime.
Configure Data Layer
There is an item called DataLayer_Realtime.
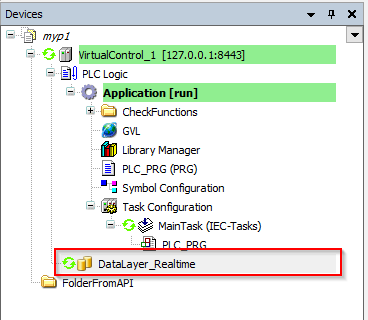
Refresh updates the current Configuration.

Add PLC real-time data
Right click the DataLayer_Realtime>Add>PLC real-time data.
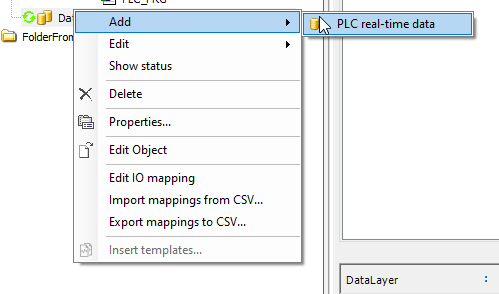
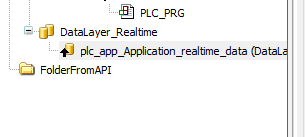
plc_app_Application_realtime_data has been added.
Add PLC RealTime data output
Next,we will add the PLC Realtime data output. Note that the Input/Output expression was established from the PLC Runtime perspective, so for the REST API, PLC Realtime data output is an input, meaning it cannot be overridden.
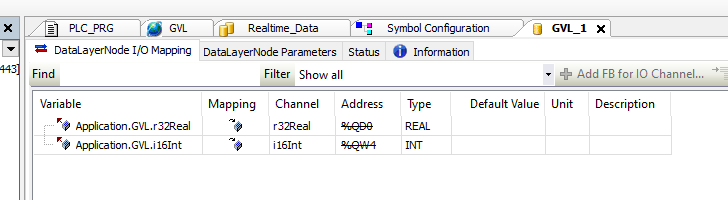
Select plc_app_Application_realtime>right click>Add>PLC Realtime data output>GVL where GVL corresponds to the Global Variable List you just added.


The DataLayerNode I/O Mapping Tab lists the variables that have been mapped, and since it shows %Q in the Address field, you know those variables are output from PLC Runtime.
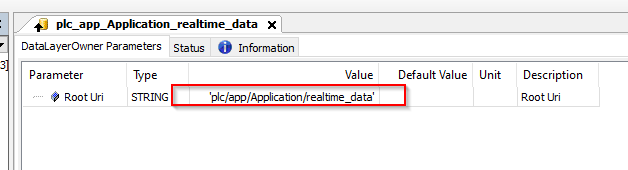
If you open the Tab of plc_app_Application_realtime_data, you will find the Root Uri variable and its current value contains the basic Path of the variable.
View Data
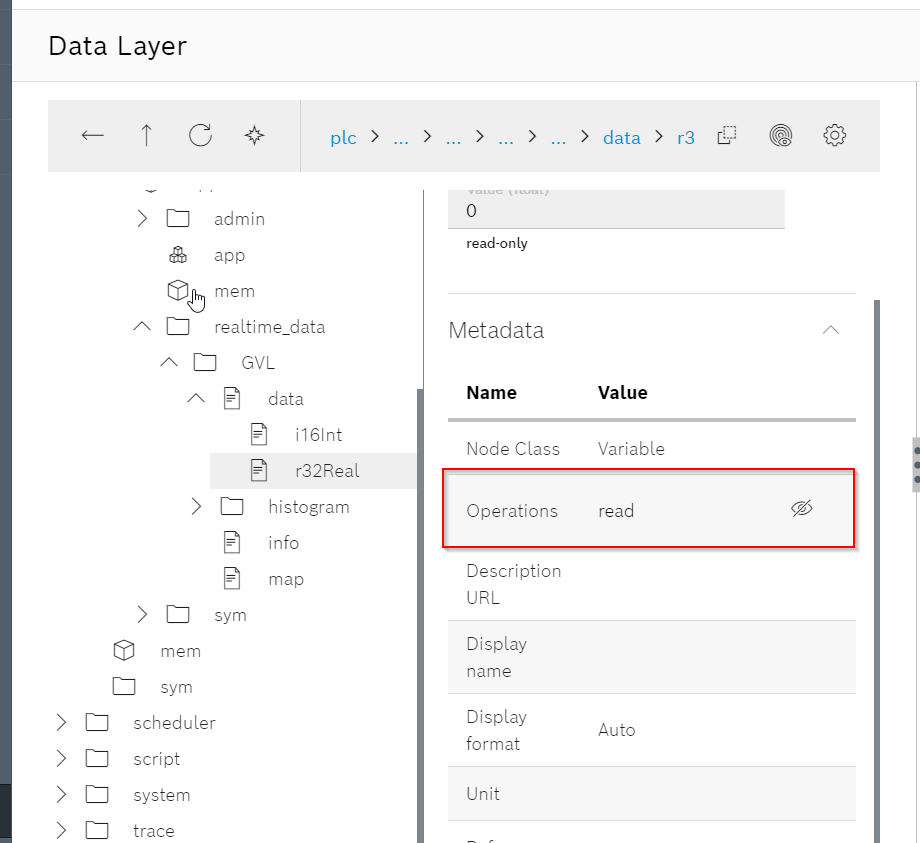
We opened the webserver again, and this time a folder named realtime_data was created, where GVL is the Global Variable List we had just added.

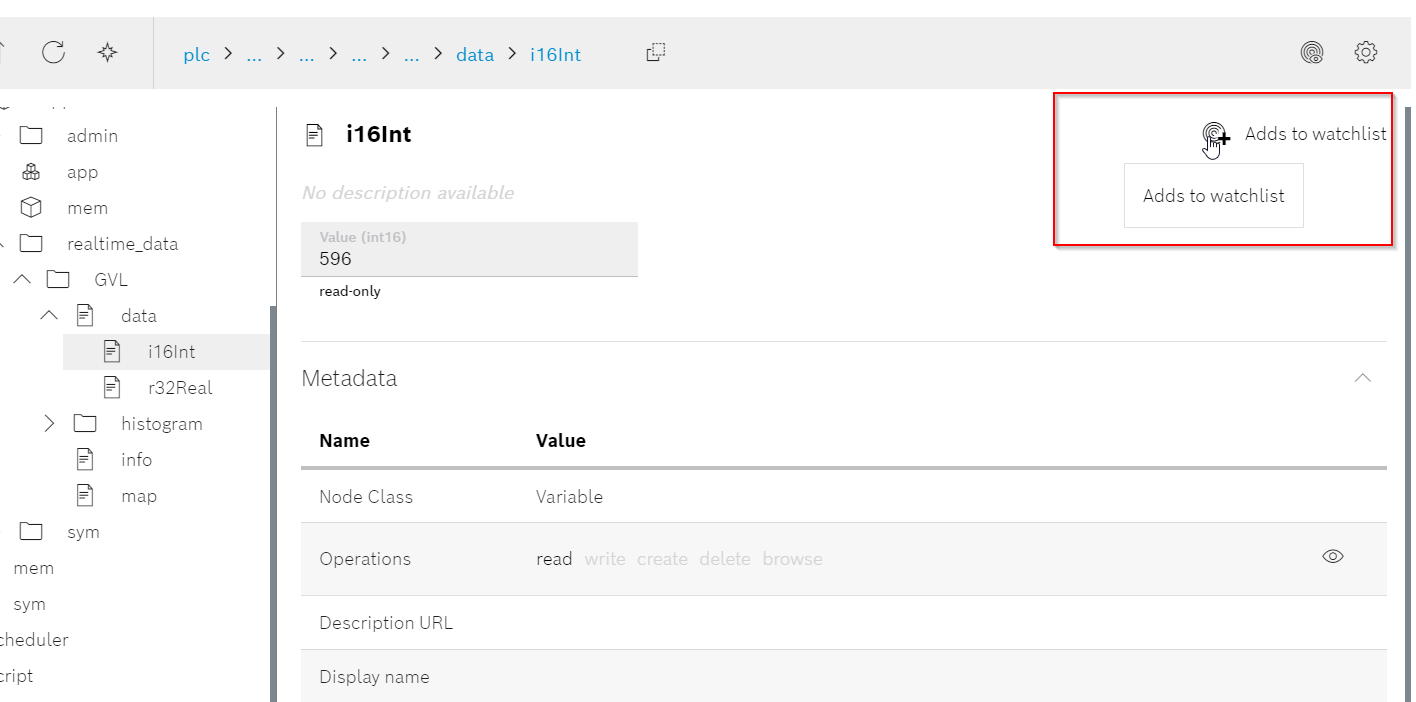
When we opened the data, we can find the i16Int and r32Real variables added to the Real time layer.

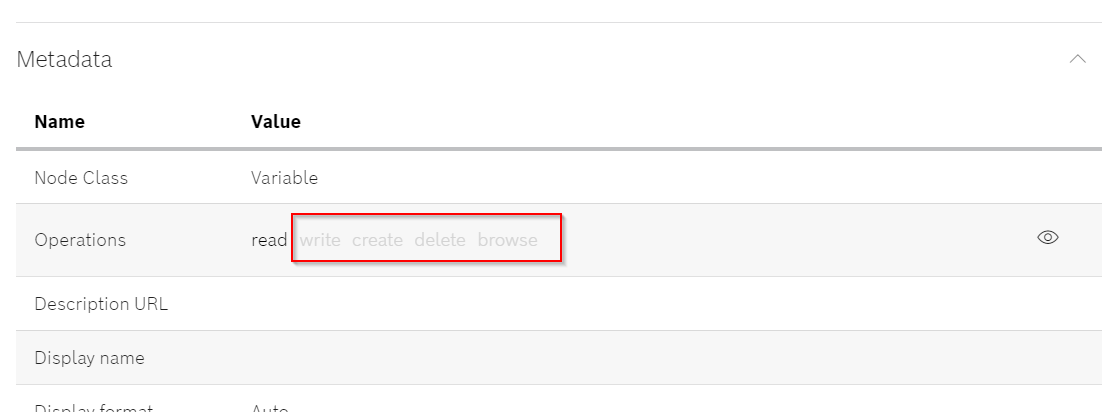
Operations Level
The level at which the variable corresponding to an Operations item can be manipulated. read alone is read-only.
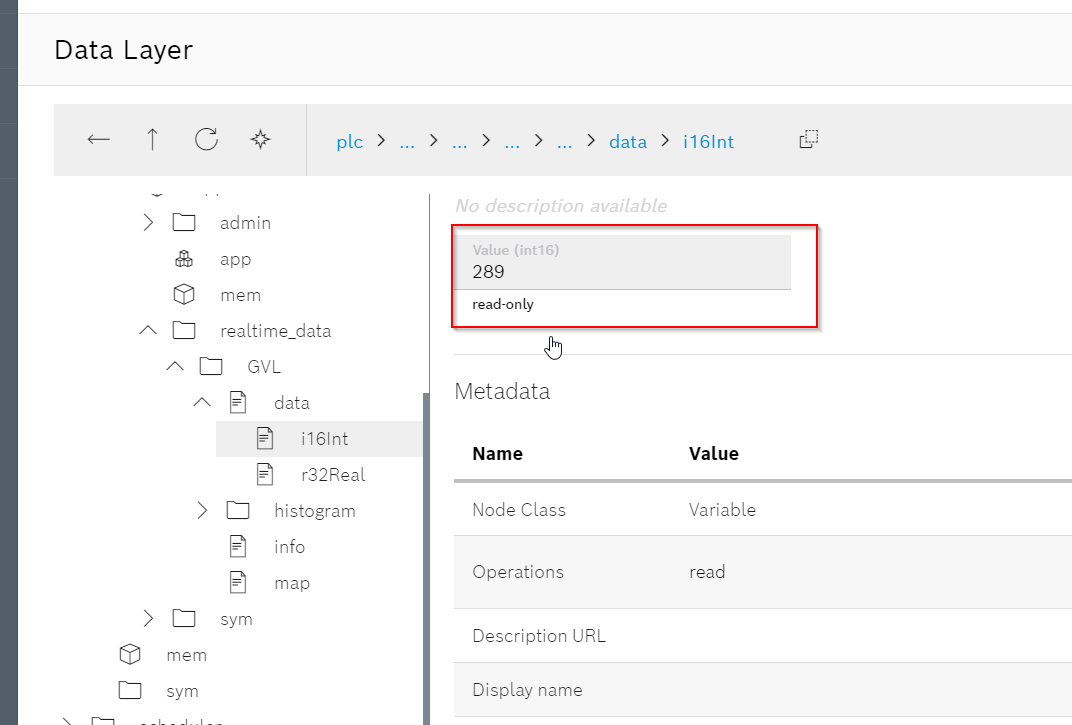
Monitor Value
The current value is always reflected.

View All Operations Level
Click on the eye ICON to list all permissions.
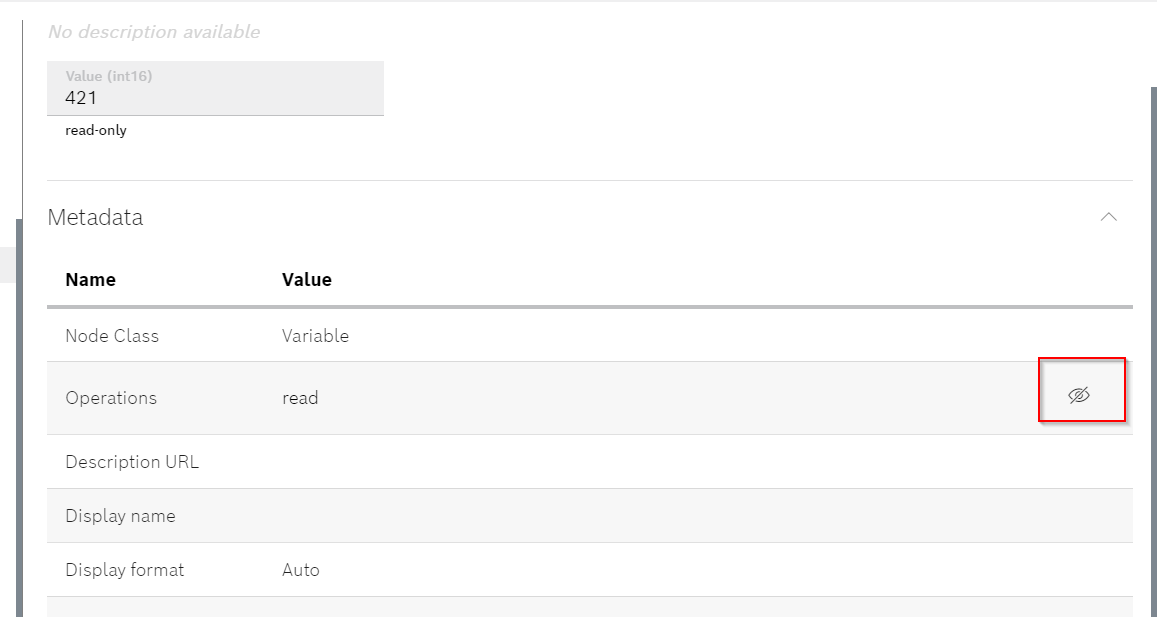
The shallow gray color is an invalid authority.
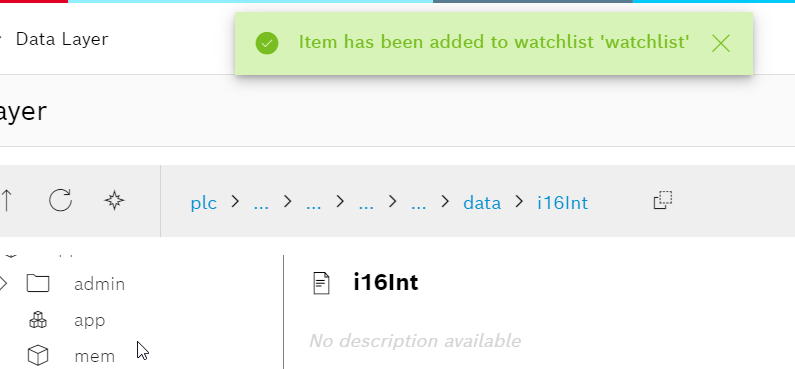
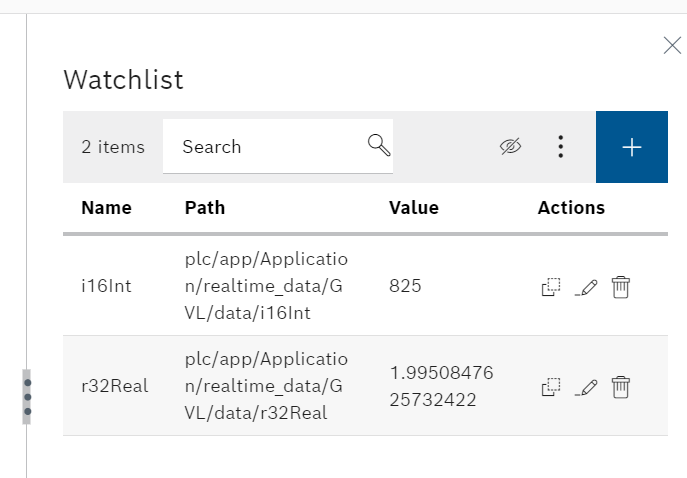
Add to watchlist
Click the Adds to watchlist button in the upper right corner to add the appropriate variable to the Watch List.
Click the watchlist.

A message is displayed indicating that the item has been added to the Watch List.
Open watchlist
Let’s open Watchlist
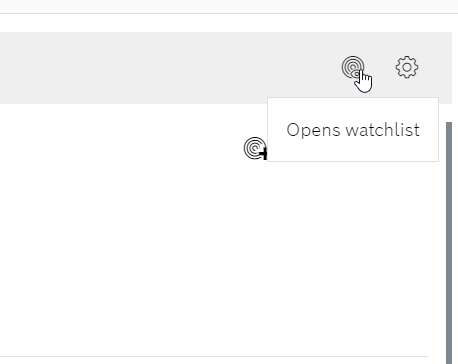
You can now see the list of the variables registered in Watchlist.
Code
Here is the program, not much different from Example 2, just the LINK of request has changed.
| import requests import sys #The base URL that you can find in the API Reference “”” please find more information from this link: https://developer.community.boschrexroth.com/t5/Store-and-How-to/Using-REST-API-of-ctrlX-CORE/ba-p/12490 VirtualCore is used in the example:127.0.0.1:8443 is the default URL. Authorization Link:https://127.0.0.1:8443/identity-manager/api/v1/auth/token CTRLX REST Basic Link:https://127.0.0.1:8443/automation/api/v1 you Should get the response from CtrlX Virtual Core like this: key:access_token , value:XXXXXXXXXXXXXXXXXXXXXXXXXXX key:token_type , value:Bearer Script Result: key:type , value:int16 key:value , value:1193 key:type , value:float key:value , value:2.8821022510528564 “”” USERNAME='”boschrexroth”‘ PASSWORD='”boschrexroth”‘ #Url Configuration Auth_URL=’https://127.0.0.1:8443/identity-manager/api/v1/auth/token’ CTRLX_URL_Basic=’https://127.0.0.1:8443/automation/api/v1/’ #Header Configuration #Additionally the “Content-Type” “application/json” has to be added to the request header to tell the server how data should be interpreted. headers={‘Content-type’: ‘application/json’} #Post Content postData=”’ {“name”:%s,”password”:%s} ”’%(USERNAME,PASSWORD) #Send Request r=requests.post(Auth_URL,postData,verify=False,headers=headers) #Get Status Code #if 201 is return, it means the request is done without error. print(‘Status Code=%s’%(r.status_code)) data=r.json() if r.status_code != 201: for k,v in data.items(): print(‘key:%s , value:%s’%(k,v)) print(‘Exit..’) sys.exit(); # AuthHeader={‘Content-type’: ‘application/json’,’Authorization’:’Bearer ‘+data[‘access_token’]} r=requests.get( CTRLX_URL_Basic+’%s’%(‘plc/app/Application/realtime_data/GVL/data/i16Int’) ,verify=False ,headers=AuthHeader) data=r.json() for k,v in data.items(): print(‘key:%s , value:%s’%(k,v)) r=requests.get( CTRLX_URL_Basic+’%s’%(‘plc/app/Application/realtime_data/GVL/data/r32Real’) ,verify=False ,headers=AuthHeader) data=r.json() for k,v in data.items(): print(‘key:%s , value:%s’%(k,v)) |
Result
Done!Ctrlx VirtualCoreからJson Formatのデータが返ってきました。
| C:\Users\root\AppData\Local\Programs\Python\Python311\Lib\site-packages\urllib3\connectionpool.py:1045: InsecureRequestWarning: Unverified HTTPS request is being made to host ‘127.0.0.1’. Adding certificate verification is strongly advised. See: https://urllib3.readthedocs.io/en/1.26.x/advanced-usage.html#ssl-warnings warnings.warn( key:type , value:int16 key:value , value:23470 C:\Users\root\AppData\Local\Programs\Python\Python311\Lib\site-packages\urllib3\connectionpool.py:1045: InsecureRequestWarning: Unverified HTTPS request is being made to host ‘127.0.0.1’. Adding certificate verification is strongly advised. See: https://urllib3.readthedocs.io/en/1.26.x/advanced-usage.html#ssl-warnings warnings.warn( key:type , value:float key:value , value:15426665472.0 |
Example4
Example4ではPLC Runtimeの変数の現在値を上書きします。In Example4 we will overwrite the current values of variables in PLC Runtime.
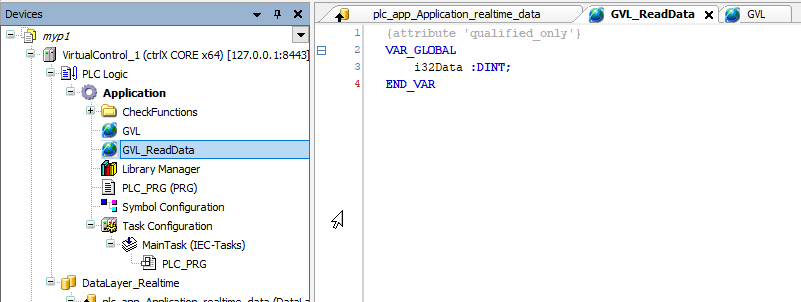
Add GVL Again
Add a new Global Variable List GVL_ReadData; DataLayer_Realtime is for setting read/write permissions based on GVL.
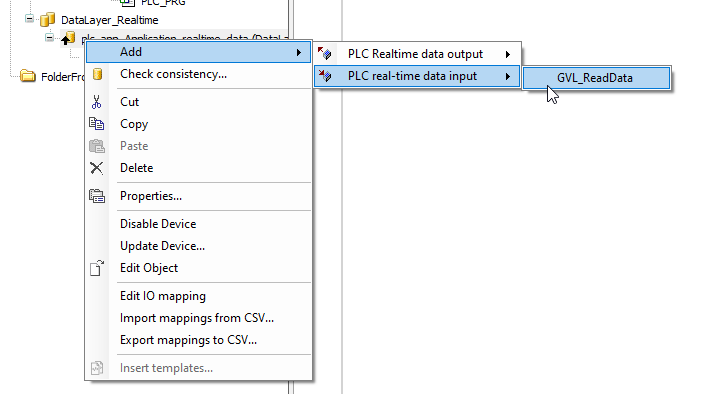
Right click on plc_app_Application_realtime_data>PLC real-time data input>Add the GVL_ReadData you just added.
Done! New Real time has been added.

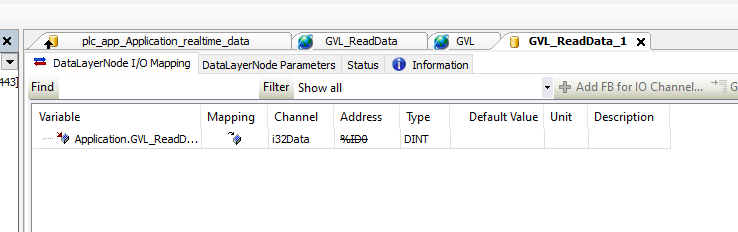
If you open the DataLayerNode I/O Mapping tab, the device for Address becomes %I, – It means that this variable is an input.
Check into WebServer
Access Ctrlx VirtualCore’s Web Server and check the Operations permission from the Data Layer – this variable can be read and write.

Code
Here is a program, similar to Example 3, but uses PUT requests instead of GET requests to the Ctrlx VirtualCore Runtime.
| import requests import sys #The base URL that you can find in the API Reference “”” please find more information from this link: https://developer.community.boschrexroth.com/t5/Store-and-How-to/Using-REST-API-of-ctrlX-CORE/ba-p/12490 VirtualCore is used in the example:127.0.0.1:8443 is the default URL. Authorization Link:https://192.168.1.194:8443/identity-manager/api/v1/auth/token CTRLX REST Basic Link:https://192.168.1.194:8443/automation/api/v1 you Should get the response from CtrlX Virtual Core like this: key:access_token , value:XXXXXXXXXXXXXXXXXXXXXXXXXXX key:token_type , value:Bearer Script Result: key:type , value:int16 key:value , value:1193 key:type , value:float key:value , value:2.8821022510528564 “”” USERNAME='”boschrexroth”‘ PASSWORD='”boschrexroth”‘ #Url Configuration Auth_URL=’https://127.0.0.1:8443/identity-manager/api/v1/auth/token’ CTRLX_URL_Basic=’https://127.0.0.1:8443/automation/api/v1/’ #Header Configuration #Additionally the “Content-Type” “application/json” has to be added to the request header to tell the server how data should be interpreted. headers={‘Content-type’: ‘application/json’} #Post Content postData=”’ {“name”:%s,”password”:%s} ”’%(USERNAME,PASSWORD) #Send Request r=requests.post(Auth_URL,postData,verify=False,headers=headers) #Get Status Code #if 201 is return, it means the request is done without error. print(‘Status Code=%s’%(r.status_code)) data=r.json() if r.status_code != 201: for k,v in data.items(): print(‘key:%s , value:%s’%(k,v)) print(‘Exit..’) sys.exit(); # AuthHeader={‘Content-type’: ‘application/json’,’Authorization’:’Bearer ‘+data[‘access_token’]} postData=”’ {“type”:”%s”,”value”:%d} ”’%(‘int32’,1234) r=requests.put( CTRLX_URL_Basic+’%s’%(‘plc/app/Application/realtime_data/GVL_ReadData/data/i32Data’) ,verify=False ,headers=AuthHeader ,data=postData ) data=r.json() for k,v in data.items(): print(‘key:%s , value:%s’%(k,v)) |
PUT Data
The content of the PUT request is the data type of that node and its updated value.
| postData=”’ {“type”:”%s”,”value”:%d} ”’%(‘int32’,1234) |
Request
A PUT request is required to override Runtime variables.
| r=requests.put( CTRLX_URL_Basic+’%s’%(‘plc/app/Application/realtime_data/GVL_ReadData/data/i32Data’) ,verify=False ,headers=AuthHeader ,data=postData ) |
Result
Done!Please check the current value with PLC Engineering software.
| C:\Users\root\Desktop\WORKS\Ctrlx api\script\REST>python Example004_WriteRealTimeData.py C:\Users\root\AppData\Local\Programs\Python\Python311\Lib\site-packages\urllib3\connectionpool.py:1045: InsecureRequestWarning: Unverified HTTPS request is being made to host ‘127.0.0.1’. Adding certificate verification is strongly advised. See: https://urllib3.readthedocs.io/en/1.26.x/advanced-usage.html#ssl-warnings warnings.warn( Status Code=201 C:\Users\root\AppData\Local\Programs\Python\Python311\Lib\site-packages\urllib3\connectionpool.py:1045: InsecureRequestWarning: Unverified HTTPS request is being made to host ‘127.0.0.1’. Adding certificate verification is strongly advised. See: https://urllib3.readthedocs.io/en/1.26.x/advanced-usage.html#ssl-warnings warnings.warn( key:type , value:int32 key:value , value:1234 |
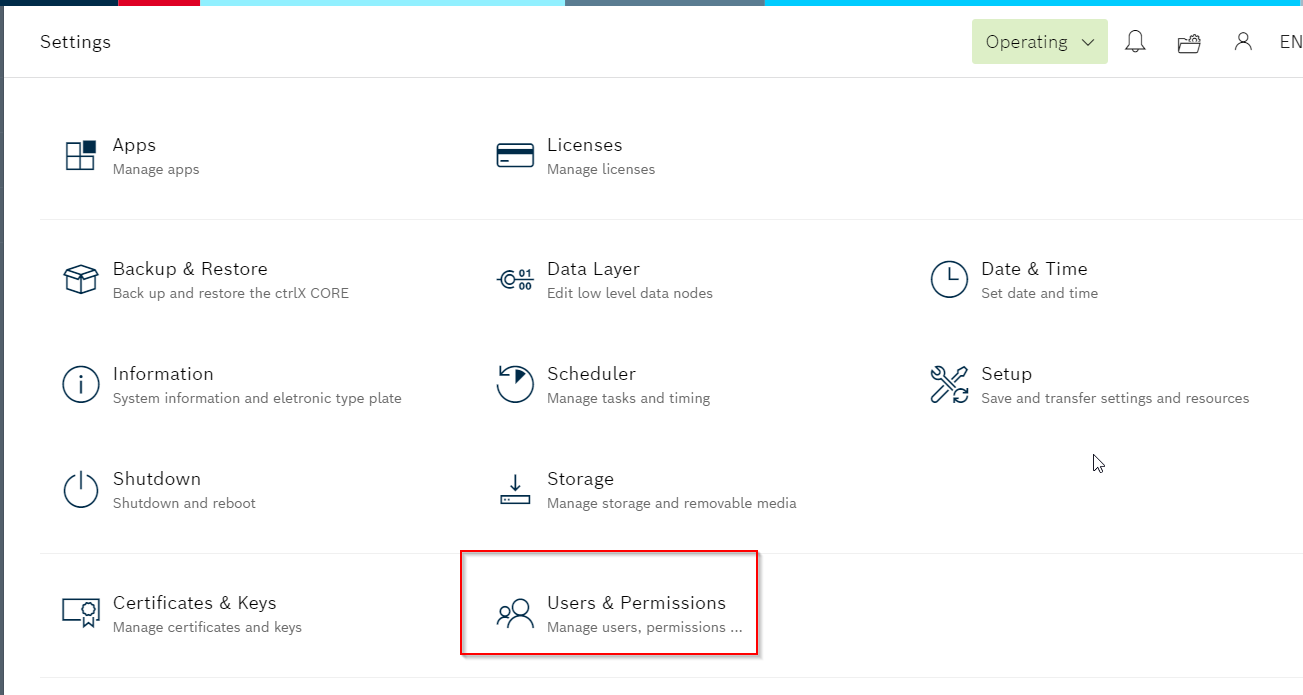
Session
have just used a POST request to obtain an Access_Token. So where is the Session actually managed?Go to User & Permissions.
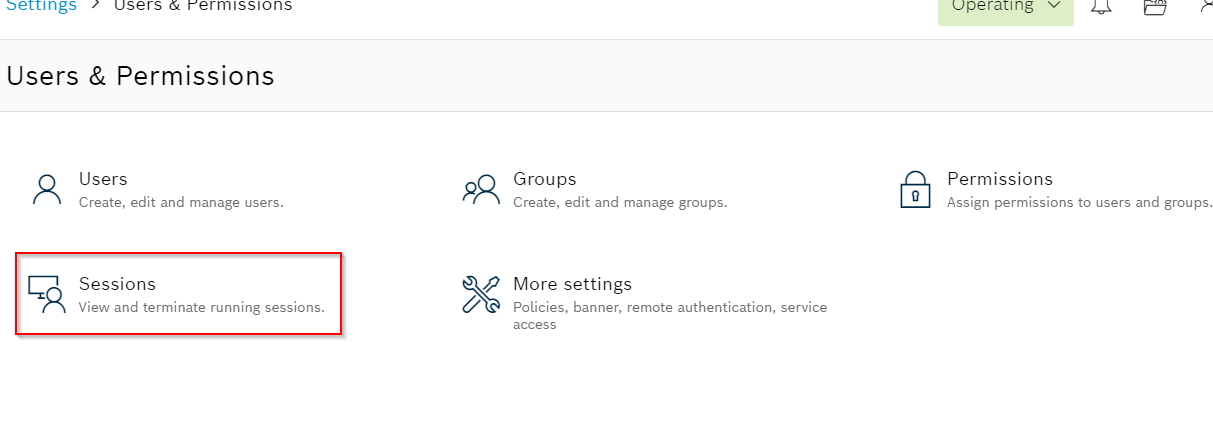
Open the Sessions.
All sessions are listed here.
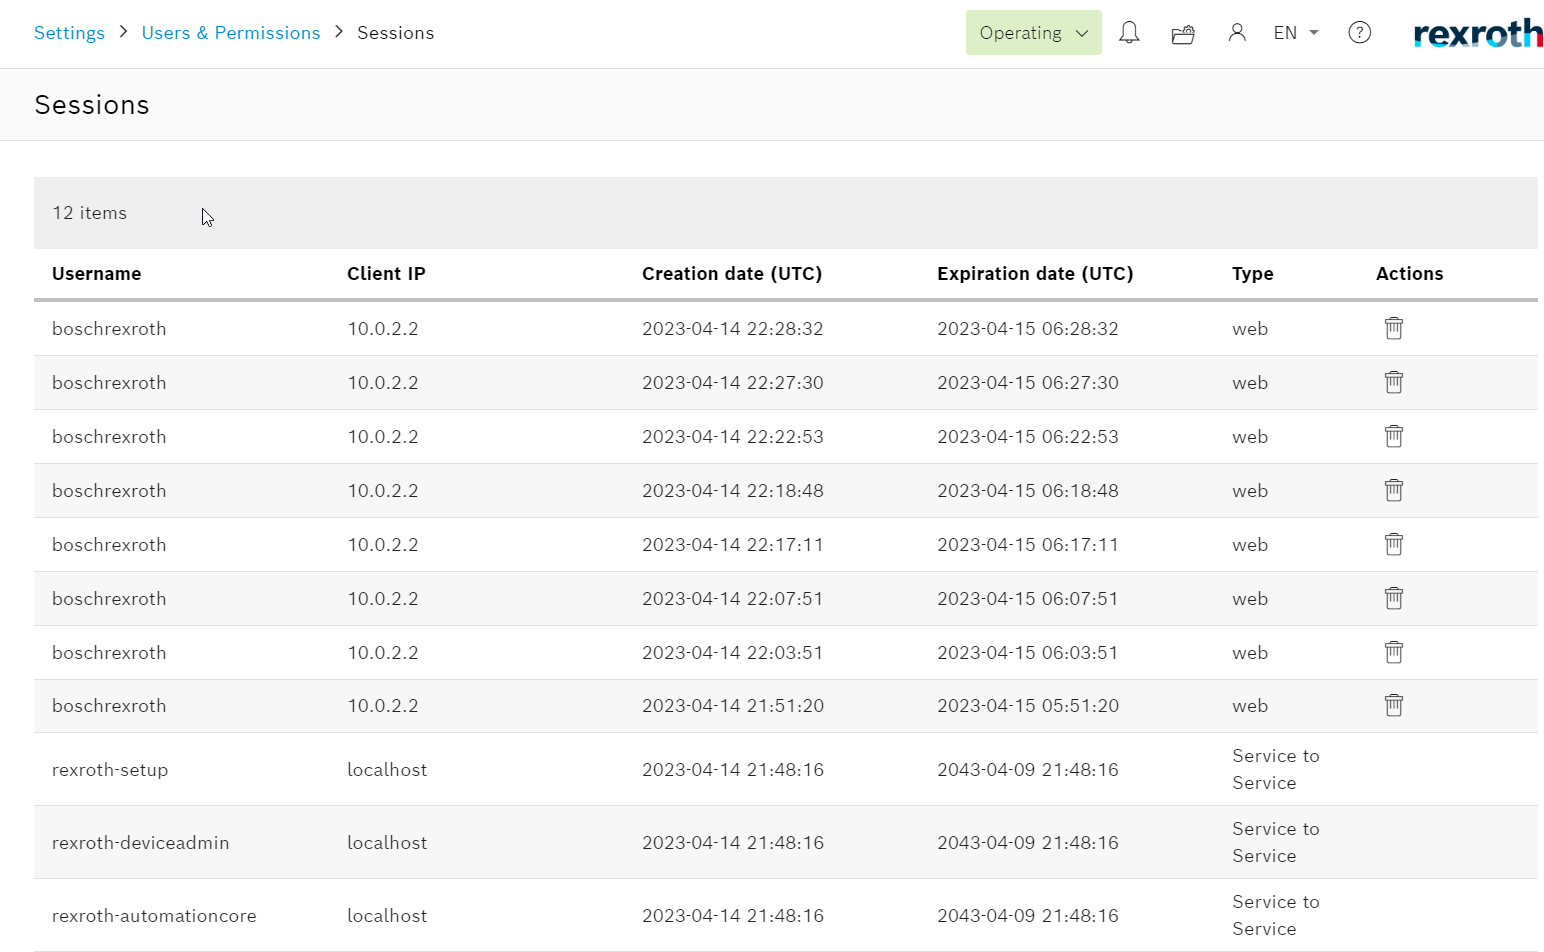
Delete Session
You can delete a Session by clicking on the trashcan ICON on the right.

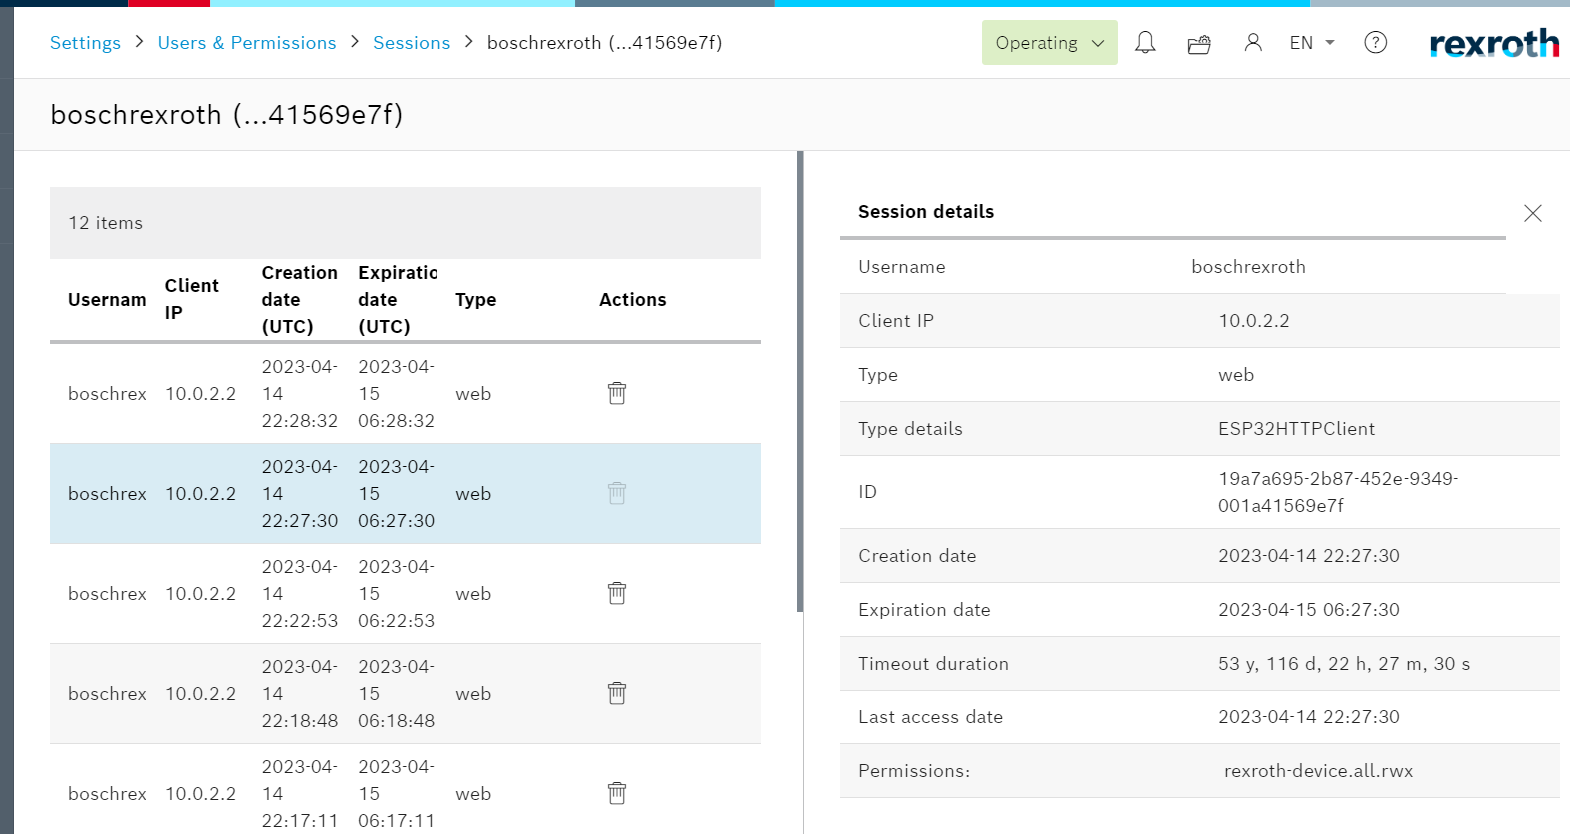
Check Details
Click on the session you want to check for more information.

For example, it is possible to list when this Session was created and by whom.
Implementation with M5Stack
The following is an example implementation of M5Stack.

Code
Here is the program.
| #include <HTTPClient.h> #include <WiFi.h> #include <M5Core2.h> #include “Arduino.h” #include <WiFiClientSecure.h> #include <Arduino_JSON.h> #ifndef WIFI_SSID #define WIFI_SSID “XXXXX” // WiFi SSID (2.4GHz only) #endif #ifndef WIFI_PASSWORD #define WIFI_PASSWORD “YYYYYYY” // WiFi Password #endif // Set your Static IP address IPAddress local_IP(192, 168, 1, 184); // Set your Gateway IP address IPAddress gateway(192, 168, 1, 1); IPAddress subnet(255, 255, 0, 0); HTTPClient http; WiFiClientSecure client; JSONVar obj1; JSONVar MyAuthInfo; bool getAuth =false; String Token; String url = “https://192.168.1.49:8443/identity-manager/api/v1/auth/token”; String CtrlxBasicUrl=”https://192.168.1.49:8443/automation/api/v1/”; String Url1r32Real=CtrlxBasicUrl+”plc/app/Application/realtime_data/GVL/data/r32Real”; String Url1i16Int=CtrlxBasicUrl+”plc/app/Application/realtime_data/GVL/data/i16Int”; void setup() { Serial.begin(115200); M5.begin(); M5.Lcd.fillScreen(BLACK); M5.Lcd.setCursor(10, 10); M5.Lcd.setTextColor(WHITE); M5.Lcd.setTextSize(1.9); M5.Lcd.printf(“Ethernet Interface:inited:)!\n”); WiFi.mode(WIFI_STA); delay(500); WiFi.config(local_IP, gateway, subnet); WiFi.begin(WIFI_SSID, WIFI_PASSWORD); while (WiFi.status() != WL_CONNECTED) { delay(1000); Serial.println(“Connecting…”); } M5.Lcd.printf(“IP is 192.168.1.184\n”); } void loop() { client.setInsecure(); M5.Lcd.fillRect(0,0,300,300,BLACK); if (!getAuth){ obj1[“name”]=”boschrexroth”; obj1[“password”]=”boschrexroth”; String result=JSON.stringify(obj1); Serial.println(result); M5.Lcd.drawString(“[HTTP] begin…\n”,0,0); http.addHeader(“Content-Type”, “application/json”); http.begin(client,url); int responseCode = http.POST(result); M5.Lcd.drawString(“[HTTP] POST…\n”,0,20); M5.Lcd.drawString(responseCode+”\n”,0,40); if (responseCode == 201){ getAuth=true; String body = http.getString(); Serial.println(body); JSONVar AuthInfo; AuthInfo=JSON.parse(body); String Token=AuthInfo[“access_token”]; MyAuthInfo[“Authorization”]=Token; } Serial.println(responseCode); http.end(); ; } bool Error=false; if (getAuth){ M5.Lcd.fillRect(0,0,300,300,BLACK); String s3=MyAuthInfo[“Authorization”]; String myToken=”Bearer “+s3; http.addHeader(“Authorization”, myToken); String url1=Url1r32Real; http.begin(client,url1); int responseCode = http.GET(); M5.Lcd.setTextColor(ORANGE); M5.Lcd.drawString(“[HTTP] GET…\n”,0,0); M5.Lcd.drawString(“r32Real\n”,0,10); M5.Lcd.drawString(String(responseCode)+”\n”,0,20); if (responseCode == 200){ String data = http.getString(); Serial.println(data); Serial.println(“Sent1”); M5.Lcd.drawString(data,0,40); } else{ getAuth=false; Error=true; } if (!Error){ String url2=Url1i16Int; http.begin(client,url2); Serial.println(“Sent2”); responseCode = http.GET(); M5.Lcd.setTextColor(YELLOW); M5.Lcd.drawString(“[HTTP] GET…\n”,0,60); M5.Lcd.drawString(“i16Int\n”,0,70); M5.Lcd.drawString(String(responseCode)+”\n”,0,80); if (responseCode == 200){ String data = http.getString(); M5.Lcd.drawString(data,0,100); Serial.println(data); } } } delay(1000); http.end(); } |
Define library
First, import the necessary library for the program.
| #include <HTTPClient.h> #include <WiFi.h> #include <M5Core2.h> #include “Arduino.h” #include <WiFiClientSecure.h> #include <Arduino_JSON.h> |
Define WIFI SSID/PASSWORD
The next step is to define the SSID and PASSWORD of the access point that you would like to connect.
| #ifndef WIFI_SSID #define WIFI_SSID “XXXXX” // WiFi SSID (2.4GHz only) #endif #ifndef WIFI_PASSWORD #define WIFI_PASSWORD “YYYYYYY” // WiFi Password #endif |
Configure IP
Configure the WIFI IP Address of your M5Stack Core2.
| // Set your Static IP address IPAddress local_IP(192, 168, 1, 184); // Set your Gateway IP address IPAddress gateway(192, 168, 1, 1); IPAddress subnet(255, 255, 0, 0); |
Object
Define the ObjectHTTPClient and WiFiClientSecure.
| HTTPClient http; WiFiClientSecure client; |
JSON Object
Object that processes JSON data to be replied or sent from Ctrlx VirtualCore.
| JSONVar obj1; JSONVar MyAuthInfo; |
Auth Operation Flag
True if Access_Token is successfully retrieved and does not send Access_Token POST request to Ctrlx VirtualCore Runtime again.
| bool getAuth =false; |
URL
Define the Token variables and URLs to be sent to the Ctrlx VirtualCore Runtime via REST API.
| String Token; String url = “https://192.168.1.49:8443/identity-manager/api/v1/auth/token”; String CtrlxBasicUrl=”https://192.168.1.49:8443/automation/api/v1/”; String Url1r32Real=CtrlxBasicUrl+”plc/app/Application/realtime_data/GVL/data/r32Real”; String Url1i16Int=CtrlxBasicUrl+”plc/app/Application/realtime_data/GVL/data/i16Int”; |
Setup Loop
Start up the WiFi, connect to the Access Point, and then perform the initial processing, including initializing the M5Stack screen.
| void setup() { Serial.begin(115200); M5.begin(); M5.Lcd.fillScreen(BLACK); M5.Lcd.setCursor(10, 10); M5.Lcd.setTextColor(WHITE); M5.Lcd.setTextSize(1.9); M5.Lcd.printf(“Ethernet Interface:inited:)!\n”); WiFi.mode(WIFI_STA); delay(500); WiFi.config(local_IP, gateway, subnet); WiFi.begin(WIFI_SSID, WIFI_PASSWORD); while (WiFi.status() != WL_CONNECTED) { delay(1000); Serial.println(“Connecting…”); } M5.Lcd.printf(“IP is 192.168.1.184\n”); } |
Main Loop
Get Token
Access_Token is retrieved from Ctrlx VirtualCore Runtime. If the response is 201, the request was successful and we will save the token.
| client.setInsecure(); M5.Lcd.fillRect(0,0,300,300,BLACK); if (!getAuth){ obj1[“name”]=”boschrexroth”; obj1[“password”]=”boschrexroth”; String result=JSON.stringify(obj1); Serial.println(result); M5.Lcd.drawString(“[HTTP] begin…\n”,0,0); http.addHeader(“Content-Type”, “application/json”); http.begin(client,url); int responseCode = http.POST(result); M5.Lcd.drawString(“[HTTP] POST…\n”,0,20); M5.Lcd.drawString(responseCode+”\n”,0,40); if (responseCode == 201){ getAuth=true; String body = http.getString(); Serial.println(body); JSONVar AuthInfo; AuthInfo=JSON.parse(body); String Token=AuthInfo[“access_token”]; MyAuthInfo[“Authorization”]=Token; } Serial.println(responseCode); http.end(); ; } |
Send Request
Finally, a GET request is sent with the Access_Token Key obtained earlier, and the JSON data will be displayed on the M5 Stack screen.
| bool Error=false; if (getAuth){ M5.Lcd.fillRect(0,0,300,300,BLACK); String s3=MyAuthInfo[“Authorization”]; String myToken=”Bearer “+s3; http.addHeader(“Authorization”, myToken); String url1=Url1r32Real; http.begin(client,url1); int responseCode = http.GET(); M5.Lcd.setTextColor(ORANGE); M5.Lcd.drawString(“[HTTP] GET…\n”,0,0); M5.Lcd.drawString(“r32Real\n”,0,10); M5.Lcd.drawString(String(responseCode)+”\n”,0,20); if (responseCode == 200){ String data = http.getString(); Serial.println(data); Serial.println(“Sent1”); M5.Lcd.drawString(data,0,40); } else{ getAuth=false; Error=true; } if (!Error){ String url2=Url1i16Int; http.begin(client,url2); Serial.println(“Sent2”); responseCode = http.GET(); M5.Lcd.setTextColor(YELLOW); M5.Lcd.drawString(“[HTTP] GET…\n”,0,60); M5.Lcd.drawString(“i16Int\n”,0,70); M5.Lcd.drawString(String(responseCode)+”\n”,0,80); if (responseCode == 200){ String data = http.getString(); M5.Lcd.drawString(data,0,100); Serial.println(data); } } } delay(1000); http.end(); } |
Result
You can see the results in this video.
Ctrlx.Using M5Stack to get data from Ctrlx Rest API with HTTPS Request
Useful Link
https://github.com/arduino-libraries/ArduinoHttpClient/blob/master/src/HttpClient.h
https://arduinogetstarted.com/tutorials/arduino-http-request
https://requests.readthedocs.io/en/latest/user/quickstart/
Source Code
Please Download the source code from my github:
https://github.com/soup01Threes/Ctrlx/tree/main/Example%20with%20Ctrlx%20Runtime%20REST%20API