今回の記事ではpfc-kbus-apiを使用しPLC RUNTIMEなしでPFC200 ControllerにインストールされてるIOモジュールの状態を収集し、出力モジュールの各ChannelをMQTT経由で更新します。
よろしくおねがいします。
Reference Link
http://soup01.com/ja/category/docker/
pfc-kbus-api
pfc-kbus-apiはMQTT プロトコルで WAGO PFC コントローラーの IO データの読み書きを可能にするオープンソースプロジェクトで、コントローラーの状態やIO値は、設定ファイルで指定されたレートで周期的に実行できます。
https://github.com/jessejamescox/pfc-kbus-api
以下は、pfc-kbus-apiによって受信データの例です:
| { “state”: { “reported”: { “node_id”: “PFC200”, “timestamp”: 1649356003, “switch_state”: “RUN”, “module_count”: 6, “modules”: { “module1”: { “pn”: 36865, “position”: 1, “type”: “DI”, “input_channel_count”: 2, “output_channel_count”: 0, “process_data”: { “inputs”: { “channel1”: { “value”: true, “label”: “myFirstLabeledChan” }, “channel2”: { “value”: false, “label”: “m1_input2” } } } } } } } } |
以下は、pfc-kbus-apiによって送信するデータの例です:
| { “state”: { “desired”: { “modules”: { “module2”: { “process_data”: { “outputs”: { “channel1”: { “value”: false } } } } } } } } |
Setup
Login as root
以下のUsernameとPasswordでRootをLoginします。wagoはDefault Passwordなので初LoginしたあとにRootのPasswordを変更してください。
| username: root password:wago |
Check docker installation
以下のコマンドでDockerのインストール状態を確認しましょう。
| docker info docker ps docker images |
Get prebuild pfc-kbus-api image
次は今回紹介するpfc-kbus-api imageを取得します。
| docker pull jessejamescox/pfc-kbus-api |
Environemnt Setup
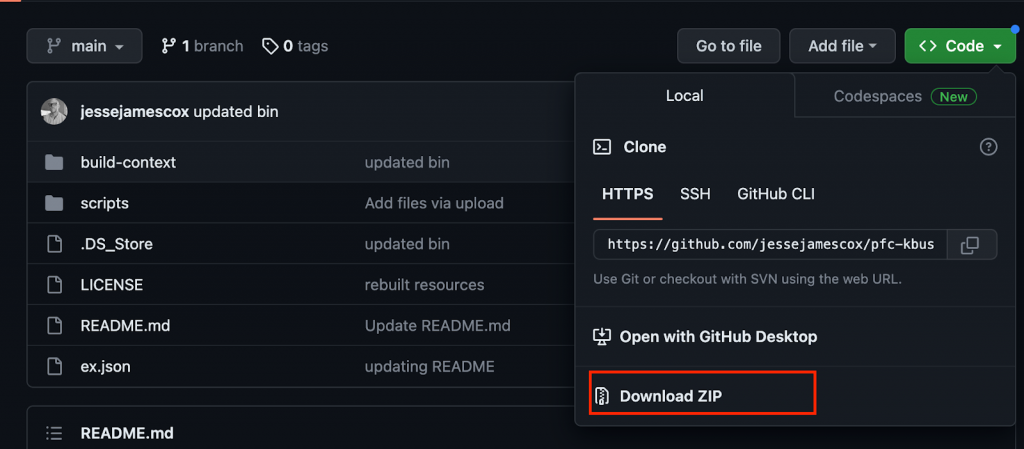
GithubからSetup shell scriptをDownlaodしてください。
https://github.com/jessejamescox/pfc-kbus-api
FTPなどのソフトを使ってFileをPFC Controllerに転送し、Fileが実行できるように権限を修正します。
| root@PFC200V3-44BD59:~ chmod +x setup_environment.sh |
そしてShell Scriptを実行します。
| root@PFC200V3-44BD59:~ ./setup_environment.sh Terminate Codesys3…done swith runtime to none…done stopping codesys3 webserver…done |
kbus-api MQTT Configure
kbbus-apiとMQTT Brokerの接続パラメータを変更します。
| root@PFC200V3-44BD59:~ nano /home/docker/volumes/kbusapidata/_data/kbus-api.cfg |
こちらは実際のConfigurationです。いくつか大事なパラメータを説明します。
| # The main configuration file for the Kbus <> MQTT # client service. Please configure all points. # The hostname or some unique identifier to the # MQTT broker. This will default to hostname. # If AWS shadaow compatibility is enabled, this will # be used as your thing name from the IoT Core # ** if blank, the controller hostname will be used *** node_id = “PFC200”; # Set the communication type. Enable the publish cyclic # in this state all messages are published to status topic # to publish the kbus on a set cycle. # DO NOT CHANGE – for future use publish_cyclic = true; # publish cycle in milliseconds. default is 100ms # performance with cloud broker may be unstable with # faster cycle speed publish_interval = 100; # The broker network address, this can be localhost # or an external device address mqtt_endpoint = “192.168.5.188”; # Mqtt broker port. The beta version only supports # non-TLS encrypted connections and no SSL config mqtt_port = 1883; # Use username and password for secure broker connections support_userpasswd = false; mqtt_username = “johnDoe”; mqtt_password = “myPassword”; # Maximum number of retries before the program exits # setting this to a negative number will loop infinitely max_retries = -1; # Setting this to true enables the TLS capabiltiy from # the client only. TLS is not currently supported by the # local broker. When enabled, you must have cert, key, # and rootCA paths mapped below support_tls = false; # direct path to your certificate #cert_path = “/etc/ssl/certs/mycert.pem.crt”; # direct path to your private key #key_path = “/etc/ssl/certs/mykey.pem.key”; # direct path to your rootCA certificate #rootca_path = “/etc/ssl/certs/root.ca.pem”; # setting this true formats the mqtt topics and payload # to comply with the AWS IoT Thing Shadow formatting support_aws_shadow = false; #TOPICS # subscribe topic for kbus events. publish to this topic # to command kbus outputs. Unless formatted to AWS Thing # Shadow, the topic will be prefixed with the Node ID. event_sub_topic = “/controller/kbus/event/outputs”; # publish topic for kbus events. subscribe to this topic # for messages on input change-of-state. Unless formatted # AWS Thing Shadow, the topic will be prefixed with the # Node ID. status_pub_topic = “/controller/status”; # setting this creates a deadband with analog input signals # which for now is the decimal value threshold you must # exceed to trigger an update to publish. See README for # instructions on how to set individual deadband for each channel default_analog_deadband = 10; |
こちらのNodeidは実際Topicの先頭付けになります。ルールはnode_id/your_topicの形になります。
| node_id = “PFC200”; |
こちらはMessageをPublishする周期を設定します。(100ms)
| publish_interval = 100; |
Brokerに接続するときLoginが必要な場合、そのUsernameとPasswordです。
| support_userpasswd = false; mqtt_username = “johnDoe”; mqtt_password = “myPassword”; |
WAGO PFC200からBrokerにsubscribeする Topic名です。Nodeidに先頭付けの組み合わせになると先ほども説明しました。ルールはnode_id/your_topicの形で、実際のTopicは、
PFC200/controller/kbus/event/outputsになります。
| event_sub_topic = “/controller/kbus/event/outputs”; |
WAGO PFC200からBrokerにPublicする Topic名です。Nodeidに先頭付けの組み合わせになると先ほども説明しました。ルールはnode_id/your_topicの形で、実際のTopicは、
PFC200/controller/statusになります。
| status_pub_topic = “/controller/status”; |
RUN
Containerを起動します。
| docker run -d –init \ –restart unless-stopped –privileged \ –network=host \ -v kbusapidata:/etc/kbus-api \ -v /var/run/dbus/system_bus_socket:/var/run/dbus/system_bus_socket \ jessejamescox/pfc-kbus-api |
Test Broker
Installation
今回はMACのMQTT Brokerを使用します。
brew
brewツールをインストールします。
| /bin/bash -c “$(curl -fsSL https://raw.githubusercontent.com/Homebrew/install/HEAD/install.sh)” |
Broker
次はMQTT Brokerをインストールします。
| brew install mosquitto |
setup
MQTT Brokerの設定を変更します。
| Chris-no-MacBook-Pro:~ chrischung$ nano /usr/local/etc/mosquitto/mosquitto.conf |
MQTT v3.1.1とV3.1に合わせるためにmax_keepalive 0を有効にします。
| # For MQTT v3.1.1 and v3.1 clients, there is no mechanism to tell the client # what keepalive value they should use. If an MQTT v3.1.1 or v3.1 client # specifies a keepalive time greater than max_keepalive they will be sent a # CONNACK message with the “identifier rejected” reason code, and disconnected. # max_keepalive 0 |
allow_anonymous trueはUsernameなしで接続します。
| allow_anonymous true # allow_zero_length_clientid # auto_id_prefix # password_file # plugin # plugin_opt_* # psk_file |
MQTT BrokerのPortは1883に設定します。
| # listener port-number [ip address/host name/unix socket path] listener 1883 |
RUN
Brokerを起動します。
| Chris-no-MacBook-Pro:~ chrischung$ /usr/local/sbin/mosquitto -c /usr/local/etc/mosquitto/mosquitto.conf -p 1883 |
Result
Done!Wago PFC200 Controllerからの接続が来ました。
| 1682559080: New connection from 192.168.5.58:46058 on port 1883. 1682559080: New client connected from 192.168.5.58:46058 as PFC200 (p2, c1, k0). |
Sub
もう1つのTerminalを開いて、PFC200/controller/status Topicをsubscribeしてみます。
| Chris-no-MacBook-Pro:~ chrischung$ mosquitto_sub -h 192.168.5.188 -t PFC200/controller/status |
Wiresharkからみると、192.168.5.58(WAGO PFC200)から192.168.5.188(自分のPC)にMQTT Packetsが流れているとわかります。
実施のTerminal出力です。各Channelの現在値を確認できます。
| { “state”: { “reported”: { “node_id”: “PFC200”, “timestamp”: 1682559258, “switch_state”: “RUN”, “module_count”: 4, “modules”: { “module1”: { “pn”: 34817, “position”: 1, “type”: “DI”, “input_channel_count”: 8, “output_channel_count”: 0, “process_data”: { “inputs”: { “channel1”: { “value”: true, “label”: “m1_input1” }, “channel2”: { “value”: false, “label”: “m1_input2” }, “channel3”: { “value”: false, “label”: “m1_input3” }, “channel4”: { “value”: false, “label”: “m1_input4” }, “channel5”: { “value”: false, “label”: “m1_input5” }, “channel6”: { “value”: false, “label”: “m1_input6” }, “channel7”: { “value”: false, “label”: “m1_input7” }, “channel8”: { “value”: false, “label”: “m1_input8” } } } }, “module2”: { “pn”: 34818, “position”: 2, “type”: “DO”, “input_channel_count”: 0, “output_channel_count”: 8, “process_data”: { “outputs”: { “channel1”: { “value”: false, “label”: “m2_output1” }, “channel2”: { “value”: false, “label”: “m2_output2” }, “channel3”: { “value”: false, “label”: “m2_output3” }, “channel4”: { “value”: false, “label”: “m2_output4” }, “channel5”: { “value”: false, “label”: “m2_output5” }, “channel6”: { “value”: false, “label”: “m2_output6” }, “channel7”: { “value”: false, “label”: “m2_output7” }, “channel8”: { “value”: false, “label”: “m2_output8” } } } }, “module3”: { “pn”: 597, “position”: 3, “type”: “AO”, “input_channel_count”: 0, “output_channel_count”: 8, “process_data”: { “outputs”: { “channel1”: { “value”: 0, “label”: “m3_output1” }, “channel2”: { “value”: 0, “label”: “m3_output2” }, “channel3”: { “value”: 0, “label”: “m3_output3” }, “channel4”: { “value”: 0, “label”: “m3_output4” }, “channel5”: { “value”: 0, “label”: “m3_output5” }, “channel6”: { “value”: 0, “label”: “m3_output6” }, “channel7”: { “value”: 0, “label”: “m3_output7” }, “channel8”: { “value”: 0, “label”: “m3_output8” } } } }, “module4”: { “pn”: 471, “position”: 4, “type”: “DX”, “input_channel_count”: 64, “output_channel_count”: 0, “process_data”: { “outputs”: { }, “inputs”: { “channel1”: { “value”: false, “label”: “m4_input1” }, “channel2”: { “value”: false, “label”: “m4_input2” }, “channel3”: { “value”: false, “label”: “m4_input3” }, “channel4”: { “value”: false, “label”: “m4_input4” }, “channel5”: { “value”: false, “label”: “m4_input5” }, “channel6”: { “value”: false, “label”: “m4_input6” }, “channel7”: { “value”: false, “label”: “m4_input7” }, “channel8”: { “value”: false, “label”: “m4_input8” }, “channel9”: { “value”: false, “label”: “m4_input9” }, “channel10”: { “value”: false, “label”: “m4_input10” }, “channel11”: { “value”: false, “label”: “m4_input11” }, “channel12”: { “value”: false, “label”: “m4_input12” }, “channel13”: { “value”: false, “label”: “m4_input13” }, “channel14”: { “value”: false, “label”: “m4_input14” }, “channel15”: { “value”: false, “label”: “m4_input15” }, “channel16”: { “value”: false, “label”: “m4_input16” }, “channel17”: { “value”: false, “label”: “m4_input17” }, “channel18”: { “value”: false, “label”: “m4_input18” }, “channel19”: { “value”: false, “label”: “m4_input19” }, “channel20”: { “value”: false, “label”: “m4_input20” }, “channel21”: { “value”: false, “label”: “m4_input21” }, “channel22”: { “value”: false, “label”: “m4_input22” }, “channel23”: { “value”: false, “label”: “m4_input23” }, “channel24”: { “value”: false, “label”: “m4_input24” }, “channel25”: { “value”: false, “label”: “m4_input25” }, “channel26”: { “value”: false, “label”: “m4_input26” }, “channel27”: { “value”: false, “label”: “m4_input27” }, “channel28”: { “value”: false, “label”: “m4_input28” }, “channel29”: { “value”: false, “label”: “m4_input29” }, “channel30”: { “value”: false, “label”: “m4_input30” }, “channel31”: { “value”: false, “label”: “m4_input31” }, “channel32”: { “value”: false, “label”: “m4_input32” }, “channel33”: { “value”: false, “label”: “m4_input33” }, “channel34”: { “value”: false, “label”: “m4_input34” }, “channel35”: { “value”: false, “label”: “m4_input35” }, “channel36”: { “value”: false, “label”: “m4_input36” }, “channel37”: { “value”: false, “label”: “m4_input37” }, “channel38”: { “value”: false, “label”: “m4_input38” }, “channel39”: { “value”: false, “label”: “m4_input39” }, “channel40”: { “value”: false, “label”: “m4_input40” }, “channel41”: { “value”: false, “label”: “m4_input41” }, “channel42”: { “value”: false, “label”: “m4_input42” }, “channel43”: { “value”: false, “label”: “m4_input43” }, “channel44”: { “value”: false, “label”: “m4_input44” }, “channel45”: { “value”: false, “label”: “m4_input45” }, “channel46”: { “value”: false, “label”: “m4_input46” }, “channel47”: { “value”: false, “label”: “m4_input47” }, “channel48”: { “value”: false, “label”: “m4_input48” }, “channel49”: { “value”: false, “label”: “m4_input49” }, “channel50”: { “value”: false, “label”: “m4_input50” }, “channel51”: { “value”: false, “label”: “m4_input51” }, “channel52”: { “value”: false, “label”: “m4_input52” }, “channel53”: { “value”: false, “label”: “m4_input53” }, “channel54”: { “value”: false, “label”: “m4_input54” }, “channel55”: { “value”: false, “label”: “m4_input55” }, “channel56”: { “value”: false, “label”: “m4_input56” }, “channel57”: { “value”: false, “label”: “m4_input57” }, “channel58”: { “value”: false, “label”: “m4_input58” }, “channel59”: { “value”: false, “label”: “m4_input59” }, “channel60”: { “value”: false, “label”: “m4_input60” }, “channel61”: { “value”: false, “label”: “m4_input61” }, “channel62”: { “value”: false, “label”: “m4_input62” }, “channel63”: { “value”: false, “label”: “m4_input63” }, “channel64”: { “value”: false, “label”: “m4_input64” } } } } } } } } |
Pub
次はまた別のTerminalを開いて、WAGO PFC200の出力を更新してみます。
| Chris-no-MacBook-Pro:~ chrischung$ mosquitto_pub –h 192.168.5.188 -t PFC200/controller/kbus/event/outputs –m {‘”state”: {“desired”: {“modules”: {“module2”: {“process_data”: {“outputs”: {“channel4”: {“value”: true}}}}}}}’} |
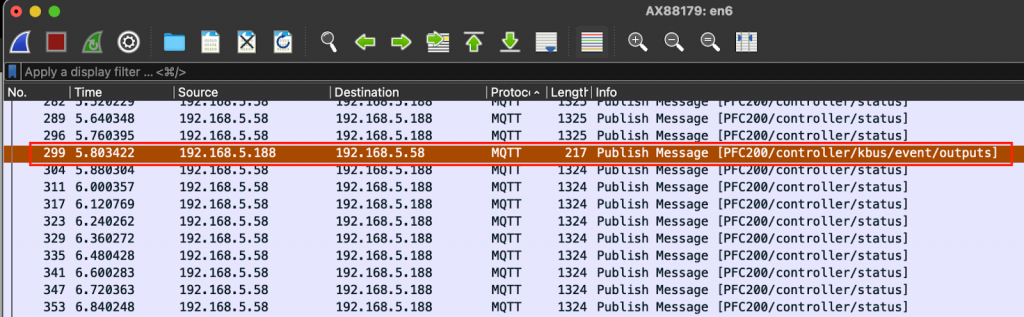
Wiresharkからみると、192.168.5.188(WAGO PFC200)から192.168.5.58(自分のPC)にMQTT Packetsが流れているとわかります、そしてPFC200 2番めの出力モジュール、Channel4がTrueになります。
Startup IO
Wago.PFC200 Startup IO With out PLC Runtime
Flashing Output
Wago.PFC 200 Flashing output without PLC Runtime
Error-Invalid arguments provided.
max_keepalive=0で解決できます。
| 1682557698: New client connected from 192.168.5.58:45916 as PFC200 (p2, c1, k0). 1682557698: Bad socket read/write on client PFC200: Invalid arguments provided. |
Error-Starting in local only Mode
以下の設定で解決できます。
| allow_anonymous true listener 1883 |
Mosquittoバージョン2.0.0のリリース以降、より安全なデフォルトの設定でlocalhostにのみバインドするようになりました。
他のマシンからブローカーにアクセスしたい場合は、設定ファイルに編集して、外部IPアドレス(または0.0.0.0)にバインドする新しいリスナーを追加するか、デフォルトリスナーのバインドエントリを追加する必要があります。
また、デフォルトでは localhost からの匿名接続(ユーザー名/パスワードなし)しか許可しませんが、リモートからの匿名接続を許可するようにしてください。
https://stackoverflow.com/questions/65278648/mosquitto-starting-in-local-only-mode