この記事ではPythonを使用しMQTT Clientを実装する方法を紹介します。ちなみにBroker側はRaspberry-pi3を使用します。
Install Broker
Raspberry操作するとき役に立つLink:
RaspberryからBrokerビルドする方法:
もsBrokerから接続拒否されたら:
Install Python Library
まずMQTT ClientのLibraryをインストールします。
| pip install paho-mqtt |
https://www.eclipse.org/paho/index.php?page=clients/python/index.php
https://www.eclipse.org/paho/index.php?page=clients/python/docs/index.php
Main Functions used
connect()
| connect(host, port=1883, keepalive=60, bind_address=””) |
connect() 関数はBrokerに接続します。
- host
- BrokerのhostnameやIP address
- port
- Brokerの接続Port. Defaults は 1883.
- keepalive
- Brokerと接続する最大時間(秒)
- bind_address
- Local network interfaceのIP
- Callback
- .BrokerからCONNACKのReturn Messageが来るときのCallBack関数。
disconnect()
| disconnect() |
Brokerと接続を切断します。
publish()
| publish(topic, payload=None, qos=0, retain=False) |
Brokerにメッセージを送る。
argumentsは以下になります:
- topic
- MessageのTopic
- payload
- Publish のmessage
- qos
- quality of service
- retain
- True,Message= “last known good”
MQTTMessageInfoの戻り:
- rc
- publishing.の結果
- MQTT_ERR_SUCCESS=成功
- MQTT_ERR_NO_CONN=未接続
- MQTT_ERR_QUEUE_SIZE =max_queued_messages_set使用
- publishing.の結果
- mid
- message ID
- wait_for_publish()
- block until the message is published.
- is_published
- True=MessageがPublishedされた
Callback (publish)
MessageがPublishされたら生成されるCallBack関数
subscribe()
| subscribe(topic, qos=0) |
TopicをSubscribe する関数。
- topic
- subscribeするTopic
- qos
- quality of service.
Callback (subscribe)
SubscribeがBrokerからAckされたら生成されるCallBack関数
Callbacks
on_connect()
| on_connect(client, userdata, flags, rc) |
Brokerから接続OKの返事がきたときのCall Back関数.
- client
- the client instance
- userdata
- the private user data as set in Client() or user_data_set()
- flags
- response flags
- rc
- connection 結果
on_message()
| on_message(client, userdata, message) |
Called when a message has been received on a topic.
Message受信されたときのCall Back関数.
- client
- the client instance
- userdata
- the private user data as set in Client() or user_data_set()
- message
- MQTTMessageのinstance . members topic, payload, qos, retainが含まれているClassです。
on_publish()
| on_publish(client, userdata, mid) |
publish() call が完了したときのCall Backの関数。
on_subscribe()
| on_subscribe(client, userdata, mid, granted_qos) |
BrokerからsubscribeのTopic返事がきたときのCall Back関数です。
Implement a Subscriber
以下はSubscriberを実装するPython Scriptです。Topicは’RoboDK/Station/#’になります。
| import paho.mqtt.client as mqtt import time def on_connect(client,userdata,flag,rc): print(‘Connected with result code ‘+str(rc)) client.subscribe(‘RoboDK/Station/#’) def on_disconnect(client,userdata,rc): if rc !=0: print(‘Something Wrong..’) def on_message(client,userdata,msg): print(str(msg.payload)+’,’+msg.topic+’,’+str(msg.qos)) BROCKER_URL=’192.168.1.50′ BROCKET_PORT=1883 client=mqtt.Client() client.on_connect=on_connect client.on_disconnect=on_disconnect client.on_message=on_message client.connect(BROCKER_URL,BROCKET_PORT,60) count=0 while True: client.loop_forever() client.disconnect() |
Implement a Publisher
以下Publisherを実装するPython Scriptです。Topicは’RoboDK/Station/st1/Example’になります。
| import paho.mqtt.client as mqtt import time def on_connect(client,userdata,flag,rc): print(‘Connected with result code ‘+str(rc)) client.subscribe(‘RoboDK/Station/s1/Lamp/Red’) def on_disconnect(client,userdata,rc): if rc !=0: print(‘Something Wrong..’) def on_publish(client,userdata,mid): print(‘publish: {0}’.format(mid)) BROCKER_URL=’192.168.1.50′ BROCKET_PORT=1883 client=mqtt.Client() client.on_connect=on_connect client.on_disconnect=on_disconnect client.on_publish=on_publish client.connect(BROCKER_URL,BROCKET_PORT,60) count=0 while count<100: ret=client.publish(‘RoboDK/Station/st1/Example’,str(count)) count=count+1 time.sleep(0.1) client.disconnect() |
Result
まずPublisherを実行し、MessageをBrokerにPublishします。

最初はTeraterm を使用しRaspberry piアクセスし、以下のコマンドを実行しsubscriberを生成します。
| mosquitto_sub -d -t RoboDK/Station/st1/# |
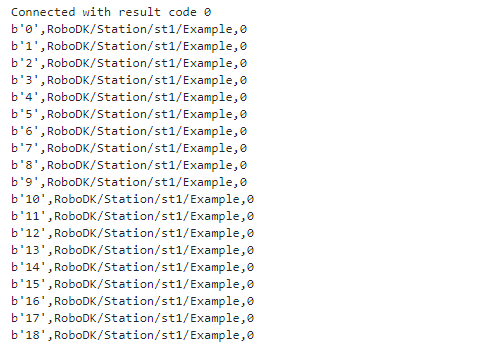
The result is output from the Terminal.

次はSubscriberのPython Scriptを実行すると、Publisherからのメッセージが受信できるようになります。