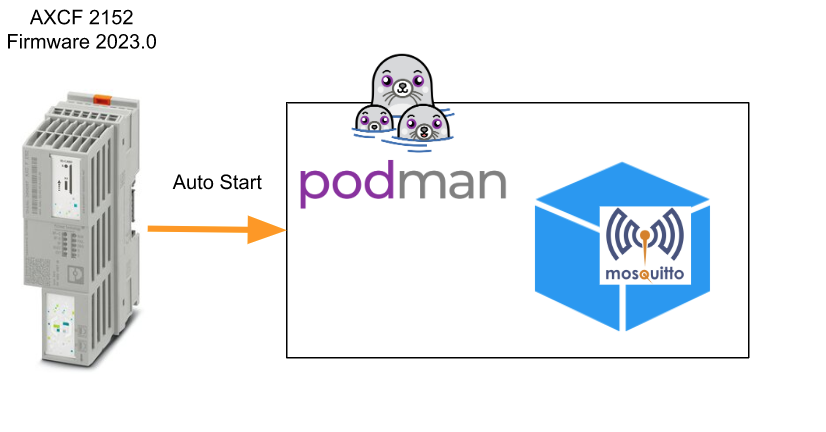
この記事ではPLCNEXT AXCF 2152(Firmware2023.0)を電源入れるときに自動的にmosquittoのMQTT Brokerを起動する手順を説明します。よろしくおねがいします。
Before Start..
最初はpodmanの公式ドキュメントを沿って構築しようと思いますが‥
https://podman.io/blogs/2018/09/13/systemd.html
| sudo systemctl enable redis.service sudo systemctl start redis.service |
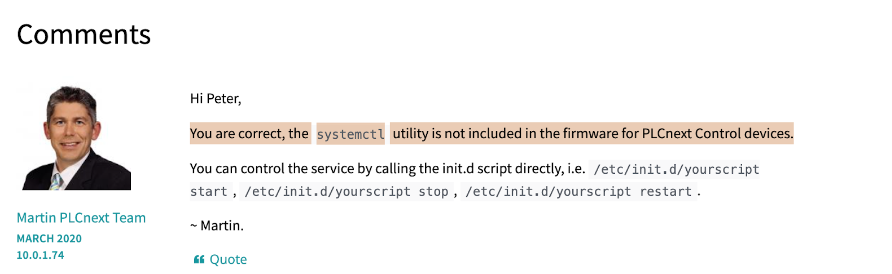
systemctrlコマンドがないとPLCNEXTに怒られました。
| root@axcf2152:/opt/plcnext/# systemctl sh: systemctl: command not found |
Martrin さんがsystemctrlはPLCNEXTがSupportしませんと言いました。
https://www.plcnext-community.net/forum/#/discussion/1184/controlling-the-openvpn-service
Reference Link
Start From Example
でも方法はまだいくらでもあります。今回はinit.dのFileを修正し、podmanを自動起動できるようにします。
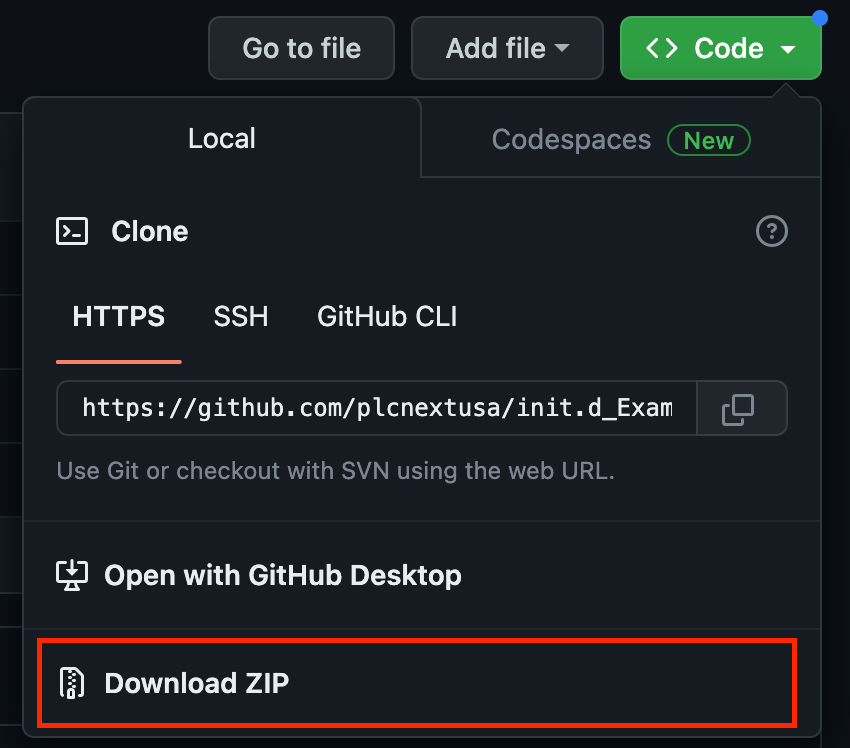
こちらのLinkからExampleをDownloadできます。
https://github.com/plcnextusa/init.d_Example
Be careful!
操作は注意深く。誤ったFileやFolderを削除してしまったらPLCNEXtが起動できなくなります。
Clone the Example
先程のLinkからFileをDownload>解凍し、WinSCPなどのSFTP Software経由でPLCNEXTにFileをすべて転送します。
| git clone https://github.com/plcnextusa/init.d_Example.git |
Installation
転送先は/opt/plcnext/です。
Login as Root
SSH Clientでroot loginしてください。
Change the permission
DownloadされたFileがすべて実行できるように権限を編集します。
| root@axcf2152:chmod +x install.sh python.sh helloworld.py |
Execute the Shell Script
install.shを実行すればOKです。
| root@axcf2152:./install.sh |
Check the Log Files
ExampleではPython ScirptがCPU立ち上げたときに自動的に実行し10秒一回でhello.logにテキストを書き込むプログラムです。
| root@axcf2152:/opt/plcnext/# ls logs/ Output.log default.sqlite plcnextapp.log uatrace.log uatrace_2.log uatrace_4.log watchdogDaemon Output.log.lock hello.log security.sqlite uatrace_1.log uatrace_3.log uatrace_5.log |
hello.logを開いて確認してみましょう。
| root@axcf2152:cat /opt/plcnext/logs/hello.log |
| root@axcf2152:/opt/plcnext/# cat logs/hello.log [2023-04-18T21:49:22] INFO [root.<module>:16] Hello from init.d! [2023-04-18T21:49:32] INFO [root.<module>:16] Hello from init.d! [2023-04-18T21:49:42] INFO [root.<module>:16] Hello from init.d! [2023-04-18T21:49:52] INFO [root.<module>:16] Hello from init.d! [2023-04-18T21:50:02] INFO [root.<module>:16] Hello from init.d! |
Auto Start Mqtt Podman
基本動作が確認されたら次はMQTT Brokerを自動に起動できるように設定します。
Broker images
まずはBroker Containerを構築します。
structure
Folderの構造です。
| ├── docker-compose.yml ├── mosquitto └── config └── mosquitto.conf |
docker-compose.yml
Docker fileの中身です。
| version: “3” services: mqtt: image: eclipse-mosquitto container_name: mqtt expose: – 1883 ports: – 1883:1883 restart: unless-stopped volumes: – ./mosquitto/config:/mosquitto/config |
mosquitto.conf
MQTT Brokerの設定Fileになります。
| set_tcp_nodelay true listener 1883 allow_anonymous true max_queued_messages 0 |
change rights
ContainerをBuildする前にすべてのFileを実行できるように権限を編集します。
| chmod +x |
build
ContainerをBuildします。
| docker-compose up |
startup.sh
Shell ScriptにMQTT Containerを起動するコマンドなどが入っています。
| #!/bin/sh echo “Hello start” >> /opt/plcnext/log.txtpodman network create podmanpodman start mqttpodman start mqttpodman start mqttpodman start mynoderedecho “end…” >> /opt/plcnext/log.txt |
Update the python.sh
python.shを編集します。
DAEMON=$DIR/startup.shを変更し実行するFileをstarup.shます。
DAEMON_USER=rootを変更し実行するUserをrootにします。
| #!/bin/sh ### BEGIN INIT INFO # Provides: myservice # Required-Start: $remote_fs $syslog # Required-Stop: $remote_fs $syslog # Default-Start: 2 3 4 5 # Default-Stop: 0 1 6 # Short-Description: Put a short description of the service here # Description: Put a long description of the service here ### END INIT INFO # Change the next 3 lines to suit where you install your script and what you want to call it DIR=/opt/plcnext DAEMON=$DIR/startup.sh DAEMON_NAME=hello2 # Change the uuser that runs the script if accessing files. Otherwise keep as admin. DAEMON_USER=root # The process ID of the script when it runs is stored here: PIDFILE=/var/run/$DAEMON_NAME.pid do_start () { # Starts the daemon (our python script) in the background with the configured DAEMON_USER start-stop-daemon –start –background –pidfile $PIDFILE –make-pidfile –user $DAEMON_USER –chuid $DAEMON_USER –startas $DAEMON — $DAEMON_OPTS } do_stop () { # Starts the daemon (our python script) based to the process id, after 10 retries it just kills the process start-stop-daemon –stop –pidfile $PIDFILE –retry 10 } #keys to call the script, e.g. ./pystart.sh start case “$1” in start|stop) do_${1} ;; restart|reload|force-reload) do_stop do_start ;; *) echo “Usage: /etc/init.d/$DAEMON_NAME {start|stop|restart}” exit 1 ;; esac exit 0 |
Updating your init.d service
将来にまたScriptなどを変更した場合、もしCPUを再起動したくないなら、以下のコマンドでServicesだけを再起動することも可能です。
| /etc/init.d/python.sh restart |
Check MQTT Docker
Done!再起動したらMQTT Brokerが自動的に起動しました。
| root@axcf2152:/opt/plcnext/# podman ps CONTAINER ID IMAGE COMMAND CREATED STATUS PORTS NAMES 34fa7e1faf20 docker.io/library/eclipse-mosquitto:latest /usr/sbin/mosquit… 17 hours ago Up 18 minutes ago 0.0.0.0:1883->1883/tcp mqtt |
Uninstalling the example
先程インストールしたExample Fileを削除するには以下のコマンドを実行してください。
| update-rc.d –f python.sh remove rm -r python.sh |
Be careful!
注意するのはPLCNEXTの init.d にあるServicesを削除する前、その削除先を確認してください。必要なServiceを削除した場合PLCNEXTは起動できなくなります。
What is inide the ?
最後にInstall.shの中身を少し説明します。
Install.sh
| #!/bin/bash echo “Starting install process…. Please wait…” echo “Changing permissions for execution” chmod +x /opt/plcnext/helloworld.py chmod +x /opt/plcnext/python.sh echo “Setting up init.d” cp –a /opt/plcnext/python.sh /etc/init.d/ cd /etc/init.d/ update-rc.d python.sh defaults ./python.sh start rm -r /opt/plcnext/python.sh echo “Removing residual files” cd /opt/plcnext/ rm -r README.md rm -r install.sh echo “Log file for errors is hello.log in the /opt/plcnext/logs folder.” echo “Install complete!” |
“#!/bin/bash” は、シェルスクリプトの最初の行に書かれる特別なコメントで、シェルがどのプログラムを使ってスクリプトを実行するべきかを示すために使用されます。この場合、Bashシェルを使用してスクリプトを実行するように指示しています。
| #!/bin/bash |
Fileの実行権限を実行できるように修正します。
| chmod +x /opt/plcnext/helloworld.py chmod +x /opt/plcnext/python.sh |
Fileを/etc/init.d/に移動し、作業Directoyを/etc/init.d/に変わります。
| cp –a /opt/plcnext/python.sh /etc/init.d/ cd /etc/init.d/ |
“update-rc.d”は、DebianやUbuntuなどのLinuxディストリビューションで使用されるinitスクリプトの管理ツールです。initスクリプトは、Linuxシステムが起動するときに自動的に実行されるプログラムであり、各ランレベルに対して実行される特定のサービスを開始または停止するために使用されます。
“update-rc.d”は、initスクリプトを管理するためのコマンドラインユーティリティで、スクリプトの有効化、無効化、削除などのタスクを実行することができます。
以下のExampleは、python.shのinitスクリプトをランレベルに登録し、システムが起動するときに自動的にpython.shを開始するためのシンボリックリンクを作成します。
| update-rc.d python.sh defaults ./python.sh start rm -r /opt/plcnext/python.sh |
最後は作業Directoryを/opt/plcnext/に戻り、不要なFileを削除する。
| cd /opt/plcnext/ rm -r README.md rm -r install.sh |
python.sh
次はpython.shです。
| #!/bin/sh ### BEGIN INIT INFO # Provides: myservice # Required-Start: $remote_fs $syslog # Required-Stop: $remote_fs $syslog # Default-Start: 2 3 4 5 # Default-Stop: 0 1 6 # Short-Description: Put a short description of the service here # Description: Put a long description of the service here ### END INIT INFO # Change the next 3 lines to suit where you install your script and what you want to call it DIR=/opt/plcnext DAEMON=$DIR/helloworld.py DAEMON_NAME=hello # Change the uuser that runs the script if accessing files. Otherwise keep as admin. DAEMON_USER=admin # The process ID of the script when it runs is stored here: PIDFILE=/var/run/$DAEMON_NAME.pid do_start () { # Starts the daemon (our python script) in the background with the configured DAEMON_USER start-stop-daemon –start –background –pidfile $PIDFILE –make-pidfile –user $DAEMON_USER –chuid $DAEMON_USER –startas $DAEMON — $DAEMON_OPTS } do_stop () { # Starts the daemon (our python script) based to the process id, after 10 retries it just kills the process start-stop-daemon –stop –pidfile $PIDFILE –retry 10 } #keys to call the script, e.g. ./pystart.sh start case “$1” in start|stop) do_${1} ;; restart|reload|force-reload) do_stop do_start ;; *) echo “Usage: /etc/init.d/$DAEMON_NAME {start|stop|restart}” exit 1 ;; esac exit 0 |
実行するUserを設定します。
| DAEMON_USER=admin |
PIDFILEを設定します。
| PIDFILE=/var/run/$DAEMON_NAME.pid |
“start-stop-daemon”は、Unix系オペレーティングシステムでデーモンプロセスを起動、停止、再起動するためのツールです。デーモンプロセスは、バックグラウンドで実行される常駐型のプロセスであり、システムの管理やサービス提供などの様々なタスクを担当します。
- –start: デーモンプロセスを開始することを指定します。
- -b, –background: デーモンプロセスをバックグラウンドで実行することを指定します。
- -m, –make-pidfile: プロセスIDファイルを作成することを指定します。
- -p, –pidfile PIDFILE: プロセスIDファイルの場所を指定します。
- -c, –chuid USER:GROUP: デーモンプロセスを実行するユーザーとグループを指定します。
- -d, –chdir DIR: デーモンプロセスが実行されるディレクトリを指定します。
- -e, –exec EXEC: デーモンプロセスを開始するための実行可能ファイルを指定します。
- -u, –user USER: デーモンプロセスを実行するユーザーを指定します。
- -g, –group GROUP: デーモンプロセスを実行するグループを指定します。
- -s, –signal SIGNAL: デーモンプロセスに送信するシグナルを指定します。
- -k, –stop: デーモンプロセスを停止することを指定します。
- -n, –name NAME: デーモンプロセスの名前を指定します。
- -R, –retry RETRY: リトライ回数を指定します。
- –oknodo: プロセスが既に実行中の場合に何もせずに成功とします。
- –startas STARTAS: 新しいプロセスの名前を指定します。
- –test: コマンドを実行せず、デバッグ情報を表示します。
- –version: バージョン情報を表示します。
これらのオプションを組み合わせると、デーモンプロセスを開始、停止、再起動、制御することができます。
| start–stop–daemon —start —background —pidfile $PIDFILE —make–pidfile —user $DAEMON_USER —chuid $DAEMON_USER —startas $DAEMON — $DAEMON_OPTS |
startup.sh
実行するコマンドを記載するだけです。
| #!/bin/sh echo “Hello start” >> /opt/plcnext/log.txtpodman network create podmanpodman start mqttpodman start mqttpodman start mqttpodman start mynoderedecho “end…” >> /opt/plcnext/log.txt |
Useful link
https://www.plcnext.help/te/Service_Components/Using_OCI_containers.htm