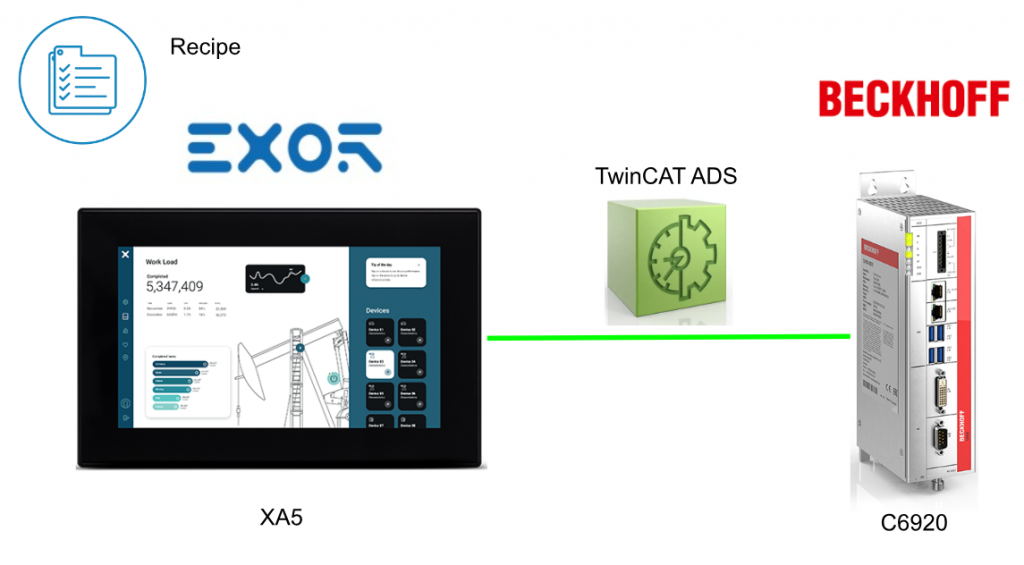
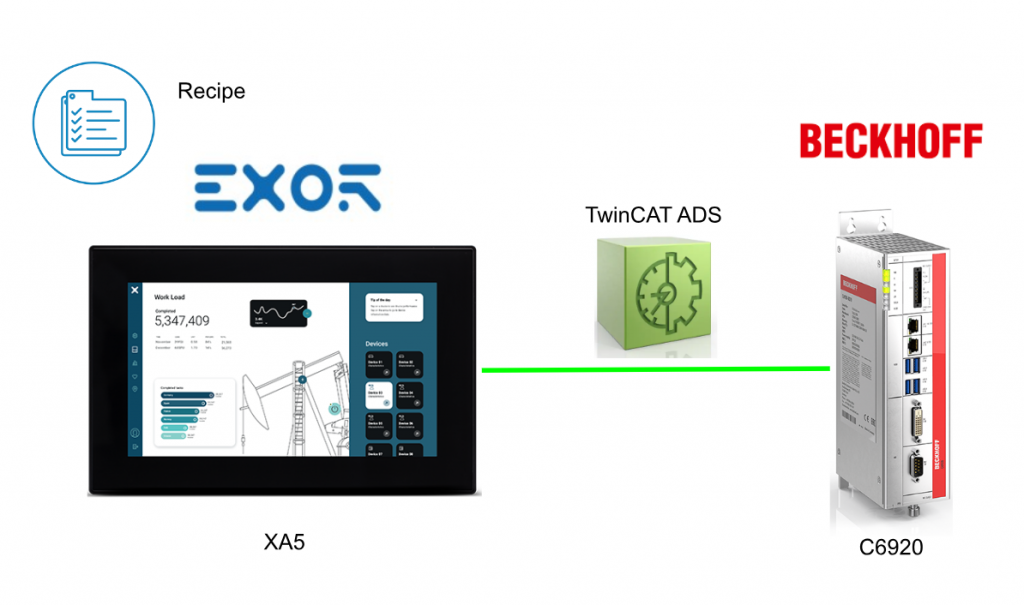
In this article, we will explain the basic concept of ADS communication and the configuration between EXOR panels and Beckhoff TwinCAT PLCs , but also introduce recipe functions.
Let’s start!
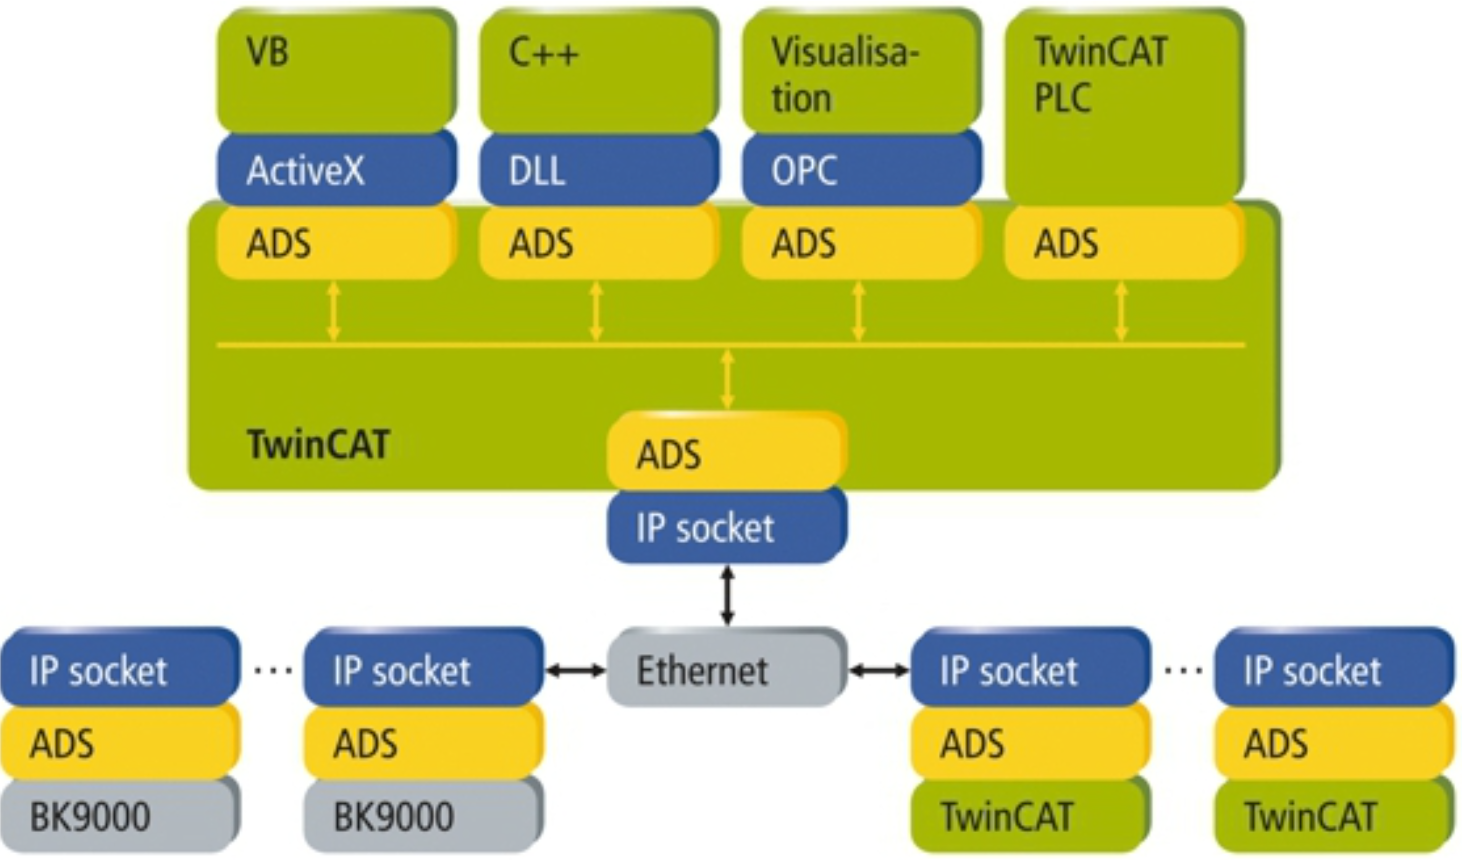
ADS
The ADS protocol (ADS: Automation Device Specification) was developed for data communication between different software modules at the transport layer within the TwinCAT system.
This protocol allows communication with other tools from anywhere within TwinCAT, and if it is necessary to communicate with another PC or device, the ADS protocol is used on top of TCP/IP. Within a networked system, all data can be accessed from any point.
Device concept
The TwinCAT system architecture allows individual software modules (TwinCAT PLC, HMI, etc.) to be treated as independent devices.
Each task has a software module (“server” or “client”).
The server in the system is a “device” running in the form of software, whose behavior is exactly the same as a hardware device.
A “client” is a program that requests the services of a “server”, for example a visualization or even a “programming device” in program form. The fact that TwinCAT can always add new servers and clients for tasks such as camshaft controllers, oscilloscopes, PID controllers, etc. is another proof of its continued growth.
Messages between these objects are exchanged through the ADS (Automation Device Specification) interface by the “message router”. The “message router” is responsible for all intra-system and over TCP/IP connections for It manages and distributes messages.
In addition, a TwinCAT “message router” is present on all TwinCAT devices.
This allows all TwinCAT server and client programs to exchange commands and data, send messages and transfer status information.

Implementation-1
First, the EXOR Panel and Beckhoff TwinCAT must be connected by Configure a message router, which is necessary to test the connection.
EXOR Side
Add Protocol
Configure the protocol in Droplist from Configuration>Protocols.
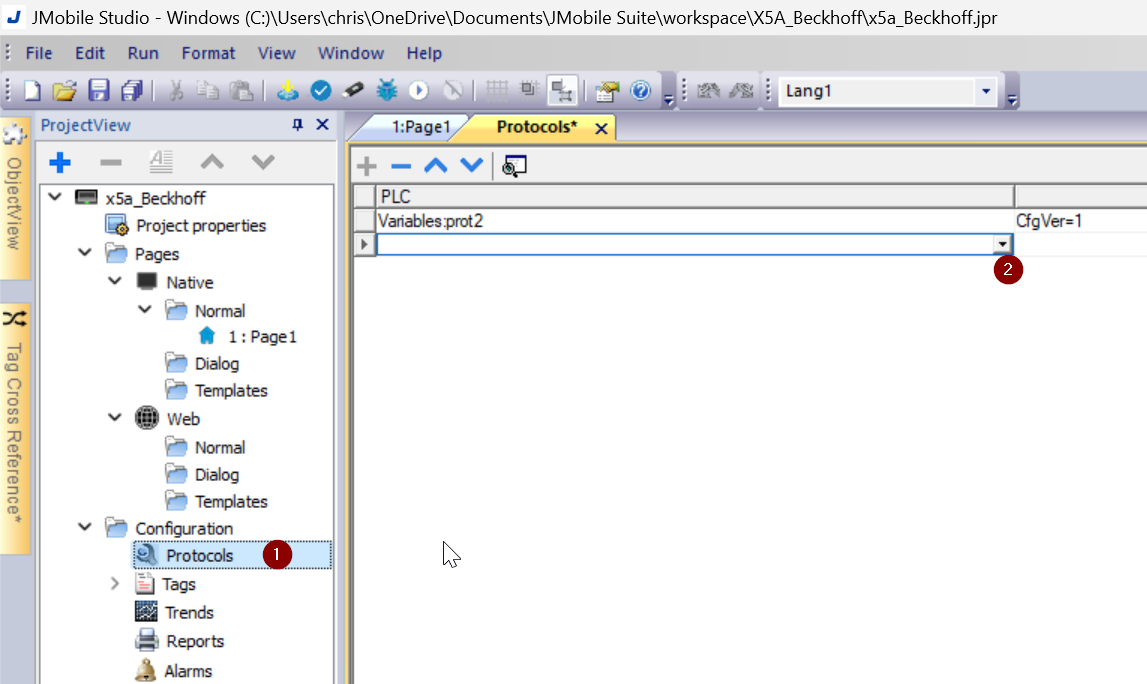
Select Beckhoff ADS from the Drop-List.
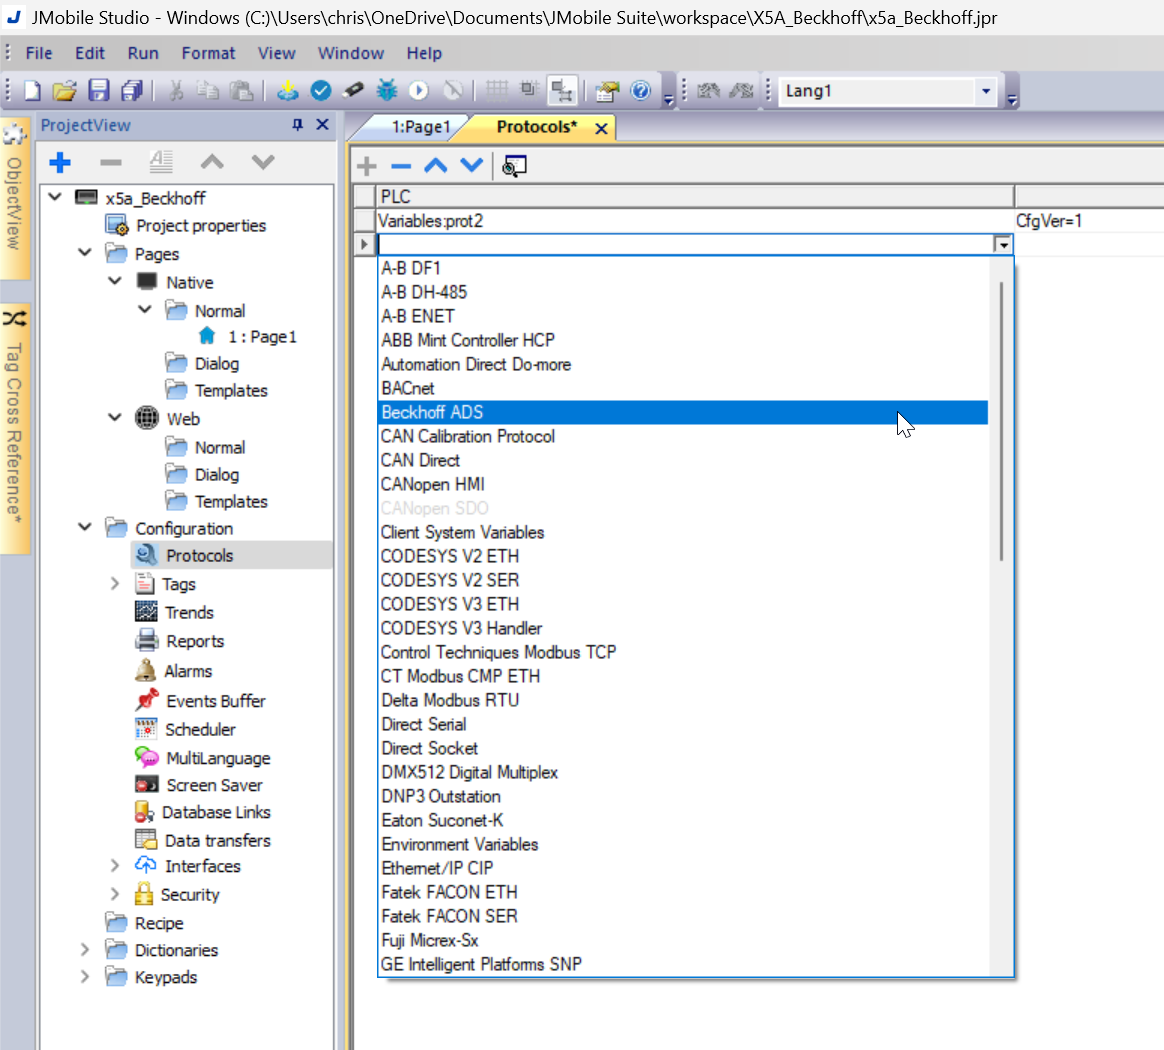
EXOR’s Beckhoff ADS communication settings screen appears.
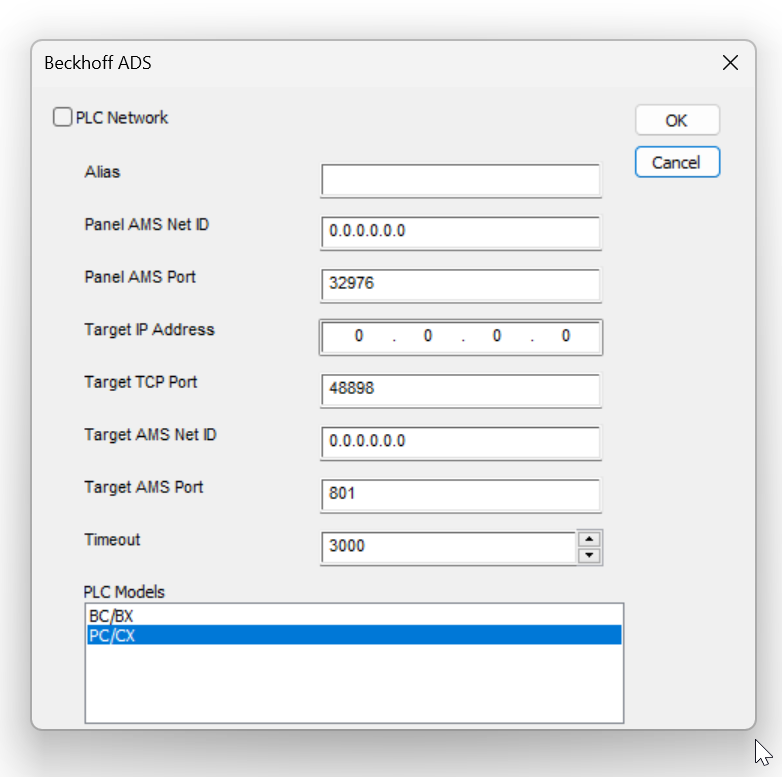
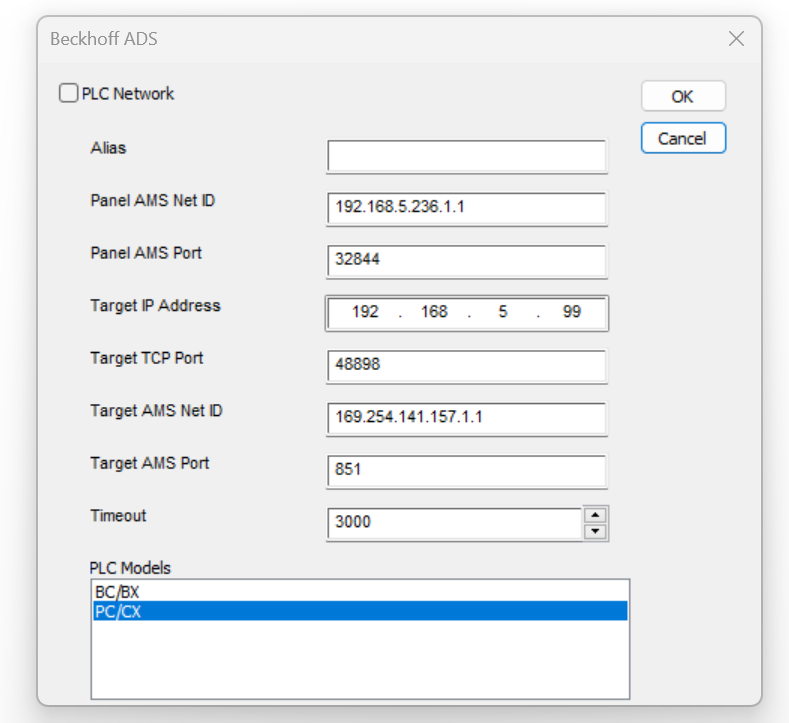
Panel AMS Net ID
Panel AMS Net ID is the AMS Net ID of the EXOR panel itself.
Configuration Format with Panel IP.1.1.

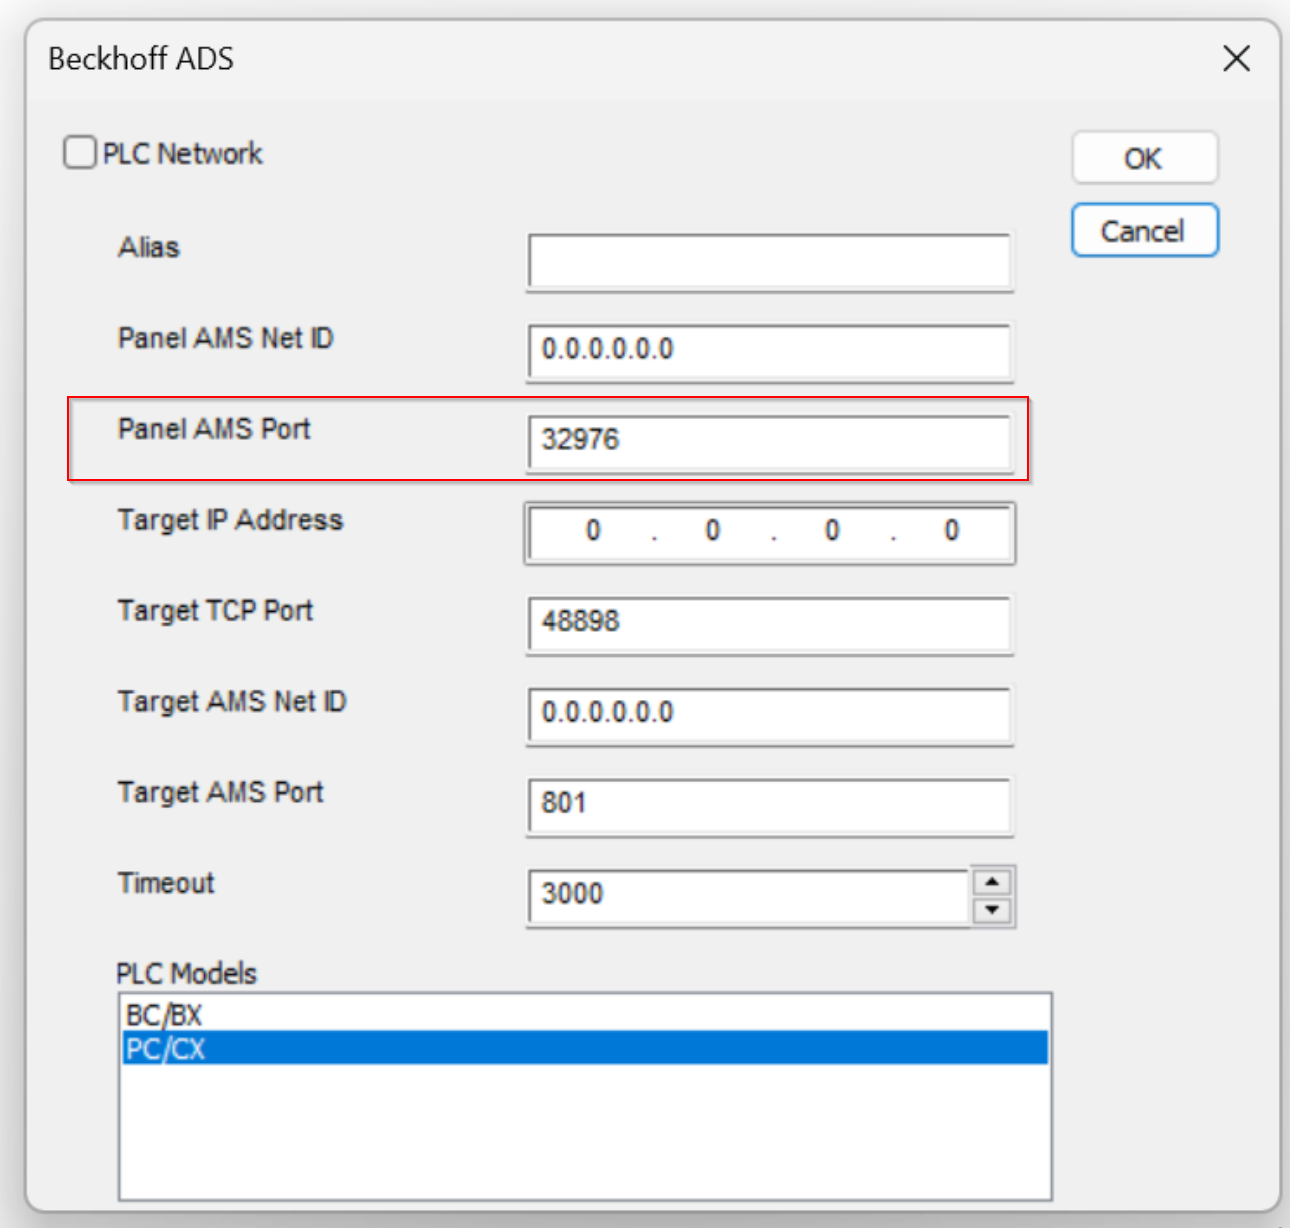
Panel AMS Port
Specifies the AMS port number used by the panel.
- When using TwinCAT2, the default panel AMS port is 32976.
- When using TwinCAT3, the default panel AMS port is 32844.
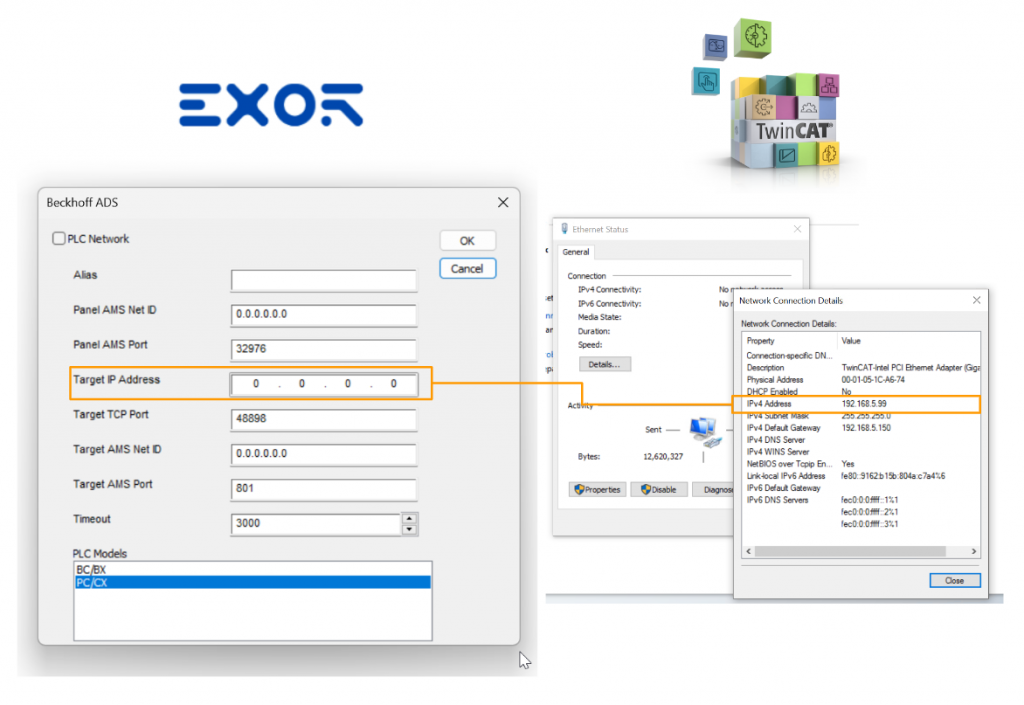
Target IP Address
Defines this field with the IP address of the Beckhoff IPC.
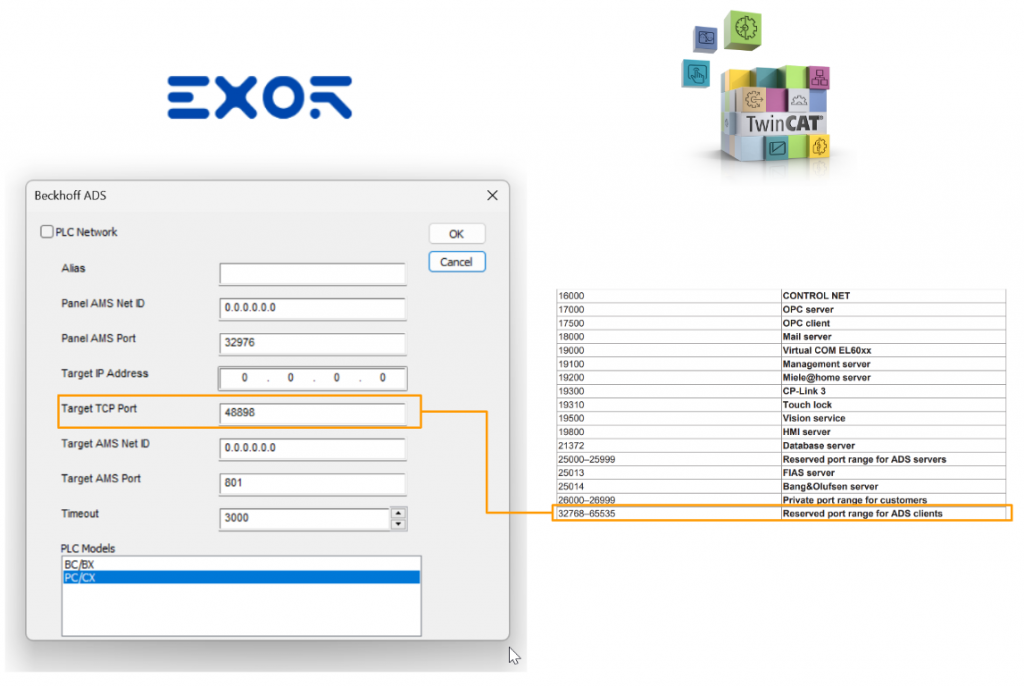
Taget TCP Port
Set the TCP Port for Beckhoff TwinCAT Runtime.
Default is 48898, but 32768 to 65535 are reserved ports for ADS Client connections.
Target AMS Net ID
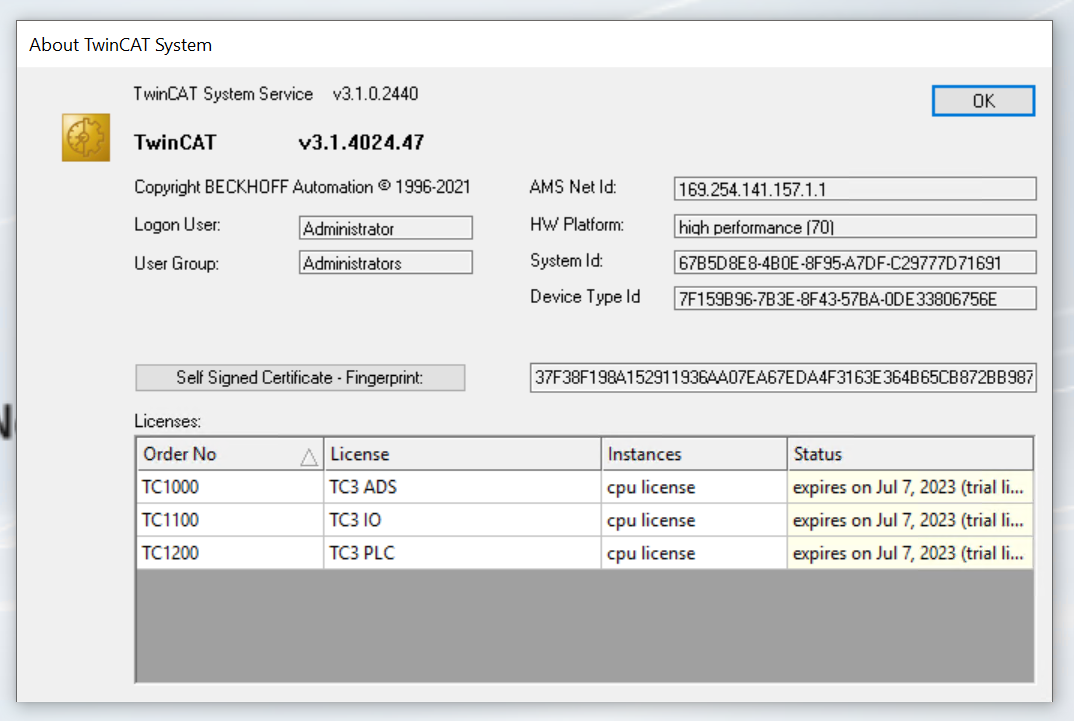
The Target AMS Net ID can be found on the About TwinCAT System screen in TwinCAT Runtime.
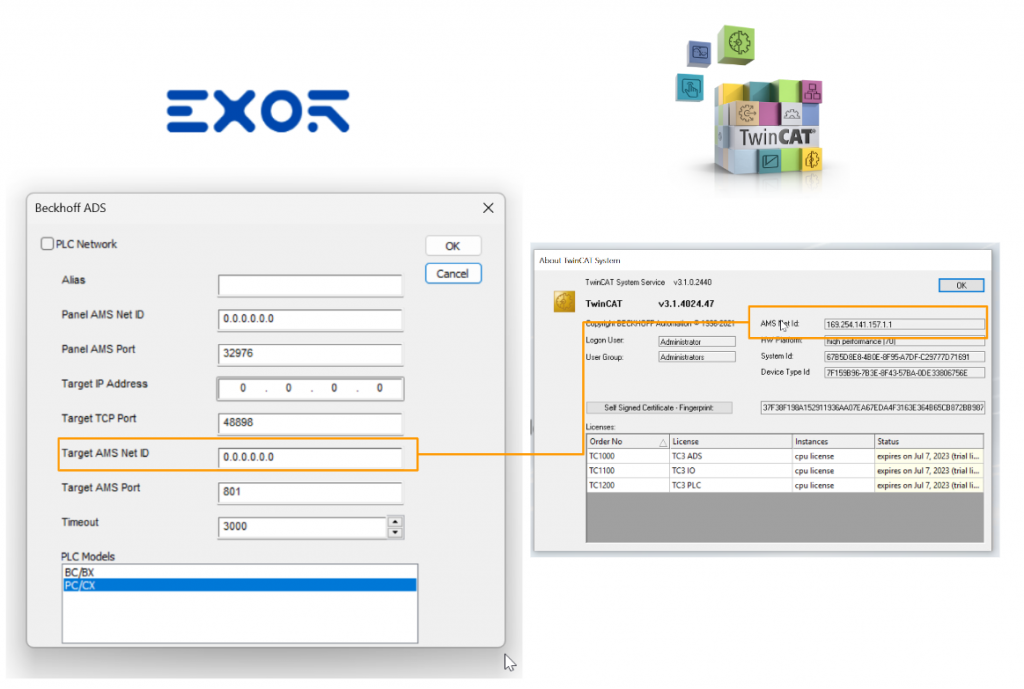
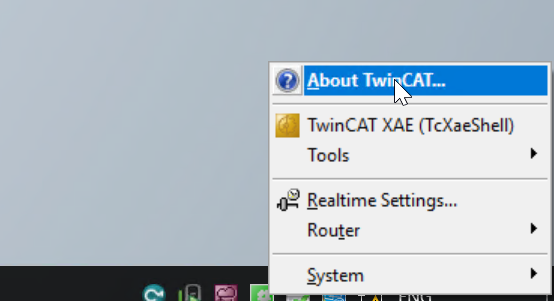
How can you find it?
To check AMS Net ID, open About TwinCAT in the IPC where TwinCAT Runtime is installed.
The AMS Net Id can be found on the About TwinCAT System screen.
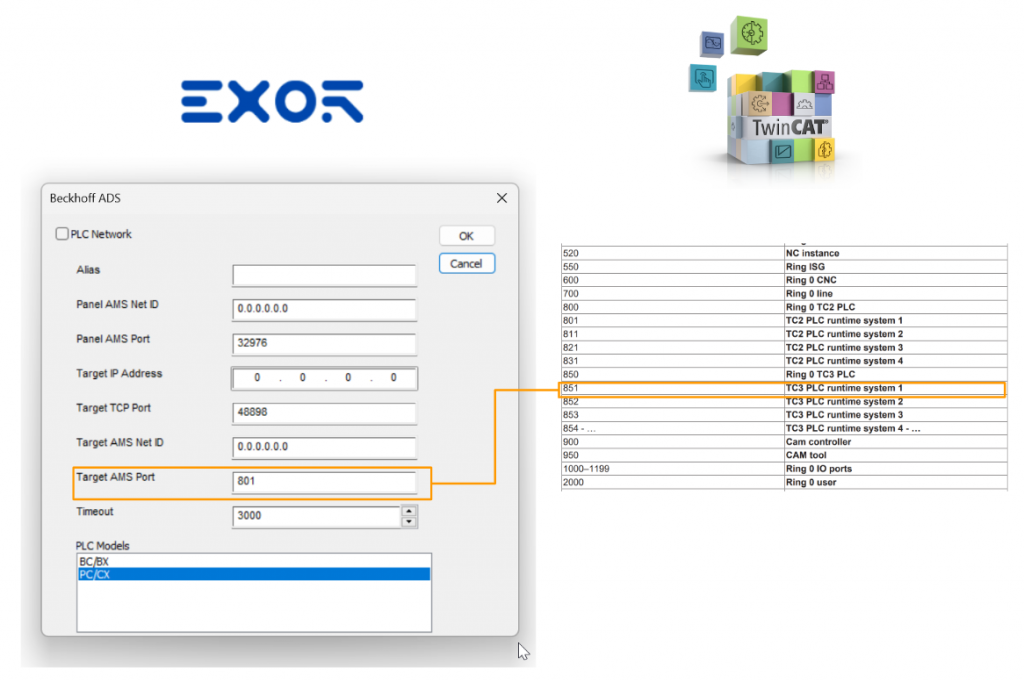
Target AMS Port
Set the AMS Port for the TwinCAT system.
- When using TwinCAT2, the default target AMS port is 801.
- When using TwinCAT3, the default target AMS port is 851.
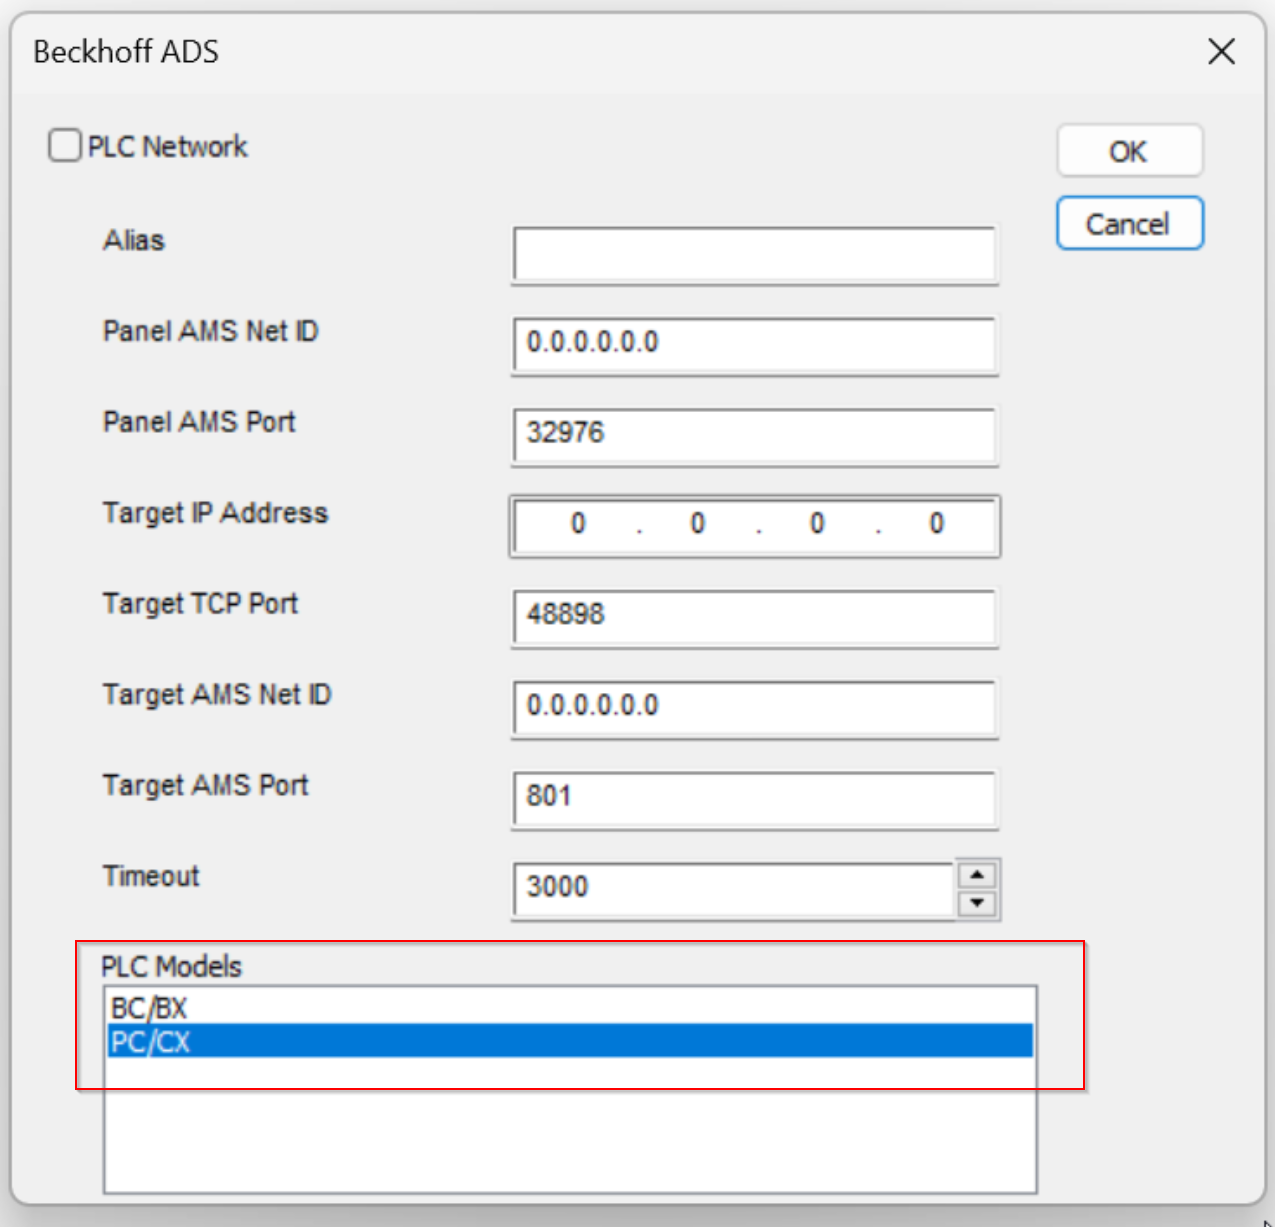
PLC models
Select a model that is compatible with the device to be connected. Model selection is very important for correct setup.
Summary
This is the Beckhoff ADS connection setup on the EXOR side.
Beckhoff Side
Add Routes
Beckhoff Controller requires some special settings to allow connections from HMI devices Static Routing from the TwinCAT3 XAE must be configured.
First, reset the TwinCAT3 system in Config Mode.
Open Project>SYSTEM>Routes.
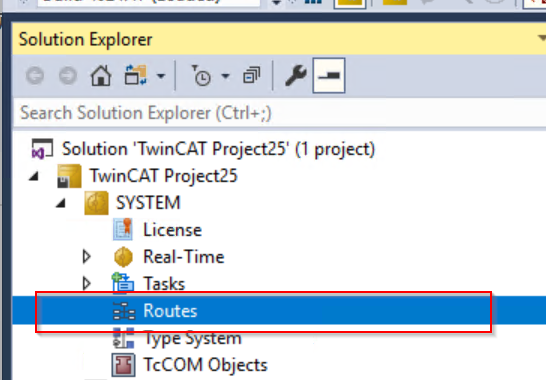
The Routes screen appears.
Open the Static Routes screen.

Add Routes using the Add button in the lower left corner.
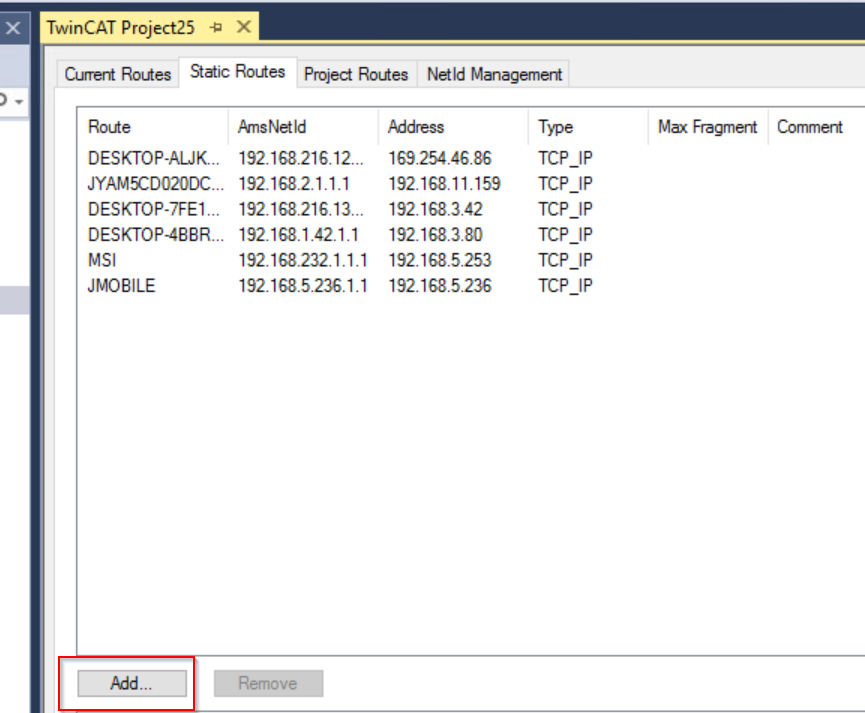
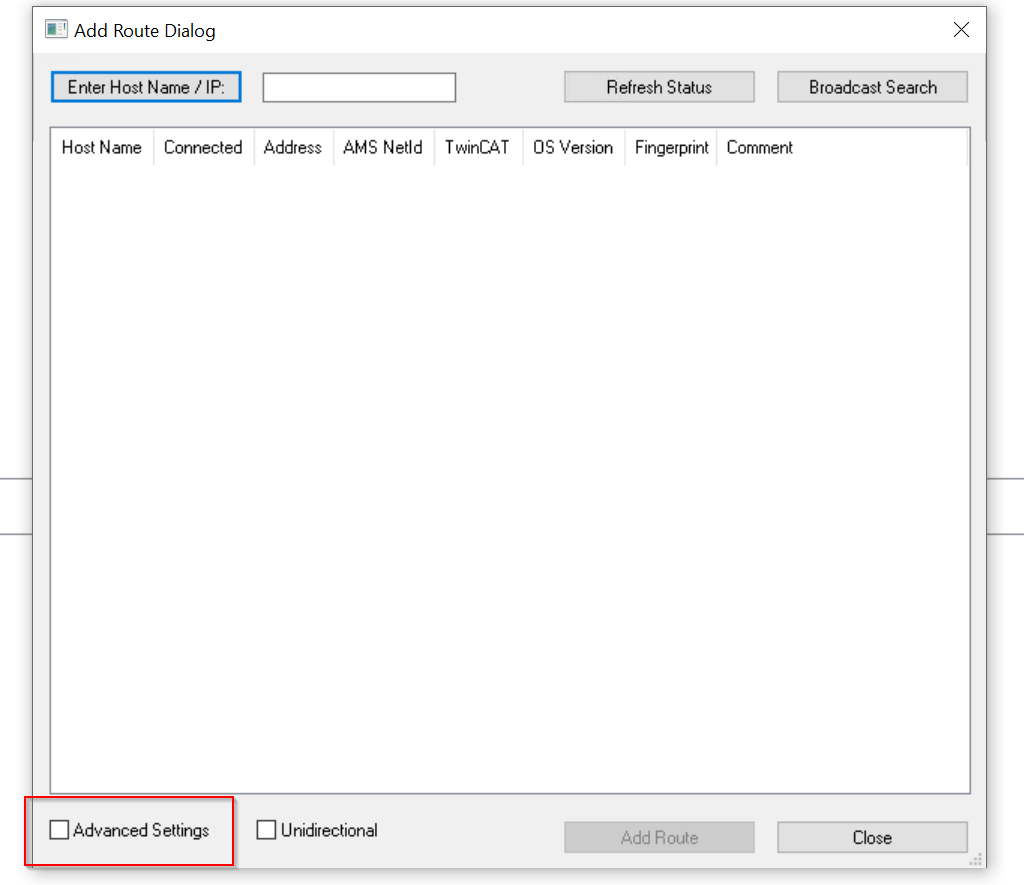
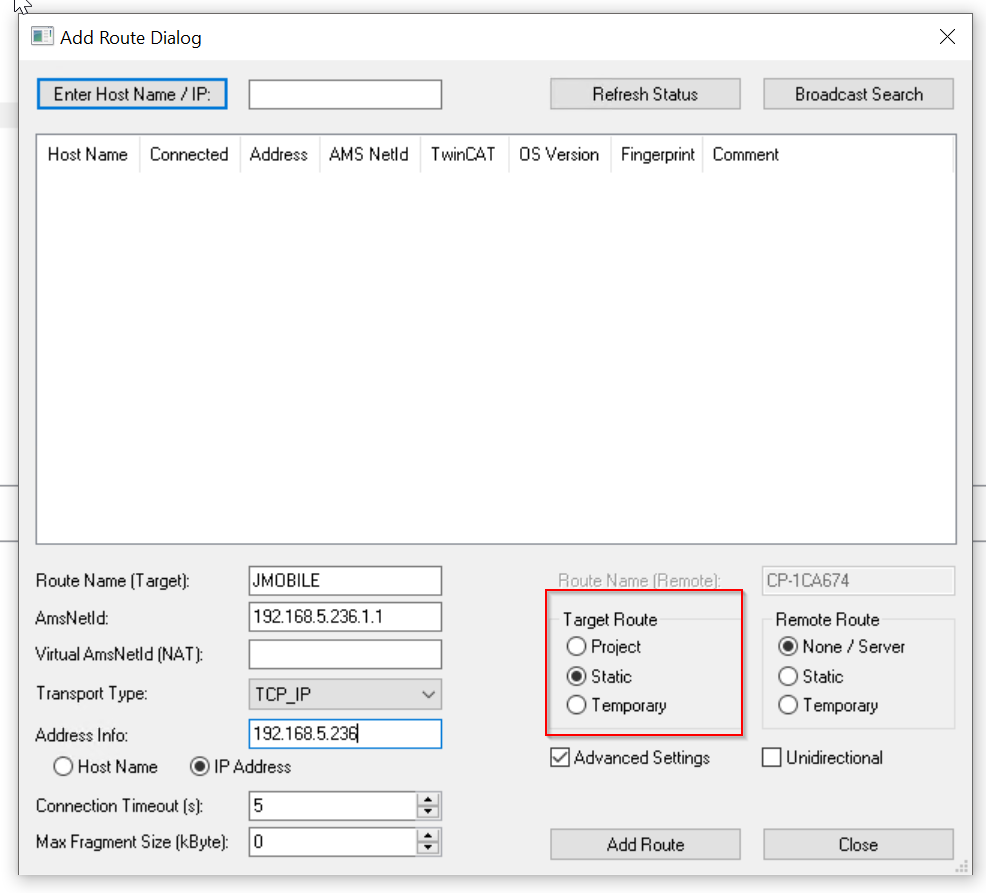
The Add Route Dialog screen appears.
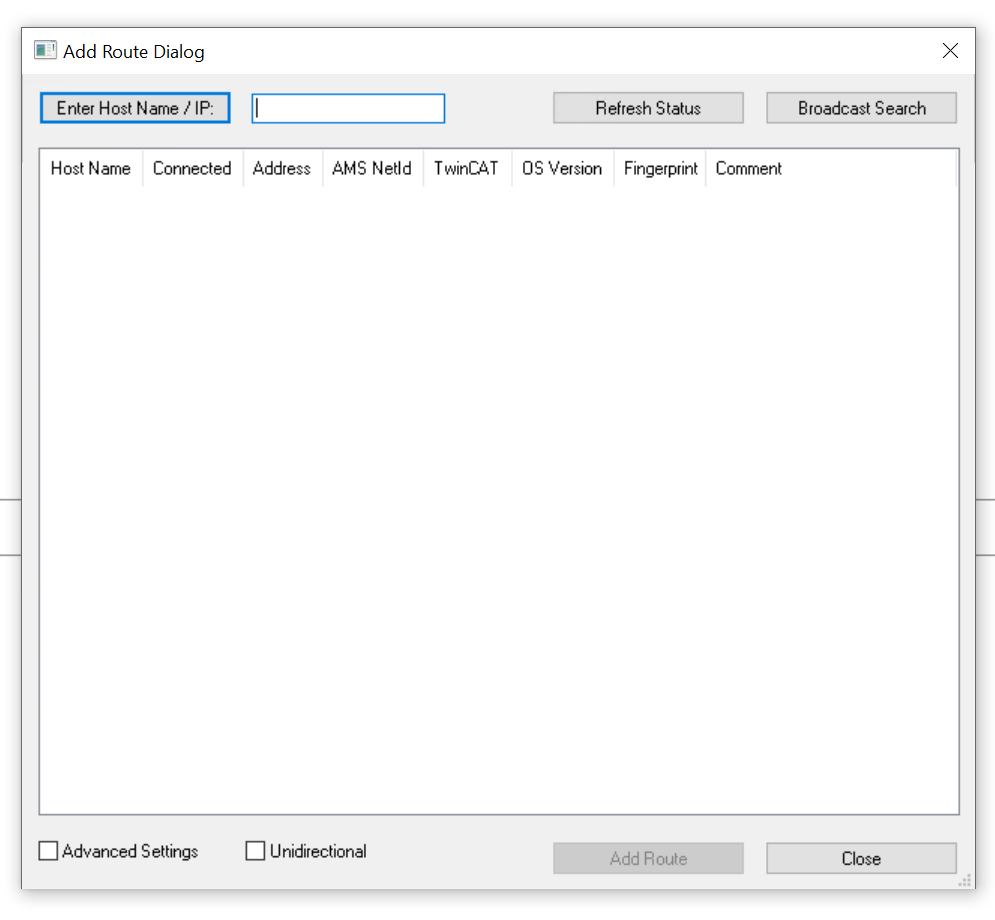
Configure Route settings in Advanced Settings.
Compared to the previous section, the number of items that can be set has increased considerably.
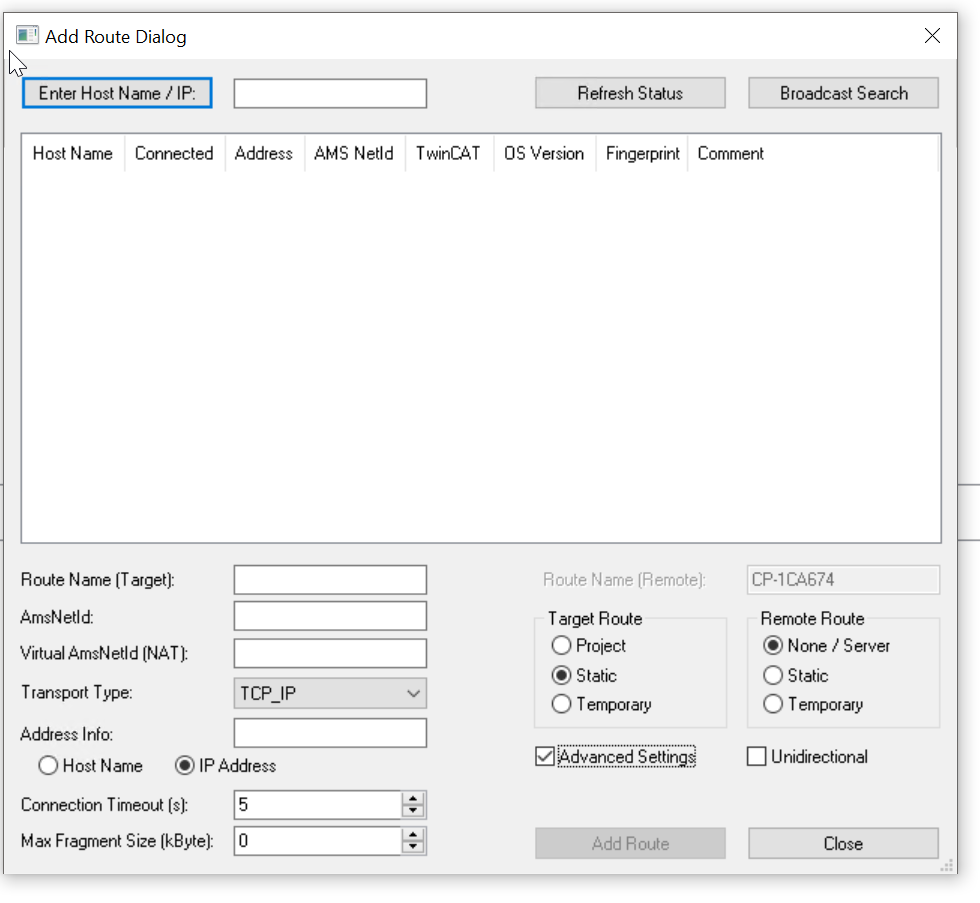
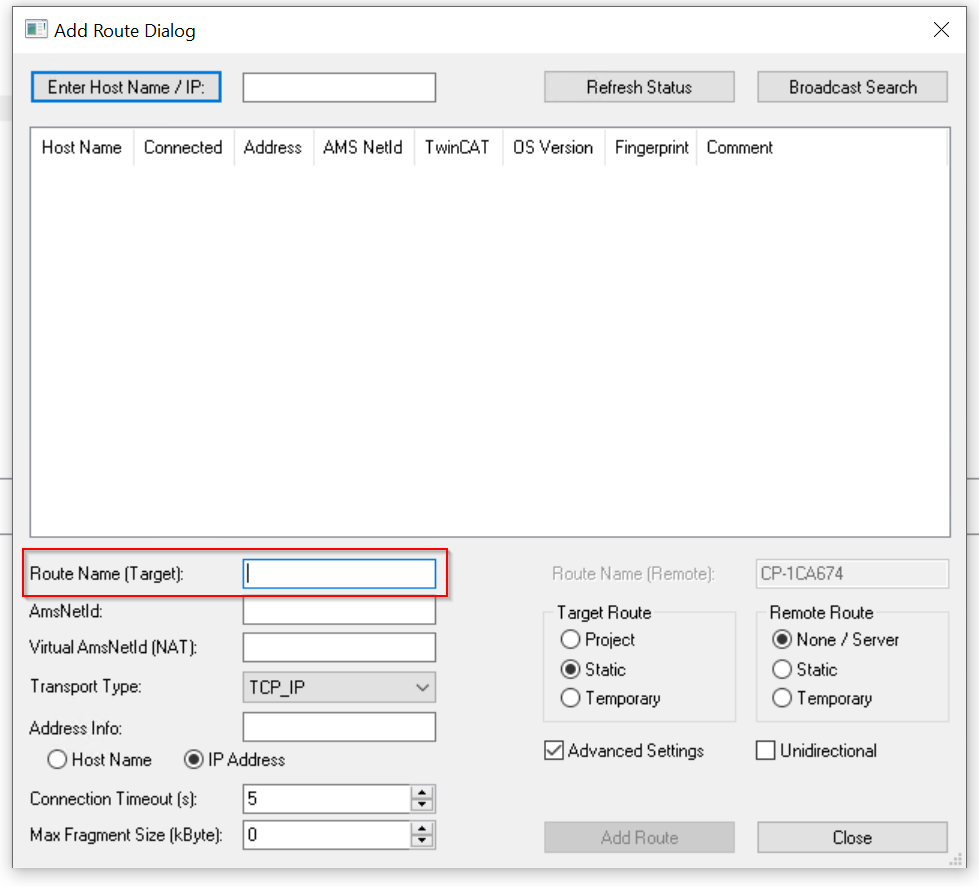
Route Name
Enter the name of the Client to connect Route Name(target).
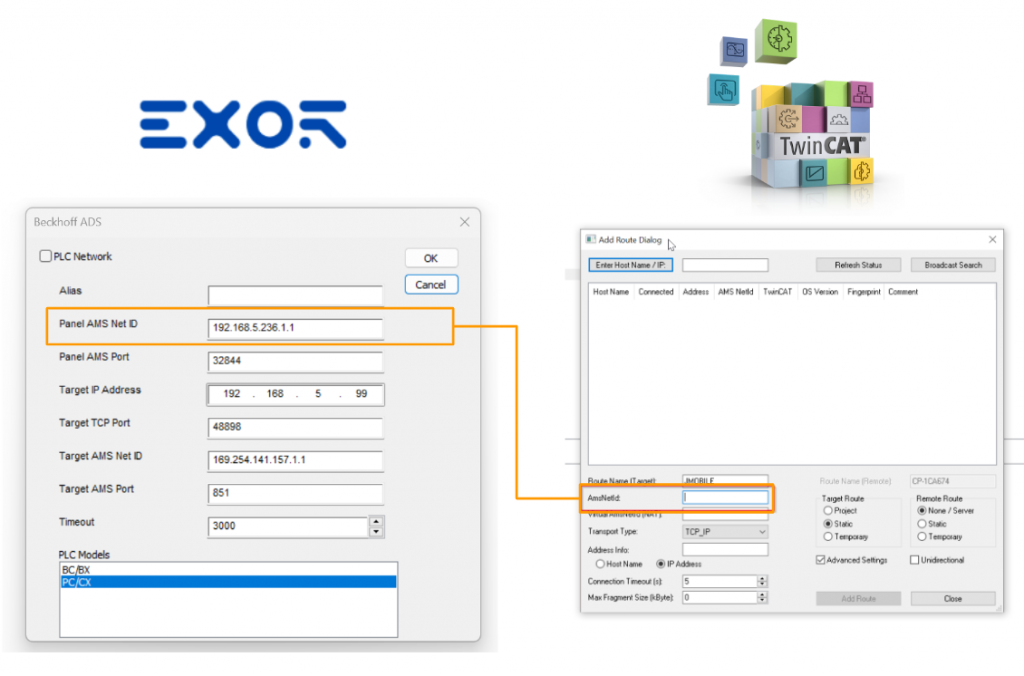
AmsNetId
AmsNetId is the Ams Net Id of the ADS Client that connects to TwinCAT Runtime.
In this case, it is 192.168.5.236.1.1 of EXOR.
Transport Type
Transport Type should be TCP_IP.

Address Info
Address Info is the IP address of the ADS Client connecting to TwinCAT Runtime.
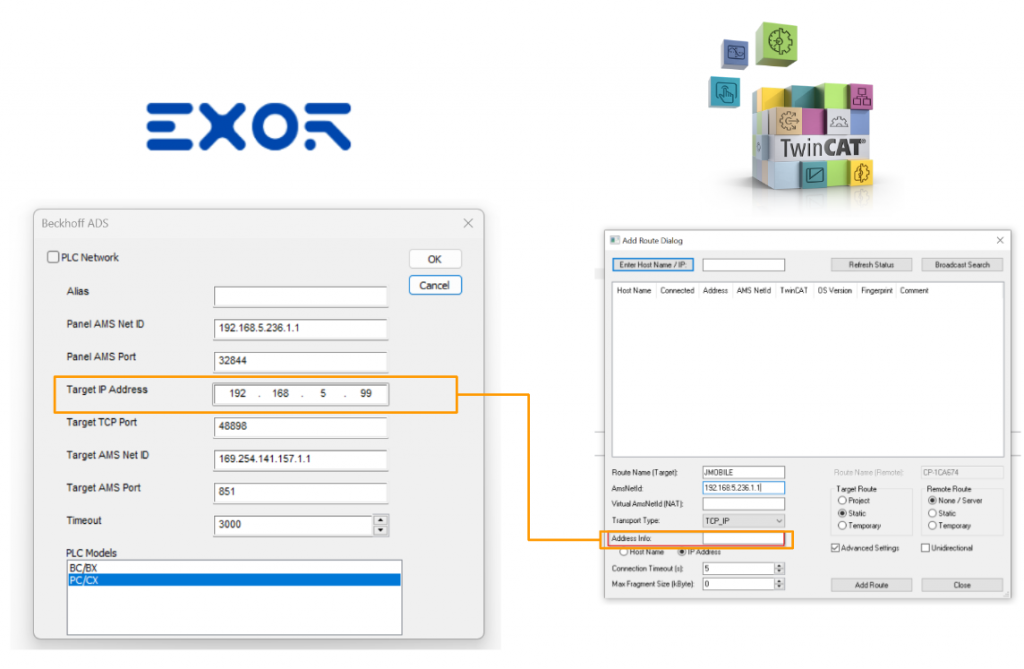
Target Route
Static is fine for Target Route.
Add Route
Finally, add a Route with Add Route.
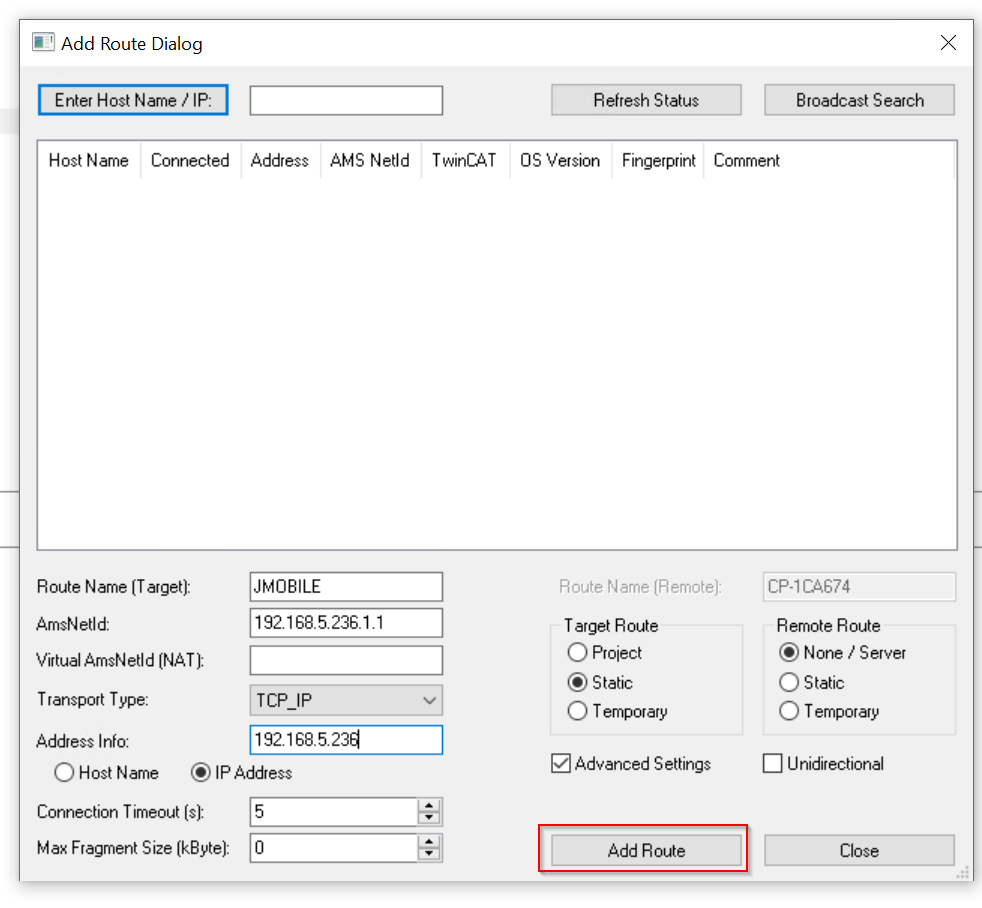
Secure ADS のCheckboxを外しOKで設定を保存します。

Done!JMOBILE routes have been added to Static Routes.

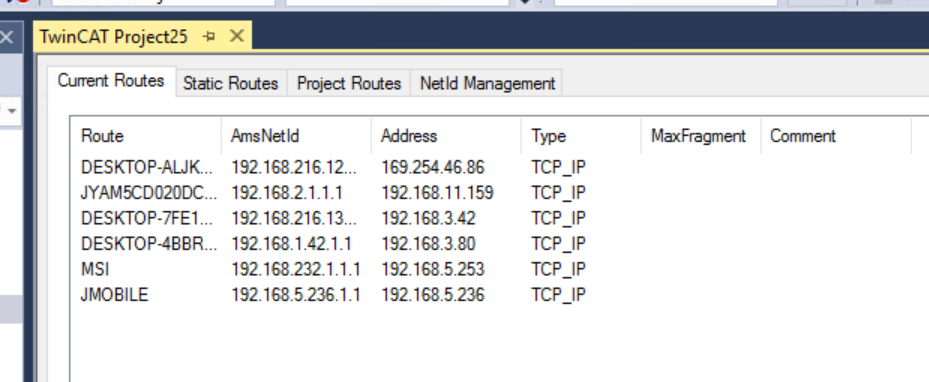
The same is true for Current Routes.

Add Data
Add data to confirm communication.
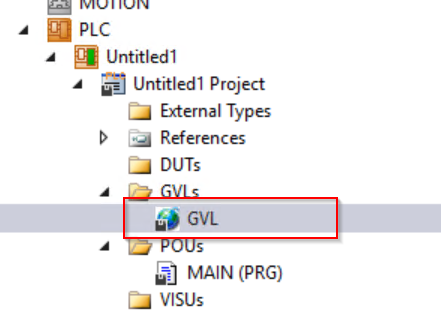
Define an array of real numbers inside the GVL.

Open the MAIN program.
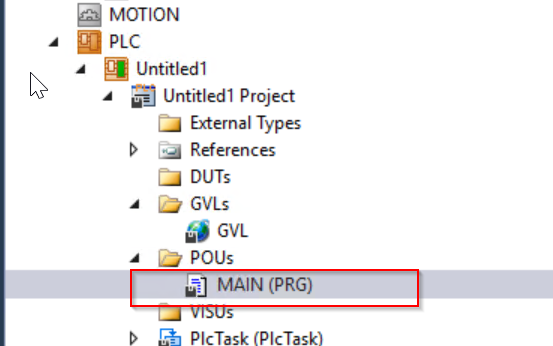
We should also define an array of INTs inside. (Note that %I* is not required.)

Compile Configure
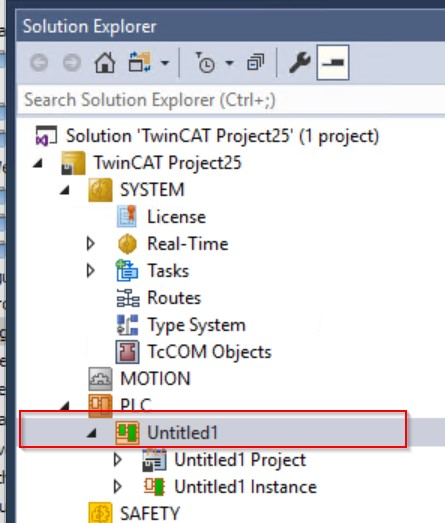
Next we will change the settings to compile the project, click on the PLC project.
Put a Checkbox in Settings>Target file for TMC File and TPY File as well.

Target Files
In the Target Files group box, you can set which information should be transferred to the “\Boot\Plc” folder when creating a boot project on the target system.
TMC File
Abbreviation for TwinCAT Module Class.
TPY File
TPYFile contains project information, routing information, compiler information, and target system information.
Build
Build>Build Solution to build the project.
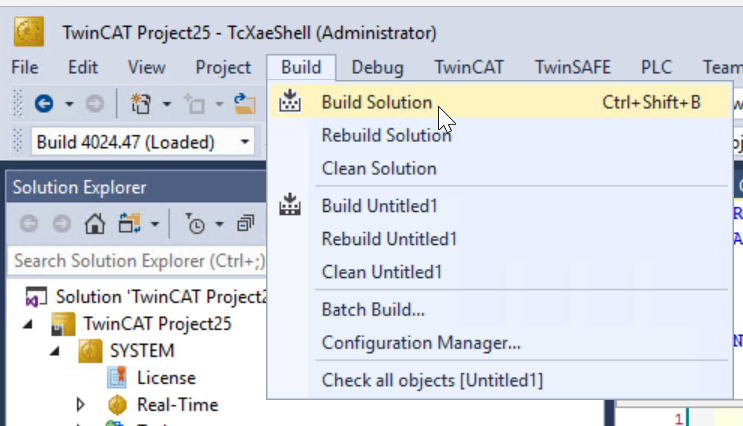
A File named .pty is generated in the compiled project.

Back to EXOR Side
The data in the Beckhoff system is based on tags, and the configuration of the controller’s internal memory is not fixed, but is set by the user during development. Those data items can be identified by a string called Tag.
The TwinCAT development environment generates a list of tags created for each controller in the application configuration.
EXOR projects must reference the tag names assigned by the TwinCAT PLC control programming software during development; the Designer Tag Editor supports direct import of tag files generated by the Beckhoff software.
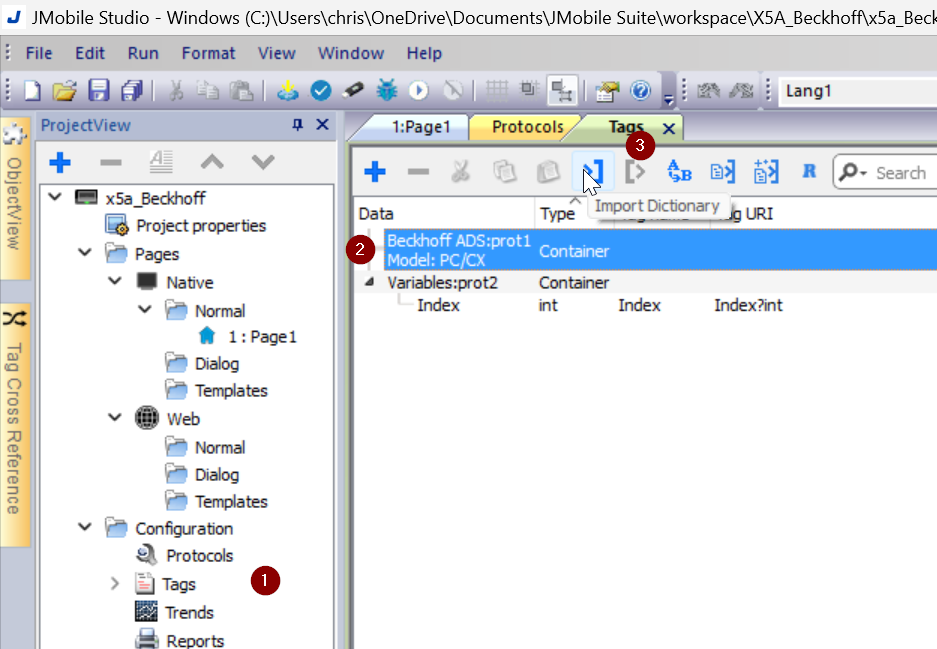
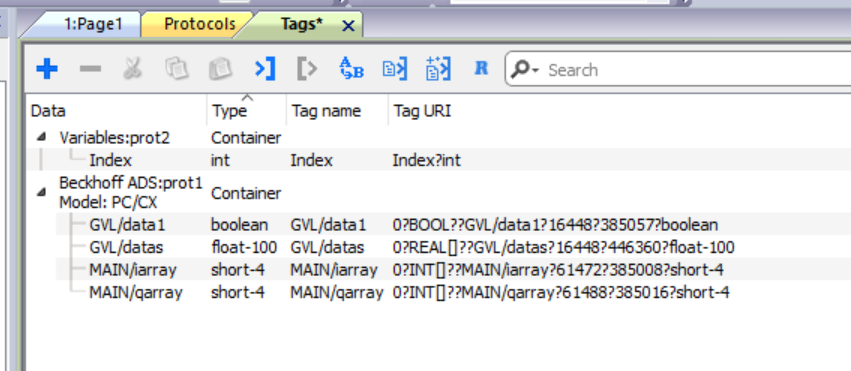
Add Tag
Go to Configuration>Tags>Select the Beckhoff Protocol you just added>Import Dictionary.
Select TwinCAT V1.0 >OK to proceed.
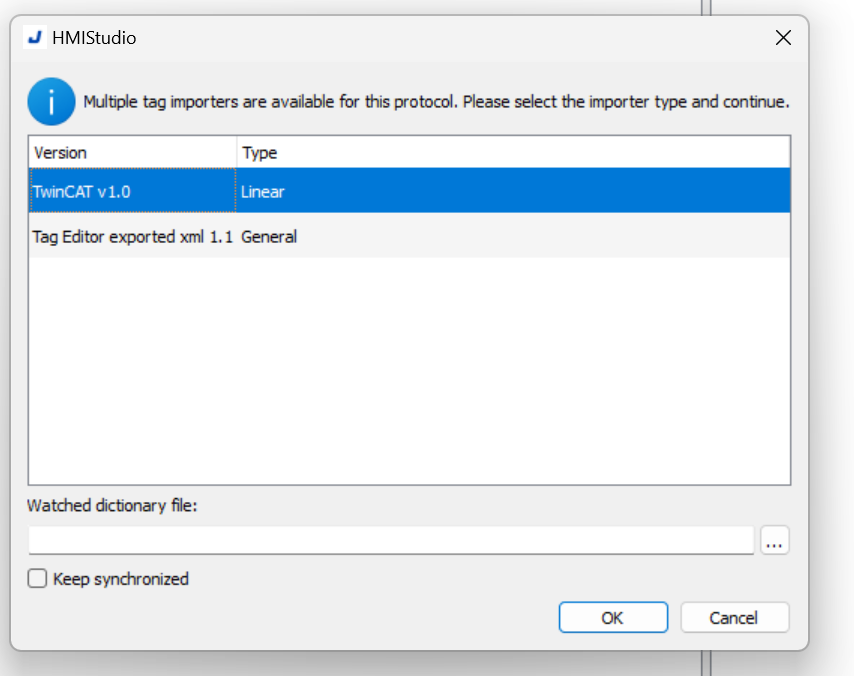
Import the .tpy File you just created.

When importing a Tag, you can choose to import all the Tags from the .tpy file or apply a Filter to import only the Tag sub-subset.
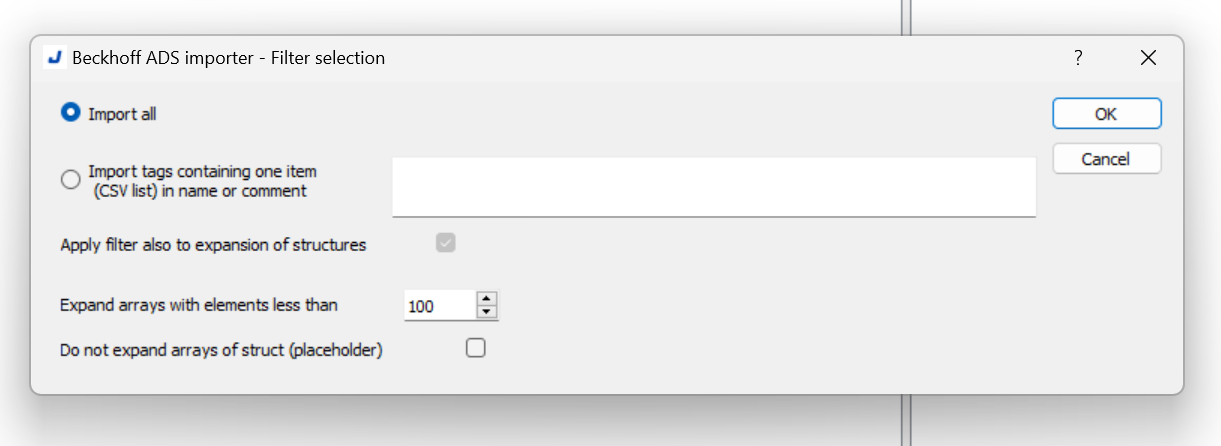
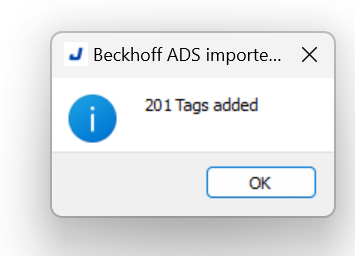
Done!This time, we will use the Import All function, so you can import all the Tags in .tpy to your project.
Done!
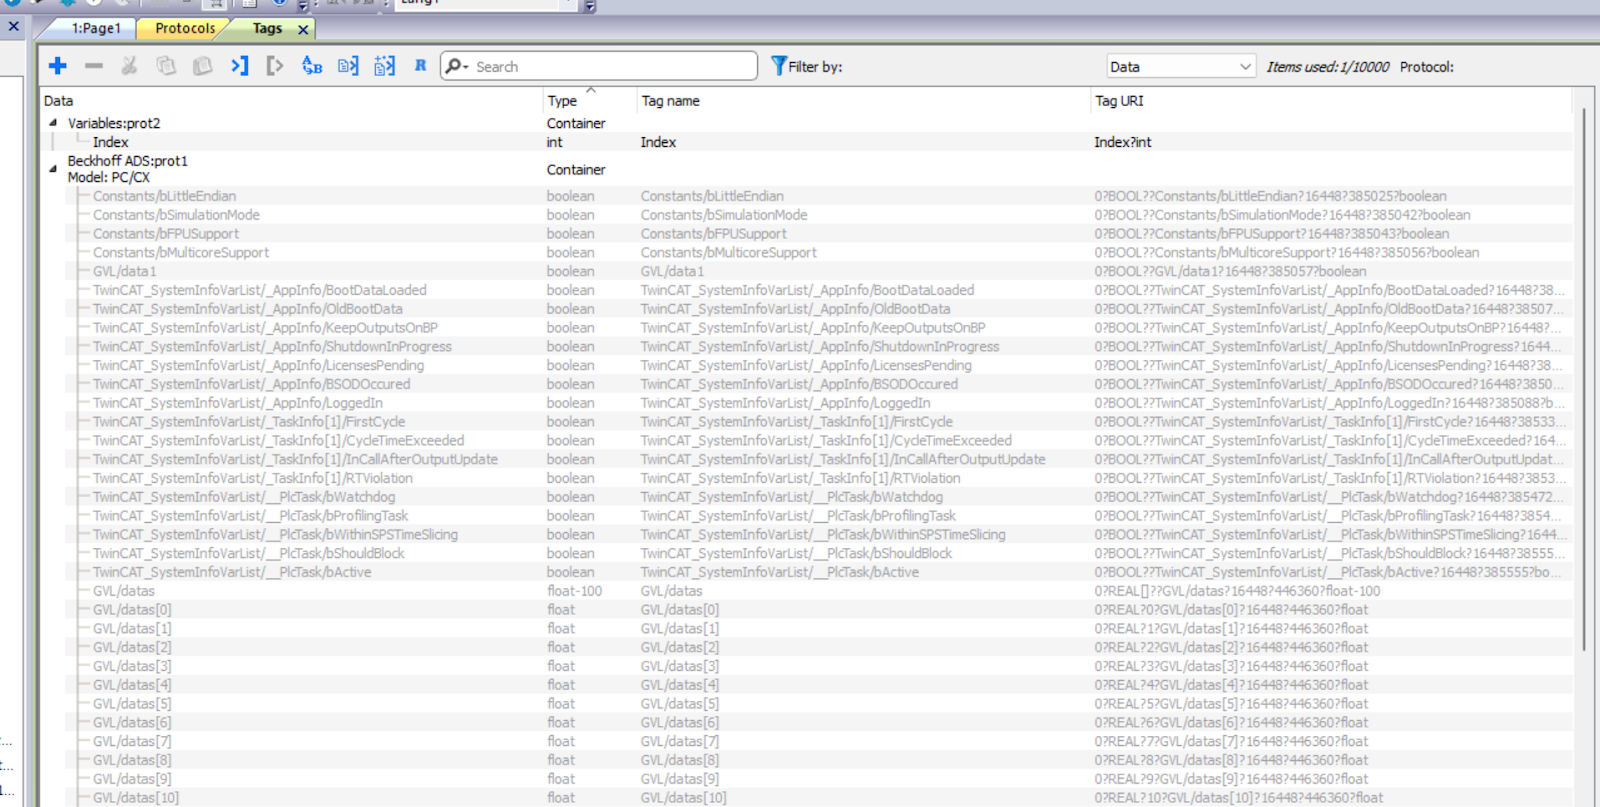
Generate the necessary Tag in your project.
Filter?
The following is an example of an EXOR Filter. For example, we have created the following Function Block and program, only the Instance of fbMotor2 has the word HMI.
| FUNCTION_BLOCK FB_Motor VAR_INPUT bStartMotor: BOOL; bReset: BOOL; END_VAR VAR_OUTPUT bMotorOn: BOOL; bAlarm: BOOL;(* HMI Thermal alarm *) END_VAR VAR sData: STRING; bResetStatistics: BOOL; (* HMI Reset statistics *) END_VAR VAR PERSISTENT stStat: ST_MotorStats; (* HMI Motor statistics *) END_VAR Function block instances declaration: VAR fbMotor1: FB_Motor; fbMotor2: FB_Motor; (* HMI only show Motor 2!! *) END_VAR |
Enter HMI in the Filter field and press OK.
Only the following Tags will be Imported.
| MAIN/fbMotor2/bAlarm MAIN/fbMotor2/bResetStatistics MAIN/fbMotor2/ST_MotorStats |
Result
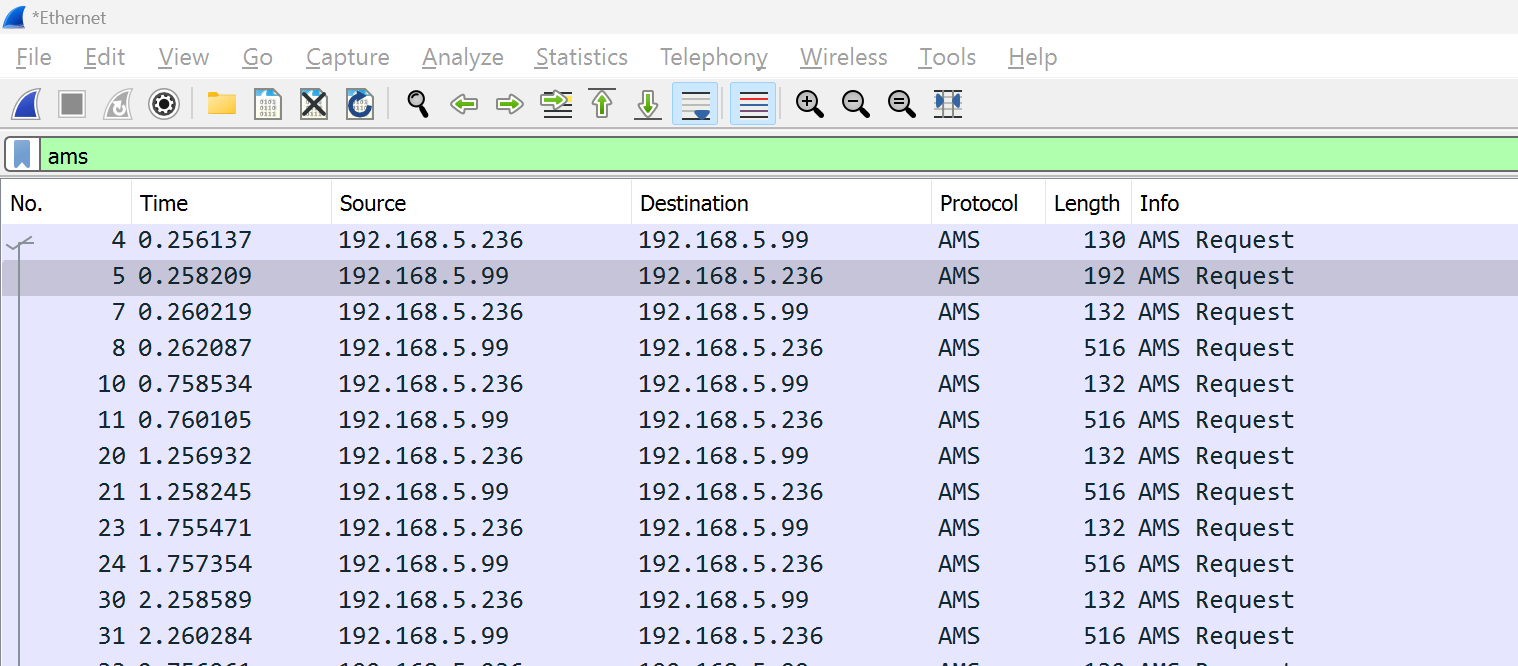
Done! Wireshark has a Protocol for AMS.
It is a Packet of ADS Protocol.
Recipe Implementation
The next step is to use EXOR’s Recipe feature.
Recipes are Collections of tag values organized by specific application requirements.
For example, let’s say you need to control room variables (temperature and humidity) in the morning, afternoon, and evening. You create three sets (morning, afternoon, and evening) and set the appropriate tag values.
By associating each element of the recipe with a tag, you can extend the memory-limited functionality of the controller as a receiver. The recipe data includes all controller data items, but the data is not read directly from the controller, but from the associated recipe element in the HMI device.
Recipe data can be configured in JMobile Studio and the User can specify default values for each element in the data record; JMobile HMI Runtime allows data to be edited and saved to a new data file, and changes to recipe data are saved to disk.
EXOR Side
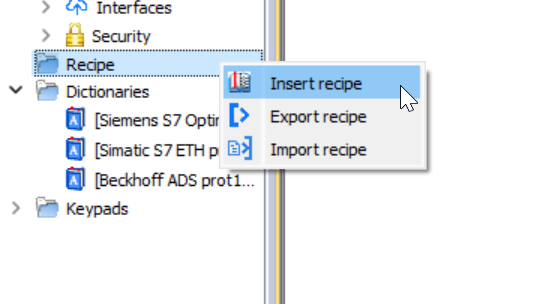
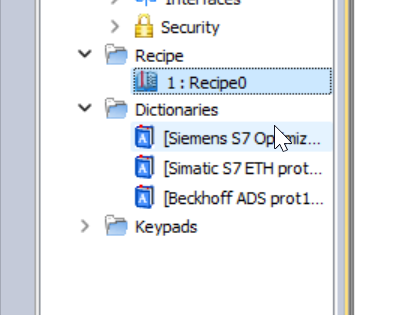
Insert Recipe
Go to Recipe>Right click>Insert recipe.
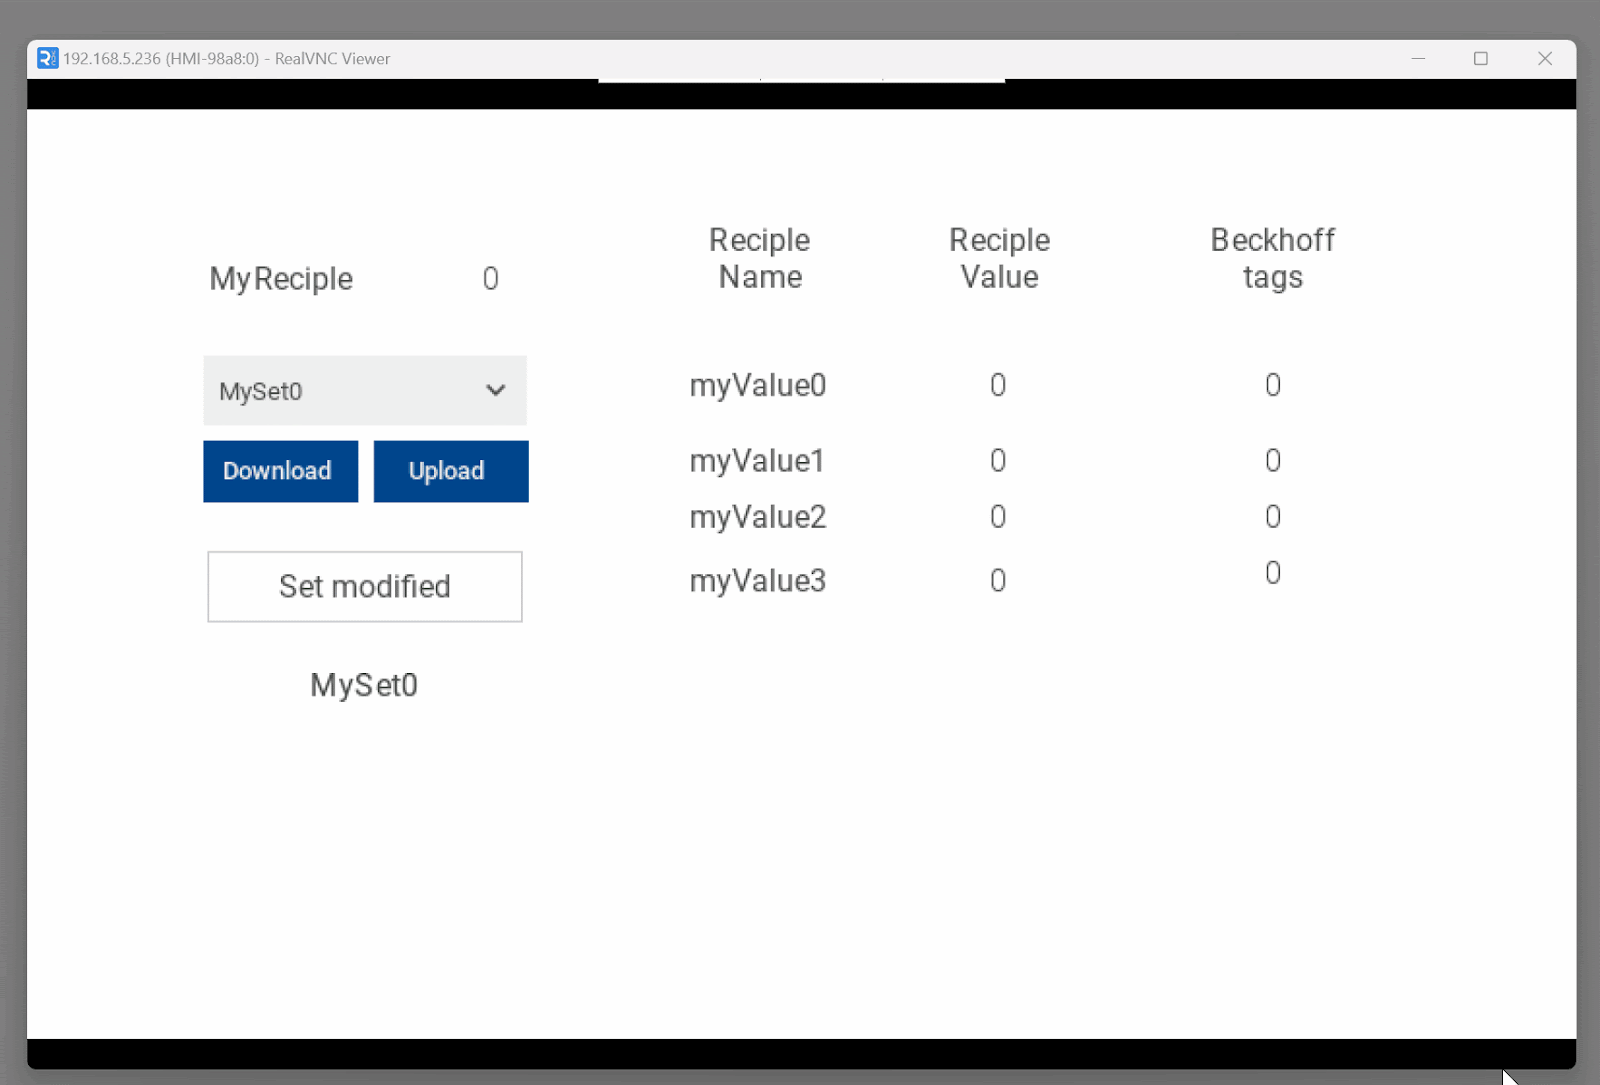
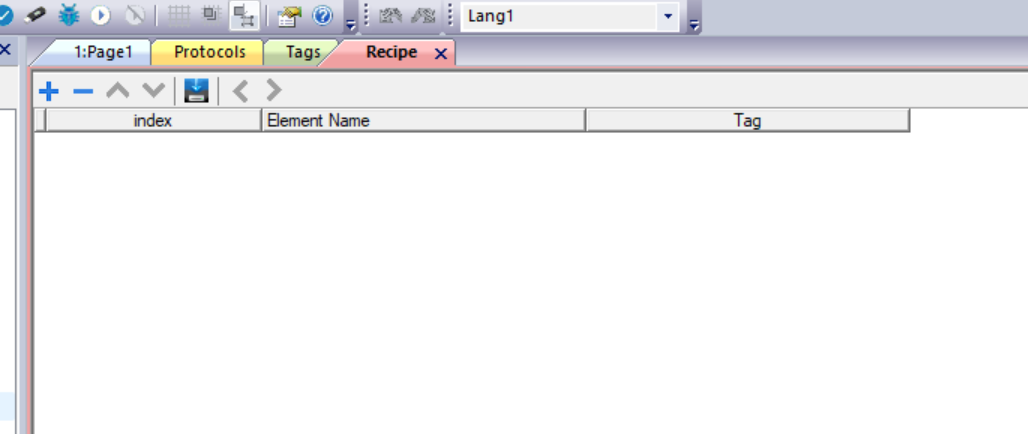
A new Recipe is added and double-clicked to open the Recipe screen.
This is the Recipe edit screen.
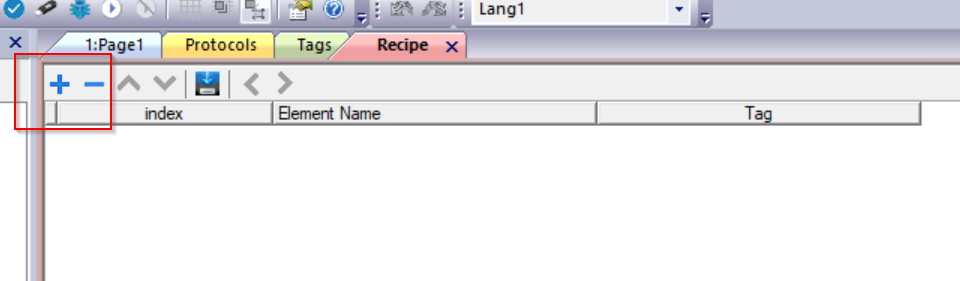
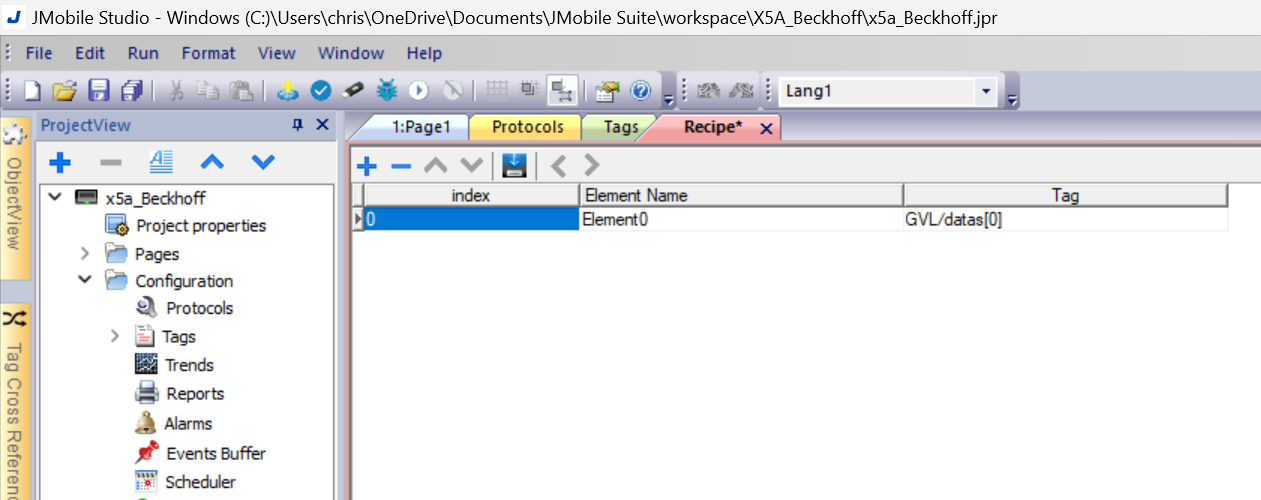
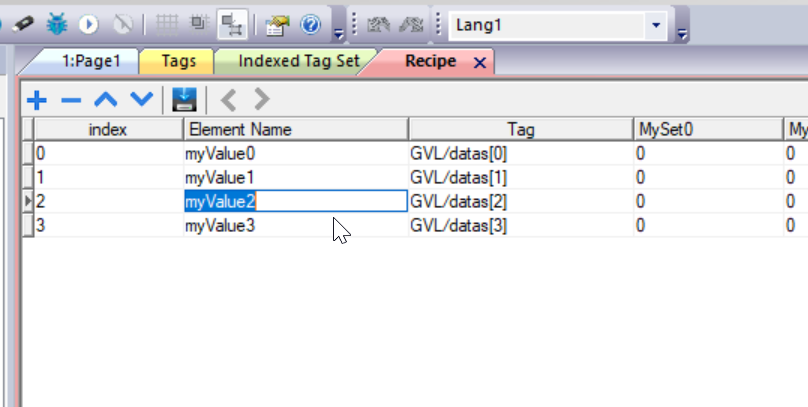
Add Recipe Elements
Add a Recipe element with +Button.
Sets the Tag to be connected to the recipe element.

This time, let’s use the real number array called GVL/datas that was just added to the Beckhoff TwinCAT project.
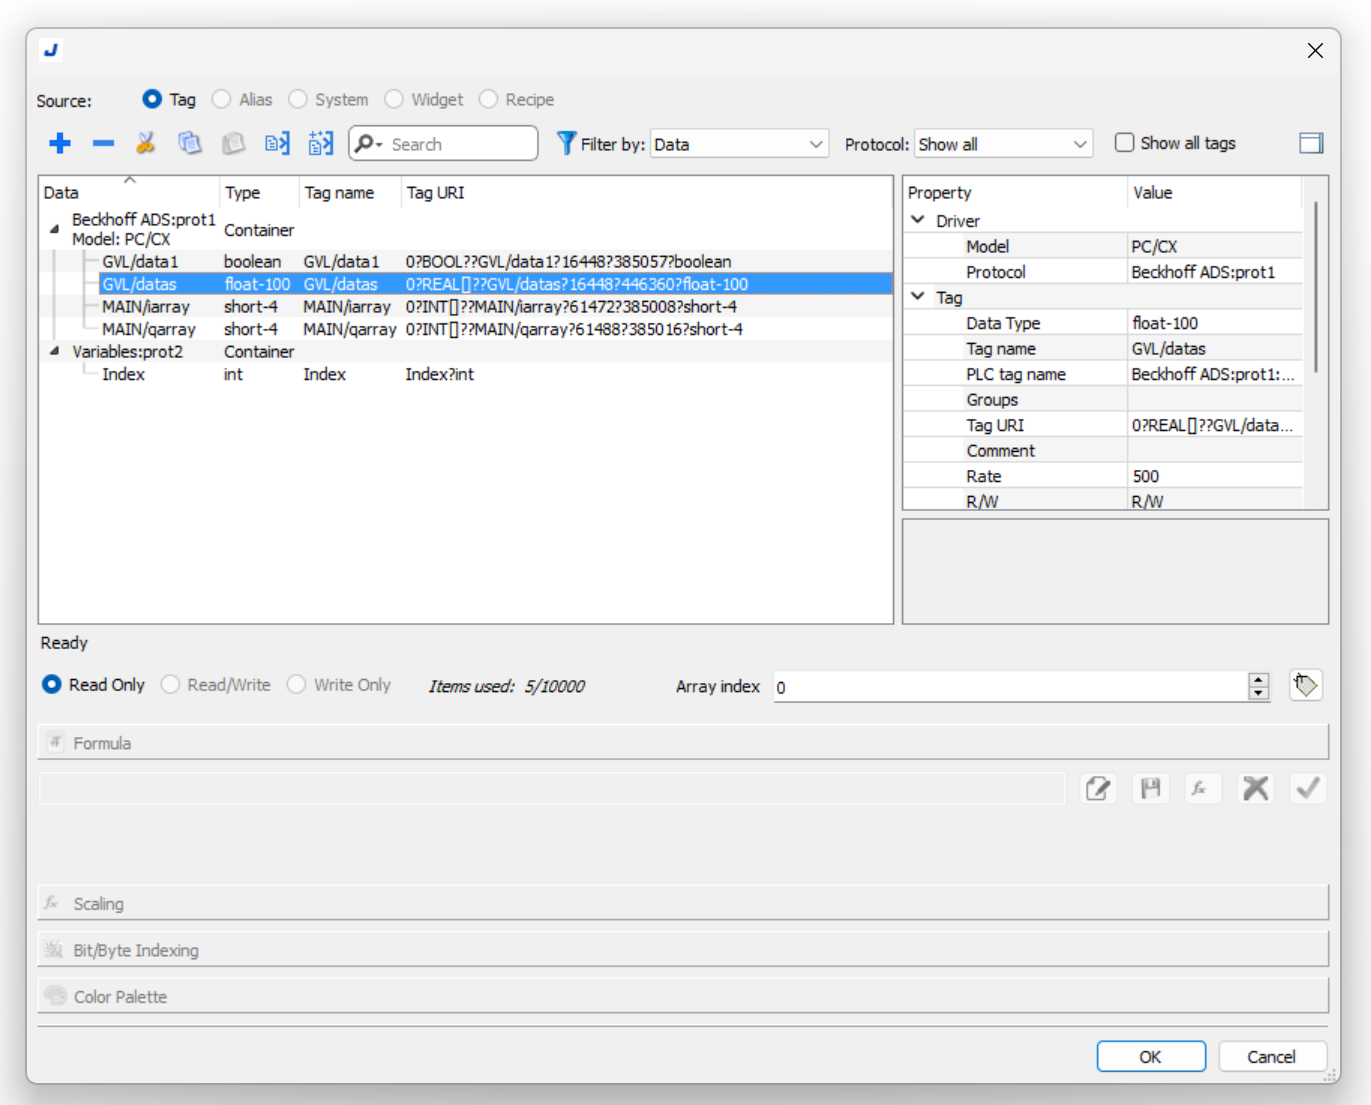
Done!Index=0 is now Element0 and the Tag used is Beckhoff’s GVL/datas[0].
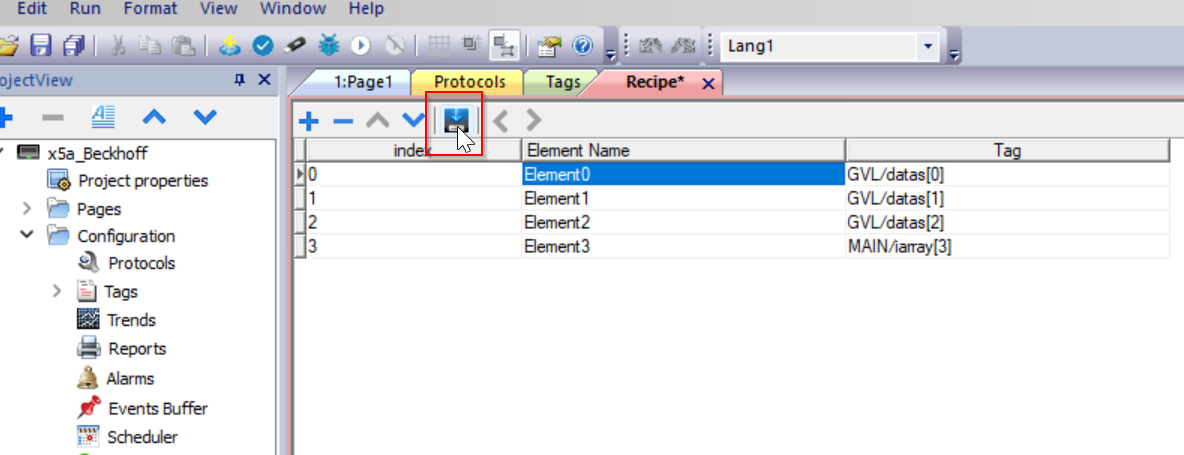
Use the same operation to add the four recipe elements.

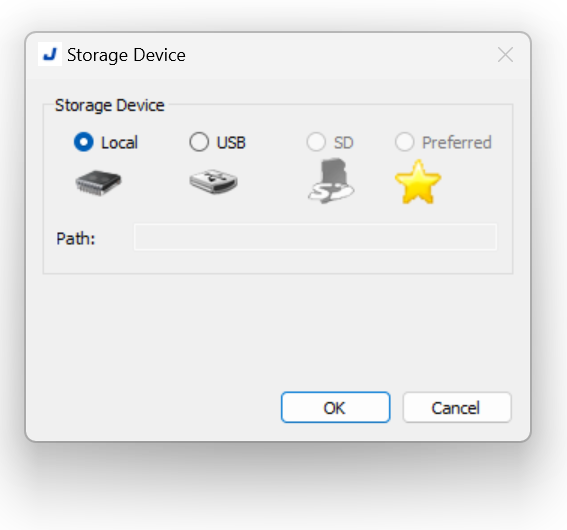
Storge Device
You can set the location of the recipe storage in ICON here.
Default is Local.
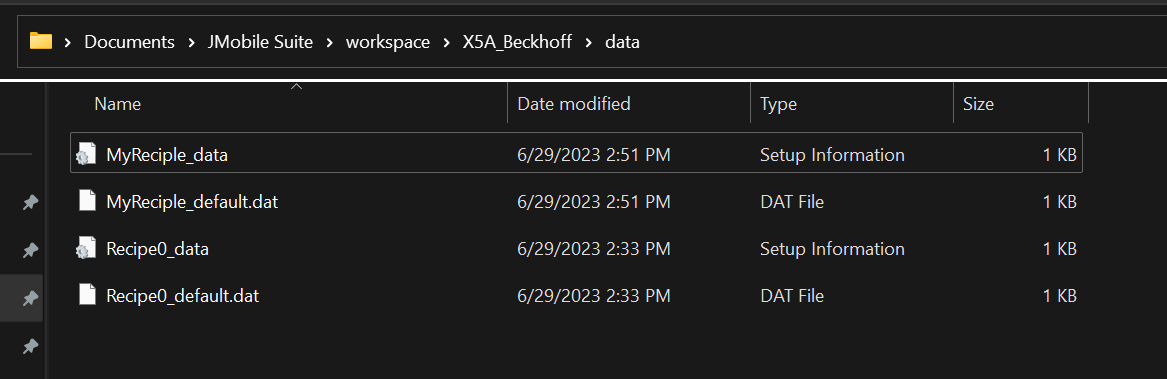
To note, the recipe configuration file is automatically created when the project is saved and is stored in the project’s data Sub Folder. To use an external storage device, this folder must be copied to an external device. (The following figure shows the Directory of my Sample project, where the recipe settings File is stored in a Sub Folder called Data.)
Element name
Define an easy-to-understand name for each Element.
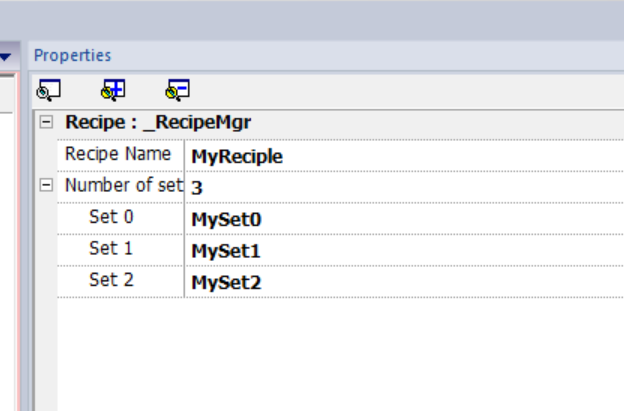
Add Recipe Set
Name of set
From the Properties of the recipe, there is an item called Number of set, which means that you can set how many of this recipe there are.
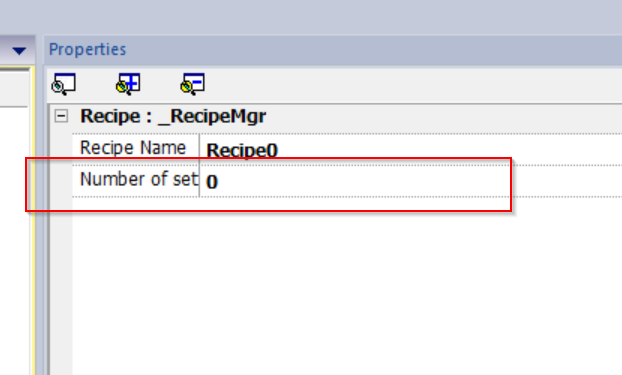
In this article, we will set up three.
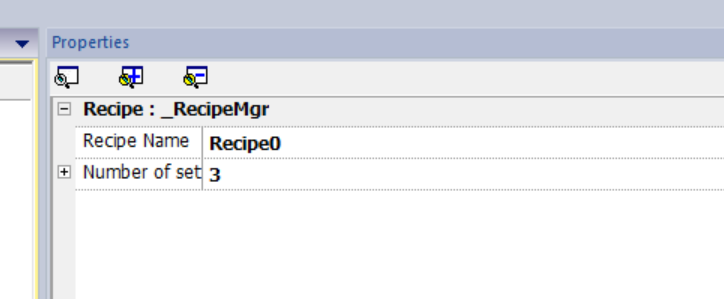
Set0, Set1, and Set2 items have been added to the Recipe settings screen.

Rename the set
The Sub menu of Number of sets shows the Field in the number of sets.
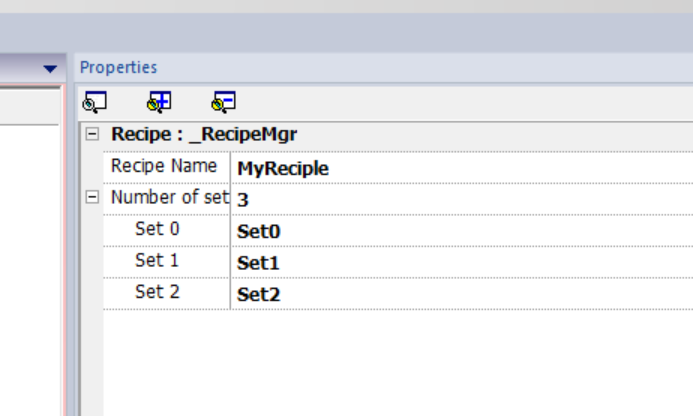
Set the Recipe Set name according to your application.
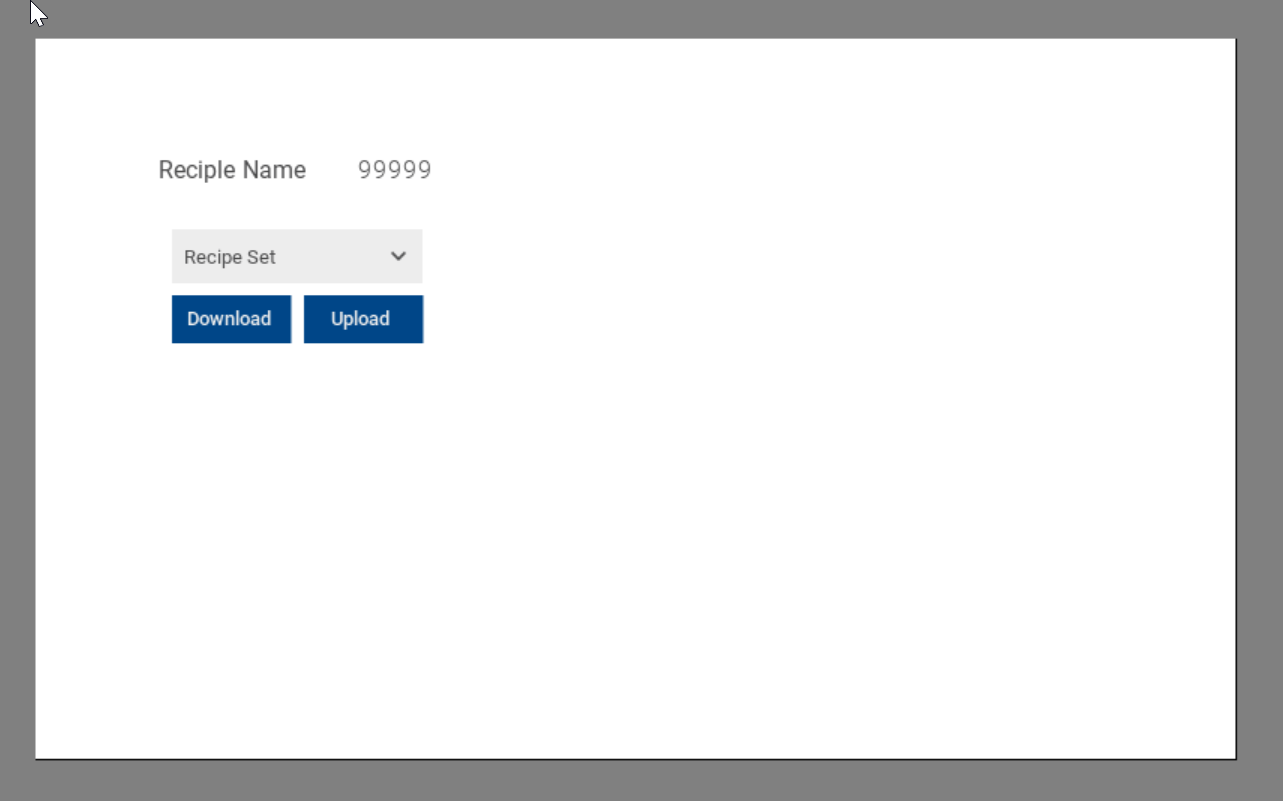
Configure screen
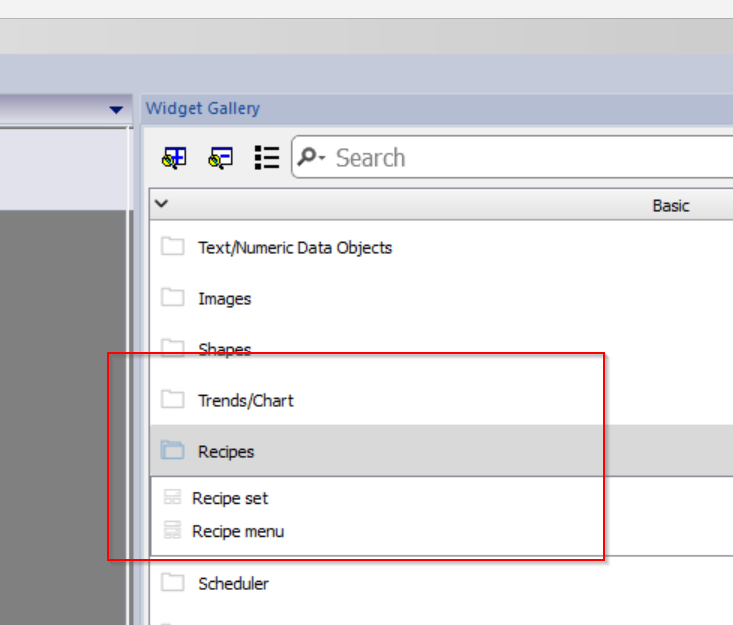
Next, create a recipe screen: open the Recipes Folder from the Widget Gallery and you will find a Recipe set and a Recipe menu Object.
- Recipe set:
- You can select a set of recipes to upload or download.
- Recipe menu
- If many recipes are created in a project, use this widget to manage them all and select the required set for each recipe.
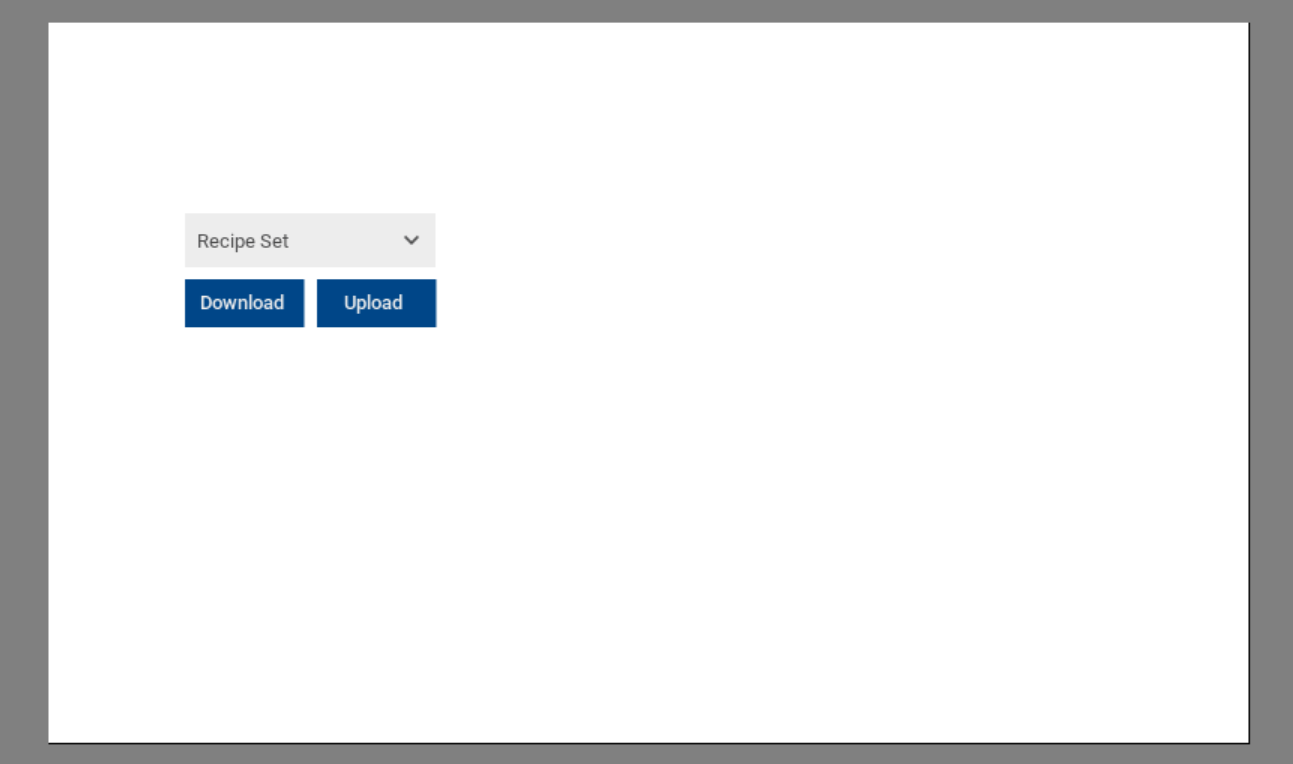
Add Recipe set
In this case, there is only one recipe set, so select the recipe set and add it to the screen.

Done!Recipe set Object has been added.
Configure Recipe set
Next, open the Properties screen of the Recipe set Object in order to set up a Recipe set that is connected to the Recipe set Object.
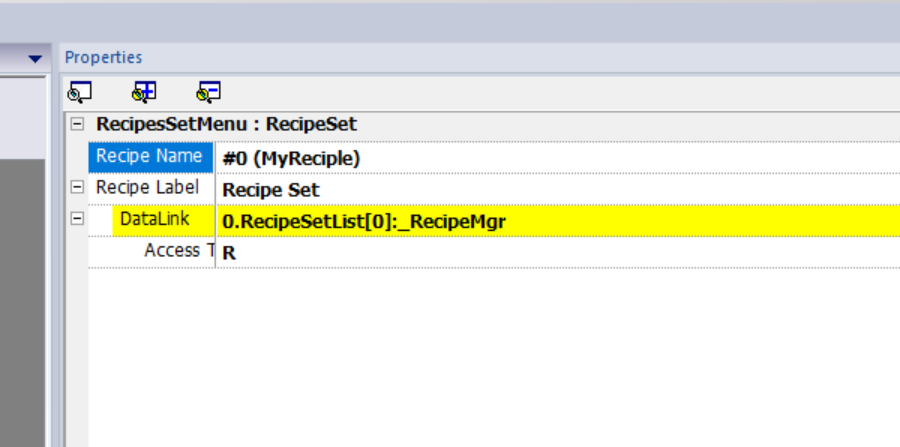
Set up Recipes from the Recipe Name drop list.
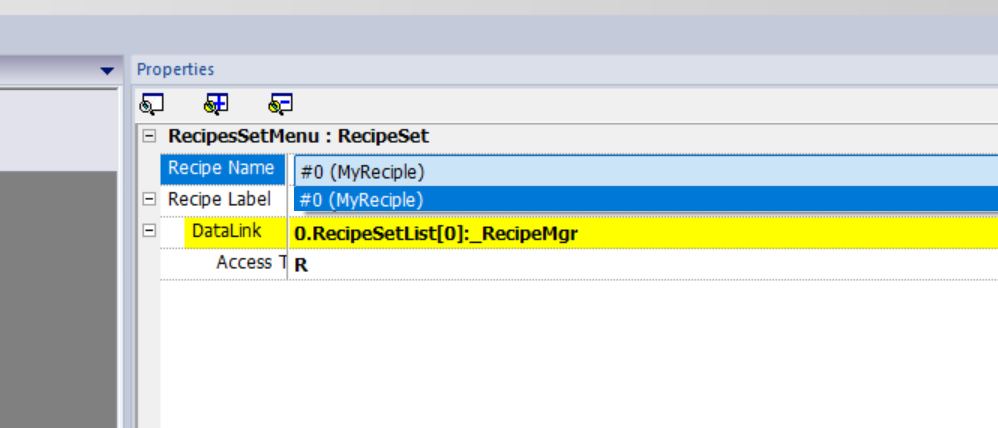
Recipe Name/Recipe Status
Add numeric labels and letter labels to display the Recipe Set name and status.
Status
There is an EXOR variable that allows you to retrieve the status of a Recipe Set, so go to Source and set the Recipe>Status that you wish to display.

Name
The same operation is used to connect Recipe set names and string labels.
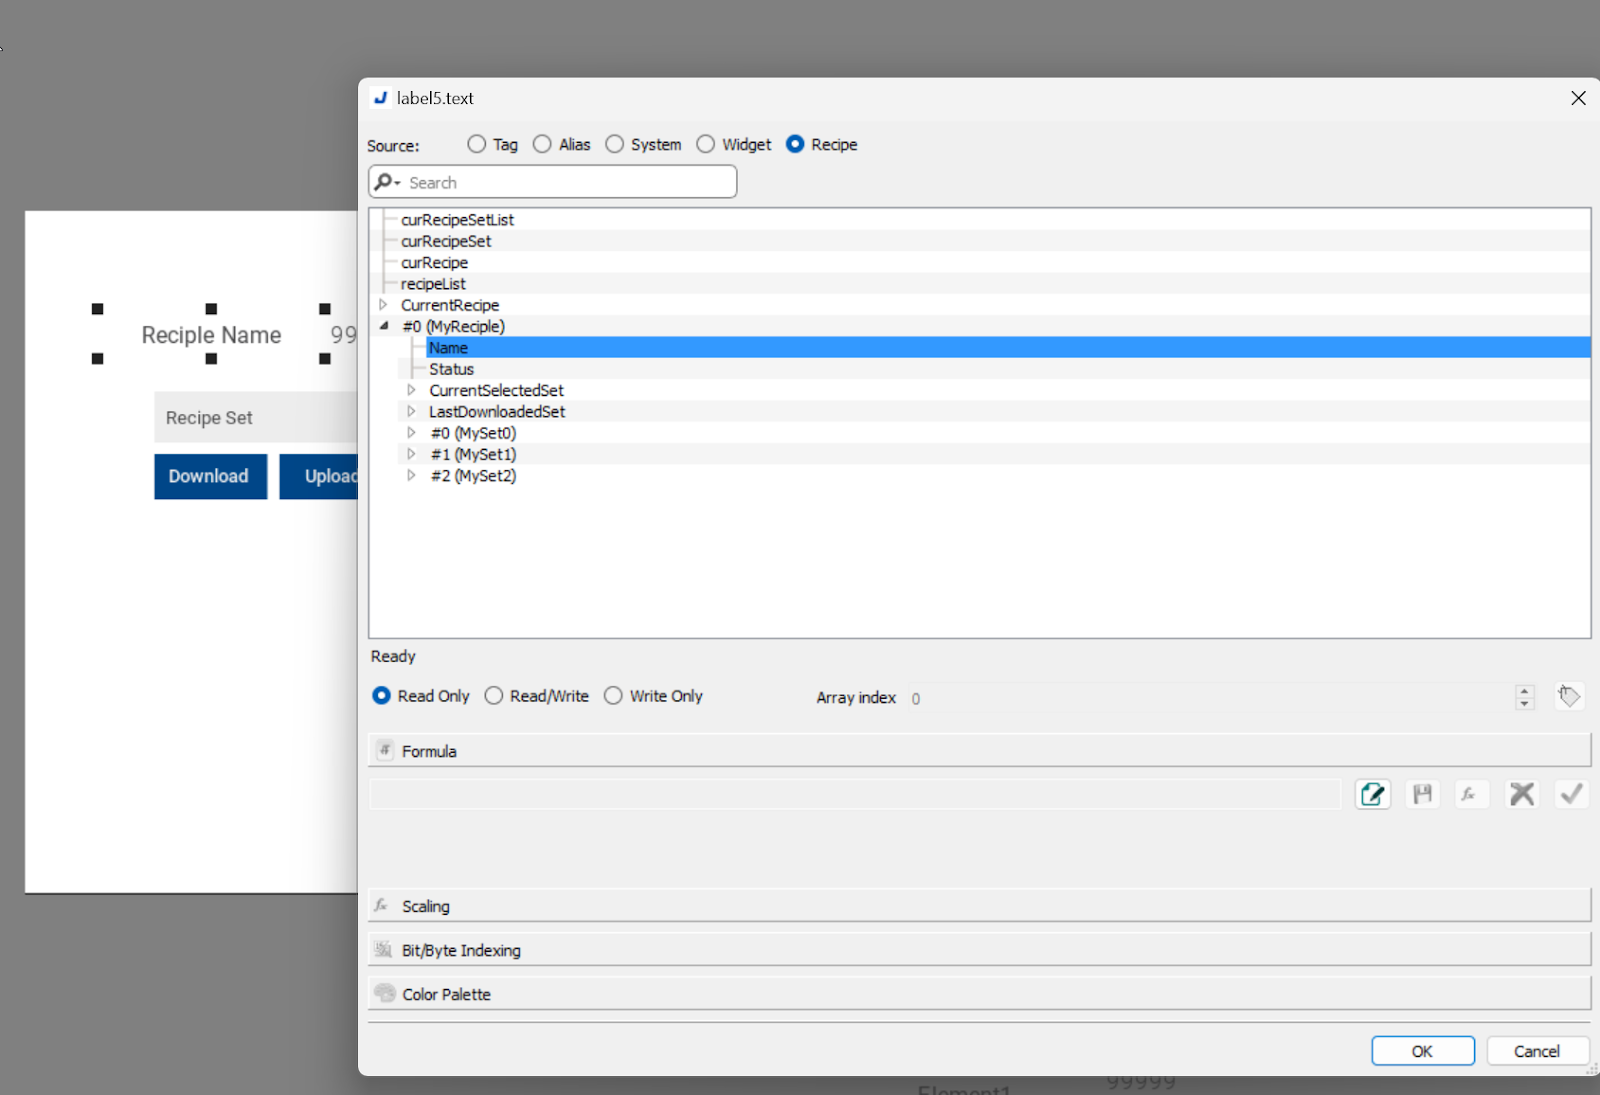
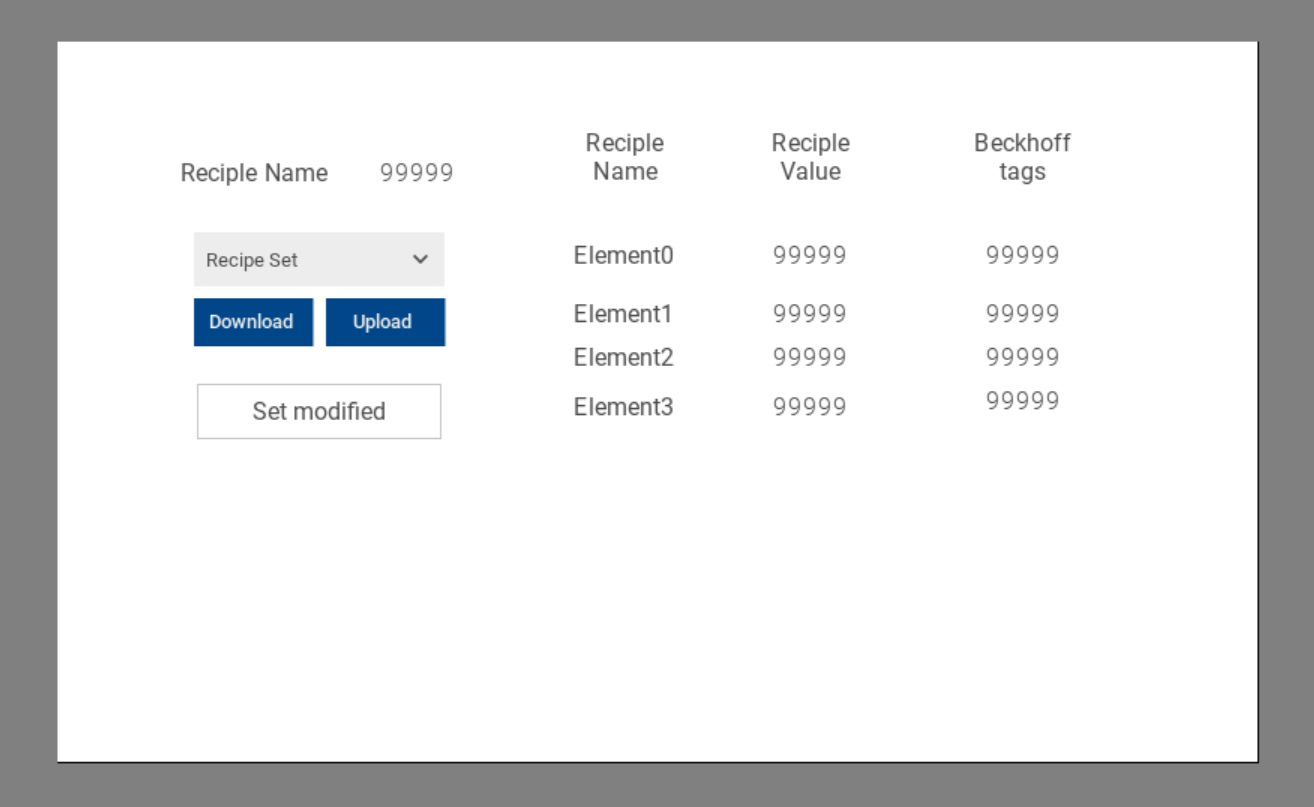
Recipe Element
The next step is to allow the elements of Recipe set#0 to be displayed.
Add string labels and R/W (read/write capable) number labels.
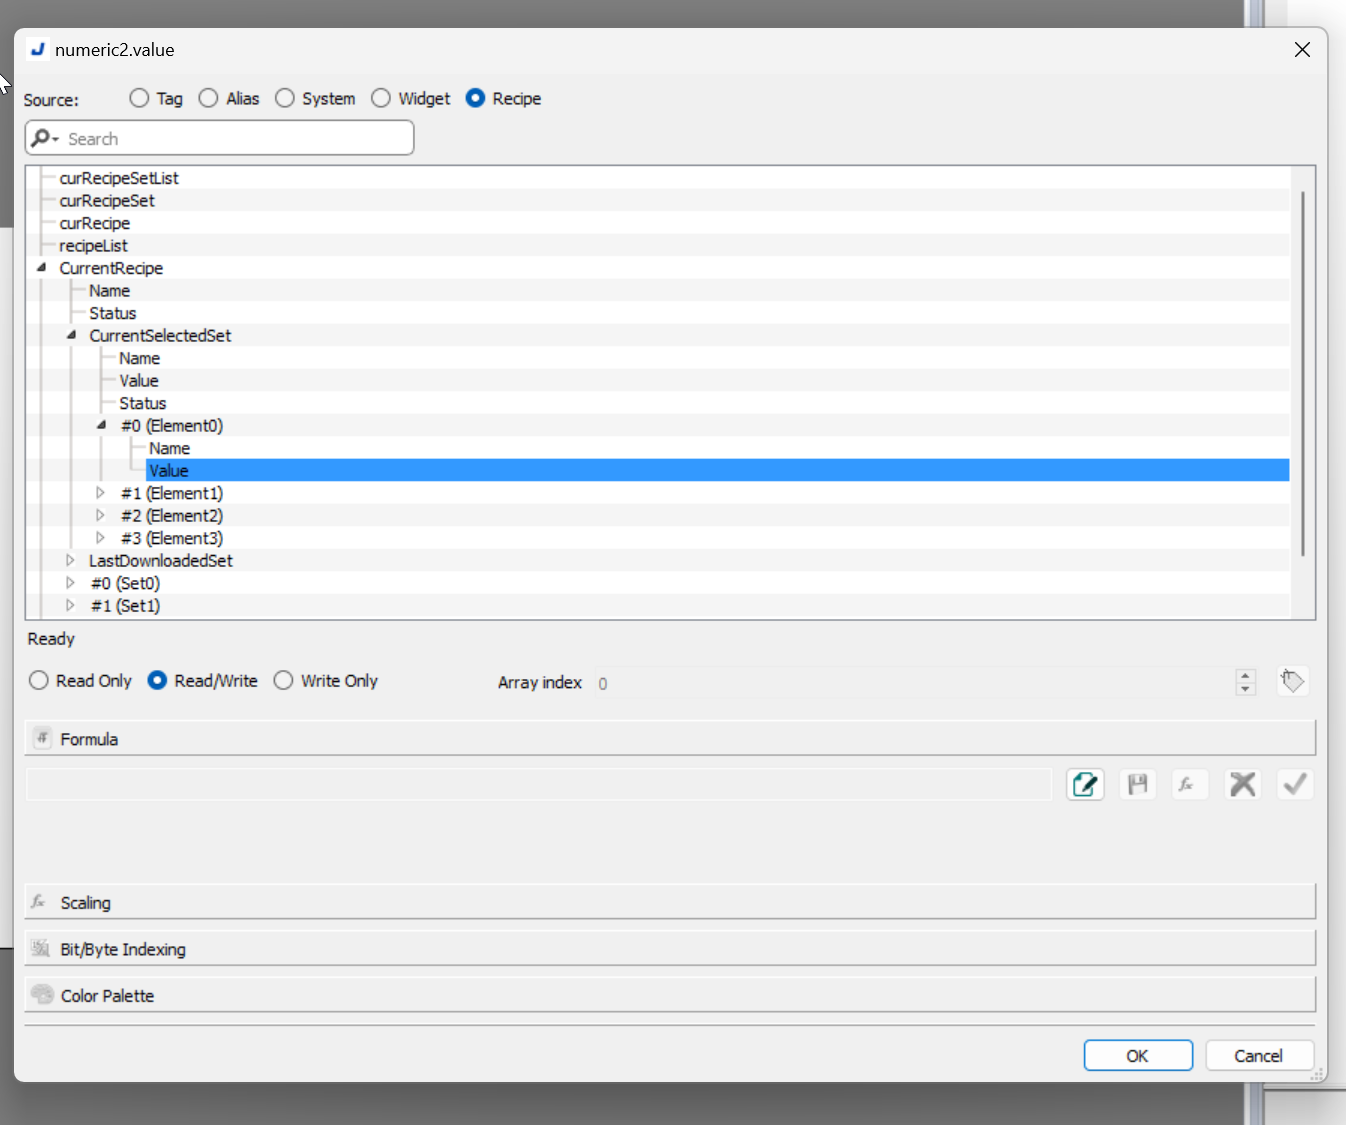
Name
The name of each element in Recipes can be found in the Name variable of CurrentSelectedSet >#0 (i.e., the currently selected Recipe Set).
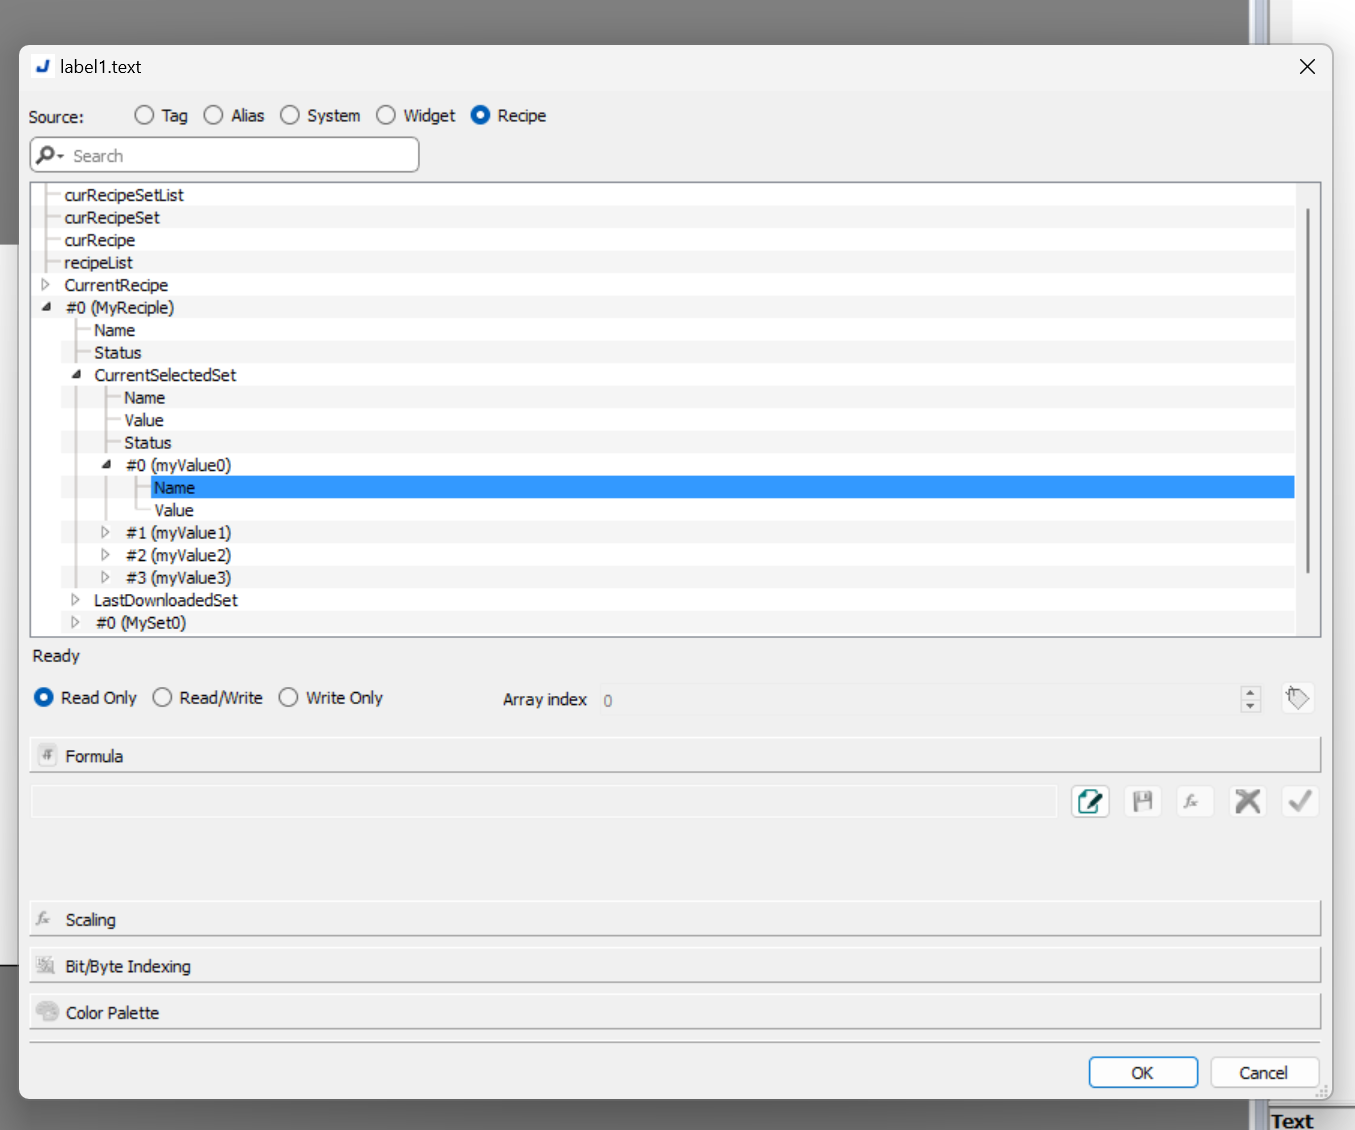
Value
Likewise, the current value of each element in Recipes can be found in the Value variable of CurrentSelectedSet >#0 (i.e., the currently selected Recipe Set).
Beckhoff tags
Next, add Beckhoff PLC tags to the screen.

Set up PLC Tags that are connected to the Recipe elements.
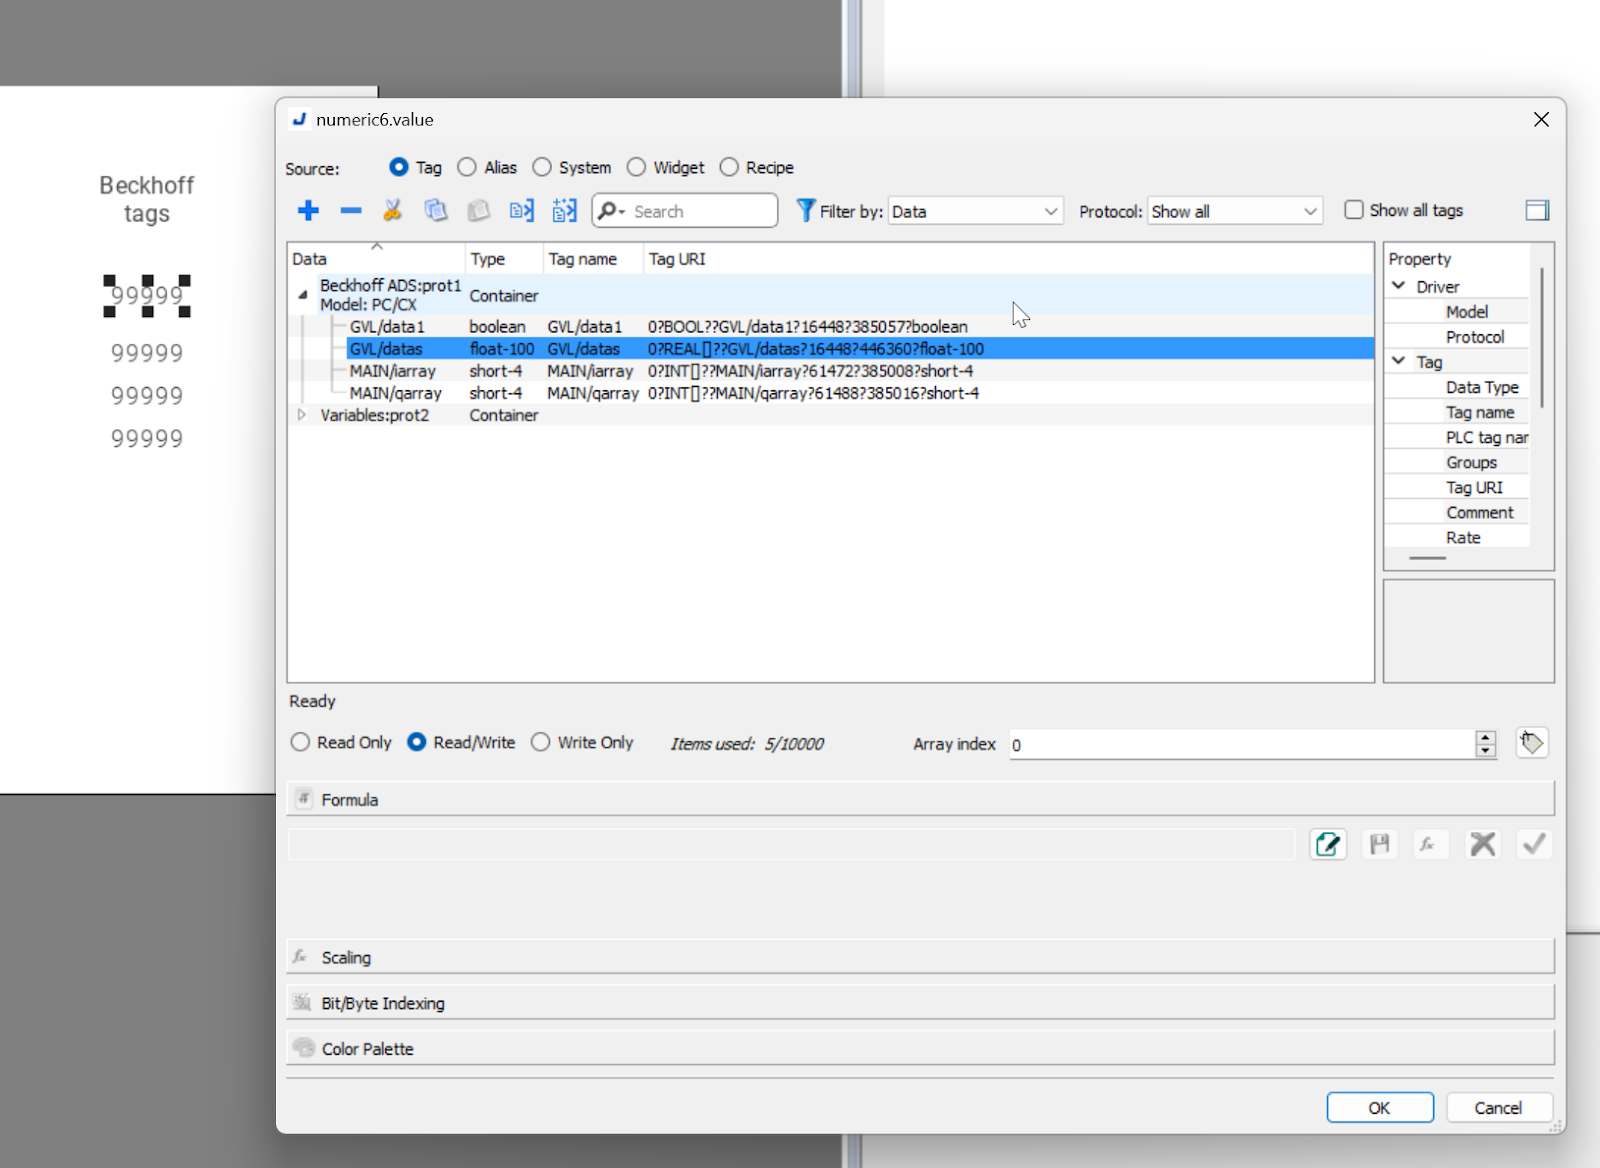
Done!
Add Status Message
Now add a Status Message in Recipe. It is the same as the Status number display shown earlier, but I think it is easier to understand if it is displayed as a Message.

Done!
Let’s connect with the #0 Status variable.

This is Meaning of Status value.
| Code | Function | Descripion |
| 0 | Set modified | The selected Recipe set has changed. |
| 1 | Download triggered | Recipe Download operation is triggered |
| 2 | Download Done | Recipe Download operation is completed |
| 3 | Download Error | Recipe Download operation has error |
| 4 | Upload triggered | Recipe Upload operation is triggered |
| 5 | Upload done | Recipe Upload operation is completed |
| 6 | Upload Error | Recipe Upload operation has error |
| 7 | General Error | Error |
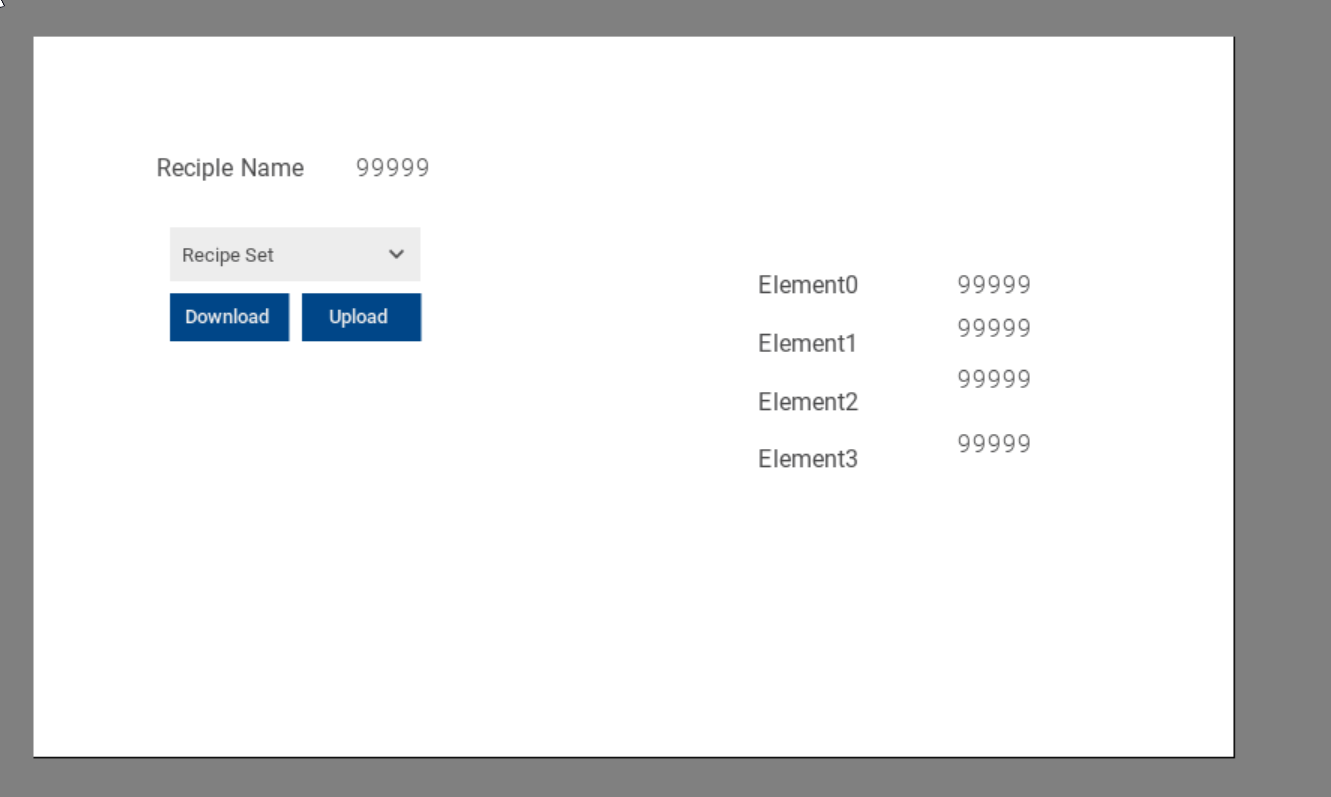
Current Recipe
The last step is to add a string label to indicate the currently selected Recipe set.

Set CurrentSelectSet>Name.

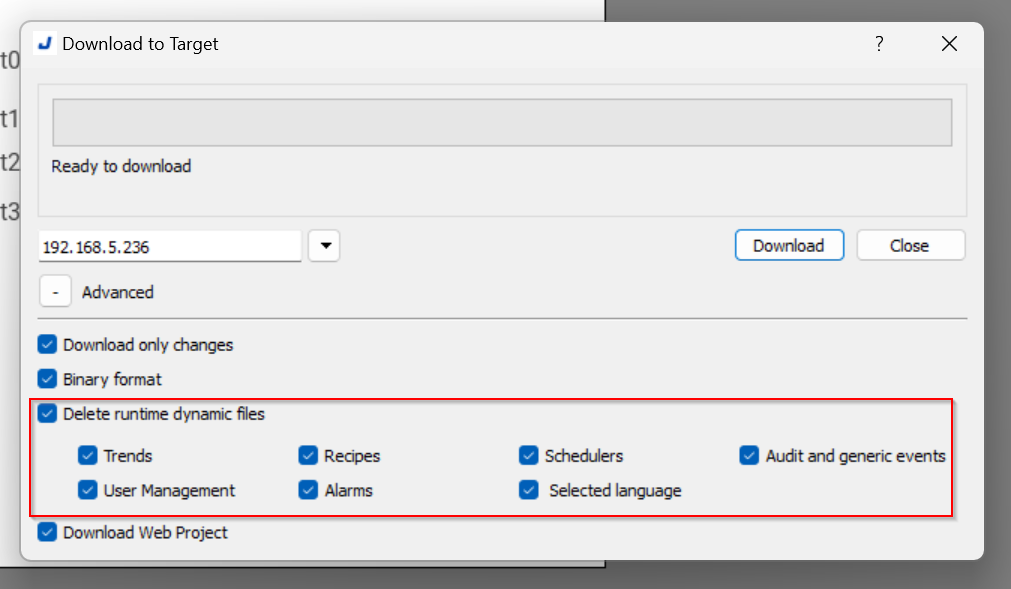
Download
If you are using the Recipe feature for the first time, or if the Recipe feature has been modified, please check the “Delete runtime dynamic files” checkbox before downloading.
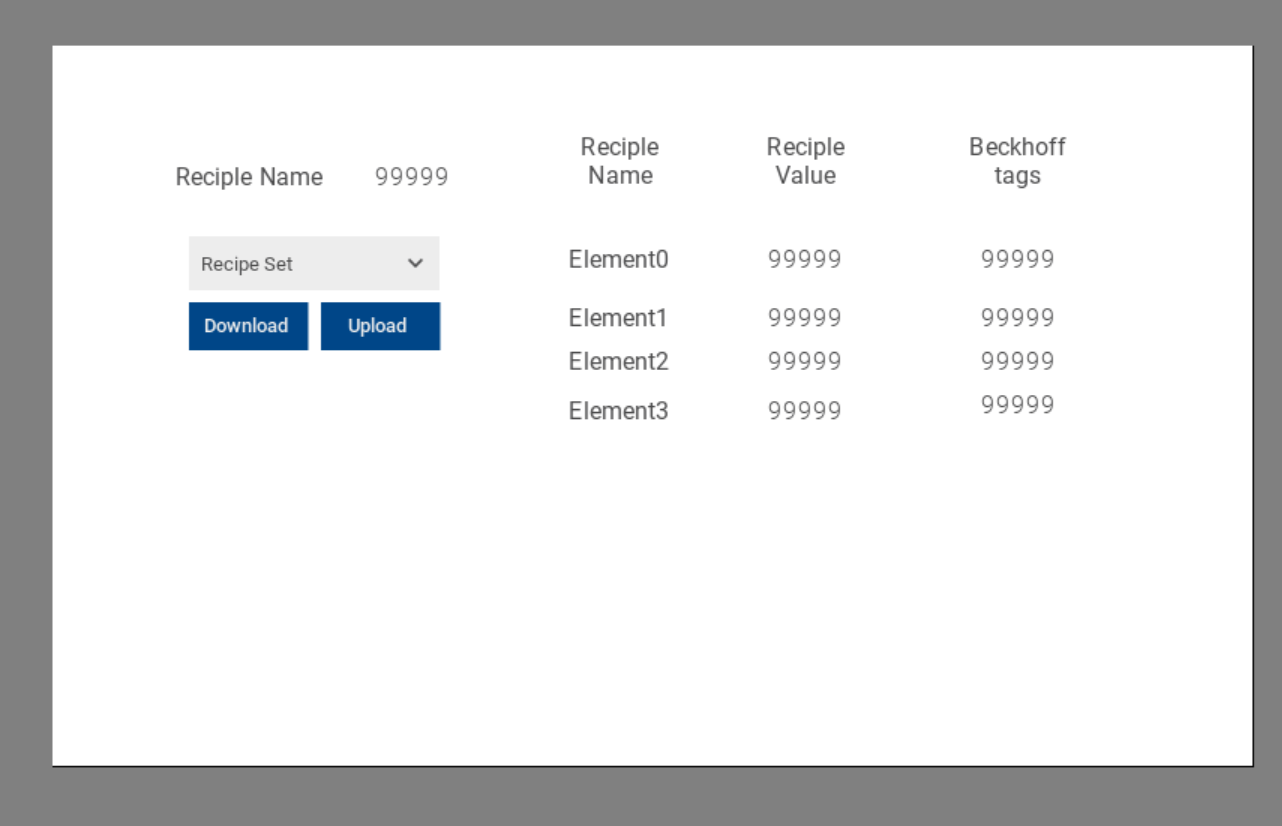
Result
As you see, the Download Upload function in Recipe works with Beckhoff PLC Tags.
The Status Message is also displayed appropriately for the operation.
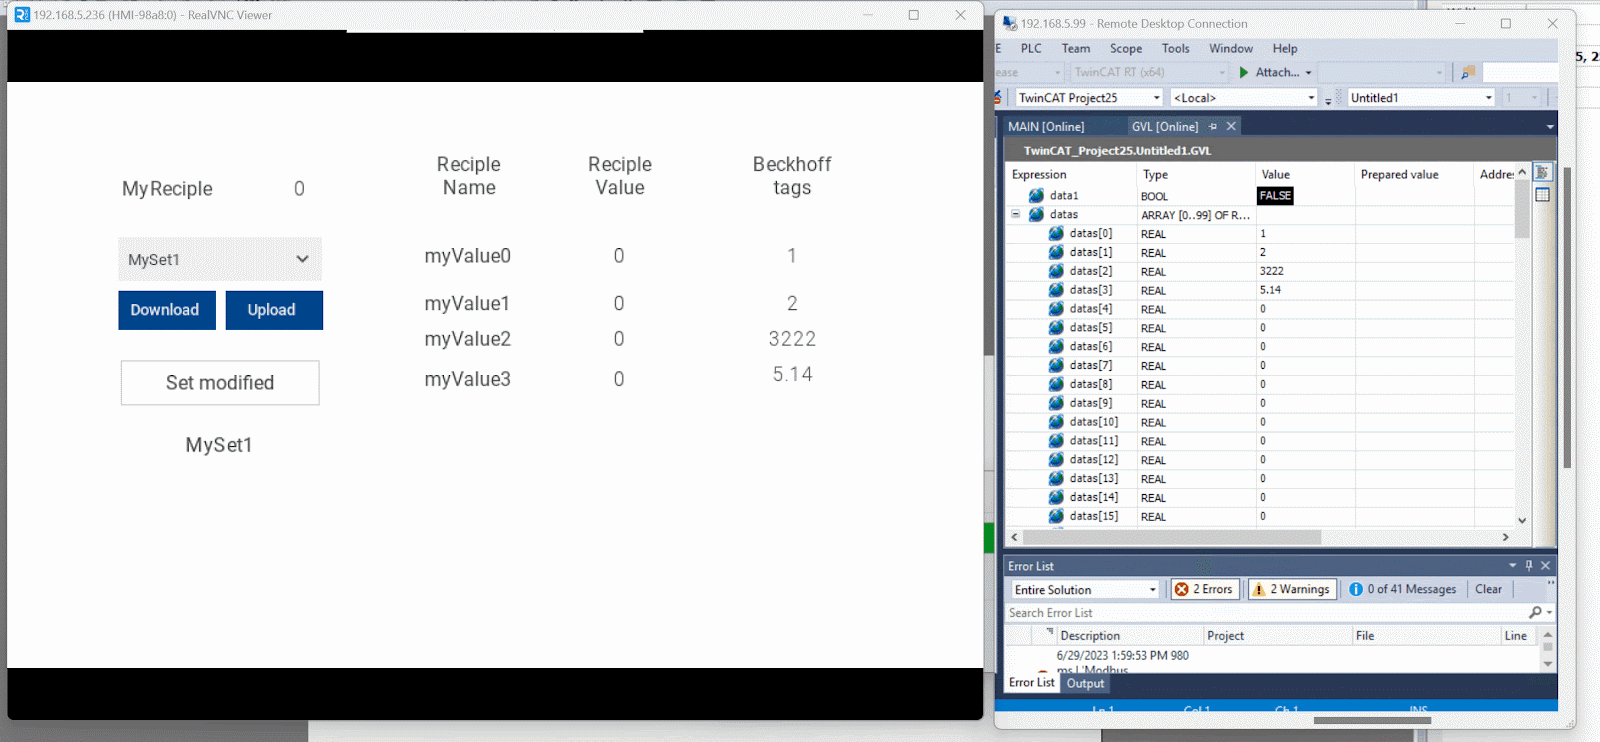
The display value is also changed to the recipe set that you selected.