This is the third episode of the HTP Junction BOX PLC and Taskscript Tutorial. This time, we will create a simple program that converts the output to a ticker every second using basic components such as Delay Timer and local variables.
Let’s get started!
Reference Link
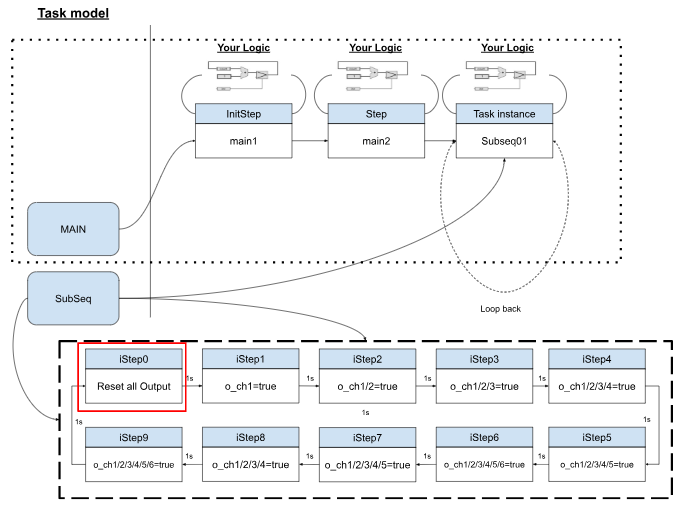
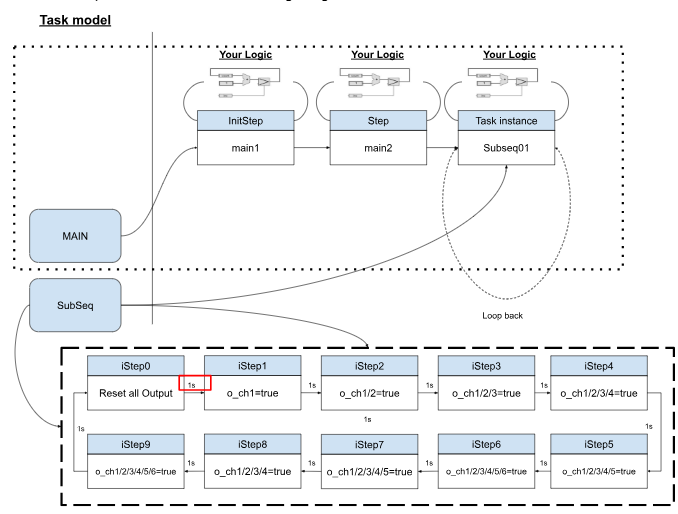
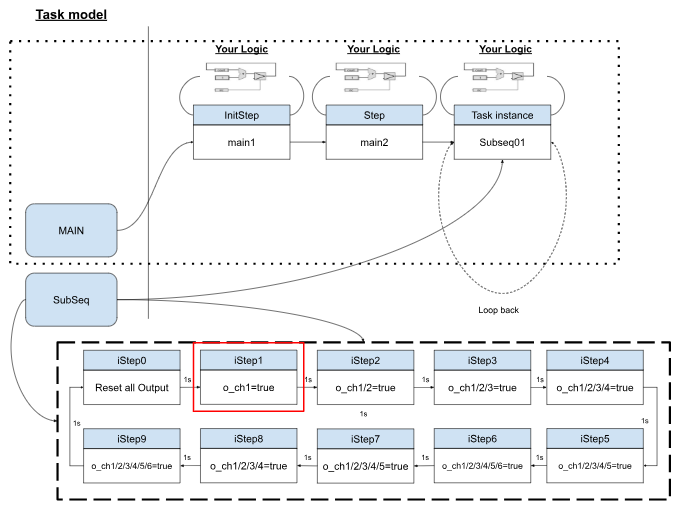
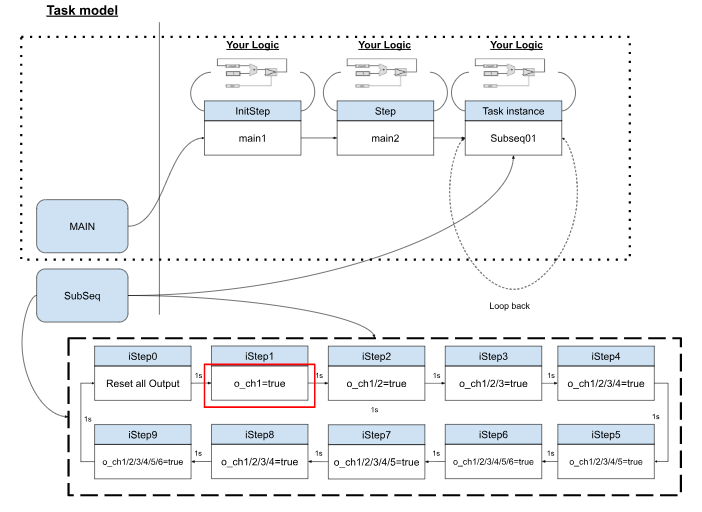
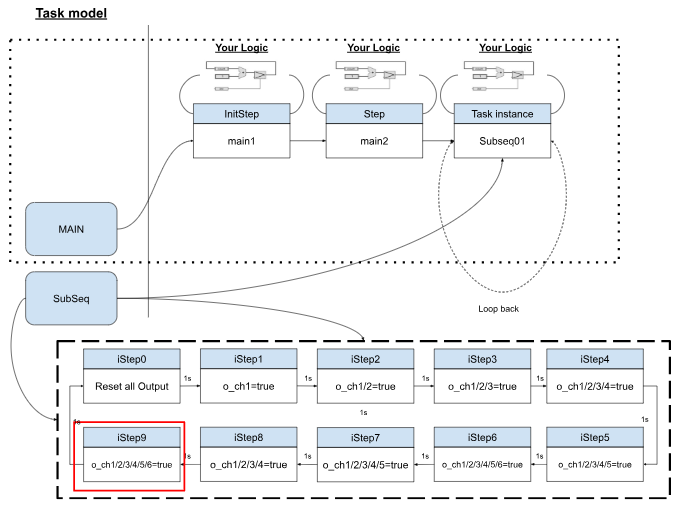
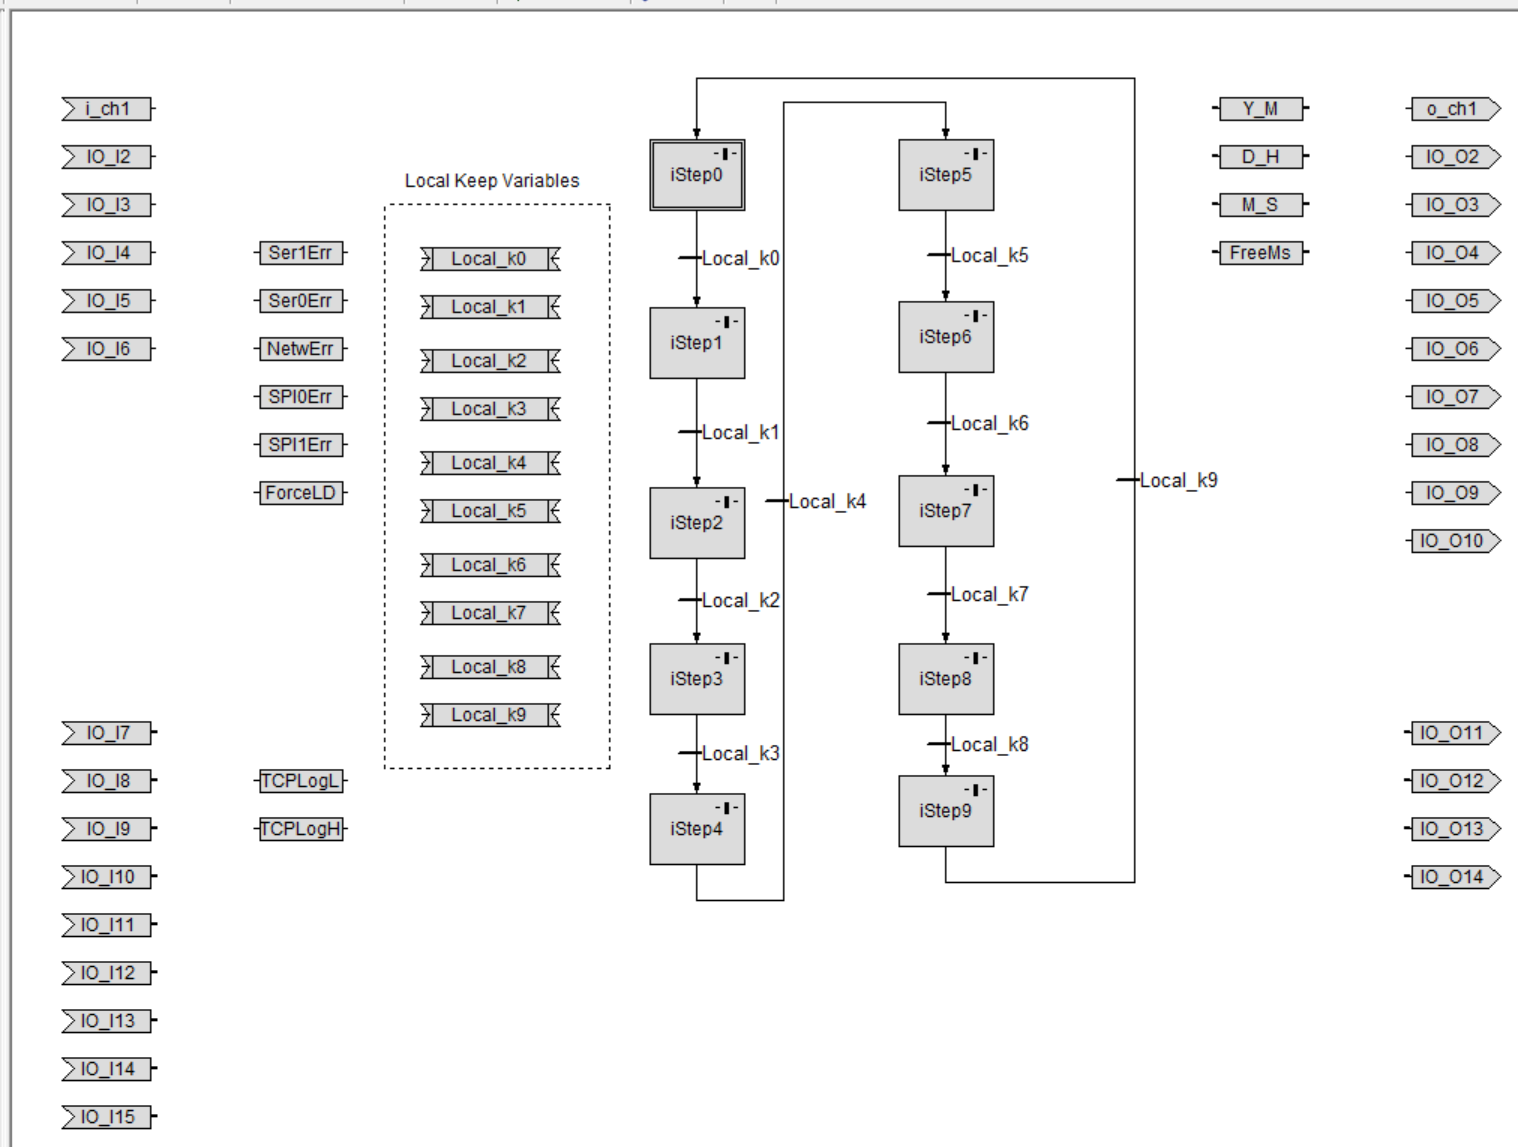
Flow
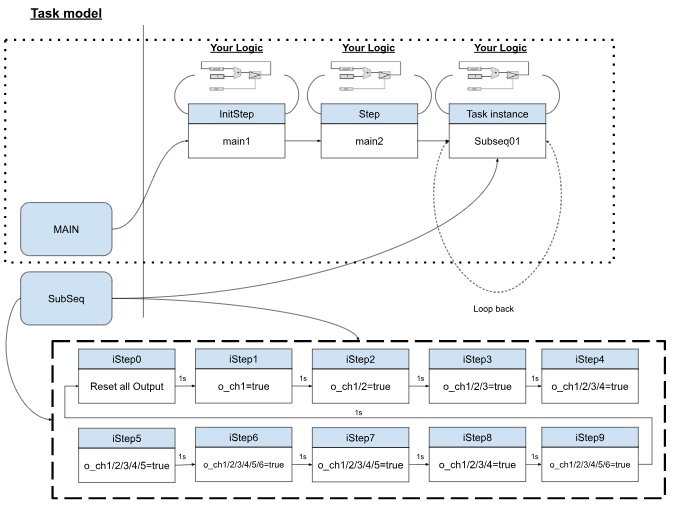
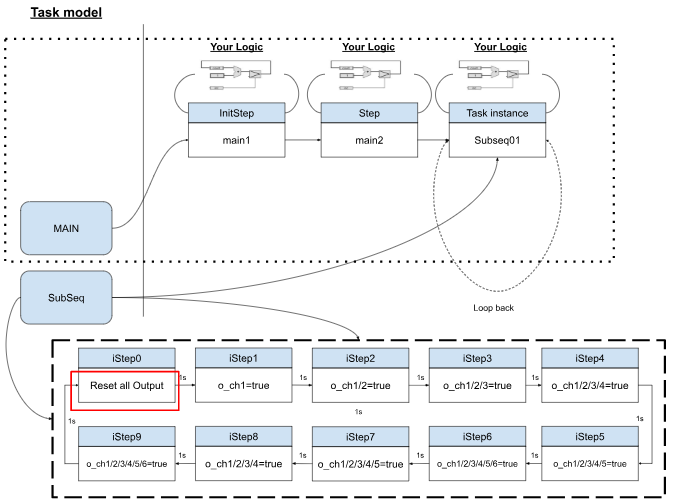
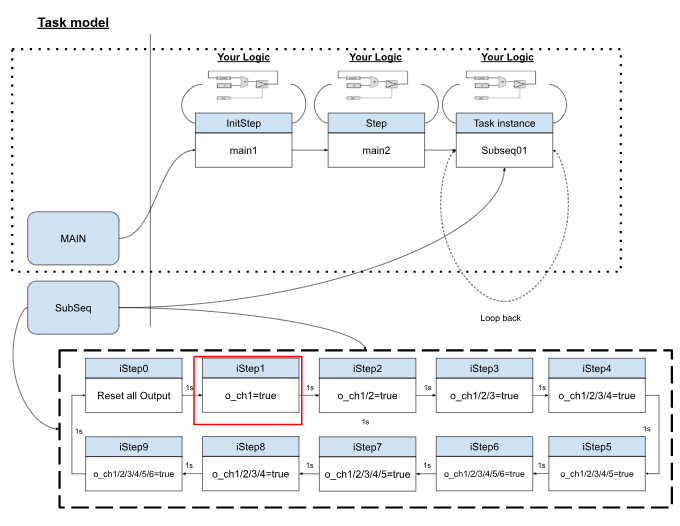
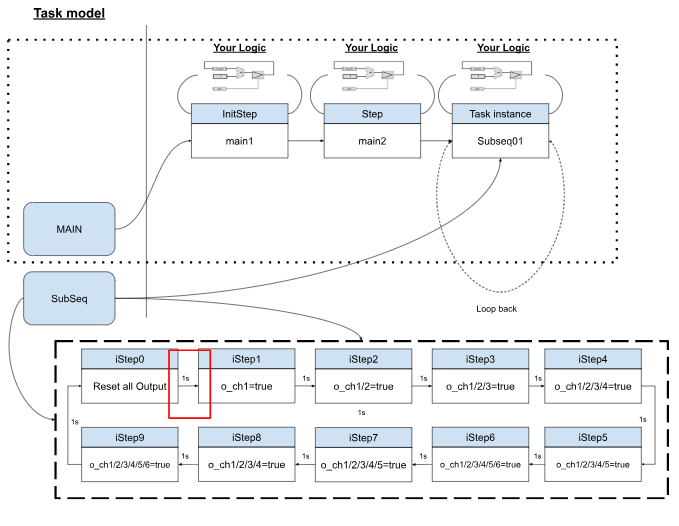
This is the Flow to be implemented in this Tutorial. There is a 1-second delay between each step to control whether the output is turned on or off depending on the corresponding step.
Implementation
You can download the project of the previous Tutorial at this Link. In this article, we will create from this project.
https://github.com/soup01Threes/Taskscript/blob/main/char02.hgr

As with the Flow depicted earlier, control is implemented from the SubSeq Task Model.
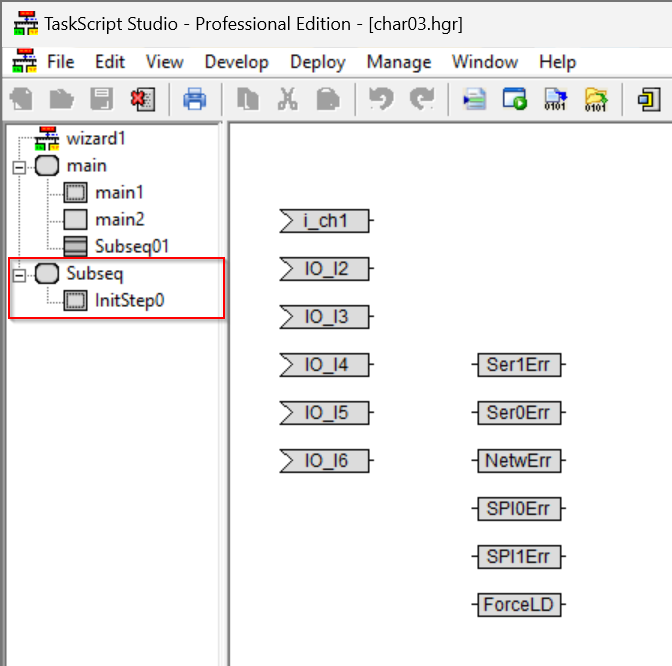
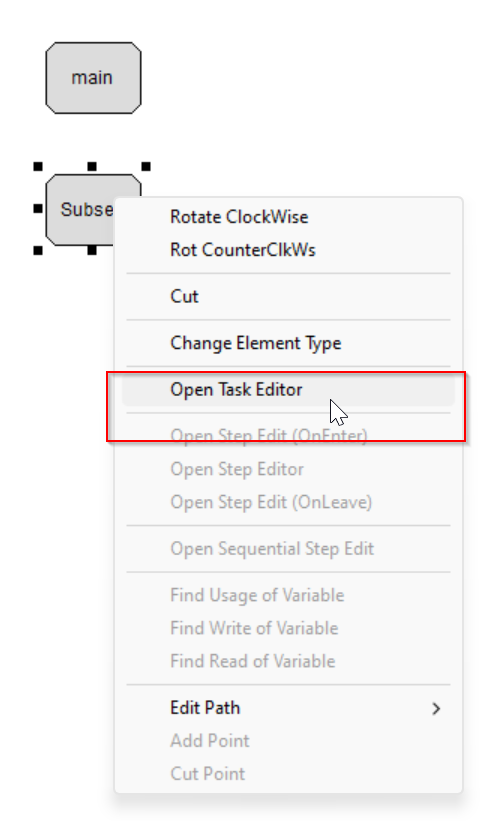
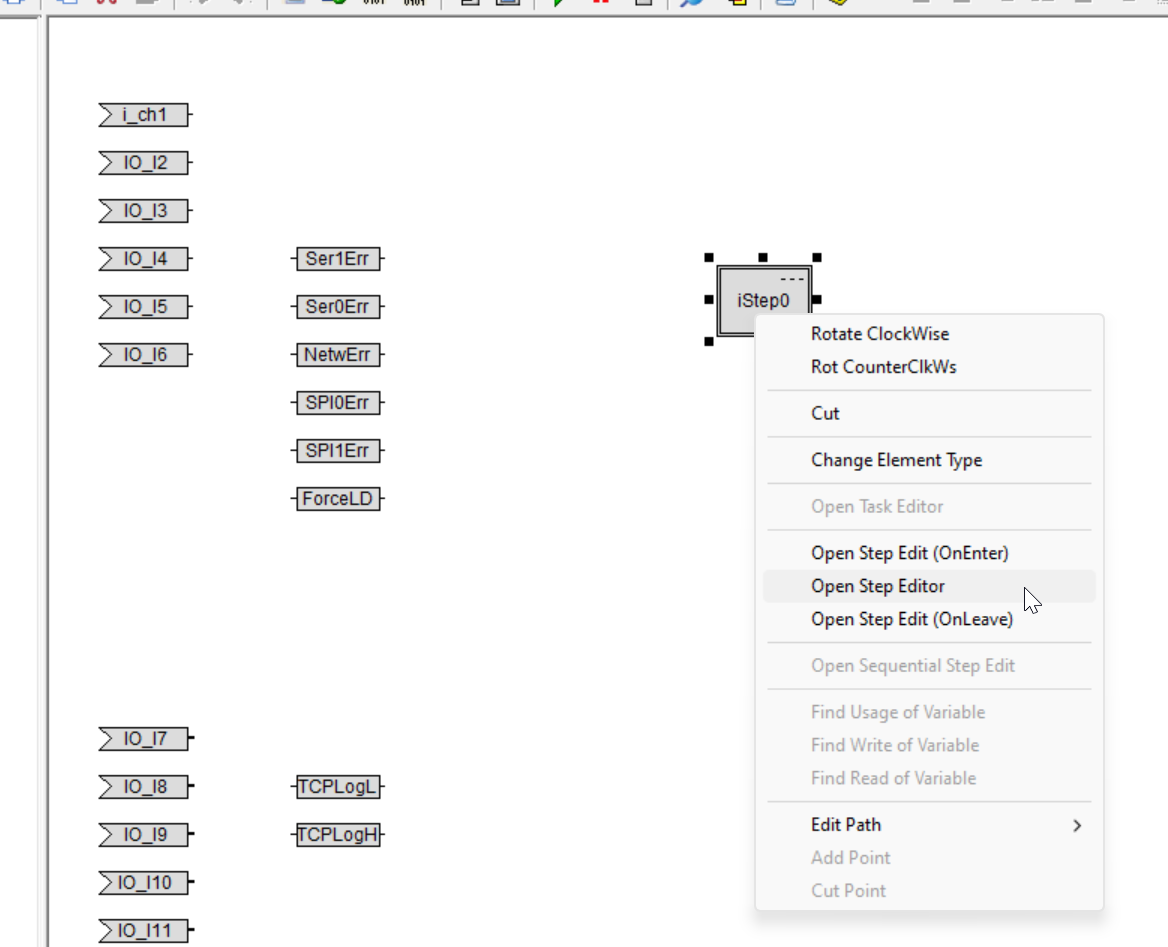
Select Subseq>Right click>Open task Editor.
iStep0
The first step is to build iStep0 (initialization Step).
Edit Step Name
Edit the InitStep name.
Rename it iStep0, as in Flow.

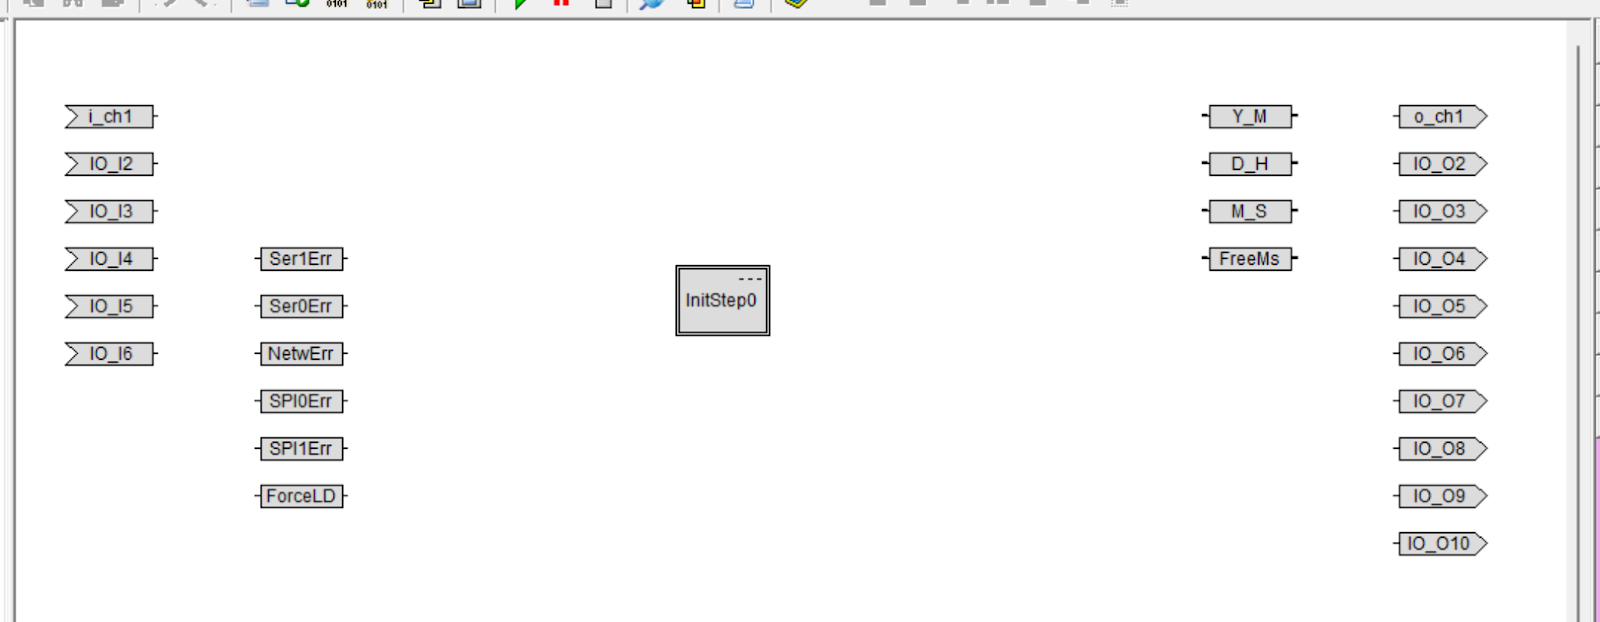
To create a control code to run on iStep0, select iStep0 > right click > Open Step Editor.
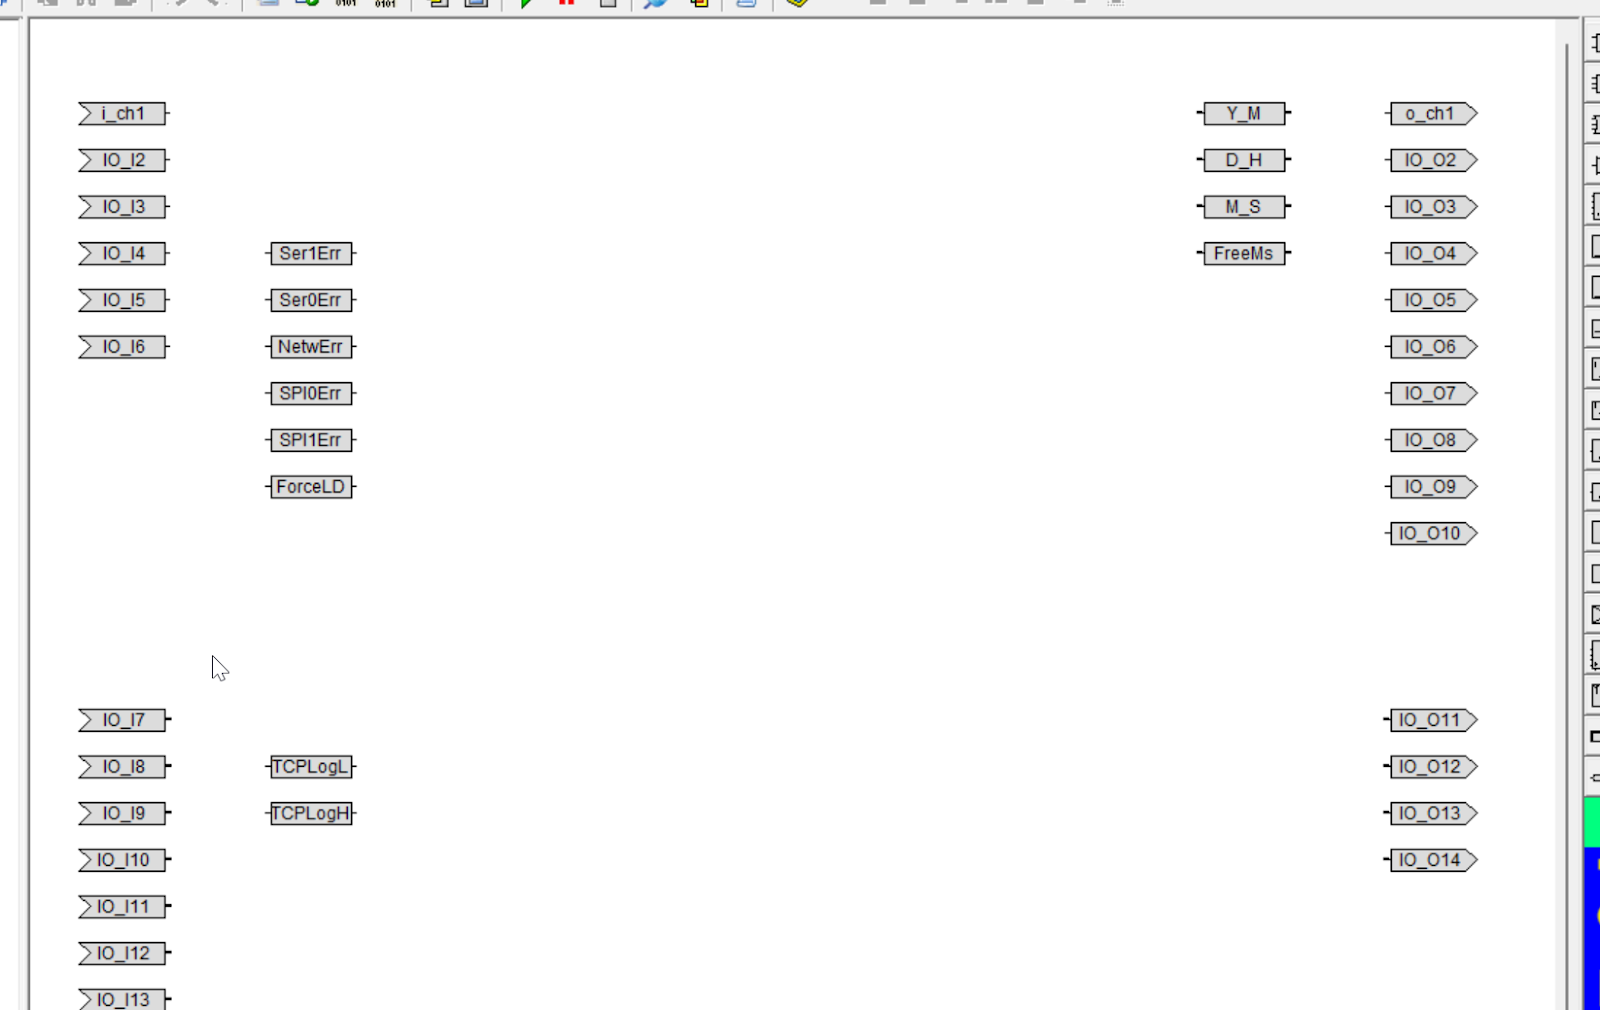
The screen will change to the iStep0 internal code editing screen.
Action
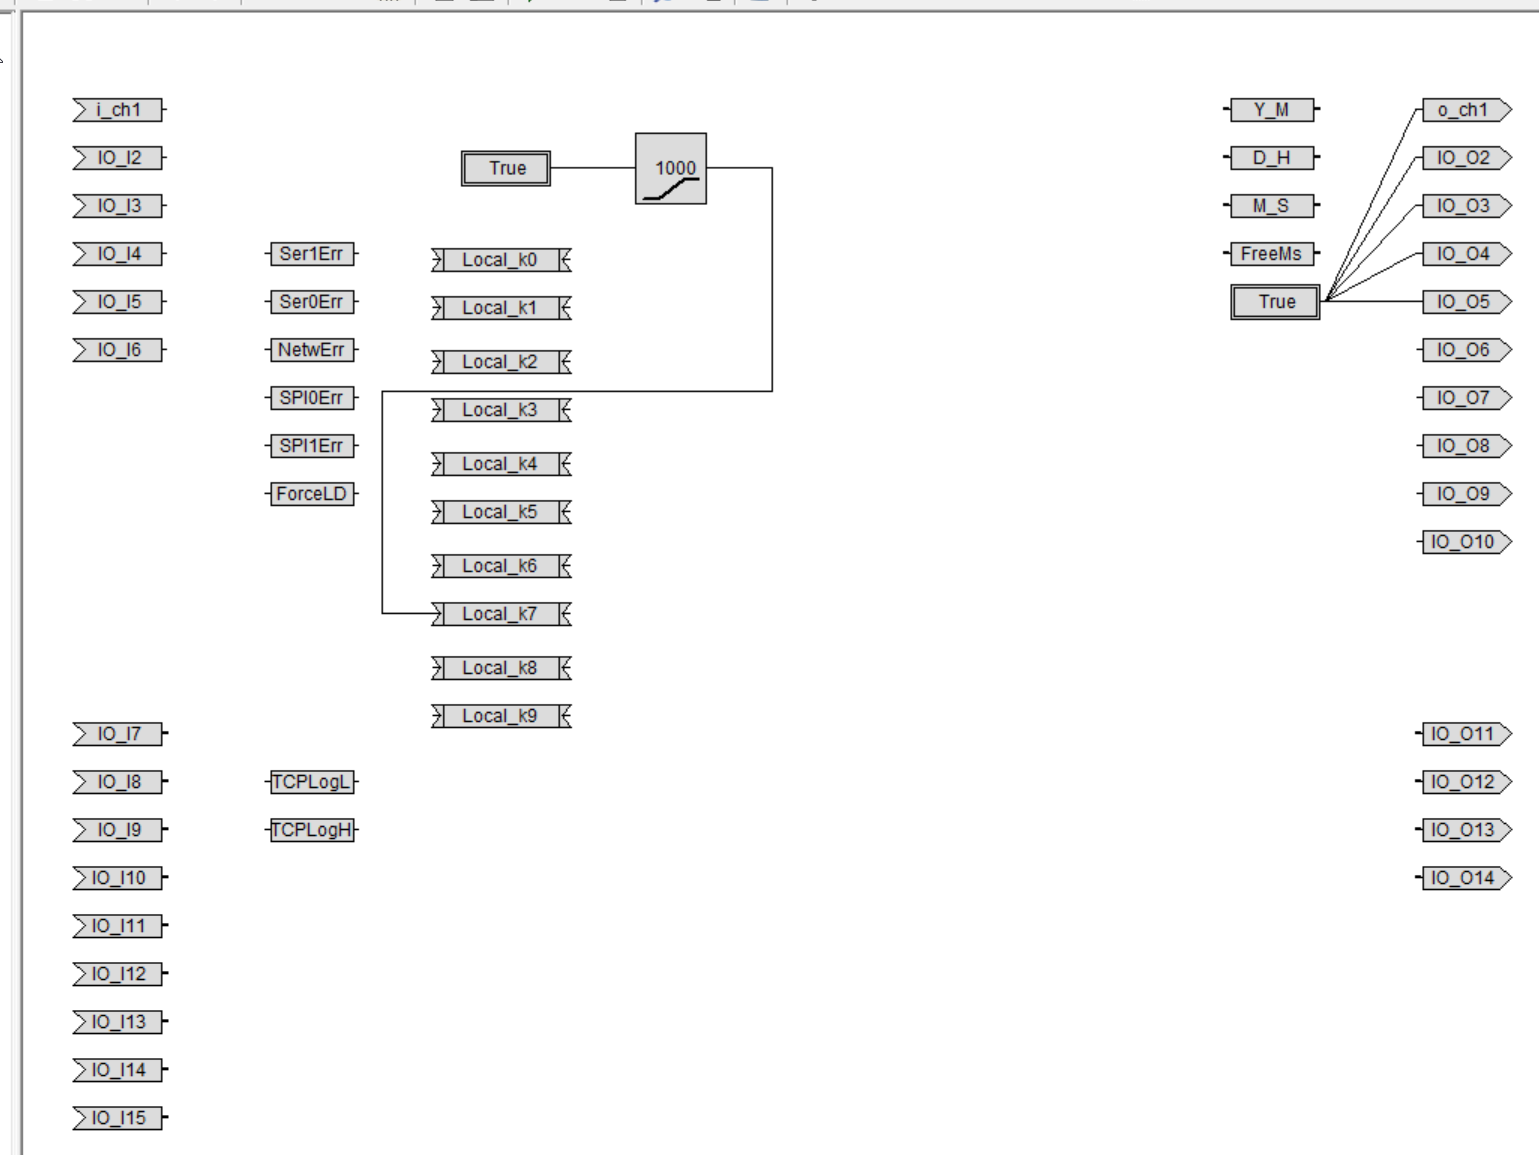
iStep 0 should reset all PLC outputs.
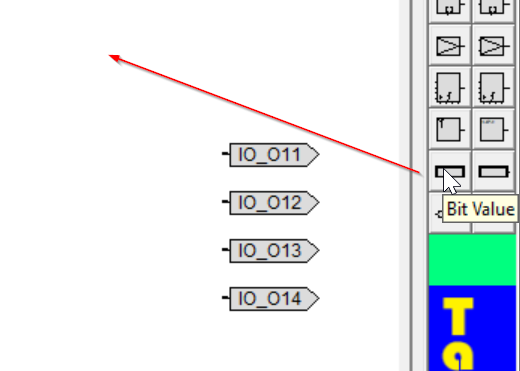
Select the Bit Value component from the previous Step Editor and add it to iStep0.
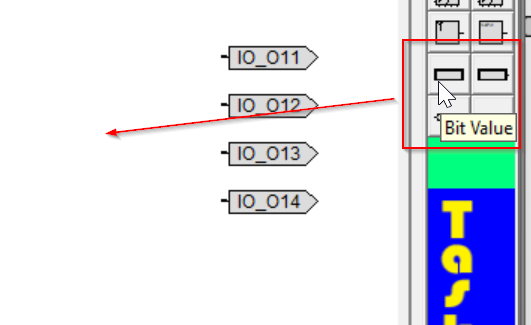
A Bit Value component has been added.

Double-clicking on the Bit Value component allows you to select False or True from the Value; if it is selected to True, the Bit Value component is constant True.
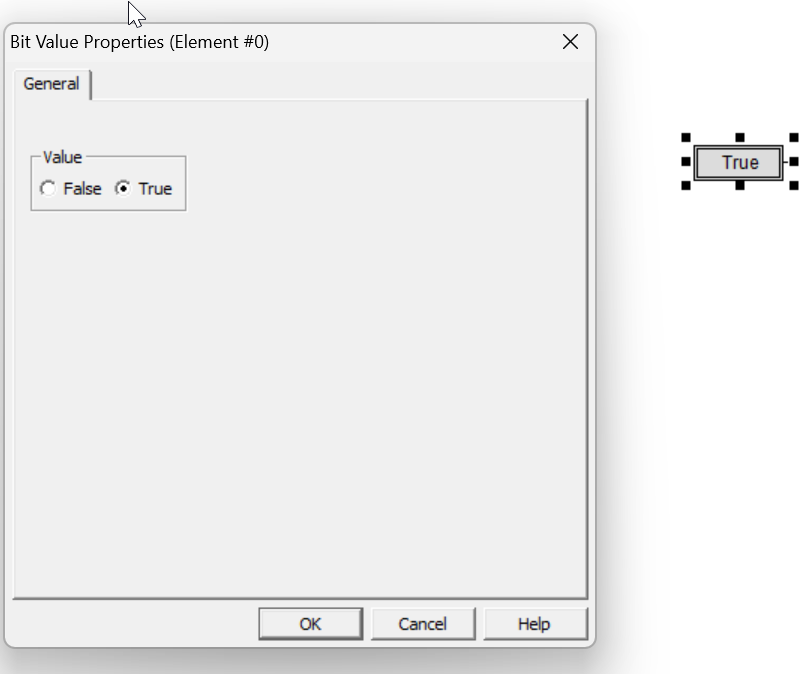
This time, we will set Value to False.

Done! Originally, the Bit Value component changed from “True” to “False”.
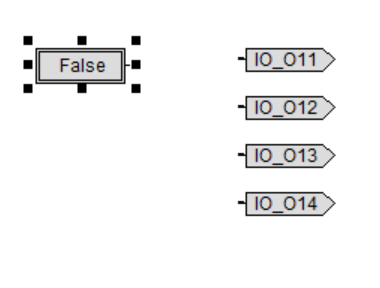
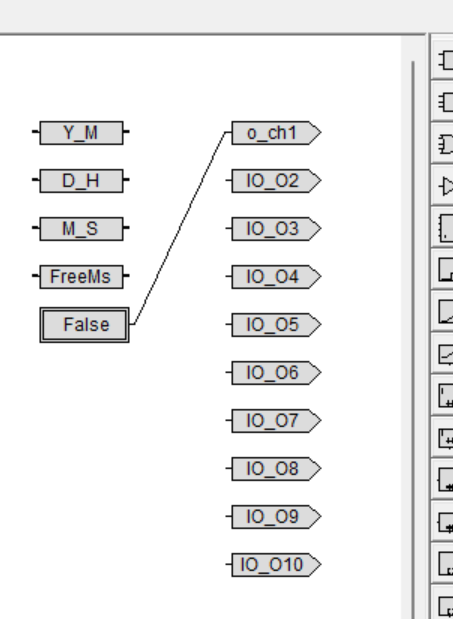
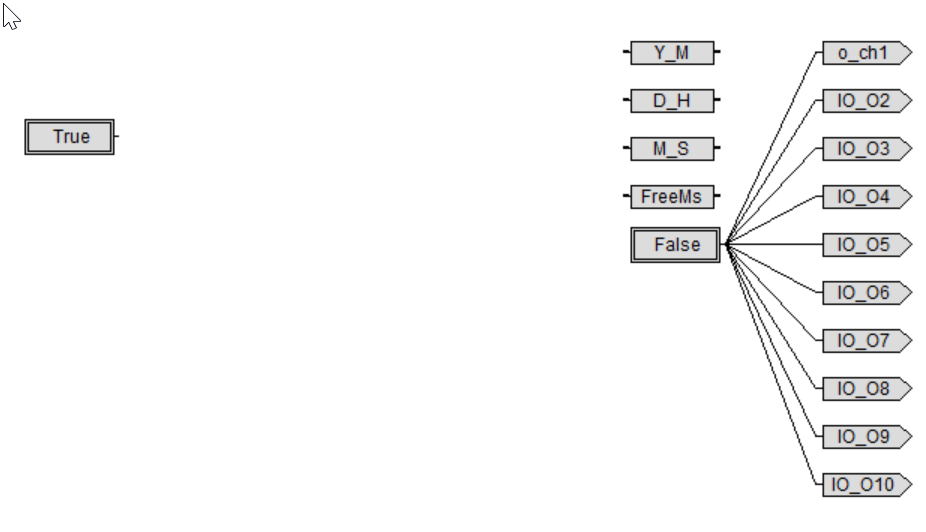
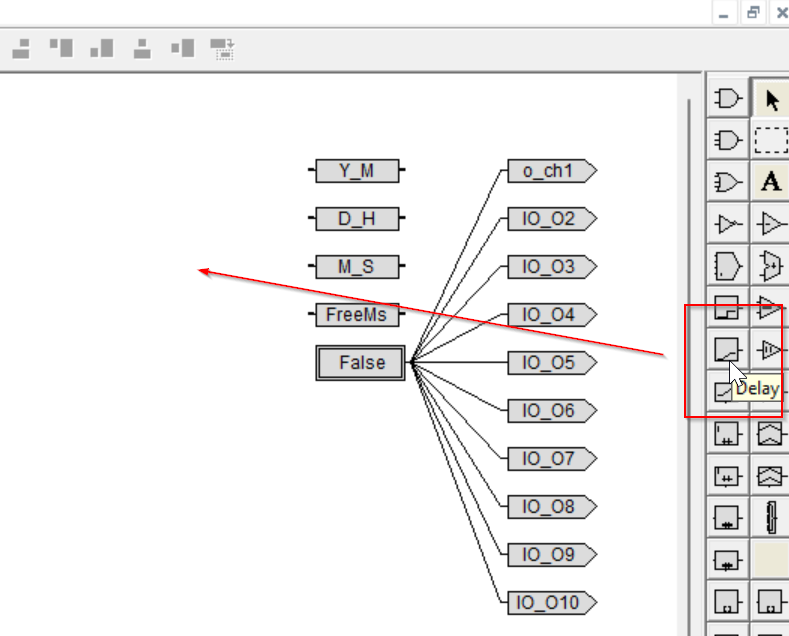
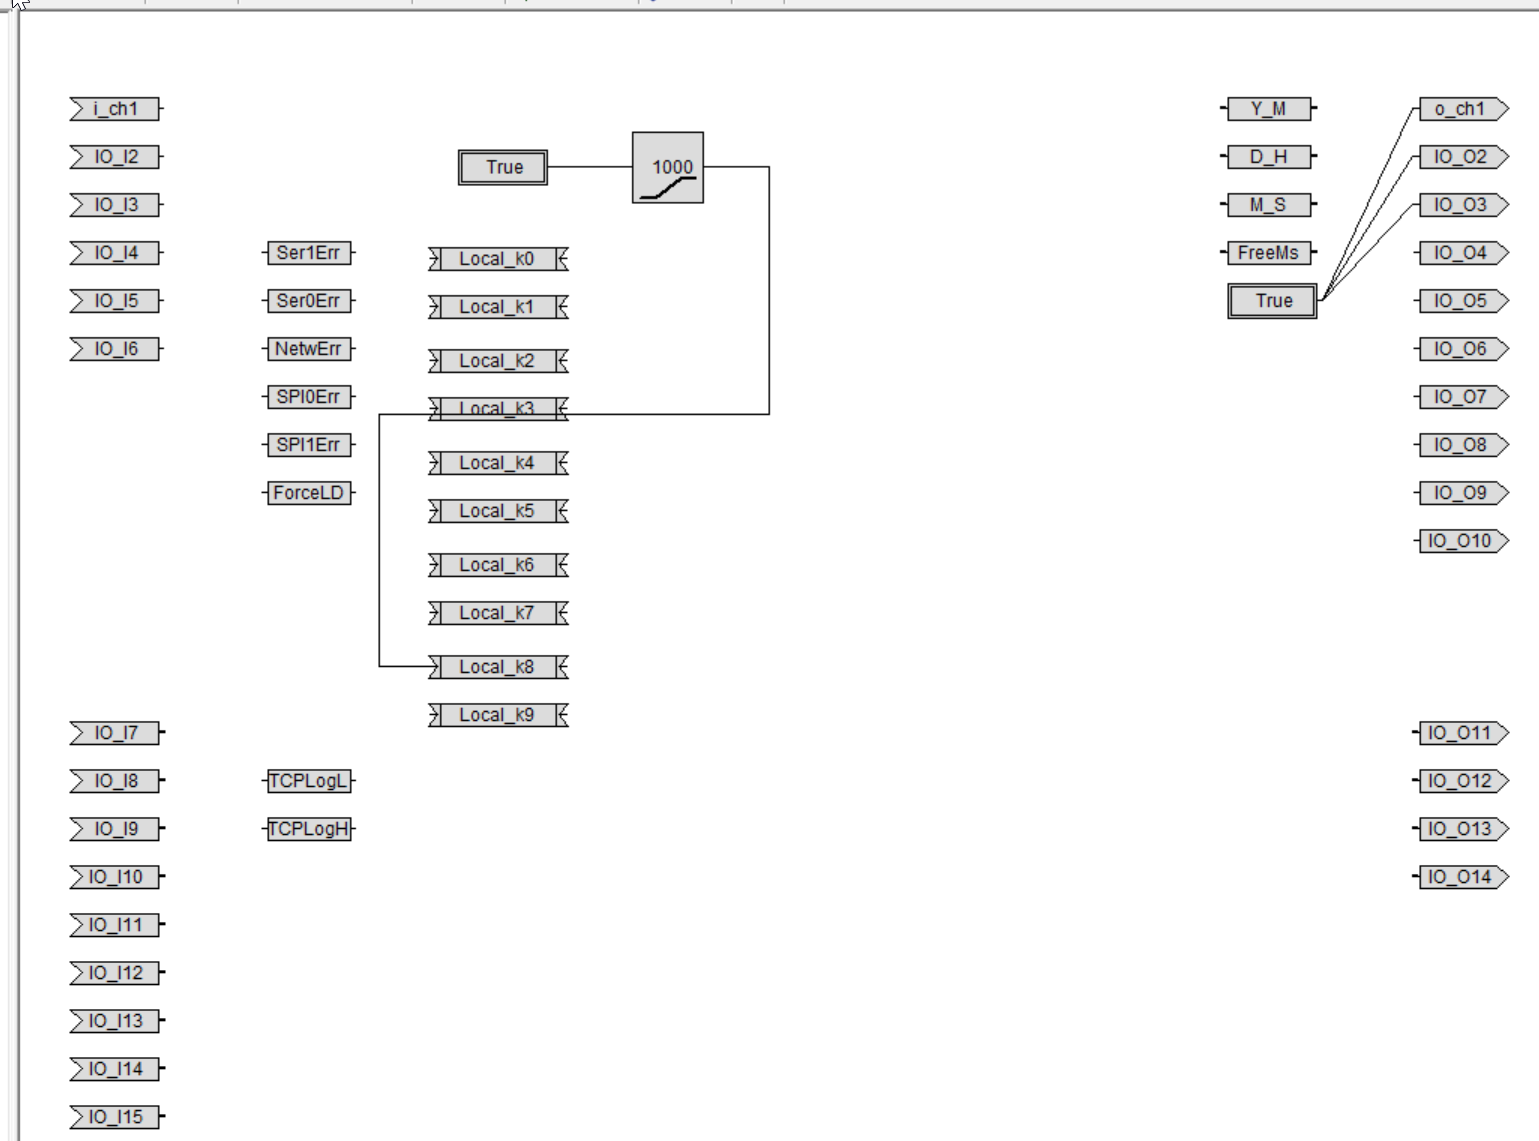
Next, o_ch1 can be reset to False by connecting the Bit Value component of the False constant to o_ch1.
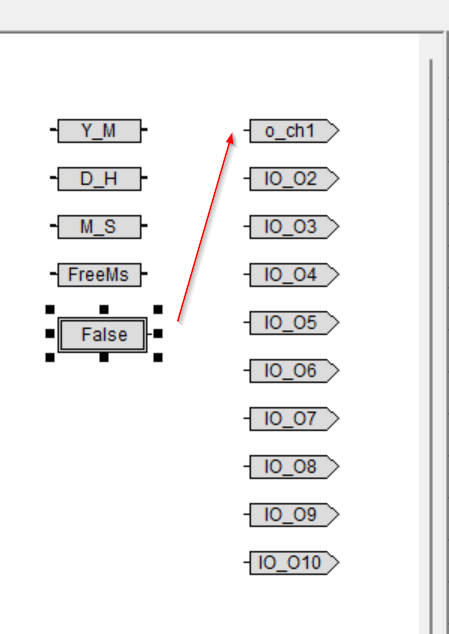
The operation is as shown in the figure below.

Done!
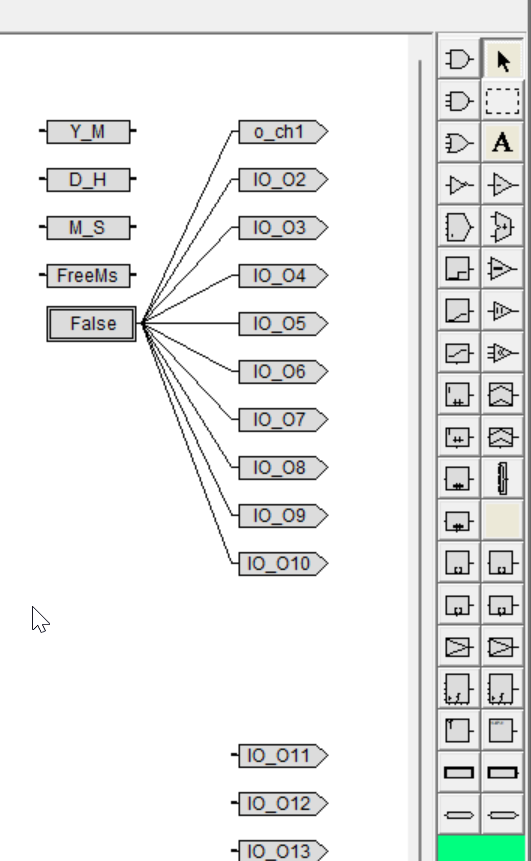
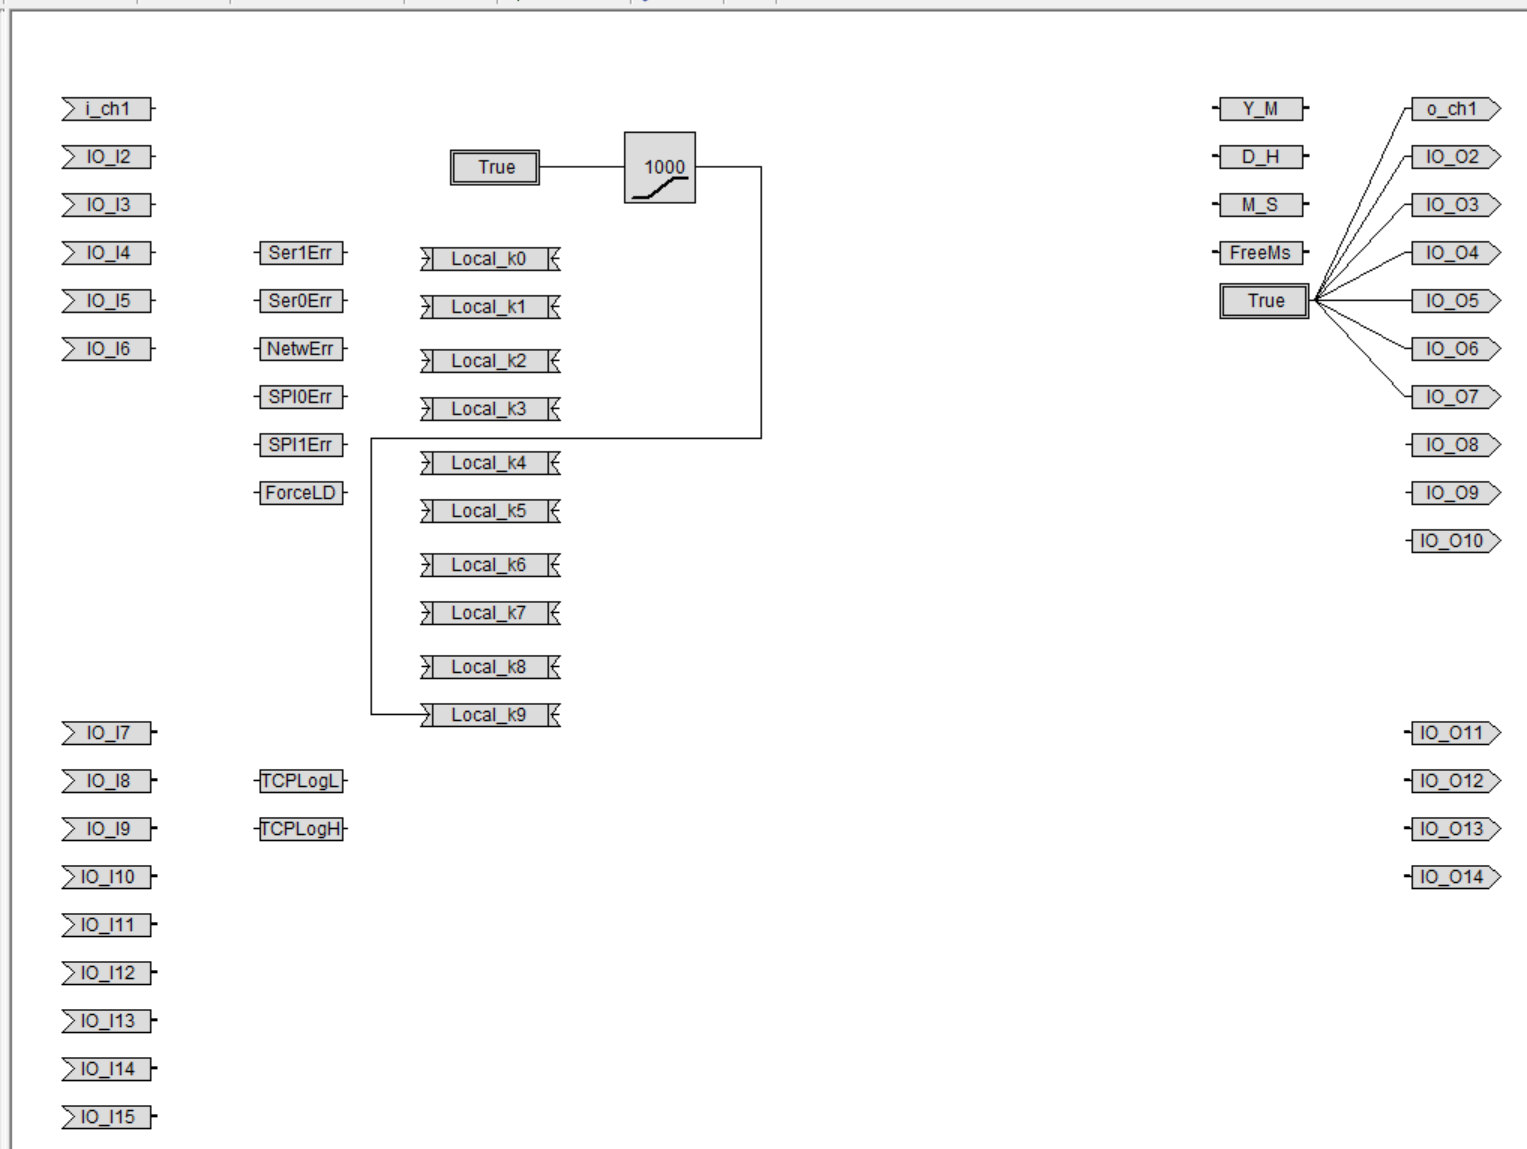
Let’s connect o_ch1, IO_O2 through IO_O10 with the Bit Value component of False using the previous operation.
This means that iStep0 will reset all outputs.
Bit Value?
Bit Value is actually a component that is there to pass new values to other variables, etc. Taskscript provides three types of Value components.
- Boolean
- True or False
- Numeric
- The range is -32768 to +32767.
- Little-Endian Format
- For example, if you want to set 0x1234, you can enter the value from 0x. (0x1234=4660Dec)
- String
Add Bit Local Keep
Now we define local variables in SubSeq: Taskscript can define two types of local variables: a Bit Local Keep component that holds the result of an operation until the next cycle, and a Bit Local Temp component that clears the result of an operation.

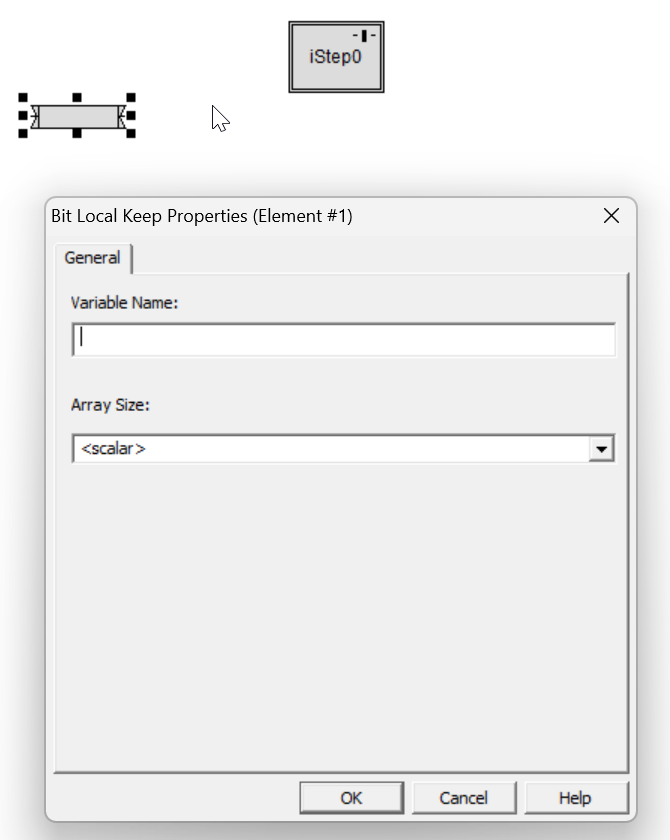
Bit Local Keep component added.

Adding a Bit Local Keep component is not enough to use it in the program yet, so double-click on the component and set the Variable Name, and if you want it to be an Array, change it from the Array Size field as well.
Bit Local Keep part Local_k0 defined.
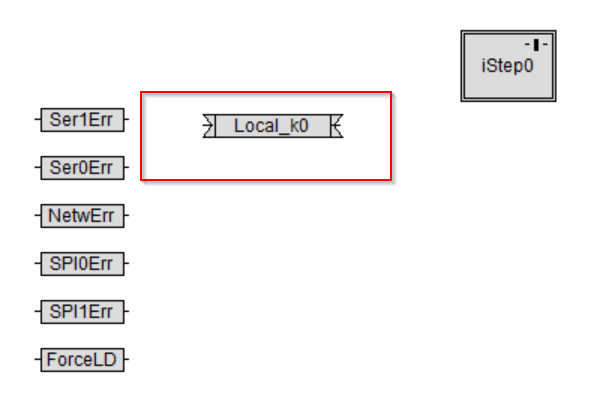
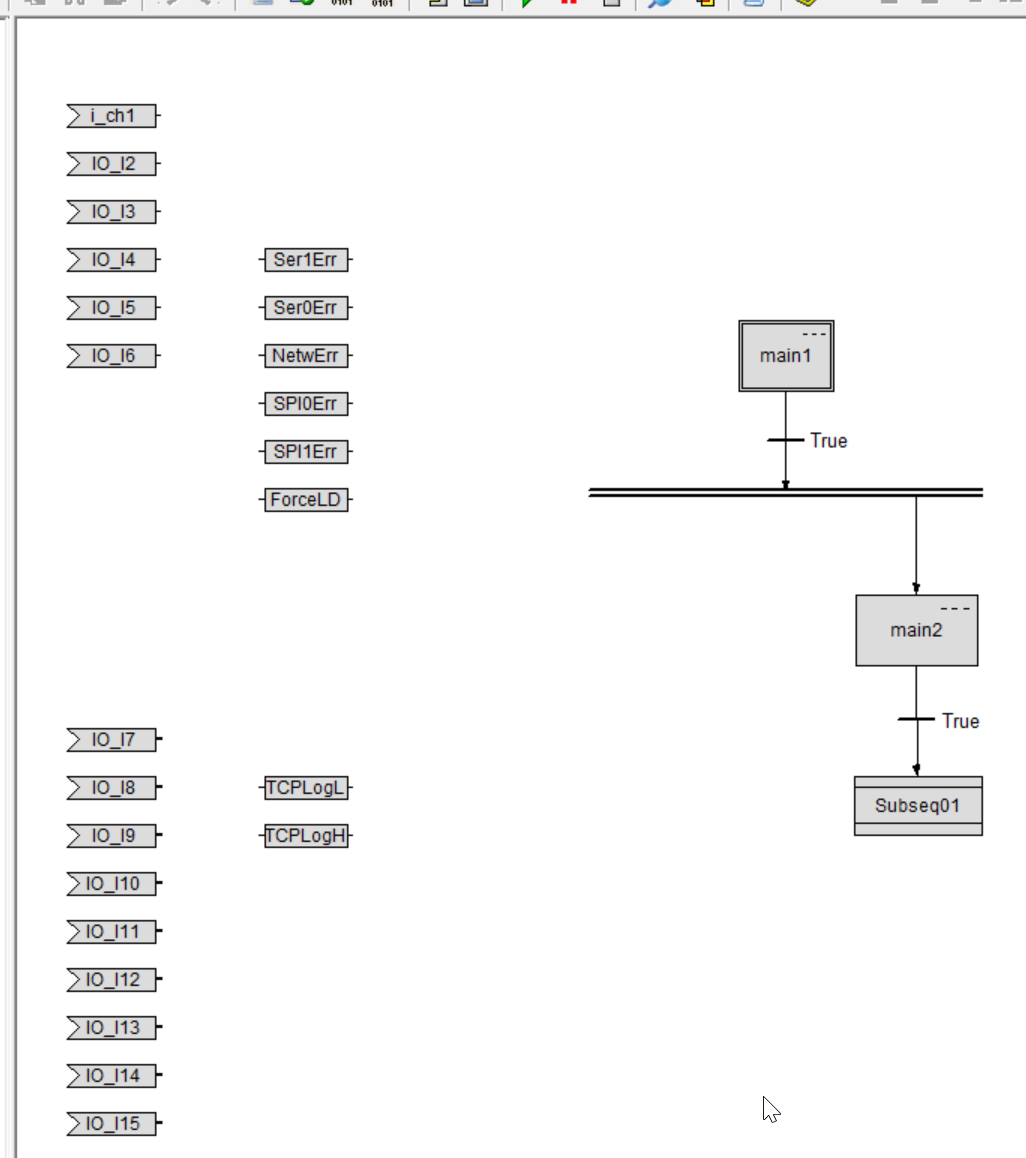
As I told you at the beginning, this component is a local variable, so it cannot be used in other Task Models. Let’s open Task main to check.

In Main Task, the Local_k0 local variable that I just defined is not visible. So, the Scope of the local variable is only your Task.
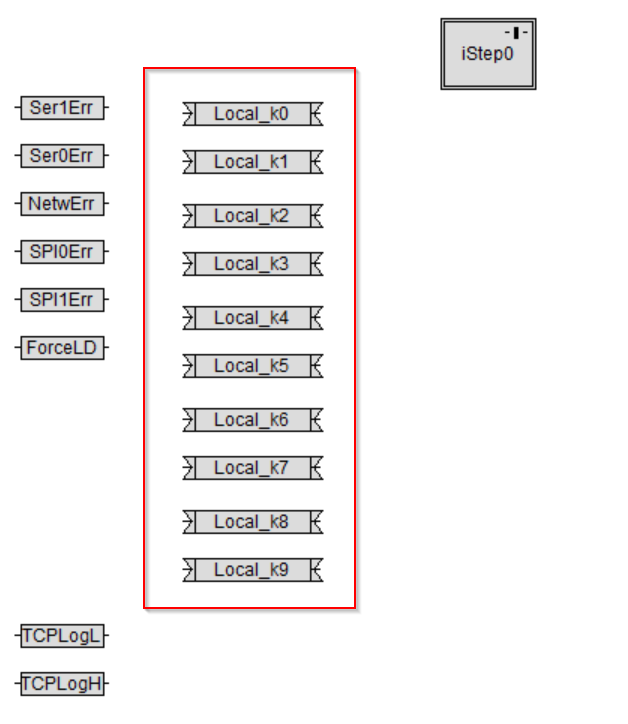
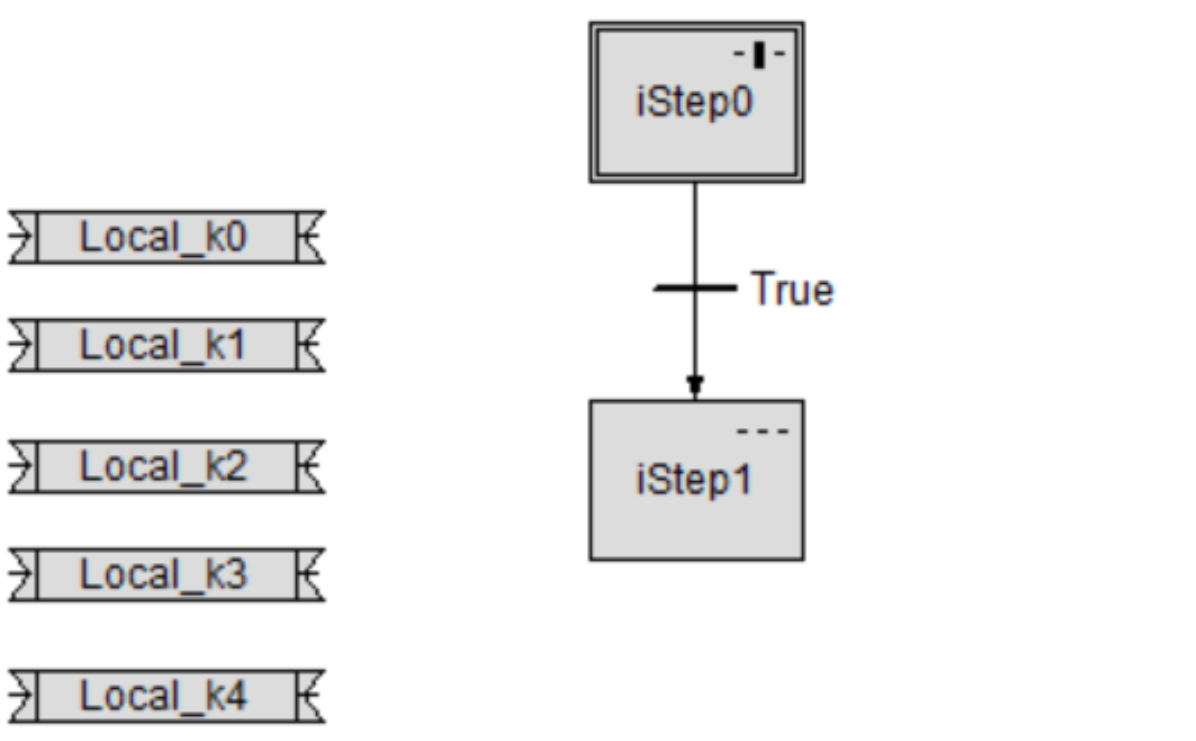
Using the same operation just described to add a total of 10 local variables.
iStep1
The next step is to create iStep1.
Add a Step component from the Toolbar on the right.
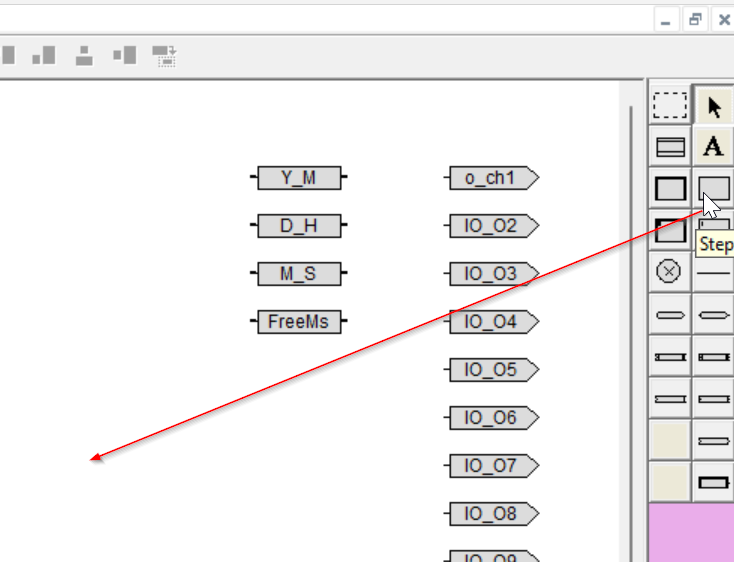
Done!A Step component named ST_1 was added.
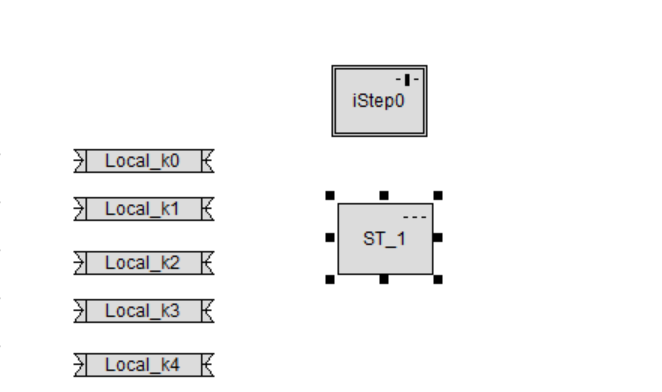
Rename ST_1 to iStep1.

Create Step Flow
Now we will define the control that transitions from iStep0 to iStep1.
Mouse right-click on iStep0>Drop upward on iStep1, and iStep0 will now move to iStep1 with the condition aligned.
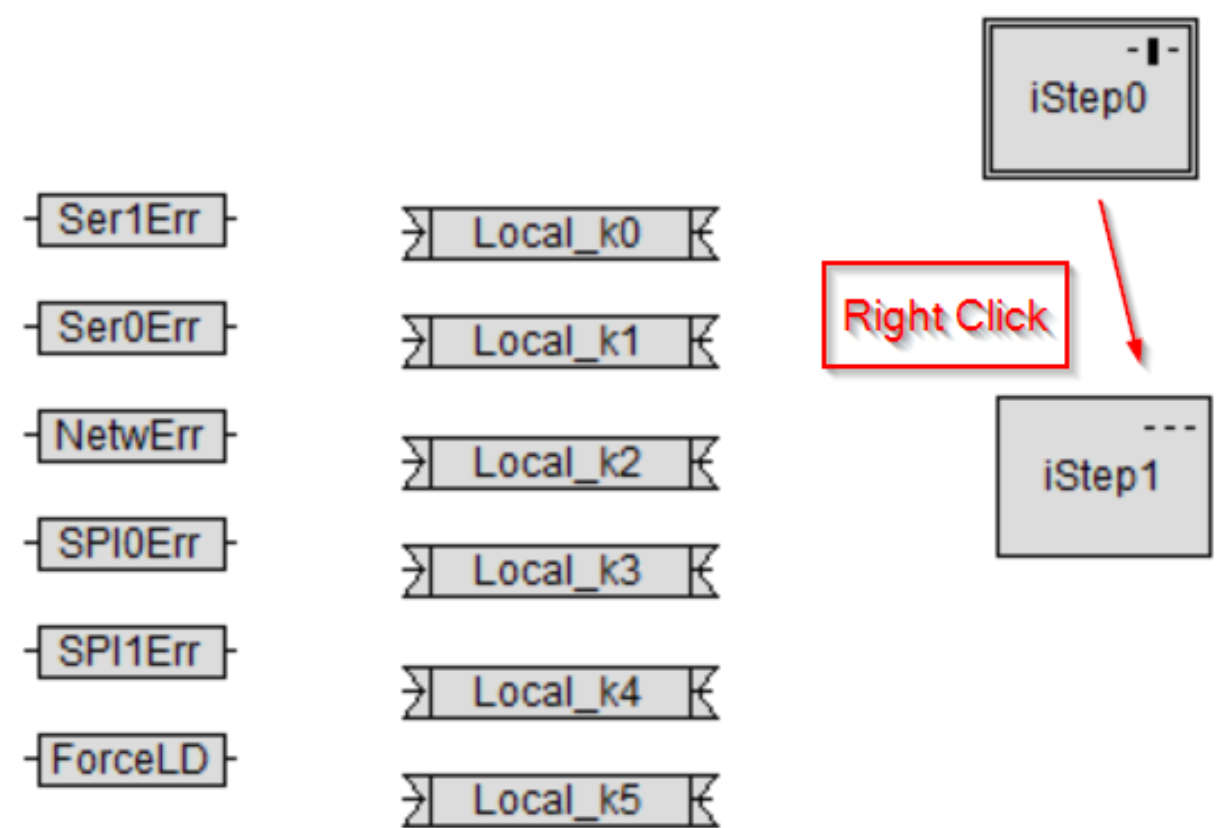
The operation is as shown in the figure below.
Done!
Flow Condition
There is a 1 second Delay to move from iStep0 to iStep1. In other words, iStep0 > 1 second wait > 1 second wait monitoring Flag becomes True > transition to iStep1.
The first step is to create the monitoring Flag.
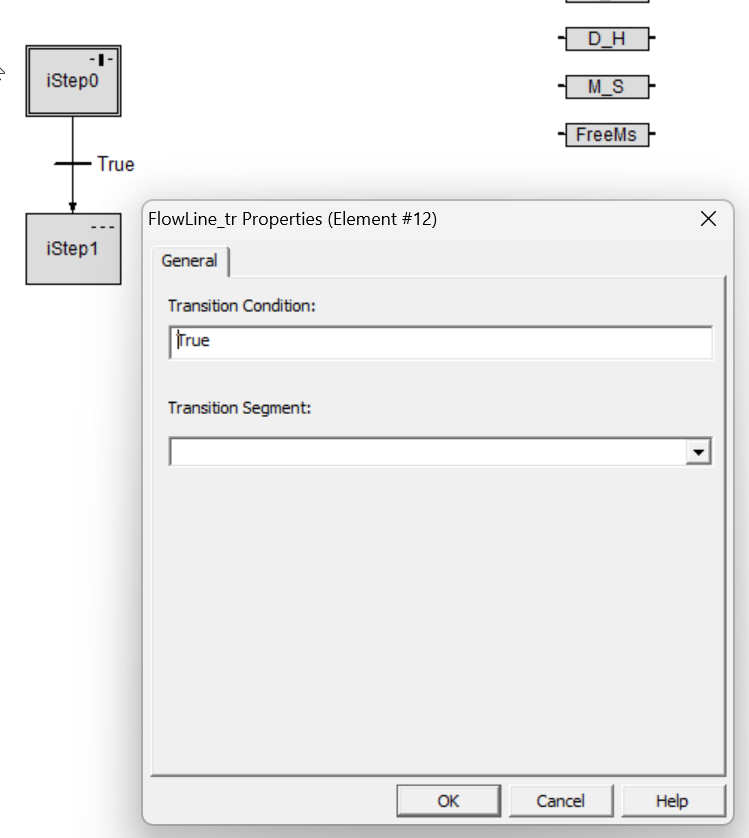
Now the transition condition from iStep0 to iStep1 is True, which means that iStep0 will unconditionally transition to iStep1.
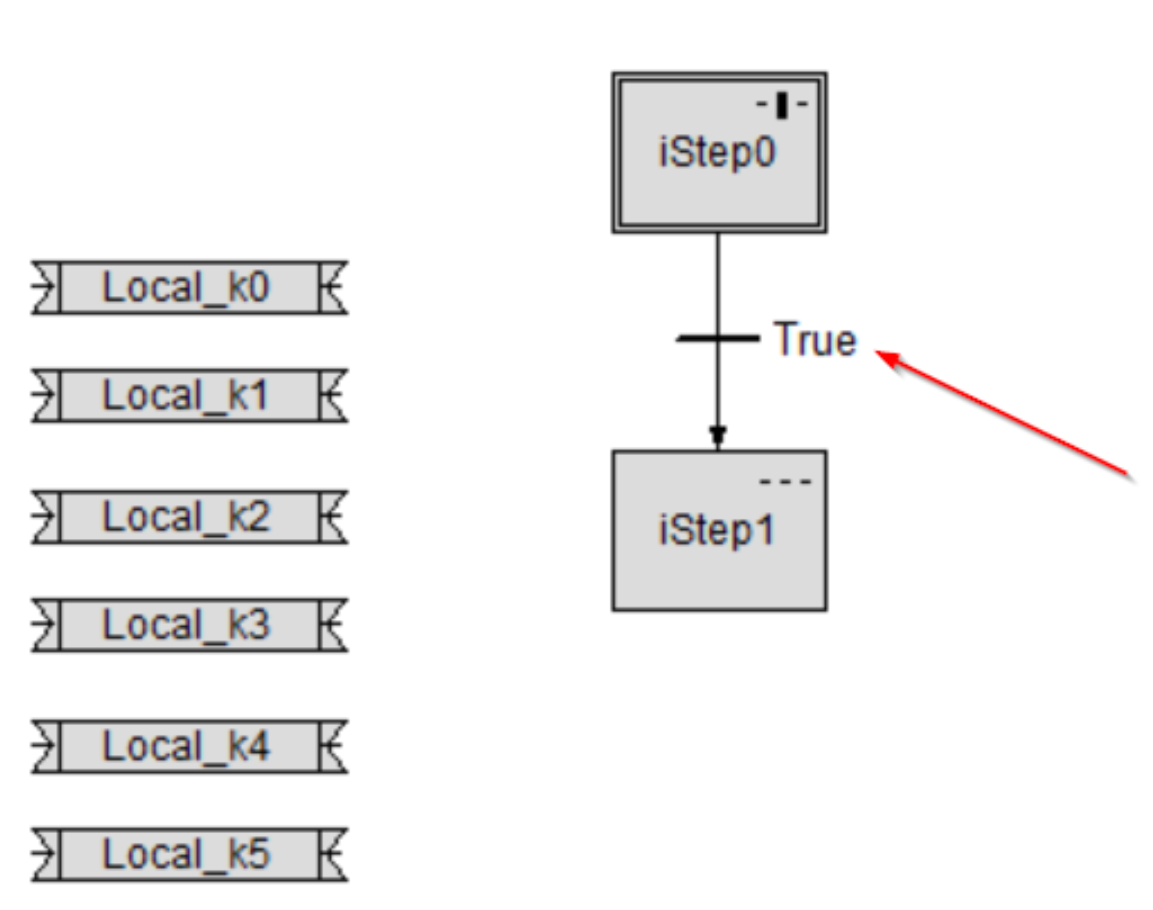
If you change the Field of Transition Condition by double-clicking the True character, you can create a condition monitoring Step Transition Flow.
Local_k0 will be used in this article.

So, enter Local_k0 directly in the Field of Transition Condition and save the setting with Ok.
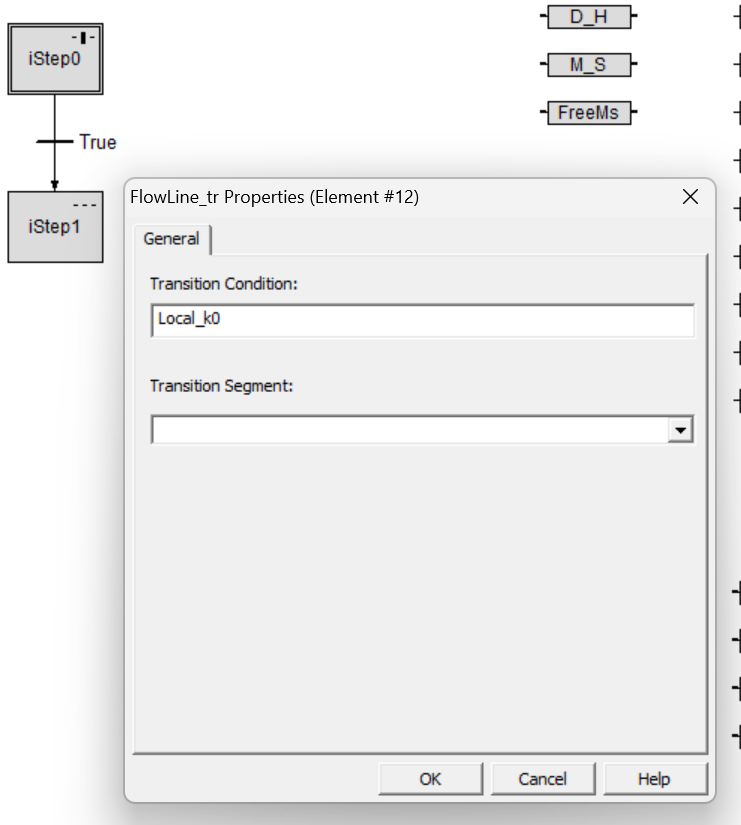
Done!

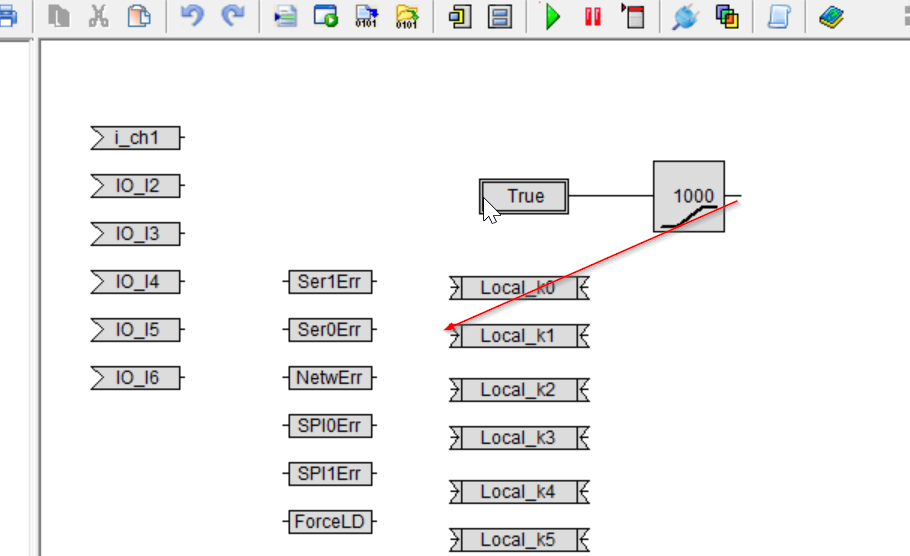
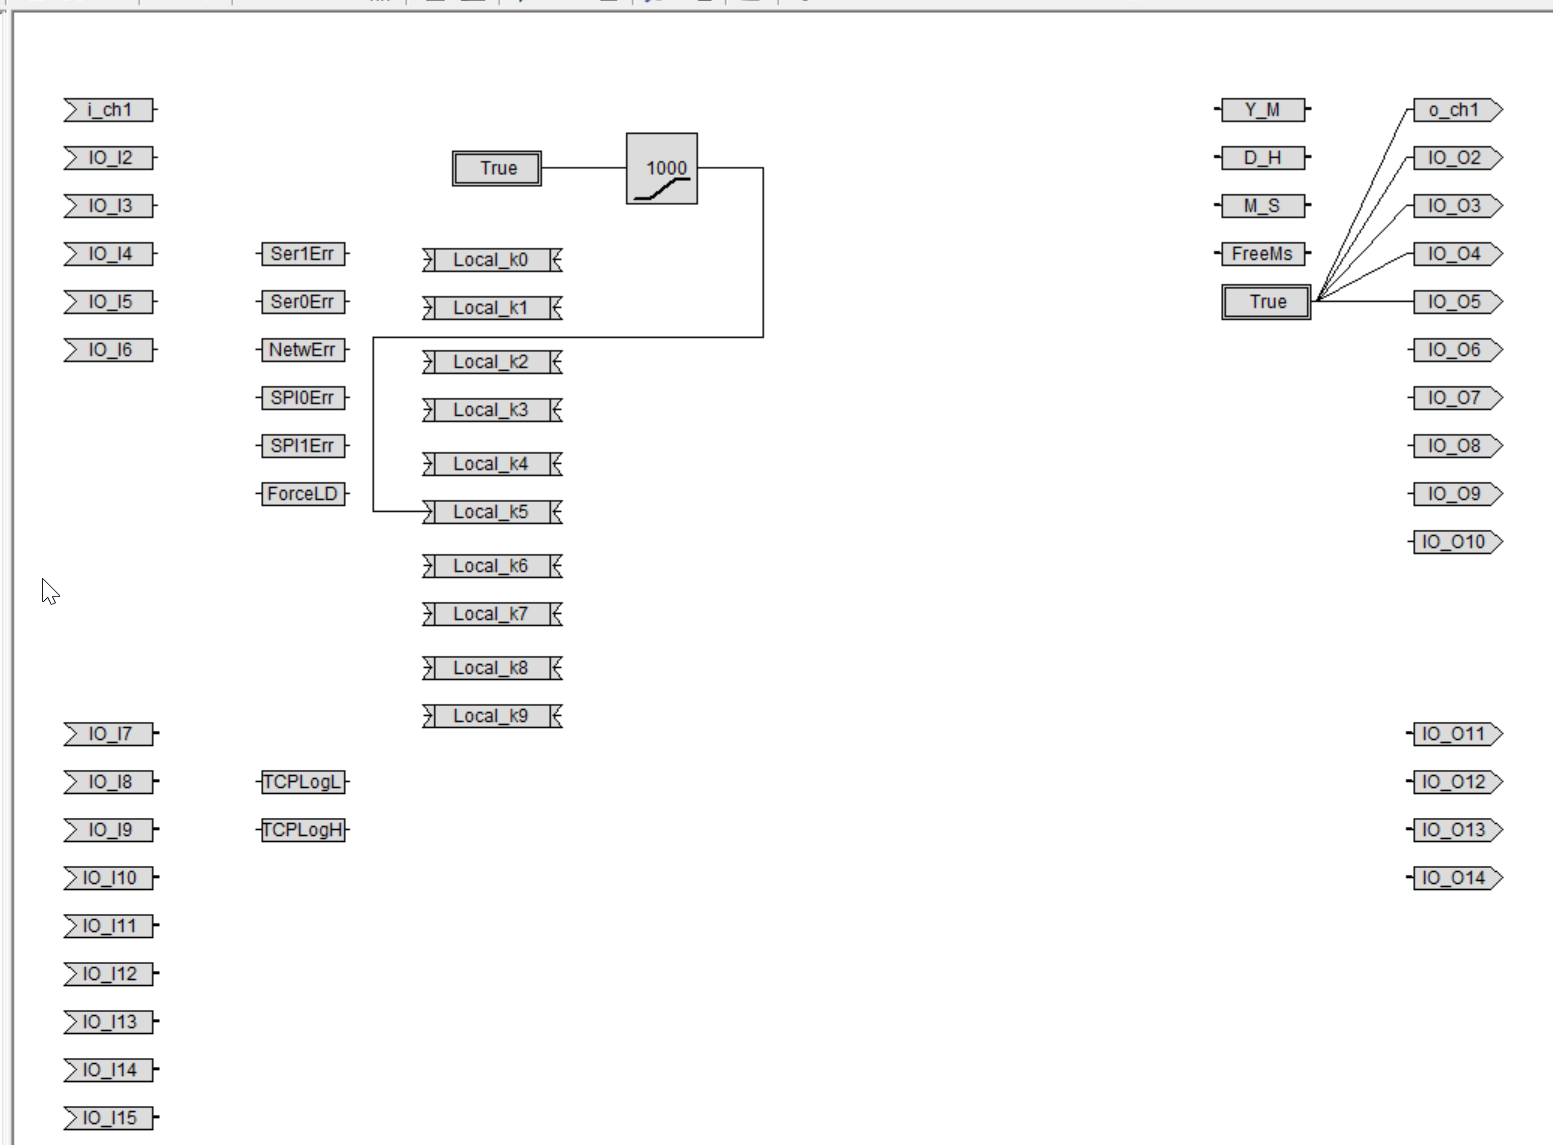
Add Delay
The next step is to create a 1-second Delay for the transition from iStep0 to iStep1.

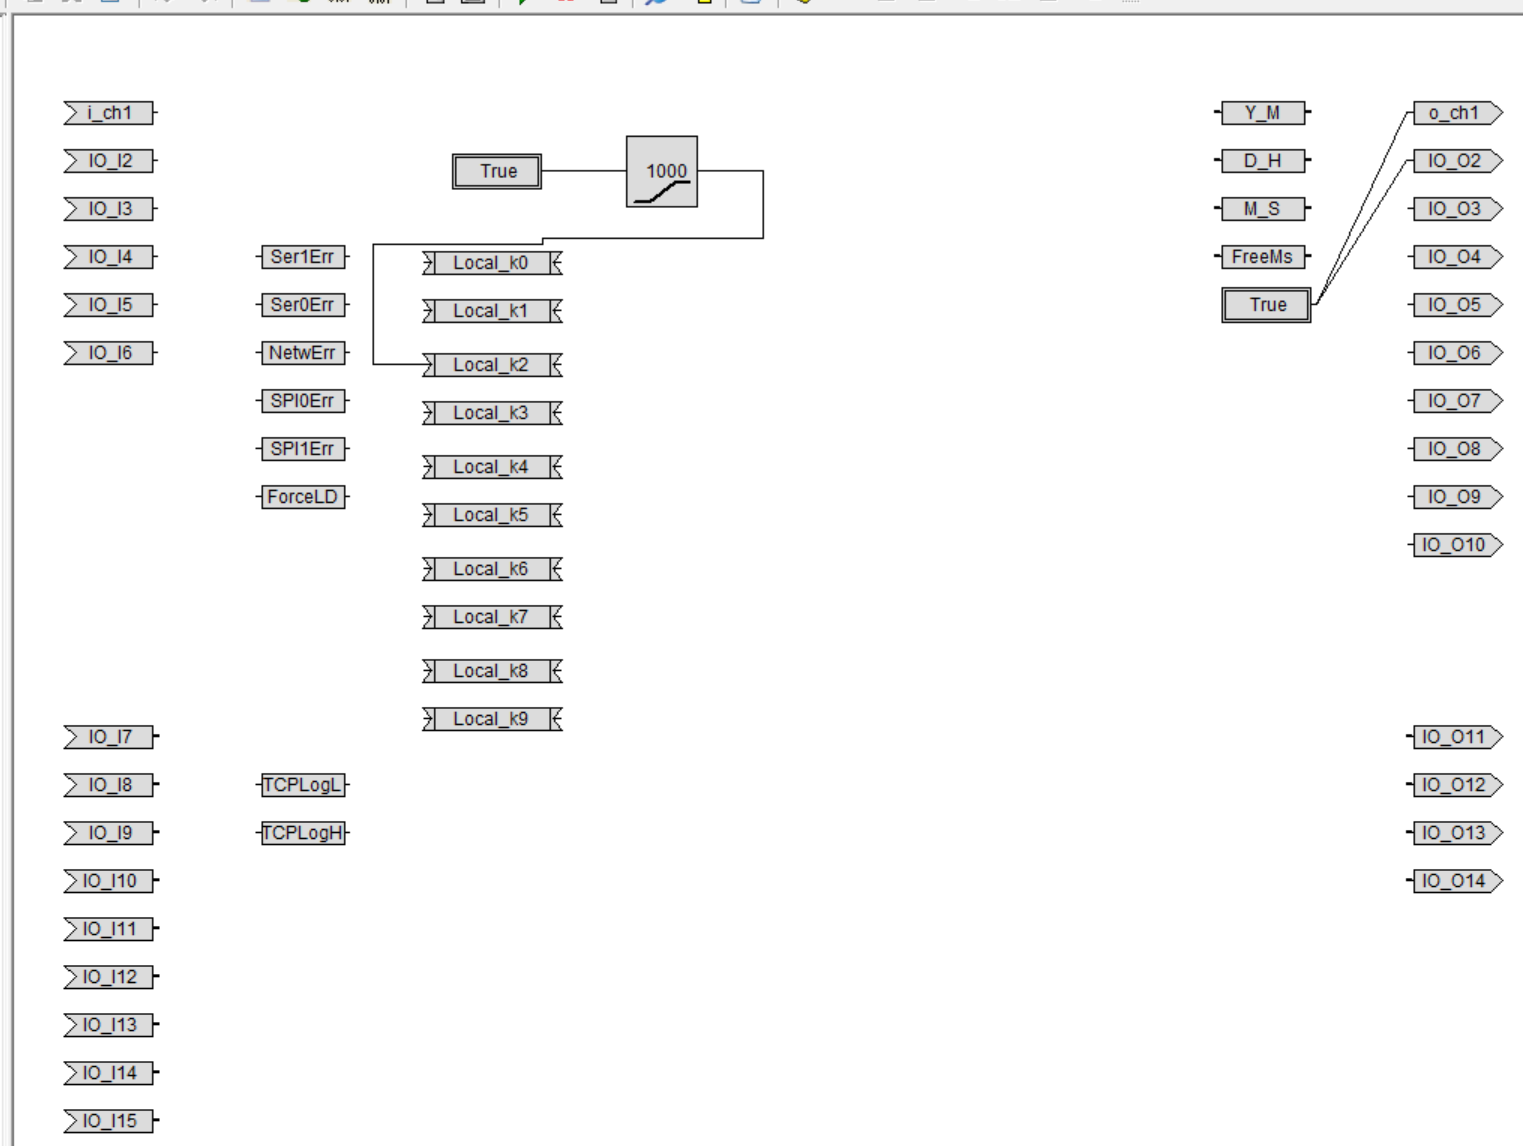
Add Bit Value from the Toolbar on the right.
A Bit Value component has been added.
Next, add the Delay component from the Toolbar on the right.
Done!A Delay component has been added, and the number 1 in the Delay component indicates that a delay of 1 ms has now been set.

Double-click on a Delay operator to configure the detailed settings for the part.

Set Delay Value (ms) to 1000 to set the delay to 1s.
The Delay Type can be left as On (Delay On).
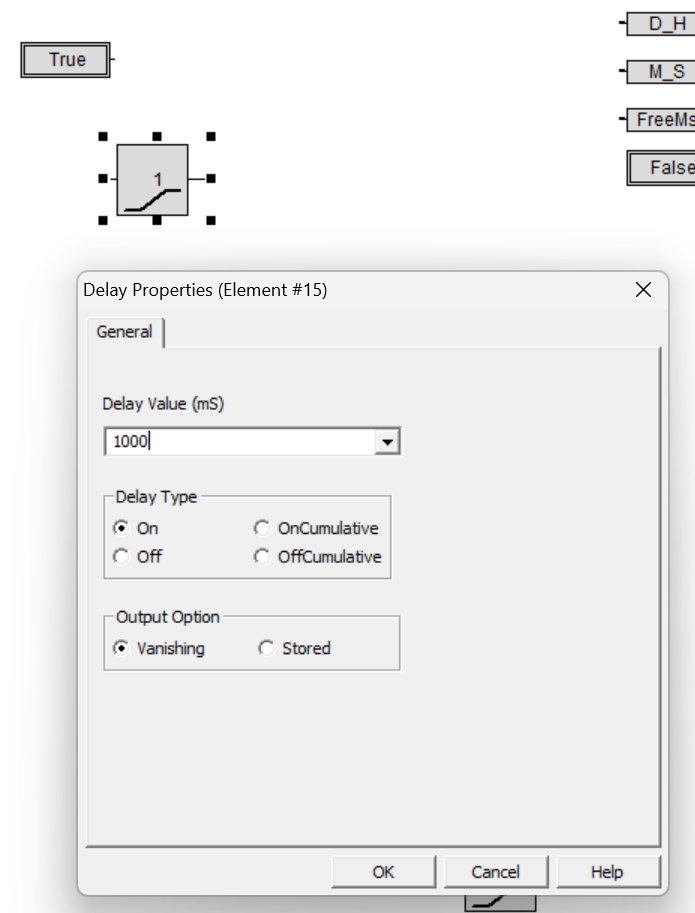
Done!

Next, connect the Bit Value component of True to the left (input) of Delay.
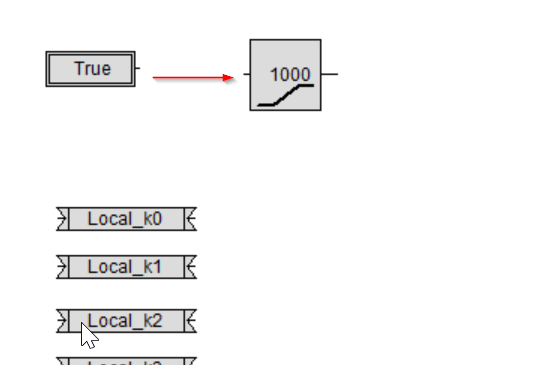
Done!
Next, we will connect the right side (output) of Delay to Local_k0.
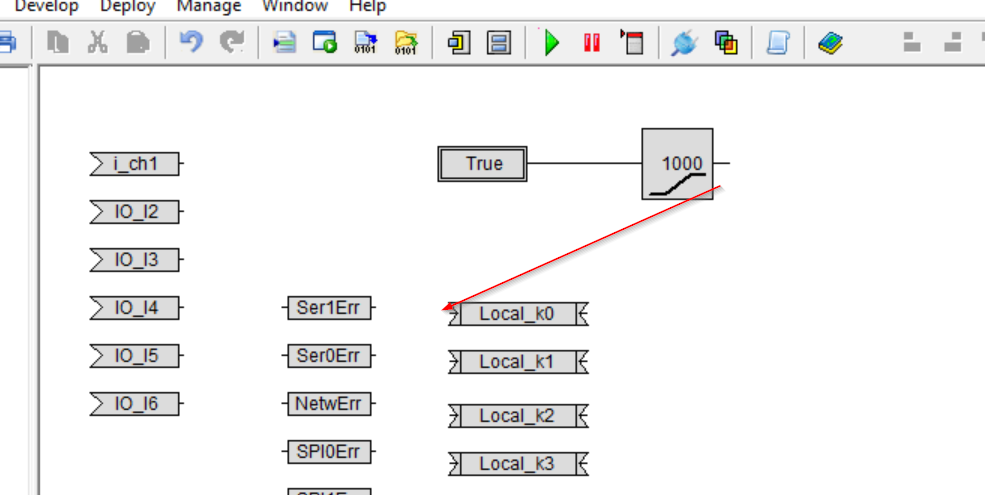
Done!
What is Delay?
Delay Operators function similarly to the timers often used in PLCs: when the time set by the Delay Operator elapses, the timer transitions to Done, stops counting, and the Done output is true. Conversely, if Enable is set to false, the timer state is reset and the Done output is false.
The constant Delay Operator used in this case is in constant milliseconds, and the maximum value of the setting is 1.6*107 milliseconds, meaning that a Delay of more than 180 days can be specified.
Two types of Delay Operator can be set in TaskScript’s Timer.
- On
- For the Delay Operator to output True, the input variable must exceed the specified set value and continue to output True at all times.
- As soon as the input variable is false, the output is also false.
- Off
- The output of Delay Operator is True as soon as the input variable becomes True, and False if the input variable becomes False or if the input variable remains True beyond the specified set time.。

Arrange the Line
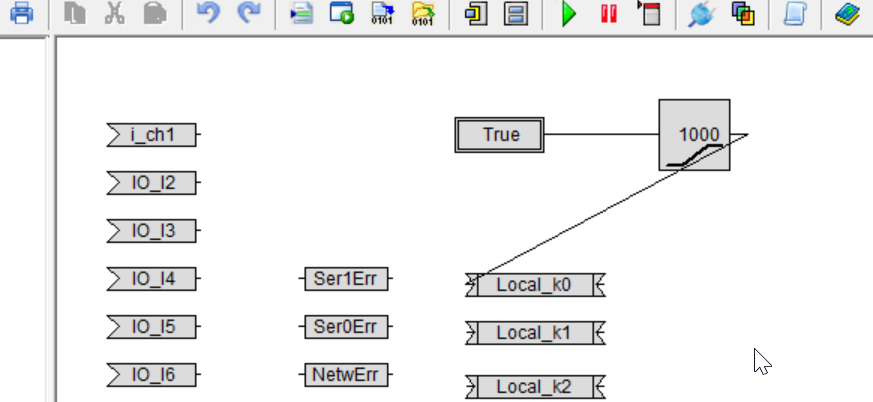
The output of the Delay Operator is connected to Local_k0, but the lines are a bit messy, and it can be difficult to see when the control becomes complex. A arrangement function is implemented in Taskscript.First, select a line > right click > Add Point.
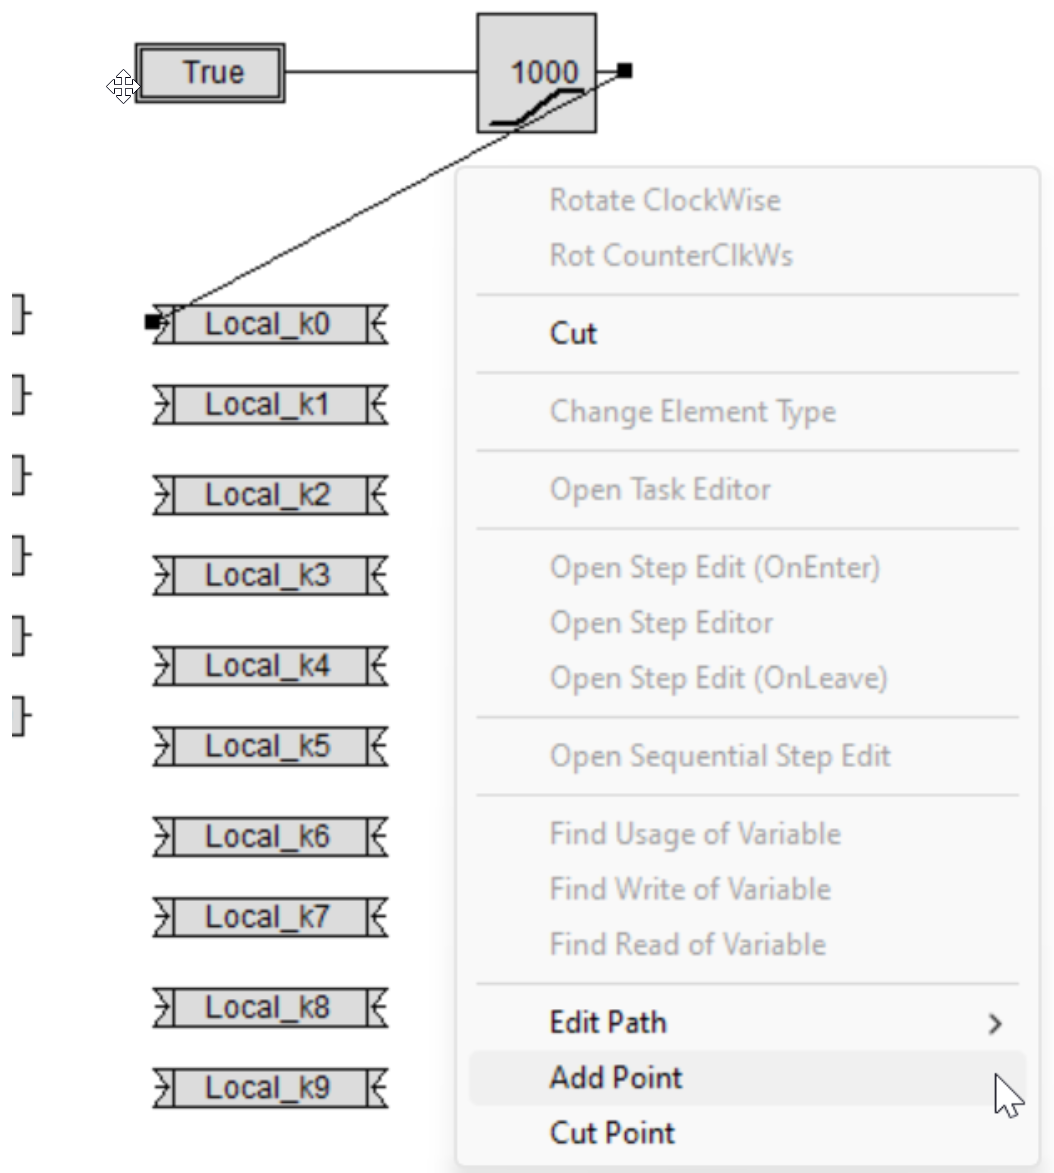
Another Point has been added between the Line origin and the Line terminus.

By clicking and dropping this Point from the Mouse, you can freely set the placement of the Line.

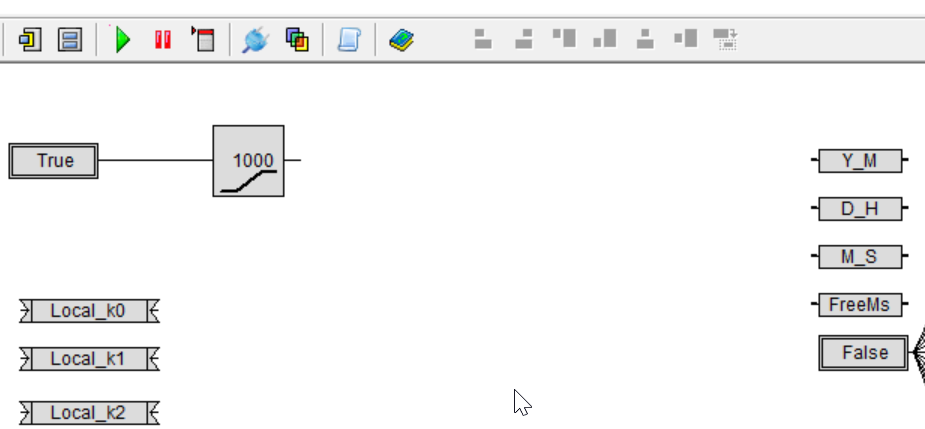
You can organize the placement of Lines in Manual, but Taskscript also has a method called Automatic Placement.
Right-click on a Line>Edit Path>HVHHHVH Path.

Lines are automatically placed as shown below!
Path?Point?
In TaskScript Studio’s Line, you can freely set up the following
- HV (first horizontal, then vertical)
- VH (first vertical, then horizontal)
- HVH (first horizontal, then vertical, then horizontal again)
- VHV (first vertical, then horizontal, then vertical again)
Free placement Options are provided,

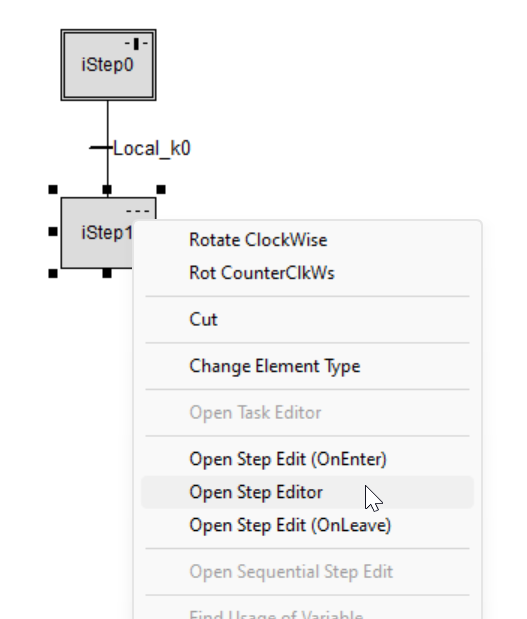
iStep1’s Action
iStep1 has a control to set the o_ch1 output to True.
Right click on iStep1>Open Step Editor.
Step Flow
First, set the conditions and Timer to move from iStep1′ to iStep2.
Connect Delay Opeator with Local_k1 as shown below.
Done!

Action
Ensure that o_ch1 is output while iStep1 is activated.
Let’s add a Bit Value component of True and connect it to o_ch1.
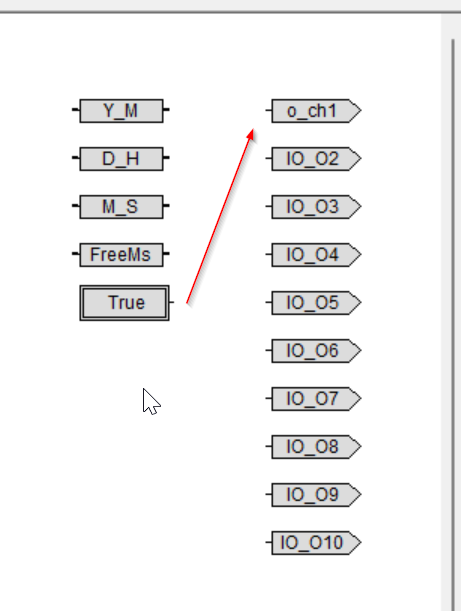
Done!

iStep2
I will not describe it in detail here because the operation is similar to other Steps.
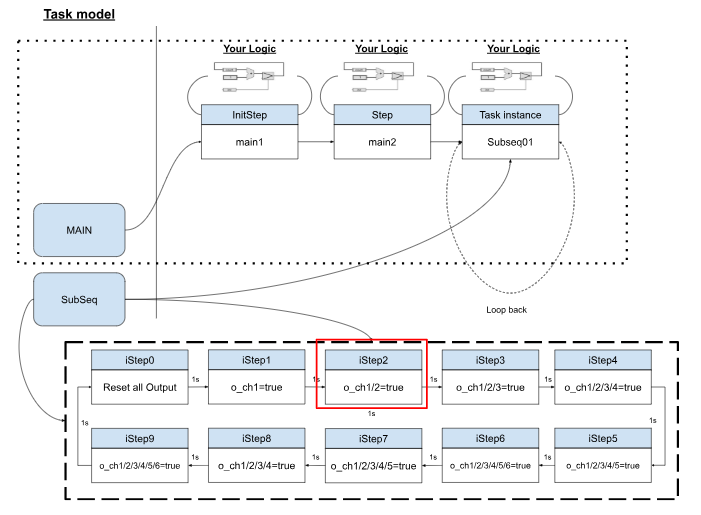
iStep2 sets o_ch1 and IO_O2 to True.
iStep3
I will not describe it in detail here because the operation is similar to other Steps.
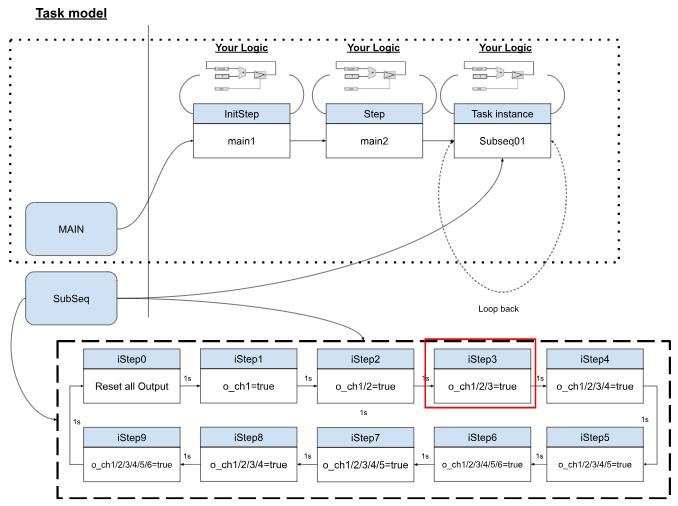
iStep3 sets o_ch1, IO_O2, and IO_O3 to True.

iStep4
I will not describe it in detail here because the operation is similar to other Steps.
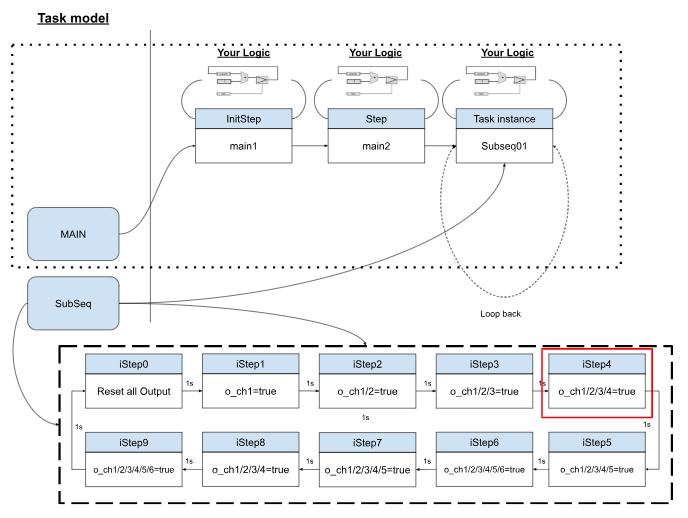
iStep4 sets o_ch1, IO_O2, IO_O3, and IO_O4 to True.

iStep5
I will not describe it in detail here because the operation is similar to other Steps.
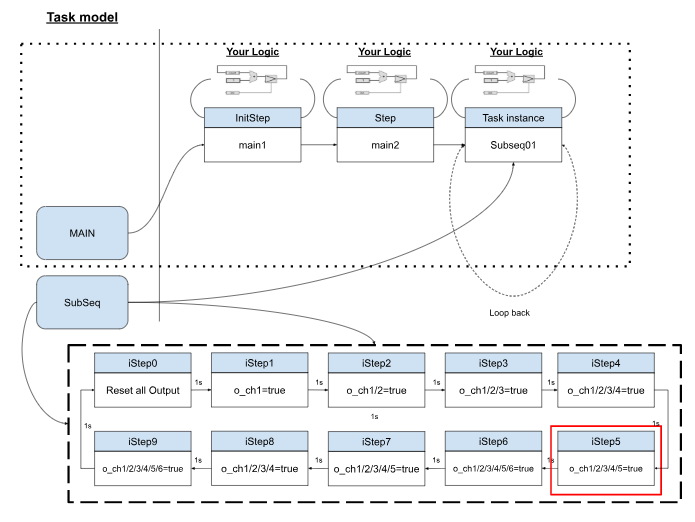
iStep5 sets o_ch1, IO_O2, IO_O3, IO_O4, and IO_O5 to True.
iStep6
I will not describe it in detail here because the operation is similar to other Steps.
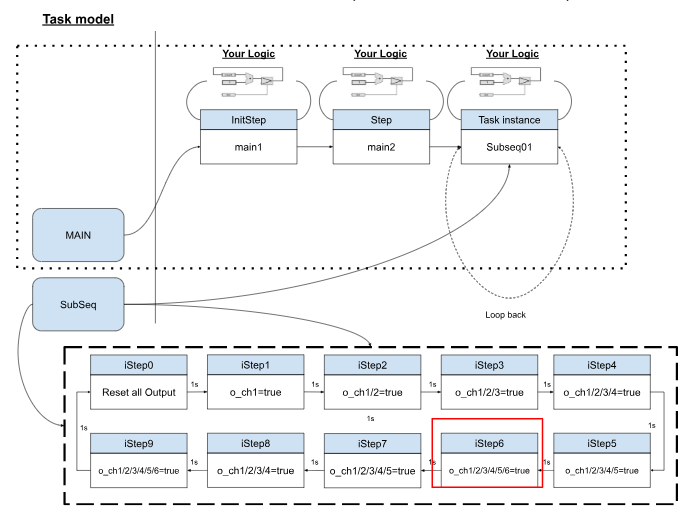
iStep6 sets o_ch1, IO_O2, IO_O3, IO_O4, IO_O5, and IO_O6 to True.

iStep7
I will not describe it in detail here because the operation is similar to other Steps.
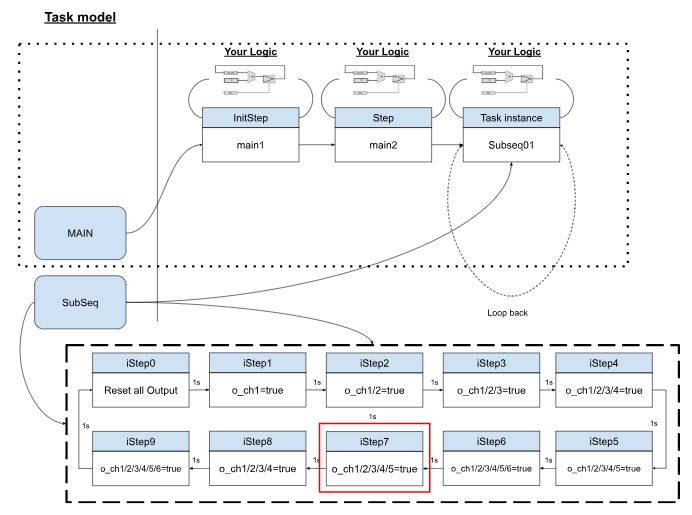
iStep7 sets o_ch1, IO_O2, IO_O3, IO_O4, and IO_O5 to True.
iStep8
I will not describe it in detail here because the operation is similar to other Steps.
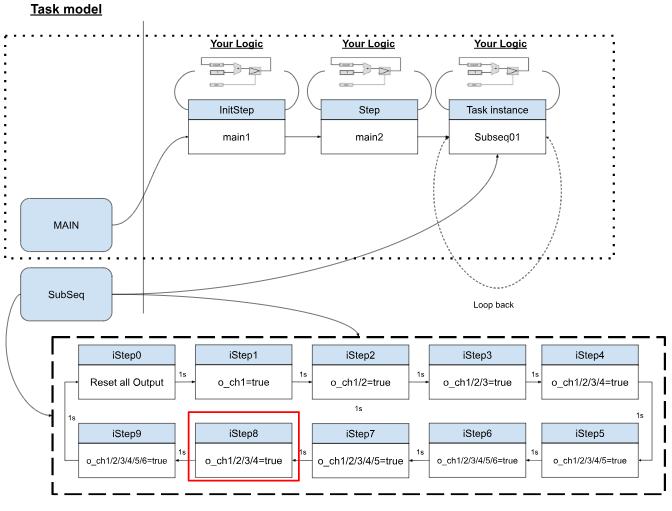
iStep8 sets o_ch1, o_ch1, IO_O2, and IO_O3 to True.
iStep9
I will not describe it in detail here because the operation is similar to other Steps.
iStep9 sets o_ch1, IO_O2, IO_O3, IO_O4, IO_O5, IO_O6, and IO_O7 to True.
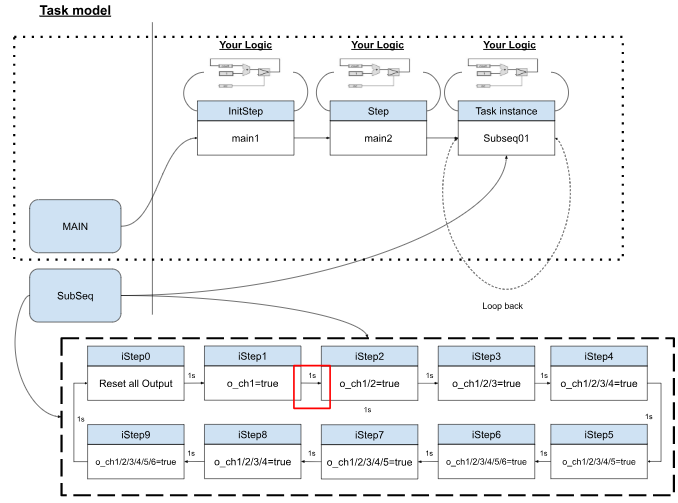
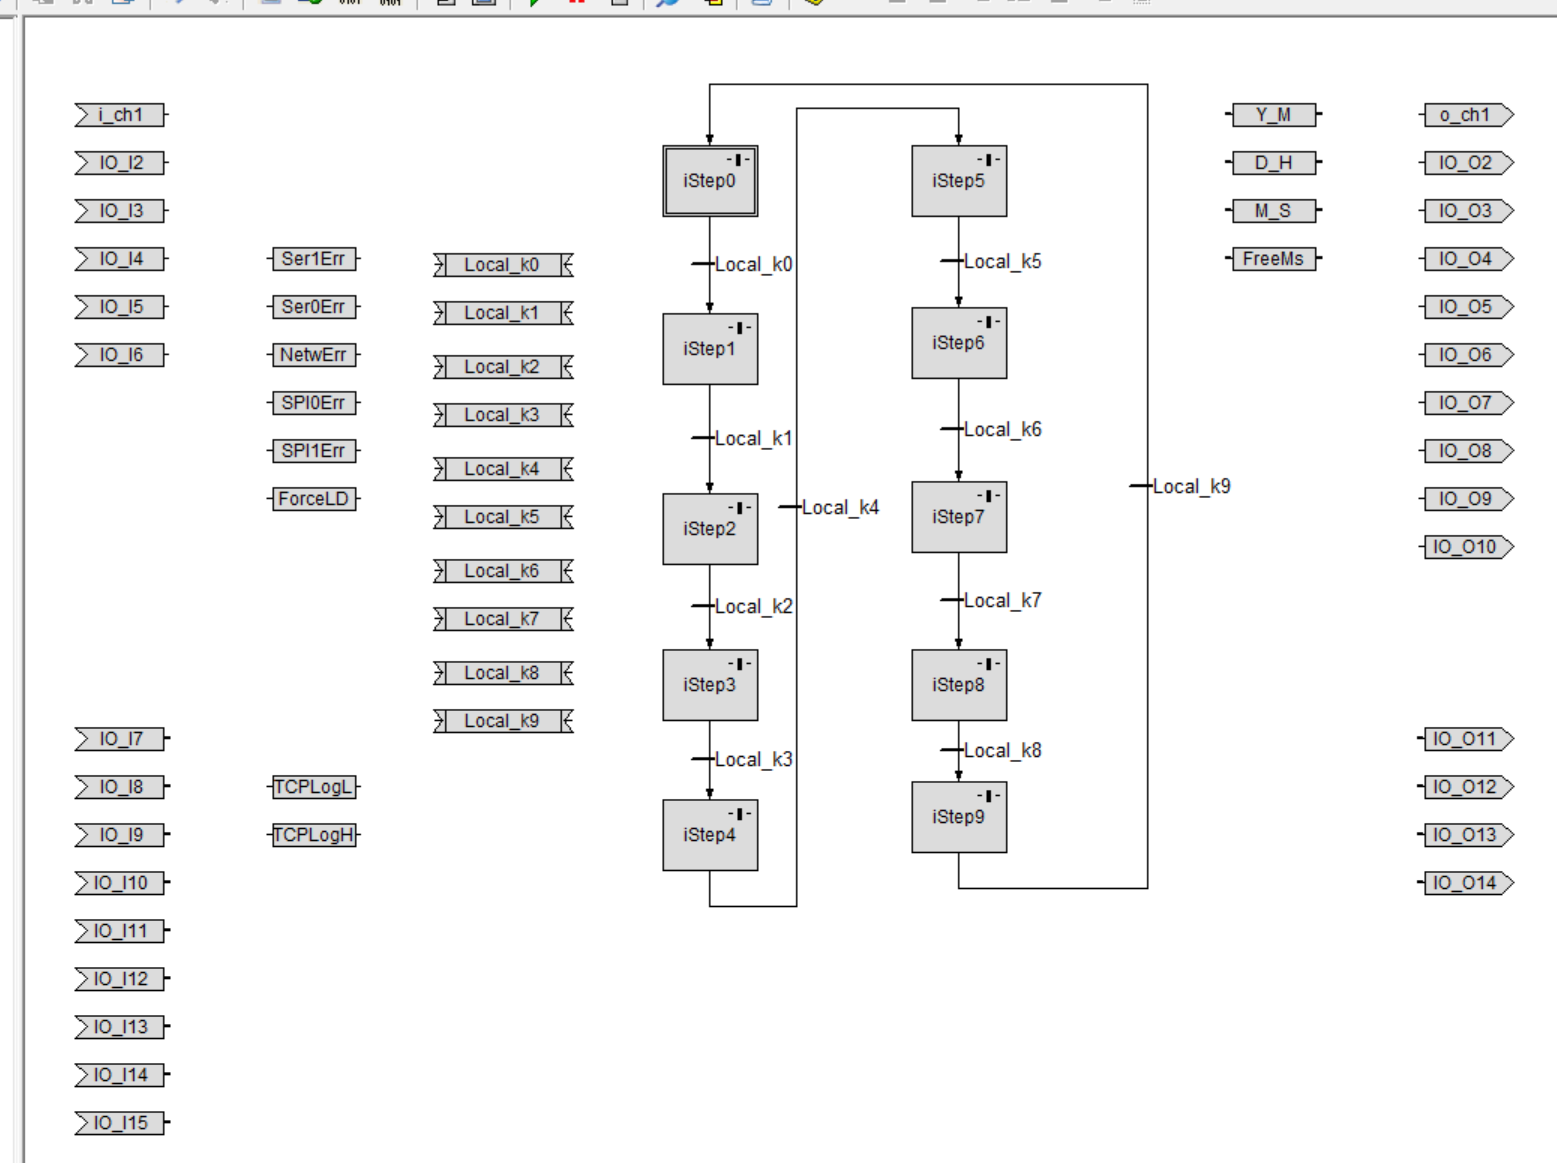
Finally Flow
This is the last Flow created.
Group
Use the Group function to make it easier to manage variables.
Add a Group from the Toolbar on the right.

Done!

Textual Annotation
Use the Textual Annotatio component to add Comments to your program.

Enter a description of your program in the Text Field.

Done!

End
This is the Flow created in this article.
Result
Check the actual operation from this Link.
Download
You can download this project from the Github Link below.
https://github.com/soup01Threes/Taskscript/blob/main/char03.hgr