This article will briefly explain how to use Javascript on EXOR’s JMobile Runtime.
Now, let’s enjoy FA.
Reference Link
http://soup01.com/en/category/exor/
JavaScript On EXOR?
JavaScript functions are executed when an event occurs. For example, with EXOR hardware the user can define a script for the OnMouseClick event, and the JavaScript script will be executed when the button is pressed on the HMI device.
Note that it is executed only when the programmed event occurs and not cyclically. This minimizes the overhead required to execute logic on the HMI device.
JMobile Studio provides a JavaScript engine that runs client-side, and each project page can contain scripts that are local in scope to the added page. Of course, you can also create global scripts that are executed by scheduler events or alarm events.
Also, since the script is running on a client, that is, if multiple clients are connected to the HMI device (in the case of an external computer running an HMI client), each client will run the same script and the inputs provided to the different clients will be different possible, thus providing different output results depending on the input.
For example, if a script operates according to the position of a slider, and this position is different for different clients, the result of the script will be different for each client.
Implementation
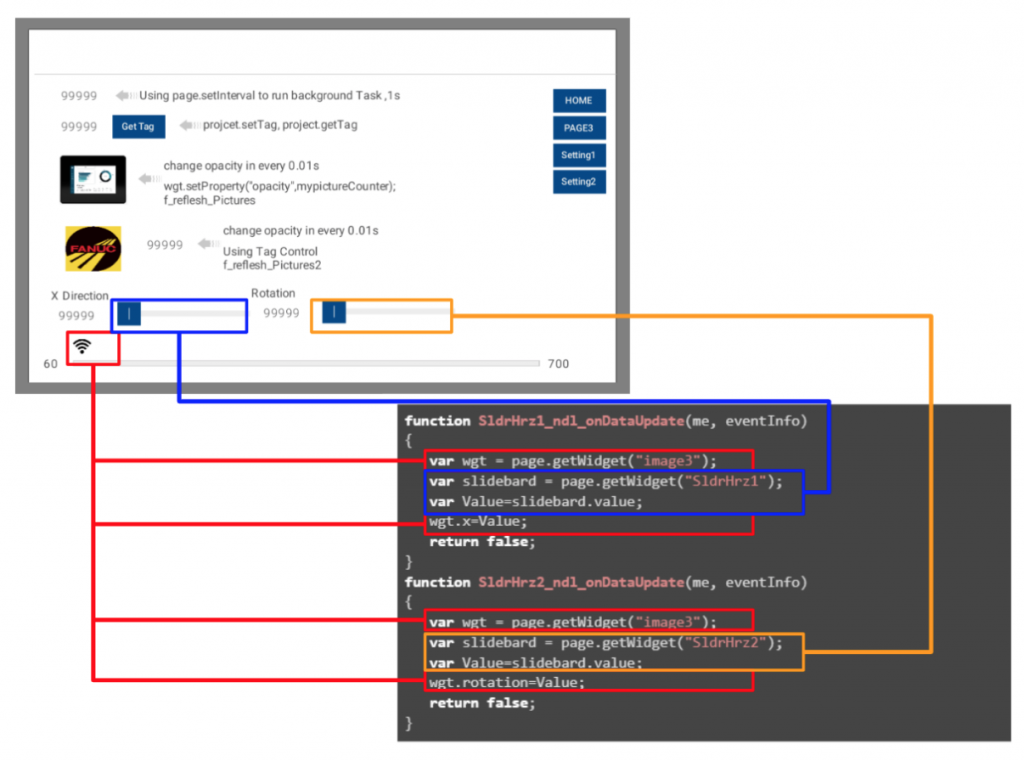
This is the screen created in this article, and the transparency of the numbers and images displayed on it can be changed using Javscript.
Define Local Variables
Define local variables for JMobile Runtime at Configuration>Protocols>Variables.
Note that the variables are basically reset when the power supply runs out.
Done!
Javascript Editor
JMobile Studio provides the Javascript IDE. At the bottom of each page there is a Tab called Script/Keyboard.
Click on that Tab to bring up Javscript’s Editor.
Part-1
This section shows how to use Javascript to perform the Background task when the page is first opened.
Script
Here is the Part-1 Script.
| var myCounter=0;var myTimer=page.setInterval(“f_reflesh()”,1000); function f_reflesh(){ myCounter=myCounter+1; project.setTag(“Tag1”,myCounter); } |
page.setInterval(“f_reflesh()”,1000);
こちらはこの関数を使用し、1000msごとにf_refleshという関数を実行するようにします。
function f_reflesh()
Next, let’s define f_reflesh.
project.setTag(“Tag1”,myCounter);
Finally, use the function project.setTag(x,y) to write the y value to Tag x.
Part-2
Next, click the button to get the current value of the other Tag and display it on the Label.
Show more options from widgets
In JMOBILE Widgets, click on the buttons in the red box to adjust more settings.
As shown in the figure below, the items Configure, Text, and General are now displayed.
Trigger Javascript via Button
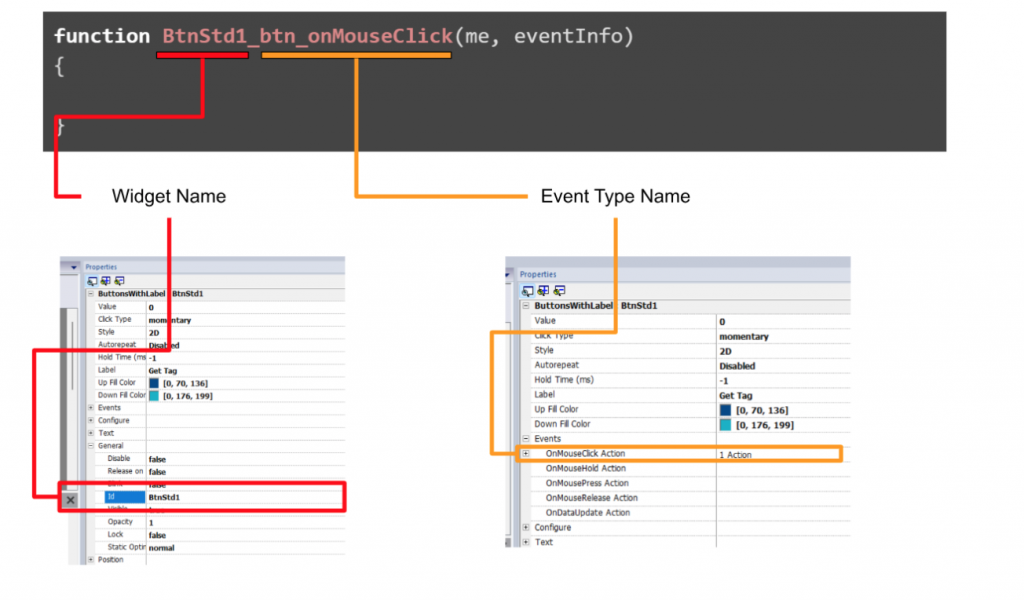
To execute a Javascript function from a button click action, add an action with Events>OnMouseClick.
Just add Widget>Javascript and JMOBILE Studio will automatically add the Javascript functions.
The following functions will be added to Script/Keyboard Tab
| function BtnStd1_btn_onMouseClick(me, eventInfo) { } |
The red line corresponds to the name of the Widgets and btn_onMouseClick indicates the type of action to be triggered.
Script
This is Scripts.
Get the current value of Tag1 with project.getTag(“Tag1”) and write it to another variable with the project.setTag function.
| function BtnStd1_btn_onMouseClick(me, eventInfo) { var tagValue=project.getTag(“Tag1”); project.setTag(“Tag2”,tagValue); } |
Part-3
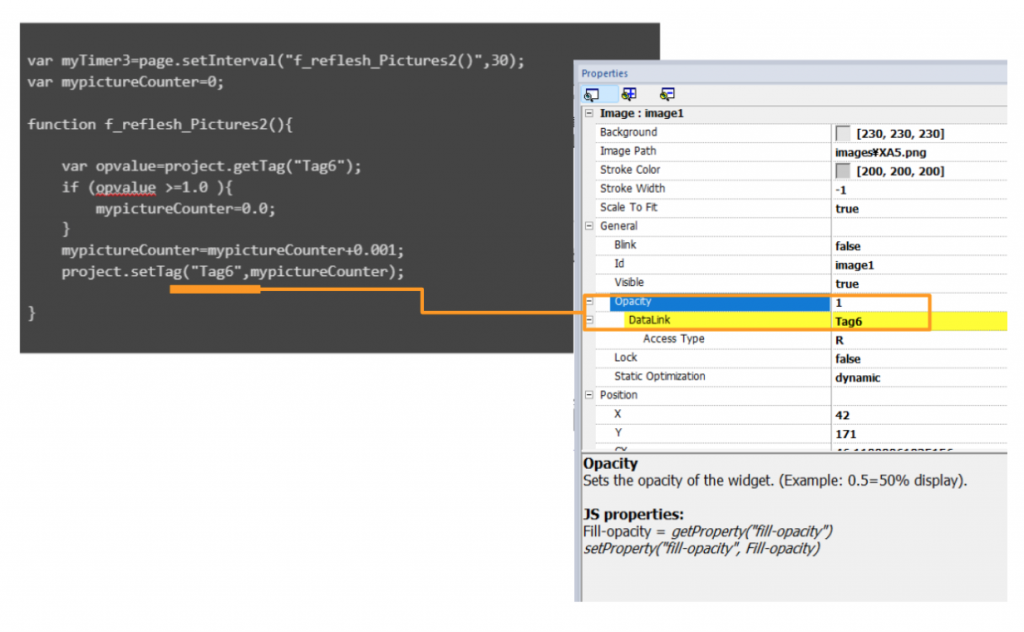
In Part 3, the properties of the widget are connected to the internal tag, and the transparency of the image is changed based on the internal tag value.
Tags
General>Opacity is related to the transparency of the image and links its properties with internal variables.
Script
The script here sets the transparency value of the image to +0.001 every 0.03s seconds, and resets it to 0.0. when the transparency value is greater than 1.
var myTimer3=page.setInterval(“f_reflesh_Pictures2()”,30);var mypictureCounter=0; function f_reflesh_Pictures2(){ var opvalue=project.getTag(“Tag6”); if (opvalue >=1.0 ){ mypictureCounter=0.0; } mypictureCounter=mypictureCounter+0.001; project.setTag(“Tag6”,mypictureCounter); } |
Part-4
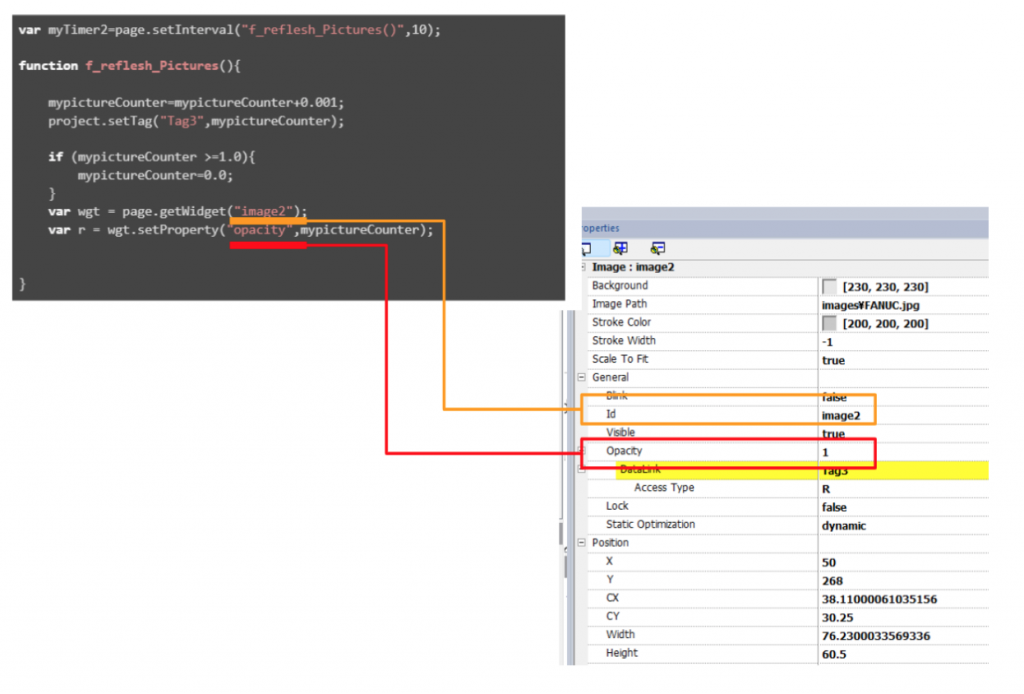
In Part 4, we will show you how to change widget properties directly from Javascript.
Scripts
Here is the script. First use page.getWidget(“image2”) to get the image Widgets, then use wgt.setProperty function to change the opacity property.
| var myTimer2=page.setInterval(“f_reflesh_Pictures()”,10); function f_reflesh_Pictures(){ mypictureCounter=mypictureCounter+0.001; if (mypictureCounter >=1.0){ mypictureCounter=0.0; } var wgt = page.getWidget(“image2”); var r = wgt.setProperty(“opacity”,mypictureCounter); } |
Part-5
The last section shows how to position and rotate the X position of the WIFI ICON at the bottom of the screen.
Tags
Connect the internal Tag to the Value value of the SlideBar.
Next, register “OnDataUpdate Action” in the Events section of the SlideBar.
OnDataUpdate Action” has the feature of triggering an Action when there is a change in the value of the current Widgets.
Scripts
The last one is Scripts, which uses slidebard.value to directly get the current value of Widgets and wgt.x=Value to change the X position of Widgets.
| function SldrHrz1_ndl_onDataUpdate(me, eventInfo) { var wgt = page.getWidget(“image3”); var slidebard = page.getWidget(“SldrHrz1”); var Value=slidebard.value; wgt.x=Value; return false; } function SldrHrz2_ndl_onDataUpdate(me, eventInfo) { var wgt = page.getWidget(“image3”); var slidebard = page.getWidget(“SldrHrz2”); var Value=slidebard.value; wgt.rotation=Value; return false; } |
Result
Check out the results of Javascript execution in this video.