Proficloud.io?
Proficloud.io is a Plug and Play IOT platform that offers manufacturers with limited IT resources a service to easily connect their devices to the Cloud.
With the ability to view data in the Cloud, equipment maintenance cycles can no longer be determined by intuition, but can be planned according to numbers. The data in the cloud is available in a single place, so the maintenance cycle is no longer determined by intuition but can be planned according to numbers.
Proficloud.io also offers an API that allows you to access data from your account on devices other than PLCNEXT/Node-RED. This means that information taken from Proficloud.io can be transferred to other Services for further collaboration. (And it’s free to start…!).
In this article, we will first explain the integration between Proficloud.io and Node-red.
Node-RED?
Node-red is a Web-based Open Source program tool developed by IBM and has been introduced to some extent in the industrial industry by Siemens, Fujitsu, AT&T, and Phoenix Contact.

The way to create a Program is like a wire connection, and the connected parts are called Nodes, which can collect, convert, and transfer data between different protocols, and many libraries are provided (TCP/UDP/OPCUA/MQTT…Etc), and Programming Time are reduced considerably. (So you don’t know about reinventing the wheel…)
Installation
Raspberry
Ubuntu
PLCNEXT
http://soup01.com/en/category/phoenixcontact/plcnext_en/
Configuration
In this article, it is not PLCNEXT that is used but a combination of Raspberry and Node-Red.
Of course, Node-Red can also run on Windows and MAC, so I think Proficloud.io is the most versatile way to use it. (Not everyone has a PLCNEXT actual device either.)
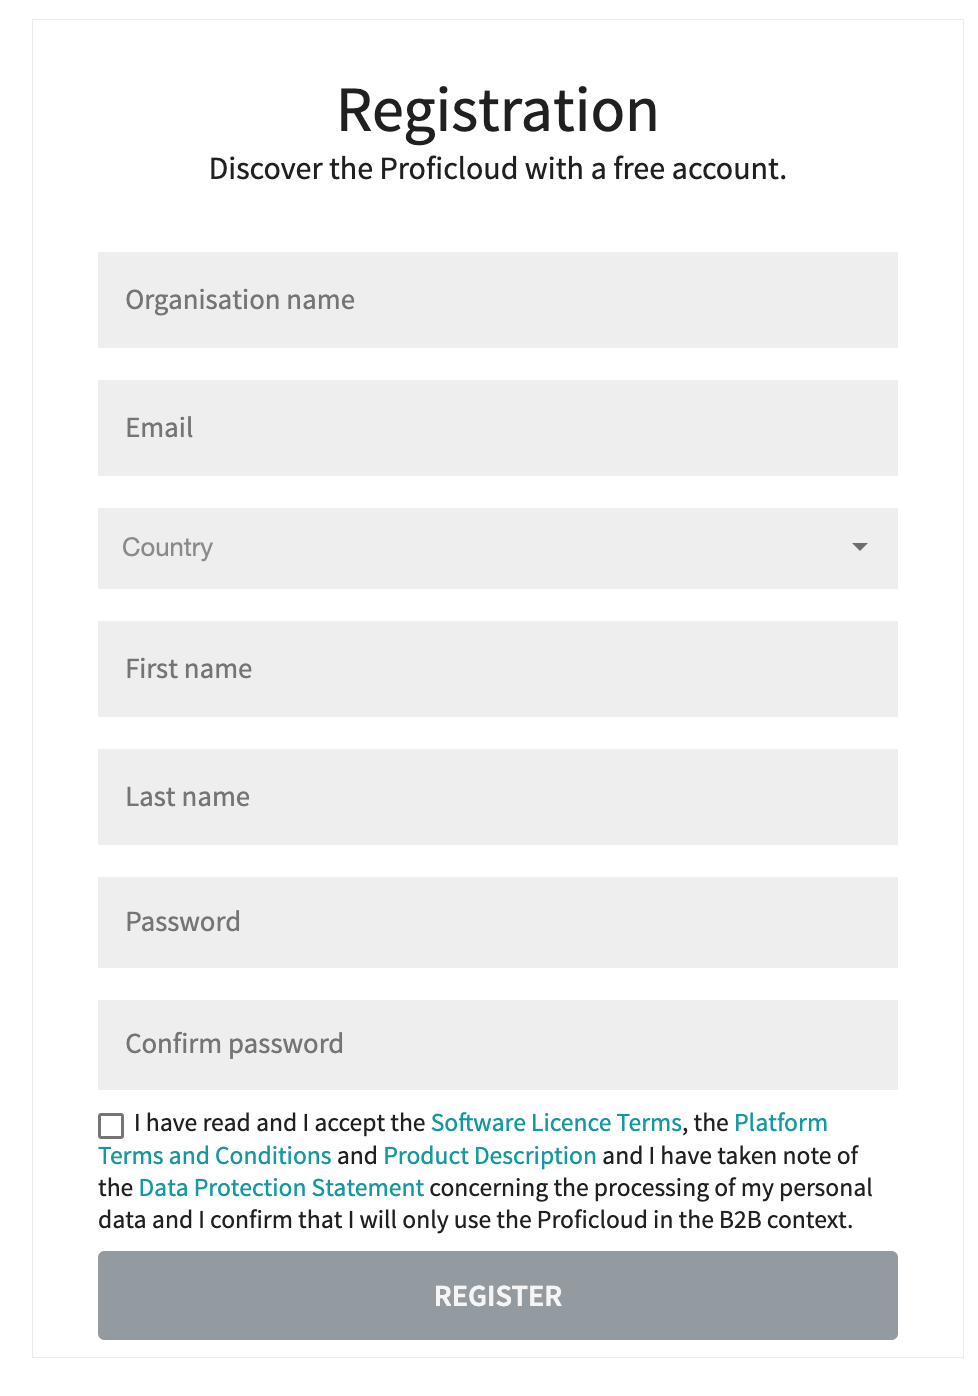
Register an account
Go to the following LINK to create a Proficloud account.

Enter personal information such as name and EMAIL and register.
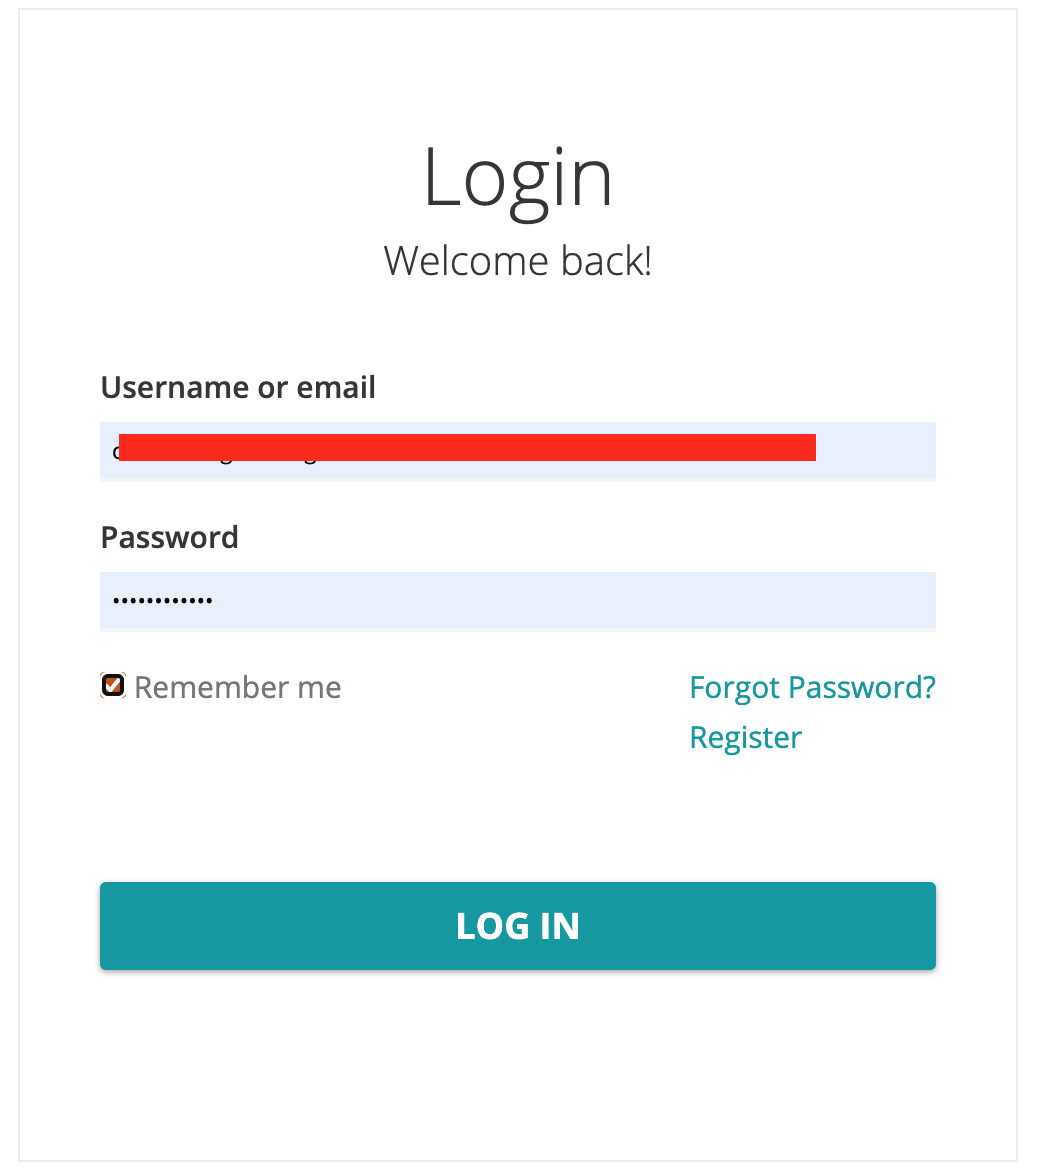
The next step is to Login.
Then you will be asked to verify your Email.
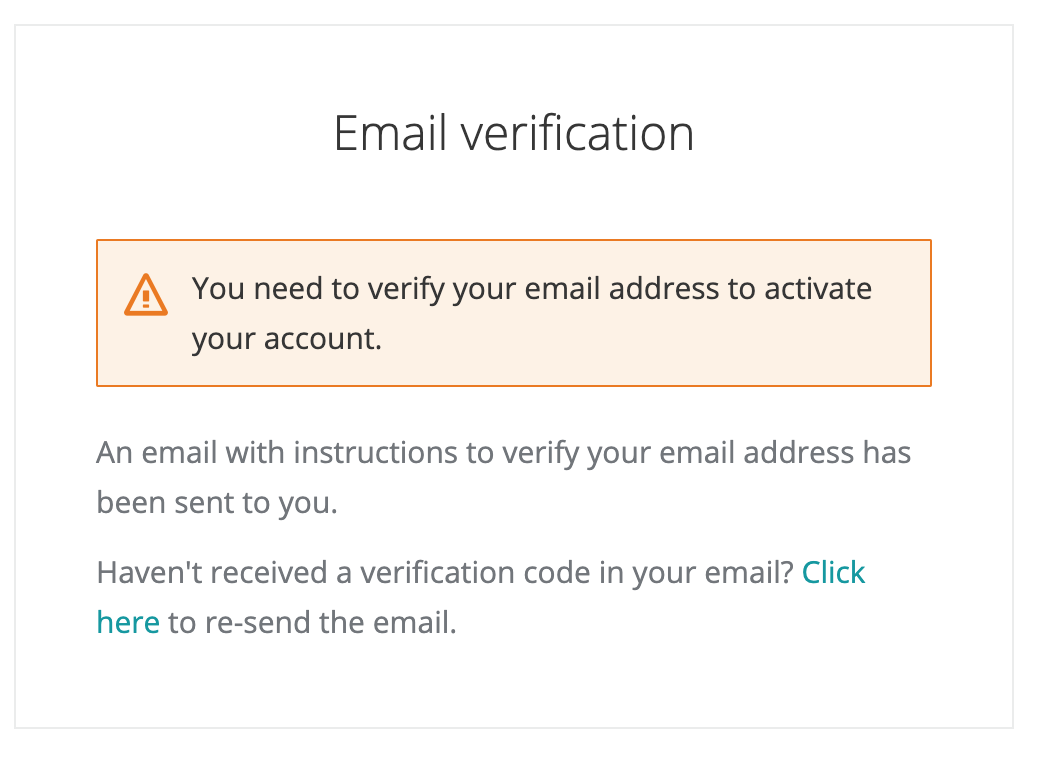
You will have received a Proficloud email from MailBox, click on the Verify E-Mail button.

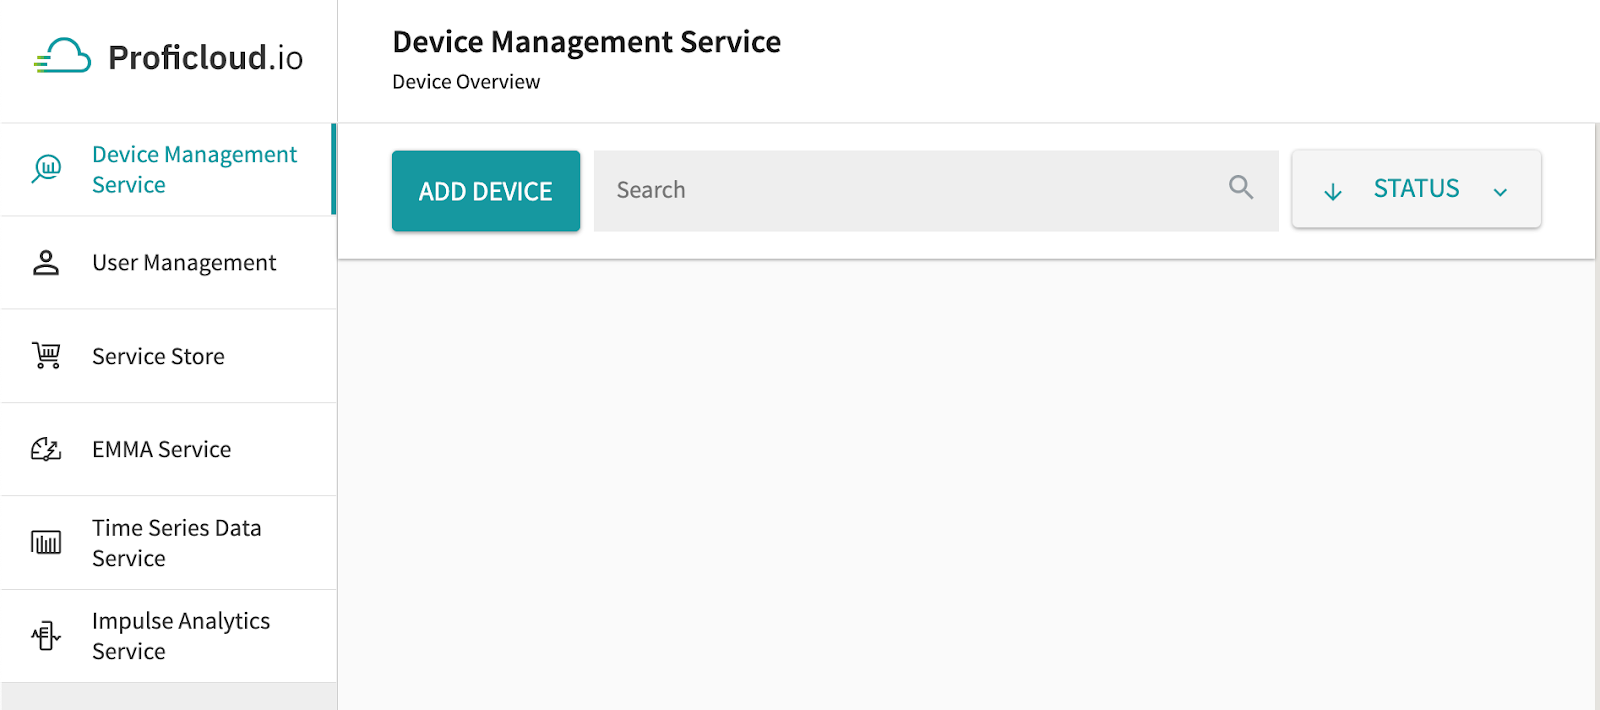
Then you should be able to re-login and see the Dashboard!
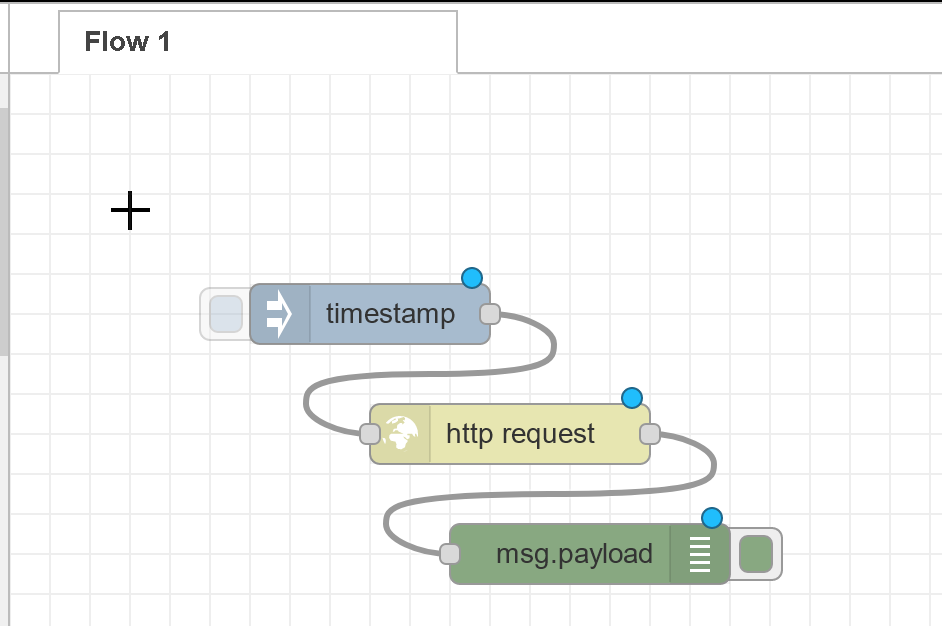
Play Node
Before we get into Proficloud.io, let’s do a little warm-up: create a Flow and add the Injection/http-request/debug-Node component to the Flow. Now, if you click on the blue button, you can send an Http request and see the response from the Server on the Debug screen.
Click on the http request component and Enter https://proficloud.io/ in the URL Field>Done.
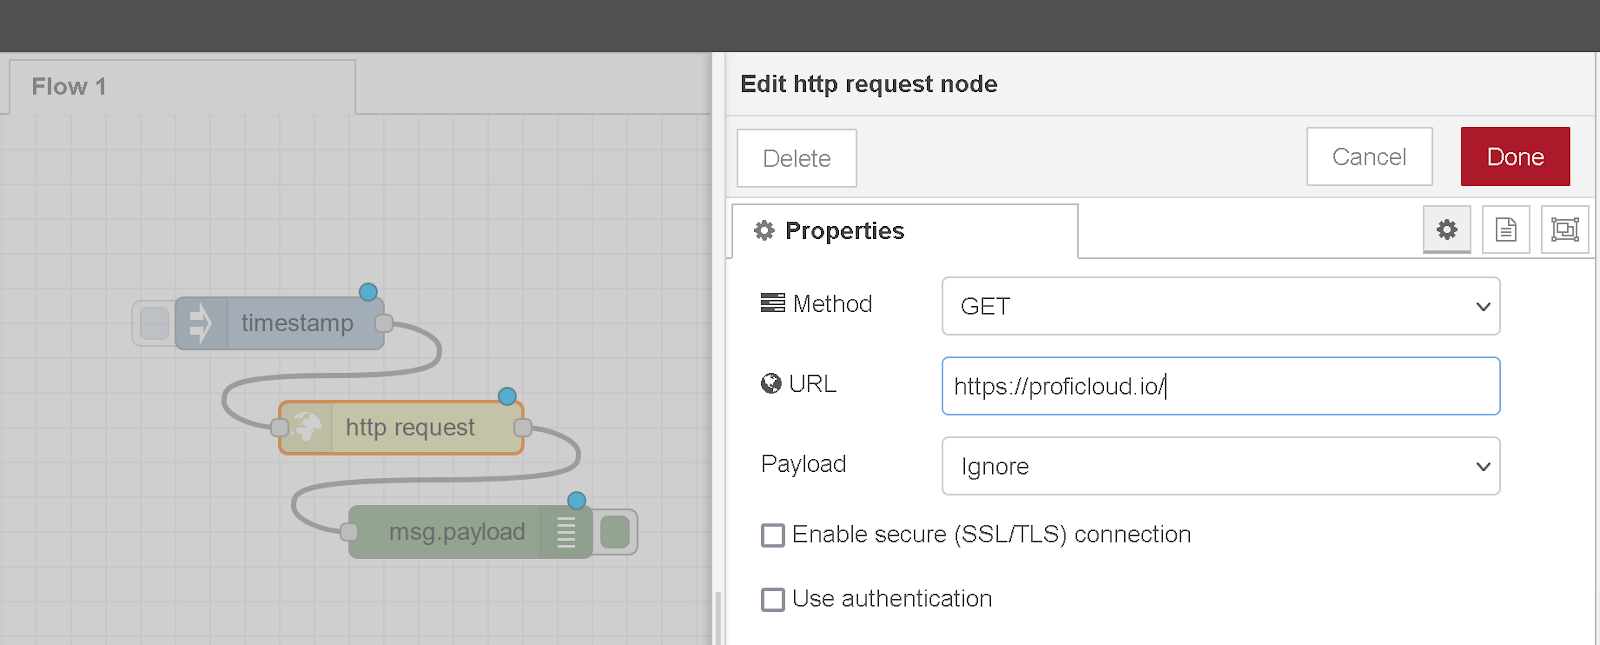
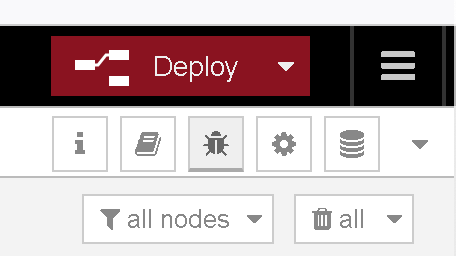
Finally, click the Deploy button in the upper right corner.
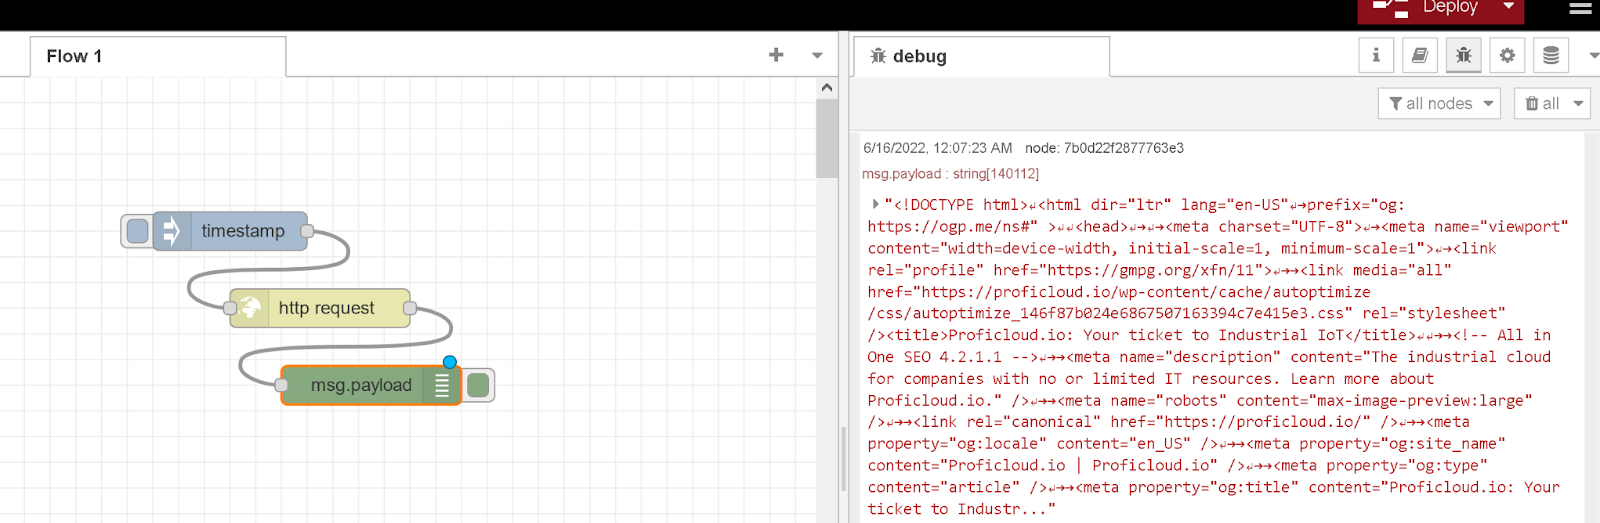
Click on the timestamp button>click on msg.payload>look at the debug screen and I get a reply from Proficloud.io Server. (Don’t worry about the content)
Now I can confirm that Node-RED has no problem connecting to the Internet and Proficloud.io.
Install proficloud
Next, we will install the Proficloud Package for Node-red, Node-red is a very interesting system with many libraries.
Go to Deploy>Manage palette.

A screen for managing the library will appear.
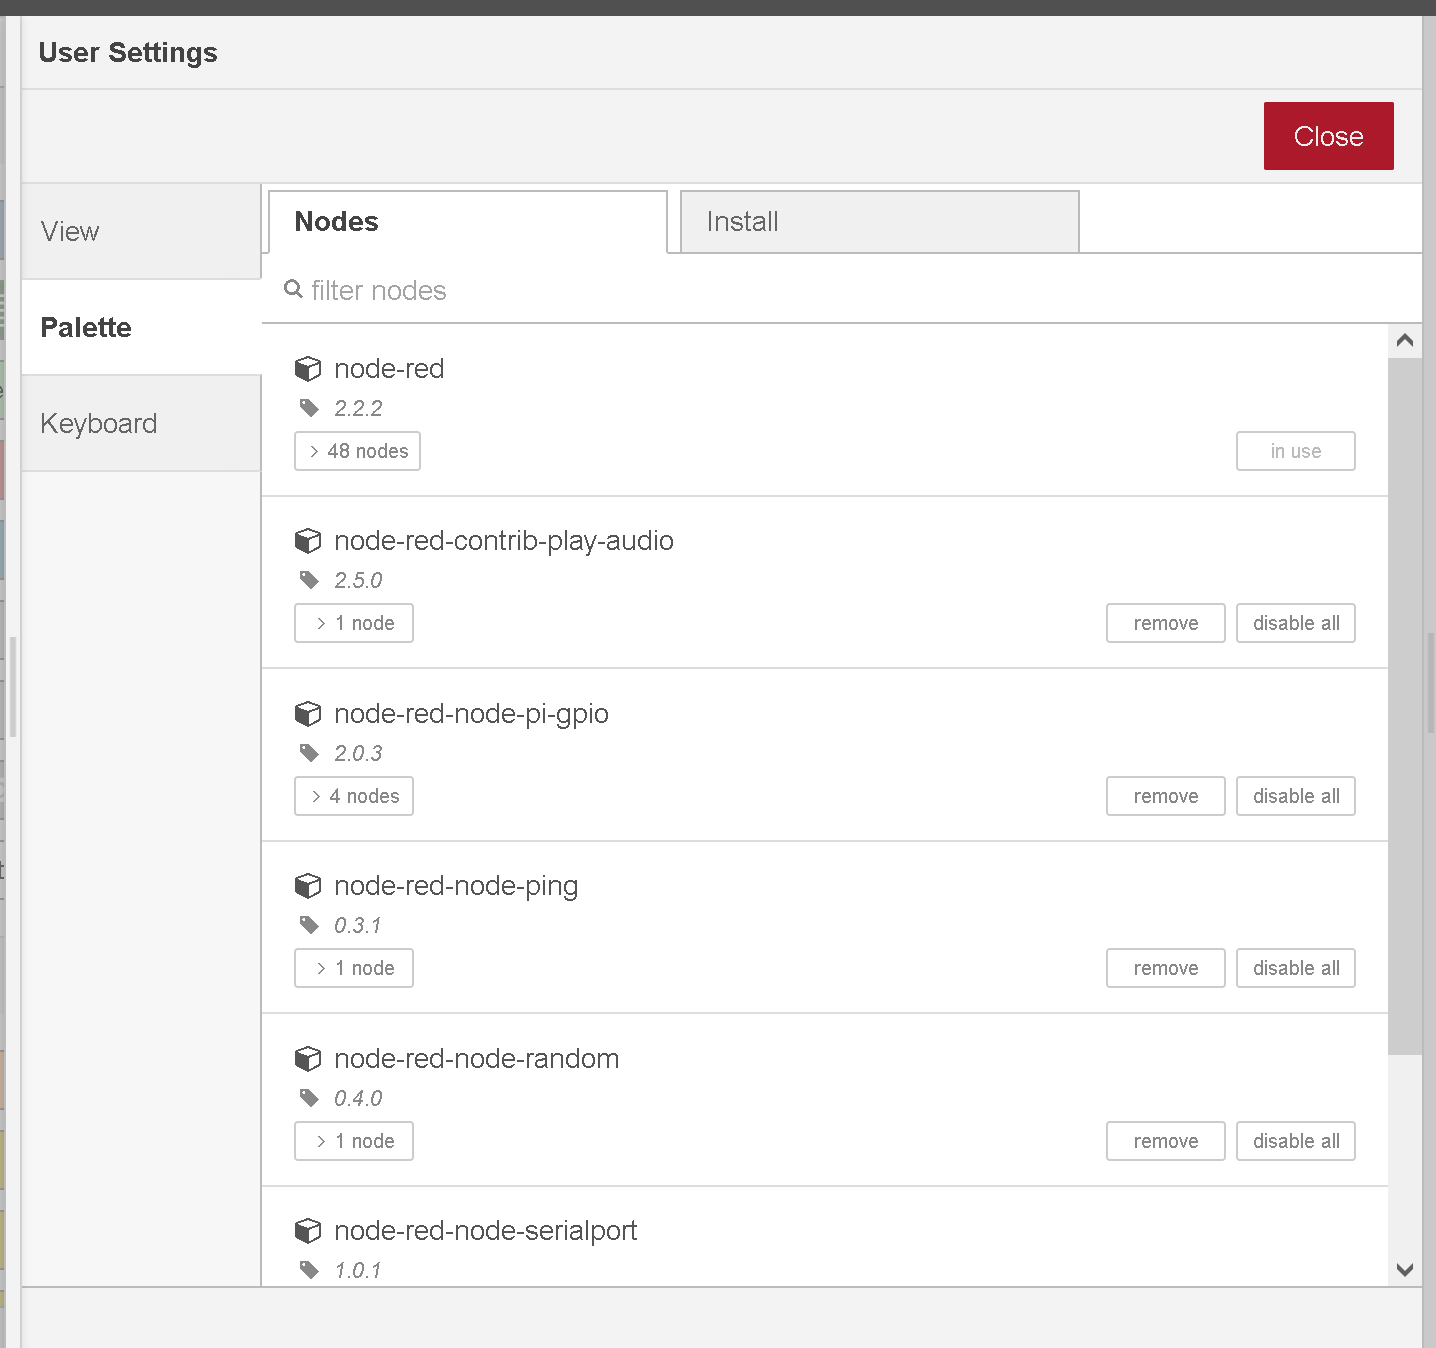
Open The install Tab.

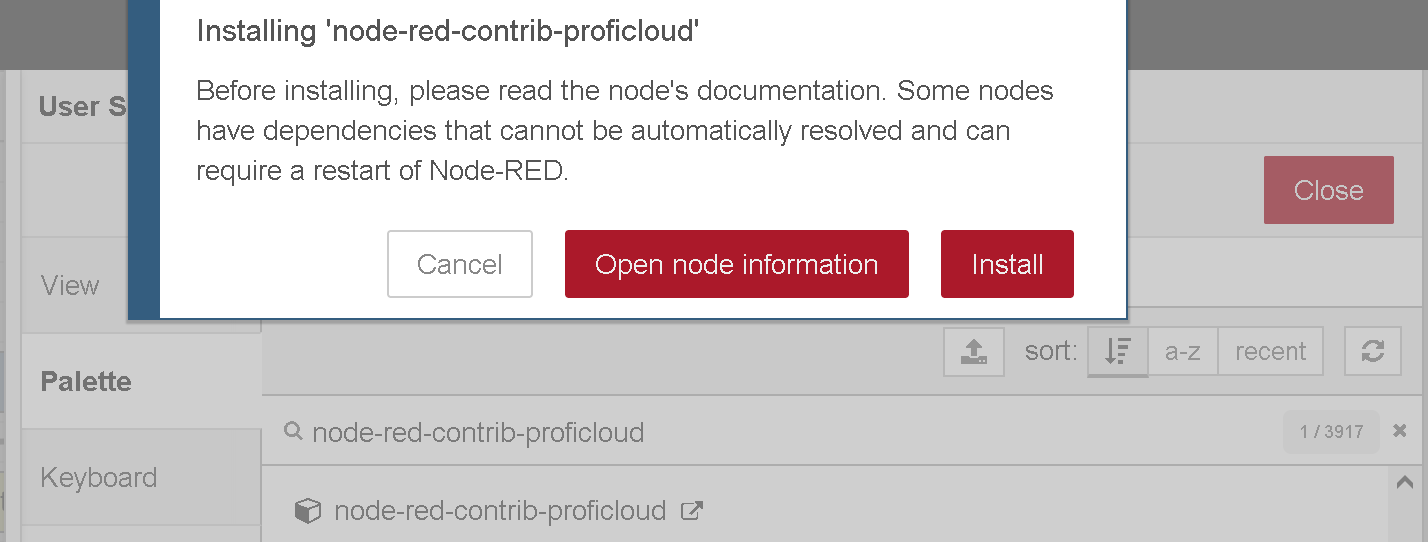
Search node-red-contrib-proficloud>Proficloud – IIot-Platform of Phoenix Contact >Install.

You will get an Alert, press Install to proceed.
Just a second..
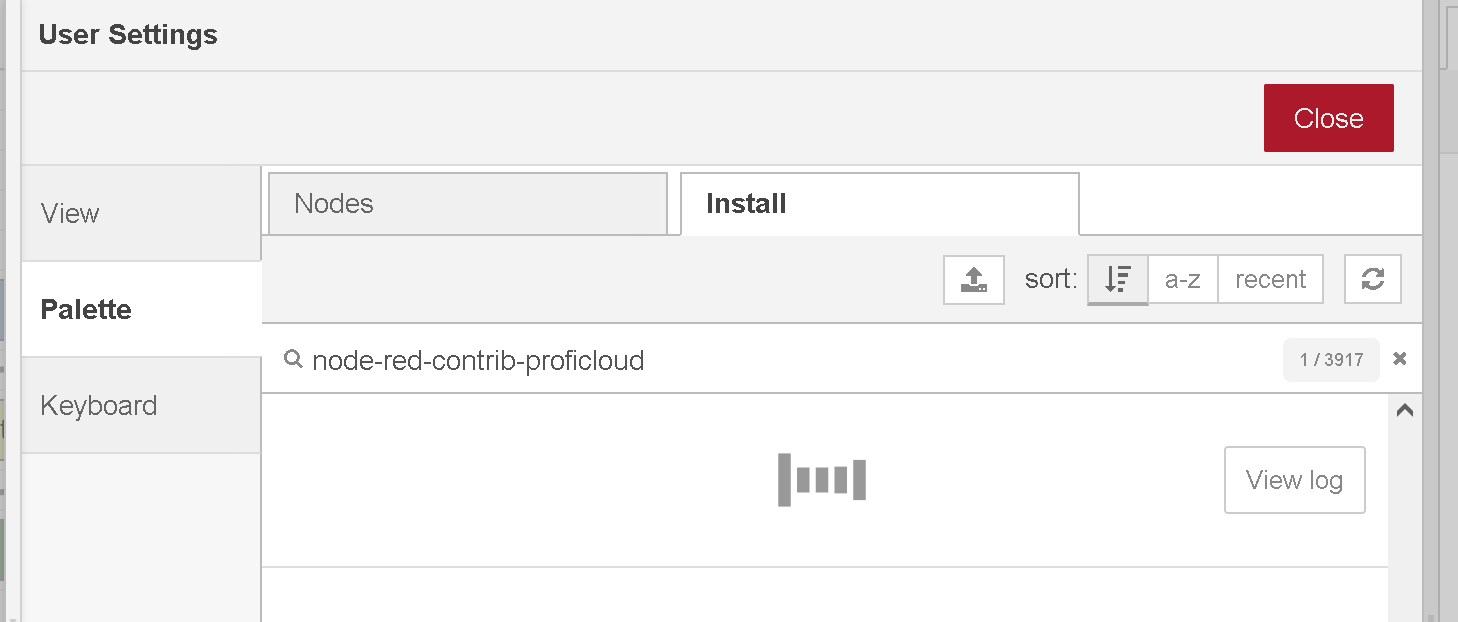
Library is added.

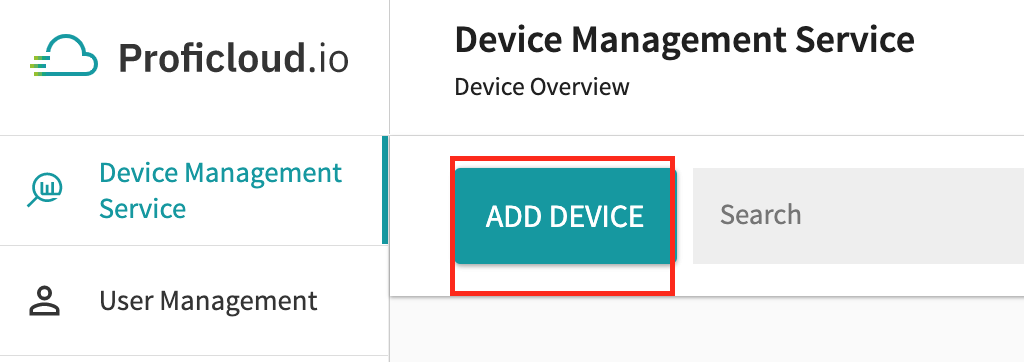
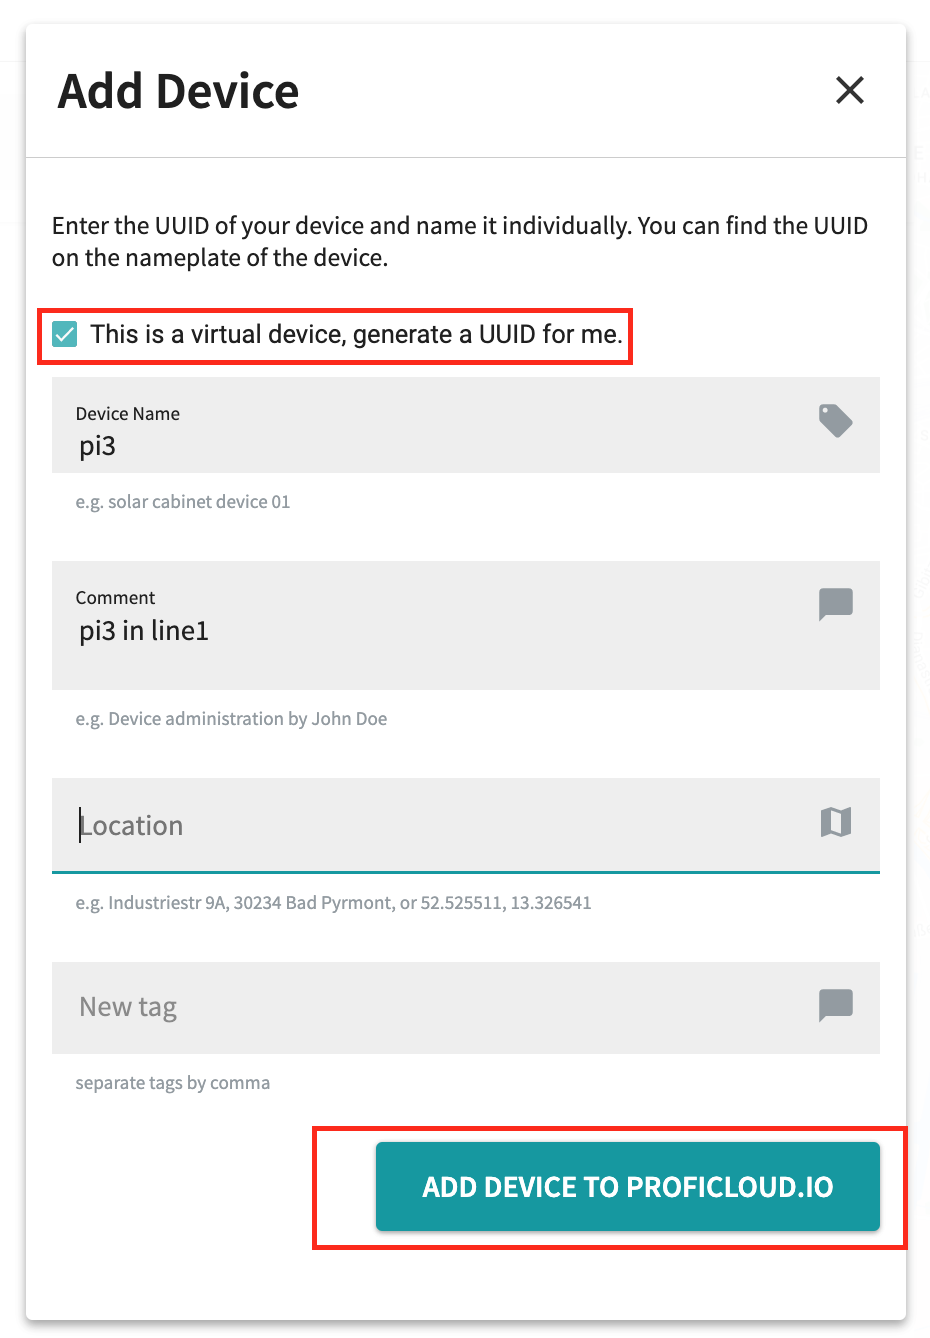
ADD Device
We have added the Proficloud.io library in Node-red, but actually connecting the device to Proficloud.io requires another ONE STEP, which is the Virtual UUID of the device. The Virtual UUID of the device can be created from your Proficloud.io account.
Open Dashboard>Add Device.
The Add Device popup will appear.
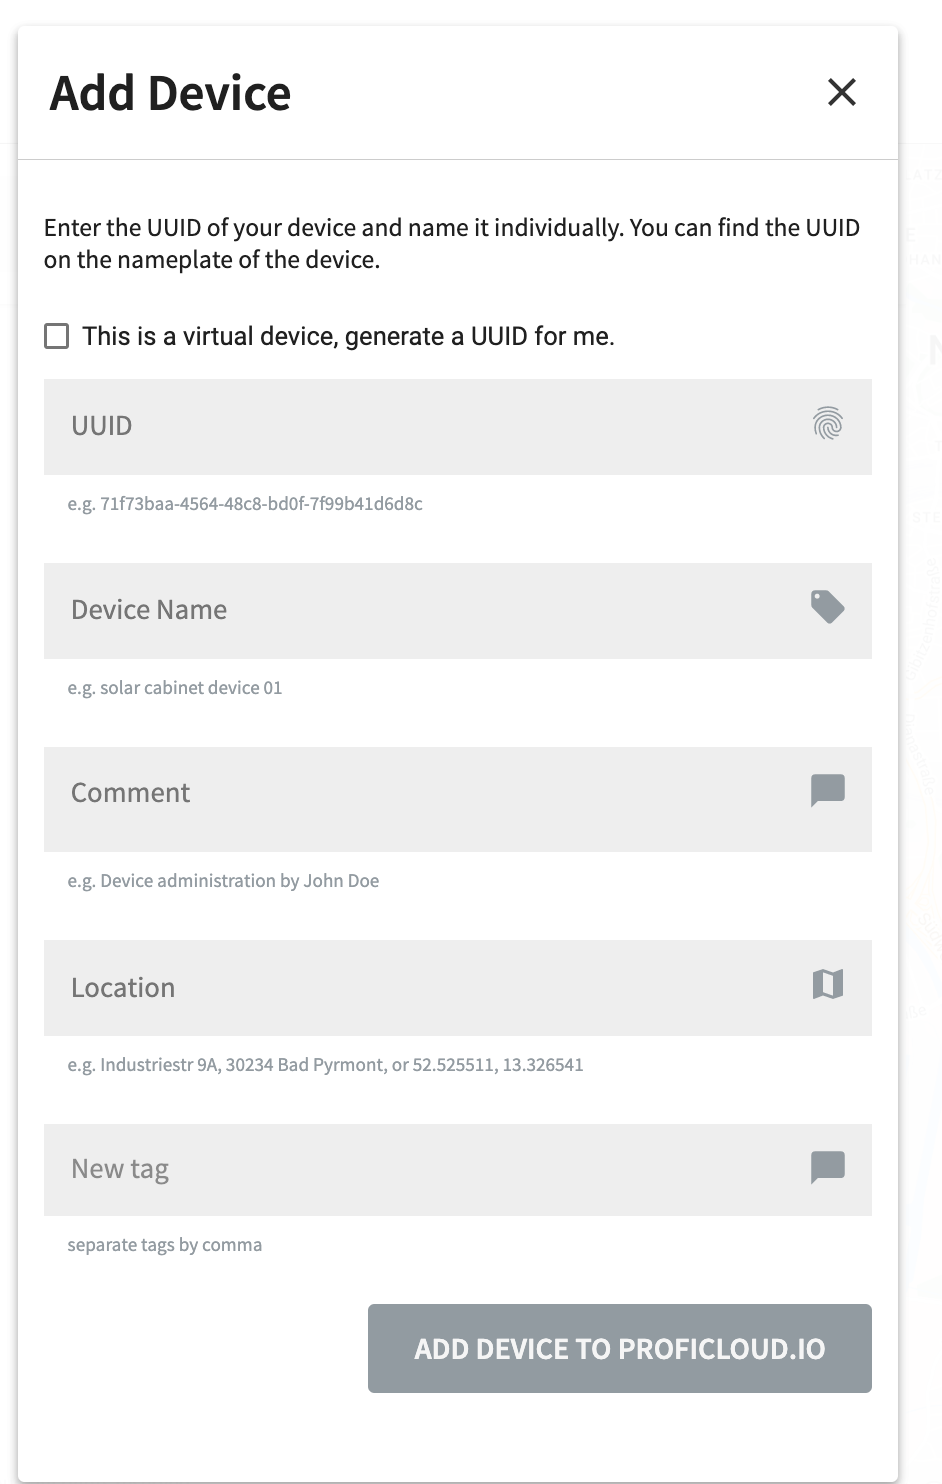
Please check the Checkbox for “This is a virtual device, generate a UUID for me.”
Then, enter information such as Device Name/Comment, etc., and add the device with ADD DEVICE TO PROFICLOUD.IO.
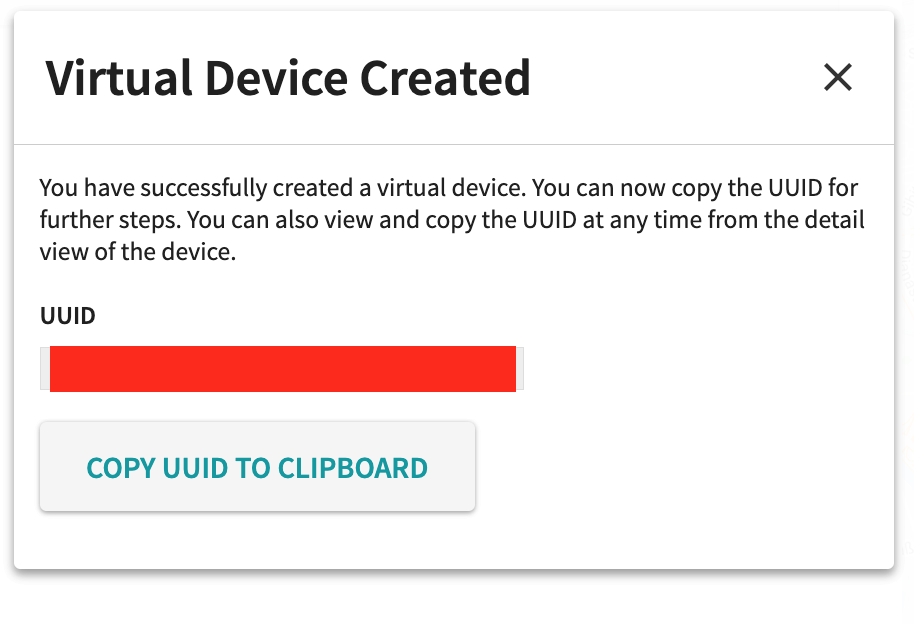
Done!

The Virtual Device has been created and a POPUP with the UUID will be displayed.
Please save the UUID in Notepad or something.
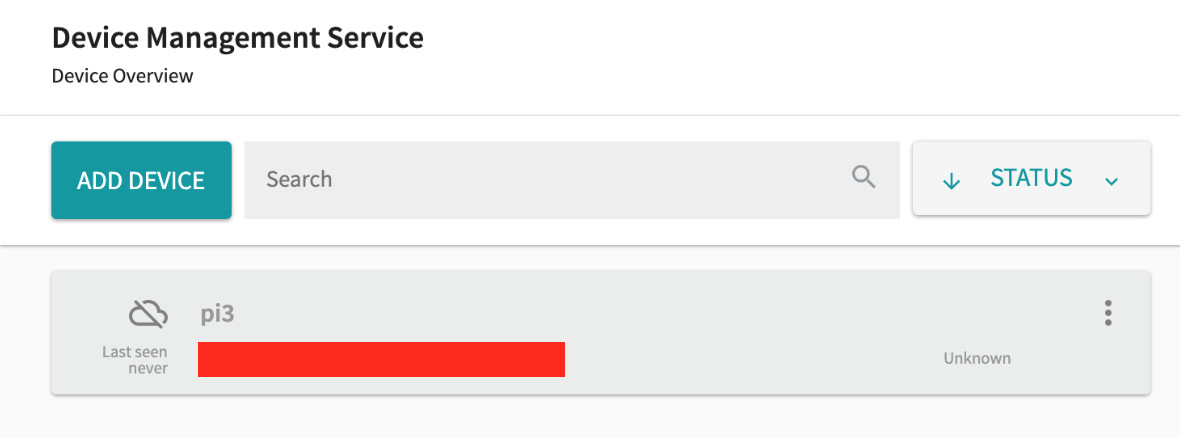
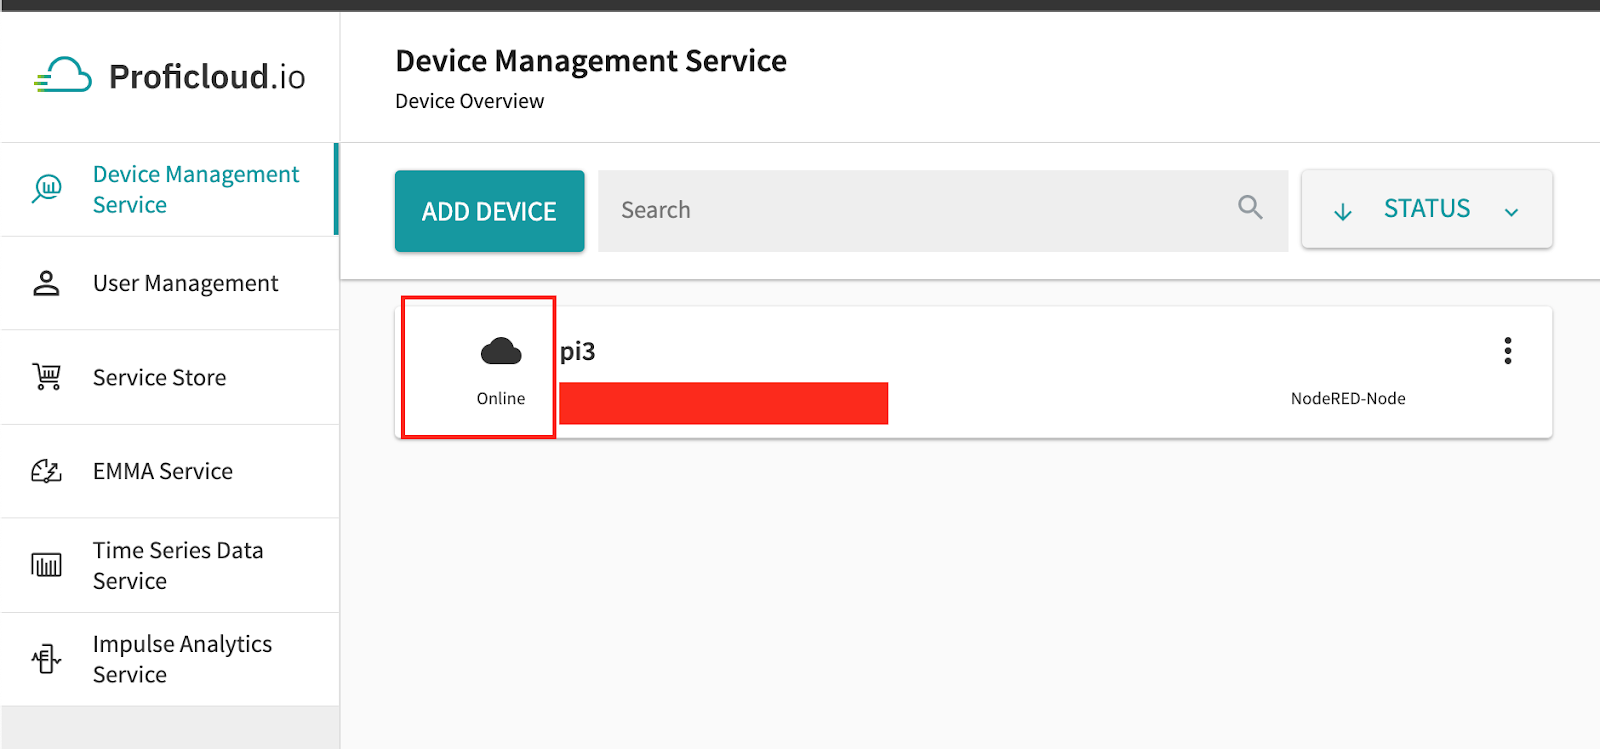
Devices that are Offline in the Device List are added.
Example1-Establish the connection
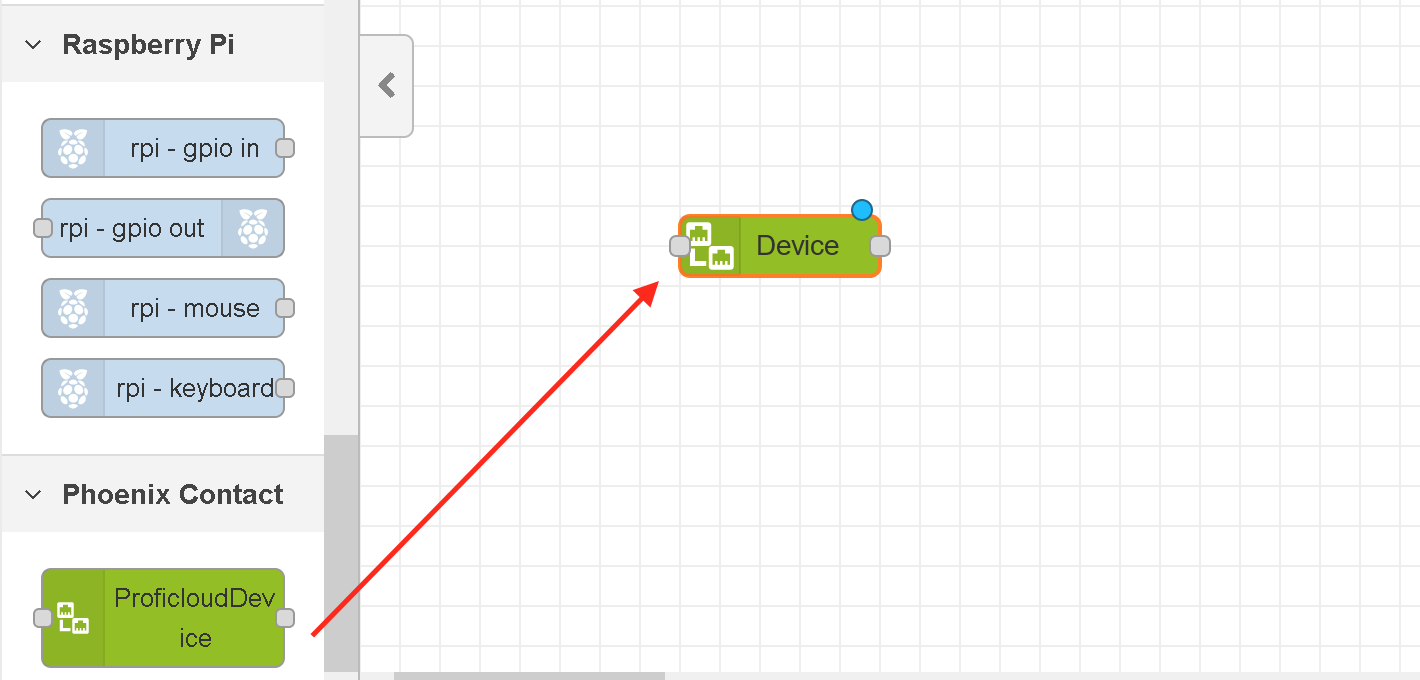
First, Let’s check if the communication between Node-Red and Proficloud.io is established or not. The ProficloudDevice Node installed earlier is at the bottom of the Node on the left.
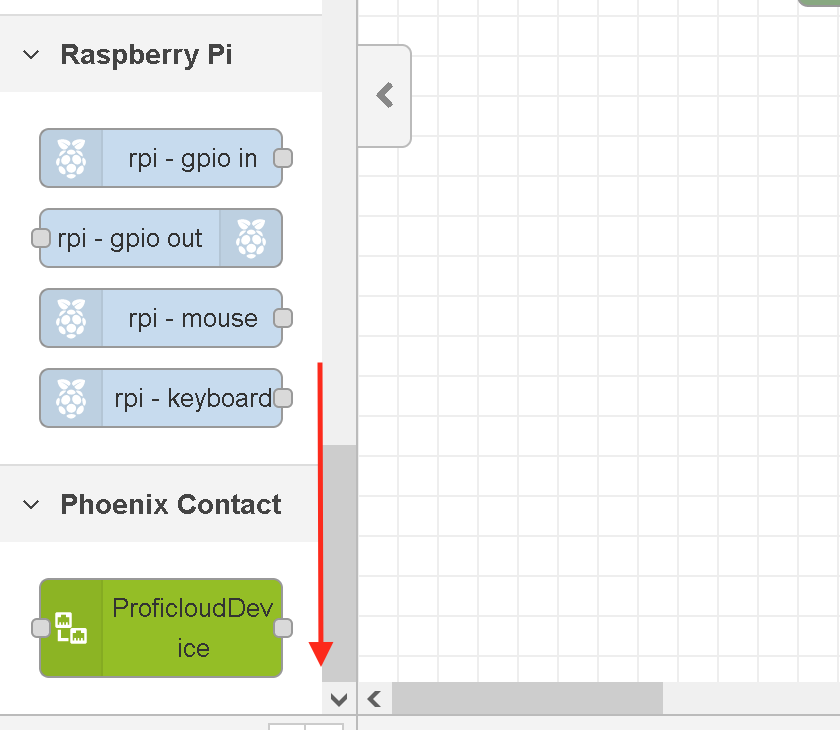
Add that Node to the Flow.
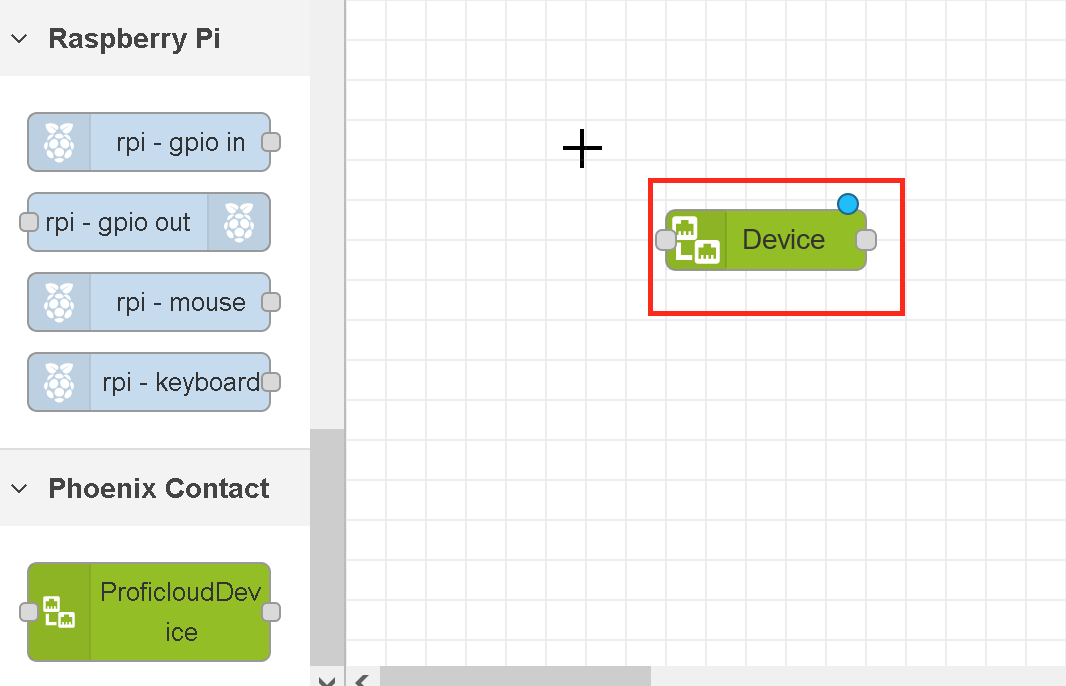
Next, click on Node.
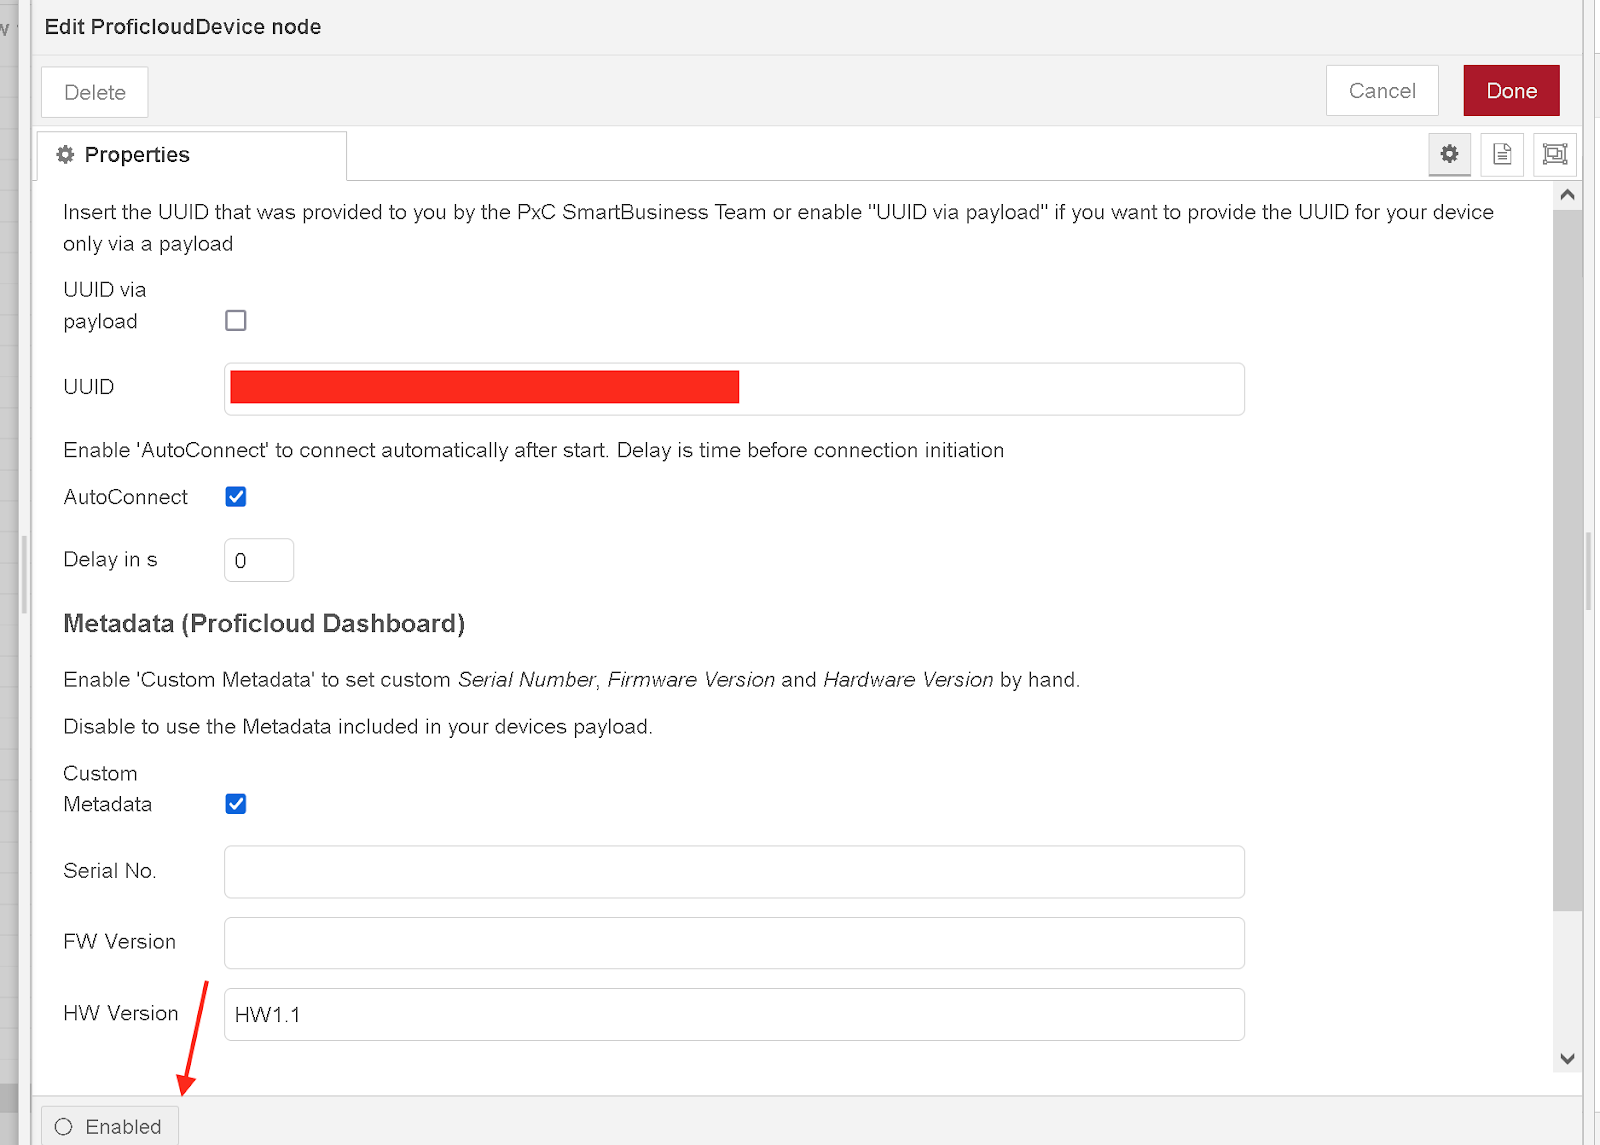
The Properties Setup screen will appear.
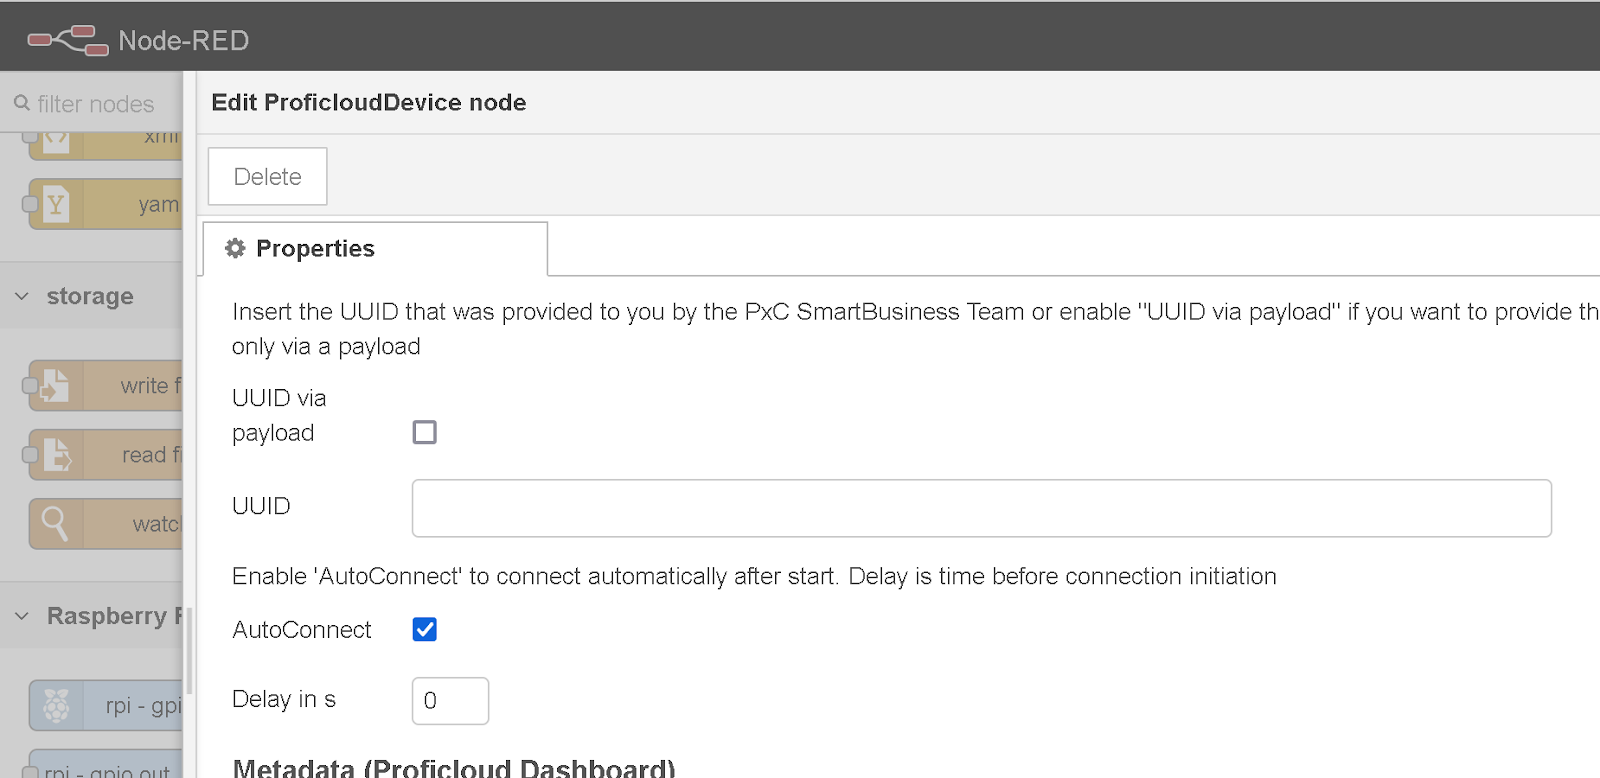
For UUID, enter the ID of the Device you just added, and Done with the AutoConnect Checkbox.

Now Node is displayed as Device your UUID.

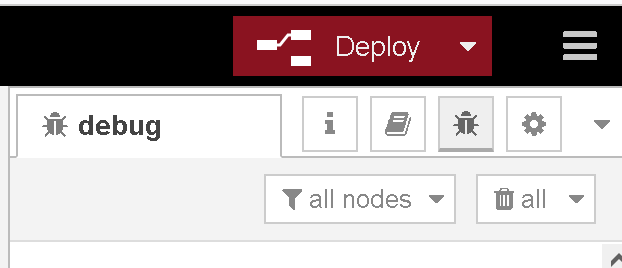
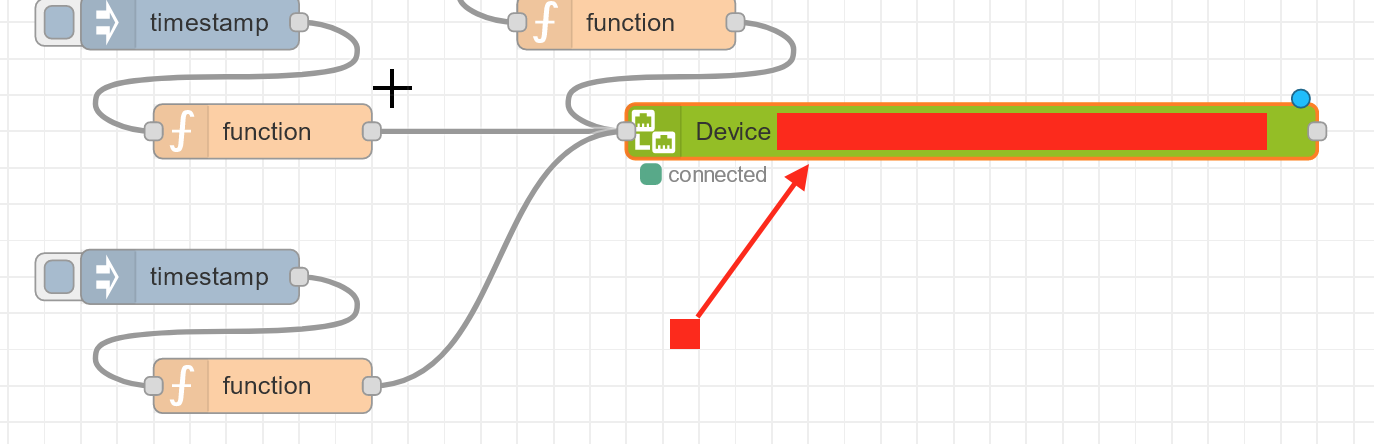
Deploy it.
After a short wait, the Device status will change to Connected.
Then the connection is OK!

Dashboard also turned my Raspberry into Online!
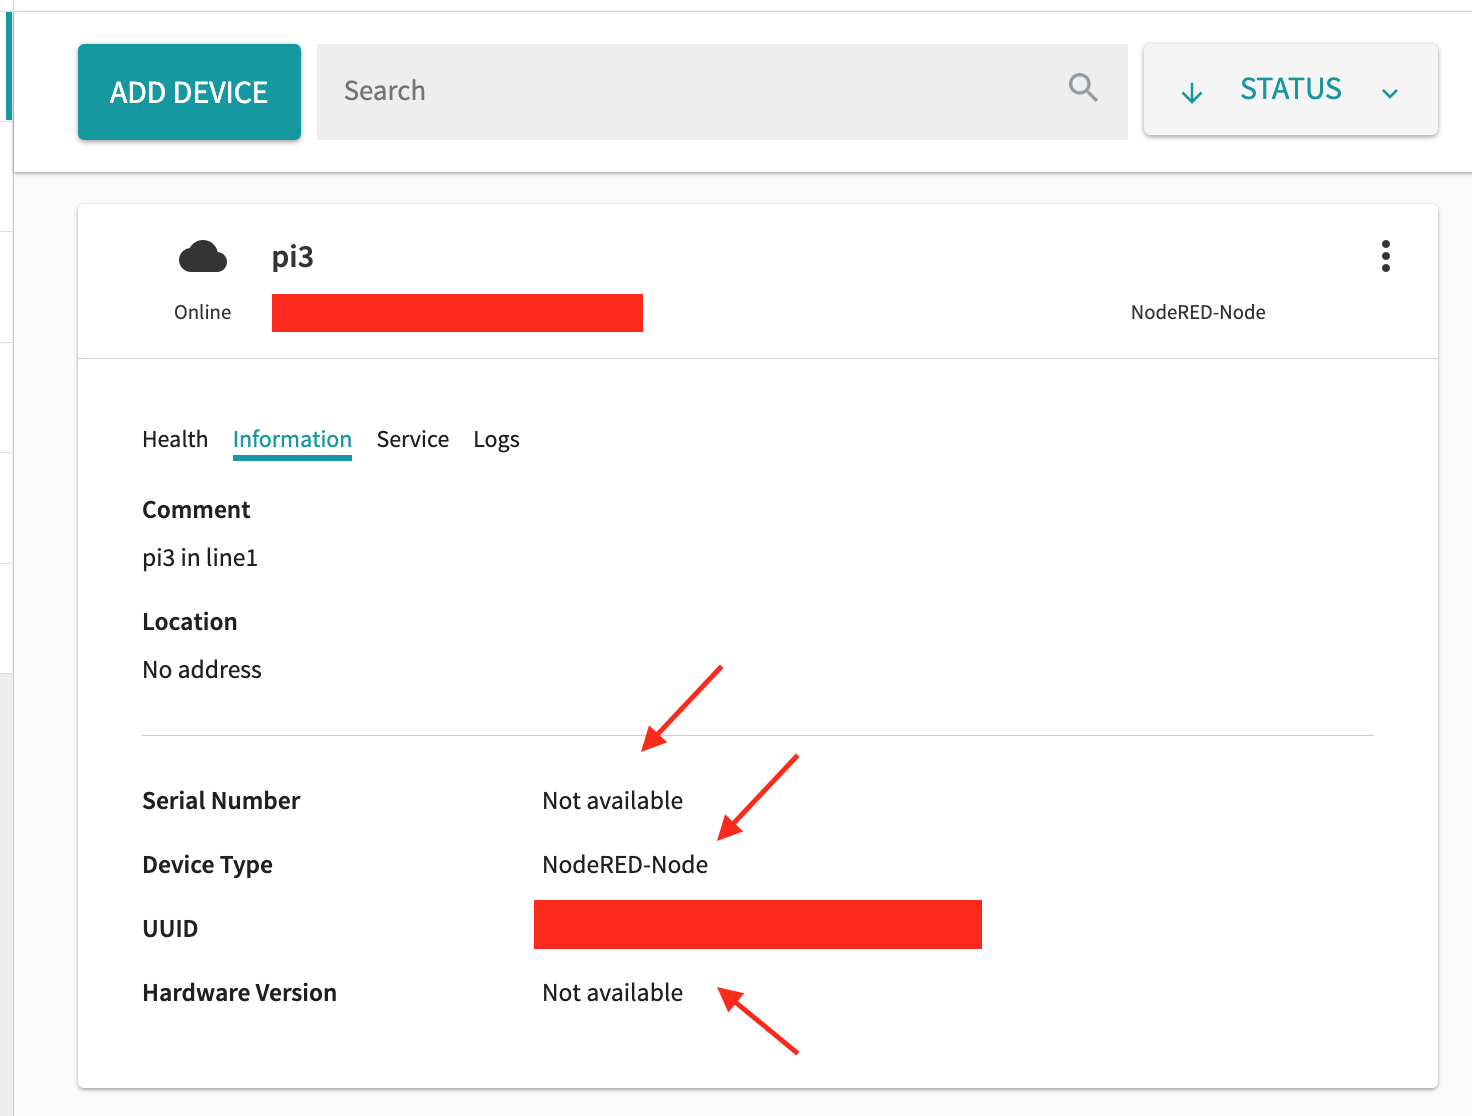
Example2-Set Some Device Information
After the communication has been established, it is time to change the device’s Metadata.
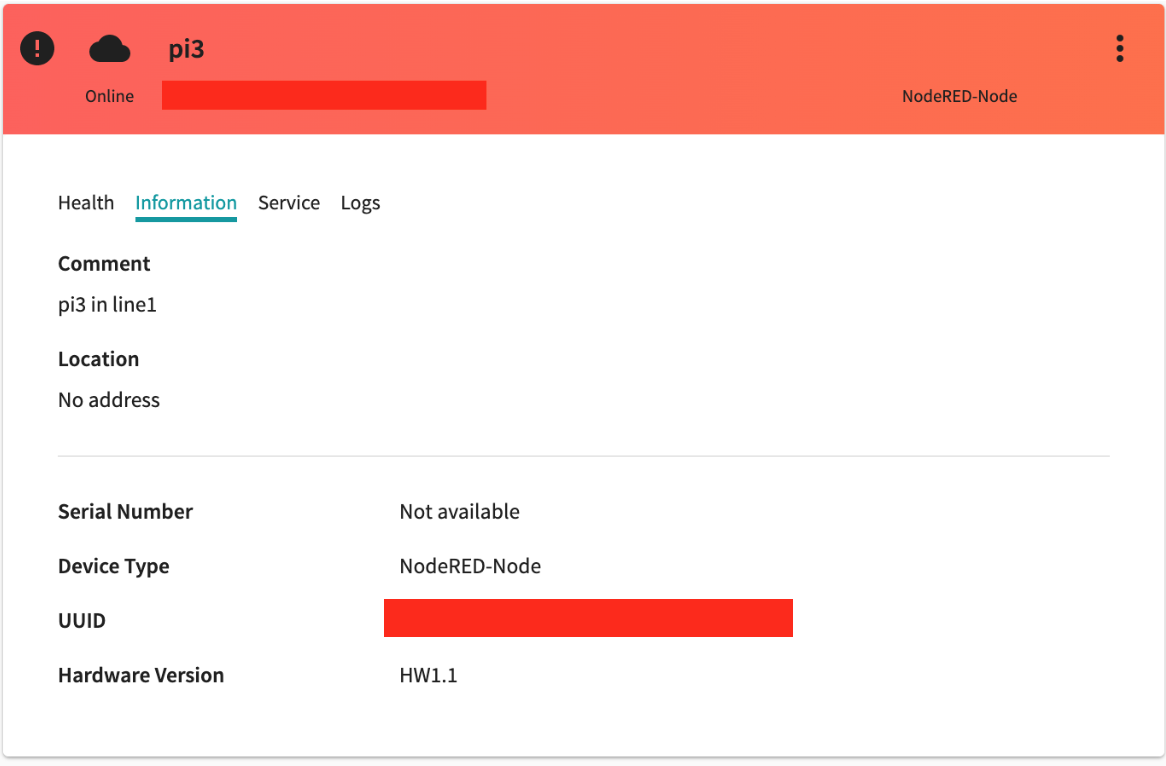
Under YourDevices>Information, there are three pieces of information that can be changed: Serial Number/Hardware Version/Software Version.
In Flow, click on the Node of the Device.
Properties include Input Field for Serial No/FW Version/HW Version.
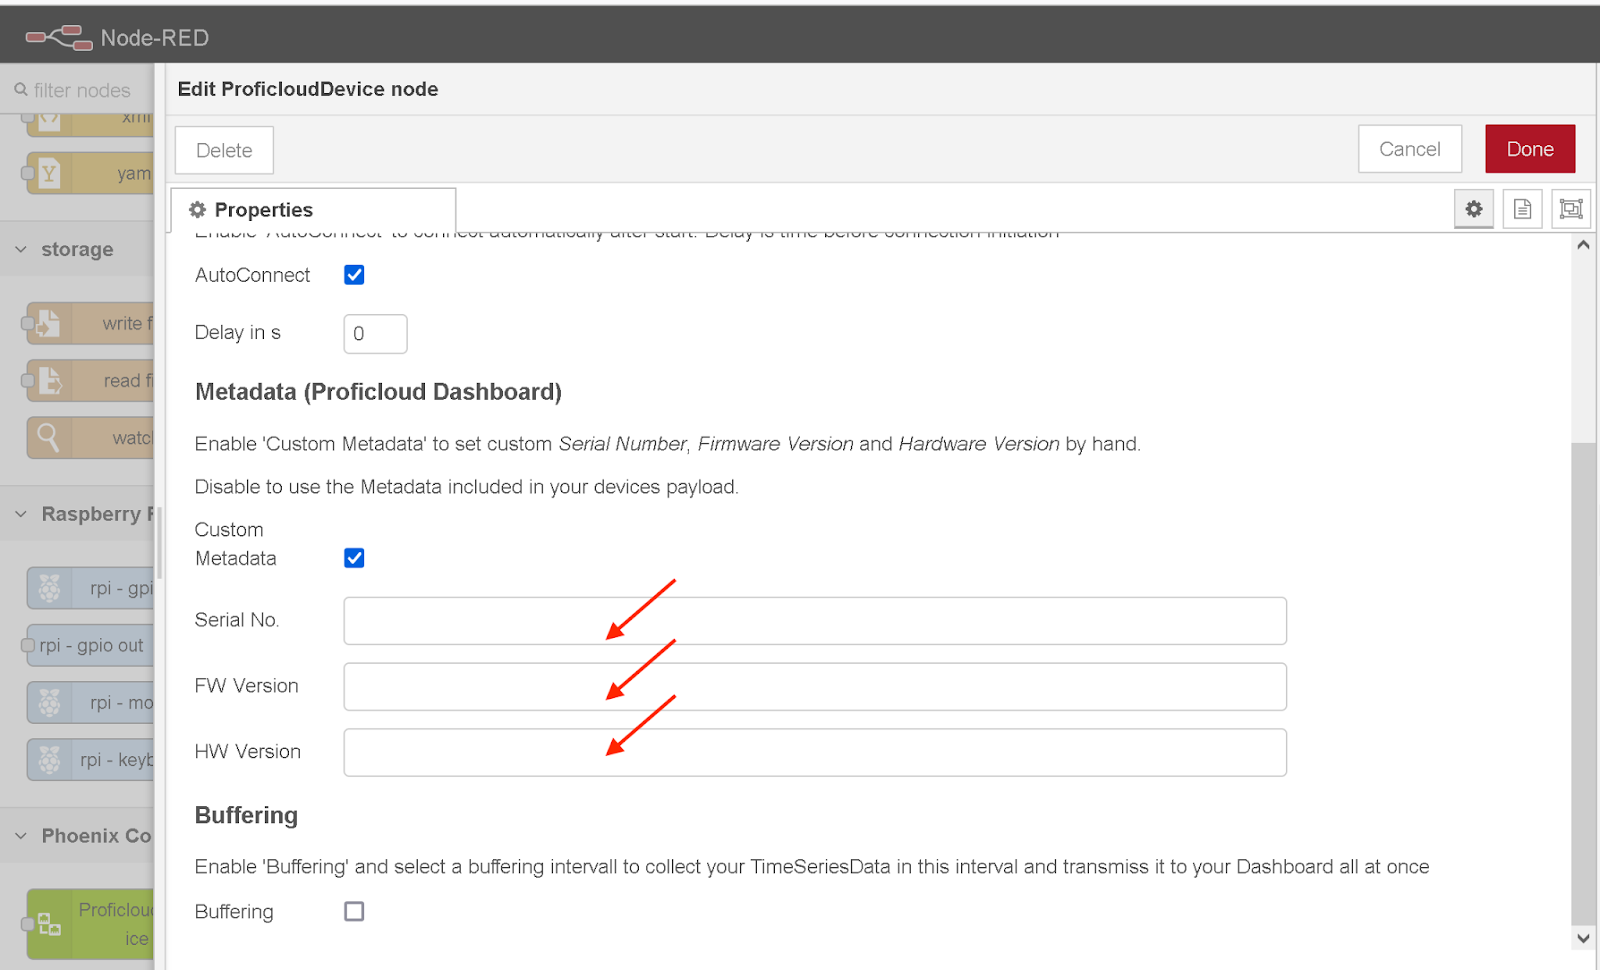
Since it is only a test, set an appropriate number and >Done.

Looking again from the Dashboard, I wonder why only the Hardware Version is updated and not the Serial Number…well, it’s not important, so I’ll put it off.
Example3-Send Time series value
The next step is to send the time sequence data to Proficloud.io. Those data are also collected from PLCs and Sensors, so we upload the Proficloud.io data from Node-RED.
First, we create a Node with timestamp>function and connect it to the Proficloud.io Device.
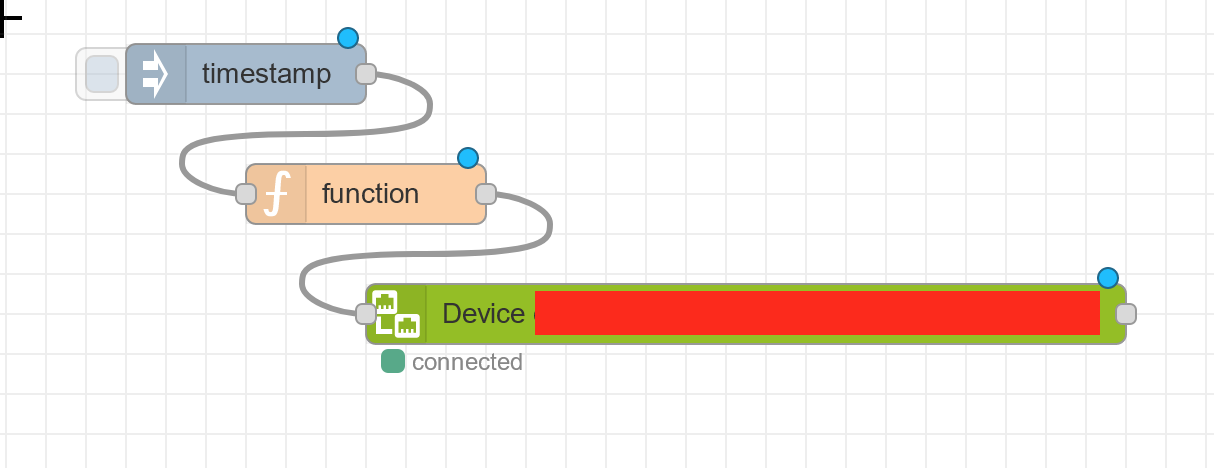
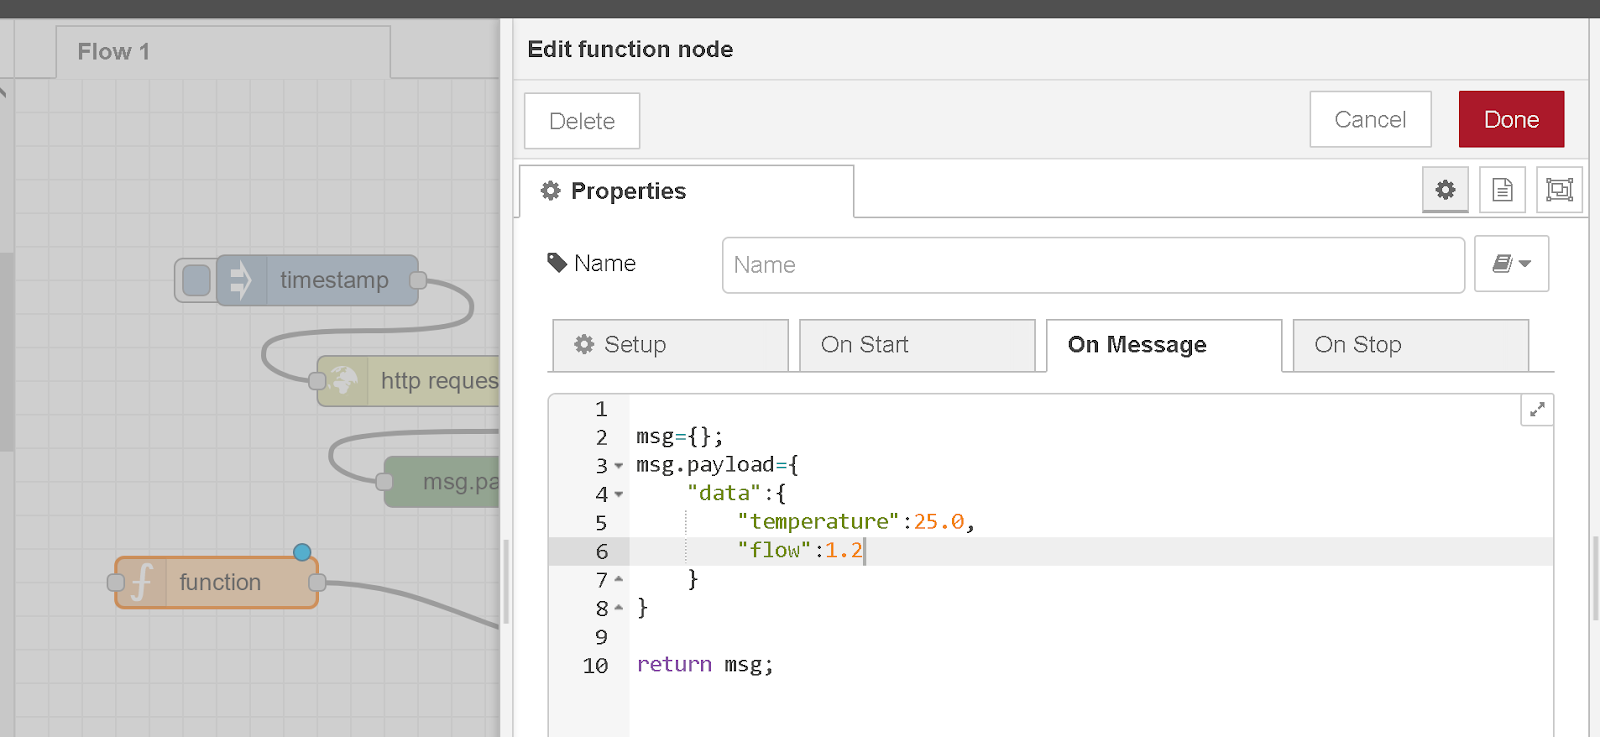
Click on Function Node and change msg.payload.
Next, we need to modify the Timestamp Node.
Change to Repeat>Interval>every 1 second>Done and you are good to go.

Execute Flow with Deploy.

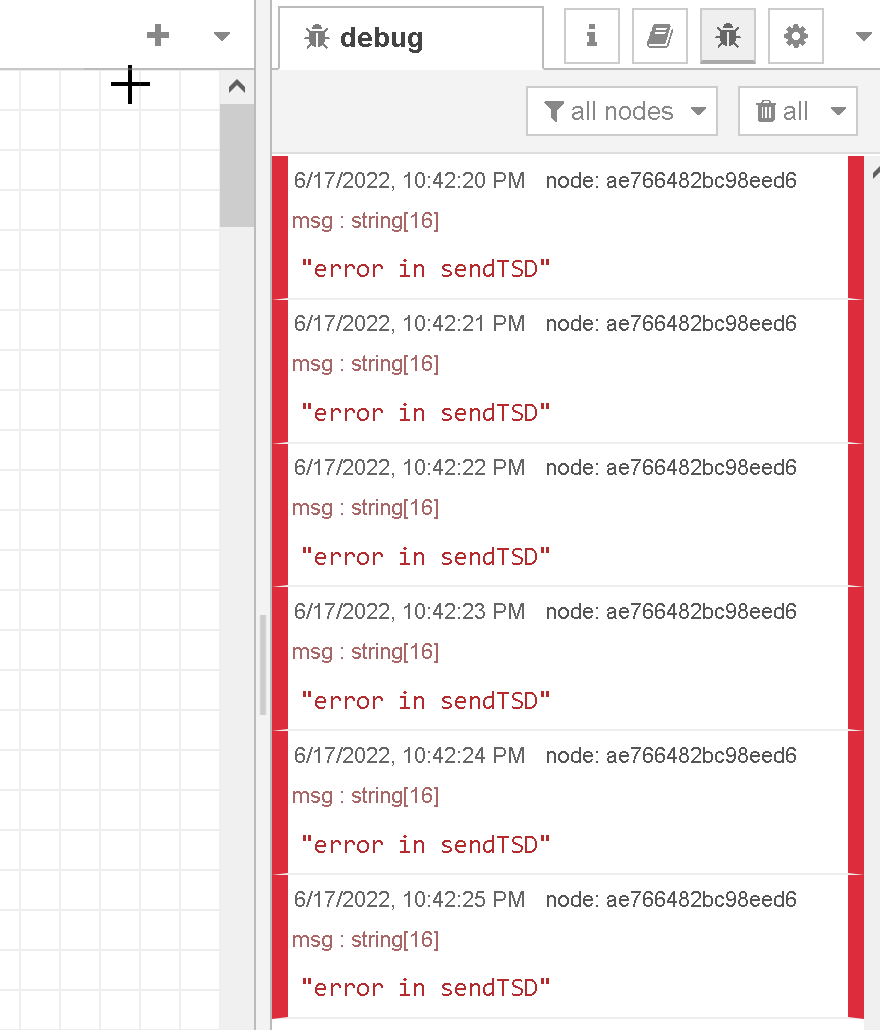
It takes a little time to connect, so don’t worry about the error in sendTSD Message.
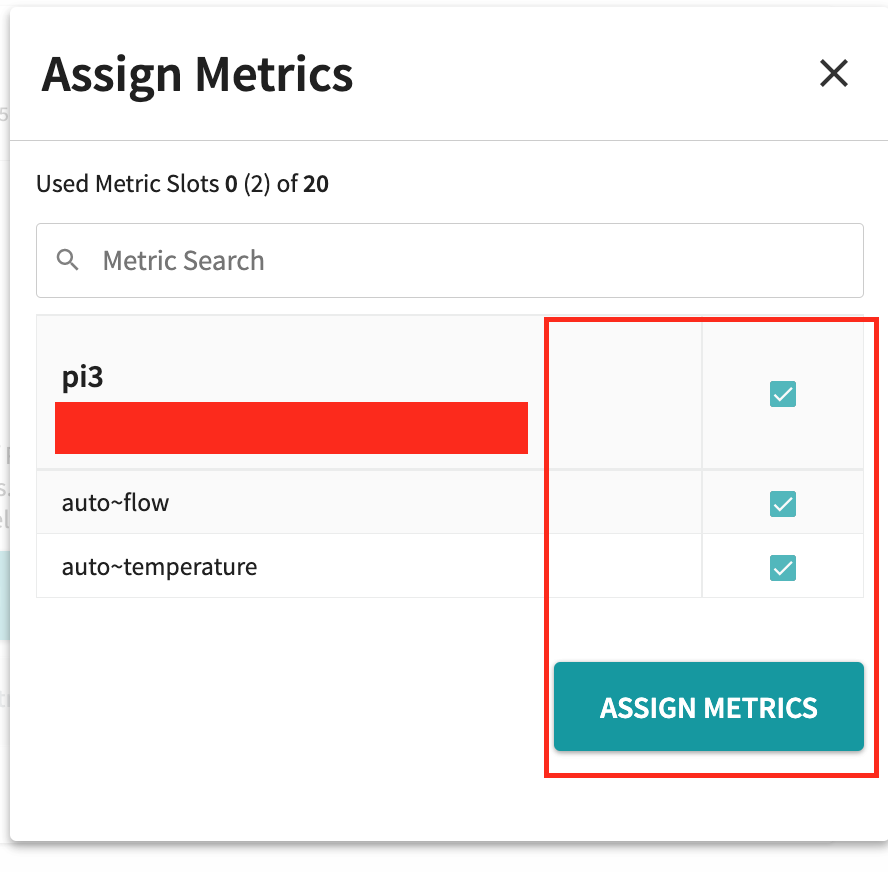
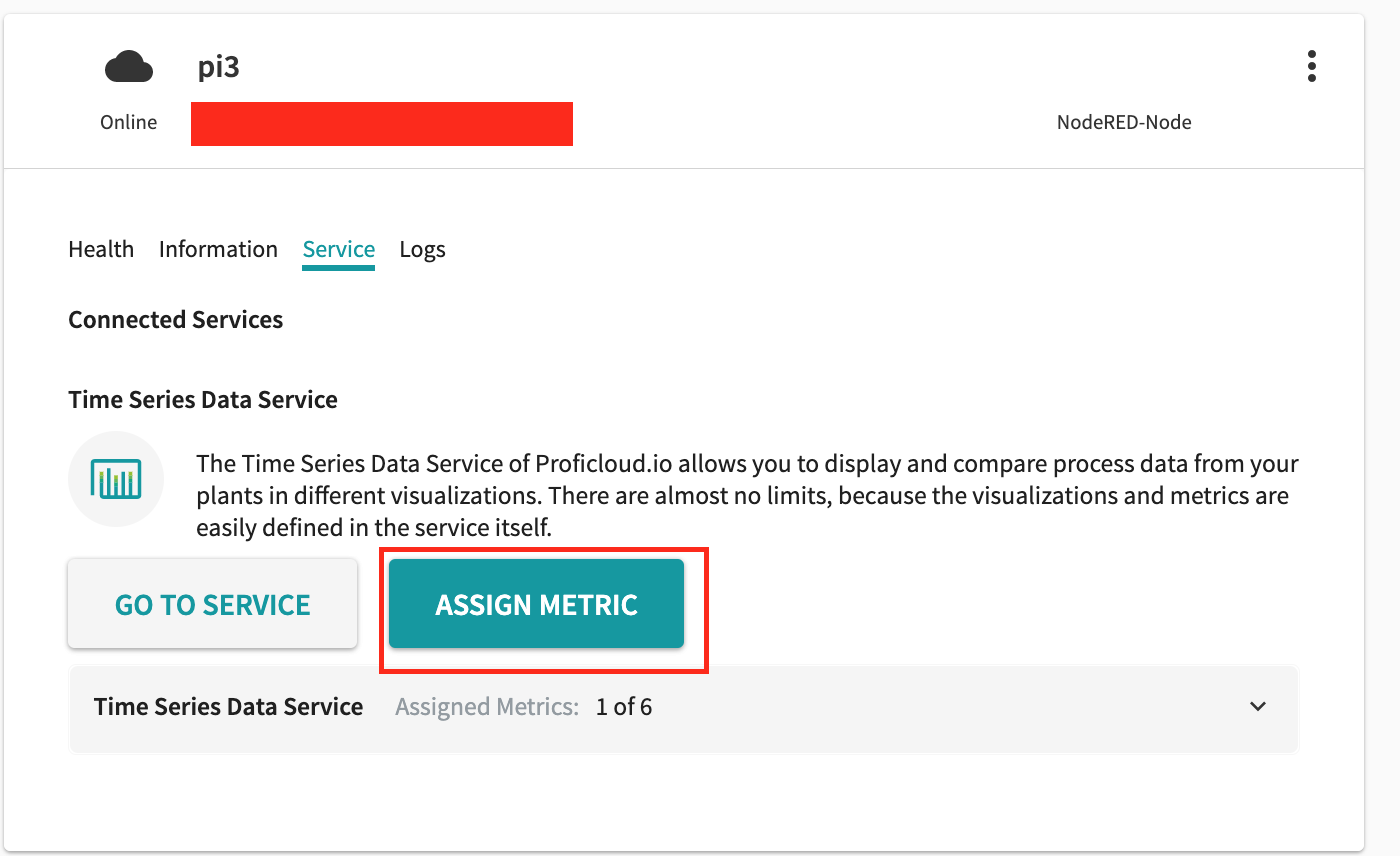
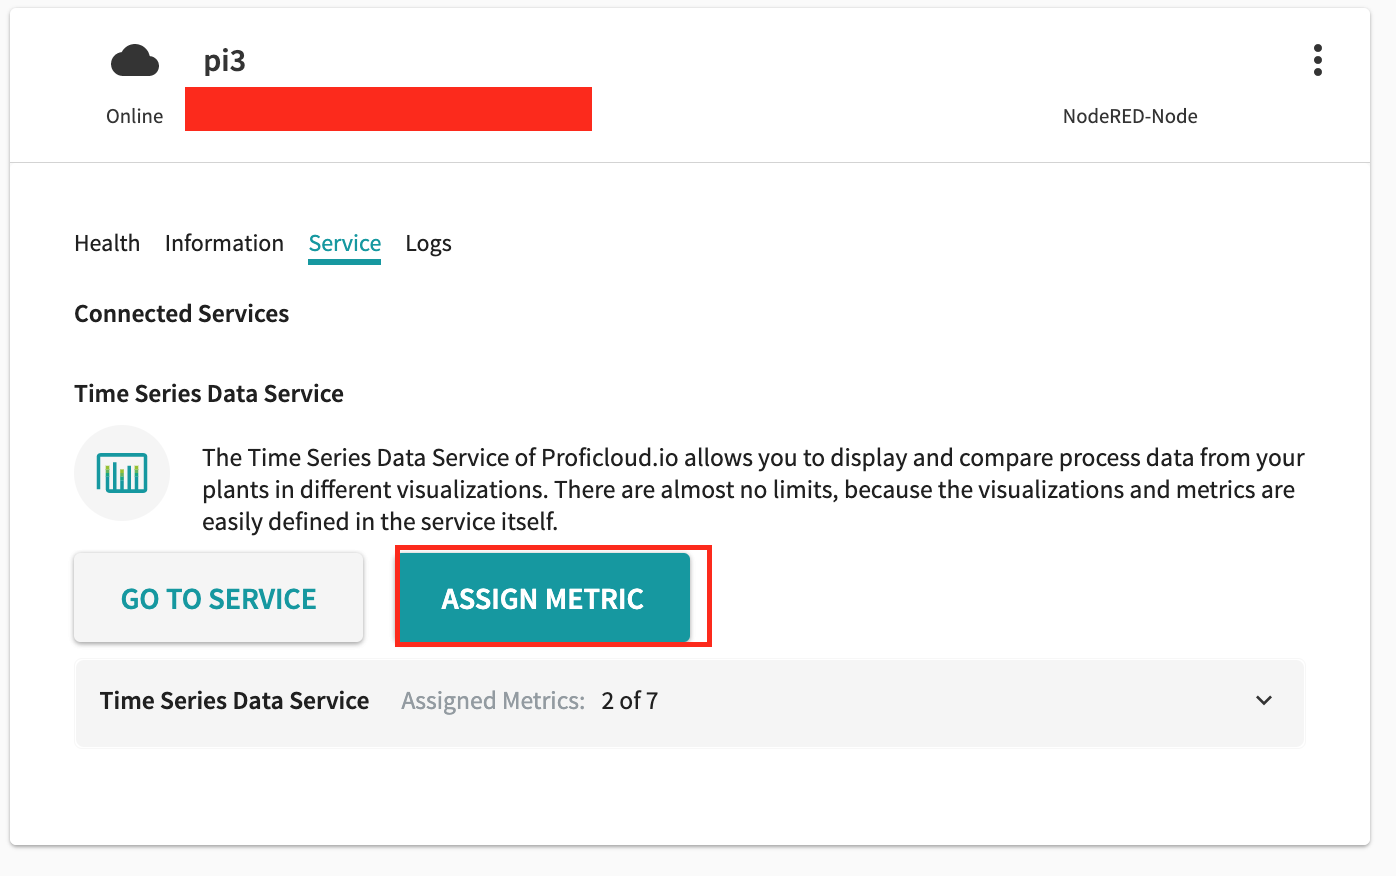
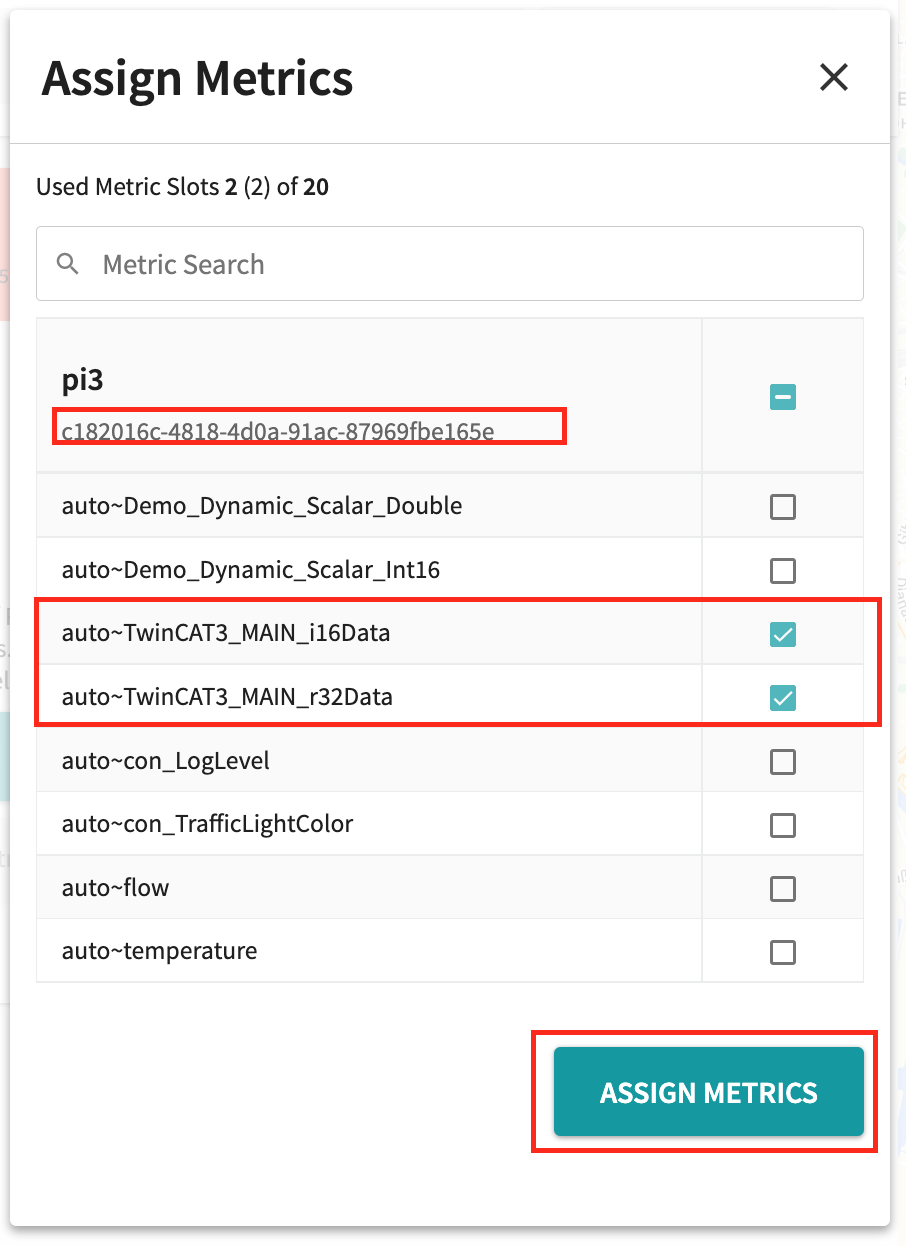
Then we can return to the Dashboard, open the Service tab, and click the >Assign Metric button.
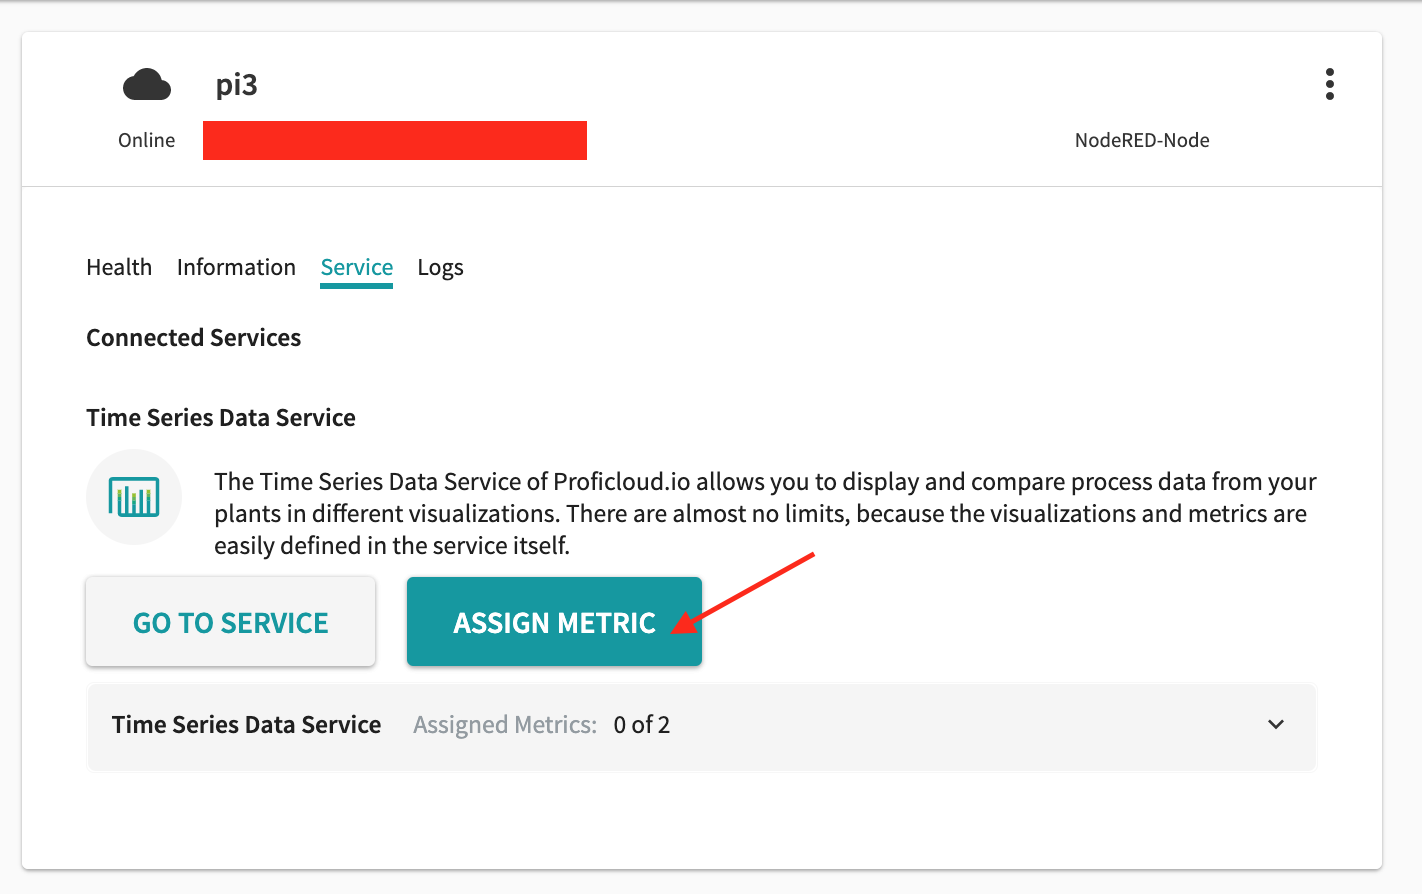
Check the flow and temperature of msg.payload and click the ASSIGN METRICS button.
just a second..

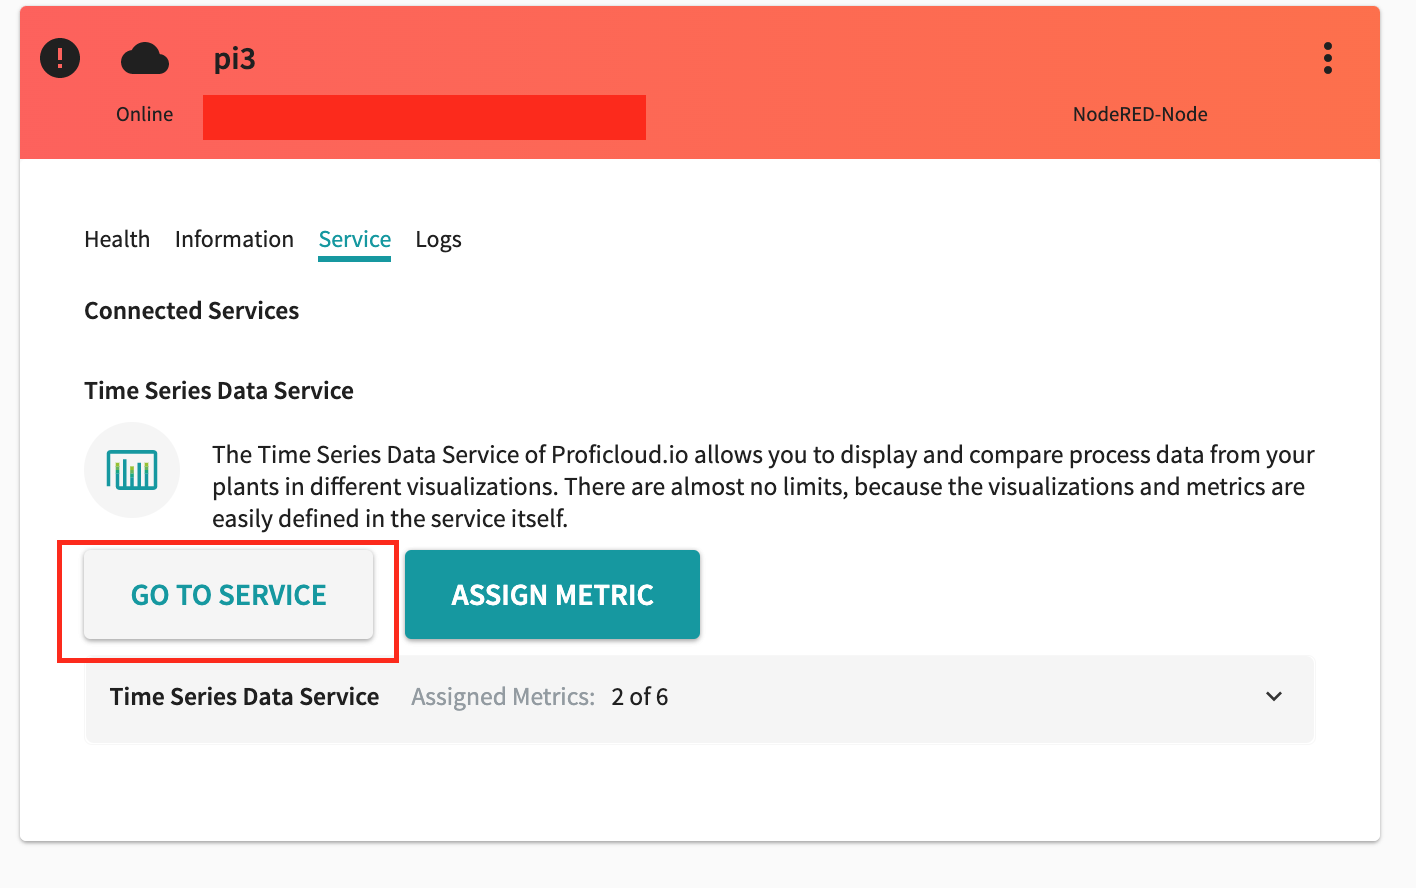
Once completed, the next step is to click on the GO TO SERVICE button.

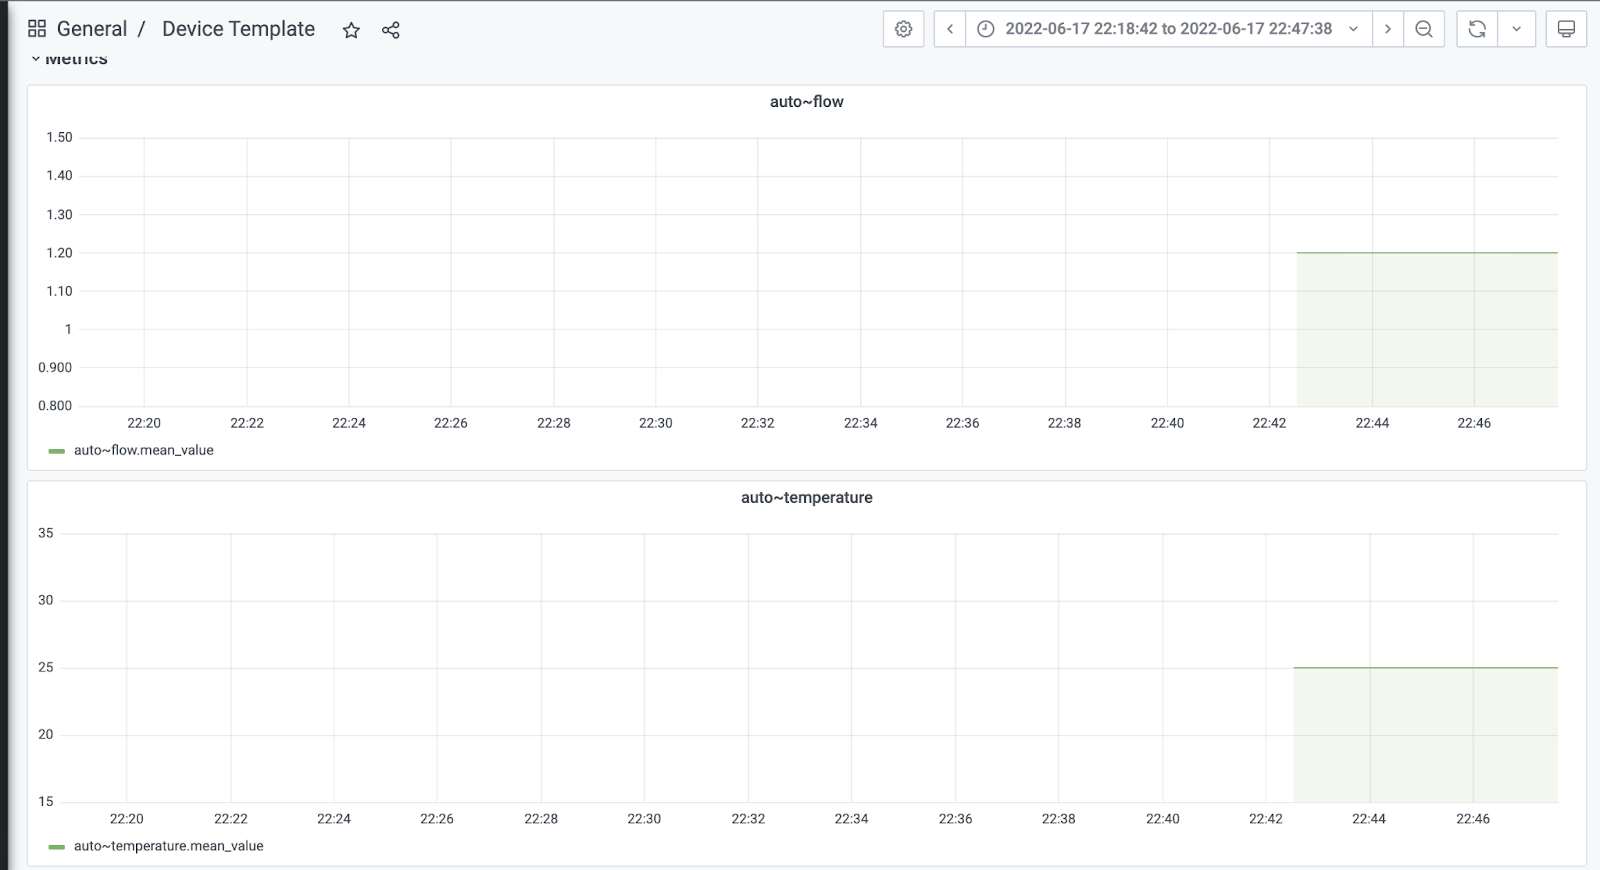
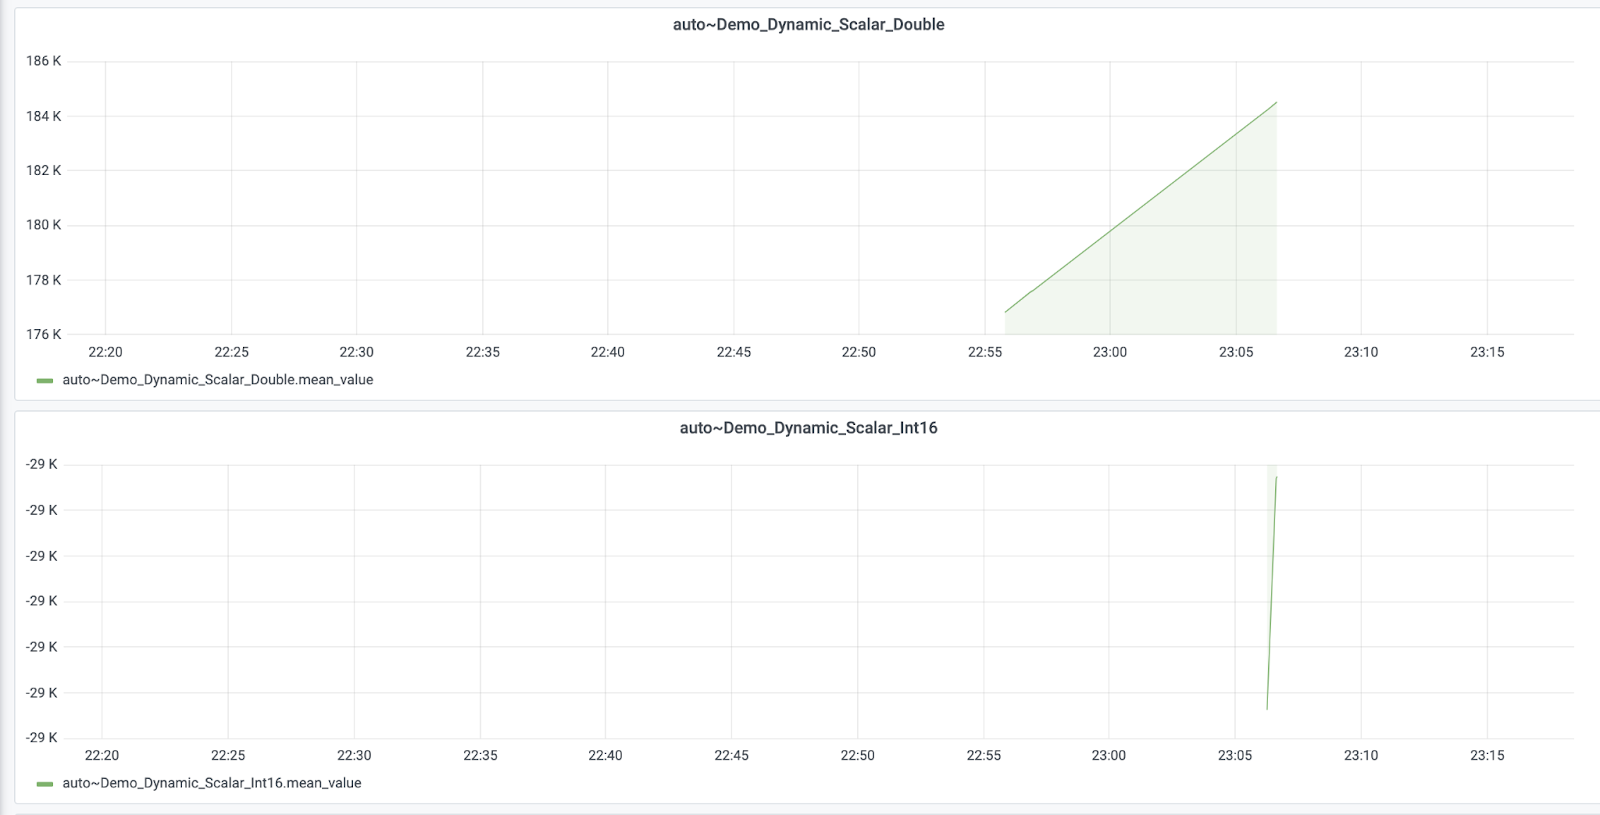
Time series data can be visualized.
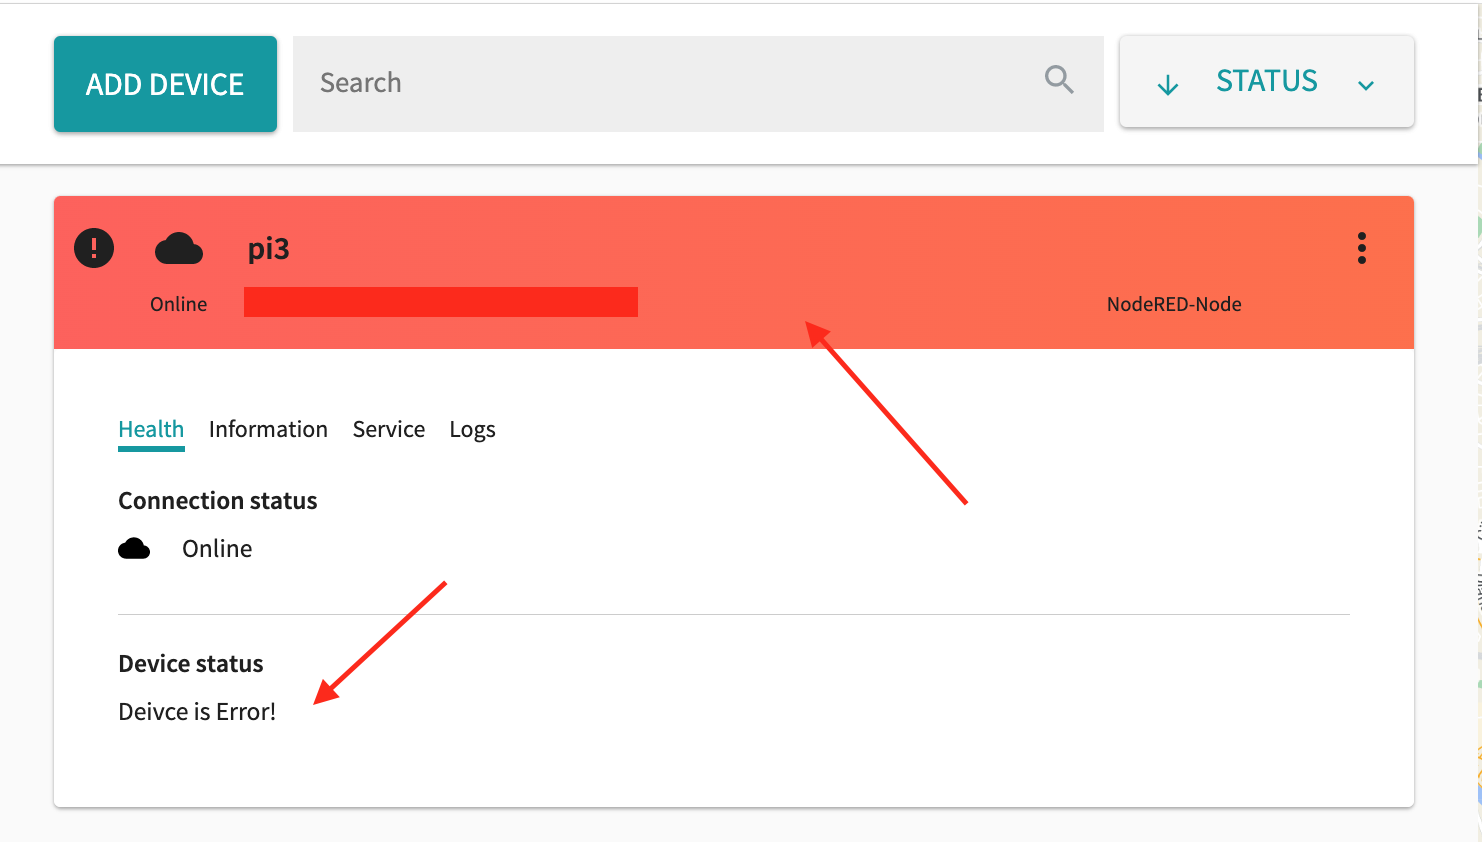
Example4-Send Status
TrafficLight Message can be used to display the device status on the Health Tab on the Dashboard with colors and a short message. All you need to do is to send a Json Object containing TrafficLight from Proficoud Node to Proficoud.
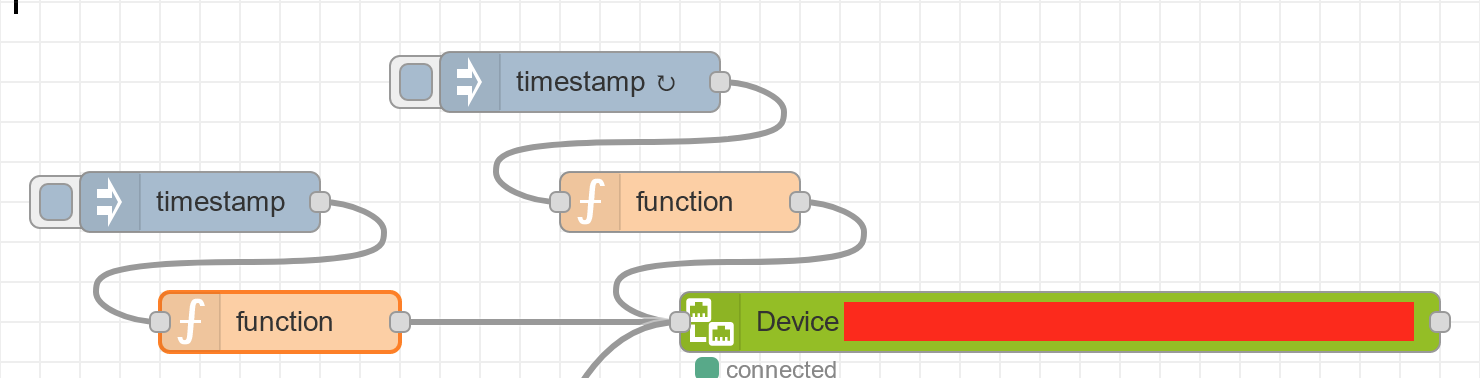
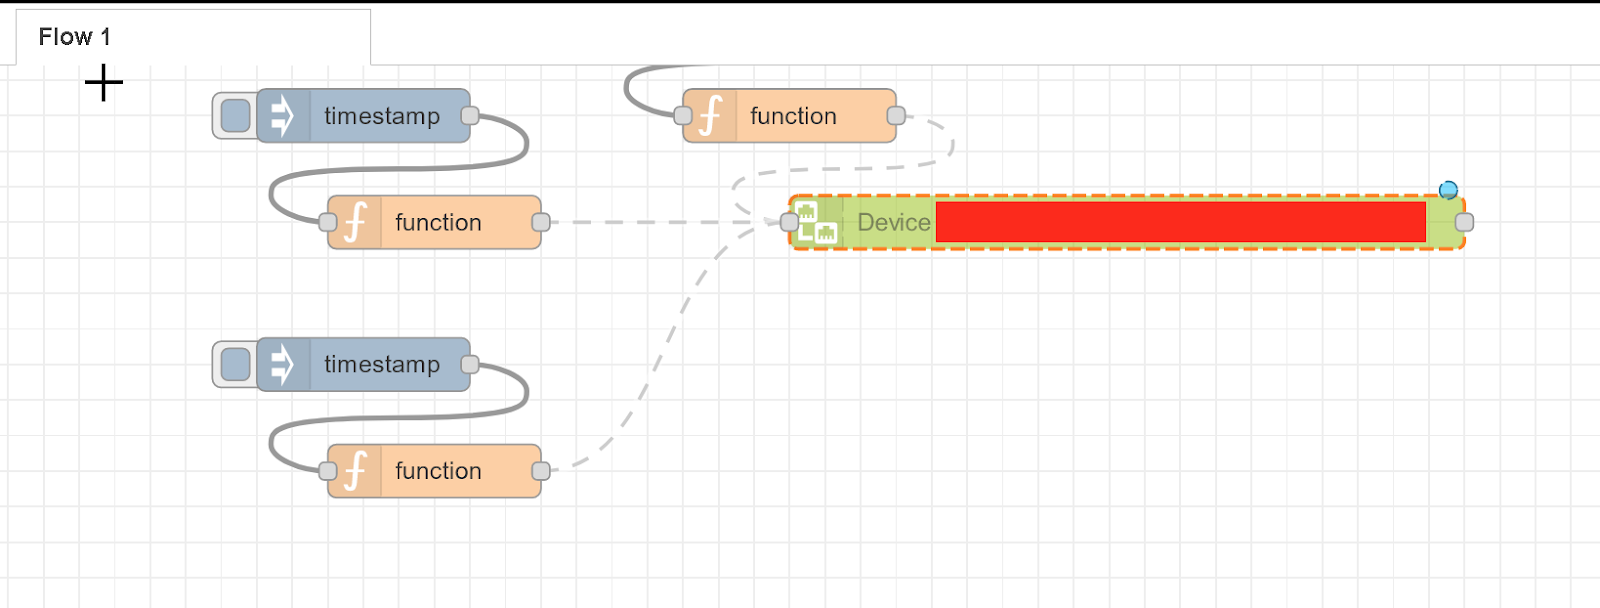
Add a new TimeStamp/function Node in Flow and connect it to the Device in Proficloud.io.
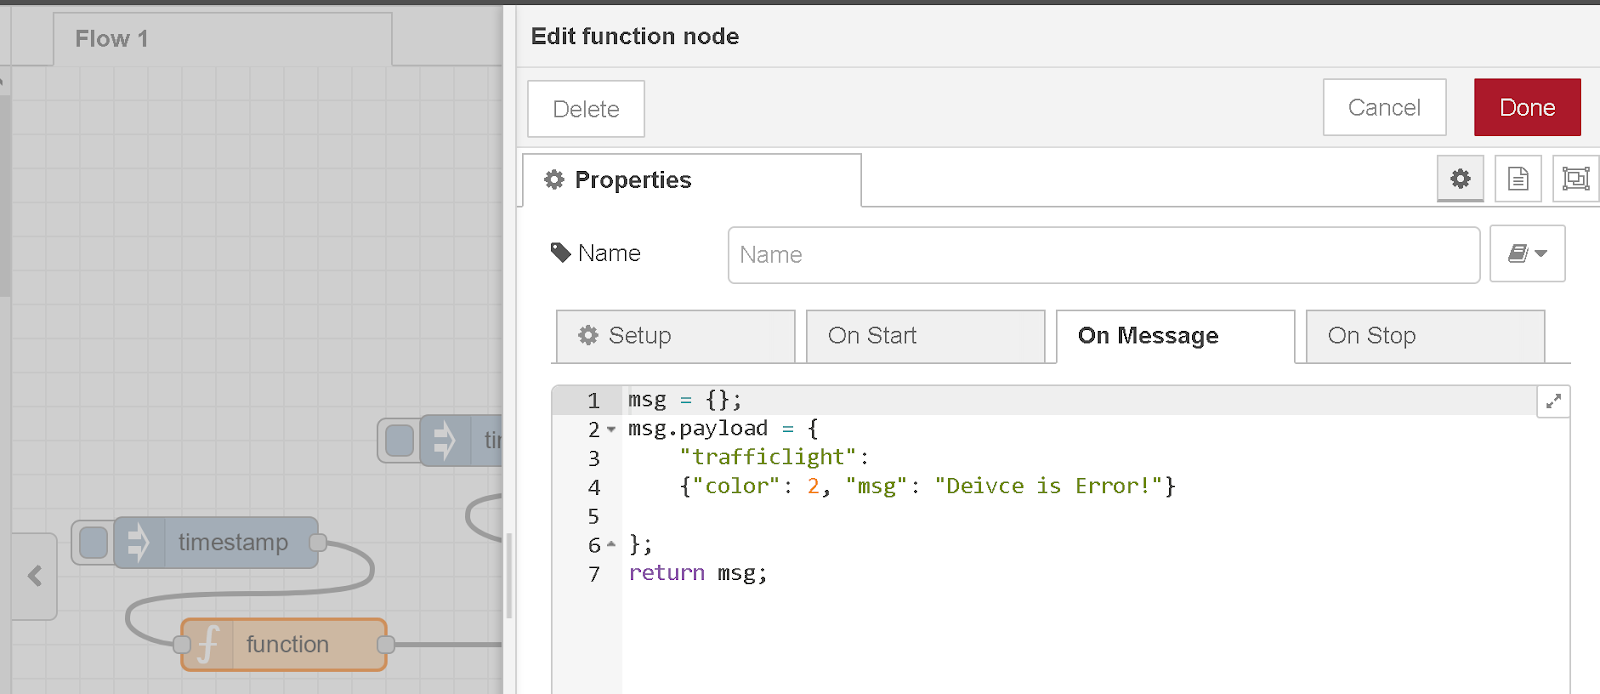
Add msg.payload as follows:
The display color of Health can be set by Number.
0=green, 1=orange, 2=red.
msg Field is the text to be displayed in the Health Tab of the Dashboard.
When Flow is deployed and tested, a device status message appears in the device’s Health and the color turns red.
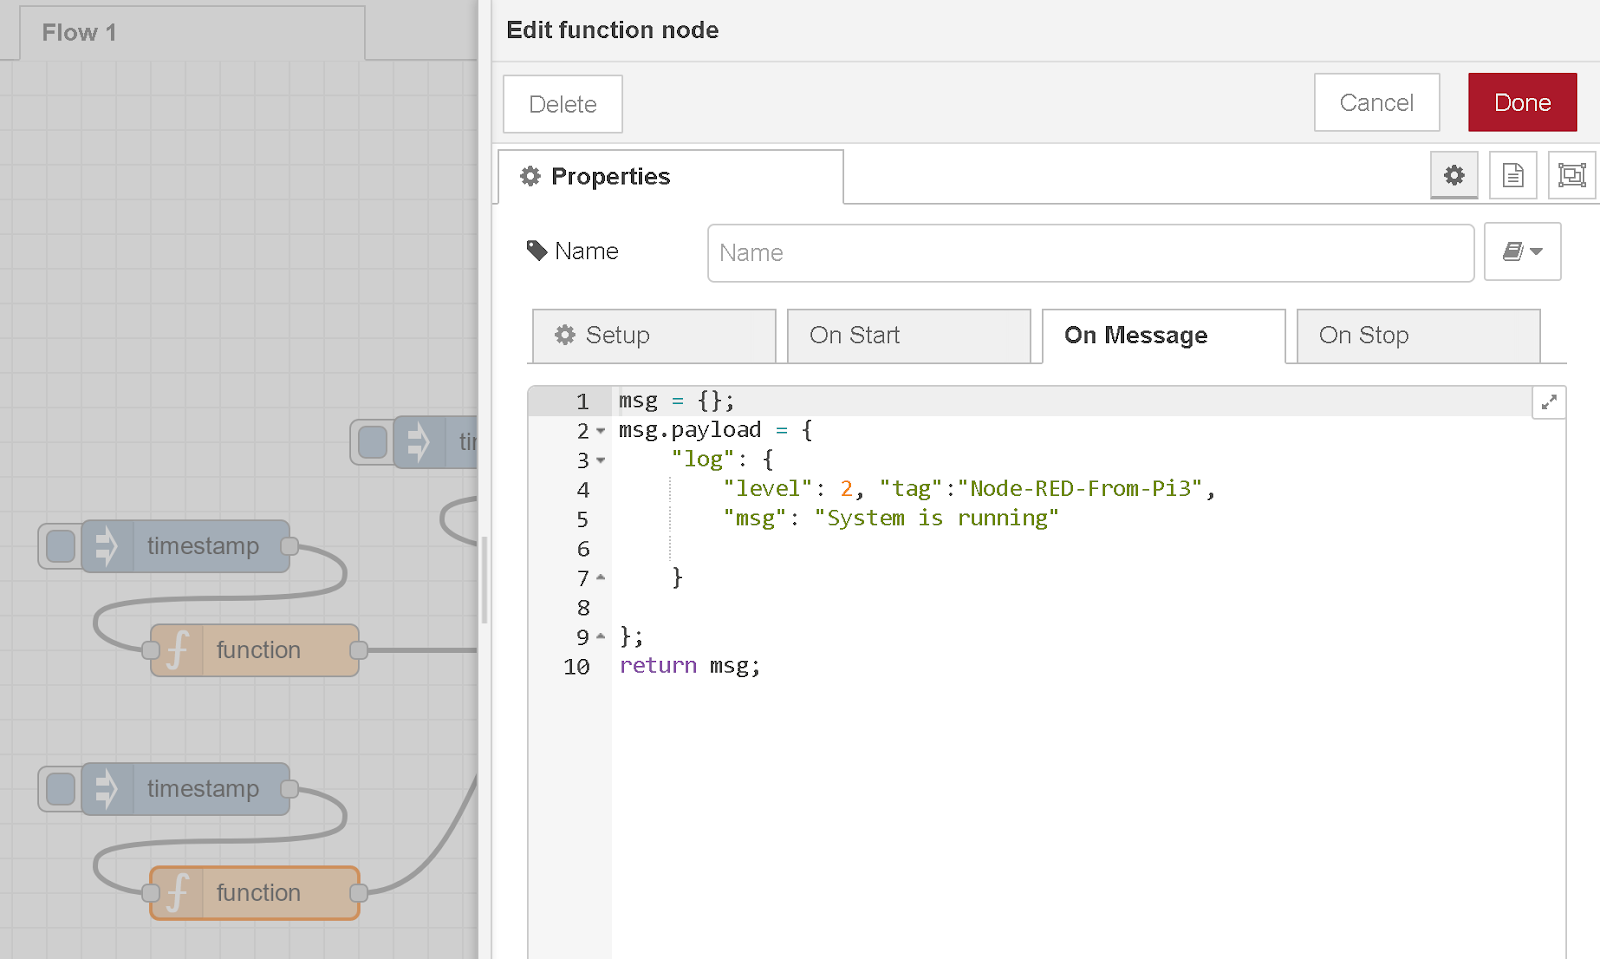
Example5-Send logging Data
It is also possible to transfer data for Logging from Node-Red to Proficloud.io. Logging data can be stored in Proficloud.io and can serve as history when needed.
Add Timestamp/Function in Flow and connect to Proficloud.io Device.

Let’s Modify msg.payload in Function.
- The level Field means 0=Debug, 1=Info, 2=Warn, 3=Error, 4=Fatal.
- The tag Field is the name of the Logging message.
- msg Field is the message content.
Deloy and open the Logs Tab of the Dashboard to see a list of Log Messages sent from Node-Red.

Example6
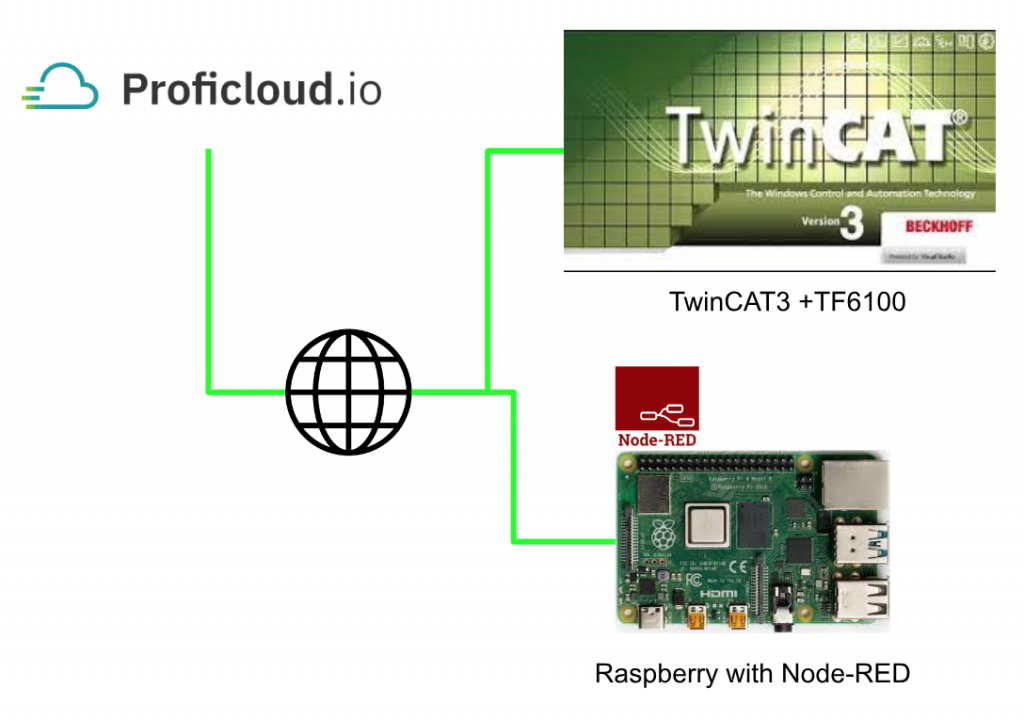
The last Example shows how to connect Proficloud.io to the TwinCAT3 TF6100.
To make sure that the connection to Node-Red is established or not , Exmaple 6.1 will first explain the connection between Node-Red and Demo Server>Node-Red and Proficloud.io.
Example 6.2 explains the points to note when connecting to TwinCAT3 TF6100.
Example6.1
Reference Link
We will use Demo Server and UaExpert, please refer to the following Link.
Install node-red-contrib-opcua Packages
Go to Deploy>Manage palette.

Search for node-red-contrib-opcua and Install it .
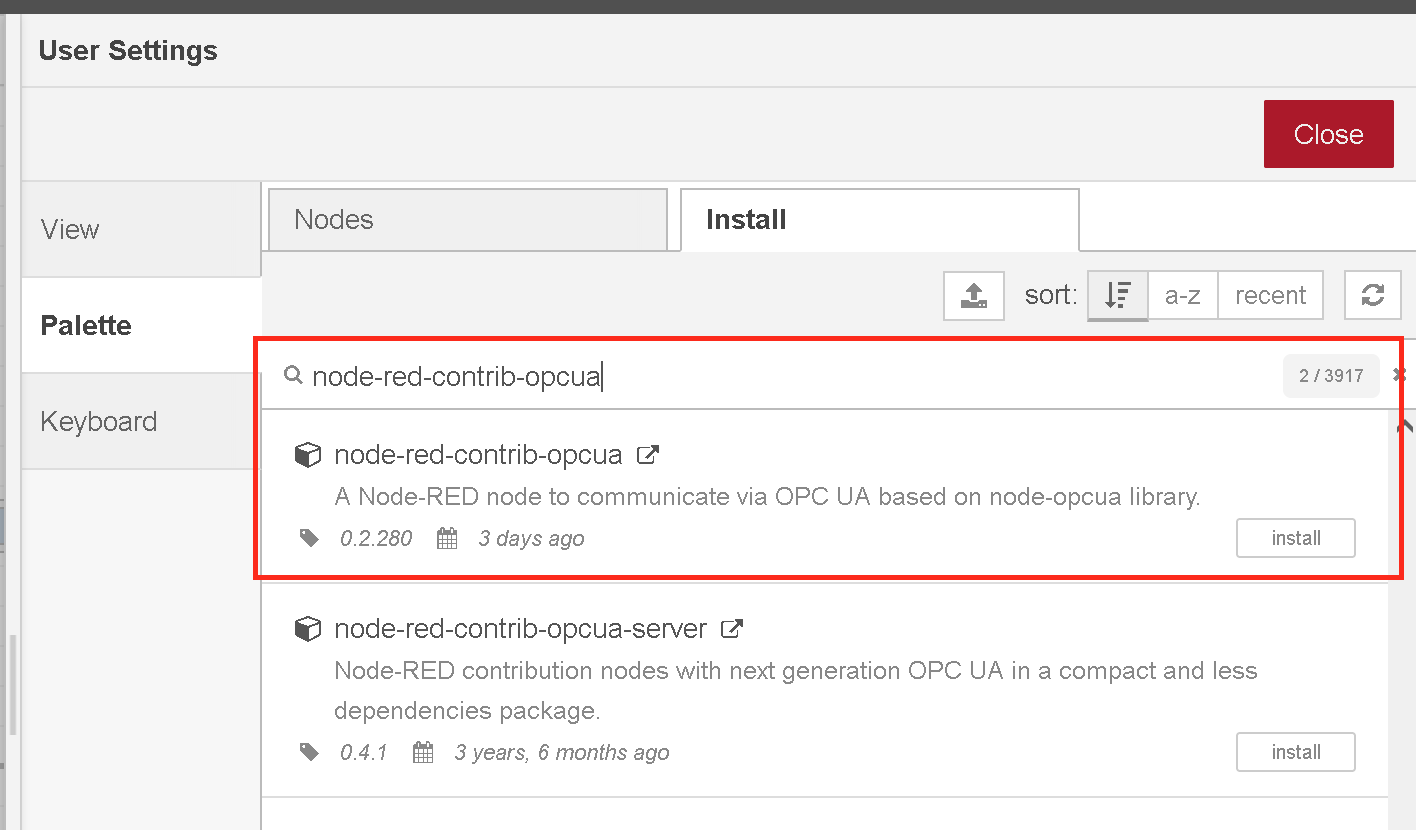
You will see a PopUp and proceed with Install.

Once the installation is complete, the Opcua Node is added.

Node Disable
Temporarily Disable the Porficloud.io Node. (It’s a little disturbing to get error messages all the time until you can connect.)
There is an Enabled button at the bottom.
Click to Disabled.
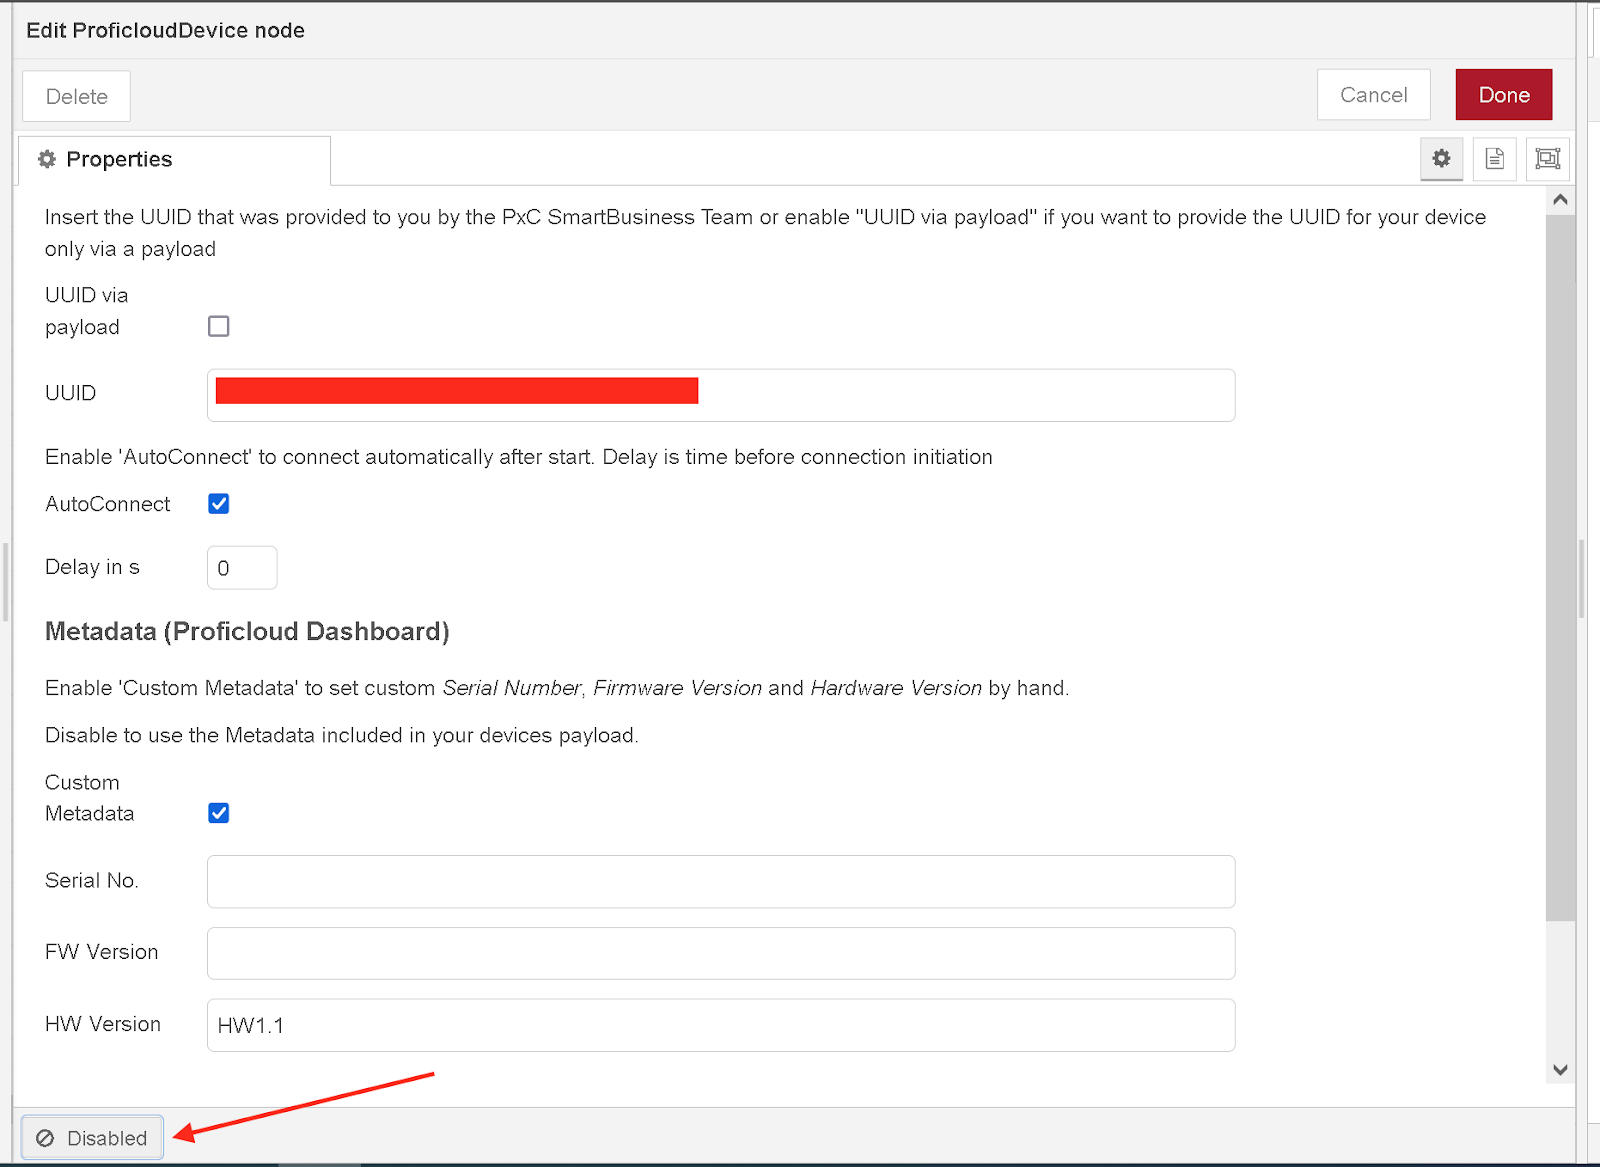
The Node connected to Proficloud.io will be the dotted line.
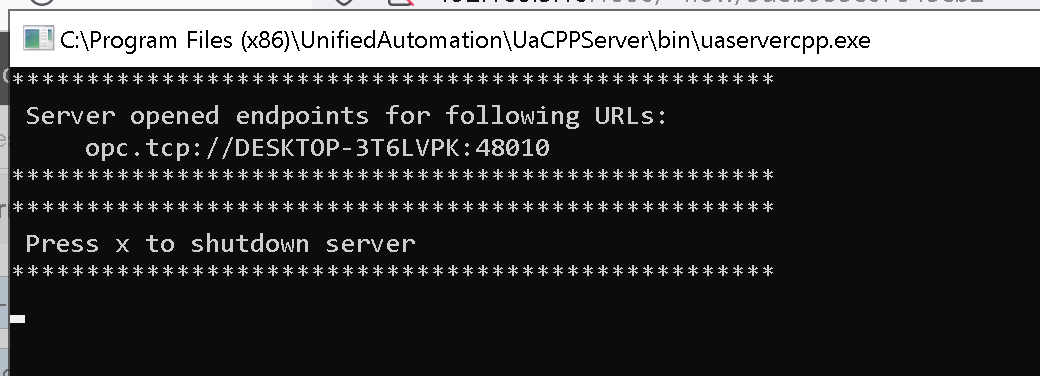
Demo Server
Start the demo Server for testing.
Configure The OPC UA Client
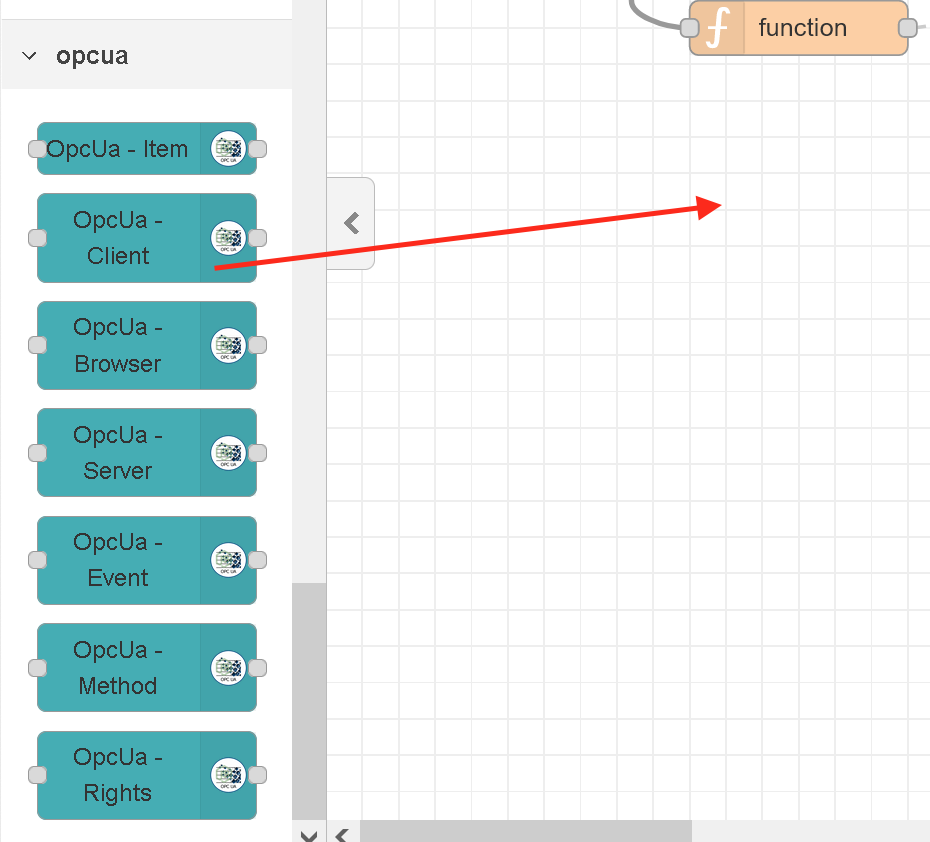
Add the Node of OpcUa-Client from opcua’s Node List to the Flow.
Double-click the Node.

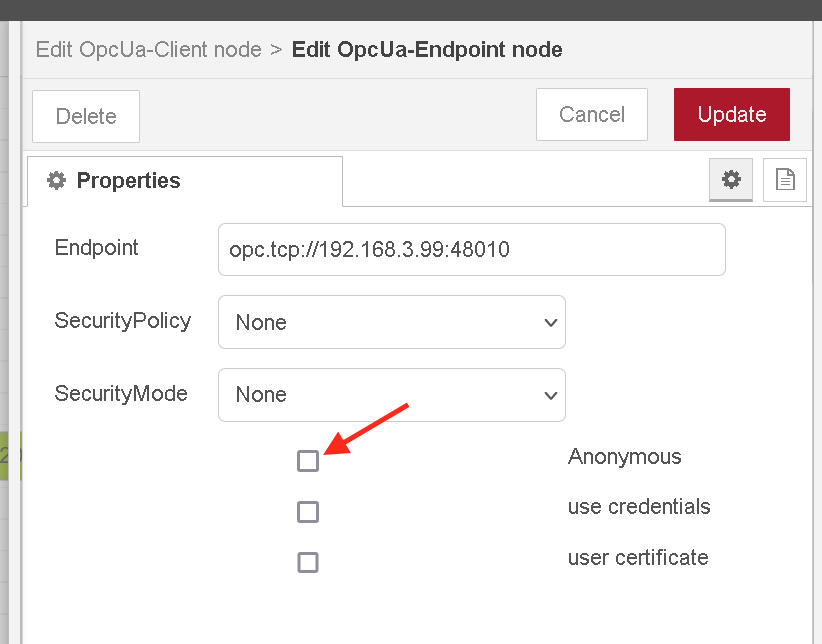
Paste the Endpoint into the Demo Server URL.

Click the pencil ICON at the Endpoint Field.

Update Anonyous in the CheckBox.
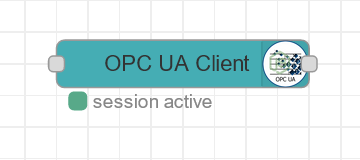
Deploying the Flow changes the Status of the Node to Session active.
Configure the Topic
Once the OPC UA Client has been configured, the next step is to set the Nodes to be accessed.
Set the NodeId in the Field of msg.topic.

So where can you actually find that NodeId?
Start the UaExpert software and connect to the Demo Server.
We will access two Nodes, Double and Int16 of Dynamic>Scalar.
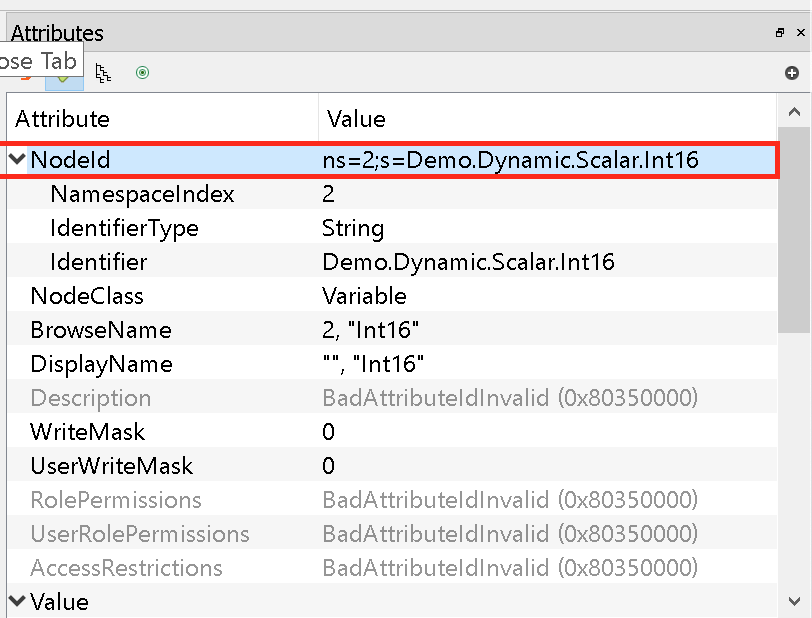
Double-click on the Node.
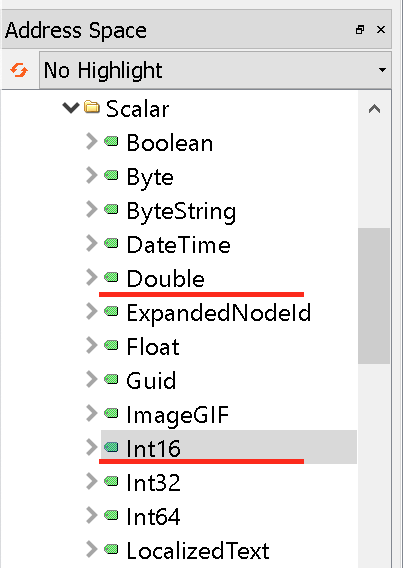
NodeId can be checked in this field!
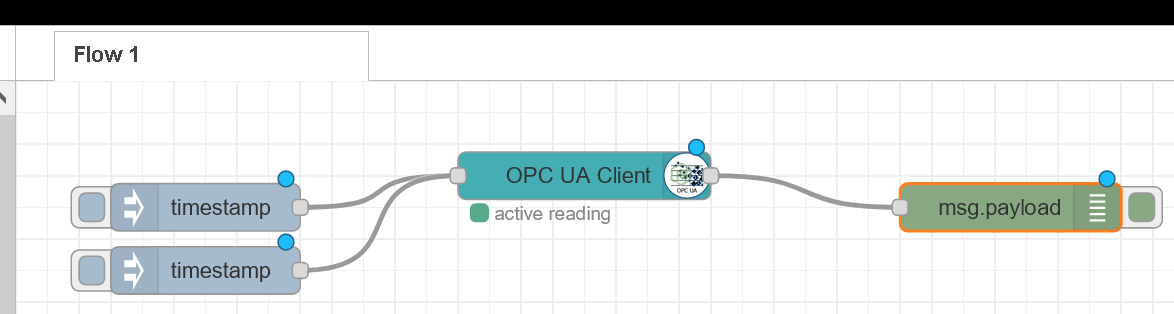
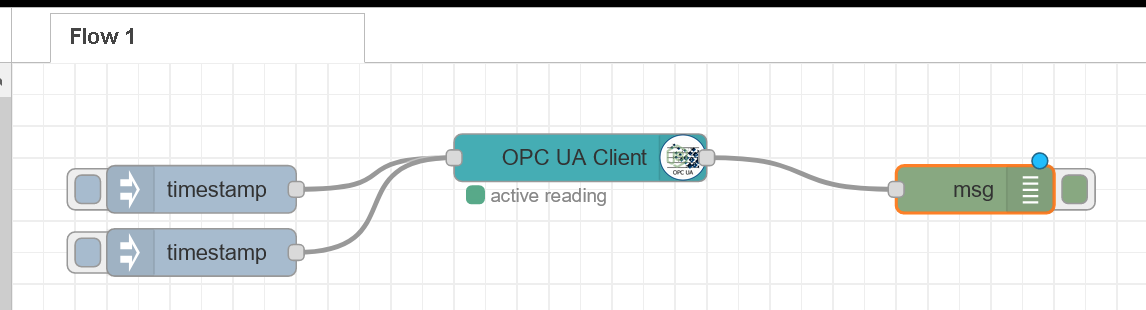
Flow
Connect to msg.payload and check the Message.
Check in Node-red
Even if only some numbers are displayed, we don’t know what is being displayed.
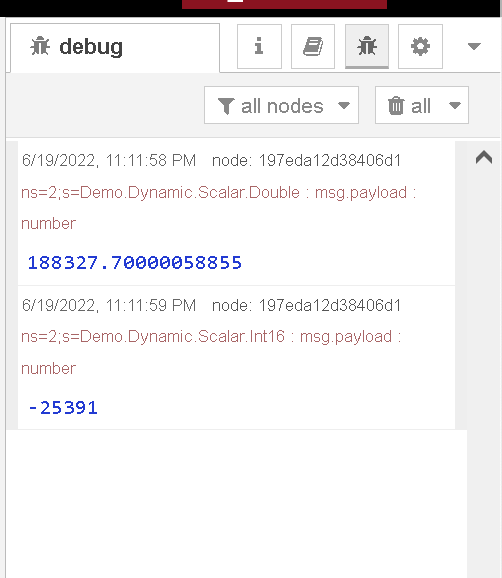
If you open payload.msg, you have an Output Field in msg.payload.

Actually, this is the Drop-list, which changes to show the complete msg object.
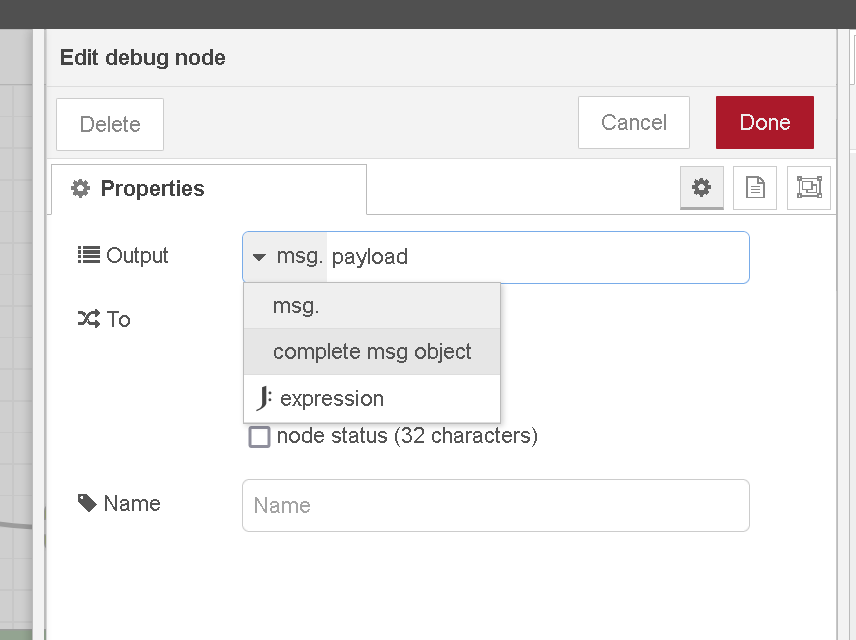
The Node has changed to msg instead of msg.payload.
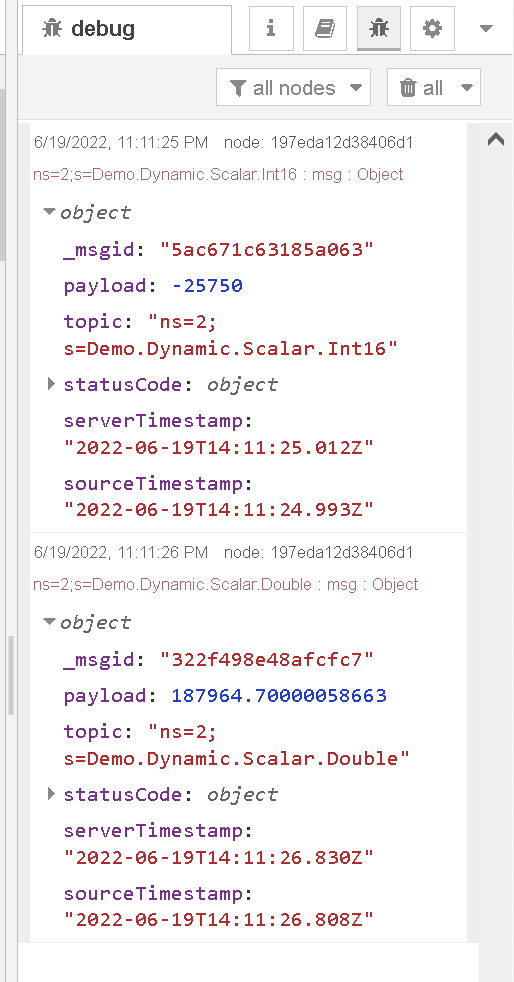
Looking at the Debug screen, we can now list Full message replies from the OPC UA Server.

Of course, you can also expand it to see all the elements.
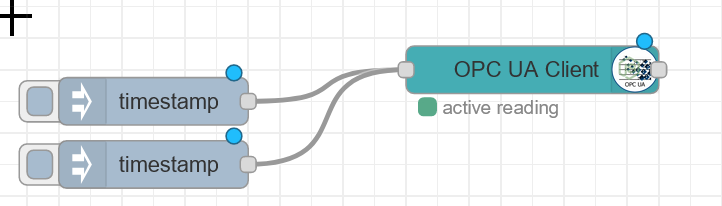
Add Function
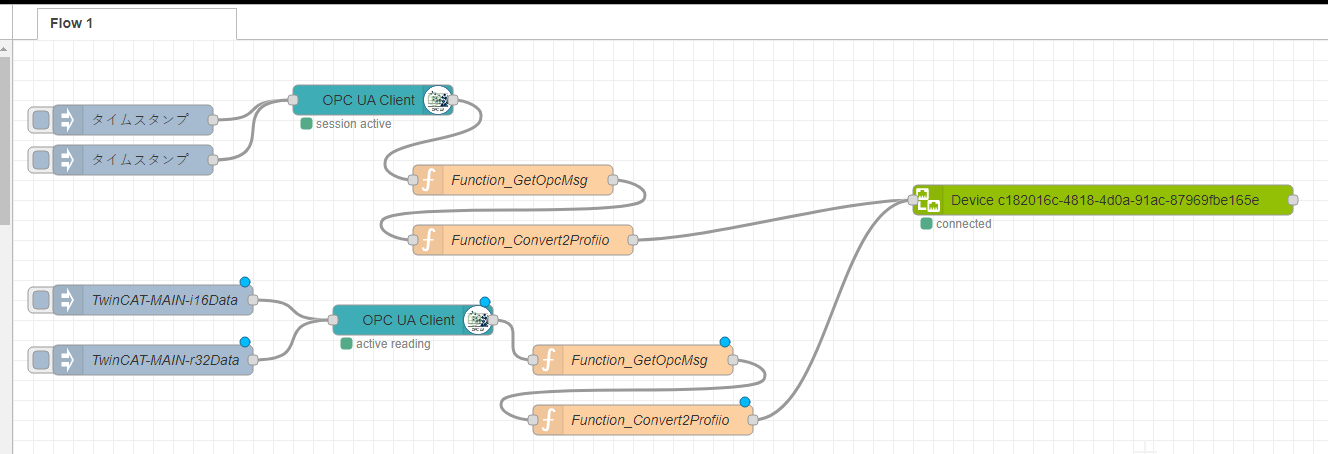
Next, we will actually connect the data received from OPCUA Server with Proficloud.io.
Let’s Add two Functions.
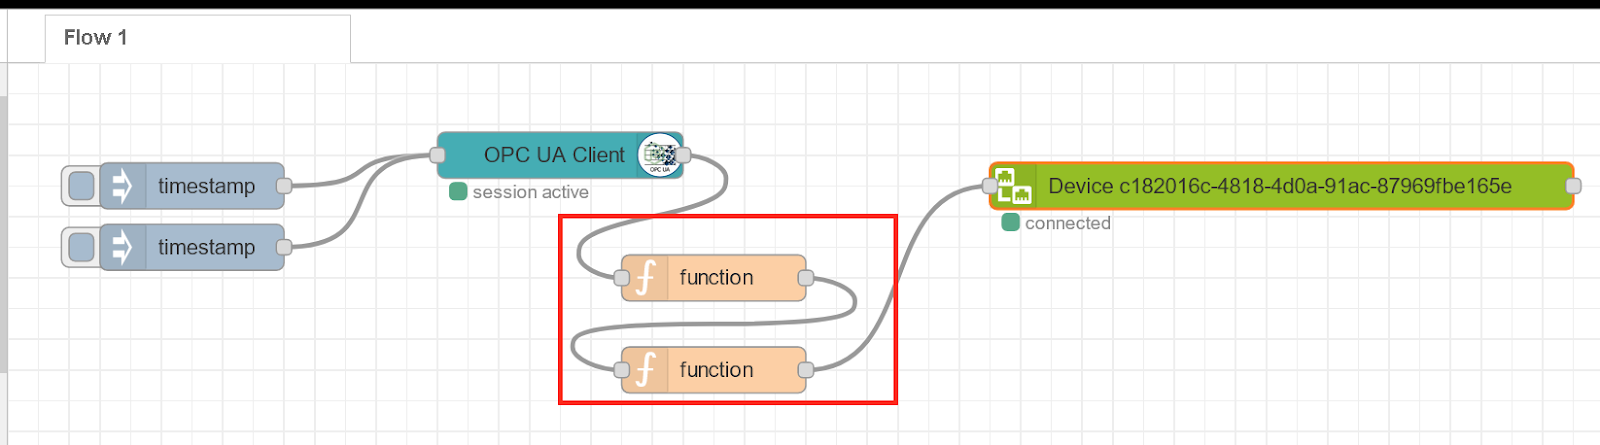
Change the Function name for clarity.

Function_GetOpcMsg
It can be renamed in the Name field.

The Message returned by the OPCUA Server earlier has the s=xxxxxxx part. That XXXX is the name of the Node. The following is a simple Javascript code that takes out the XXXX part and creates a Payload for the Node Object.
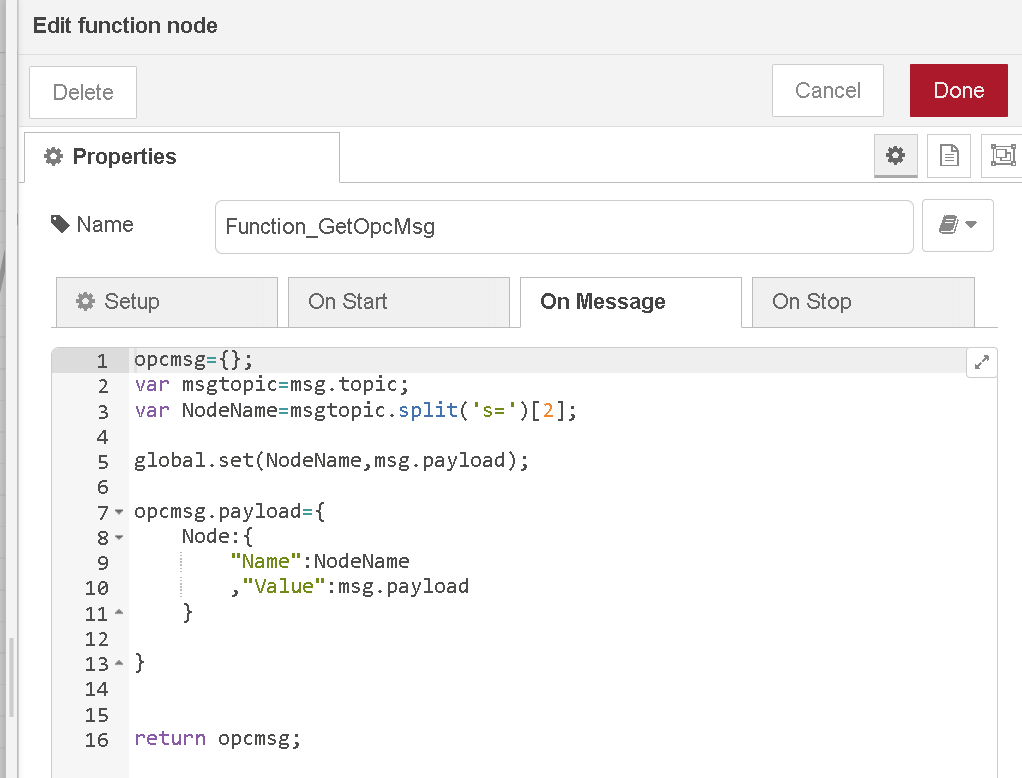
| opcmsg={}; var msgtopic=msg.topic; var NodeName=msgtopic.split(‘s=’)[2]; global.set(NodeName,msg.payload); opcmsg.payload={ Node:{ “Name”:NodeName ,”Value”:msg.payload } } return opcmsg; Function_Convert2Profiio var l=msg.payload.Node.Name; var y=msg.payload.Node.Value; |
Function_Convert2Profiio
The Payload Message output by Function_GetOpcMsg is received as the Input parameter of the Function, and a Time series Message is constructed from the comparison of Node Name and passed to the Proficloud.io Node.

| _msg={}; if (l === ‘Demo.Dynamic.Scalar.Double’){ _msg.payload={ “data”:{ Demo_Dynamic_Scalar_Double:y } } } if (l === ‘Demo.Dynamic.Scalar.Int16’){ _msg.payload={ “data”:{ Demo_Dynamic_Scalar_Int16:y } } } |
Check in Proficloud.io
Now let’s actually check it in Proficloud.io.
Open the Services tab and click on >Assign Metric.
Now you should see the OPC UA Node that you just added.

GO TO SERVICE.
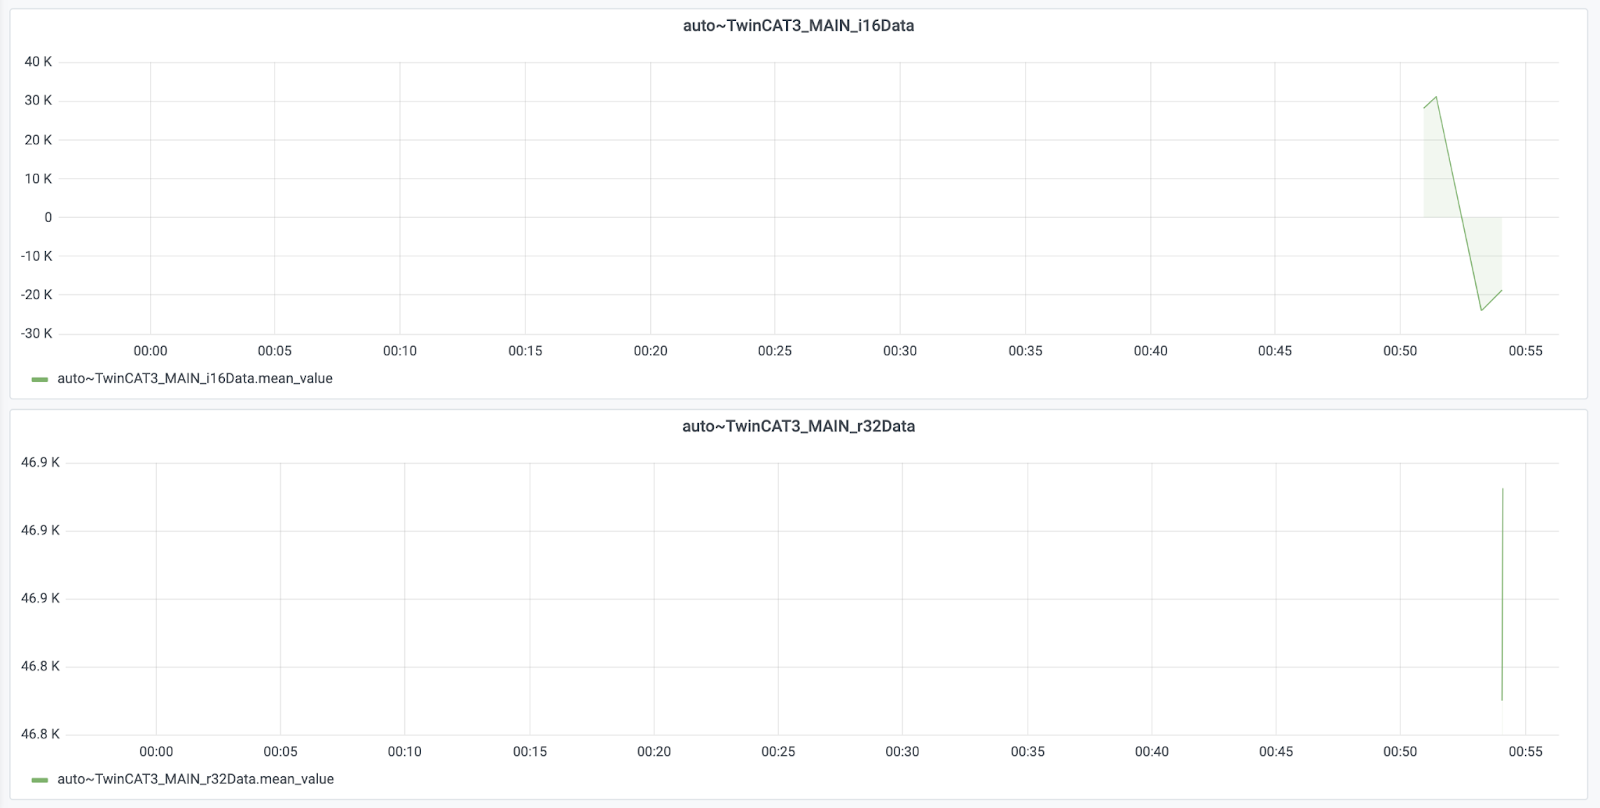
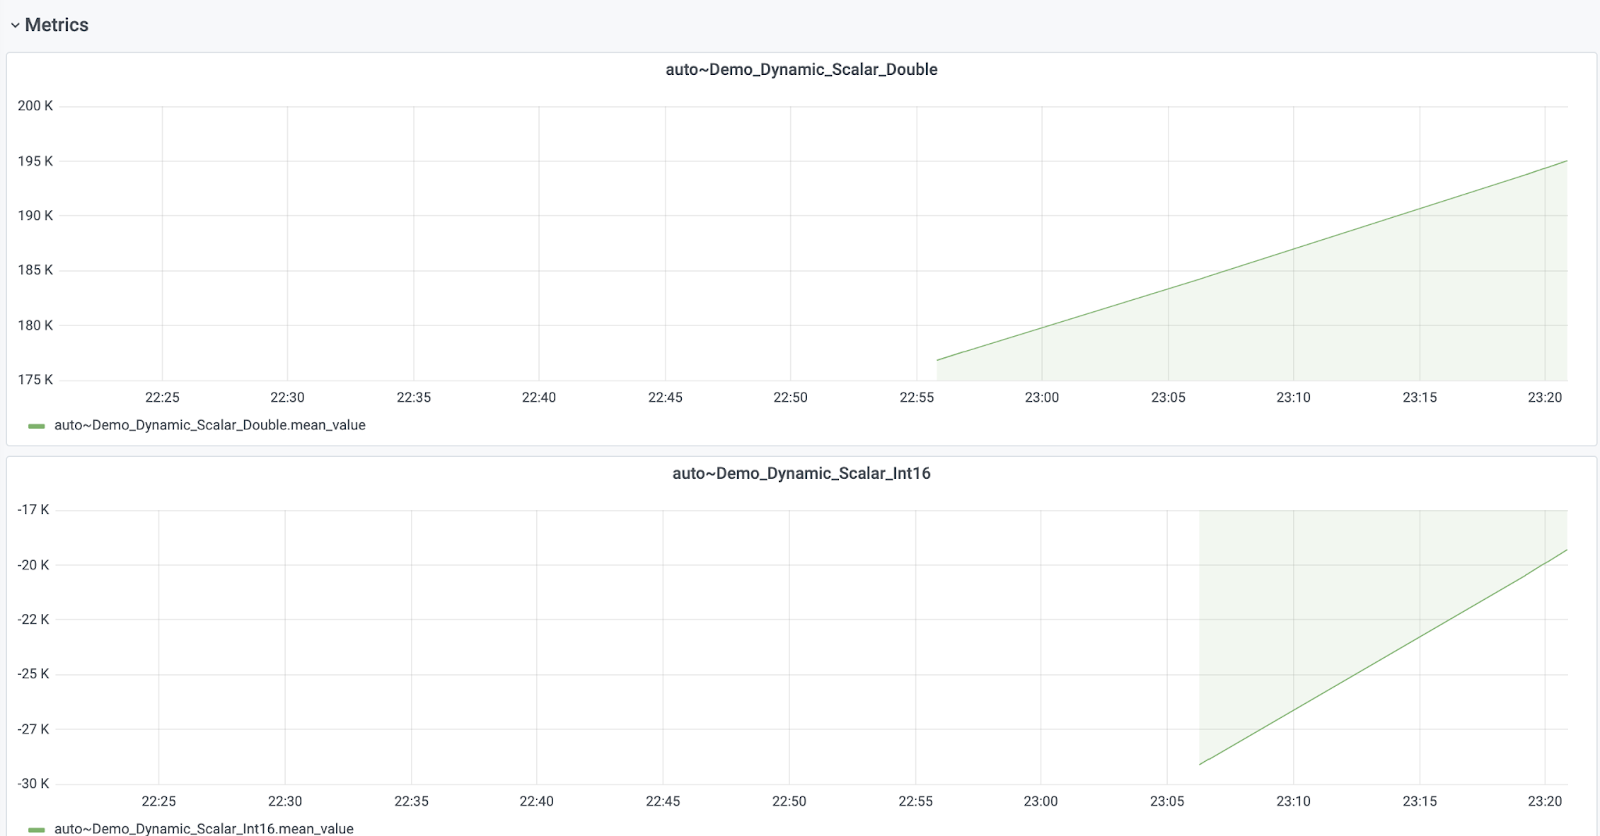
You have displayed the current value of the Demo Server’s Node as a Graph!
Since it is tedious to click each time, change TimeStamp to send periodic.

Change Interval to Repeat and I think it should be about 1s.

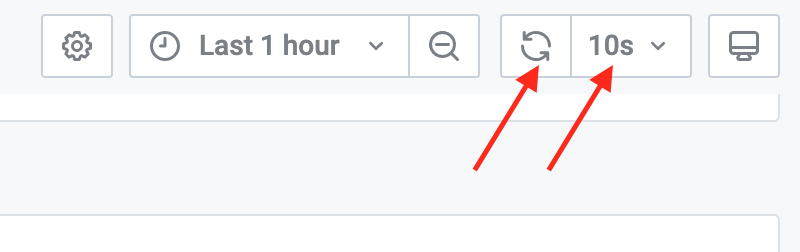
From the previous Proficloud.io Dashboard, you can set the Refresh button and automatic refresh time.
You should see a change in the data!
Example 6.2
Reference Link
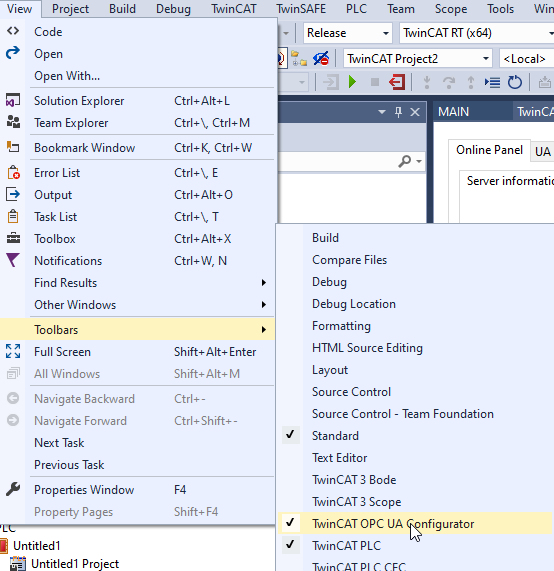
Point1-TwinCAT OPC UA Configurator Tools bar
The OPCUA can be configured from View>Toolbards>TwinCAT OPCUA Configurator.
Point2-Node Red EndPoint
Default Port is 4840, and enter IP and Host Name.

Point3-TMC File Enable
Enable TMC File in PLC>Settings.

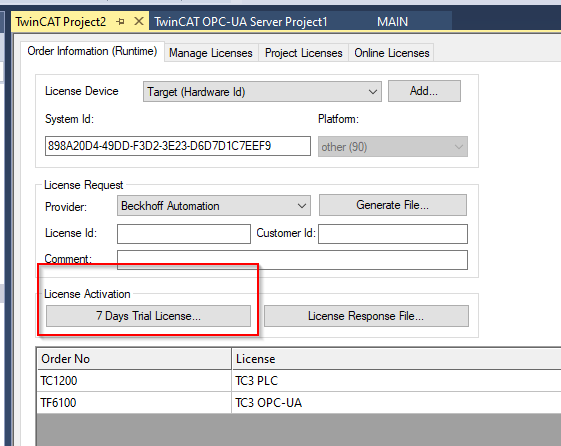
Point4-BadLicenseExpired
If you get a BadLicenseExpired error when monitoring a TwinCAT3 Node from UaExpert, you need to insert the license.

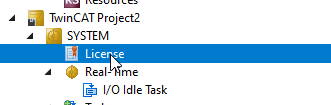
Go to SYSTEM>Licenseします。
Find TF6100 in Manage Licenses and check the cpu license check box.

Generate a license with 7 Days Trial License in the Order Information (Runtime) tab.
Enter the magic code.
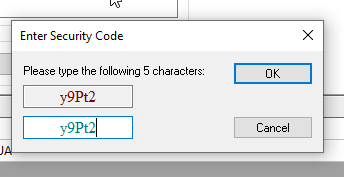
License creation succeeded!

Close the License screen and reopen it again to update the license.
Finally, perform the Active Configuration once again.

UaExpert should change the StatusCode of the Node to Good.

Point5-Security
OPCUA security should be changed depending on the application.

Point6-Variable attribute
Please add the following Attribute to the OPCUA Client permissions variable.
| {attribute ‘OPC.UA.DA’ := ‘1’} |

Flow
Flow is not much different from Example 6.1.
Check in Proficloud.io
Check again with Proficloud.io.
We see the variables from TwinCAT3.
GO TO SERVICE to see the Dashboard.
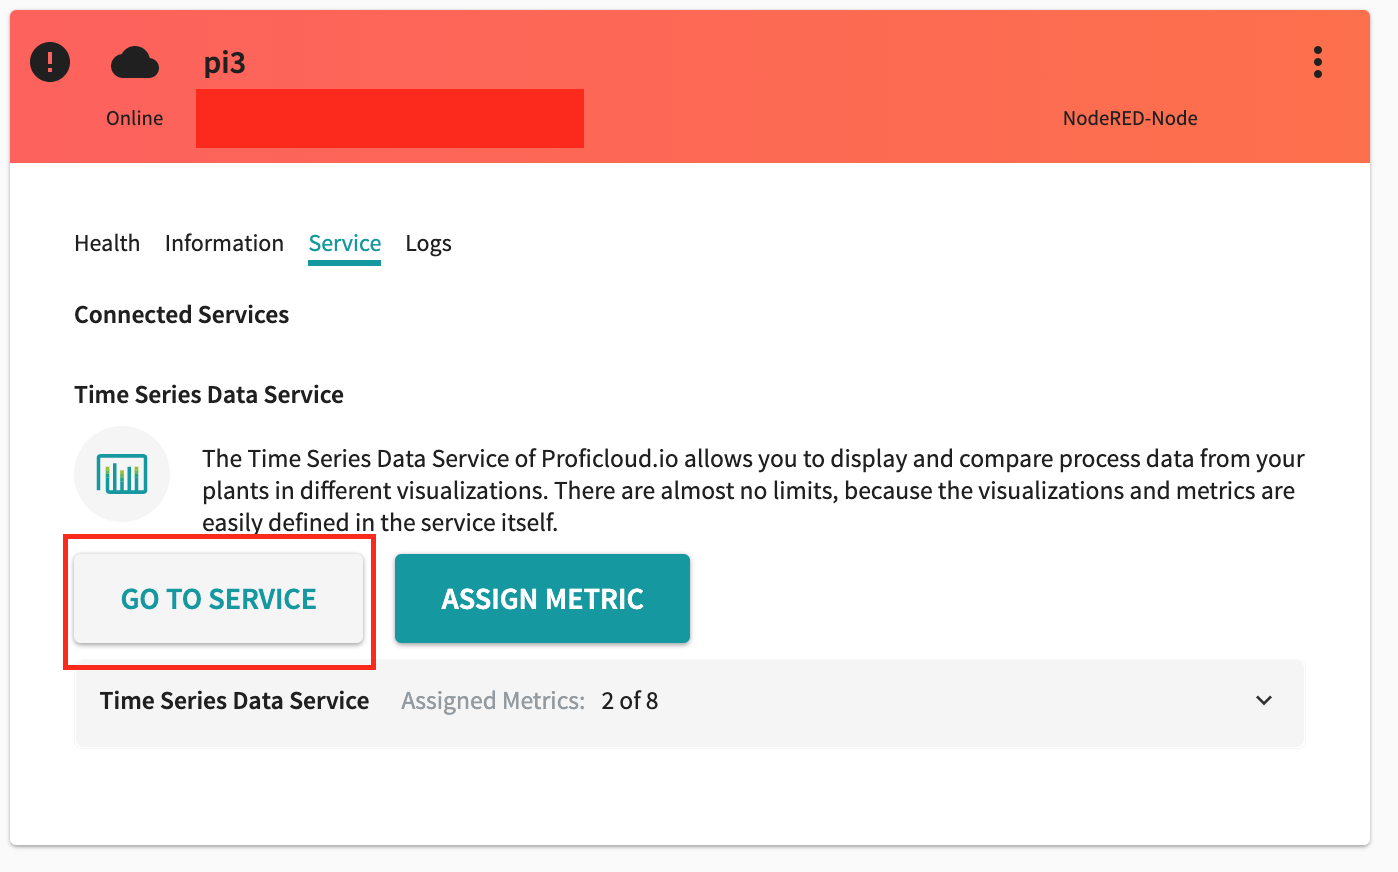
Looks like it’s all good. we do it!