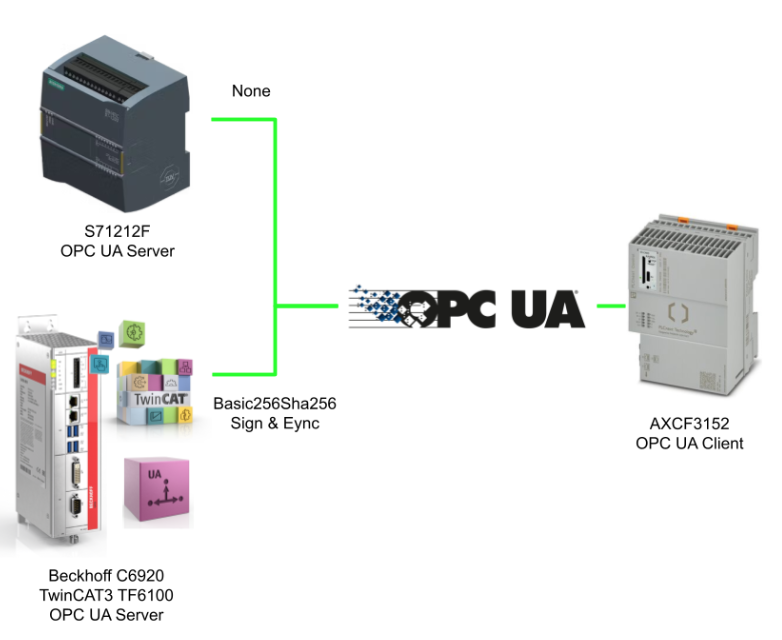
In this article, we will use the AXCF3152’s OPC UA Client functionality and explain the steps to connect to Siemens and Beckhoff TF6100’s OPC UA Server.
Let’s get started!
Reference Link
http://soup01.com/en/category/protocol-en/opcua-en/
PLC NEXT with OPC UA Client
PLCnext Technology’s Controller incorporates the OPC UA Client; from the OPC UA perspective, the OPC UA Client is the data consumer and the OPC UA Server is the data provider.
The Client sends a request for data to the Server, and the Server returns the corresponding data. This allows the Client to directly access the data provided by the Server.
PLCnext Engineering can also configure the OPC UA Client and Server settings from “OPC UA” in PLANT. PLCnext Engineer writes the OPC UA data set in the project together with the project to the controller, and the OPC UA Client function loads the project at controller startup and executes it automatically.

Server-client communication
Server-client communication is designed according to the OPC Unified Architecture protocol, and OPC UA provides a new data model compared to previous OPC communication (e.g., structured Machine Data).
In addition to the OPC UA standard, the PLCopen Standard allows OPC UA servers to provide an information model for providing IEC 61131 compliant controller data to the environment.
Data exchange
Data exchange between OPC UA Client and Server is realized via variables. Local variables (Local variables in PLCnext Engineer project) can be mapped and Subscribed (read) or Write (write) to the OPC UA Server.
After establishing a connection with the Server, the OPC UA Client scans the Server’s address space for available variables. The variable is represented as a Node. And each NodeId consists of the following three elements:
- Namespace
- The namespace will contain the URI (Uniform Resource Identifier) to which the Node is assigned.
- Namespaces ensure that unique identifiers are used for different naming devices.
- Type – That type of identifier for the NodeId. The type can be one of the following characters
- i:Numeric (integer) value
- Example: I=10
- s:String value
- Example: s=test
- g:GUID (Global Unique IDentifier)
- Example: g=1D73013A-5FAF-45D5-8F2E-DE97C4869873
- b:Base64 encoded value
- Example: b=dGhvbWFz
- i:Numeric (integer) value
- Value: Identifier value of Node in Namesapce of OPC UA Server
Security settings
In ‘Security’ of PLCNEXT Engineering, you can change the Security Check performed on the OPC UA Client side when connecting to the OPC UA Server.
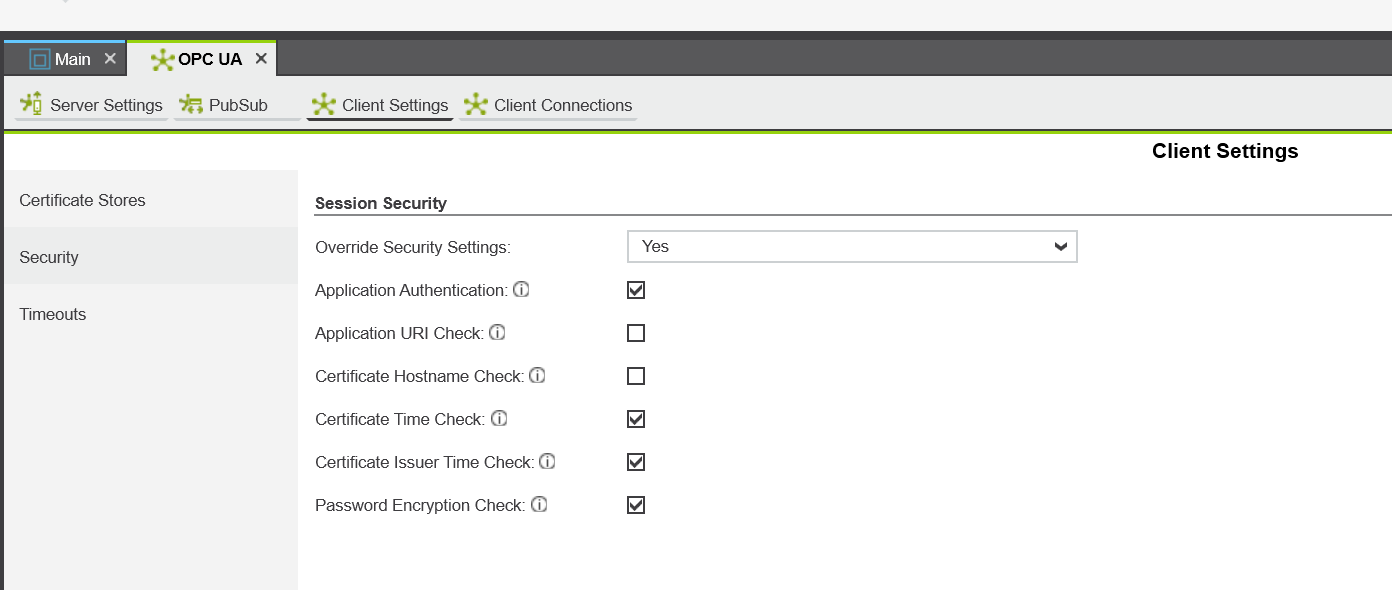
Application Authentication
If that setting is disabled, server certificate verification failures are ignored when connecting to the OPC UA server.
Application Uri Check
If that setting is disabled, invalid server certificate application URIs are ignored, and if URI Check is disabled, connections to OPC UA servers can be established even if the server URI does not match the URI entered in the client’s certificate.
Certificate Hostname Check
If you disable that setting, the hostname of an invalid server certificate is ignored; disabling Hostname Check allows connections to be established to the OPC UA server even if the server hostname does not match the hostname entered in the client’s certificate.
Certificate Time Check
If you disable that setting, invalid certificate times are ignored; if you disable Certificate Time Check, you can establish a connection with an OPC UA server even if the OPC UA server’s certificate has expired or is invalid.
Certificate Issuer Time Check
If you disable that setting, the time of invalid certificate issuers will be ignored; disabling the Certificate Issuer Time Check will allow you to establish a connection with the OPC UA server even if the issuer certificate on the OPC UA server has expired or is invalid The OPC UA server is not required to be connected to the OPC UA server.
Password Encryption Check
If that setting is disabled, the ServerNonce and PasswordEncryptionMode checks are ignored.
Implementation
Siemens Side
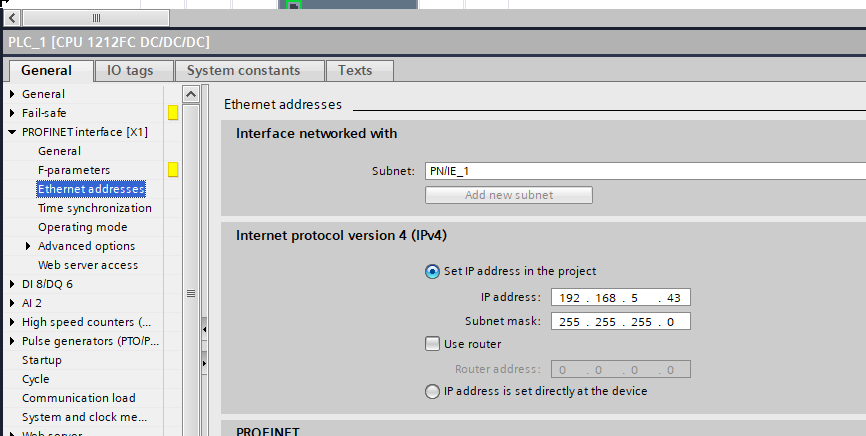
IP
Start TIA and create a new project.
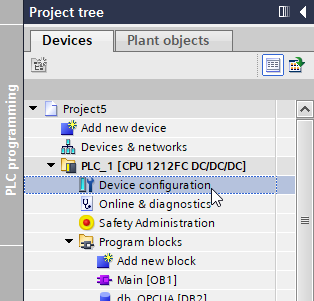
Set the IP of the CPU in the Ethernet addressess section.
OPC UA Server
Next, activate the OPC UA Server functionality by going to OPC UA>General>Server.
Activate OPC UA Server Checkbox and set the Port.

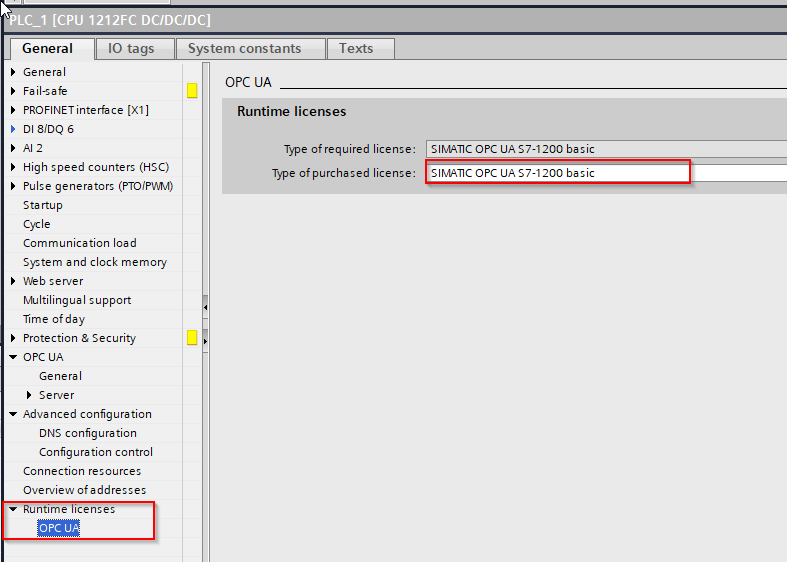
License
The last step is to set up the Runtime License: go to Runtime License>OPC UA, select Type of purchased license and set it to SIMATIC OPC UAS7-1200 Basic.
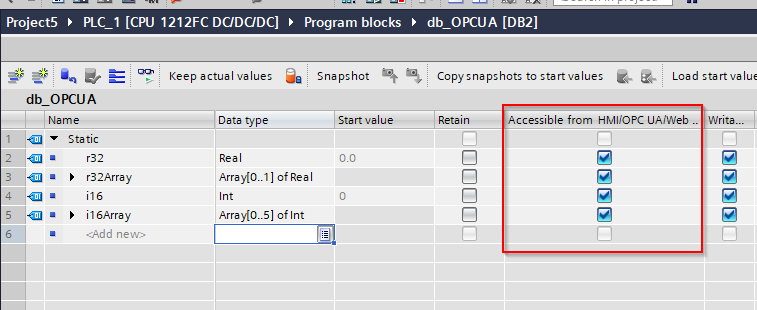
Add DB
Next, let’s add a Data Block and put in the Accessible From HMI/OPC/Webserver CheckBox.
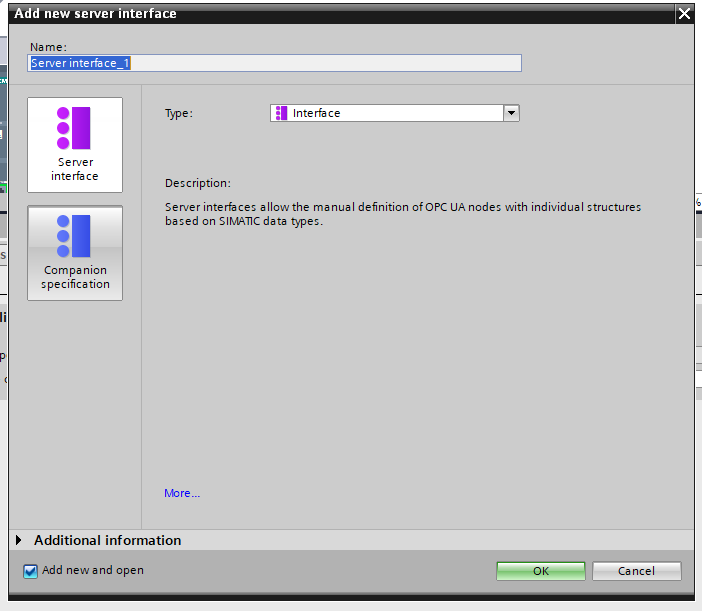
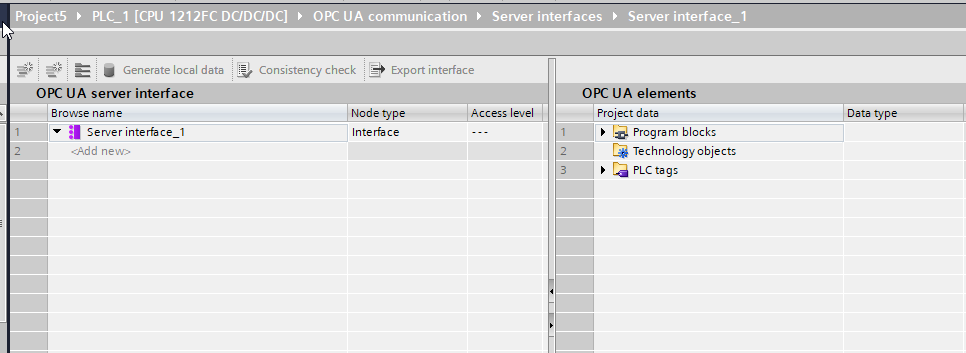
Add Server Interface
Add OPC UA Server Interface, click OPC UA Communication>Server interface>Add New server inteterfae.

Enter a name for the Server interface and OK.
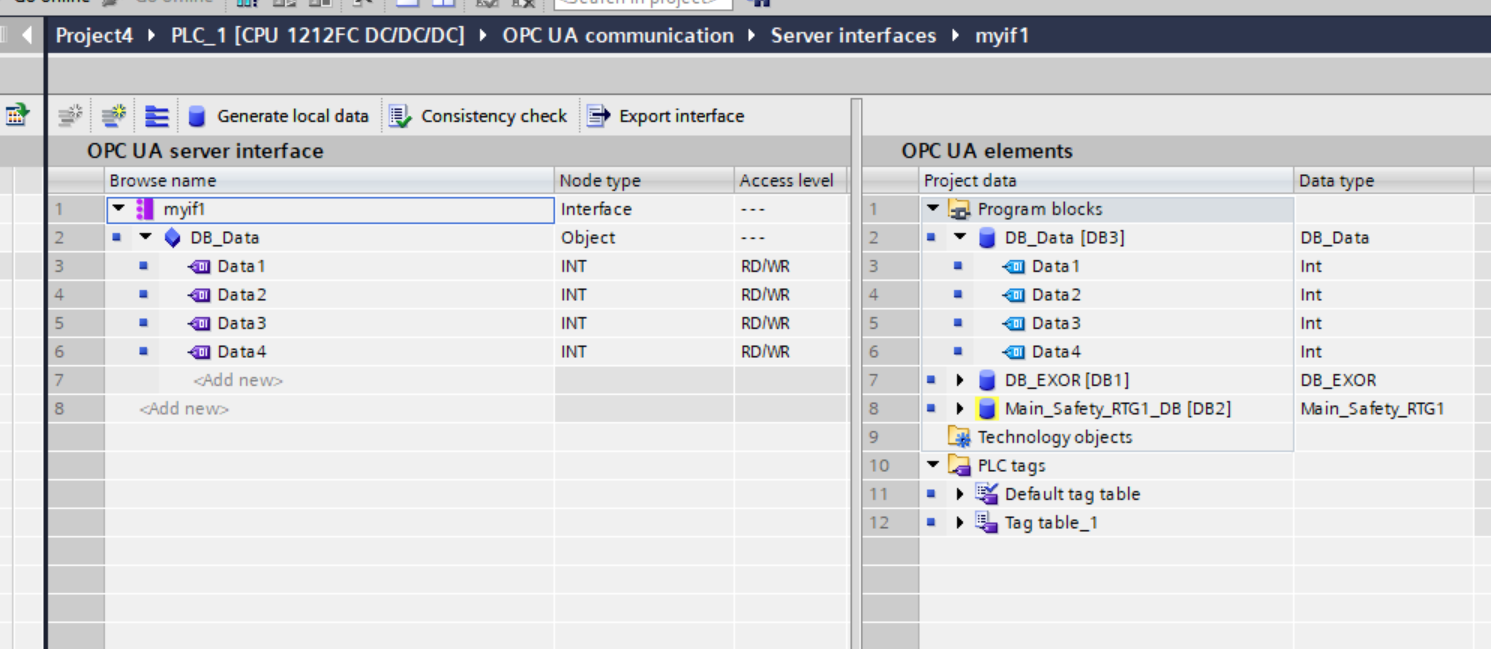
Done!Server intetface has been added.
Drop the necessary variables into Interface.
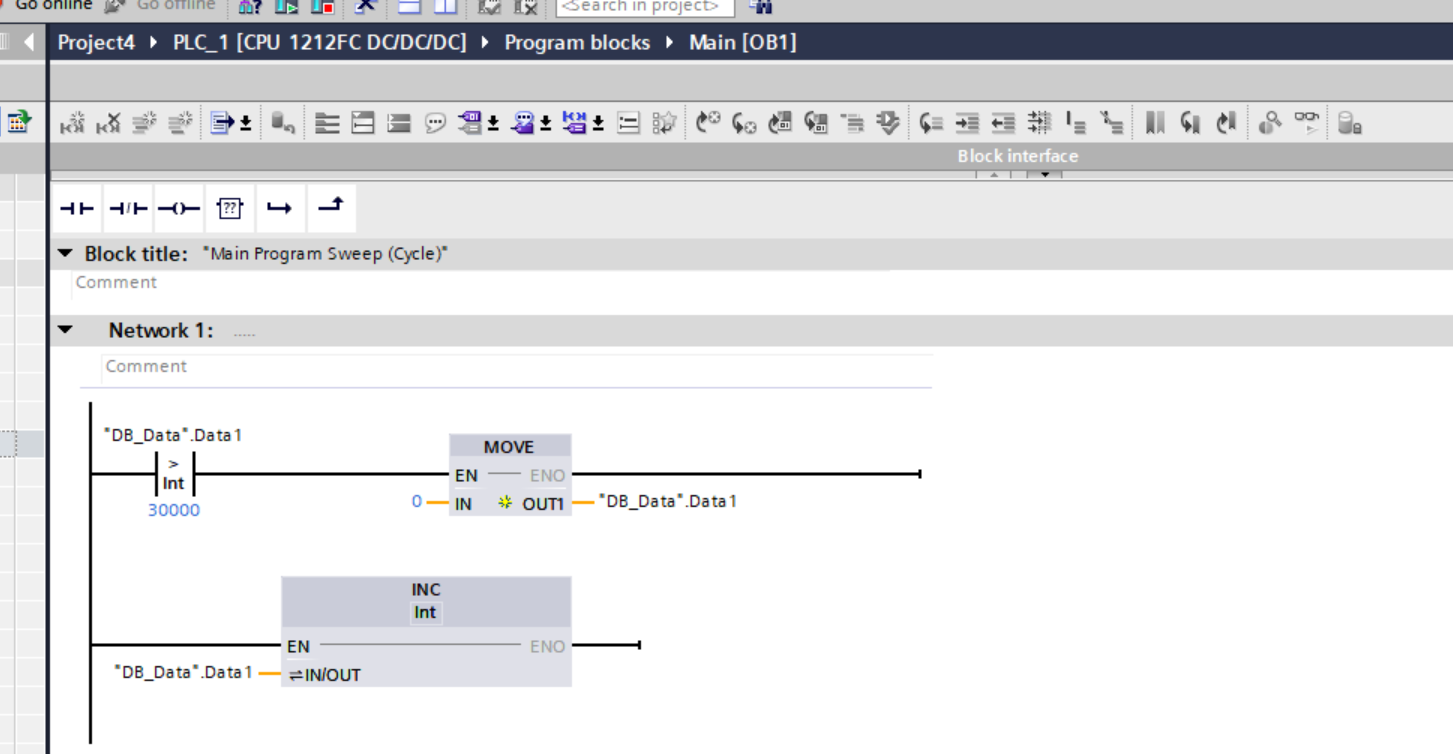
Program
The next step is to set up a simple program to constantly convert variables.
Download
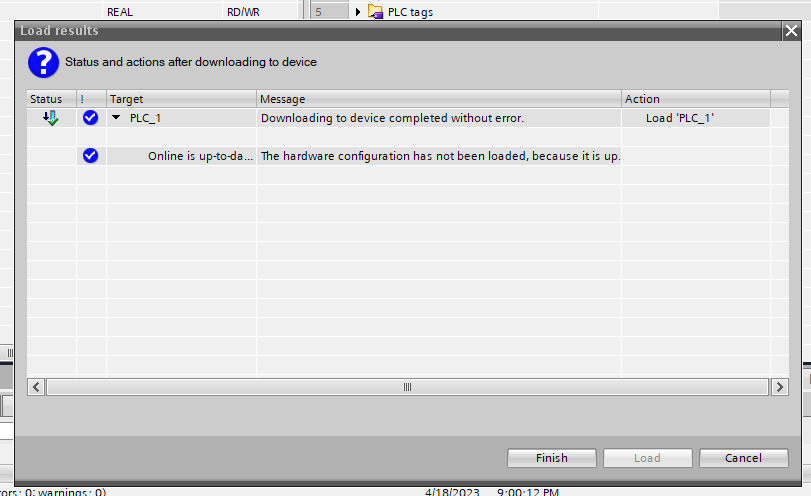
Download to device downloads the project to the CPU.

Proceed with Load.
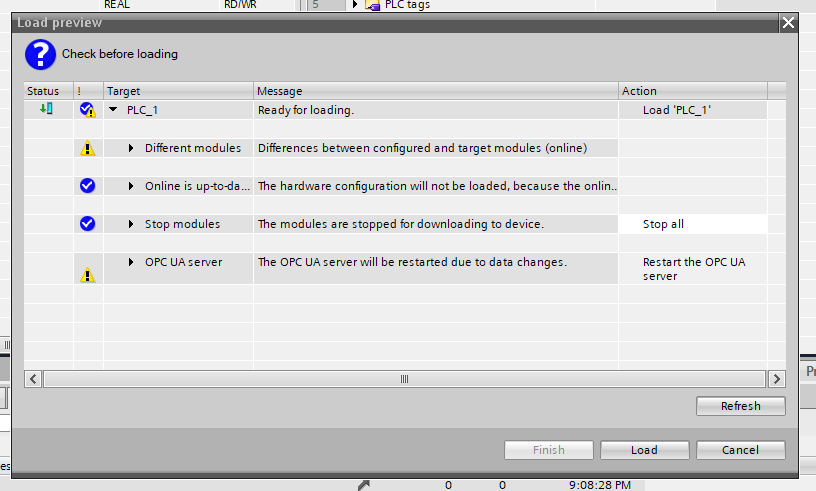
Done!
Beckhoff Side
The next step is to build the Beckhoff side.
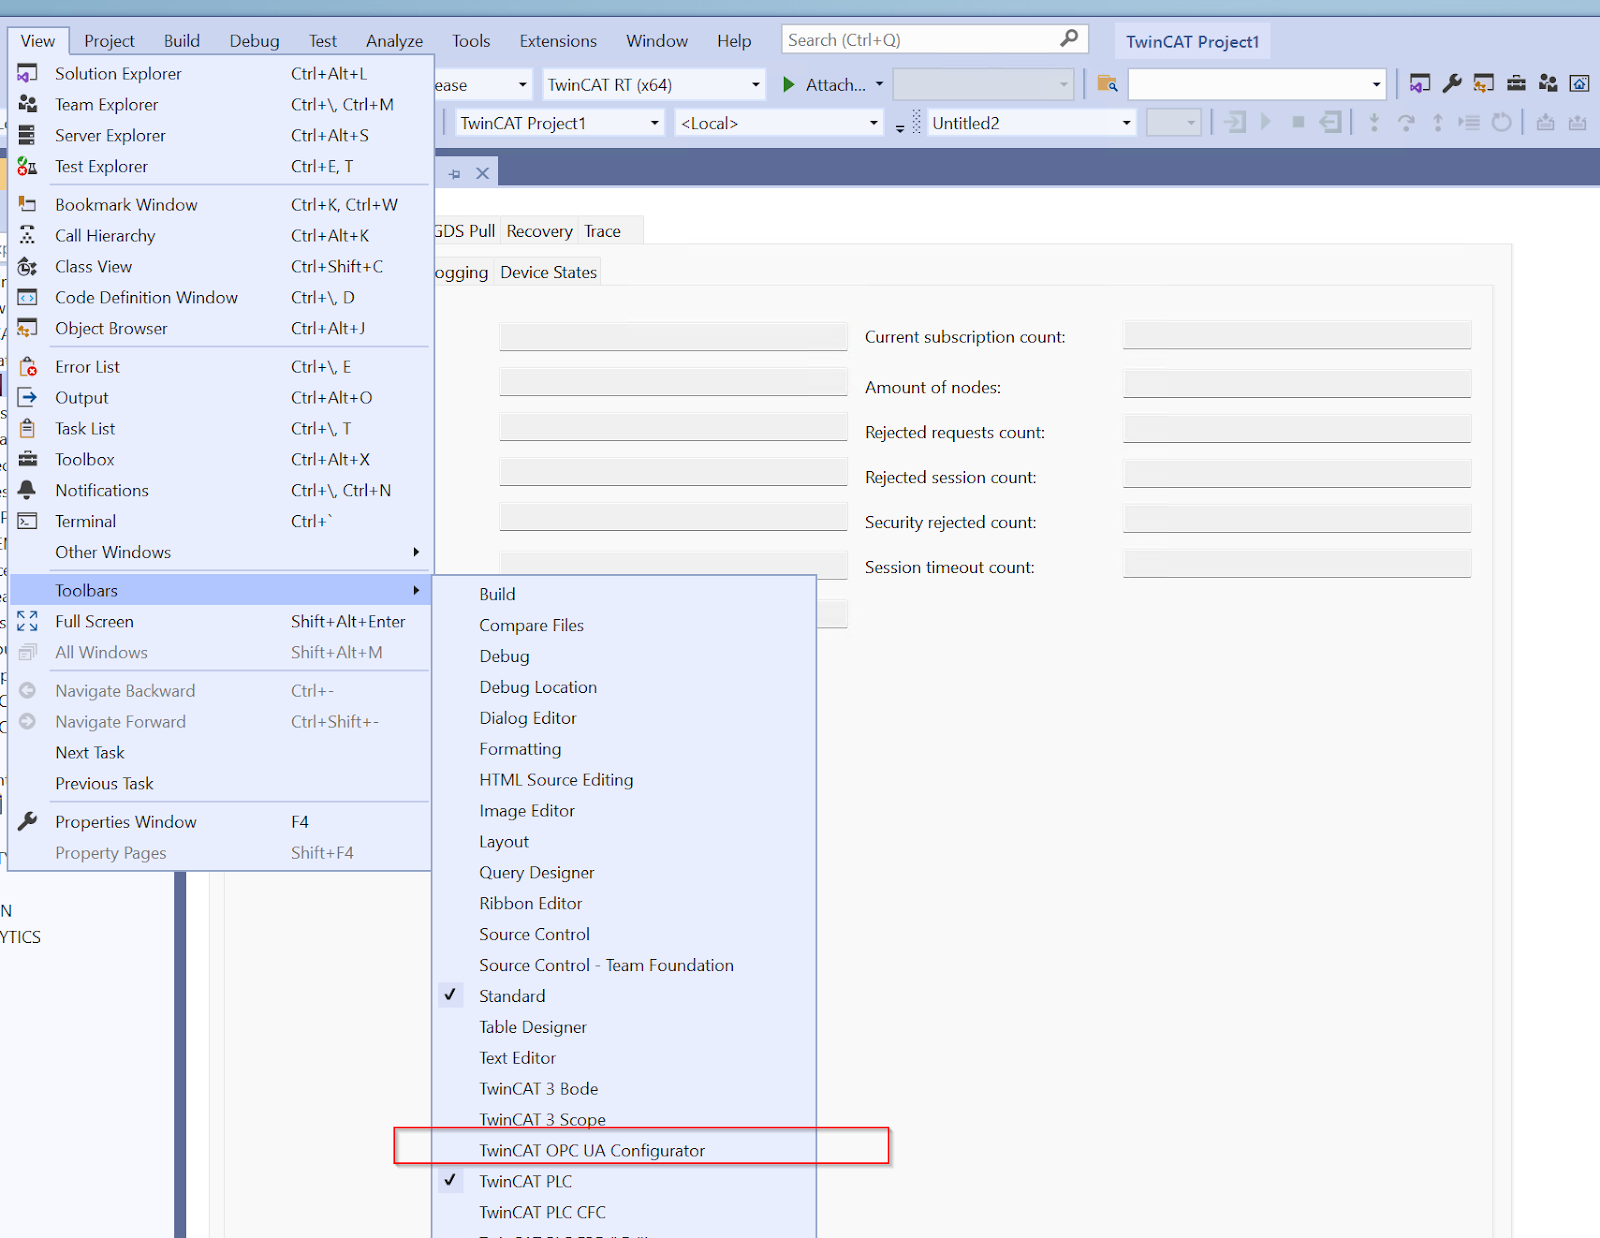
Activate OPC UA Configurator
First, click on View>Toolbars>TwinCAT OPC UA Configurator to display TwinCAT’s OPC UA Configurator on the Toolbar.
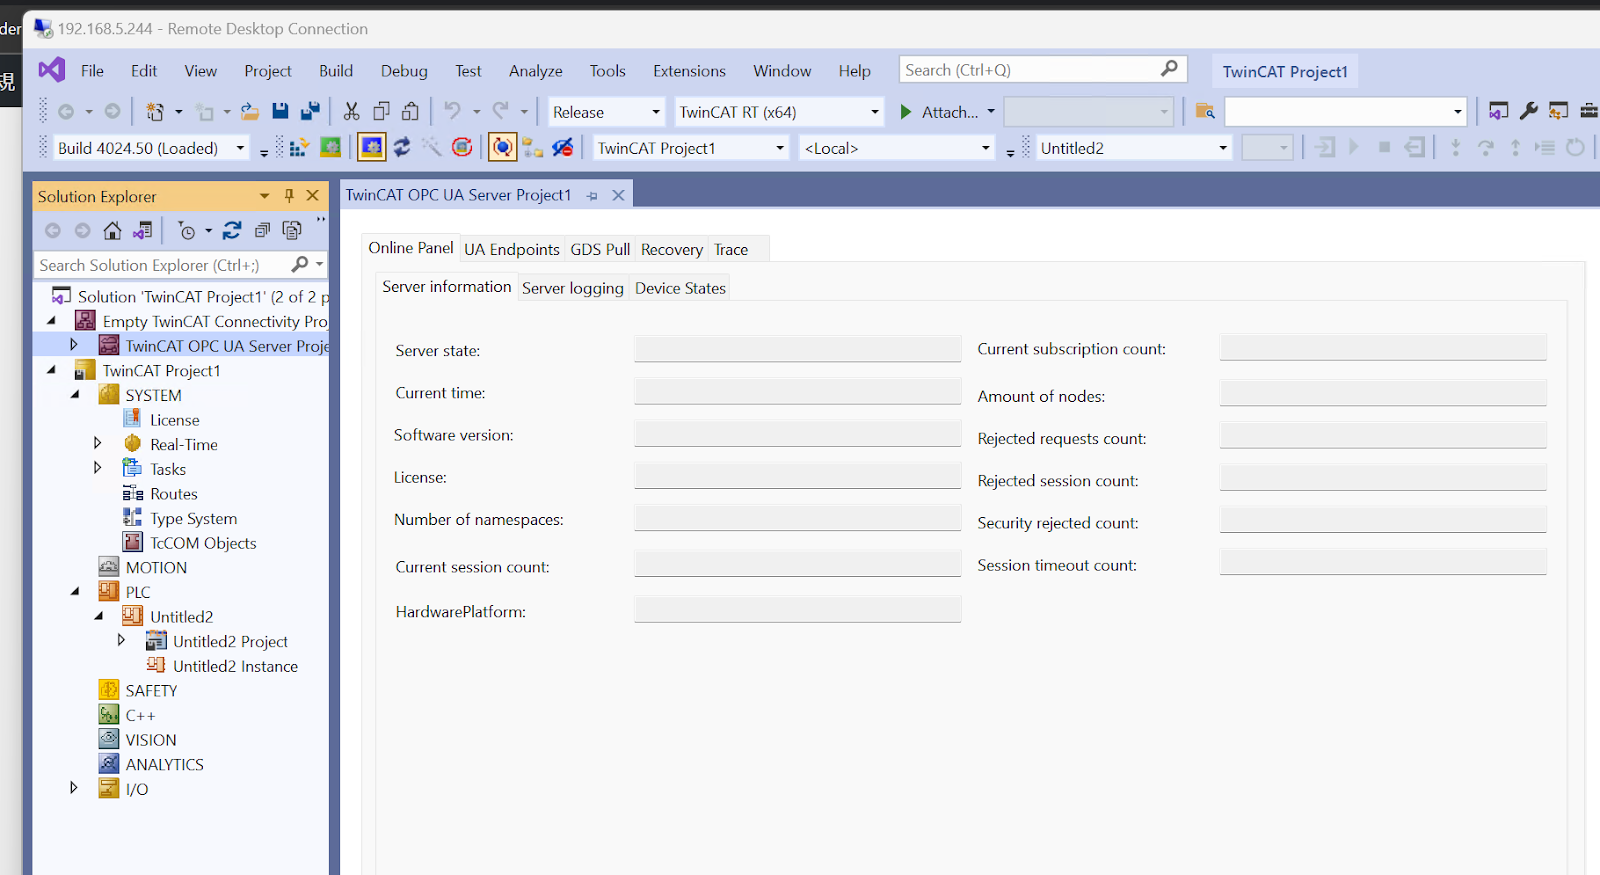
Add OPC UA Project
To add an OPC UA project to a TwinCAT project, go to Solution>Right click>Add> New Item.

Open the TwinCAT OPC UA Server Project and add it with >Add.

Done!
Add Device Type
To add an OPC UA Data Access Device, go to Data Access>right click>Add Device type.

The Create Device Type screen appears. Set ADS Port to 851 and click Create to create a new device.

Done!

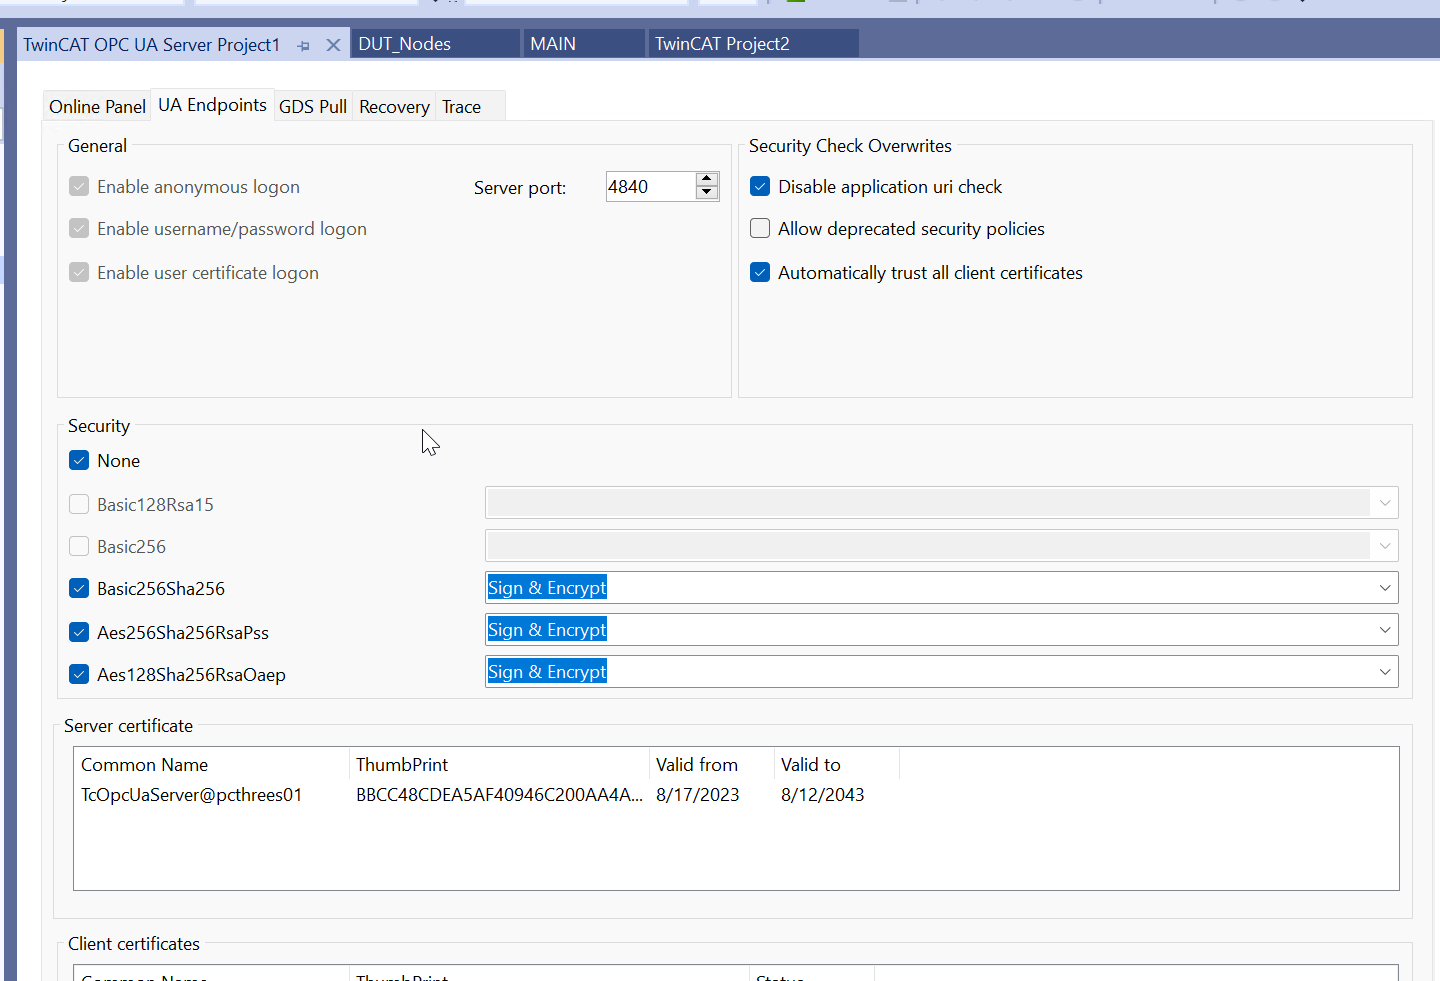
UA Endpoints
It is possible to configure settings such as Port, Security, etc. for the OPC UA Server that corresponds to the UA Endpoints Tab.
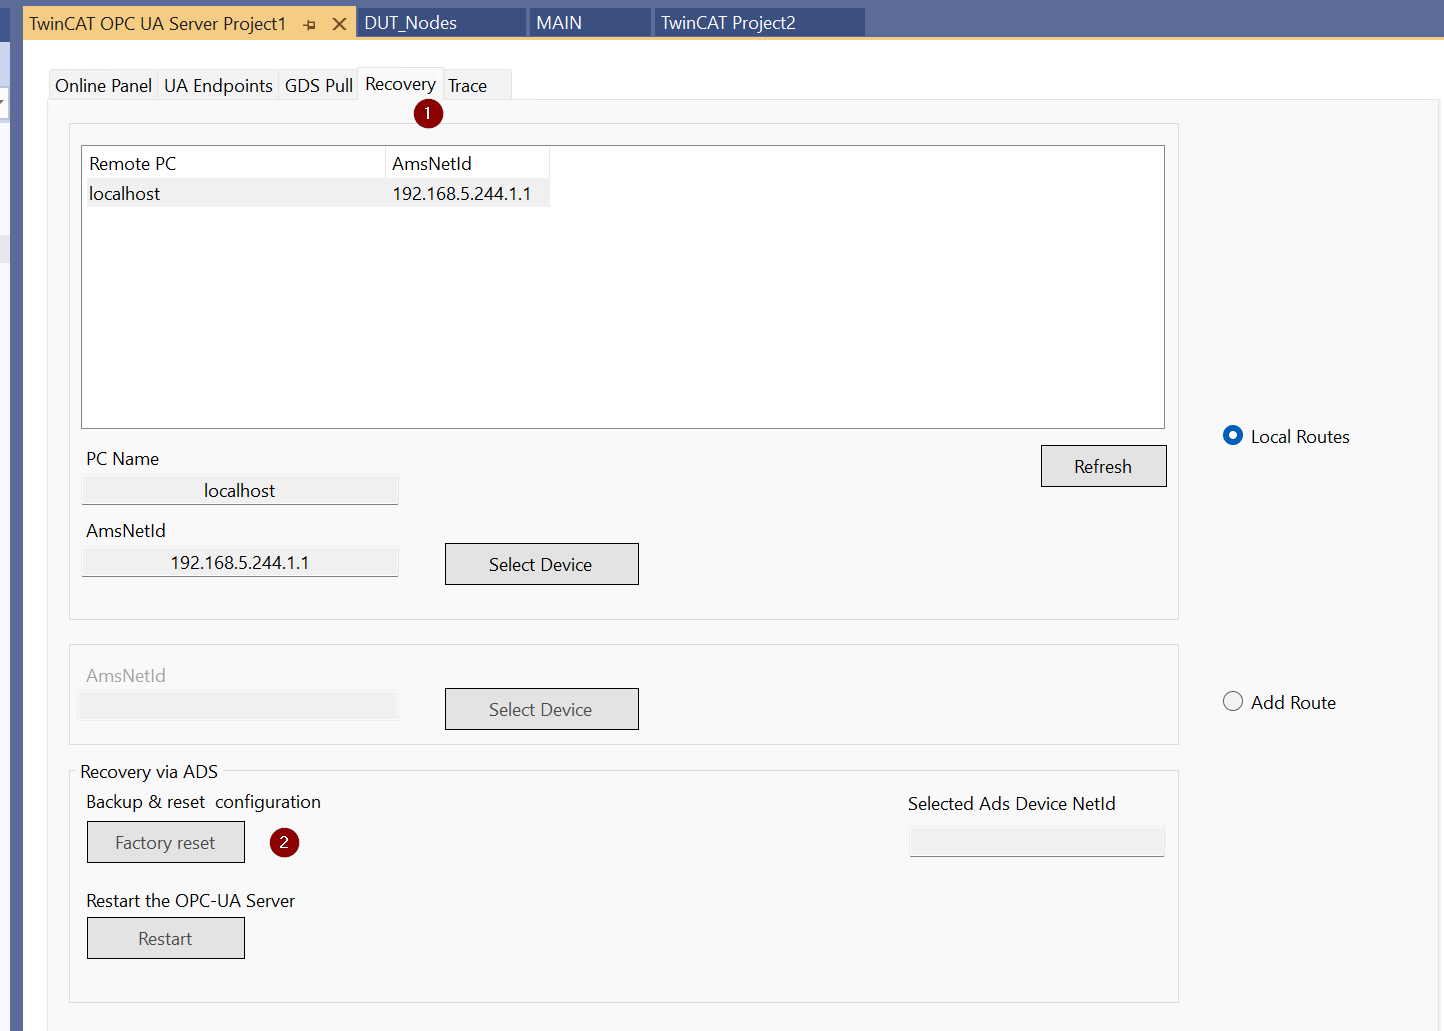
Factory Reset
Before setting up the OPC UA Server, you need to do a Factory Reset of the Server once, open the Recovery Tab > Factory reset to return to the default settings.
New OPC-UA Server Config
The next step is to generate a new OPC-UA Server Configuration.
Add a new OPC-UA Server configuration with “New OPC-UA Server Config” in the OPC UA Configurator.

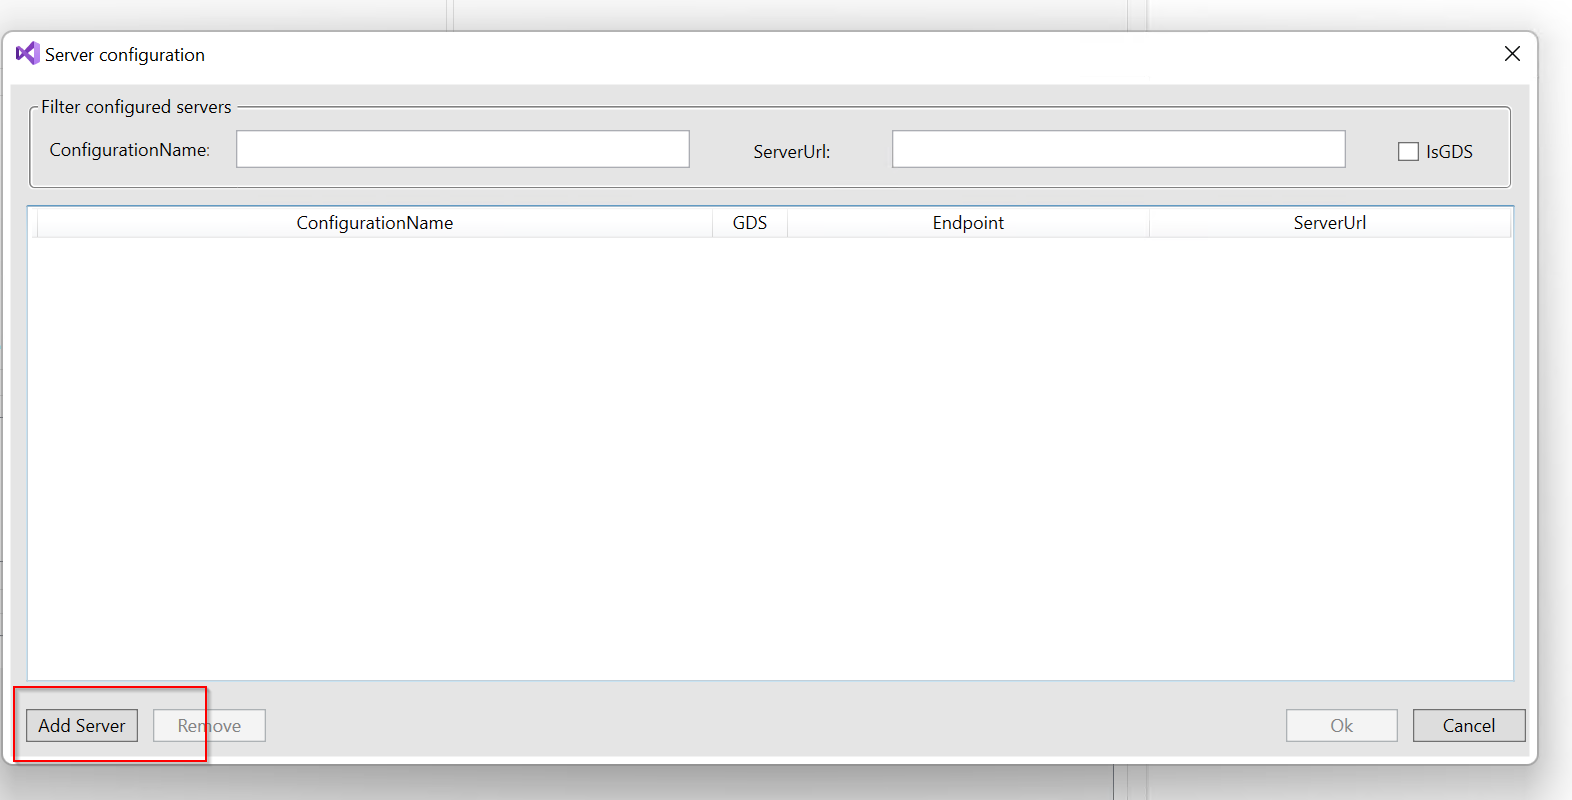
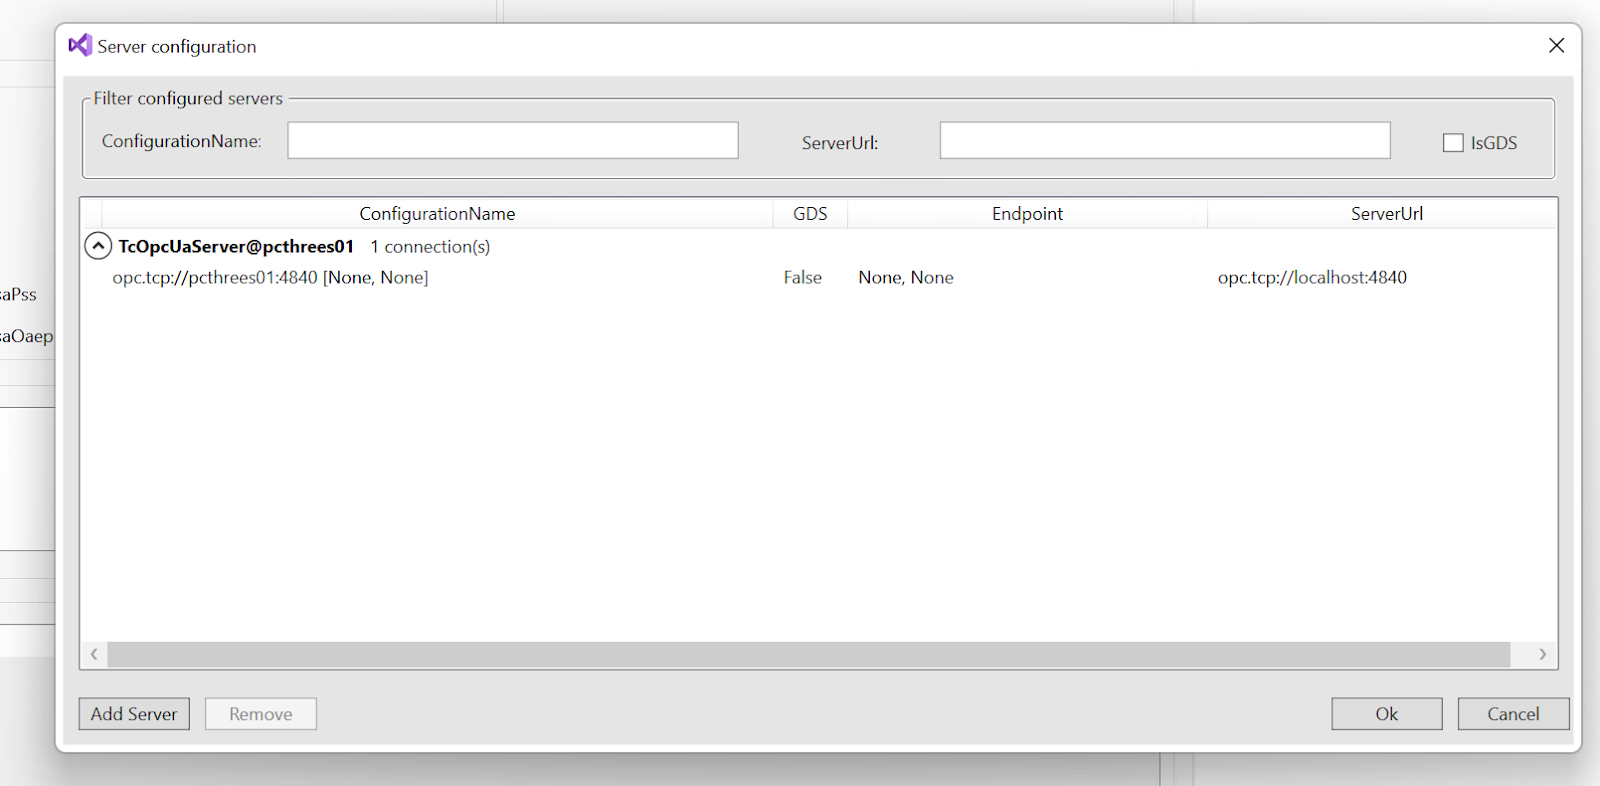
The Server Configuration screen appears.

Add a new Server with Add Server.
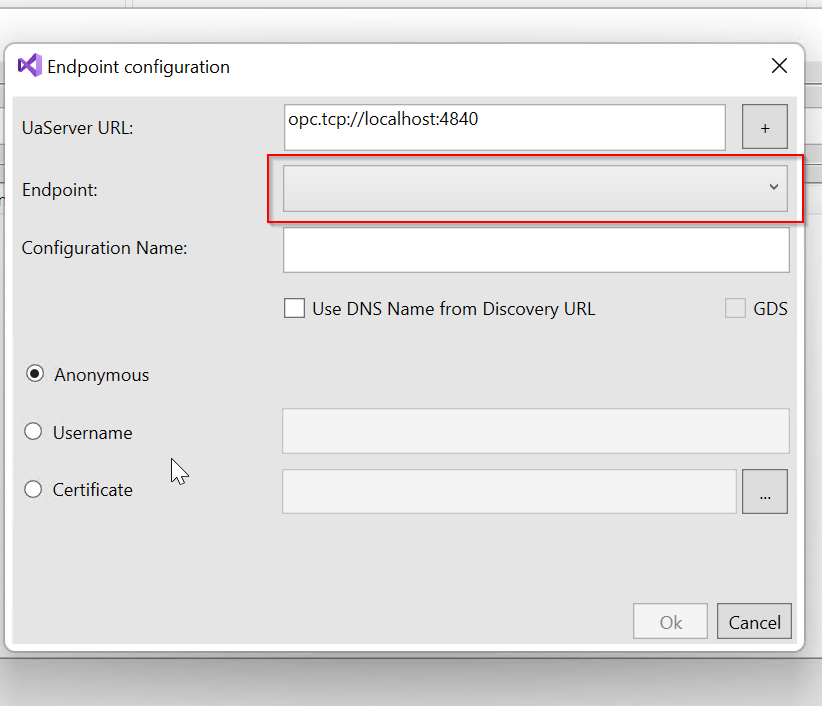
The Endpoint Configuration screen appears.
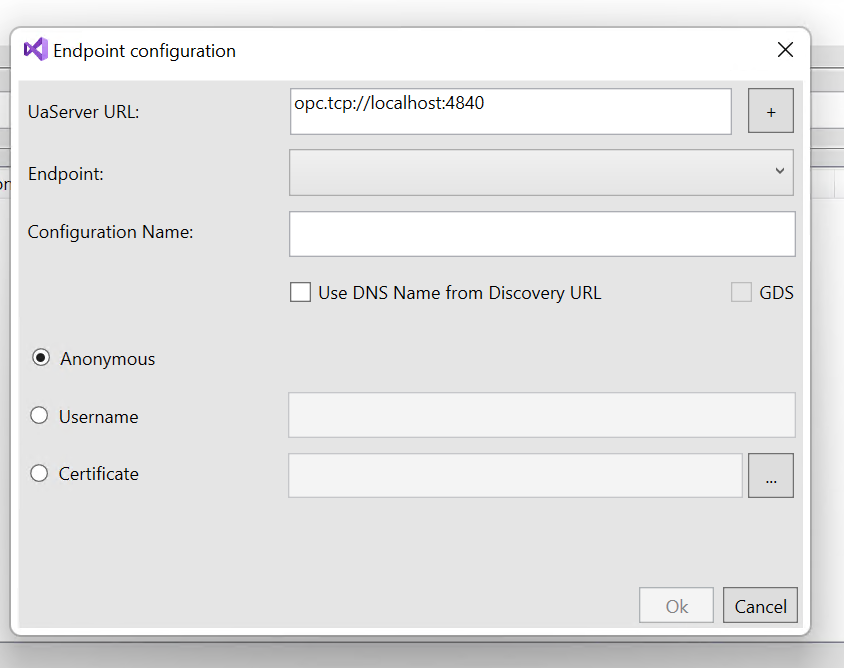
Add a new UaServer URL with the + button.
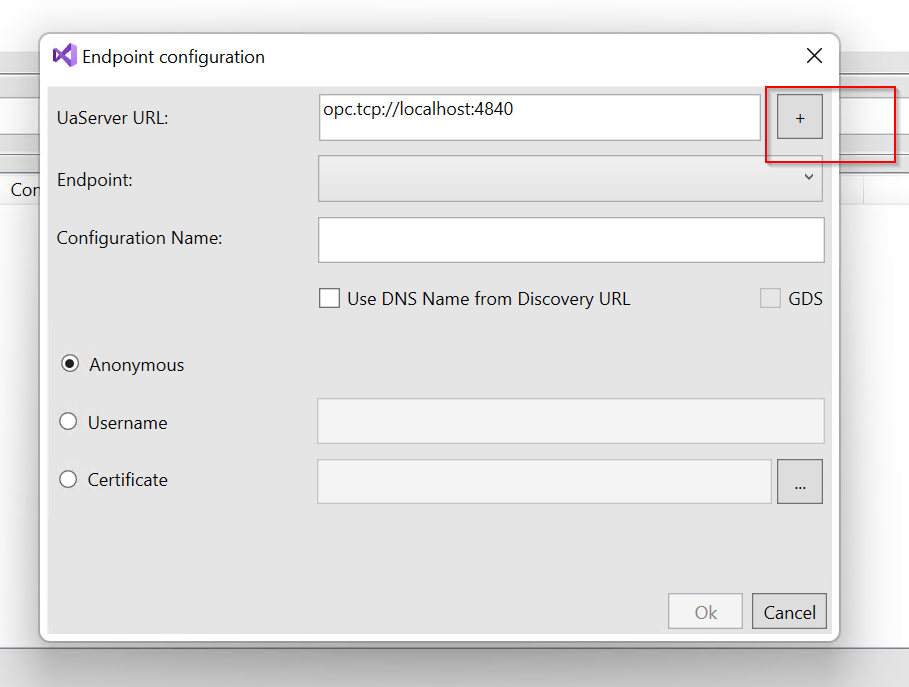
Set the End-point of the OPC UA Server that can be accessed by the End-point.
Choose None or another Security policy.

Finally, apply the settings with Ok.

Done!
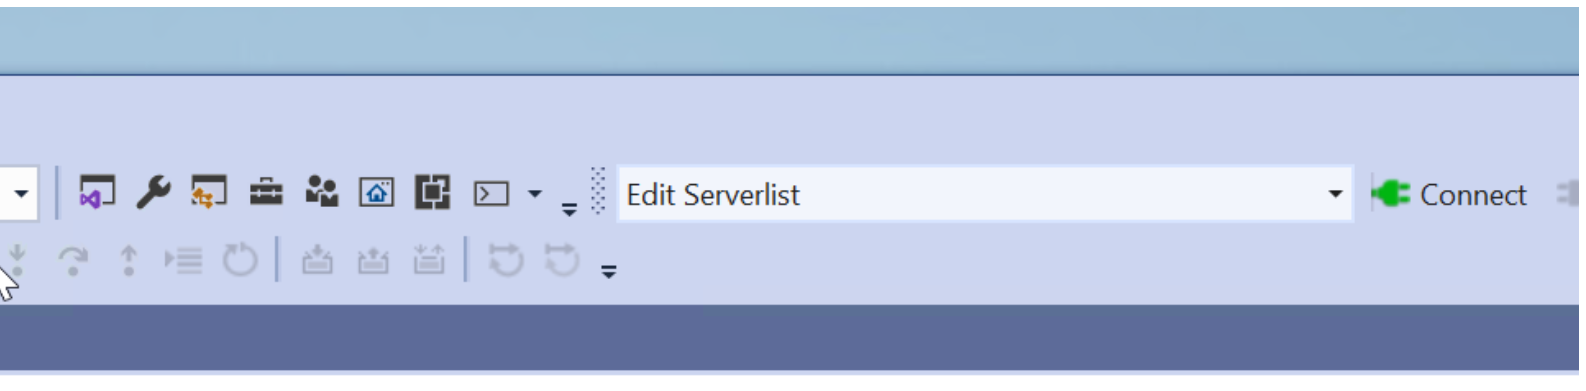
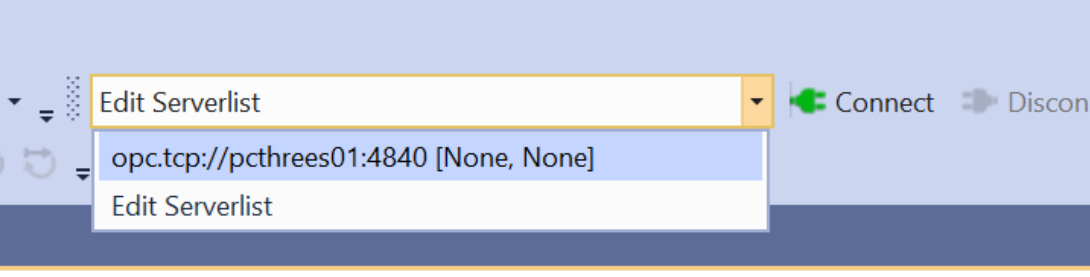
Connect to OPC UA Server
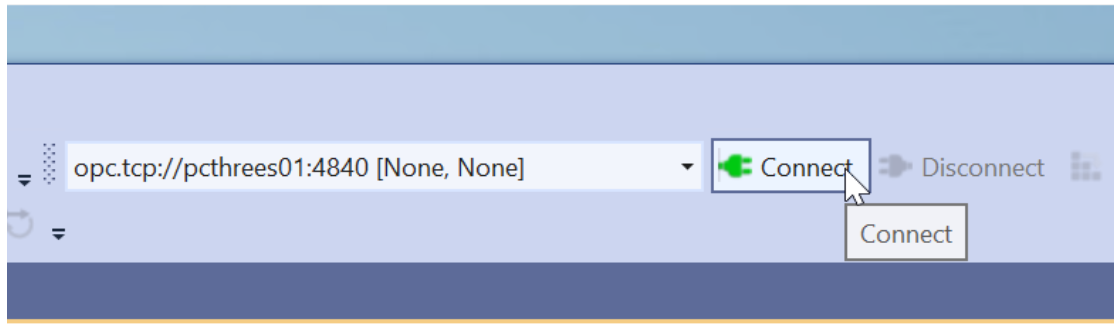
Select the Endpoint you just added from the Drop-list of “Edit Serverlist” in the OPC UA Configurator.
Connect to TwinCAT and OPC UA Server with Connect.
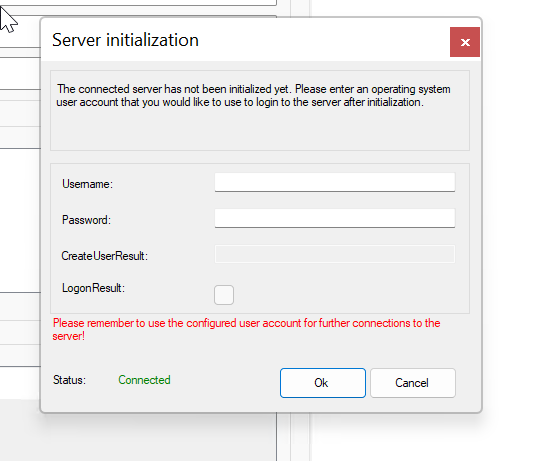
When setting up the OPC UA Server for the first time, the Server Initialization screen will appear.
Set the Username and Password to the Username and Password of your PC.
Firewall Configuration
In some cases, you may need to configure your PC’s Firewall to allow OPC UA Port connections.
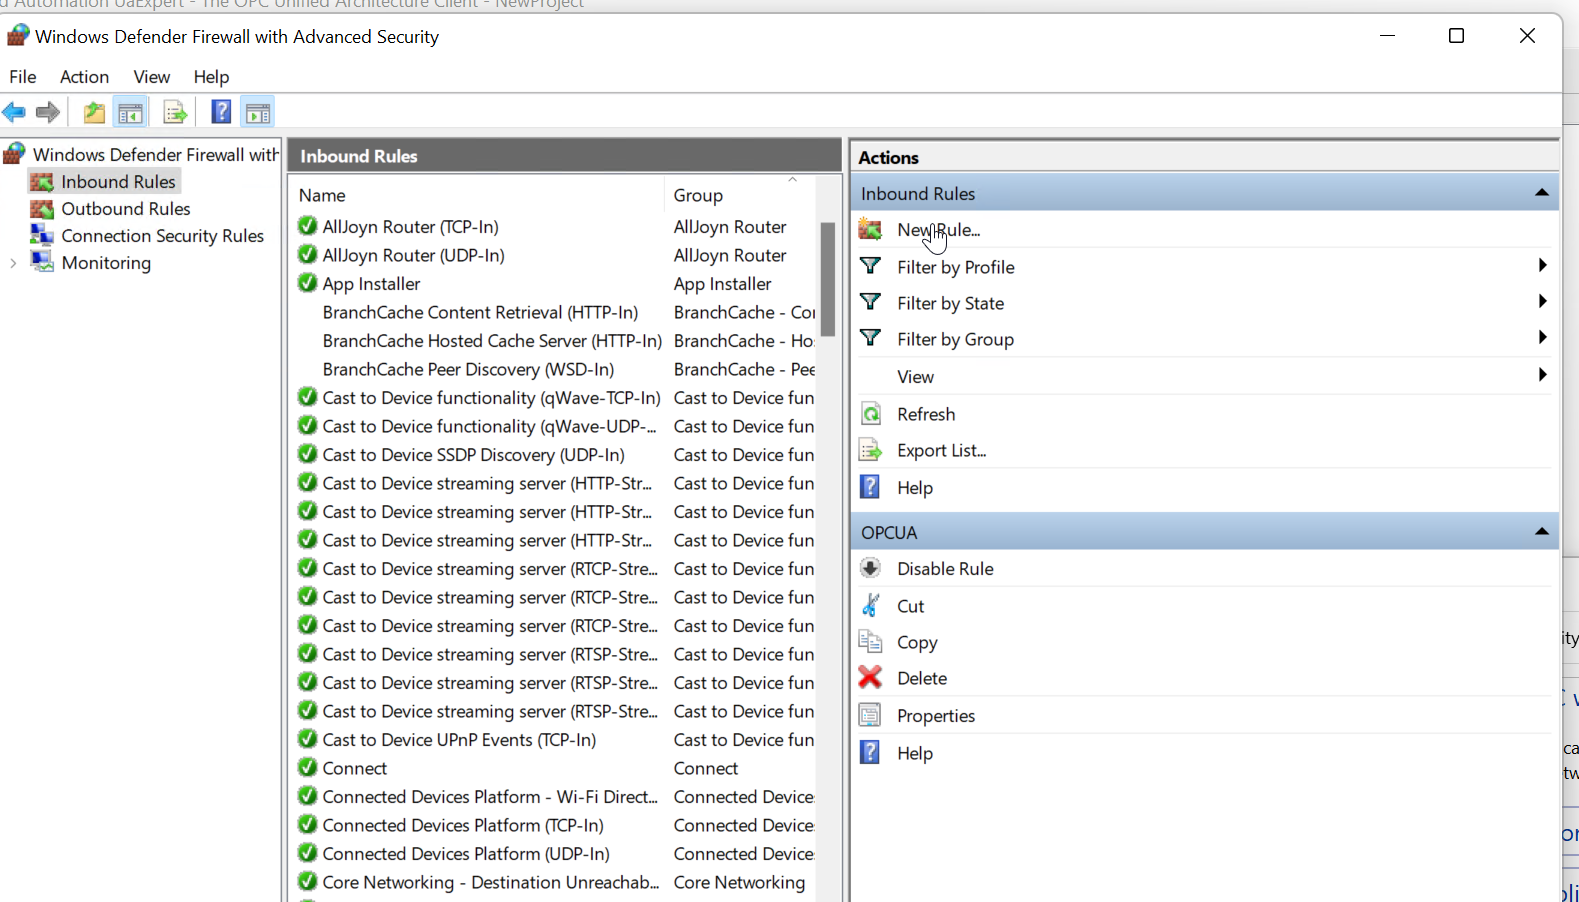
For Rule Type, select Port and press Next> to proceed.
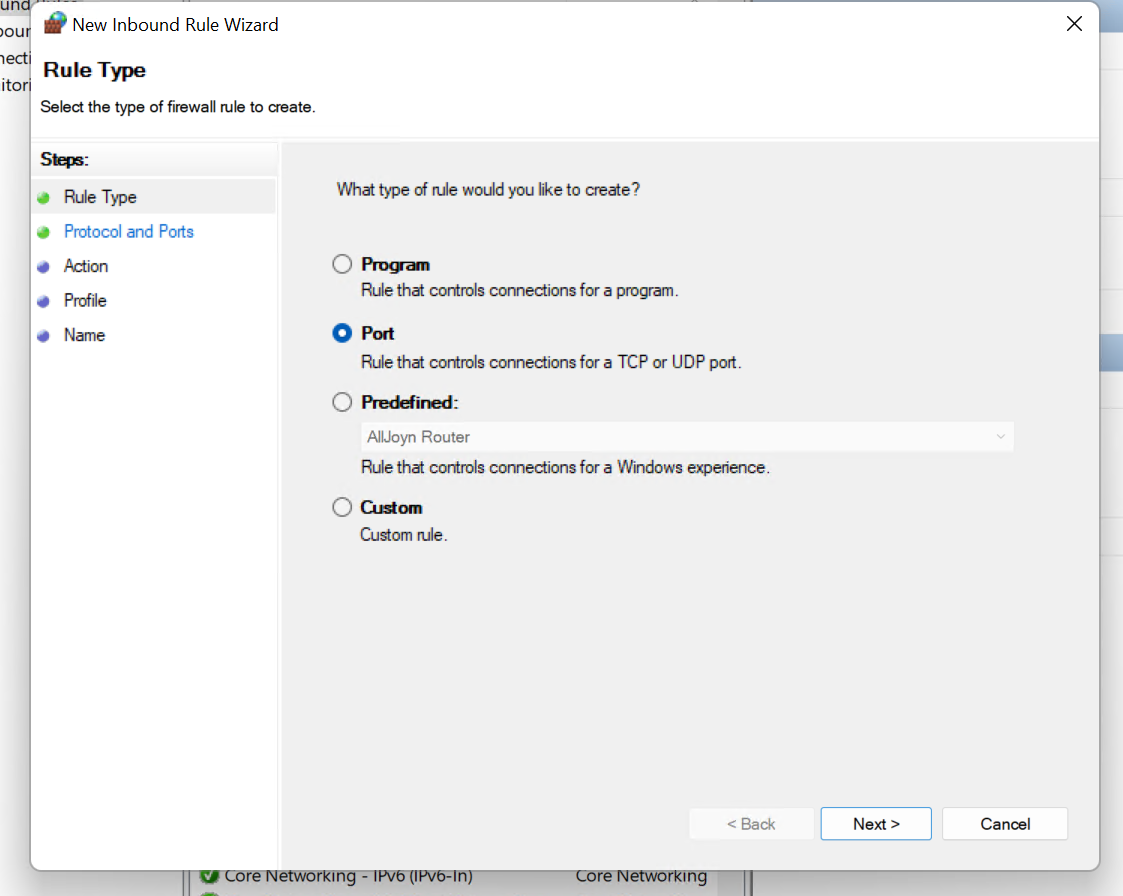
Rules are set to TCP and Port number is 4840.

Select Allow the connection and press Next>.

Proceed with Next>.
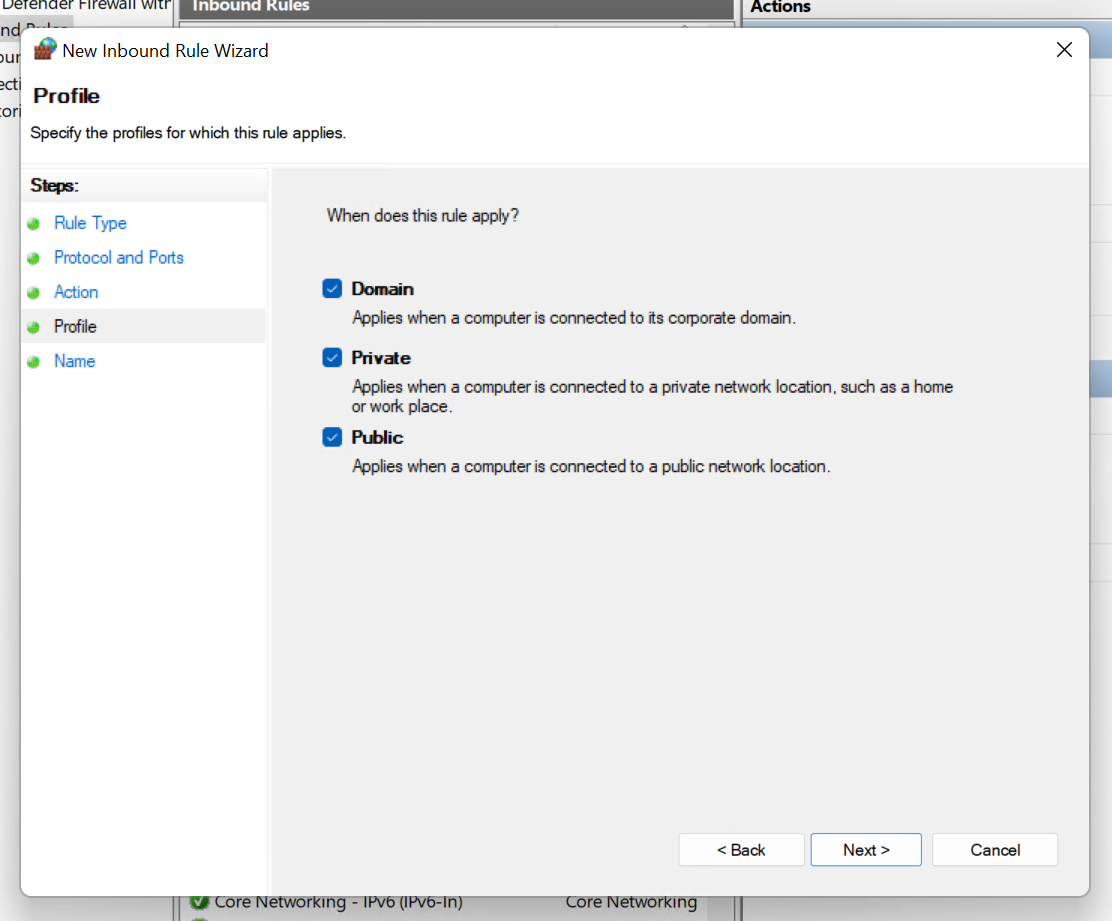
Name should be set to an easy-to-understand name.

Done!
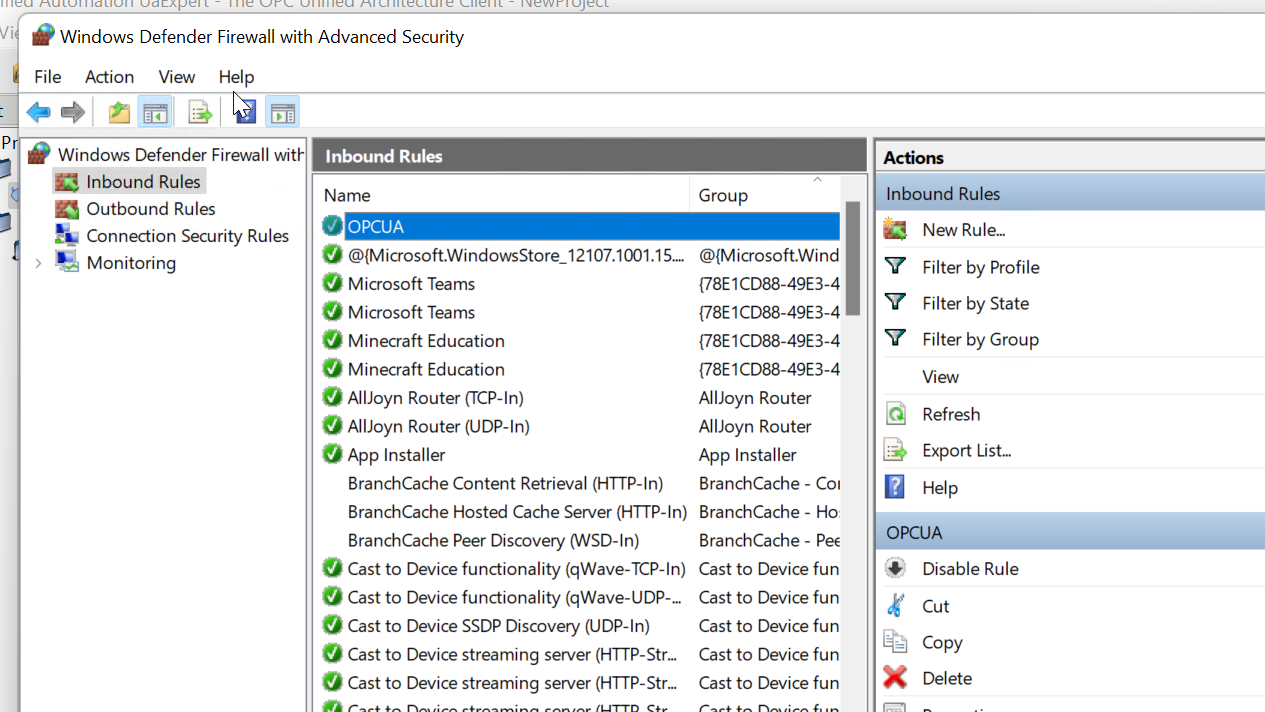
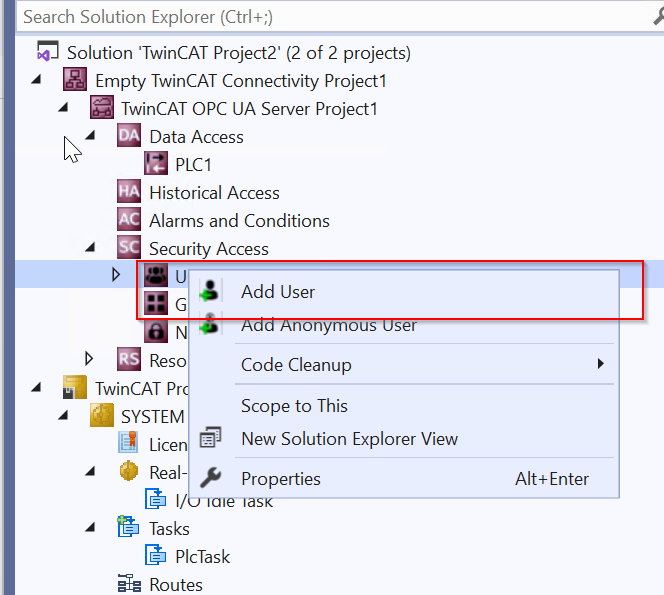
Add User
OPC UA ServerにアクセスするためにUserを追加するため、Security Access>右クリック>Add Userします。
The Create User screen will appear, and you should set your Username and Password.
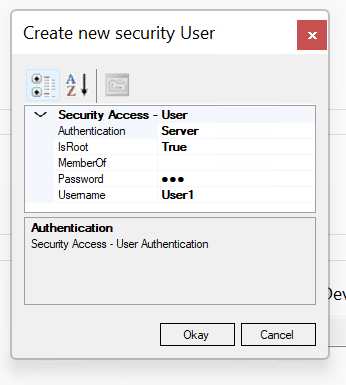
Done!

Program
Configuration
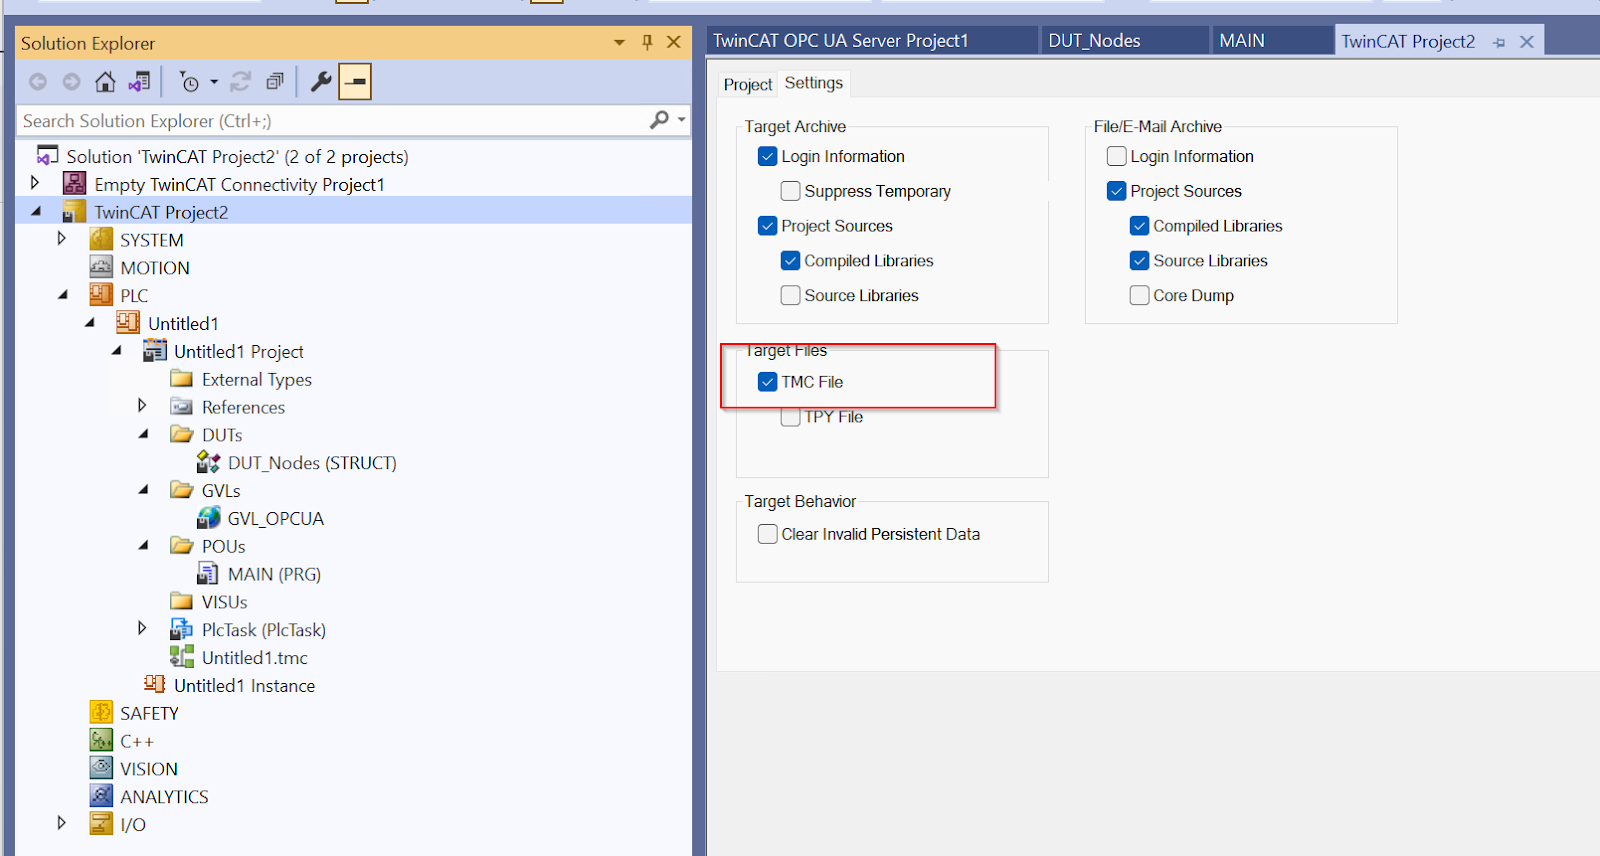
Put the Settings>TMC File Checkbox in the Project>PLC>PLC Project.
DUT
Defines a Node to be published to OPC UA Server as a structure.
| TYPE DUT_Nodes : STRUCT inBool,Outbool :BOOL; inint,Outint :BOOL; inReal,OutReal :REAL; inLreal,OutLReal :LREAL; inArraysBool,OutArraysBool :ARRAY[0..31]OF BOOL; inArrayInt,OutArrayInt :ARRAY[0..31]OF INT; inArrayReal,OutArrayReal :ARRAY[0..31]OF REAL; END_STRUCT END_TYPE |
GVL
Create a Global variable List for OPC UA Server.
Do not forget {attribute ‘OPC.UA.DA’ := ‘1’}.
| {attribute ‘qualified_only’} VAR_GLOBAL {attribute ‘OPC.UA.DA’ := ‘1’} bbool_out:BOOL; {attribute ‘OPC.UA.DA’ := ‘1’} MyData :DUT_Nodes; END_VAR |
Main
Create a simple verification program.
| GVL_OPCUA.bbool_out:=TRUE; GVL_OPCUA.MyData.OutReal:=GVL_OPCUA.MyData.OutReal-0.01; IF GVL_OPCUA.MyData.OutReal <= -10000.0 THEN GVL_OPCUA.MyData.OutReal:=0.0; END_IF |
PLCNEXT Side
Enable the OPC-UA Client Function
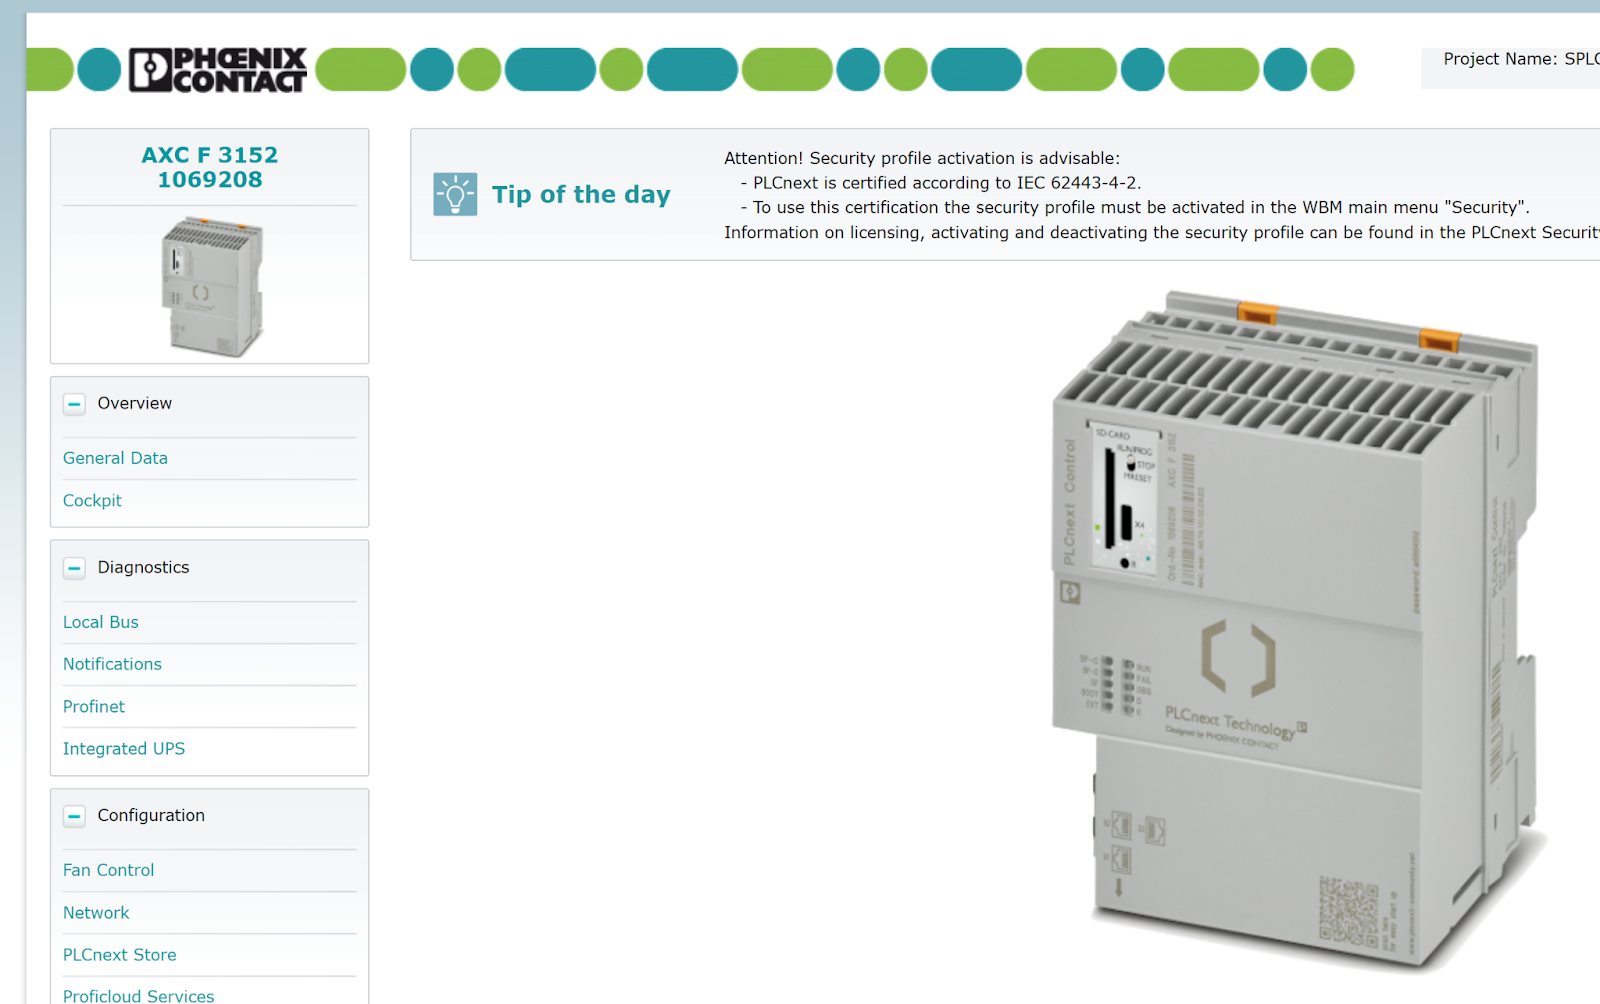
Access the CPU’s Web server to enable the AXCF3152’s OPC UA Client function.
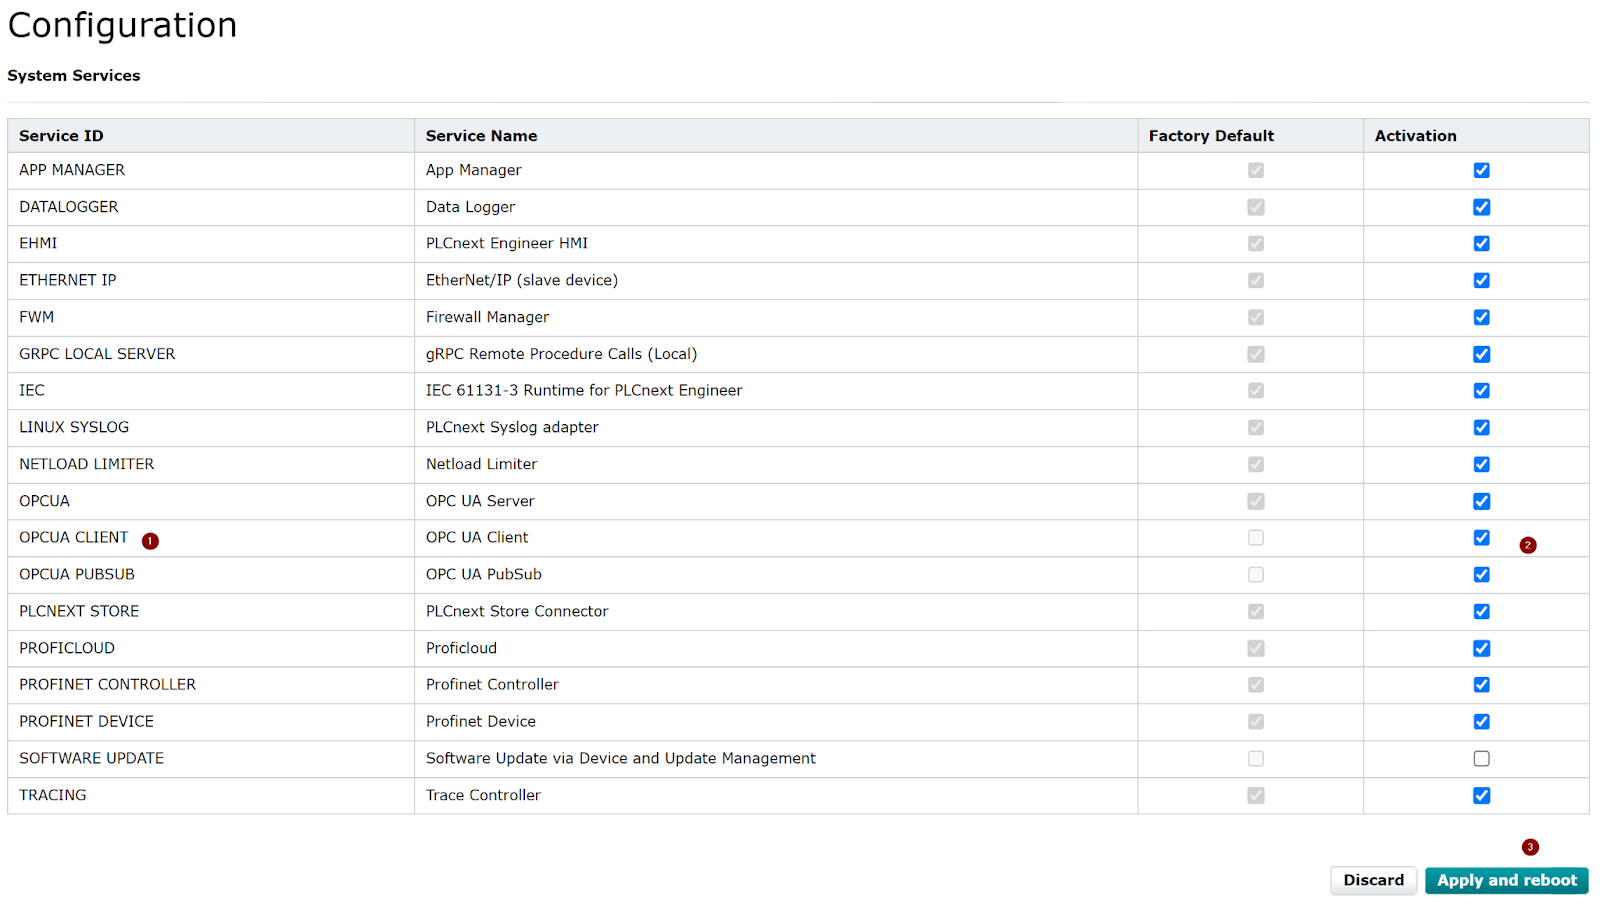
Open Configuration>System Services.

Check the Activation checkbox under OPCUA Client in Configuration, then Apply and restart to apply the settings.
Diagnosics
Using the Web Server’s diagnostic capabilities will make it easier to TroubleShoot if OPC UA connection problems arise.
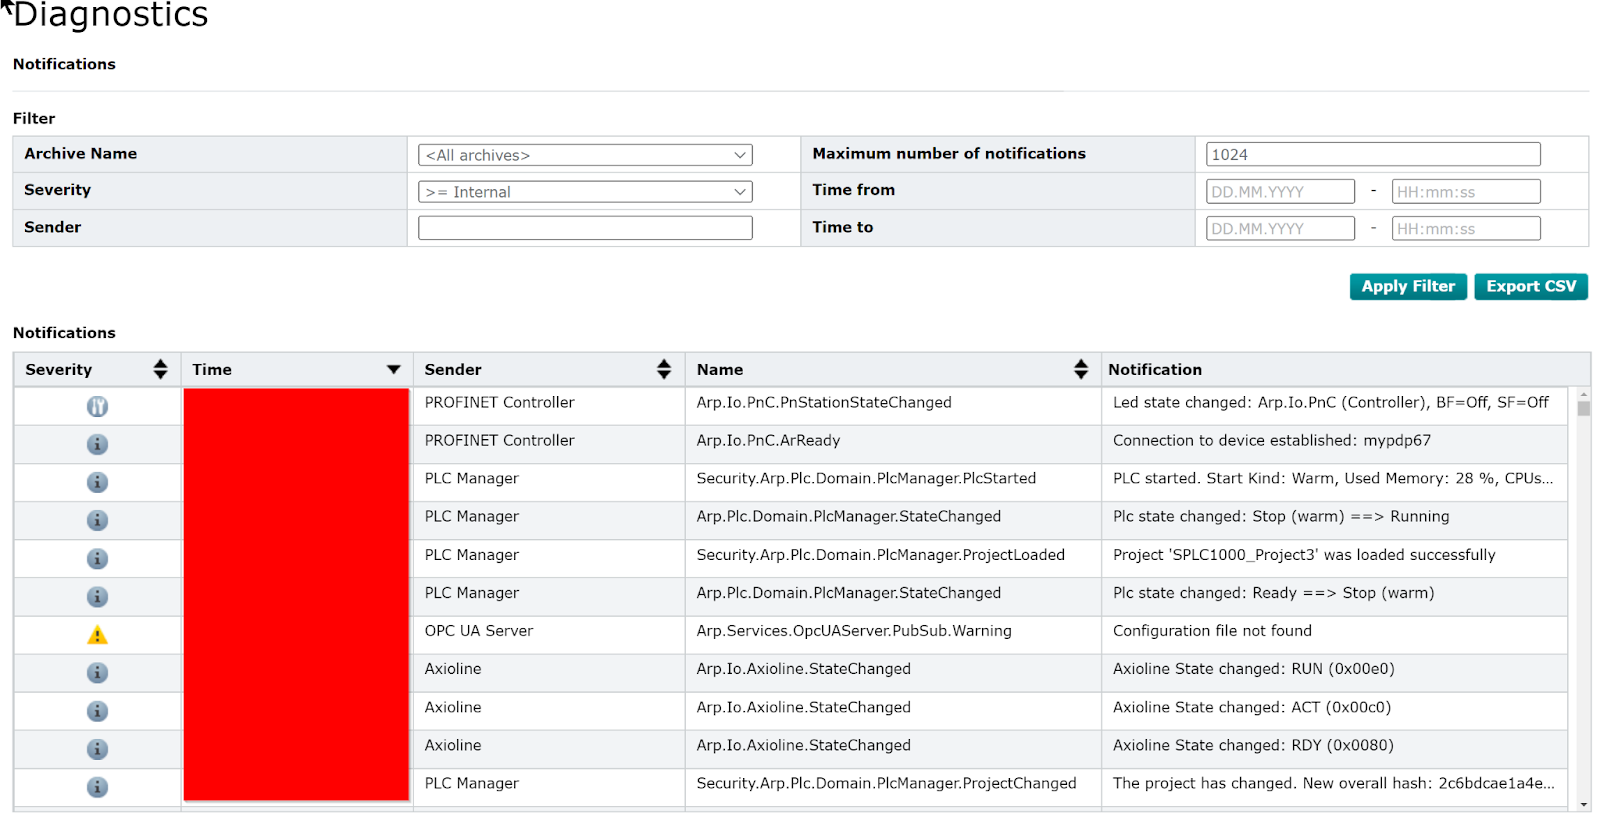
You can Filter the Message catalog from the Sender Field.
In this case, we will use OPC UA Client.
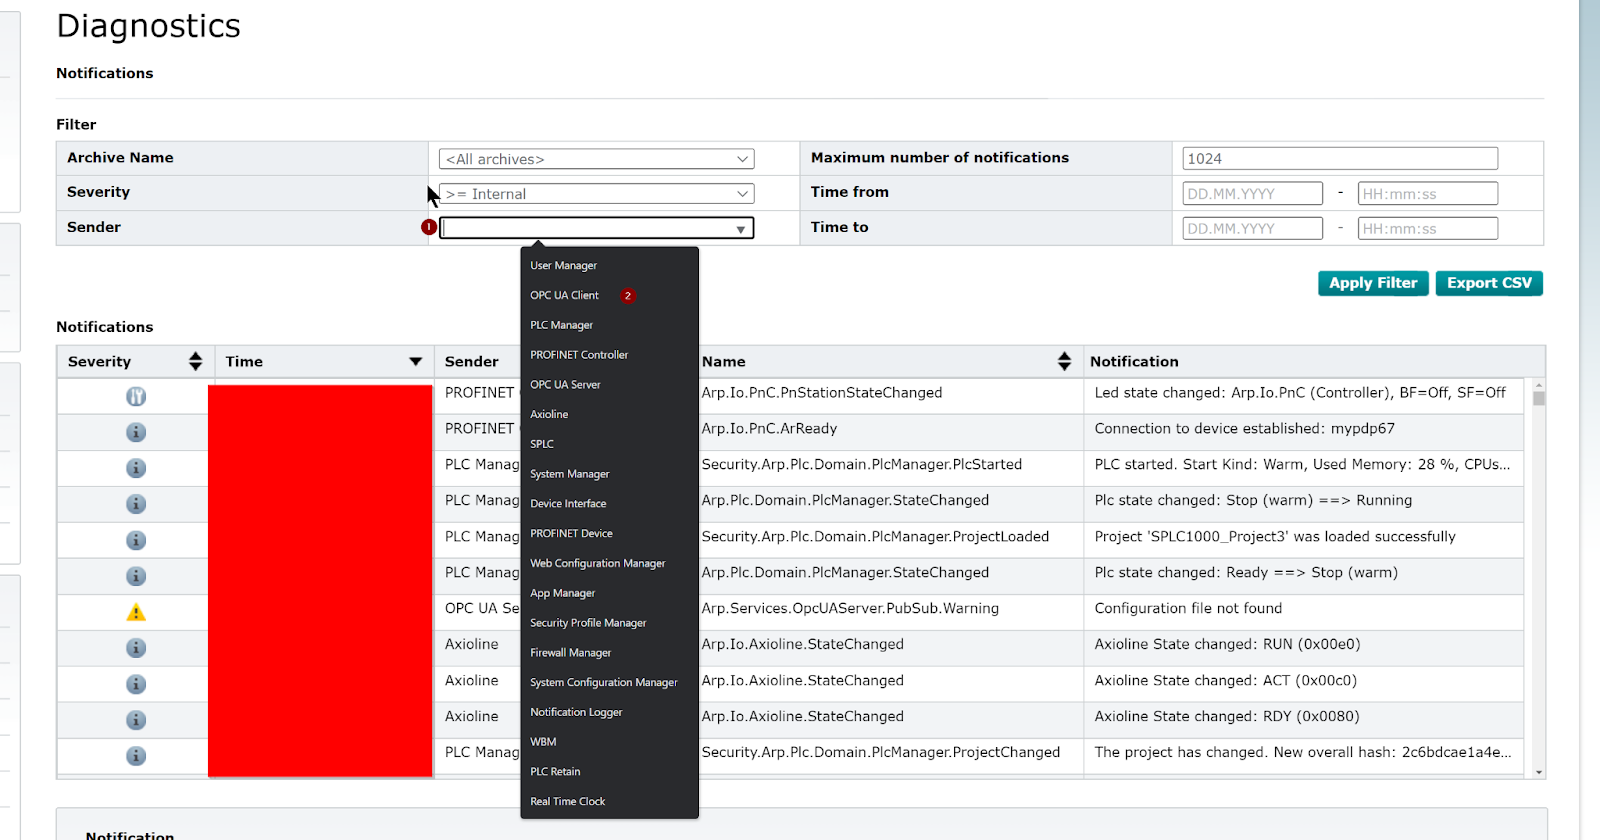
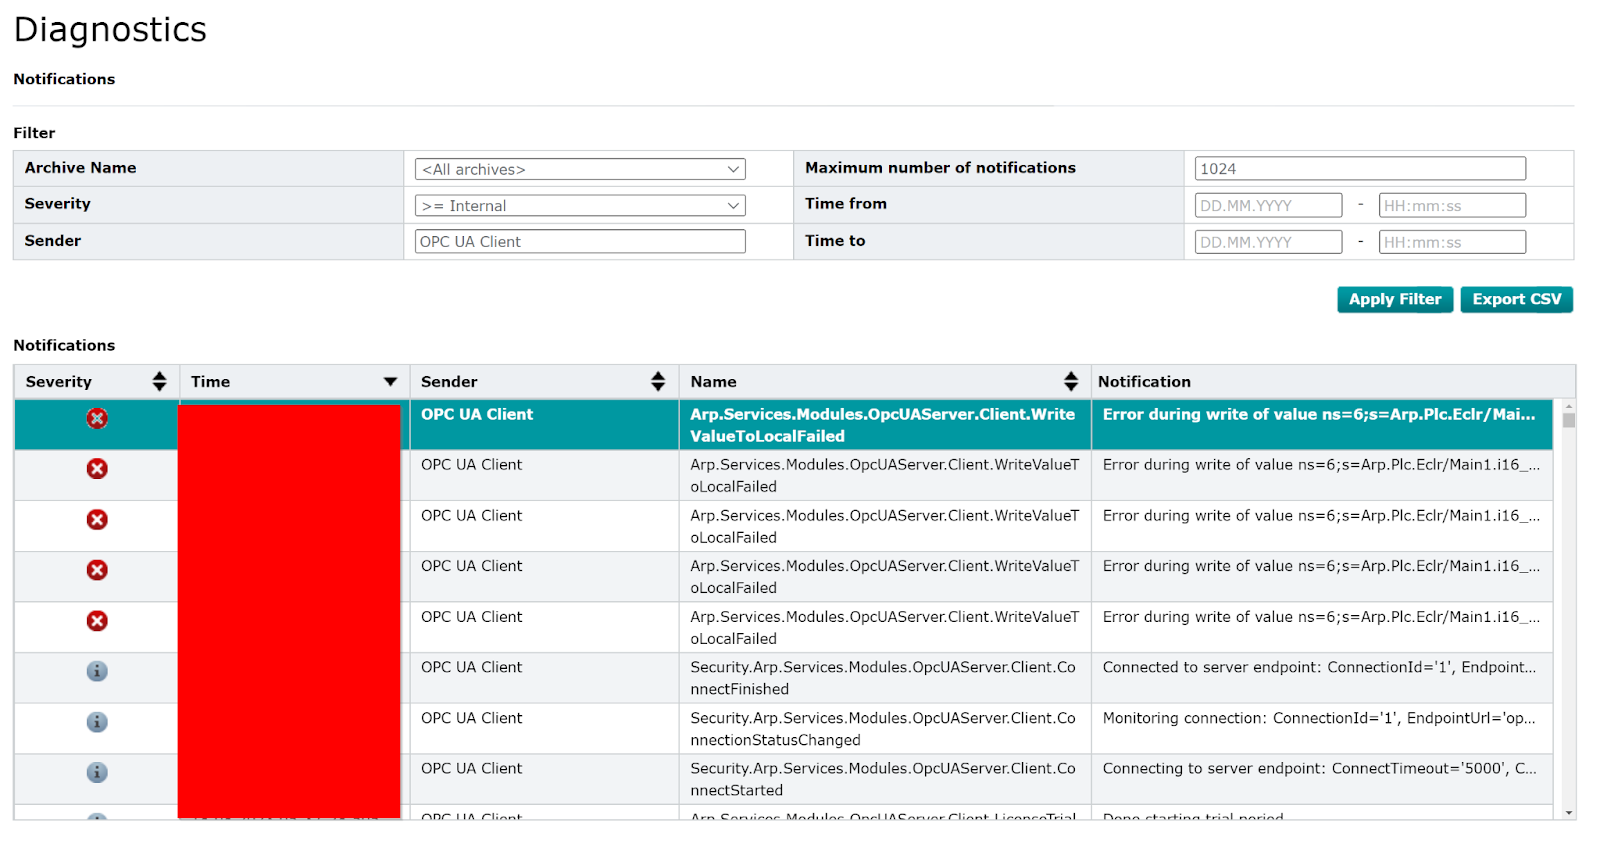
Done!Only Message of OPC UA Client is displayed now.
Import the certification
Convert Beckoff’s OPC UA Server certificate (.der) to .crt for Import to PLCNEXT AXCF3152.
Install openssl Light
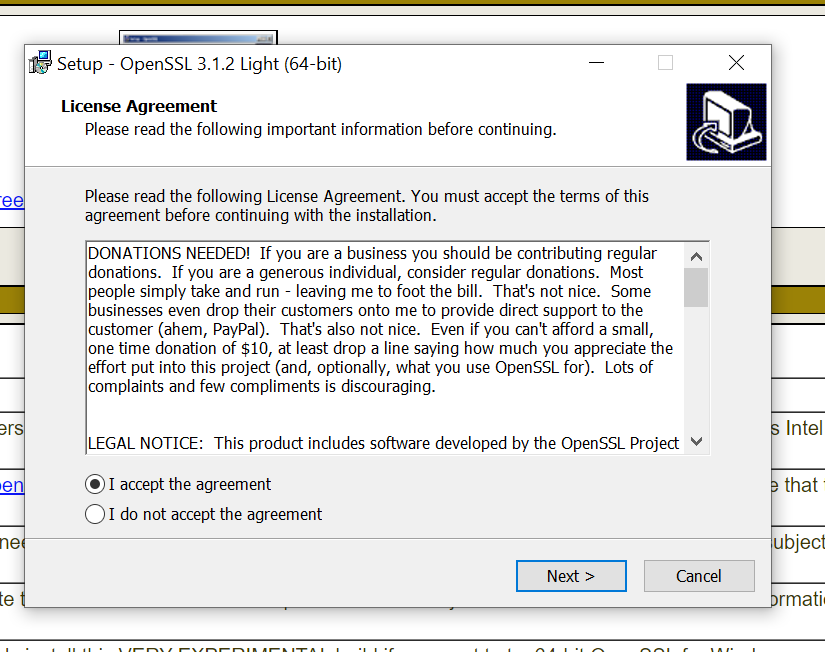
Download the Win64 OpenSSL Light Setup File from the link below.

Launch the Setup File, agree to the license, and click Next>.
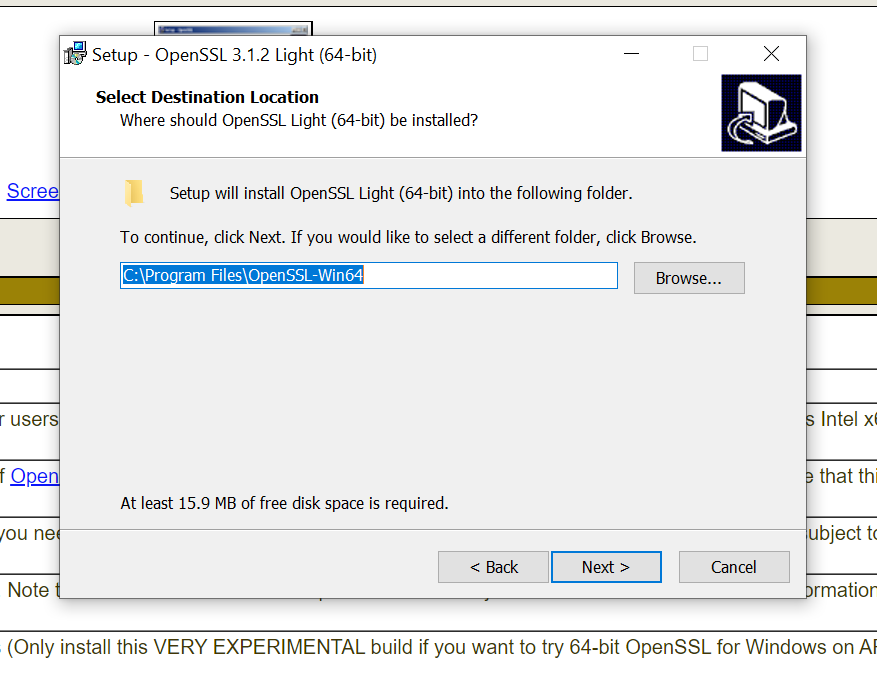
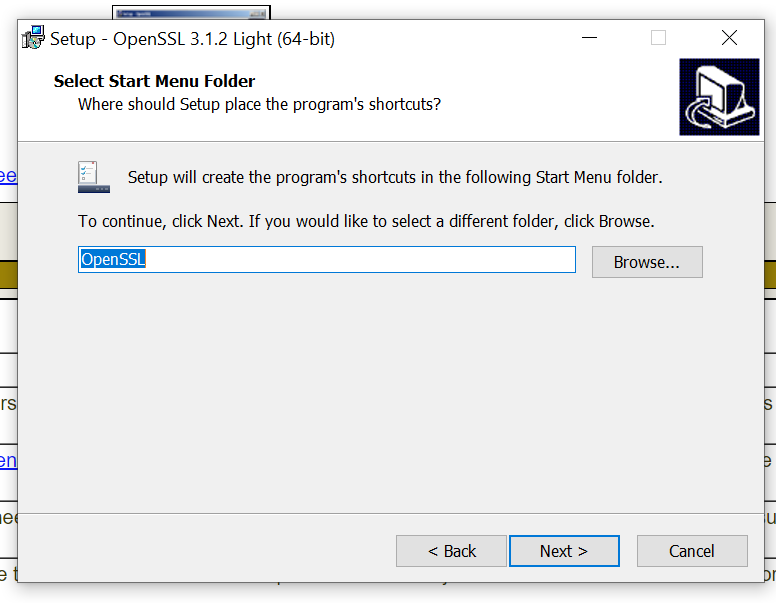
Set the installation location and click Next>.
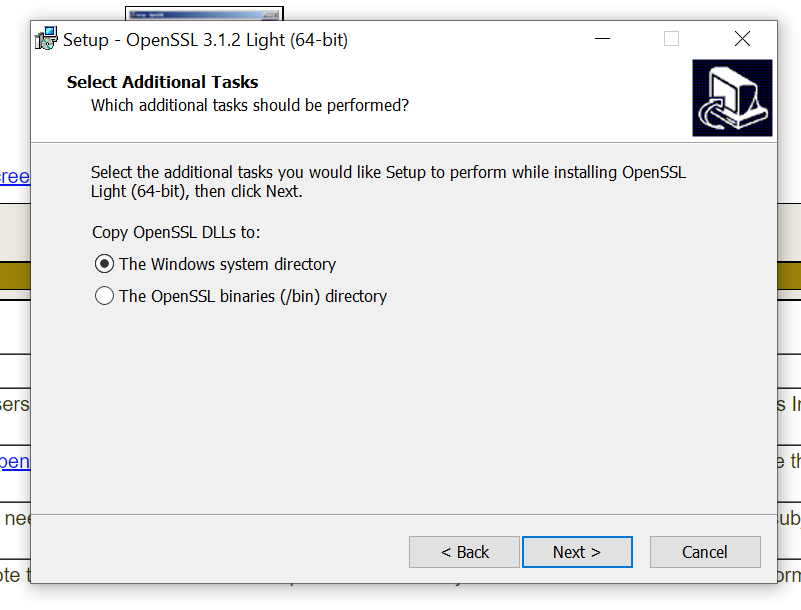
Proceed with Next>.
Next>.
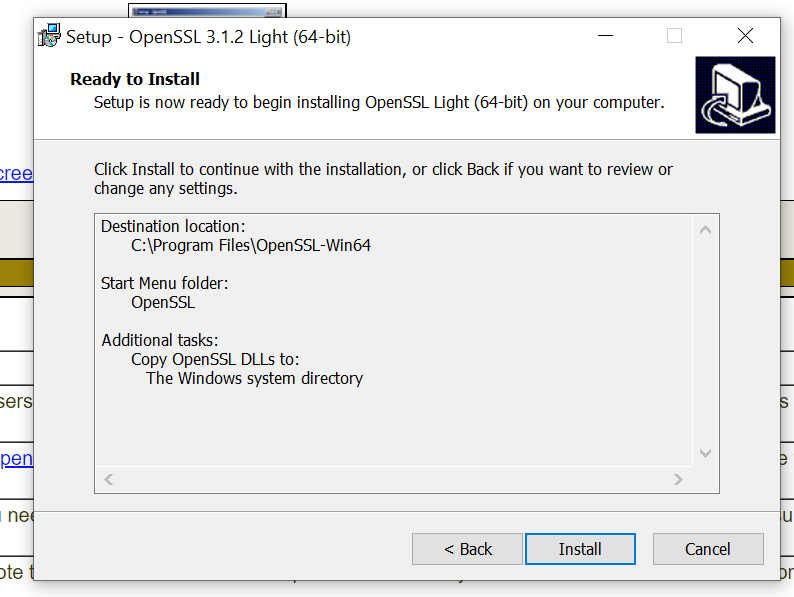
Start installation.
Done!

Edit System variable
Next, add the Openssl environment variable to Windows.
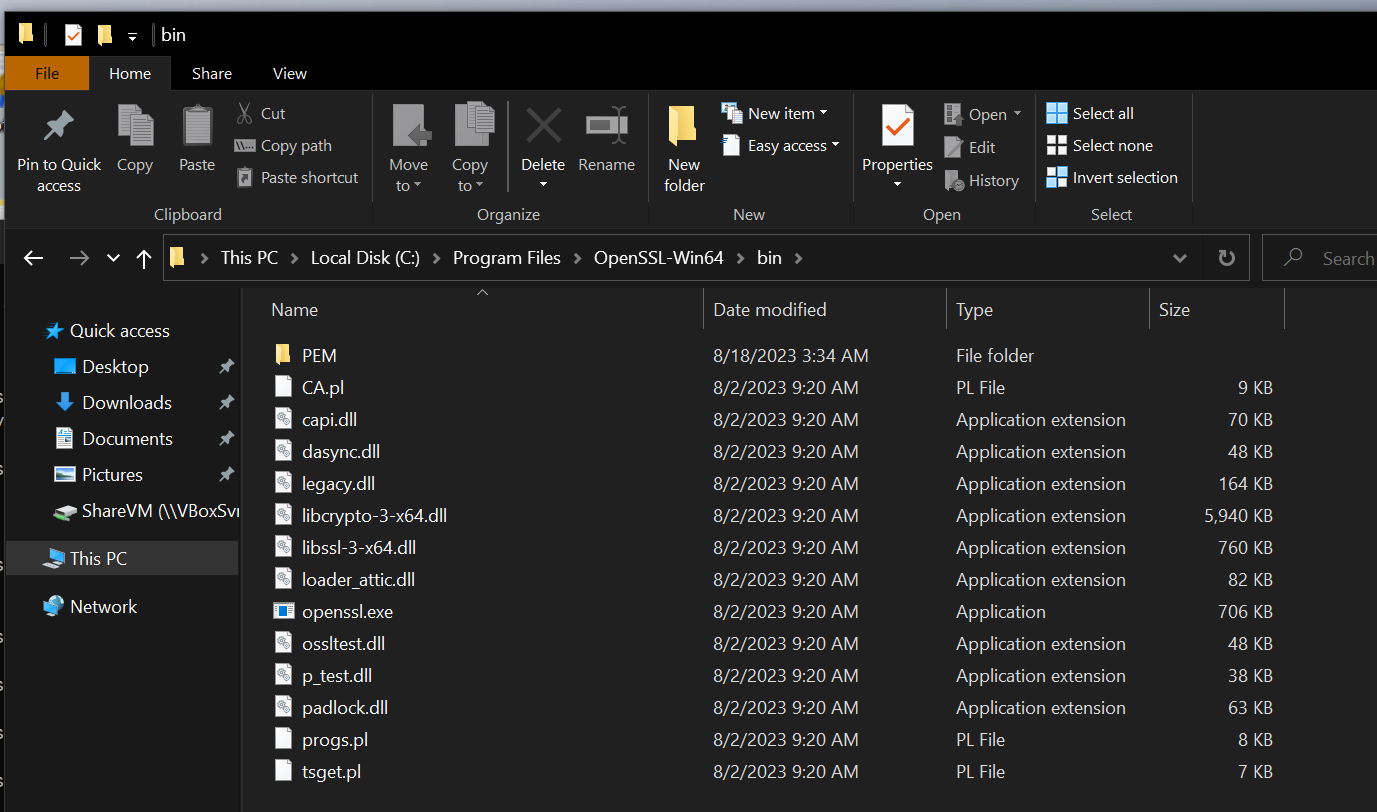
Here is the installation Location for Openssl Light.
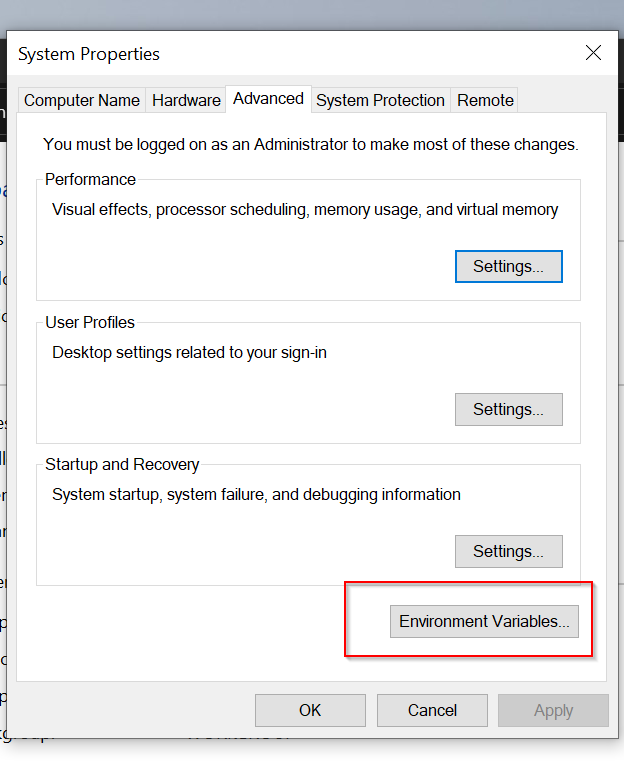
From Control Panel>System and Security>System, click on Advanced system settings.

Open Advanced Tab>Environment Variables.
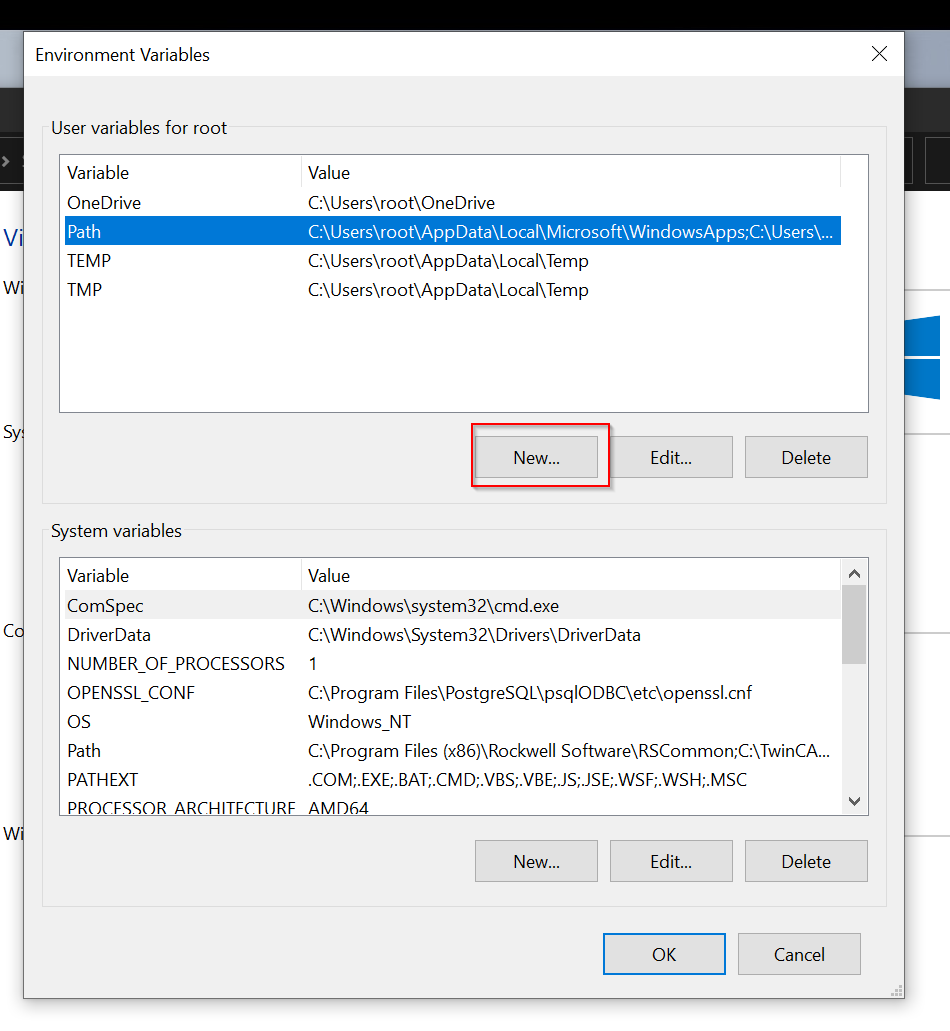
Select Path and press >New to add a new Path.
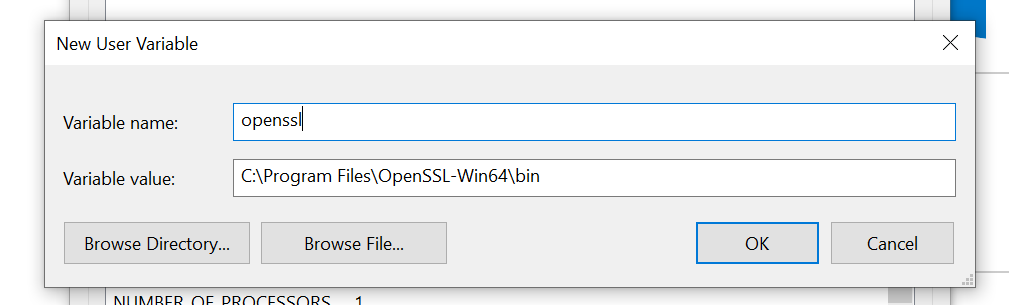
Variable name is Openssl and Variable Value is the following Path.
| C:\Program Files\OpenSSL-Win64\bin |
Lanuch openssl
Check the Openssl Version in Terminal.
| C:\Users\root>openssl version OpenSSL 3.1.2 1 Aug 2023 (Library: OpenSSL 3.1.2 1 Aug 2023) |
Change the Format
The next step is to convert the Beckhoff OPC UA Server certificate from .der to .pem using the Openssl tool.
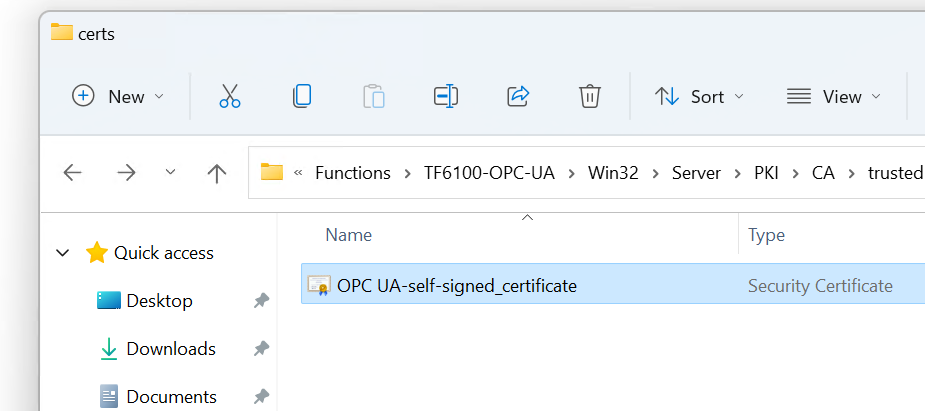
| C:\TwinCAT\Functions\TF6100-OPC-UA\Win32\Server\PKI\CA\trusted\certs |
Next, the following commands can be used to convert the certificate from .der to .pem.
| C:\Users\root\Desktop>openssl x509 -inform der –in Beckhoff_OpcUaServer.der –out beckhoff-opcua-cert.pem |
Upload to AXCF3152
Next, open Security>Authentication to upload to Beckhoff TwinCAT’s OPC UA ServerwAXCF3152.

Click Trust Stores, then click the + button in the OPC UA Client’s Certificate Management.

The Upload Certificate screen will appear. Click the Browse button to upload the certificate.
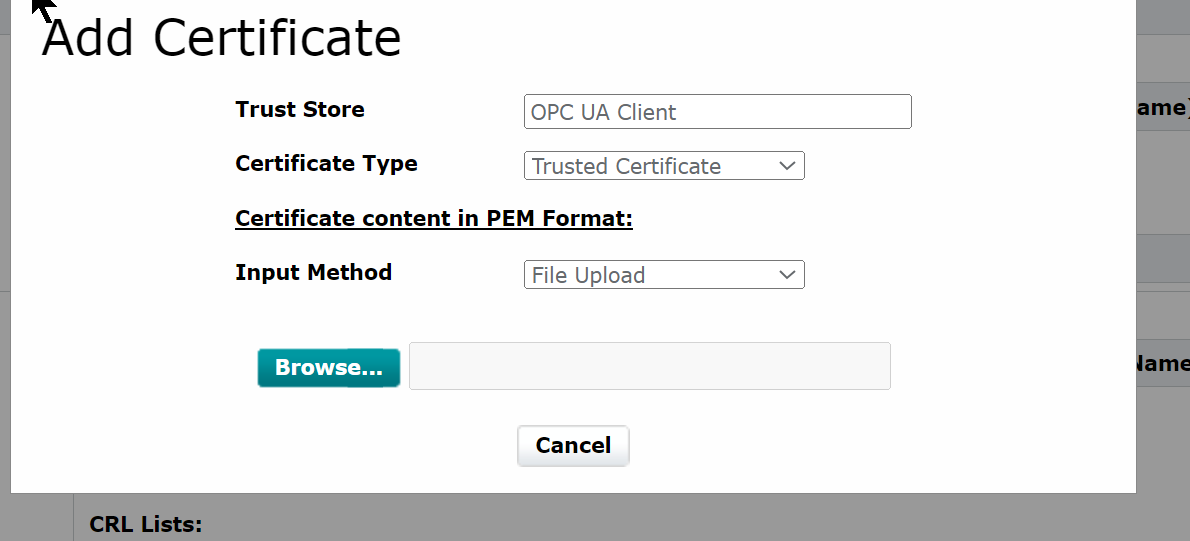
Done! The certificate is uploaded.

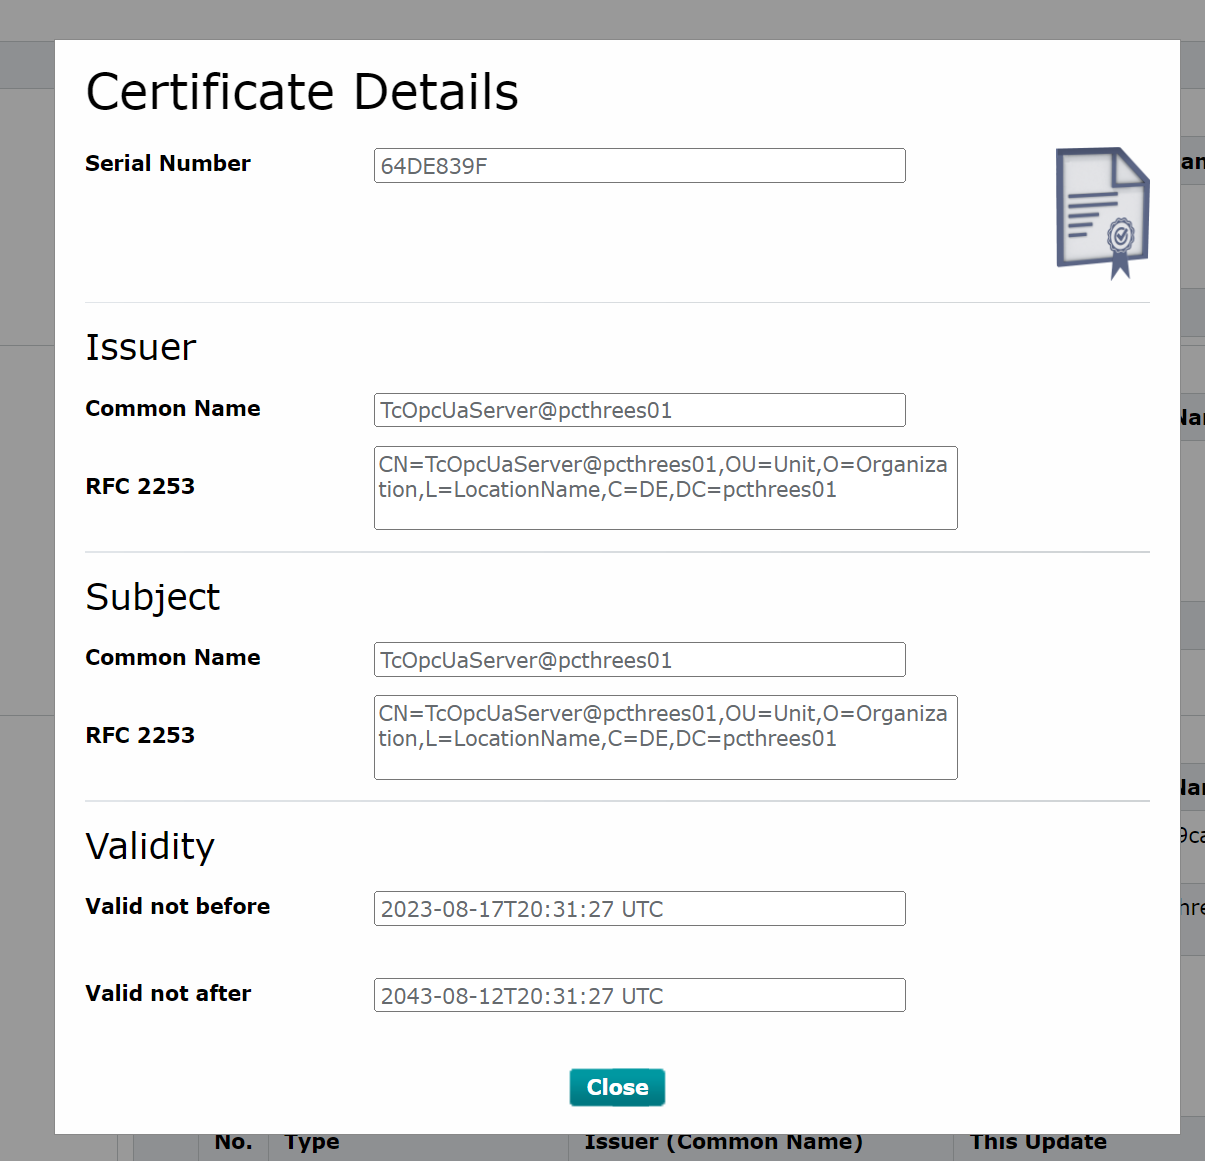
The Details button allows you to view the details of the corresponding certificate.
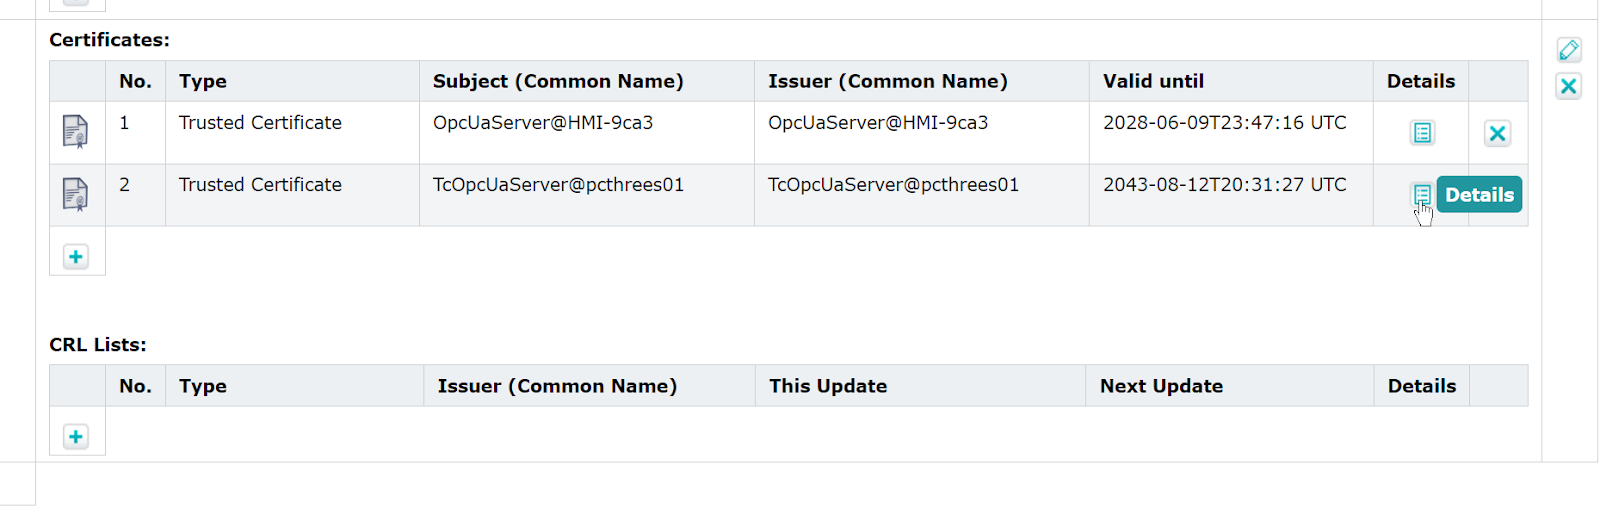
You can check information such as the issuer and expiration date of the Certification.
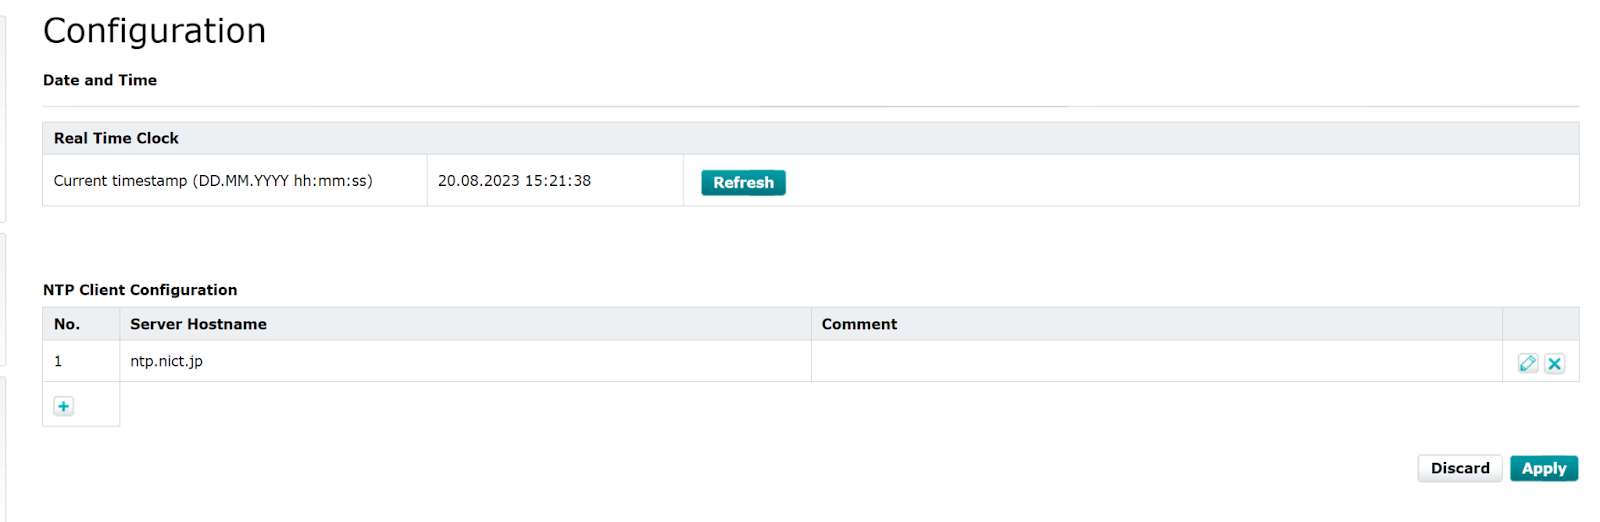
Configure the Time
To use Certification, the time in AXCF3152 must be adjusted to the current time; click Configuration>Data and Time.

Set up your Ntp Server.
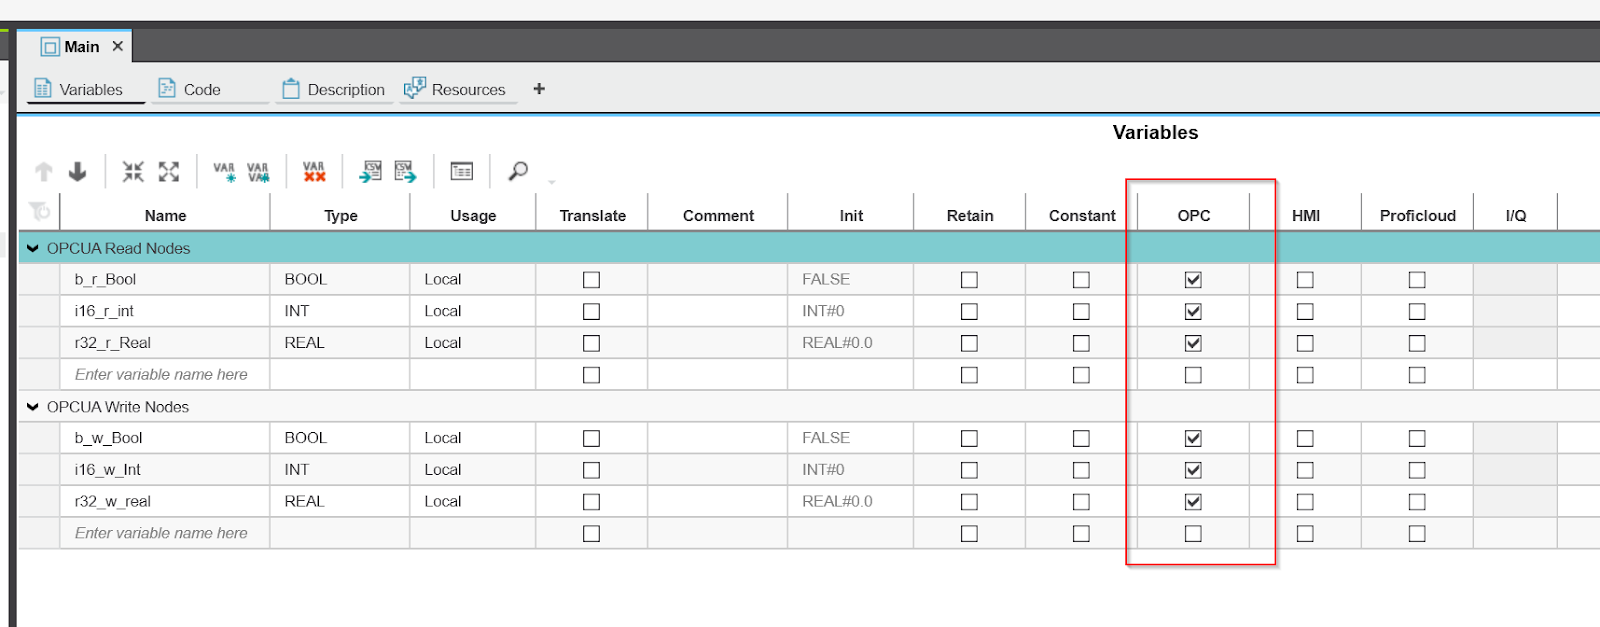
Define Variables
Next, Inside your plcnext Project, please define the AXCF3152 Nodes that can be accessed by OPC UA Server and the variables in the CPU, and then insert the OPC Checkbox.
Configure the OPC UA
Now open Project>OPC UA to change the OPC UA settings.
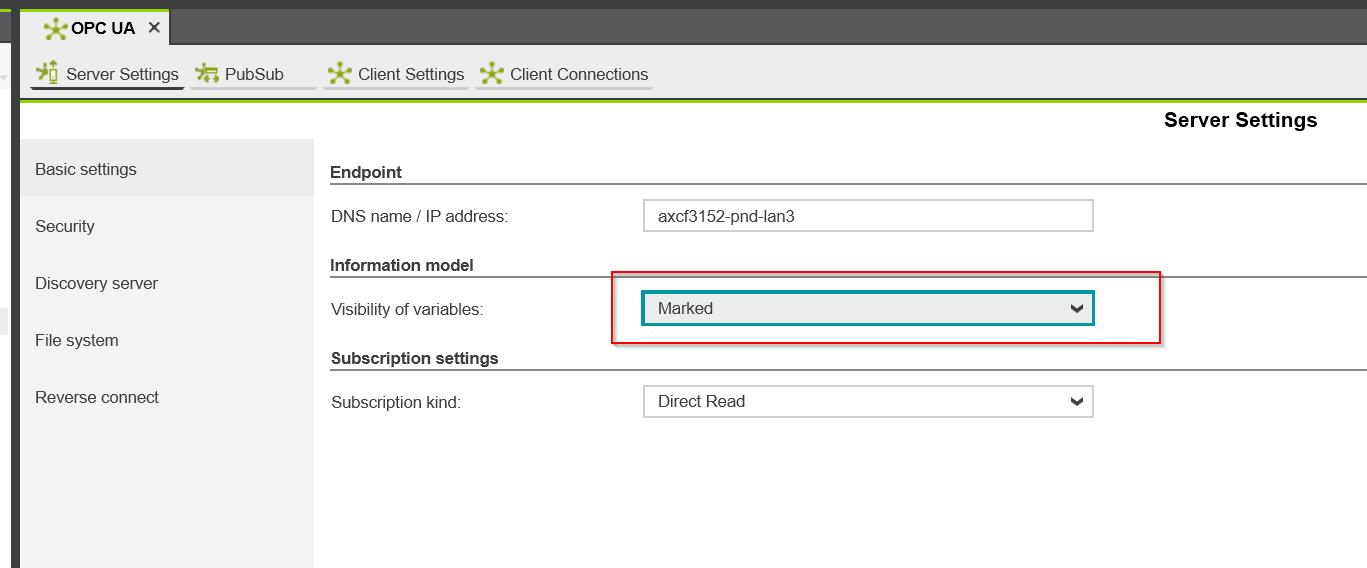
OPC UA Server
First, open the Tab in Server Settings.
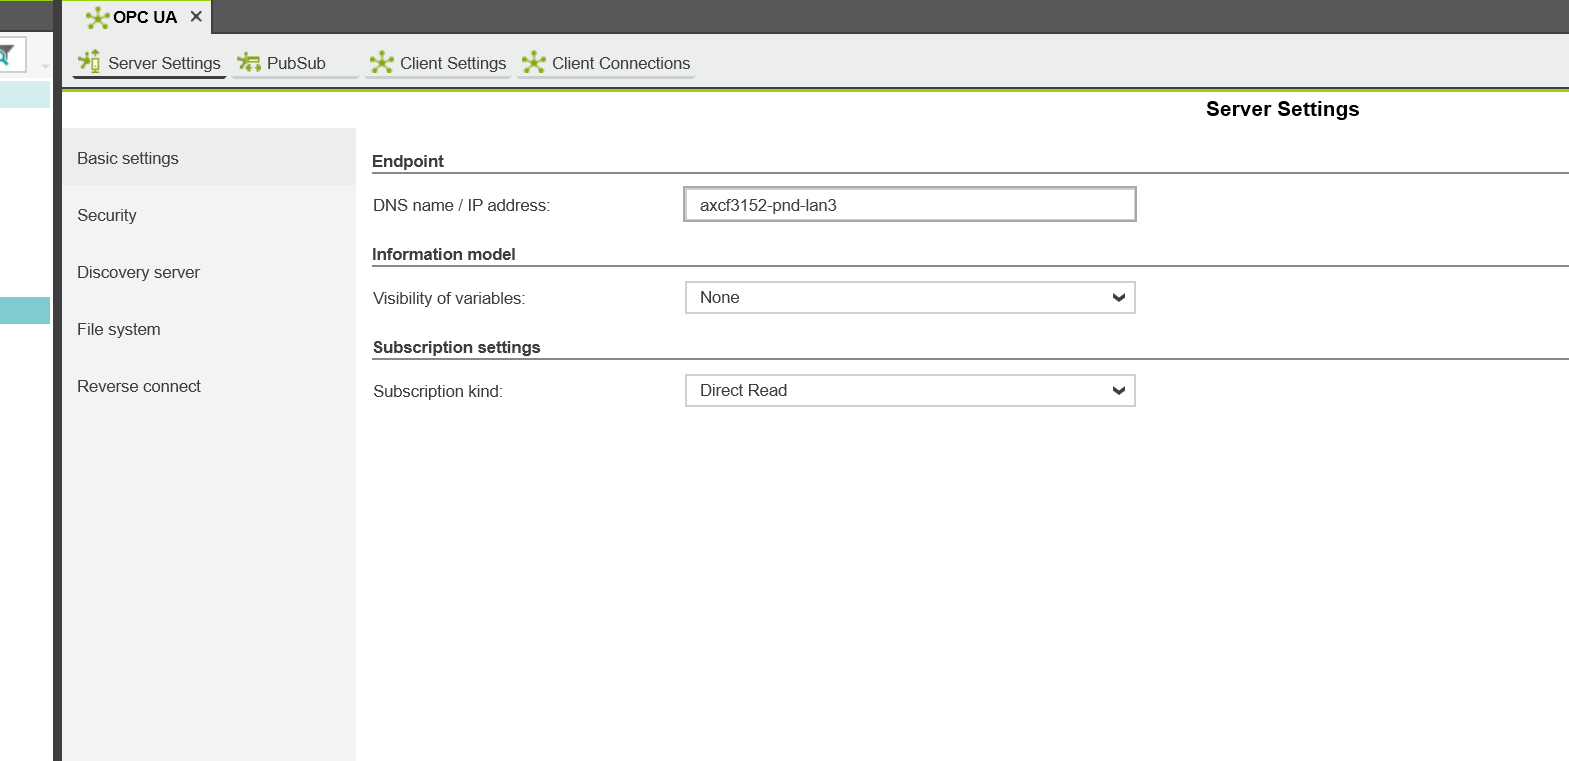
The Infomration model setting is set to Marked.
OPC UA Client
Set the OPC UA Client function of PLCNEXT.
Enable the Override Certificate Store Name feature if necessary.

Session Security should also enable the Override Security feature in some cases.
When connecting to Beckhoff TwinCAT’s OPC UA Server, only disable Application URI Check and Certificate Host Check detection.
Configure Connection
Open the Client Connections tab to build the OPC UA Server connection.
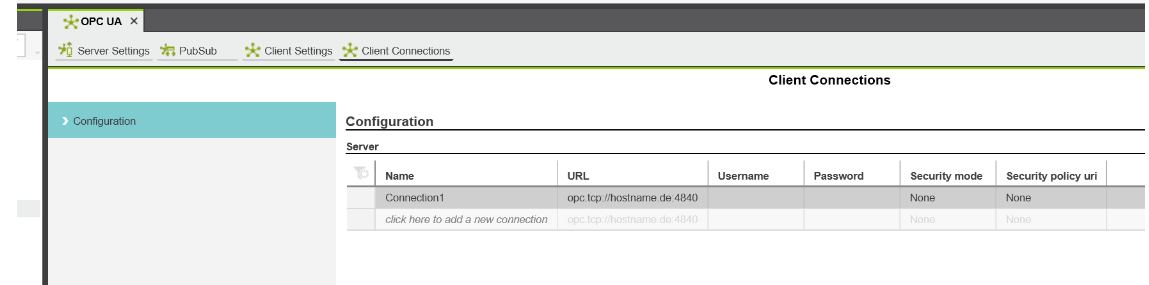
Siemens
First, configure the connection settings between AXCF3152 and Siemens OPC UA Server, where Name is the connection name of the corresponding Connections.
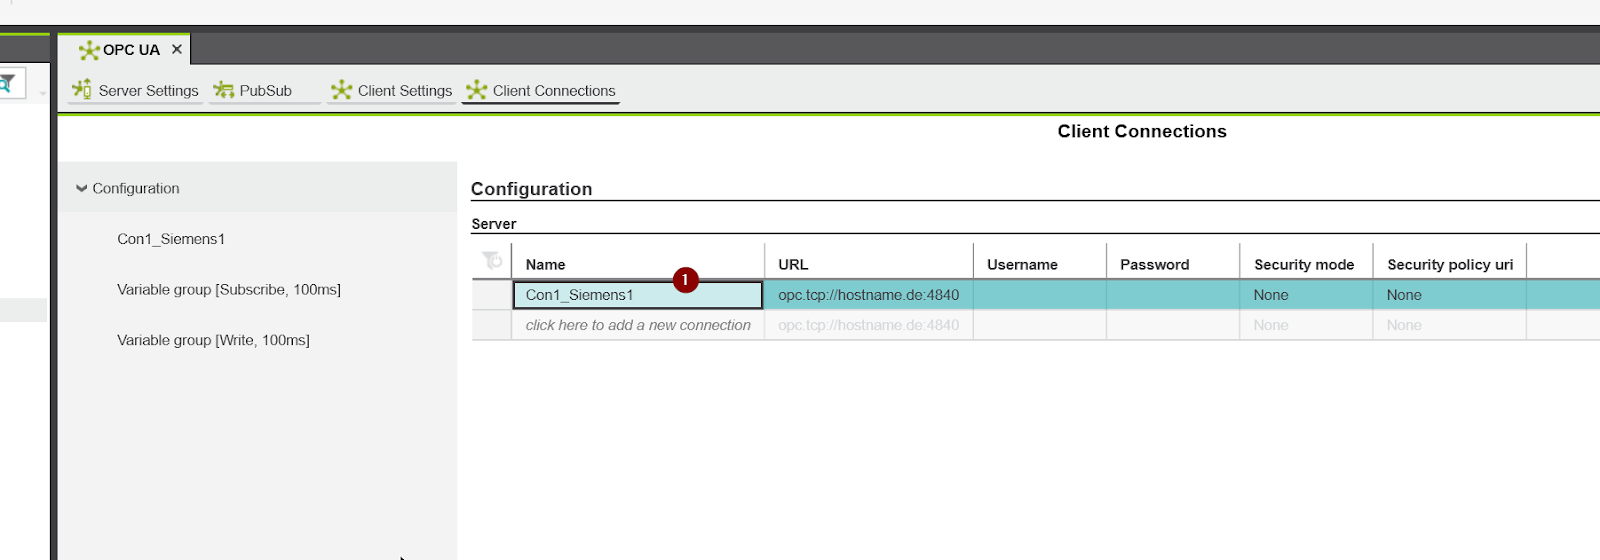
The URL is the URL of the Siemens OPC UA Server, which is opc:tcp://IP:port.

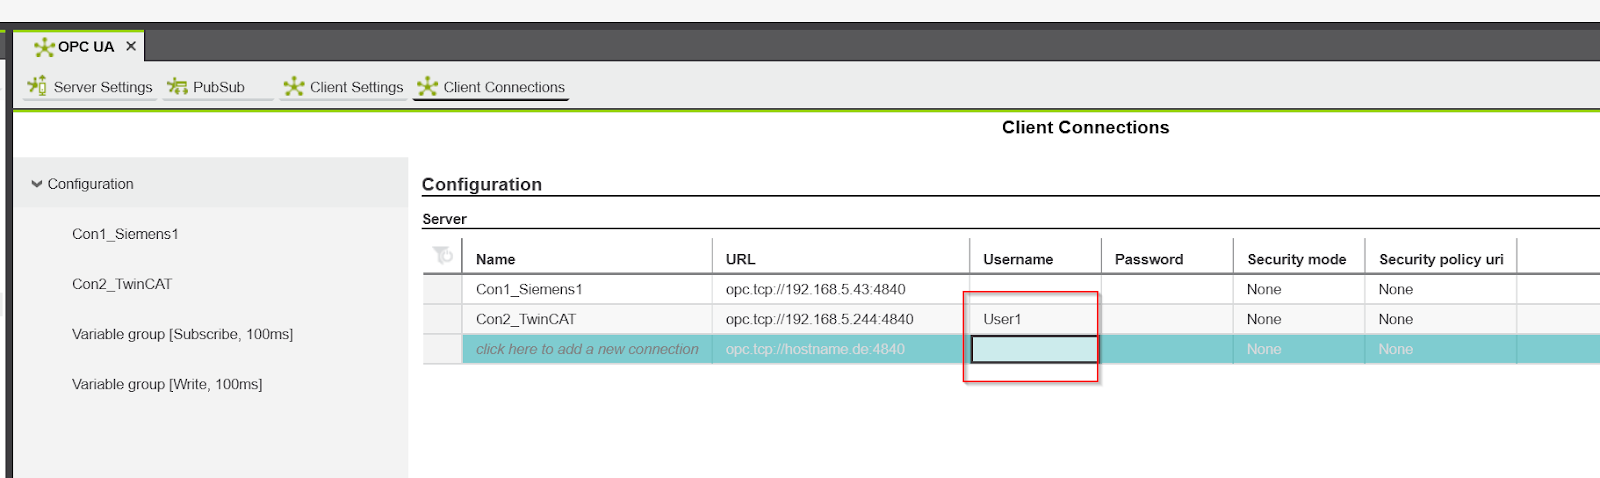
TwinCAT
Next is the OPC UA Server for TwinCAT, setting the Connection Name and URL.

Since TwinCAT is a User & Eync setup, enter the User name created in TwinCAT earlier in the Username Field.
For Password, enter the Password for User1 created in TwinCAT.
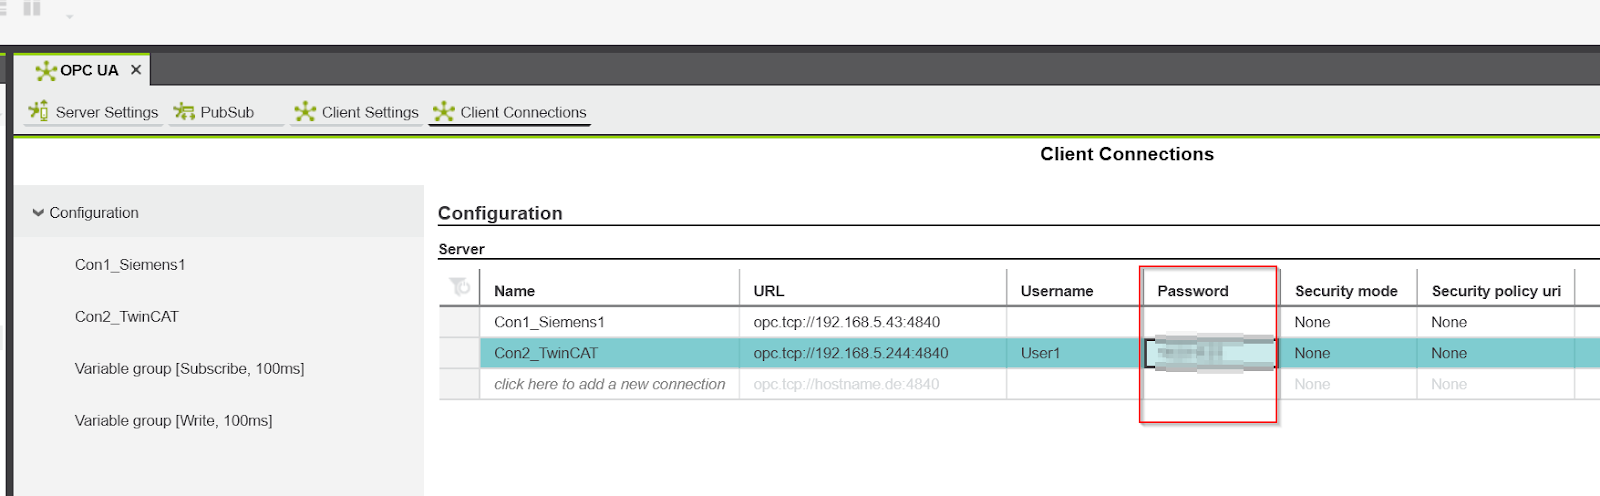
Security policy uri is set to Basic 256 SHA 256.

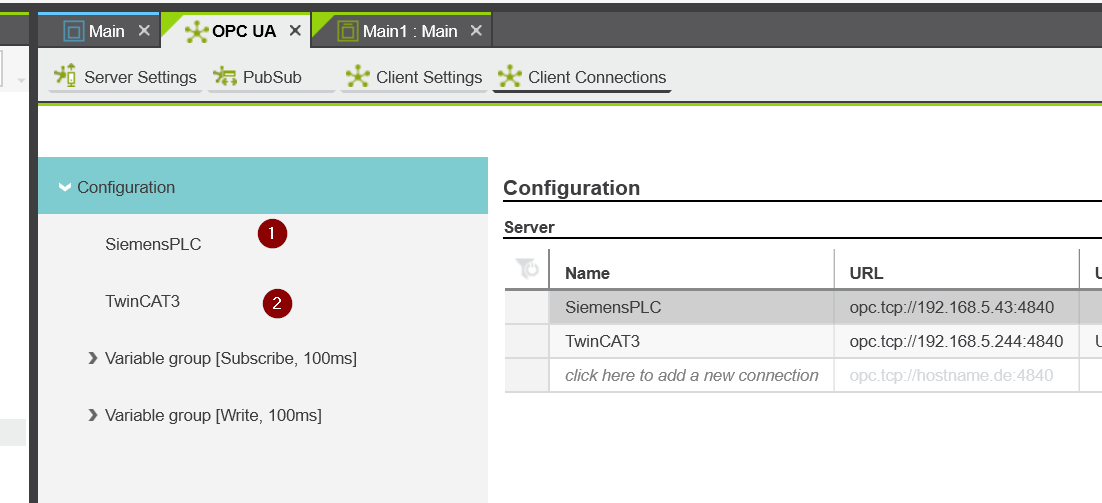
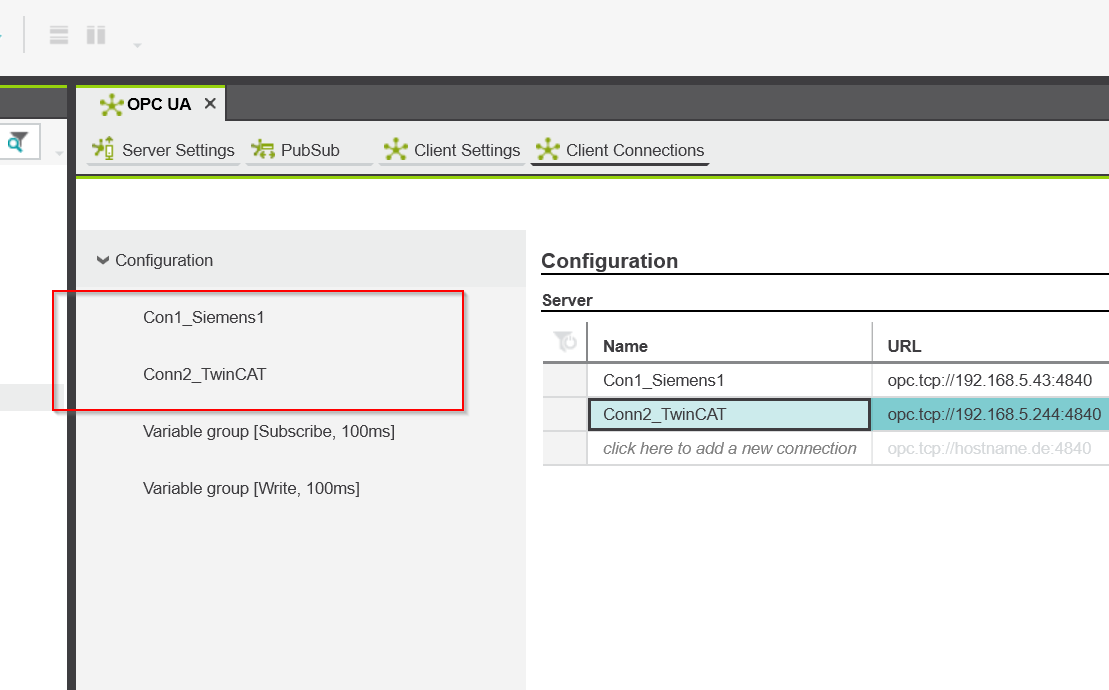
Two OPC UA Server Connections have been added under Configuration.
Variable Group-Subscribe
The next step is to set the variable to Subscribe, which will cause PLCNEXT to load the OPC UA Server’s Node. Below is a ScreenShot of UaExpert accessing TwinCAT’s OPC UA Server.
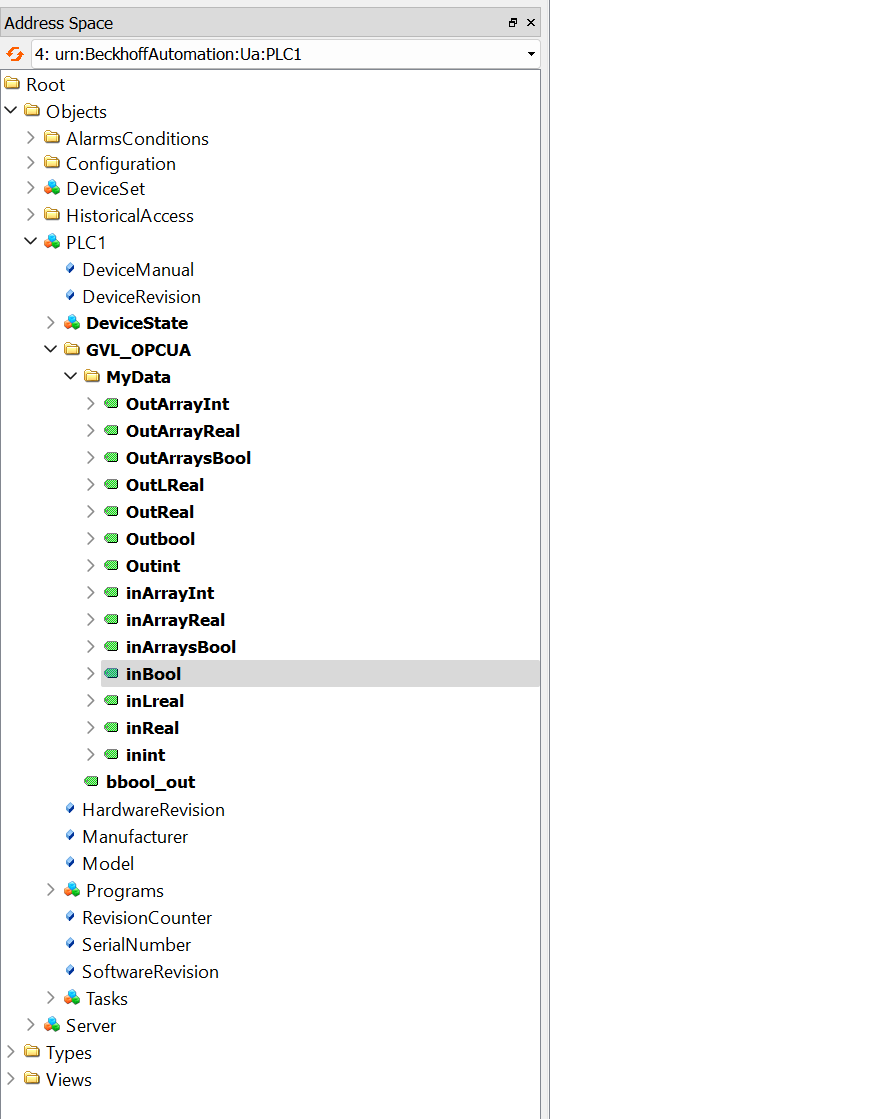
Node Attribute in GVL_OPCUA.MyData.OutReal, you can check the information of the corresponding Node, and you need to set those information according to PLCNEXT Engineering.
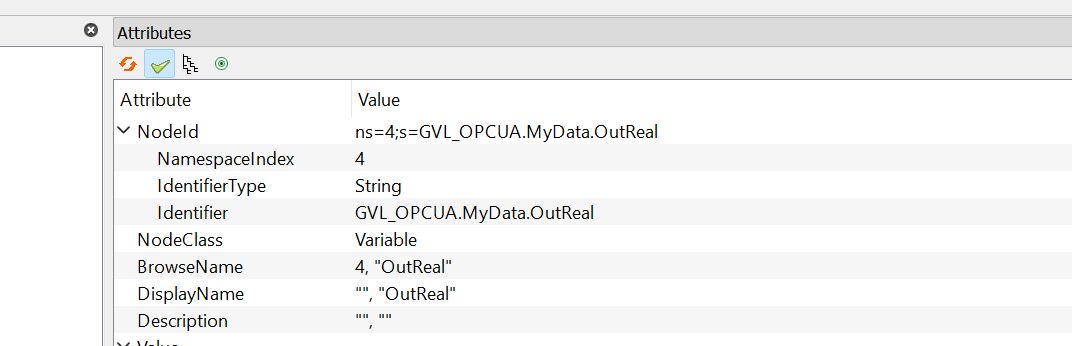
As shown in the figure below, the Remote variable Identifier corresponds to the “s=” portion of the Node Id, and the Remote variable namespace corresponds to the “ns=4 Remote variable namespace corresponds to the “ns=4” portion of Node Id.
The 4 in “ns=4” corresponds to 4:urn:xxxxxxxxx in the Address space drop list.
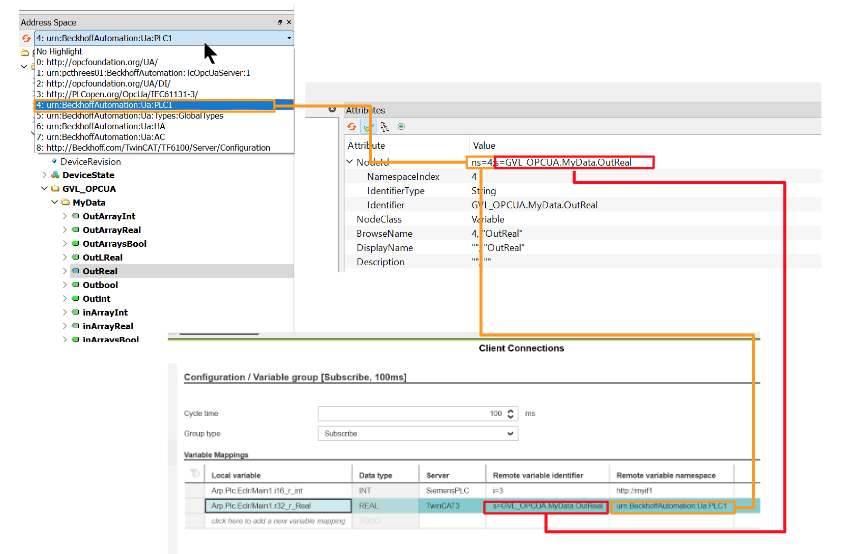
Finally, let’s link the Local Variable’s Field to the variable we have just defined.

Variable Group-Write
Write will cause PLCNEXT to write the OPC UA Server’s Node to a new value. As before, set the following Field.
- Local Variables: Variables to be tied inside PLCNEXT
- Remote Variable Identifier: “s=” part of Node Id
- Remote variable Namespace: “n=” part of Node Id

Cycle Time
Cycle Timeは実際のアプリケーションに合わせて設定しましょう。

Program
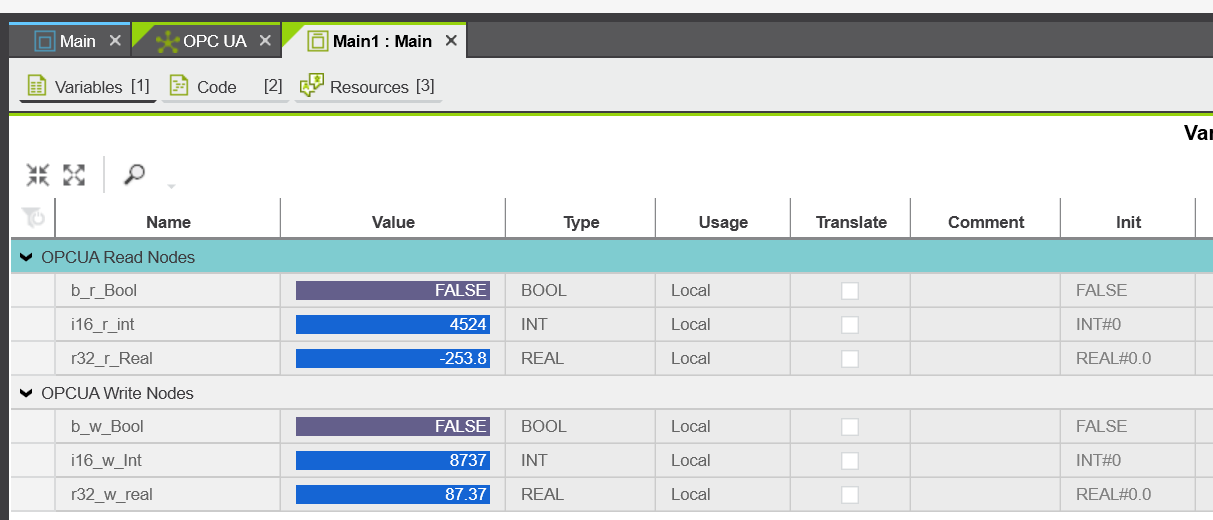
The final step is to create a simple verification program.
| i16_w_Int:=i16_w_Int+1; r32_w_real:=r32_w_real+0.01; if r32_w_real>=10000.0 THEN r32_r_Real:=0.0; end_if; |
Result
The Main program can read and write data to and from Siemens and TwinCAT’s OPC UA Server node.
AXCF3152 Web Server diagnostics screen to Filter to OPC UA Client with Monitoring connection; For Example,ConnectionId=”1″ and Monitoring connection;
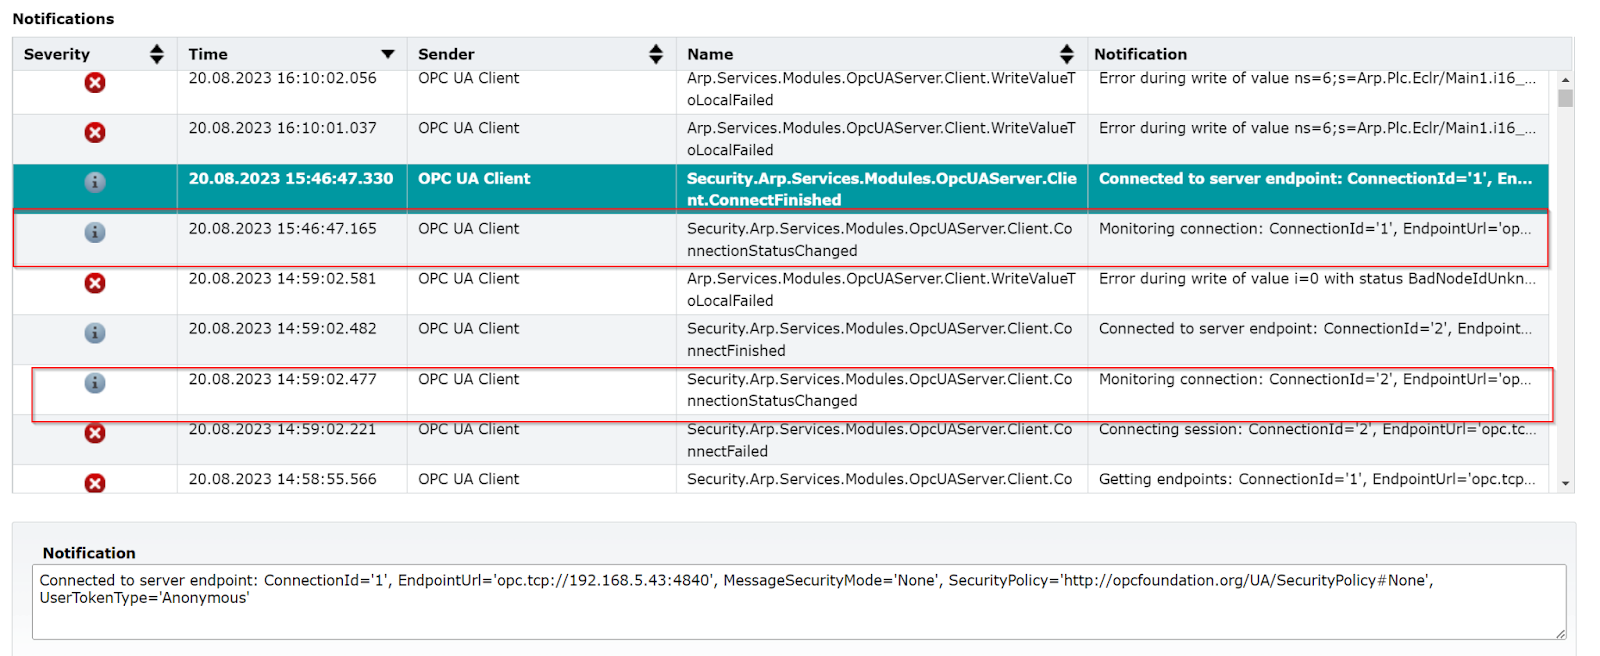
As shown in the figure below, Connection 1 is the first Siemens OPC UA Server and Connection 2 is the second Beckhoff TwinCAT3 OPC UA Server.