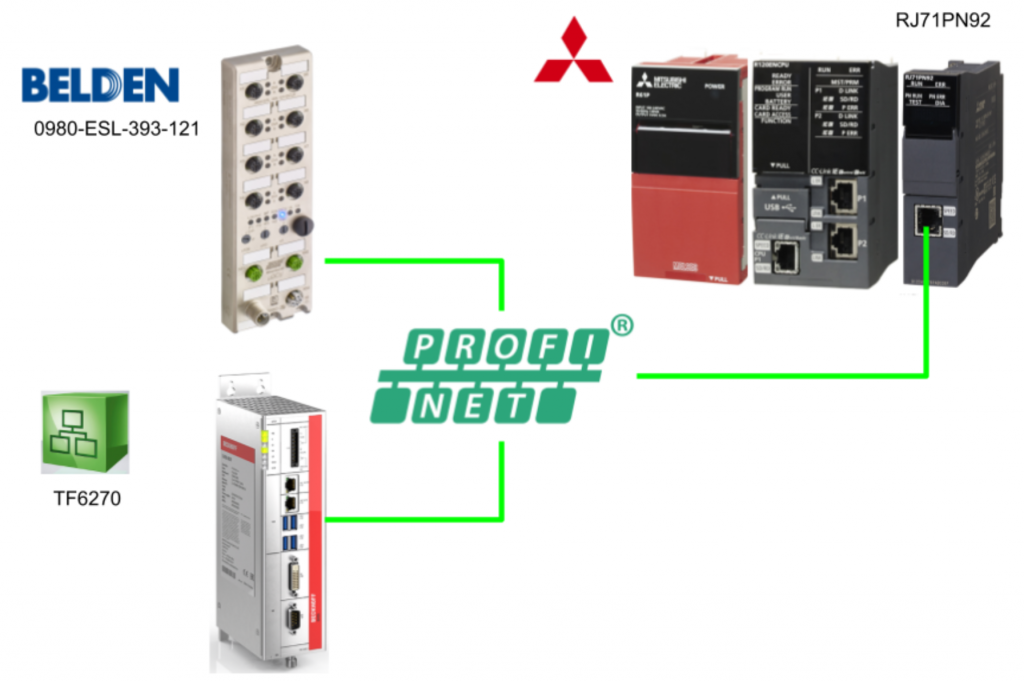
This Blog explains the procedure from step 1 to connect Beckhoff TwinCAT3 TF6270 and Belden’s multi-protocol Block IO with Profinet using Mitsubishi IQ-R’s RJ71PN92.
Let’s get started!
Foreword
Thank you from the bottom of my heart for visiting my technical blog and YouTube channel.
We are currently running the “Takahashi Chris” radio show with Full-san (full@桜 八重 (@fulhause) / X) which I deliver every Wednesday night.
Sharing, not hoarding, technical knowledge
We publish technical information related to factory production technology and control systems for free, through blogs and videos.
With the belief that “knowledge should be accessible to everyone,” we share practical know-how and real-world troubleshooting cases from our own field experience.
The reason we keep it all free is simple: to help reduce the number of people who struggle because they simply didn’t know.
If you’ve ever thought:
- “Will this PLC and device combination actually work?”
- “I’m having trouble with EtherCAT communication—can someone test it?”
- “I want to try this remote I/O, but we don’t have the testing environment in-house…”
Feel free to reach out!If lending equipment or sharing your configuration is possible, we’re happy to verify it and share the results through articles and videos.
(We can keep company/product names anonymous if requested.)
How can you support us?
Currently, our activities are nearly all unpaid, but creating articles and videos takes time and a proper testing environment.If you’d like to support us in continuing and expanding this content, your kind help would mean a lot.
Membership (Support our radio show)
This support plan is designed to enhance radio with Mr Full.
https://note.com/fulhause/membership/join
Amazon Gift List (equipment & books for content production)
Lists equipment and books required for content creation.
https://www.amazon.co.jp/hz/wishlist/ls/H7W3RRD7C5QG?ref_=wl_share
Patreon (Support articles & video creation)
Your small monthly support will help to improve the environment for writing and verifying articles.
https://www.patreon.com/user?u=84249391
Just trying to share things that could’ve helped someone—if only they’d known.
Your support helps make knowledge sharing more open and sustainable.
Thank you for being with us.
soup01threes*gmail.com
Technical knowledge shouldn’t be kept to ourselves.
Reference Link
Reference Video
Mitsubishi.Let’s Configure a Profinet Network with RJ71PN92 and Beckhoff TF6270
RJ71PN92?
The RJ71PN92 is an expansion communication module for Mitsubishi’s IQ-R.This module allows the Profinet IO Controller to stand up and communicate with multiple Profinet IO Devices.

Layout
This is the Layout for the RJ71PN92 module.

Flow
Here is the Time Chart for using RJ71PN92.

Download GSDML
Please download the GSDML File of IO Block corresponding to Belden’s Profinet/Ethernet/IP multi-protocol from the link below.
https://catalog.belden.com/index.cfm?event=pd&p=PF_0980ESL393121DCU1

GX Configurator-PN
GX Configurator-PN installation is required to set up a Profinet network for the RJ71PN92. Contact Mitsubishi Electric sales department for the GX Configurator-PN setup File.Please contact Mitsubishi Electric sales department for the setup file of GX Configurator-PN.
Launch SetupFile and proceed with Next>.

Enter brief personal information and proceed with Next>.

Set the location to Install and press Next> to proceed.

Start with Install.

wait for a while…

Let’s install Driver as well.

Done!

Finally, restart your computer.

Implementation
Beckhoff Side
Add Profinet Devices
Add a new device at I/O>Devices>Add New Item.

Select Profinet>Profinet I/O Device(RT) and press >Ok to proceed.

Set the Ethernet Interface to be used as the Profinet Device.

Configure Task
To add a dedicated Task for Profinet Devices communication, select Sync Task>Special Sync Task>Create new I/O Task.

Enter a Task name and press >Ok to proceed.

Done!Next, set the Task update time in Cycle Ticks.Note that if the Clock of the Profinet Controller is lower than that of the Profinet Devices, it is likely to be Timeout.

Add New PNTC Device
Next, to define the data to be communicated with Mitsubishi’s module, go to Device 1>Right click>Add New Item.

Select PNTC Device and press >Ok to proceed.

This is the screen for setting the Profinet Version.

Configure Slots
API>Add New Item to define the data exchange area for each Slot in the Beckhoff TwinCAT3 API.

The Device Configuration screen will appear, so define a Slot for your application.In this article, we have defined Modules from Slot1-3.

Slot1
Slot 1 has 64 words of input/output.

Slot2
Slot 2 has 10 Float32 inputs and outputs.

Slot3
Slot 3 will have 100 DWord input/output.

Generate GSDML
Finally, open the GSDML Generator tab and click “Create GSDML from original” to generate a GSDML file.

Add PLC
Now to add a PLC project, go to PLC>Right click>Add New Item.

Choose Standard PLC Project > Add to add a PLC project.

Add DUT
Create a structure so that variables to be associated with Process Input/Output can be defined all at once.

Sets the name of the structure.

This is the data area to be replaced with Mitsubishi’s RJ71PN92 Profinet IO Controller.In this article, the input and output are the same size, so the definition will be done only once.
| TYPE DUT_dataExchange_Mels : STRUCT dataWords:ARRAY[0..63]OF WORD; dataFloat:ARRAY[0..9]OF REAL; dataDWord:ARRAY[0..99]OF DWORD; END_STRUCT END_TYPE |
Add GVL
Next, to add a Global Variable List, right click>Add>Global Variable List.

Defines the name of the GVL.

Using the structure defined earlier, define variables to exchange data with Mitsubishi’s RJ71PN92 module.
| {attribute ‘qualified_only’} VAR_GLOBAL dataFromMels AT %I*:DUT_dataExchange_Mels; dataToMels AT %Q*:DUT_dataExchange_Mels; END_VAR |
MAIN
This is the MAIN program, which uses the TwinCAT3 library to generate random numbers and write data to each register.
| PROGRAM MAIN VAR i:INT; rand:DRAND; nrand:REAL; END_VAR rand(); nrand := rand.Num*5.0; FOR i := 0 TO 99 BY 1 DO GVL_data.dataToMels.dataDWord[i] := REAL_TO_DWORD(100.0*nrand*(i+1)); END_FOR FOR i := 0 TO 9 BY 1 DO GVL_data.dataToMels.dataFloat[i] := 10.0*nrand*(i+1); END_FOR FOR i := 0 TO 63 BY 1 DO GVL_data.dataToMels.dataWords[i] := i+1; END_FOR |
Activate Configuration
Download your project to the CPU with Activate Configuration.

OK to proceed.

Proceed with Yes.

If you are missing a license, enter the magic code.

Switch TwinCAT Runtime to Run Mode.

Login
The next step is to Login.

Proceed with Yes.

Finally, Start makes the program Run.

GXWORKS3 Side
Module Configuration
First, build the Module Configuration.

R35B
Add Rack Module R35B.

R61P
Next, add the R61P power module.

CPU
Now pull the R04EU CPU that was added when the project was created into the CPU Slot.

Done!

CPU Ext
This is the R04ENCPU used in this project, but there is one expansion module next to it, and in fact this CPU occupies two slots.So, in Module Configuration, we need to build the adjacent expansion module as well.

There are four _RJ71EN71 Slots in the CPU Extenstion, so add the appropriate Slot for your actual application.

Done!This time we added _RJ71EN71(E+IEF).

RJ71PN92
Finally, please add RJ71PN92, the main subject of this article.

Done!

Add System Label
If you want to use labels, which is not a Must in this Step, you can add CPU labels by going to Module Label>Right click>Add Module Label.

Module Parameter
Next, double-click RJ71PN92>Module Parameter to set the parameters for RJ71PN91.

Set the module’s Ip address and Subnet to match your application.

Next, let’s also set the Controller name for RJ71PN91.

PROFINET Module Setting
Now double-click PROFINET Module Setting to build the Profinet network.

Once you have installed the GX Configurator PN mentioned earlier, the tool will launch automatically.

Add GSDML
To build a PROFINET network, a GSDML File is required. Click on the red arrow button to add the GSDML File.

The GSDML Management screen will appear and proceed with Next>.

Choose Add File(s), set the location where GSDML is stored in Browse, and press Next> to proceed.

Open the GSDML File that was just exported by Beckhoff TwinCAT3.

Proceed with Next>.

GSDML File is now installed.

Done!Click “Finish” to exit.

The TwinCAT Device you just added appears in the Device Library.

Use the same operation to add Belden’s Profinet IO Block.

Add Devices
Drop the TwinCAT Profinet device from the Device Library and add it to the PROFINET network.

The Profinet Device configuration screen appears.

Device Name
To build a Profinet network, each IO Device also needs a device name, and the Device Name here is the device name.Let’s set it up according to the actual application.

IP Address
This is the IP address of the Profinet IO device.

When a device number is set from the Number’s Drop-List, the corresponding number is reflected in the number at the end of the IP address.For example, if Number is set to 99 as shown in the figure below, the IP address of this Profinet IO Device will be 192.168.5.99.

Activate Configuration
By default, the “Active Configuration” check box is set, but let’s check it again just to be sure.

Module Configuration
In Module Configuration, the GSDML File to be used this time also does not require any special settings since the area of each Slot has already been determined.In case of Profinet IO Device, which can be freely configured, the IO Device side of Profinet must match the Slot Configuration you have built.

Parameters
Parameters can be set for the sequence of bytes (Device Data Order), communication cycle (Refresh Period), and number of timeout visits (Watchgod Factor, Refresh Period x Watchdog Factor = actual Watchgod time).The following settings can be configured

In this case, a 1 ms cycle is set.

Result
Add or set up the Belden device using the same operation as before.

Save
When you have finished building the Profinet IO Device, save the configuration.

MAIN
This is the Main program used in this article.
| bPNConectOKTwinCAT3 Bit VAR iCounter Word [Signed] VAR |
This program feeds back data received from RJ71PN92 directly to TwinCAT.It also monitors the inputs of the Belden module and turns on the emergency stop lamp when input 0 and input 1 are True.
| glRJ71PN92_1.stMgmtOutputs.bReq_DataExchangeStartRequest:= glRJ71PN92_1.stMgmtInputs.bSts_ConfigurationStatus; bPNConectOKTwinCAT3:=glRJ71PN92_1.stMgmtInputs.bnSts_IODevicesConnStatus[99]; glRJ71PN92_1.SLV099SLOT001DataStructOut.SLOT001_1_WORD_OUTPUT:= glRJ71PN92_1.SLV099SLOT001DataStructIn.SLOT001_1_WORD_INPUT; glRJ71PN92_1.SLV099SLOT001DataStructOut.SLOT001_1_WORD_OUTPUT62:= glRJ71PN92_1.SLV099SLOT001DataStructIn.SLOT001_1_WORD_INPUT62; glRJ71PN92_1.SLV099SLOT002DataStructOut.SLOT002_1_FLOAT32_OUTPUT:= glRJ71PN92_1.SLV099SLOT002DataStructIn.SLOT002_1_FLOAT32_INPUT; glRJ71PN92_1.SLV099SLOT002DataStructOut.SLOT002_1_FLOAT32_OUTPUT8:= glRJ71PN92_1.SLV099SLOT002DataStructIn.SLOT002_1_FLOAT32_INPUT8; glRJ71PN92_1.SLV099SLOT003DataStructOut.SLOT003_1_DWORD_OUTPUT:= glRJ71PN92_1.SLV099SLOT003DataStructIn.SLOT003_1_DWORD_INPUT; glRJ71PN92_1.SLV099SLOT003DataStructOut.SLOT003_1_DWORD_OUTPUT98:= glRJ71PN92_1.SLV099SLOT003DataStructIn.SLOT003_1_DWORD_INPUT98; glRJ71PN92_1.SLV111SLOT001DataStructOut.SLOT001_8_BIT_OUTPUT_DATA[0]:= (glRJ71PN92_1.SLV111SLOT001DataStructIn.SLOT001_16_BIT_INPUT_DATA[0] AND glRJ71PN92_1.SLV111SLOT001DataStructIn.SLOT001_16_BIT_INPUT_DATA[1] ) AND RCPU.stSM.b1sClock ; ; |
Update Label
The item names and associated global labels and structures registered by IO devices from GX Configurator-PN must be manually updated in GXWORKS3 to reflect them in the project.
Right-click on the module>Update PROFINET Label.
The item names and associated global labels and structures registered by IO devices from GX Configurator-PN must be manually updated in GXWORKS3 to reflect them in the project.
Right-click on the module>Update PROFINET Label.

A Sheet named Global_PN92_1 will be added to the Global Label Folder.

glRJ71PN92_1というGlobal Labelがあり、先程Update Labelの操作でGlobal Labelが更新されました。

All inputs and outputs of the Profinet device built with RJ71PN92 inside were also defined.

Autorefresh Settings
Next, when the RJ71PN92 Profinet IO Controller and each Profinet Device exchange input/output data, where memory address should be set in the CPU.
Right click on the module>Autorefresh Settings.

Output device (IQ-R -> PN Controller) specifies the memory address in the CPU when outputting to the CPU side RJ71PN92 Profinet Controller.In the figure below, User CPU Device is set to w0, which means that w0 to w189 is the output data area of CPU->RJ71PN92.

Input device(IQ-R <ー PN Controller)はRJ71PN92 Profinet ControllerがCPU側に出力するとき、CPU内のメモリ番地を指定します。下図ではUser CPU Deviceをw0に設定しましたので、つまりw3Aからw2A6まではCPU‐>RJ71PN92の出力データ領域になります。
それらの設定はすべてGXWORKS3が自動で行うので、特に手動で設定する必要がありません。

Show I/O Mapping
The Show I/O Mapping function allows the user to see where each I/O data is located in the CPU.

The OS Default Browser is automatically launched, and now you can check Profinet’s mapping.

PROFINET DUT
This is the meaning of the structure automatically generated by GXWORKS3.
- Global labels with names beginning with “Global_PN92” are structures for control and status checks related to Profinet.
- Structures with names beginning with “stSLV” are structures defined for each Profinet Devices input/output structure.

Those structures are used in RJ71PN92_1.

Compile
最後はプロジェクトをコンパイルしましょう。

Download
Download your project to the CPU with Write to PLC.

Don’t forget to check the Checkbox of the PROFINET Module when downloading.

Reset Power
Turn the CPU back on when the project download is complete.
Assign Device Name
Finally, to assign a Device Name to each Profinet Device, launch GX Configurator-PN one more time and click Network Delection>Online Action.

The RJ71PN92 automatically searches for Profinet devices in the network.

Done!

Select a Profinet device and enter the Profinet Device Name in the >Name Field and assign the Profinet Name via DCP in the Apply Name field.
You can save the saved settings to non-volatile memory by putting a Checkbox in the Pemanent Name.In other words, the settings will be retained even if power is lost.

Result
You can check the status of each Profinet Devices at Devices>Start Console Diagnostic.

Done!The Profinet Device of Beckhoff TwinCAT3 and the Profinet IO of Belden also have a green ICON, that is, they are currently in good communication.

Click on Profinet Devices, and the Connection Information Tab allows you to check the Connection State.

The I/O Data Tab allows you to view data between the Profinet IO Controller and IO Devices.

The data transmitted from TwinCAT3 was also confirmed.

Let’s check the TwinCAT3 side as well: click on the PnIoBoxState variable.

Current State=5, i.e., 0x0001 and 0x004, indicating that Devices is currently in the IO data exchange state.

It was also confirmed by the input signal of the Belden Profinet IO Block.

This is the LED state when the RJ71PN92 communicates normally.

This is the LED state when the Belden Profinet IO Block communicates normally.

This video shows the Belden Profinet IO controlled from the RJ71PN92.
Download
Download the project for this article from this Link.
https://github.com/soup01Threes/GXWROKS/blob/main/Project_RJ71PN92.gx3