Welcome to my blog!
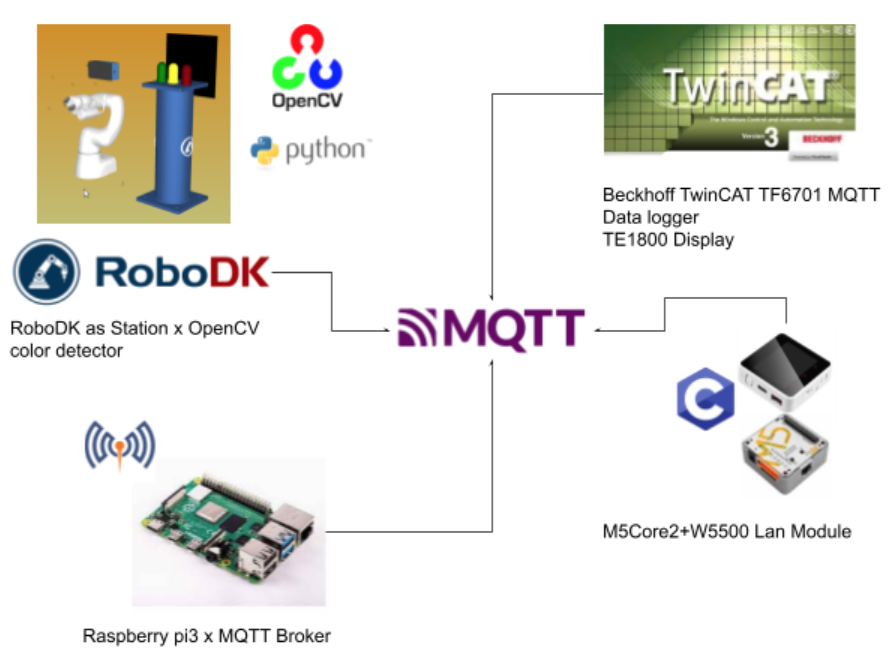
This is my other self-project to use RoboDK as a main station – operate the robot and indicate the current status by LED Towner, we will use opencv to implement a color detector in python to detect Red/Yellow/Green Colors ,and publish these statuses via MQTT.
Beckhoff TwinCAT TF6701 is used to subscribe to the topic also and implement a Data logger,Finally, A M5Core2+W5500 Lan Module will also subscribe to the topics from MQTT Broker that are built from Raspberry-pi3.
There are some goals in this project and I will explain them step by step;
- Create a RoboDK station with LED Tower display
- Play with the RoboDK 2D Camera simulation interface
- understand the opencv-python
- how to read the images from filesystem
- how to read the images from RoboDK
- What is the RGB/HSV Color Model?
- how to make a color detector?
- how to draw the Contours?
- implement the python MQTT Client
- understand and program the Beckhoff TwinCAT Function TF6701
- Get the local-time and shifting the data 1 by 1 in the logging function
- setup the MQTT Broker in Raspberry-pi3
- setup the M5Stack Lan Module
- Implementing the MQTT Client with M5Stack in C Language
Other Project
Here is my other project;)
Please feel free to access it.
Color Detecor
Opencv installation
Please use this command to install Opencv in your machine.
| pip install opencv-python |
if Trouble
Concept
Now I will explain some basic concepts in opencv and skills that are used in this tutorial.
Import images/Show
Here is a sample code to import an image into opencv and show it.
| import cv2 import numpy as np # Reading the image img = cv2.imread(‘image.jpg’) # Showing the output cv2.imshow(“Image”, img) cv2.waitKey(0) cv2.destroyAllWindows() |
You would see the image like this.
RGB color model
RGB color values are supported in all browsers.
An RGB color value is specified with: rgb(red, green, blue).
Each parameter (red, green, and blue) defines the intensity of the color as an integer between 0 and 255.
For example, rgb(0, 0, 255) is rendered as blue, because the blue parameter is set to its highest value (255) and the others are set to 0.

please reference w3c school to get more information
https://www.w3schools.com/colors/colors_rgb.asp?color=rgb(253,%20205,%20161)
Becareful!
In Opencv, the sequence is not RGB and BGR.
RGB Calculator
You can find thousands of RGB simulators on the internet and please practice by yourself;)
https://www.w3schools.com/colors/colors_rgb.asp

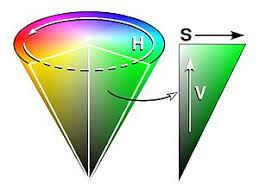
HSV Model
The HSV color model shares most of its properties with HSL. (It is recommended that you read about HSL first as this page will build on the page about HSL).
The range is 0-360 ,0-100%,0-100%.
Hues are the three primary colors (red, blue, and yellow) and the three secondary colors (orange, green, and violet) that appear in the color wheel or color circle. When you refer to hue, you are referring to pure color, or the visible spectrum of basic colors that can be seen in a rainbow.
Color saturation is the purity and intensity of a color as displayed in an image. The higher the saturation of a color, the more vivid and intense it is. The lower a color’s saturation, or chroma, the closer it is to pure gray on the grayscale. Learn more about saturation in our guide here.
Color value refers to the relative lightness or darkness of a color. We perceive color value based on the quantity of light reflected off of a surface and absorbed by the human eye. We refer to the intensity of the light that reaches the eye as “luminance.”
Please reference this link to get more information:
http://color.lukas-stratmann.com/color-systems/hsv.html
Becareful!
For HSV in opencv, hue range is [0,179], saturation range is [0,255], and value range is [0,255]. And different software uses different scales.
HSV Calculator
You can find thousands of HSV simulators on the internet and please practice by yourself;)
http://color.lukas-stratmann.com/color-systems/hsv.html

Mask
We will use HSV instead of RGB Model to detect the color in the image.
Here is a table to show the range of Red,Green and Blue.
| Rnage | Range in Opencv | |
| Red | 0-60,300-360 | 0-30,150-179 |
| Green | 60-189 | 30-90 |
| Blue | 180-300 | 90-150 |
Sample
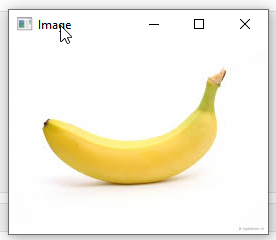
Here is an example to show you how to detect the yellow color in a banana image.
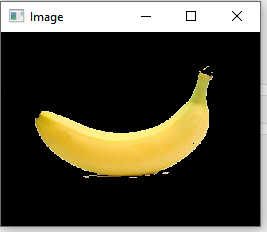
we will set the lower_bound and upper_bound of the yellow color as a numpy and create a mask to filter it.
| import cv2 import numpy as np # Reading the image img = cv2.imread(‘image.jpg’) # convert to hsv colorspace hsv = cv2.cvtColor(img, cv2.COLOR_BGR2HSV) # lower bound and upper bound for Green color lower_bound = np.array([20, 50, 50]) upper_bound = np.array([100, 255, 255]) # find the colors within the boundaries mask = cv2.inRange(hsv, lower_bound, upper_bound) # Segment only the detected region segmented_img = cv2.bitwise_and(img, img, mask=mask) cv2.imshow(“Image”, segmented_img) cv2.waitKey(0) cv2.destroyAllWindows() |
Good, here is the banana!
Contours
Contours are the concepts that I explained in the last tutorial with Beckhoff Tc3_Vision.
Please reference this tutorial to get more information:
Sample
In the previous sample, we detected the yellow color in a banana image. Now we will draw the Contours inside the image.
| import cv2 import numpy as np # Reading the image img = cv2.imread(‘image.jpg’) # convert to hsv colorspace hsv = cv2.cvtColor(img, cv2.COLOR_BGR2HSV) # lower bound and upper bound for Green color lower_bound = np.array([20, 50, 50]) upper_bound = np.array([100, 255, 255]) # find the colors within the boundaries mask = cv2.inRange(hsv, lower_bound, upper_bound) # Segment only the detected region segmented_img = cv2.bitwise_and(img, img, mask=mask) # Find contours from the mask contours, hierarchy = cv2.findContours(mask.copy(), cv2.RETR_EXTERNAL, cv2.CHAIN_APPROX_SIMPLE) output = cv2.drawContours(segmented_img, contours,-1,(0,255,0),3) # Showing the output cv2.imshow(“Output”, output) cv2.waitKey(0) cv2.destroyAllWindows() |
Contours is drawn.

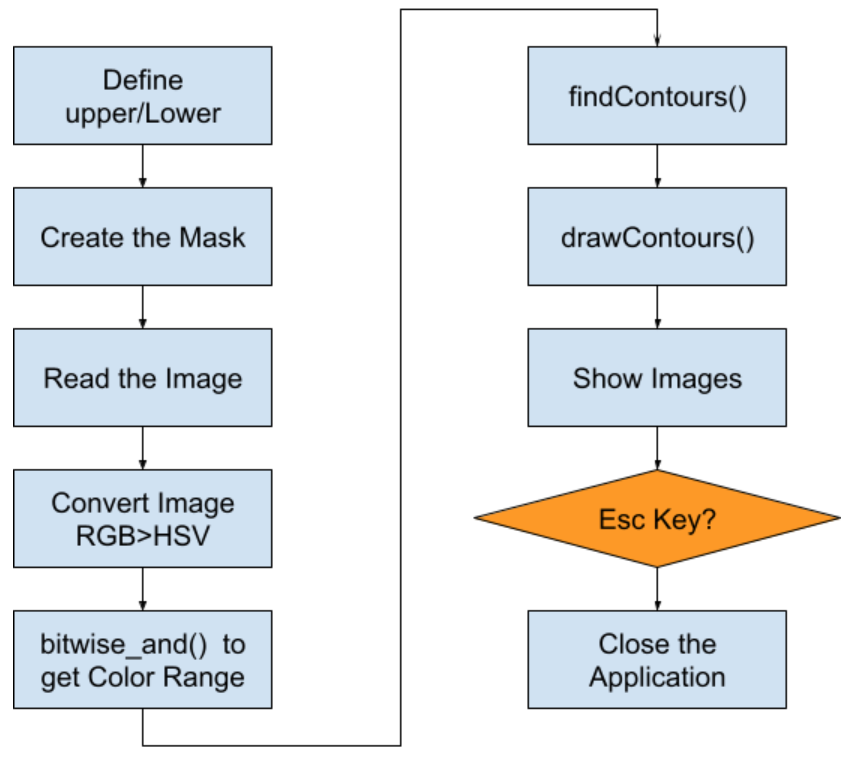
WorkFlow
Finally, you can follow this flow to do the color detector.
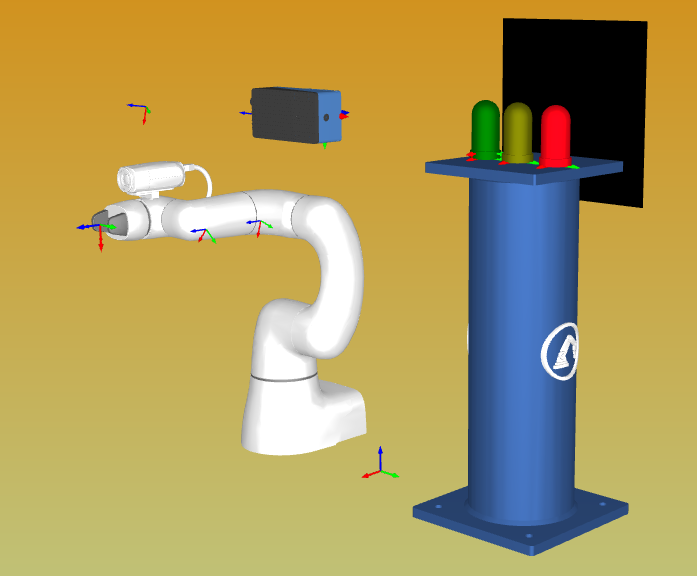
RoboDK Side
Here is the RoboDK station, Camera,3 colors of Signal Tower and A Robot.
In this tutorial I will just start the Robot program manually(click the robot program).
If you want, please follow my reference link to program your station to start it from PLC/Other Devices.
Reference Link
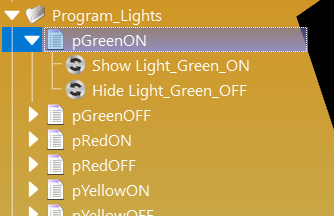
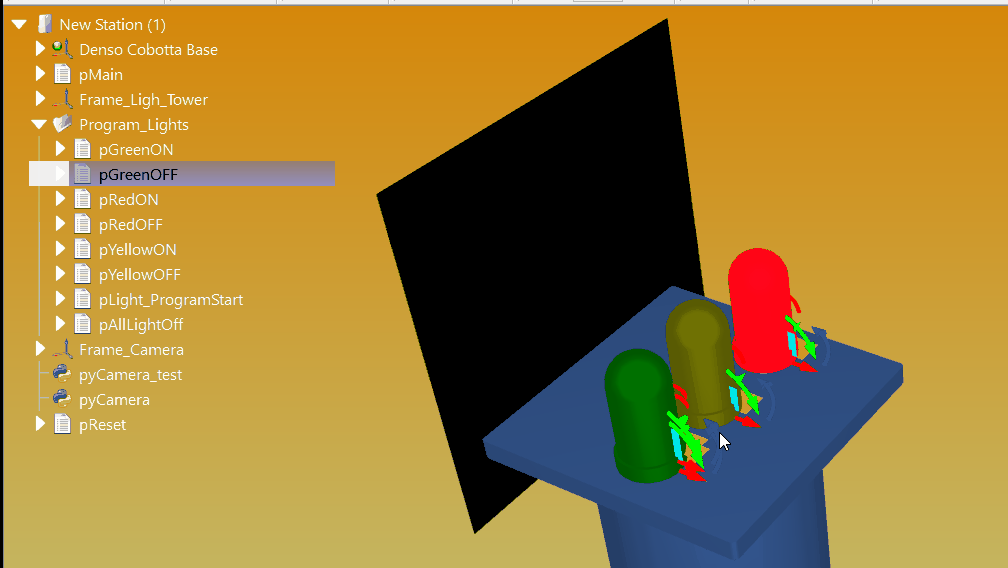
Light Tower Signal
Here is the tutorial that shows you how to create the Light ON/OFF control.
The Idea is very easy – Place a Light with deep color and place another one with light color.
Finally, using Event to Show/Hide the objects.
Red
Here is the Red Color.

Yellow
Here is the Yellow Color.

Green
Here is the Green Color.
Signal Flow
The Color tower will be turned on with different colors, depending on the status of the Robot.
If the Robot Program is started>Green will be on,Yellow and Red will be off.
If the Robot Program is started and the status is waiting for IO_5>Yellow will also be on.
If the Robot Program is started and the status is passed for the IO_5 waiting Step, Yellow will be off.
If the Robot Program ends>Green will be off and red will be on.

WorkFlow
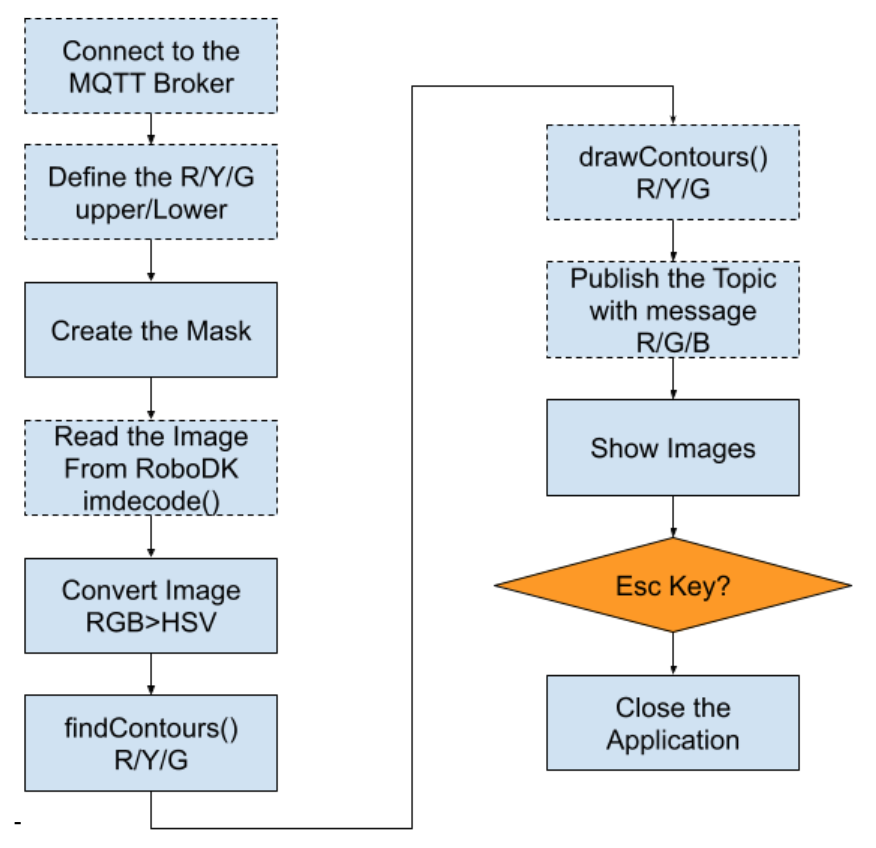
The working Flow of the Color Detector is integrated into the program from the previous opencv program,and also adds the features of publishing the topic to an MQTT Broker.
The topic would be the current status of Lamp Tower.
–
Code
Here is the Code in RoboDK to implement a Color detector and MQTT Client.
| from robodk import robolink # RoboDK API from robodk import robomath # Robot toolbox import cv2 import numpy as np import paho.mqtt.client as mqtt #MQTT Client def on_connect(client,userdata,flag,rc): print(‘Connected with result code ‘+str(rc)) client.subscribe(‘RoboDK/Station/s1/Lamp/Red’) def on_disconnect(client,userdata,flag,rc): if rc !=0: print(‘Something Wrong..’) def on_publish(client,userdata,mid): print(‘publish: {0}’.format(mid)) RDK = robolink.Robolink() count=0 CAM_NAME=’Camera1′ # GREEN_LOWER_BOUND=np.array([40, 150, 150]) GREEN_HIGHER_BOUND=np.array([100, 255, 255]) RED_LOWER_BOUND=np.array([130, 150, 150]) REG_HIGHER_BOUND=np.array([179, 255, 255]) YELLOW_LOWER_BOUND=np.array([20, 150, 150]) YELLOW_HIGHER_BOUND=np.array([35, 255, 255]) cam_item = RDK.Item(CAM_NAME) if not cam_item.Valid(): raise Exception(“Camera not found! %s” % CAM_NAME) cam_item.setParam(‘Open’, 1) # Force the camera view to open BROCKER_URL=’192.168.1.50′ BROCKET_PORT=1883 MQTT_BASIC_TOPIC=’RoboDK/Station/s1/’ #———————————- # Settings PROCESS_COUNT = 300 # How many frames to process before exiting. -1 means indefinitely. client=mqtt.Client() client.on_connect=on_connect client.on_disconnect=on_disconnect client.on_publish=on_publish client.connect(BROCKER_URL,BROCKET_PORT,60) while count < PROCESS_COUNT or PROCESS_COUNT < 0: Green,Red,Yellow=False,False,False print(“=============================================”) print(“Processing image %i” % count) count += 1 #———————————————- # Get the image from RoboDK bytes_img = RDK.Cam2D_Snapshot(“”, cam_item) if bytes_img == b”: raise # Image from RoboDK are BGR, uchar, (h,w,3) nparr = np.frombuffer(bytes_img, np.uint8) img = cv2.imdecode(nparr, cv2.IMREAD_UNCHANGED) hsv = cv2.cvtColor(img, cv2.COLOR_BGR2HSV) mask_y = cv2.inRange(hsv, YELLOW_LOWER_BOUND, YELLOW_HIGHER_BOUND) mask_r = cv2.inRange(hsv, RED_LOWER_BOUND, REG_HIGHER_BOUND) mask_g = cv2.inRange(hsv, GREEN_LOWER_BOUND, GREEN_HIGHER_BOUND) # Find contours from the mask contours_y, hierarchy = cv2.findContours(mask_y.copy(), cv2.RETR_EXTERNAL, cv2.CHAIN_APPROX_SIMPLE) contours_r, hierarchy = cv2.findContours(mask_r.copy(), cv2.RETR_EXTERNAL, cv2.CHAIN_APPROX_SIMPLE) contours_g, hierarchy = cv2.findContours(mask_g.copy(), cv2.RETR_EXTERNAL, cv2.CHAIN_APPROX_SIMPLE) output = cv2.drawContours(img, contours_y,-1,(255,197,250),3) output = cv2.drawContours(img, contours_r,-1,(255,197,250),3) output = cv2.drawContours(img, contours_g,-1,(255,197,250),3) output = cv2.resize(output, (int(output.shape[1] * .3), int(output.shape[0] * .3))) if img is None or img.shape == (): raise key = cv2.waitKey(200) if key == 27: break # User pressed ESC, exit cv2.imshow(“Output”, output) client.publish(MQTT_BASIC_TOPIC+’Lamp/Yellow’,str(len(contours_y))) client.publish(MQTT_BASIC_TOPIC+’Lamp/Red’,str(len(contours_r))) client.publish(MQTT_BASIC_TOPIC+’Lamp/Green’,str(len(contours_g))) if len(contours_y) >0: Yellow=True if len(contours_r) >0: Red=True if len(contours_g) >0: Green=True cv2.waitKey(500) cv2.destroyAllWindows() |
Install Broker
Some Useful Link while using Raspberry
Here is the tutorial to build a broker in the raspberry pi/ubuntu.
If the connection is refused:
TwinCAT Side
Reference Link
Please reference these links to operate with MQTT in TwinCAT.
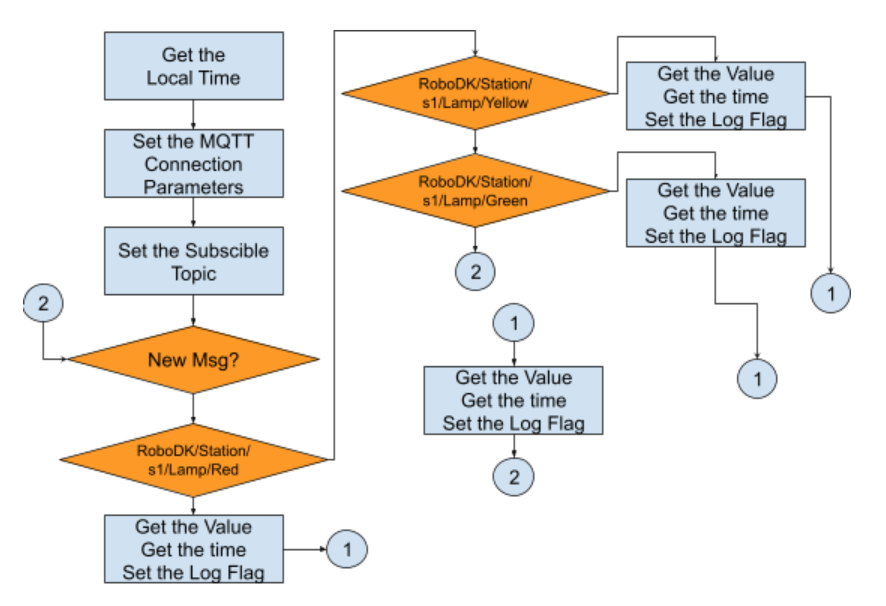
WorkFlow
In the TwinCATSide, the work flow is very simple.
Get the Local time cyclically>set the MQTT Connection Parameters>Subscribe the Topic>
if any new messages come from these topics> define the topic title>set the logger trigger flag>logged the status>loop back.
Program
DUT_Log
This is the DUT of data logging,
A String format of timestamp and the status is defined here.
| TYPE DUT_Log : STRUCT timeStamp:STRING; Status :DINT; END_STRUCT END_TYPE |
GVL_Logger
The Global variables of the logging data.
You can adjust the array length as you like.
| VAR_GLOBAL Red,Green,Yellow:ARRAY[0..99]OF DUT_Log; END_VAR |
Function Block FB_GetLocalTime
Here is the Function Block to get the Local time of the runtime.
Please reference this tutorial to get more information:
VAR_INPUT
True=Get the Local Time
| VAR_INPUT i_bEnable:BOOL:=TRUE; END_VAR |
VAR
Some variables for internal use and the instance of FB_LocaSystemTime.
| VAR bTimeSyncError :BOOL; TimeStruct :TIMESTRUCT; InitTimeStruct :TIMESTRUCT; LocalSystemTime :FB_LocalSystemTime; dwCycle:INT:=1; TON:TON; END_VAR |
PROGRAM
Here is the main program, it is a very simple cyclic called the FB_LocalSystemTime() and detects any error of this function block.
| LocalSystemTime( bEnable:=i_bEnable ,dwCycle:=1 ); TON( IN:=NOT LocalSystemTime.bValid ,PT:=INT_TO_TIME( (dwCycle+ciTimeValidCheckOffset)*1000 ) ); TimeStruct:=LocalSystemTime.systemTime; IF TON.Q THEN bTimeSyncError:=TRUE; END_IF |
METHOD Init : BOOL
A method to reset the current time value to default.
| TimeStruct:=InitTimeStruct; |
METHOD Reset : BOOL
A method to reset the error flag of function block.
| bTimeSyncError:=FALSE; |
METHOD TimeInString : String
This is a method to change the time value to a String format and use the CONCAT function to join them.
Here is the format:yy-mm-dd-hh:mm:ss
| VAR _string:STRING; END_VAR _string:=CONCAT(WORD_TO_STRING(TimeStruct.wYear),’-‘); _string:=CONCAT(_string,WORD_TO_STRING(Timestruct.wMonth)); _string:=CONCAT(_string,’-‘); _string:=CONCAT(_string,WORD_TO_STRING(Timestruct.wDay)); _string:=CONCAT(_string,’-‘); _string:=CONCAT(_string,WORD_TO_STRING(TimeStruct.wHour)); _string:=CONCAT(_string,’:’); _string:=CONCAT(_string,WORD_TO_STRING(TimeStruct.wMinute)); _string:=CONCAT(_string,’:’); _string:=CONCAT(_string,WORD_TO_STRING(TimeStruct.wSecond)); TimeInString:=_string; |
PROPERTY LocalTimeStruct : TIMESTRUCT
GET
The property to get the current system time.
| LocalTimeStruct:=LocalSystemTime.systemTime; |
PROPERTY LocalTimeValid : Bool
GET
The property to get the current system time is valid or not.
| LocalTimeValid:=LocalSystemTime.bValid; |
PROPERTY TimeSyncError : Bool
GET
The property to get the current function block is normal or not.
| TimeSyncError:=bTimeSyncError; |
FUNCTION_BLOCK FB_Logger
Here is a function block to save the LED Tower status and the time.
0=Off、1=On.
VAR_INPUT
| VAR_INPUT i_TimeStamp:STRING; i_Value :DINT; END_VAR |
VAR_IN_OUT
| VAR_IN_OUT io_logData:ARRAY[*]OF DUT_Log; END_VAR |
VAR
| VAR index:INT:=0; END_VAR |
METHOD ClearLog : BOOL
A method to clear the log.
VAR_INPUT
| VAR_INPUT bStart:BOOL; END_VAR |
VAR_INST
| VAR_INST R_TRIG:R_TRIG; END_VAR |
VAR
| VAR i:DINT; END_VAR |
PRGORAM
| R_TRIG(CLK:=bStart); IF R_TRIG.Q THEN FOR i:=ArrayLower TO ArrayHigher DO io_logData[i].Status:=0; io_logData[i].timeStamp:=’ ‘; END_FOR END_IF |
METHOD datalog : BOOL
The method to save and “shift” the log.
VAR_INPUT
| VAR_INPUT bStart:BOOL; END_VAR |
VAR_INST
| VAR_INST R_TRIG:R_TRIG; END_VAR |
VAR
| VAR i:DINT:=0; END_VAR |
PROGRAM
Here is a small program to auto calculate the DUT size that needs to be shifted.
MEMCPY is a function to copy the memory from source to destination.
[0] is the newest value.
| datalog:=FALSE; R_TRIG(CLK:=bStart); IF R_TRIG.Q THEN MEMCPY( destAddr:=ADR(io_logData[1]) ,srcAddr:=ADR(io_logData[0]) ,n:=SIZEOF(io_logData[0])*ArrayHigher ); io_logData[0].Status:=i_Value; io_logData[0].timeStamp:=i_TimeStamp; datalog:=TRUE; END_IF |
PROPERTY ArrayHigher : DINT
The property gets the array lower and Upper.
GET
| ArrayHigher:=UPPER_BOUND(io_logData,1); |
PROPERTY ArrayLower : DINT
GET
| ArrayLower:=LOWER_BOUND(io_logData,1); |
MAIN
VAR
| PROGRAM MAIN VAR MQTTClient:FB_IotMqttClient; payload:STRING(255); payload_r,payload_y,payload_g:STRING(20); fbMessageQueue : FB_IotMqttMessageQueue; fbMessage : FB_IotMqttMessage; sTopic :STRING; bSetNullTermination :BOOL; bScbscribed:BOOL; sTopicReceived:STRING(255); Value_r,Value_g,Value_y:DINT; GetLocalTime:FB_GetLocalTime; stTimeInString:STRING; datalog_r,datalog_g,datalog_y:FB_Logger; LastTimeStamp_r,LastTimeStamp_g,LastTimeStamp_y:STRING; i1,i2:DINT; bTest:BOOL; binit:BOOL; logTrigger_r,logTrigger_g,logTrigger_y:BOOL; hmi_LP_r,hmi_LP_g,hmi_LP_y:BOOL; END_VAR |
PROGRAM
| //Get Local Time GetLocalTime( i_bEnable:=TRUE ); IF GetLocalTime.LocalTimeValid THEN stTimeInString:=GetLocalTime.TimeInString(); END_IF; //init IF binit THEN LastTimeStamp_r:=stTimeInString; LastTimeStamp_g:=stTimeInString; LastTimeStamp_y:=stTimeInString; binit:=FALSE; END_IF //MQTT Client Setup //Parameters MQTTClient.sHostName:=’192.168.1.50′; MQTTClient.nKeepAlive:=60; MQTTClient.ipMessageQueue:=fbMessageQueue; //Execute() must always Run MQTTClient.Execute(bConnect:=TRUE); //Subscribe Topic sTopic:=’RoboDK/Station/s1/#’; IF MQTTClient.bConnected THEN IF NOT bScbscribed THEN MQTTClient.Subscribe( sTopic:=sTopic ,eQoS:=0 ); bScbscribed:=TRUE; END_IF END_IF //Check Message From Broker IF fbMessageQueue.nQueuedMessages > 0 THEN IF fbMessageQueue.Dequeue(fbMessage:=fbMessage) THEN //Get the Topic fbMessage.GetTopic(pTopic:=ADR(sTopicReceived), nTopicSize:=SIZEOF(sTopicReceived)); //Compare IF fbMessage.CompareTopic(sTopic:=’RoboDK/Station/s1/Lamp/Red’) THEN payload_r:=’ ‘; fbMessage.GetPayload(pPayload:=ADR(payload_r), nPayloadSize:=SIZEOF(payload_r), bSetNullTermination:=FALSE); LastTimeStamp_r:=GetLocalTime.TimeInString(); logTrigger_r:=TRUE; ELSIF fbMessage.CompareTopic(sTopic:=’RoboDK/Station/s1/Lamp/Yellow’) THEN payload_y:=’ ‘; fbMessage.GetPayload(pPayload:=ADR(payload_y), nPayloadSize:=SIZEOF(payload_y), bSetNullTermination:=FALSE); LastTimeStamp_y:=GetLocalTime.TimeInString(); logTrigger_y:=TRUE; ELSIF fbMessage.CompareTopic(sTopic:=’RoboDK/Station/s1/Lamp/Green’) THEN payload_g:=’ ‘; fbMessage.GetPayload(pPayload:=ADR(payload_g), nPayloadSize:=SIZEOF(payload_g), bSetNullTermination:=FALSE); LastTimeStamp_g:=GetLocalTime.TimeInString(); logTrigger_g:=TRUE; END_IF END_IF END_IF //Convert the Value from String to Numbers Value_r:=STRING_TO_DINT(payload_r); Value_g:=STRING_TO_DINT(payload_g); Value_y:=STRING_TO_DINT(payload_y); //Hmi hmi_LP_r:=Value_r =1; hmi_LP_g:=Value_g =1; hmi_LP_y:=Value_y =1; //Data logger //Green Lamp datalog_g( i_TimeStamp:=stTimeInString ,i_Value:=Value_g ,io_logData:=GVL_Logger.Green ); IF datalog_g.datalog(bStart:=logTrigger_g) THEN logTrigger_g:=FALSE; END_IF //Yellow Lamp datalog_y( i_TimeStamp:=stTimeInString ,i_Value:=Value_y ,io_logData:=GVL_Logger.Yellow ); IF datalog_y.datalog(bStart:=logTrigger_y) THEN logTrigger_y:=FALSE; END_IF //Red Lamp datalog_r( i_TimeStamp:=stTimeInString ,i_Value:=Value_r ,io_logData:=GVL_Logger.Red ); IF datalog_r.datalog(bStart:=logTrigger_r) THEN logTrigger_r:=FALSE; END_IF |
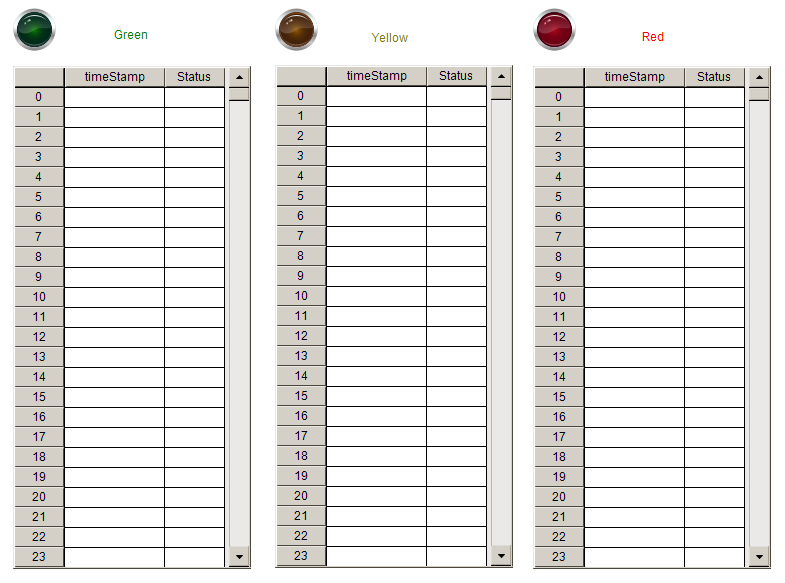
Visulization
A screen to show the LED Tower status in Beckhoff TE1800.
M5Core2 Side
Please reference this tutorial to setup a M5Stack with W5500 LAN Module.
Code
Here is the Code in M5Stack to implement an MQTT Client in C Language, Subscribe the Topic from RoboDK and Display the Current LED Tower status in the LED Display.
| #include <M5Core2.h> #include <SPI.h> #include <Ethernet2.h> #include <PubSubClient.h> #define SCK 18 #define MISO 19 #define MOSI 23 #define CS 26 byte mac[] = { 0x90, 0xA2, 0xDA, 0x0F, 0x08, 0xE1 }; IPAddress Local(192, 168, 1, 211); EthernetClient ethClient; PubSubClient mqttClient(ethClient); //MQTT Broker const char *ENDPOINT=”192.168.001.050″; const int PORT=1883; char *MYID=”M5Stack”; char *PUBLISHTOPIC=”M5Stack/pub”; char *SUBTOPIC=”RoboDK/Station/s1/#”; // int GreenStatus=0; int RedStatus=0; int YellowStatus=0; // char *SubtopicYellow=”RoboDK/Station/s1/Lamp/Yellow”; char *SubtopicGreen=”RoboDK/Station/s1/Lamp/Green”; char *SubtopicRed=”RoboDK/Station/s1/Lamp/Red”; void callback(char* topic, byte* payload, unsigned int length) { Serial.print(“Message arrived [“); Serial.print(topic); int result_yellow=strcmp(topic,SubtopicYellow); int result_red=strcmp(topic,SubtopicRed); int result_green=strcmp(topic,SubtopicGreen); if (result_yellow ==0 ){ Serial.print(payload[0]); if (payload[0]==48){ YellowStatus=0; Serial.print(YellowStatus); } if (payload[0]==49){ YellowStatus=1; Serial.print(YellowStatus); } } if (result_red ==0 ){ Serial.print(payload[0]); if (payload[0]==48){ RedStatus=0; } if (payload[0]==49){ RedStatus=1; } } if (result_green ==0 ){ Serial.print(payload[0]); if (payload[0]==48){ GreenStatus=0; } if (payload[0]==49){ GreenStatus=1; } } Serial.print(“] “); for (int i = 0; i < length; i++) { Serial.print((char)payload[i]); } } void setup(){ //If LAN Modules is used,Please use this operation mode M5.begin(true, true, true, false, kMBusModeInput); Serial2.begin(115200, SERIAL_8N1, 13, 14); // START M5.Lcd.fillScreen(BLACK); M5.Lcd.setCursor(10, 10); M5.Lcd.setTextColor(WHITE); M5.Lcd.setTextSize(3); M5.Lcd.printf(“Inited..\n”); M5.Lcd.printf(“IP:192.168.1.211\n”); M5.Lcd.printf(“Mac:90-A2-DA-x0F-08-E1\n”); mqttClient.setServer(ENDPOINT, PORT); mqttClient.setCallback(callback); SPI.begin(18, 19, 23, -1); Ethernet.init(26); Ethernet.begin(mac, Local); connectMQTT(); } void mqttLoop() { if (!mqttClient.connected()) { connectMQTT(); } mqttClient.loop(); } void connectMQTT() { while (!mqttClient.connected()) { Serial.print(“Connection Loop..”); if (mqttClient.connect(MYID)) { Serial.println(“Connected.”); int qos = 0; mqttClient.subscribe(SUBTOPIC, qos); Serial.println(“Subscribed.”); } else { Serial.print(“Failed. Error state=”); Serial.print(mqttClient.state()); // Wait 5 seconds before retrying delay(1000); } } } long messageSentAt = 0; int count = 0; char pubMessage[128]; int led,red,green,blue; int status=0; void loop() { mqttLoop(); long now = millis(); if (now – messageSentAt > 500) { M5.update(); M5.Lcd.fillScreen(BLACK); if (YellowStatus ==1){ M5.Lcd.fillCircle(160, 120, 30, YELLOW); } if (YellowStatus ==0){ M5.Lcd.drawCircle(160, 120, 30, YELLOW); } if (RedStatus ==1){ M5.Lcd.fillCircle(240, 120, 30, RED); } if (RedStatus ==0){ M5.Lcd.drawCircle(240, 120, 30, RED); } if (GreenStatus ==1){ M5.Lcd.fillCircle(80, 120, 30, GREEN); } if (GreenStatus ==0){ M5.Lcd.drawCircle(80, 120, 30, GREEN); } Serial.print(YellowStatus); messageSentAt = now; sprintf(pubMessage, “{\”count\”: %d}”, count++); Serial.print(“Publishing message to topic “); Serial.println(PUBLISHTOPIC); Serial.println(pubMessage); mqttClient.publish(PUBLISHTOPIC, pubMessage); Serial.println(“Published.”); } } |
Result
Result-M5Core2 Side
Source Code
Please access this link to download the source code;
You can find the RoboDK Project,TwinCAT Project and the M5Stack Source Code.
https://github.com/soup01Threes/TwinCAT3/blob/main/Project_RoboDK_Color_Detector.zip