In this tutorial, I will introduce the startup procedure of AXC F XT ML1000 with AXC F 3152 and show you a demo that how to play with RoboDK.Thank you very much and Hope you like this.
Thanks!
Thanks to Phoenix Contact Japan that borrowing the AXC F3152 and AXC F XT ML1000 for me to test it.
Video
AXC F XT ML1000?
By using AXC F XT ML1000 and AXC F 3152 PLCnext Controller, we can directly implement the machine learning application in your PLCNEXT, and the data can be directly exchanged between PLC application and your scripts.
Inside the AXC F XT ML1000, Edge TPU (Coral) is integrated inside and easy to play with machine learning applications with Python and import the Tensorflow Lite Models.

Firmware
AXC F XT ML1000 can only be used in AXC F 3152 with Firmware > 2022.0 LTS.
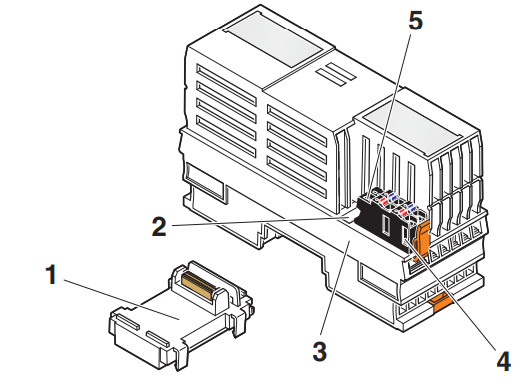
Interneal Cirucit
Here is the internal circuit of AXC F XT ML1000.
- Tensor Processing unit
- Error Display
- Extension bus for Axioline F.


Layout
Here is the Layout of AXC F XT ML1000.
- Bus base Module
- Function Identification
- Electronics module
- Connector of Power Supply
- LED of the power supply status
Power Supply
Basically we need to use the same power source of AXC F XT ML1000 and AXC F 3152. Because if only AXC F XT ML1000 had 24v power supply and no supply on the CPU side, the AXC F ML1000 will shift to the Error status and can not reset.

Terminal
AXC F ML1000 had the same power connector of AXC F 3152 CPU.
The Red one a1,a2 is for 24V+ and the blue one b1,b2 is for 0v side.

LED
The only LED that is used on the AXC F XT ML1000 is the lower left one. If it turns red, it is an error.
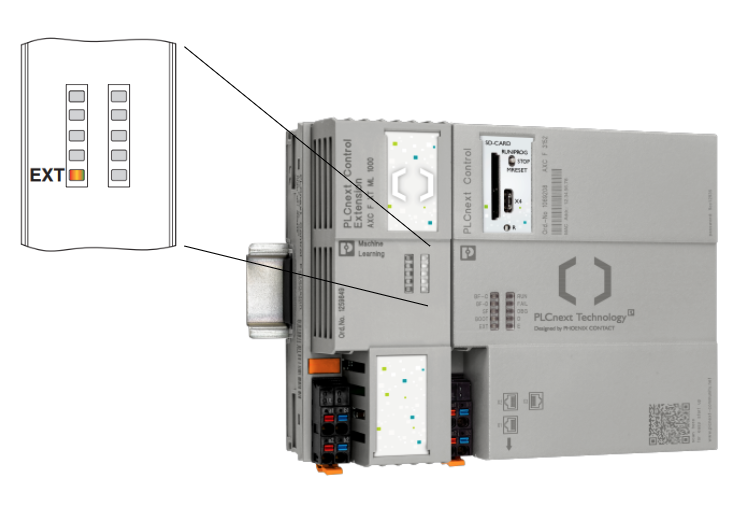
| Color | State | Description |
| Red | On | Module is in Error statusCPU does not supportedModule is not installed properlyCPU do not have Power supply |
| Yellow | On | Boosting Up |
| Green | On | No Error and Running |
Setup
Before you set up the AXC F XT ML1000,please make sure :
- you can login as root
- internet connection to your PLCNext
PLCNEXT Engineer Version
Here is the version of my PLCNEXT Engineering tools.

SFTP Download
Reference Link
Please follow this tutorial to Download and see how to operate the WINSCP and download the file to SFTP server .
Step
Download the ML1000 software package from this link:
https://www.phoenixcontact.com/en-in/products/extension-module-axc-f-xt-ml-1000-1259849

agree the license and download it.

A zip file is downloaded.
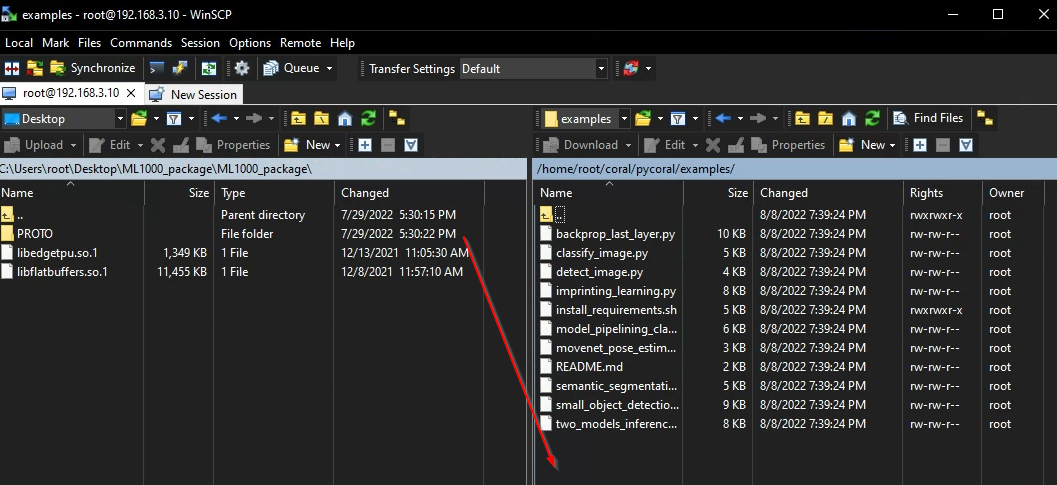
Unzip the file and transfer the so.1 file to \usr\lib.
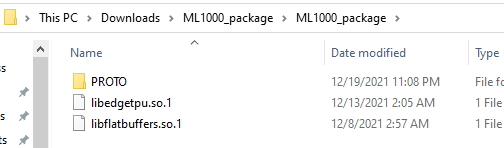
PROTO is used in other steps and we can skip this folder currently.

Download python basic
You can skip this if the Python Basic app from PLCNEXT Store is downloaded and installed in your CPU. even you need to install it manually by using the pip command.
- numpy
- pillow
- pycoral
- tflite_runtime
Refercence Link
Please follow this link to download the app from PLCNEXT store and install it in your CPU.
Check the Module
Now you can enter this command in the terminal and check the modules status now.
| lspci –nn | grep 089a |
It is normal if no error message is feedbacked.

Please check if the module is installed properly or power supply is normal or not, while an error message is feedbacked.
Downloading and installing a sample application
In this step、 an internet connection to your AXC F 3152 is necessary.we will use the internet to download the sample and some packages.
Our first application is classifying what type of bird is inside the images.
Create a Directory and change the directory to that.
| mkdir coral && cd coral |
Usig git command to clone the Sample application from GitHub to your CPU.
| git clone https://github.com/google-coral/pycoral.git |
Install the sample.
| bash examples/install_requirements.sh classify_image.py |
Now you can disconnect the internet connection.
SSL Certificate problem certificate is not yet valid
Please reference this link if SSL Certificate error is occupied while using the git command.
Executing the sample application
Enter this command to run the example script.
Model file, label file and image file are passed as the parameters of the script .
| python3 examples/classify_image.py \ –model test_data/mobilenet_v2_1.0_224_inat_bird_quant_edgetpu.tflite \ –labels test_data/inat_bird_labels.txt \ —input test_data/parrot.jpg |
TPUから判定結果が返答されました!

Integrate With PLCNEXT Controller
Now it is a problem to transfer the classification result from your script to PLC Application. Although you can use OPC-UA or MQTT, in this tutorial I will choose the gRPC server that integerted inside the AXC F 3152 and use gRPC communication to transfer the result back to PLC Application.
gRPC communication?
Before we start to use it, let me talk a little about gRPC Communication.gRPC is Remote Procedural Call, an open source,high performance framework.
gRPC is using HTTP2 and Protocol Buffer.
For Example we have applications that have many services. Let’s imagine that we are shopping on Amazon Web Site. That is a “Buy services” for us to put your goods into shopping charts, servers need a “Delivery Services” to order the Logistics company to send the products.That is also “Promotion” Services” to Show the Advertisement in the Website.
These services are connected to “User Services”” ,and they may not be implemented in the same programming Language.
There is a very popular technology that we are using now is REST(HTTP-JSON).

However, there are various considerations for REST. for example
- What is the Data Model? JSON?XML?or Other?
- End Point may be very complex.
- GET: /api/v1/something/123/post/abcsd
- POST: /api/v1/post/something
- Error Detection
- Efficiency
- Scaleable?
- Load Balaning?
- support multiple languages?
- User authentication/Monitoring/Logging
Then we have an API. API is just like an Agreement between Client and server. if Client sends the server a request, the server will base on the request and respond to it.
As I mentioned before, gRPC is free ,open source and developed by google and now is managed by Cloud Native Computing Foundation.gRPC is ,
- Modern
- High Speed
- Efficiency
- From HTTP/2
- Stream Support
- programming language agnostic
- Easy to plug-in the User authentication/Monitoring/Logging
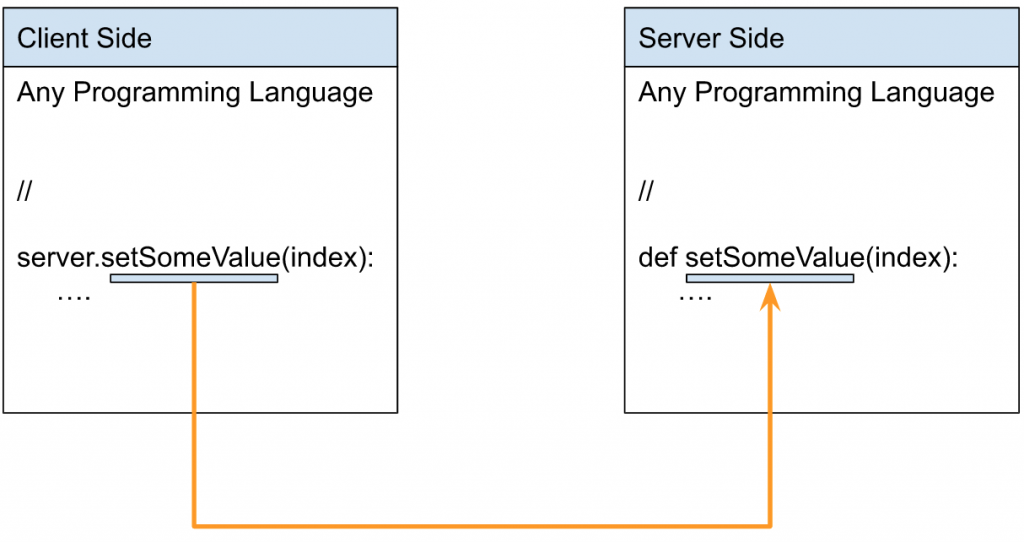
As one of the RPC features, it seems that the Client side directly calls functions from the Server.In other words, as shown in the figure below, RPC Code has the same function name and seems to be directly called from the Server side.
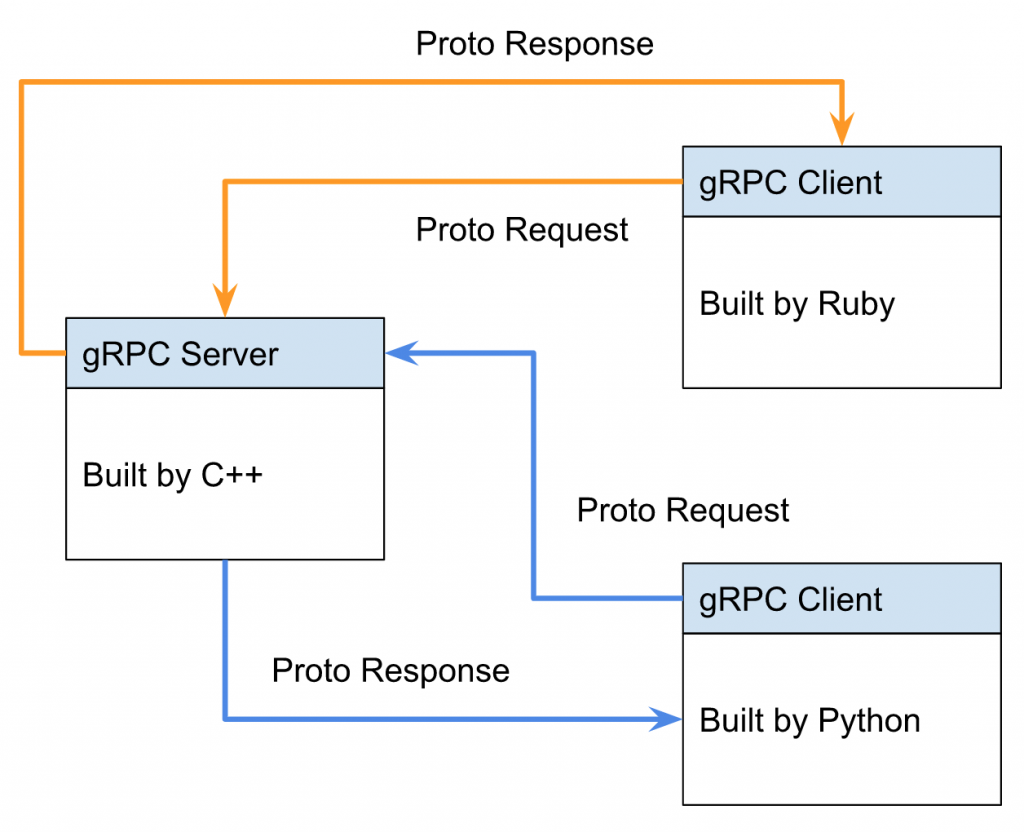
A real application might look like this.
To use gRPC, you need to define messages and services from “Protocol buffers”.
The client side first initializes read and write requests.
It is defined in a .proto File and can be downloaded from the gRPC GitHub repository.
.proto File automatically generates a program on communication.
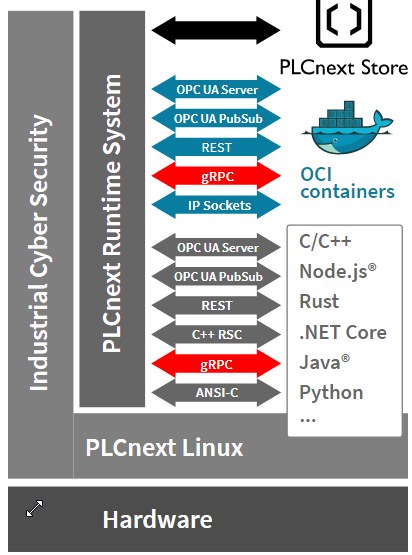
PLCnext Technology and gRPC
Depending on the application, we need some communication Interface to interact with the PLCnext Runtime System. It can’t do it 100%, and part of it may be due to functional limitations or programming language limitations.
gRPC can add an interface to inter process communication (IPC).
and by using the RPC Framework ,PLCNEXT can make an open source ,programming languages independent Application.
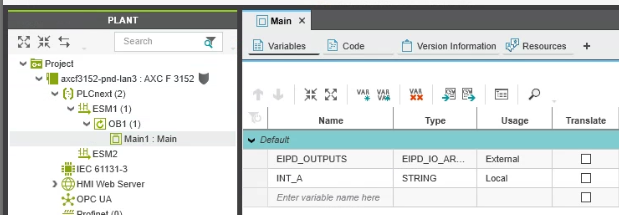
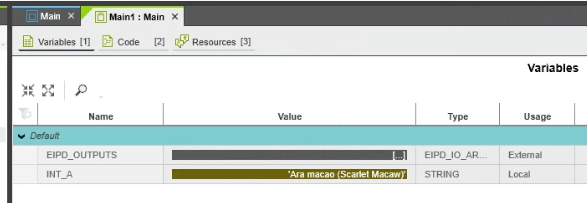
Step1:Creating the required variables
Open your PLCNext Engineering Tools, Define INT_A as a string inside your local program and Download it to CPU.
Step2:Install the packages
Please use these commands to download the Packages if you did not install the Python Basic app from PLCNEXT Store.
| pip3 install grpcio pip3 install protobuf |
Move the PROTO folder inside the ML1000_packages that you downloaded from Phoenix Contact web site to this directory:
*The python script that executes and PROTO should be in the same folder.
| \home\root\coral\pycoral\examples |
Step3:Making changes in the machine-learning application
As I mentioned before, the classification result from our python script will transfer to the PLC application by using gRPC Communication.
Let’s open the python script and modify it.
Importing modules
Import the necessary modules to use the gRPC communication.
| import grpc from google.protobuf.empty_pb2 import Empty from PROTO.Authentication_pb2 import CreateSessionRequest from PROTO.Authentication_pb2_grpc import AuthenticationStub from PROTO.IDataAccessService_pb2 import IDataAccessServiceReadSingleRequest, \ IDataAccessServiceReadRequest, IDataAccessServiceWriteSingleRequest, IDataAccessServiceWriteRequest from PROTO.IDataAccessService_pb2_grpc import IDataAccessServiceStub from PROTO.PLCnextBase_pb2 import CoreType from PROTO.ErrorCode_pb2 import ErrorCode |
Opening a gRPC channel
Open the gRPC Channel.
| channel=grpc.insecure_channel(“unix:/run/plcnext/grpc.sock”) |
Defining the function :
Write a Function to overwrite the variable value inside your PLC Application.
| def WriteSingle_StringValue(P_PortName,P_StringValue): stub=IDataAccessServiceStub(channel) response1= IDataAccessServiceWriteSingleRequest() response1.data.PortName= P_PortName response1.data.Value.TypeCode=19 response1.data.Value.StringValue=P_StringValue response=stub.WriteSingle(response1) return response |
Writing the result into a variable
Finally we will write the classification result to the variable in the PLC Application.
| result=(‘%s’ % (labels.get(c.id, c.id))) WriteSingle_StringValue(“Arp.Plc.Eclr/Main1.INT_A”, result) |
Full Example Code
Here is the Full-Code.
| import grpc from google.protobuf.empty_pb2 import Empty from PROTO.Authentication_pb2 import CreateSessionRequest from PROTO.Authentication_pb2_grpc import AuthenticationStub from PROTO.IDataAccessService_pb2 import IDataAccessServiceReadSingleRequest, \ IDataAccessServiceReadRequest, IDataAccessServiceWriteSingleRequest, IDataAccessServiceWriteRequest from PROTO.IDataAccessService_pb2_grpc import IDataAccessServiceStub from PROTO.PLCnextBase_pb2 import CoreType from PROTO.ErrorCode_pb2 import ErrorCode #Opening a gRPC channel channel=grpc.insecure_channel(“unix:/run/plcnext/grpc.sock”) import argparse import time import numpy as np from PIL import Image from pycoral.adapters import classify from pycoral.adapters import common from pycoral.utils.dataset import read_label_file from pycoral.utils.edgetpu import make_interpreter def main(): parser = argparse.ArgumentParser( formatter_class=argparse.ArgumentDefaultsHelpFormatter) parser.add_argument( ‘-m’, ‘–model’, required=True, help=’File path of .tflite file.’) parser.add_argument( ‘-i’, ‘–input’, required=True, help=’Image to be classified.’) parser.add_argument( ‘-l’, ‘–labels’, help=’File path of labels file.’) parser.add_argument( ‘-k’, ‘–top_k’, type=int, default=1, help=’Max number of classification results’) parser.add_argument( ‘-t’, ‘–threshold’, type=float, default=0.0, help=’Classification score threshold’) parser.add_argument( ‘-c’, ‘–count’, type=int, default=5, help=’Number of times to run inference’) parser.add_argument( ‘-a’, ‘–input_mean’, type=float, default=128.0, help=’Mean value for input normalization’) parser.add_argument( ‘-s’, ‘–input_std’, type=float, default=128.0, help=’STD value for input normalization’) args = parser.parse_args() labels = read_label_file(args.labels) if args.labels else {} interpreter = make_interpreter(*args.model.split(‘@’)) interpreter.allocate_tensors() # Model must be uint8 quantized if common.input_details(interpreter, ‘dtype’) != np.uint8: raise ValueError(‘Only support uint8 input type.’) size = common.input_size(interpreter) image = Image.open(args.input).convert(‘RGB’).resize(size, Image.ANTIALIAS) # Image data must go through two transforms before running inference: # 1. normalization: f = (input – mean) / std # 2. quantization: q = f / scale + zero_point # The following code combines the two steps as such: # q = (input – mean) / (std * scale) + zero_point # However, if std * scale equals 1, and mean – zero_point equals 0, the input # does not need any preprocessing (but in practice, even if the results are # very close to 1 and 0, it is probably okay to skip preprocessing for better # efficiency; we use 1e-5 below instead of absolute zero). params = common.input_details(interpreter, ‘quantization_parameters’) scale = params[‘scales’] zero_point = params[‘zero_points’] mean = args.input_mean std = args.input_std if abs(scale * std – 1) < 1e-5 and abs(mean – zero_point) < 1e-5: # Input data does not require preprocessing. common.set_input(interpreter, image) else: # Input data requires preprocessing normalized_input = (np.asarray(image) – mean) / (std * scale) + zero_point np.clip(normalized_input, 0, 255, out=normalized_input) common.set_input(interpreter, normalized_input.astype(np.uint8)) # Run inference print(‘—-INFERENCE TIME—-‘) print(‘Note: The first inference on Edge TPU is slow because it includes’, ‘loading the model into Edge TPU memory.’) for _ in range(args.count): start = time.perf_counter() interpreter.invoke() inference_time = time.perf_counter() – start classes = classify.get_classes(interpreter, args.top_k, args.threshold) print(‘%.1fms’ % (inference_time * 1000)) print(‘——-RESULTS——–‘) for c in classes: print(‘%s: %.5f’ % (labels.get(c.id, c.id), c.score)) result=(‘%s’ % (labels.get(c.id, c.id))) WriteSingle_StringValue(“Arp.Plc.Eclr/Main1.INT_A”, result) def WriteSingle_StringValue(P_PortName,P_StringValue): stub=IDataAccessServiceStub(channel) response1= IDataAccessServiceWriteSingleRequest() response1.data.PortName= P_PortName response1.data.Value.TypeCode=19 response1.data.Value.StringValue=P_StringValue response=stub.WriteSingle(response1) return response if __name__ == ‘__main__’: main() |
Result
Scriptを実行します。
| python3 examples/classify_image_plcnext.py \ –model test_data/mobilenet_v2_1.0_224_inat_bird_quant_edgetpu.tflite \ –labels test_data/inat_bird_labels.txt \ —input test_data/parrot.jpg |
Now you can see the result is transferred to PLC Application.We did it!
Try more Fun!
Let’s build another demo to have more fun!
Download a new Model
Download the Edge TPU mode and Label File from the Follow Link:
https://coral.ai/models/image-classification/

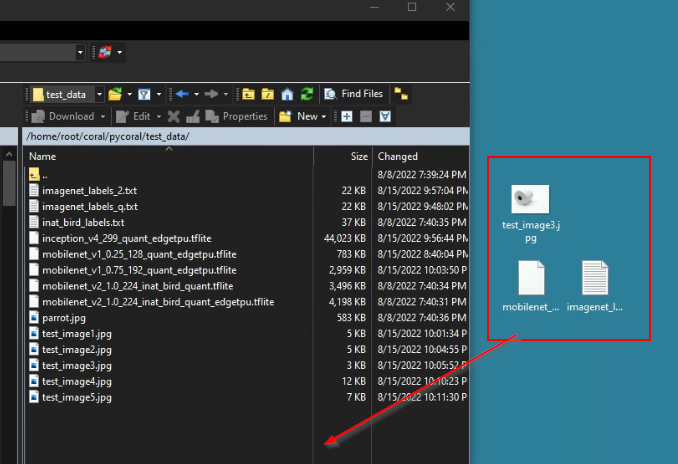
Transfer to the CPU
We need to test this model and move the tflite file,label file and test images into /home/root/coral/pycoral/test/data/.
The image that I tested here is a toilet paper image;)
Run the Script
Let’s run the script.
| python3 examples/classify_image_plcnext.py –model test_data/mobilenet_v1_0.75_192_quant_edgetpu.tflite –labels test_data/imagenet_labels_q.txt —input test_data/test_image3.jpg |
Here is the image ;).

The result is 79% , Paper towel.OK and it seems like work.

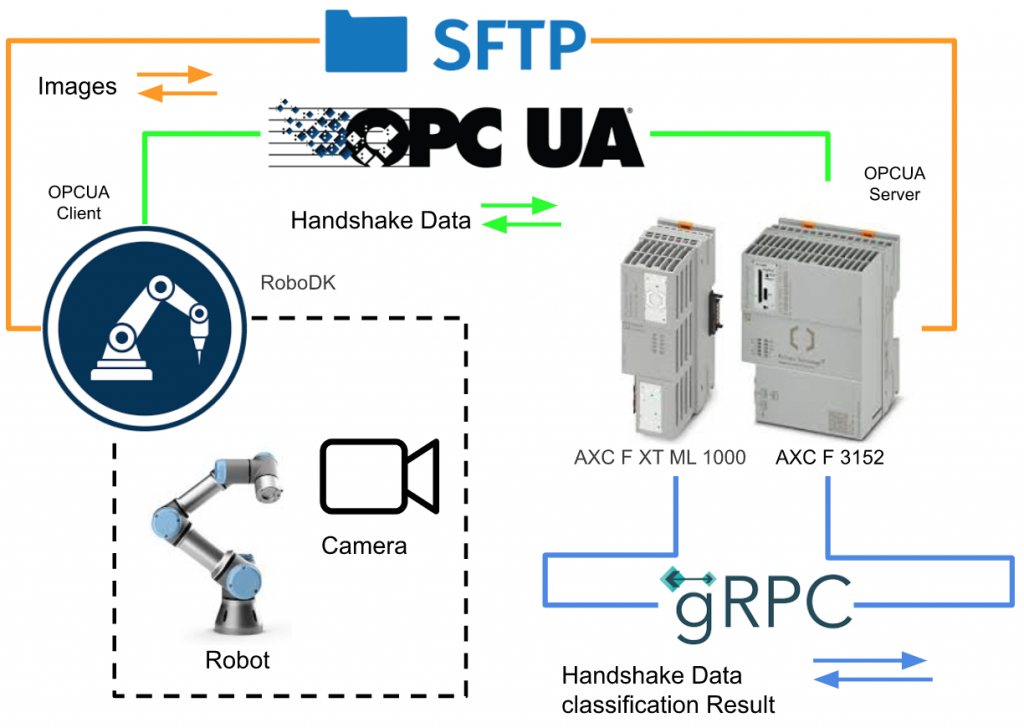
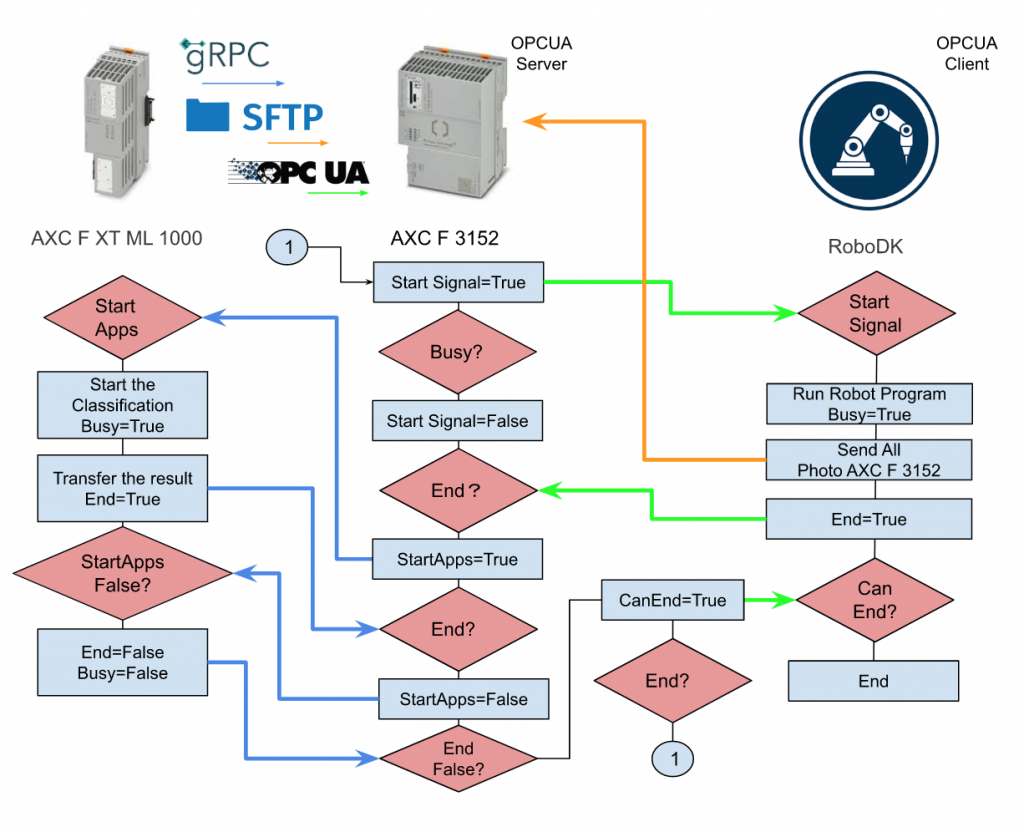
Implementation
Now let’s build the actual demo. The figure below shows the current configuration. AXC F 3152 launches the OPCUA Server, communicates with the Python OPCUA Client on the RoboDK side, and exchanges Handshake information (program start, Busy, End, etc.).
The photos that are taken by the robot will be sent to the AXF F 3152 via SFTP.
gRPC is used for the Handshake data (judgment start, result, Busy, End, etc.) between AXF F XT ML1000 and AXC F 3152.
Handshake Flow
This is HandShake Flow at this time.
>AXC F3152 sends a Start signal to RoboDK.
>RoboDK launches the robot program, returns Busy, and sends photos taken during that time to the AXC F3152 via SFTP.
>When AXCF 3152 receives the End True signal from RoboDK, it sends the StartApps signal to ML1000.
>The ML1000 receives this signal, starts image judgment, and writes the results to the AXF F3152.
> An End signal is sent to AXF F 3152 when the ML1000 process is complete.
>AXC F3152 resets the StartApps signal and ML1000 is done and reset.
>Finally, AXC F3152 sends a CanEnd signal to RoboDK
>RoboDK completes the process
>It will be in the state of waiting for Start Signal from the beginning again.
Reference Link
PLCNEXT
OPCUA Server Setup
Let’s configure the OPCUA Server first.

Choose Self signed by Controller in the Certificate field and choose the Security Policies that the client side is supported.

DUT
DUT_ML1000
DUT_ML1000 defines the data and handshake signal between PLCNEXT and ML1000 modules.
| TYPE DUT_ML1000_ClassificationResult : STRUCT Label:STRING; Score:REAL; END_STRUCT DUT_TO_ML1000 : STRUCT bStart2Classification:BOOL; sImageName :STRING; END_STRUCT DUT_From_ML1000 :STRUCT bClientReady:BOOL; bTPUReady:BOOL; bBusy:BOOL; bFinished:BOOL; Results:ARRAy[1..6]of DUT_ML1000_ClassificationResult; Result_label:ARRAY[0..6]of string; Result_Score:ARRAY[0..6]of REAL; END_STRUCT END_TYPE |
DUT_RoboDK
DUT_RoboDK defines the data and handshake signal between PLCNEXT and RoboDK modules.
| TYPE DUT_OPCUA_ReadFromRoboDK : STRUCT sImagePath:ARRAY[1..6]of string; bImageisSaved:BOOL; bBusy:BOOL; bEnd:BOOL; END_STRUCT DUT_OPCUA_Write2RoboDK : STRUCT bStartProgram:BOOL; bCanEnd :BOol; END_STRUCT DUT_OPCUA_Write2PI4 : STRUCT bStart2Classification:BOOL; sImageName :STRING; END_STRUCT END_TYPE |
Program
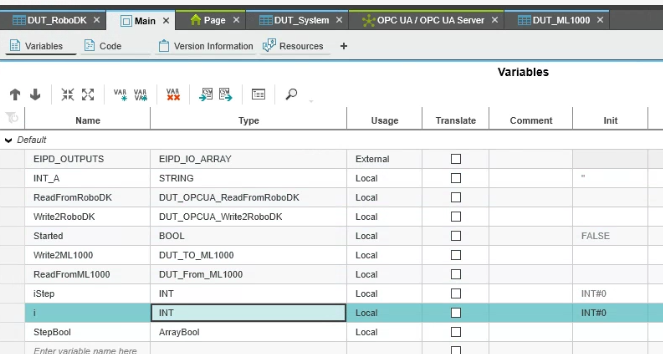
VAR
Go to Main>Variables Tab and create these variables.
PROGRAM
Here is the main program and I will use a case statement to implement the HandShake and Data exchange task.
| case iStep of 0: ReadFromRoboDK.bBusy:=False; ReadFromRoboDK.bEnd:=False; ReadFromRoboDK.bImageisSaved:=False; Write2RoboDK.bCanEnd:=False; Write2RoboDK.bStartProgram:=False; for i:=1 to 6 DO ReadFromRoboDK.sImagePath[i]:=’ ‘; END_for; ReadFromML1000.bBusy:=False; ReadFromML1000.bClientReady:=False; ReadFromML1000.bTPUReady:=False; ReadFromML1000.bFinished:=False; Write2ML1000.bStart2Classification:=False ; Write2ML1000.sImageName:= ‘ ‘; iStep:=10; Started:=False; 10: if Write2RoboDK.bStartProgram and not Started THEN Started:=True; iStep:=20; end_if; 20: if ReadFromRoboDK.bBusy THEN Write2RoboDK.bStartProgram:=False; iStep:=30; for i:=1 to 6 DO ReadFromML1000.Result_label[i]:=’ ‘; ReadFromML1000.Result_Score[i]:=0.0; END_for; end_If; 30: if ReadFromRoboDK.bEnd THEN Write2ML1000.bStart2Classification:=True; iStep:=40; end_if; 40: if ReadFromML1000.bFinished THEN Write2RoboDK.bCanEnd:=True; Write2ML1000.bStart2Classification:=False; iStep:=50; end_if; 50: if not ReadFromRoboDK.bEnd then Write2RoboDK.bCanEnd:=False; iStep:=0; end_if; END_CASE; |
HMI Setup
And then we will use PLCNEXT Engineering to create a sample HMI Application and Download to CPU. The StartRobotProgram is the button that starts the flow, and other elements are just to display the status.

RoboDK Side
The Script came from the reference link and made some modifications for this demo.
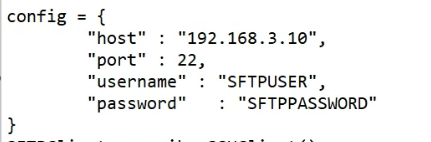
| from robodk import robolink # RoboDK API from robodk import robomath # Robot toolbox import datetime import time from opcua import Client,ua import random import os import paramiko SFTP_FROM=’C:\FTPFiles\RoboDK’ SFTP_TO=’/home/root/coral/pycoral/test_data/’ config = { “host” : “192.168.3.10”, “port” : 22, “username” : “SFTPUSER”, “password” : “SFTPPASSWORD” } SFTPClient=paramiko.SSHClient() SFTPClient.set_missing_host_key_policy(paramiko.AutoAddPolicy) os.chdir(r’C:\Users\root\Desktop\ML1000_package\ML1000_package’) RDK = robolink.Robolink() UR=RDK.Item(“UR5”) CameraPosition1=RDK.Item(‘tCamera1’) CameraPosition2=RDK.Item(‘tCamera2’) CameraPosition3=RDK.Item(‘tCamera3’) CameraPosition4=RDK.Item(‘tCamera4’) CameraPosition5=RDK.Item(‘tCamera5’) CameraPosition6=RDK.Item(‘tCamera6’) Prog=RDK.Item(‘pMain’) ENDPOINT=’opc.tcp://user:passwd@192.168.3.10:4840′ USERNAME=’PLCNEXTUSERNAME’ PASSWORD=’PLCNEXTPASSWORD’ NODE_BUSY=’ns=5;s=Arp.Plc.Eclr/Main1.ReadFromRoboDK.bBusy’ NODE_END=’ns=5;s=Arp.Plc.Eclr/Main1.ReadFromRoboDK.bEnd’ NODE_IMAGEISSAVED=’ns=5;s=Arp.Plc.Eclr/Main1.ReadFromRoboDK.bImageisSaved’ NODE_SIMAGEPATH=’ns=5;s=Arp.Plc.Eclr/Main1.ReadFromRoboDK.sImagePath’ NODE_STARTPROGRAM=’ns=5;s=Arp.Plc.Eclr/Main1.Write2RoboDK.bStartProgram’ NODE_CANEND=’ns=5;s=Arp.Plc.Eclr/Main1.Write2RoboDK.bCanEnd’ client=Client(ENDPOINT) client.set_user(USERNAME) client.set_password(PASSWORD) client.set_security_string(‘Basic256,Sign,cert.der,key.pem’) try: client.connect() client.load_type_definitions() print(‘Node2Server is loaded..’) NodeBusy=client.get_node(NODE_BUSY) NodeEnd=client.get_node(NODE_END) NodeImageIsSaved=client.get_node(NODE_IMAGEISSAVED) NodeSImagePath=client.get_node(NODE_SIMAGEPATH) NodeCanEnd=client.get_node(NODE_CANEND) print(‘NodeFromServer is loaded..’) NodeStartProgram=client.get_node(NODE_STARTPROGRAM) Busy=NodeBusy.get_value() End=NodeEnd.get_value() print(Busy,End) except Exception as e: print(e) quit() def WriteNode(): NodeBusy=client.get_node(NODE_BUSY) NodeEnd=client.get_node(NODE_END) NodeImageIsSaved=client.get_node(NODE_IMAGEISSAVED) NodeSImagePath=client.get_node(NODE_SIMAGEPATH) return NodeBusy.get_value(),NodeEnd.get_value(),NodeImageIsSaved.get_value(),NodeSImagePath.get_value() def ReadNode(): NodeStart=client.get_node(NODE_STARTPROGRAM) NodeCanEnd=client.get_node(NODE_CANEND) return NodeStart.get_value(),NodeCanEnd.get_value() cam_item = RDK.Item(“Camera1”) if not cam_item.Valid(): print(‘No camera..’) quit() def createImagePath(s): path=getCurrentTime() return “C:\FTPFiles\RoboDK”+path+”.jpg”,path def getCurrentTime(): return time.strftime(‘%Y_%m_%d_%H_%M_%S_’+str(random.randint(0,99))) def Sanp(Path,Cam): return RDK.Cam2D_Snapshot(Path,Cam) def SetNodeValue(Node,value): DataType=Node.get_data_type_as_variant_type() DataValue=ua.DataValue(ua.Variant(value,DataType)) Node.set_data_value(DataValue) NodeSImagePath=client.get_node(NODE_SIMAGEPATH) flag=[False,False,False,False,False,False] photoTaken=[False,False,False,False,False,False] counts=0 start=0 End=False _busy=False try : while True: Busy,End,ImageIsSaved,Path=WriteNode() bStartProgram,bCanEnd=ReadNode() Pose=UR.Pose() if not _busy and bStartProgram : _busy=True PathArray=[] value = Prog.RunProgram() End=False if Prog.Busy(): NodeBusy.set_value(ua.DataValue(True)) if Pose == CameraPosition1.Pose() and not flag[0]: path,p=createImagePath(“001”) ret=Sanp(path,cam_item) print(‘Camera pos1..’) if ret: flag[0]=True PathArray.append(p) UR.setDO(‘CamIO_1’,1) elif Pose == CameraPosition2.Pose()and not flag[1]: path,p=createImagePath(“002”) ret=Sanp(path,cam_item) print(‘Camera pos2..’) if ret: UR.setDO(‘CamIO_2’,1) PathArray.append(p) flag[1]=True elif Pose == CameraPosition3.Pose()and not flag[2]: path,p=createImagePath(“003”) ret=Sanp(path,cam_item) print(‘Camera pos3..’) if ret: UR.setDO(‘CamIO_3’,1) PathArray.append(p) flag[2]=True elif Pose == CameraPosition4.Pose()and not flag[3]: path,p=createImagePath(“004”) ret=Sanp(path,cam_item) print(‘Camera pos4..’) if ret: UR.setDO(‘CamIO_4’,1) PathArray.append(p) flag[3]=True elif Pose == CameraPosition5.Pose()and not flag[4]: path,p=createImagePath(“005”) ret=Sanp(path,cam_item) print(‘Camera pos5..’) if ret: UR.setDO(‘CamIO_5’,1) PathArray.append(p) flag[4]=True elif Pose == CameraPosition6.Pose()and not flag[5]: path,p=createImagePath(“006”) ret=Sanp(path,cam_item) print(‘Camera pos6..’) if ret: UR.setDO(‘CamIO_6’,1) PathArray.append(p) flag[5]=True if flag[0] and flag[1] and flag[2] and flag[3] and flag[4] and flag[5]: SFTPClient.connect(config[‘host’], port = config[‘port’],username = config[‘username’],password = config[‘password’]) sftp_con = SFTPClient.open_sftp() for i in range(0,6): sftp_con.put(“C:\FTPFiles\RoboDK”+PathArray[i]+”.jpg”, “/home/root/coral/pycoral/test_data/”+PathArray[i]+”.jpg”) SFTPClient.close() SetNodeValue(NodeSImagePath,PathArray) NodeEnd.set_value(ua.DataValue(True)) End=True start=time.time() else: NodeBusy.set_value(ua.DataValue(False)) PathArray=[] for i in range(0,6): flag[i]=False if End: print(‘NodeEnd=True..’) NodeEnd.set_value(ua.DataValue(True)) if time.time()-start > 2 and False : print(‘NodeEnd=False..’) NodeEnd.set_value(ua.DataValue(False)) if bCanEnd: print(‘NodeEnd=False–Cam End..’) NodeEnd.set_value(ua.DataValue(False)) _busy=False except Exception as e: print(e) client.disconnect() |
Point1:SFTP Configuration
Please modify the IP/Username/Password of the SFTP Server(In this case, it is your PLCNEXT AXC F3152)
Point2:cert.der/key.pem Location
This is the cert and key for accessing the AXC F 3152 OPC Server, and please change the directory where the key and cert files are.

Point3:OPC-UA ENDPOINT
Enter the Username/Password of your PLCNEXT CPU.

Point4: OPCUA Endpoint/username/Password/Security
Enter the User/Password/Security information to access the OPCUA ENDPOINT.

ML1000 Python Script
The last is the Image classification script that I mentioned earlier.
Note that there is an –Input Arg from the previous Script, and it is necessary to enter parameters when executing Python, but now the Image is read directly from the File System, so we will delete the Arg part. The name of the screen is also sent to PLCApplicaton, the script will only read the screen according to the screen name.
| import grpc from google.protobuf.empty_pb2 import Empty from PROTO.Authentication_pb2 import CreateSessionRequest from PROTO.Authentication_pb2_grpc import AuthenticationStub from PROTO.IDataAccessService_pb2 import IDataAccessServiceReadSingleRequest, \ IDataAccessServiceReadRequest, IDataAccessServiceWriteSingleRequest, IDataAccessServiceWriteRequest from PROTO.IDataAccessService_pb2_grpc import IDataAccessServiceStub from PROTO.PLCnextBase_pb2 import CoreType from PROTO.ErrorCode_pb2 import ErrorCode #Opening a gRPC channel channel=grpc.insecure_channel(“unix:/run/plcnext/grpc.sock”) import argparse import time import numpy as np from PIL import Image from pycoral.adapters import classify from pycoral.adapters import common from pycoral.utils.dataset import read_label_file from pycoral.utils.edgetpu import make_interpreter def WriteSingle_StringValue(P_PortName,P_StringValue): stub=IDataAccessServiceStub(channel) response1= IDataAccessServiceWriteSingleRequest() response1.data.PortName= P_PortName response1.data.Value.TypeCode=19 response1.data.Value.StringValue=P_StringValue response=stub.WriteSingle(response1) return response def WriteSingle_BoolValue(P_PortName,value): stub=IDataAccessServiceStub(channel) response1= IDataAccessServiceWriteSingleRequest() response1.data.PortName= P_PortName response1.data.Value.TypeCode=2 response1.data.Value.BoolValue=value response=stub.WriteSingle(response1) return response def read_single_value(stub, port_name): single_read_request = IDataAccessServiceReadSingleRequest() single_read_request.portName=port_name return stub.ReadSingle(single_read_request) def read_multiple_values(stub, port_names): read_request = IDataAccessServiceReadRequest() read_request.portNames.extend(port_names) return stub.Read(read_request) def write_single_Stringarray(stub, port_name, value,index): single_write_request = IDataAccessServiceWriteSingleRequest() single_write_request.data.PortName = port_name+'[‘+str(index)+’]’ single_write_request.data.Value.TypeCode = 19 single_write_request.data.Value.StringValue=value return stub.WriteSingle(single_write_request) def write_single_Realarray(stub, port_name, value,index): single_write_request = IDataAccessServiceWriteSingleRequest() single_write_request.data.PortName = port_name+'[‘+str(index)+’]’ single_write_request.data.Value.TypeCode = 13 single_write_request.data.Value.FloatValue=value return stub.WriteSingle(single_write_request) #TPU Path setup LABELPATH=’/home/root/coral/pycoral/test_data/imagenet_labels_2.txt’ MODELPATH=’/home/root/coral/pycoral/test_data/mobilenet_v1_0.75_192_quant_edgetpu.tflite’ top_k=2 threshold=0.0 count=2 input_mean=128 input_std=128 DEBUG=False PORTS=[‘Arp.Plc.Eclr/Main1.ReadFromRoboDK.sImagePath’] WORKING_DIR=’/home/root/coral/pycoral/test_data/’ def main(): labels = read_label_file(LABELPATH) if LABELPATH else {} interpreter = make_interpreter(*MODELPATH.split(‘@’)) interpreter.allocate_tensors() # Model must be uint8 quantized if common.input_details(interpreter, ‘dtype’) != np.uint8: raise ValueError(‘Only support uint8 input type.’) size = common.input_size(interpreter) params = common.input_details(interpreter, ‘quantization_parameters’) scale = params[‘scales’] zero_point = params[‘zero_points’] mean = input_mean std = input_std bInit=False bBusy=False stub=IDataAccessServiceStub(channel) step=0 #————————————————————- while True: PathArray=[] bStart2Classification = read_single_value(stub, ‘Arp.Plc.Eclr/Main1.Write2ML1000.bStart2Classification’)._ReturnValue.Value.BoolValue bPaths=read_multiple_values(stub, PORTS) if bStart2Classification and step ==0 : print(‘command is received.’) bBusy=True WriteSingle_BoolValue(“Arp.Plc.Eclr/Main1.ReadFromML1000.bBusy”, True) if not bInit: bInit=True Paths=bPaths._ReturnValue[0].Value.ArrayValue for path in Paths.ArrayElements: PathArray.append(path.StringValue) print(path.StringValue) step=10 # Run inference if step==10: i=0 for path in PathArray: image = Image.open(WORKING_DIR+path+”.jpg”).convert(‘RGB’).resize(size, Image.ANTIALIAS) if abs(scale * std – 1) < 1e-5 and abs(mean – zero_point) < 1e-5: # Input data does not require preprocessing. common.set_input(interpreter, image) else: # Input data requires preprocessing normalized_input = (np.asarray(image) – mean) / (std * scale) + zero_point np.clip(normalized_input, 0, 255, out=normalized_input) common.set_input(interpreter, normalized_input.astype(np.uint8)) print(‘—-INFERENCE TIME—-‘) print(‘Note: The first inference on Edge TPU is slow because it includes’, ‘loading the model into Edge TPU memory.’) for _ in range(count): start = time.perf_counter() interpreter.invoke() inference_time = time.perf_counter() – start classes = classify.get_classes(interpreter, top_k, threshold) print(‘%.1fms’ % (inference_time * 1000)) print(‘——-RESULTS——–‘) write=False for c in classes: print(‘%s: %.5f’ % (labels.get(c.id, c.id), c.score)) if write is False: result=labels.get(c.id, c.id) score=c.score write=True write_single_Stringarray(stub,’Arp.Plc.Eclr/Main1.ReadFromML1000.Result_label’,result,i) write_single_Realarray(stub,’Arp.Plc.Eclr/Main1.ReadFromML1000.Result_Score’,score,i) print(i) i=i+1 result=(‘%s’ % (labels.get(c.id, c.id))) WriteSingle_StringValue(“Arp.Plc.Eclr/Main1.INT_A”, result) step=20 if step ==20: bBusy=False WriteSingle_BoolValue(“Arp.Plc.Eclr/Main1.ReadFromML1000.bBusy”, False) WriteSingle_BoolValue(“Arp.Plc.Eclr/Main1.ReadFromML1000.bFinished”, True) if not bStart2Classification and step==20: WriteSingle_BoolValue(“Arp.Plc.Eclr/Main1.ReadFromML1000.bFinished”, False) step=0 bInit=False if __name__ == ‘__main__’: main() |
Point1:Label/tfilte Location
Because we do not need any input parameters for Python script, please set the Model file and Label File path.

Point2; The Image location
Please set the path for the image saving directory that you received from RoboDK.

Result
Download the Project
Please follow this link to download the project.
https://github.com/soup01Threes/PLCNEXT/blob/main/Demo_PLCNEXT_DEMO_ML1000_ROBODK.zip
- cert.der,key.pem are the files that used for login the OPCUA Server PLCNEXT AXC F3152
- Demo_RoboDK_PLCNEXT_Image.rdk – The RoboDK Project
- imagenet_labels_2.txt – Label File
- mobilenet_v1_0.75_192_quant_edgetpu.tfite – Model File
- image_classification_plcnext_robodk.py – the script for image classification
- robodk_script.py – the script inside robodk
- PLCNEXT_DEMO_ML1000_ROBODK.pcweax – the PLCNEXT Project.
