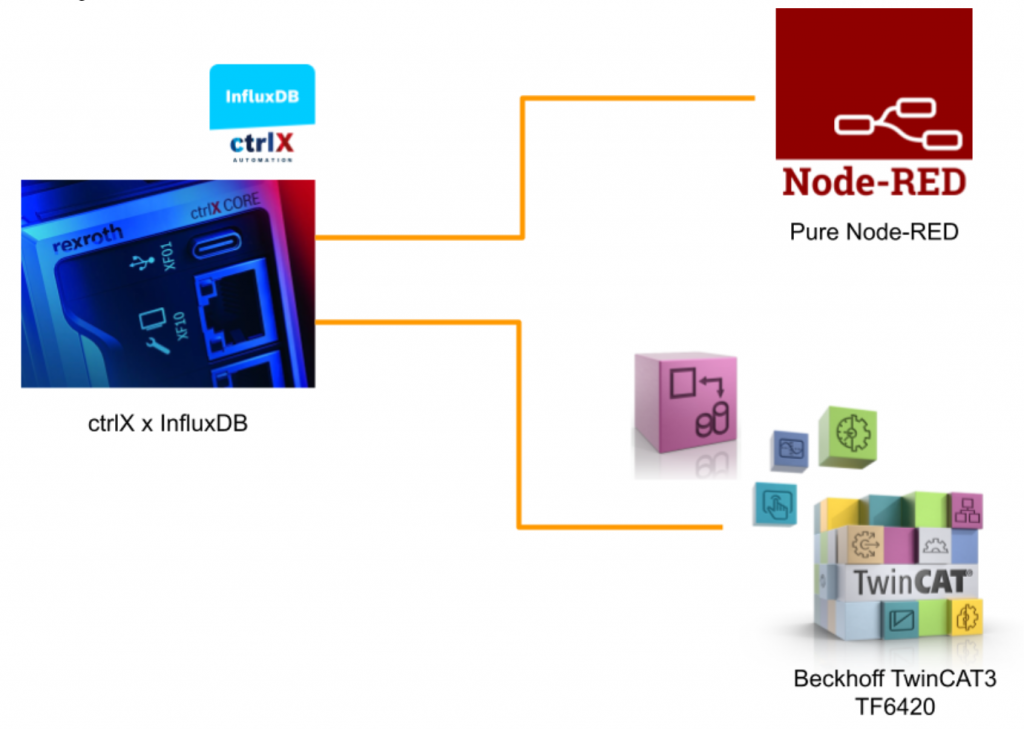
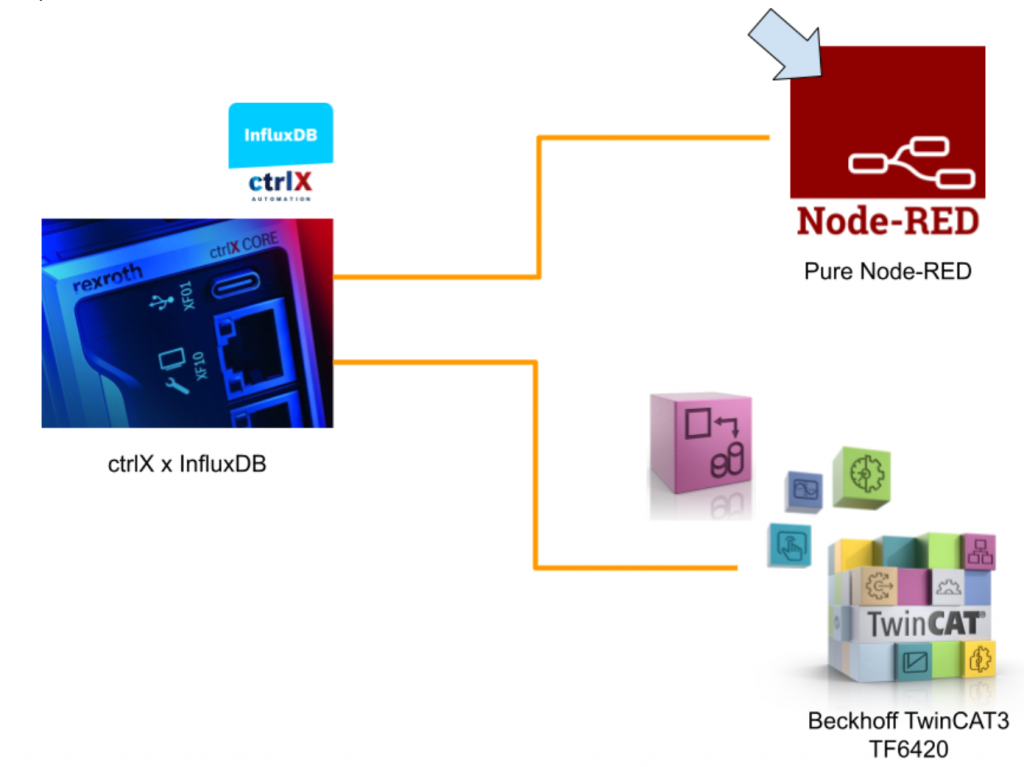
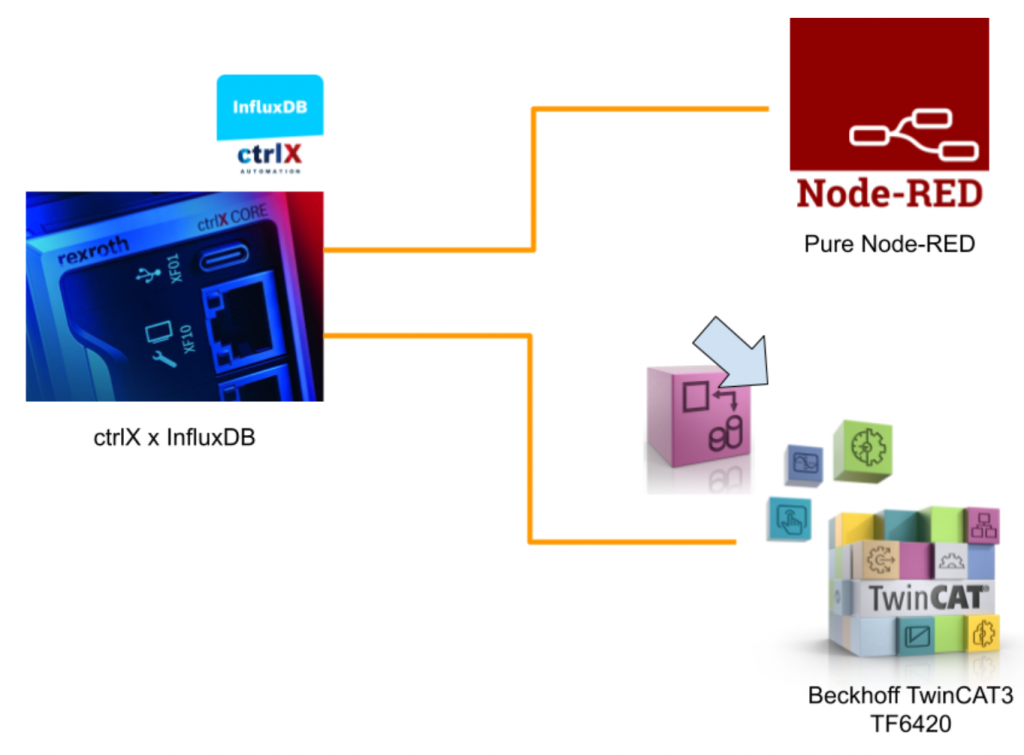
In this article, we will use the InfluxDB APP in ctrlX to set up InfluxDB, send Queries from Node-RED and TwinCAT3 TF6420 to a time series database, and create a simple Dashboard in InfluxDB.
Let’s get started!
InfluxDB?
The InfluxDataTM* data platform InfluxDB is designed and optimised to process large volumes of time-stamped data from sensors, applications, users and systems. It also facilitates the collection, storage and visualisation of large volumes of time-series data.

ctrlX AUTOMATION – InfluxDB
InfluxDB is available as an app for ctrlX AUTOMATION InfluxDB is not just a database, it collects and analyzes data from almost all sources, including MQTT, OPC UA and Modbus, so a number of Open source Telegraf Plug-ins are provided.

Why use InfluxDB?
Using InfluxDB offers a number of benefits. For example,
- Fast processing of time series data
- Data analysis using Data Explorer
- Built-in dashboards for direct viewing of data
InfluxDB is also written in Google’s programming language Go (Golang), and InfluxDB 2.0 is written in a new language called Flux Flux is optimized for database extraction, transformation and loading processes.
Its syntax is based on JavaScript, a common language, and the main advantage of Flux is the ability to integrate different data sources using, for example, third-party APIs.
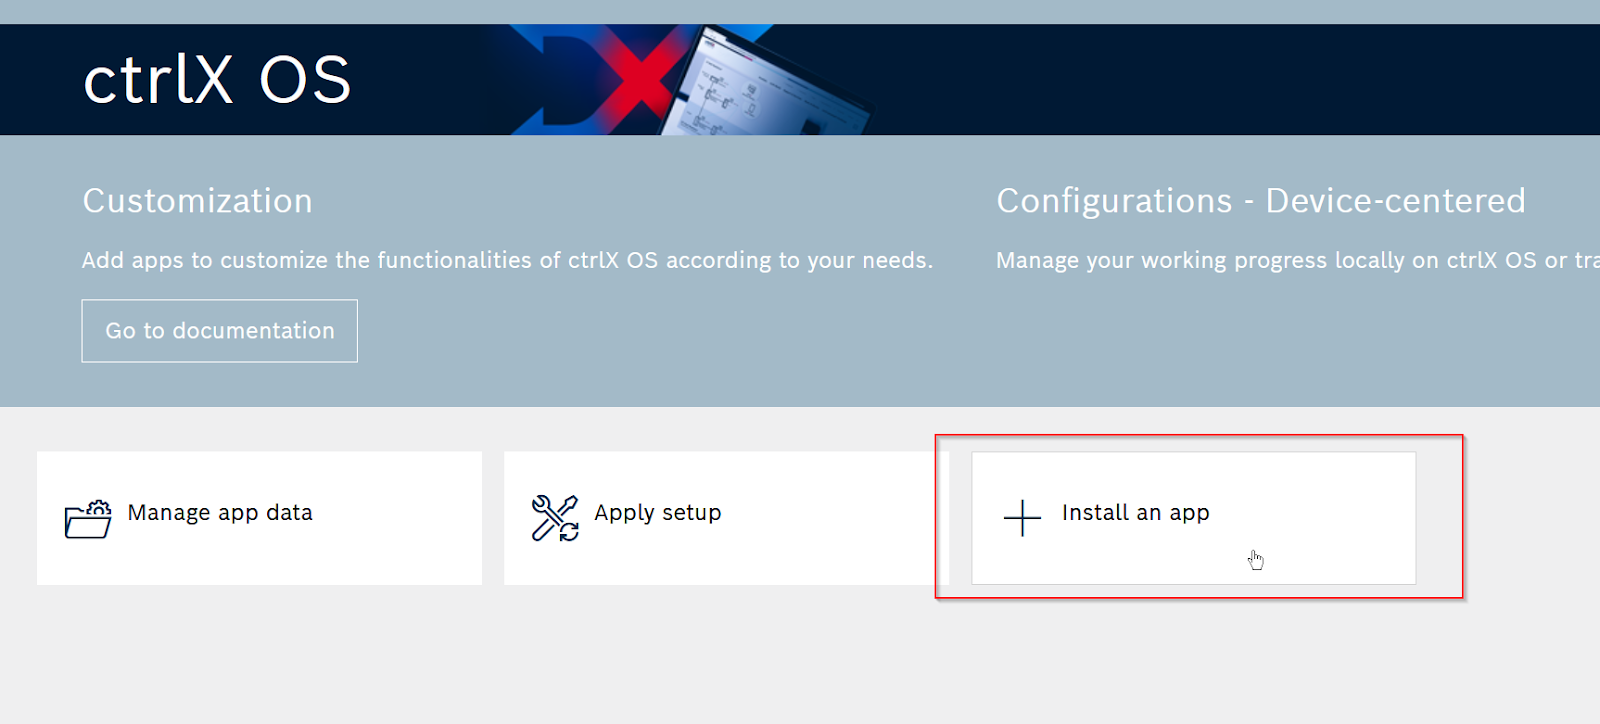
Install APP
Open the ctrlX web server and click ‘Install an app’ to install the APP.
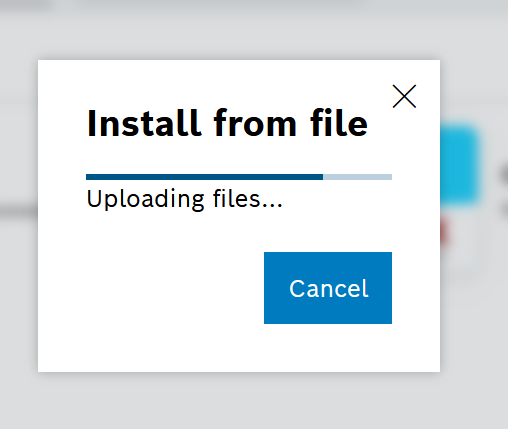
Click on ‘Install from file’.

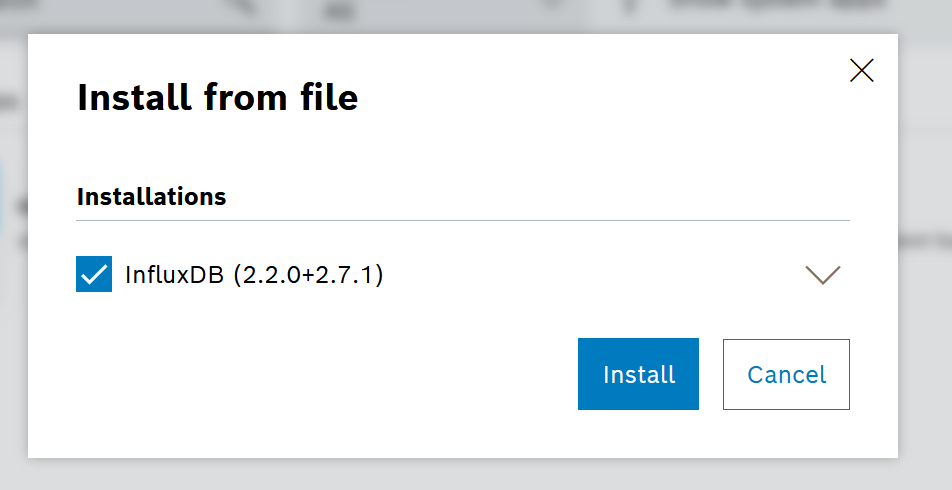
InfluxDB Appを選び、App FileをOSにUploadしてください。
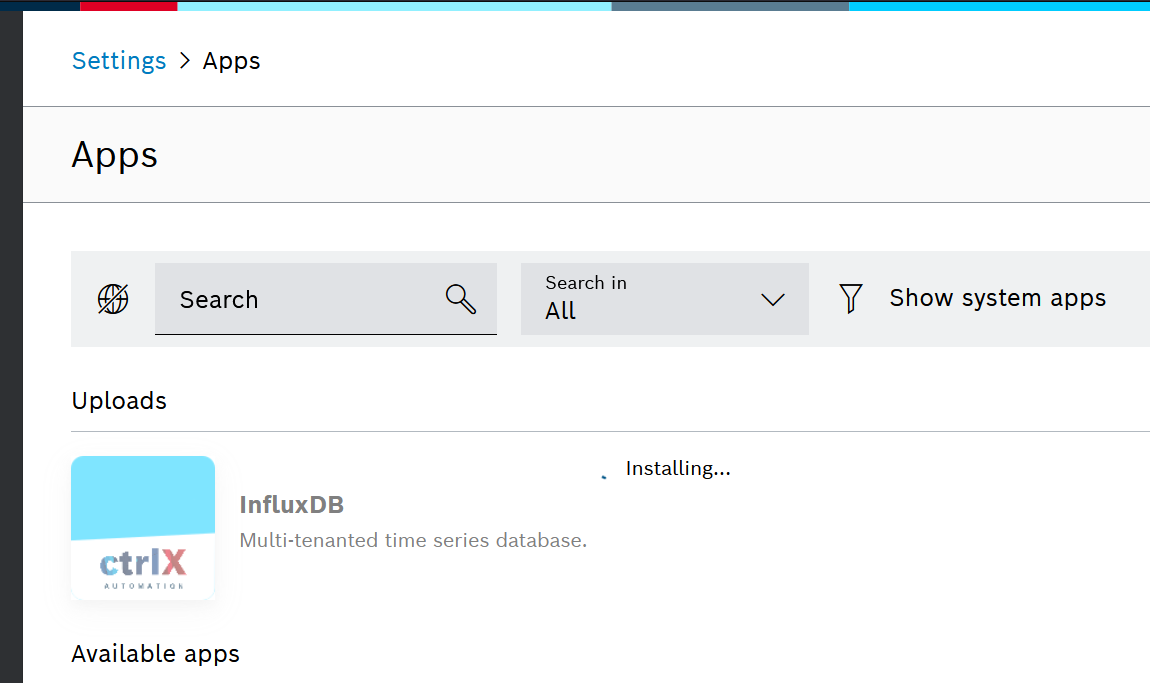
Install the InfluxDB App with the “Install” button.
just a second..
Done!
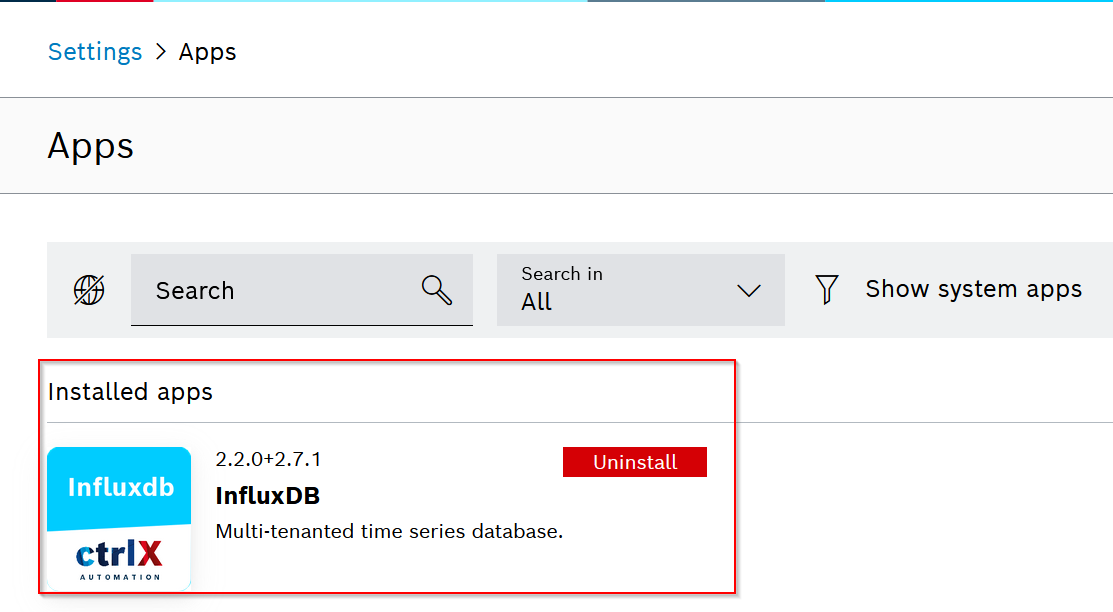
To the left of the web server, there will now be an entry called ‘InfluxDB’.
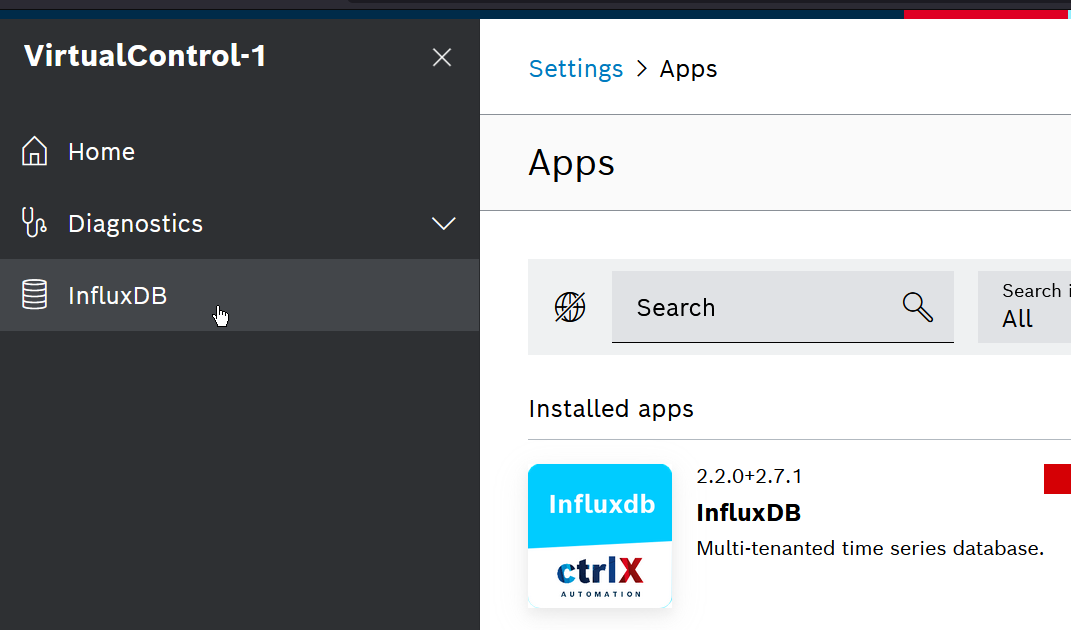
Configure Click screen?
Next, click “GET STARTED” to build the InfluxDB App installed on the ctrlX OS,

The initial User settings screen appears.
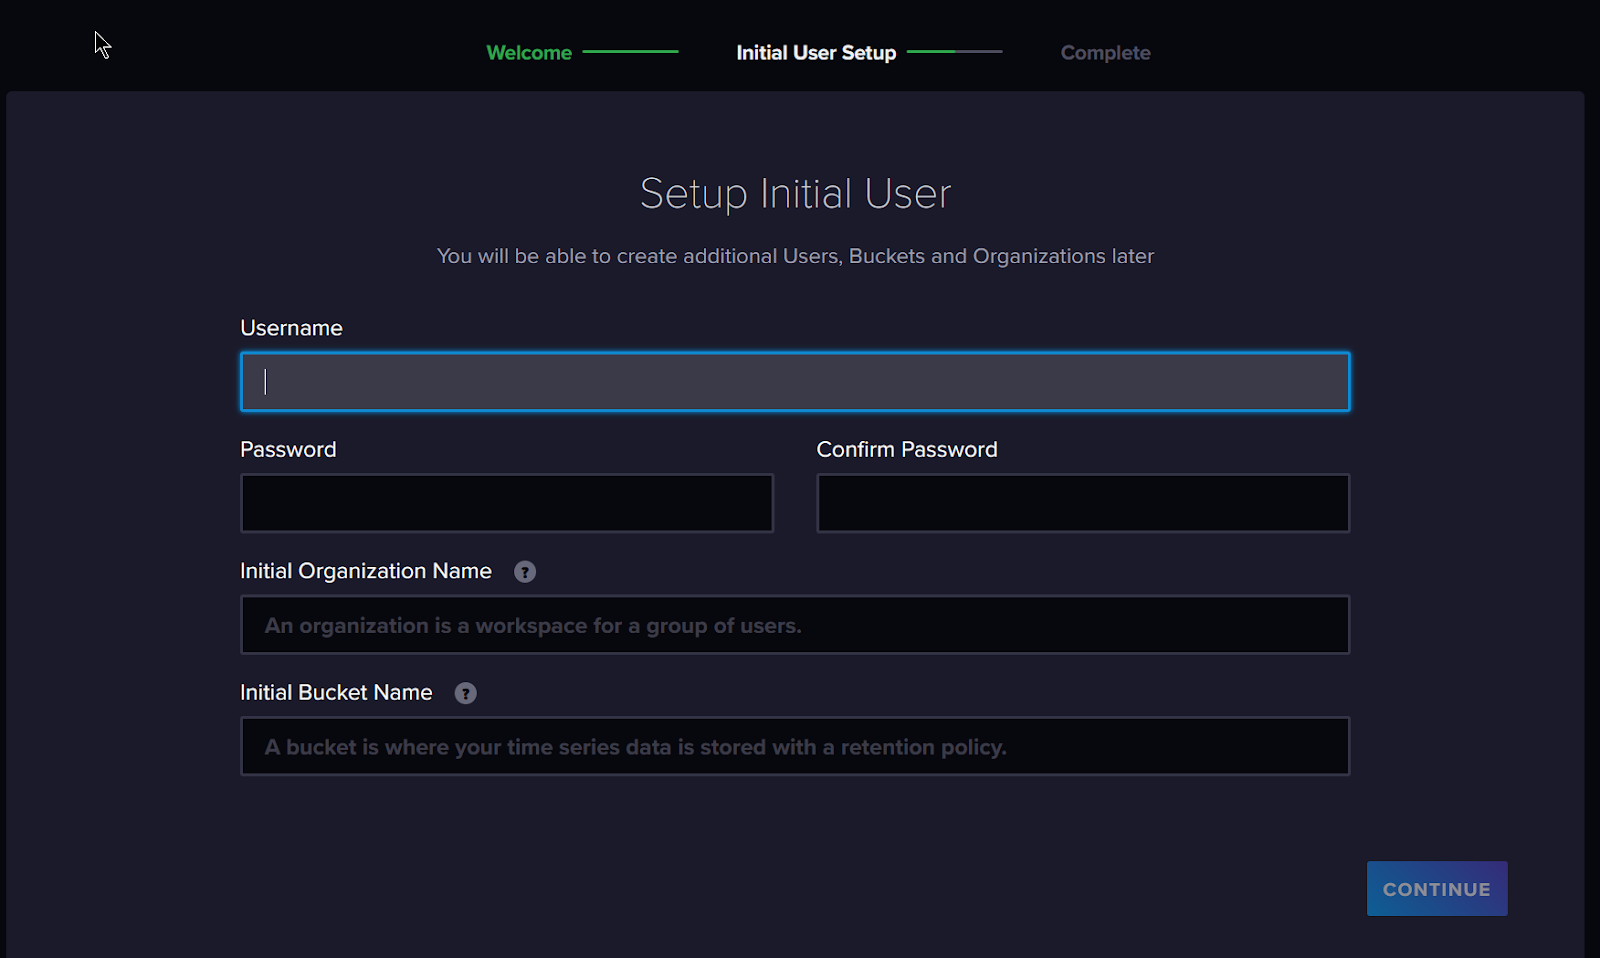
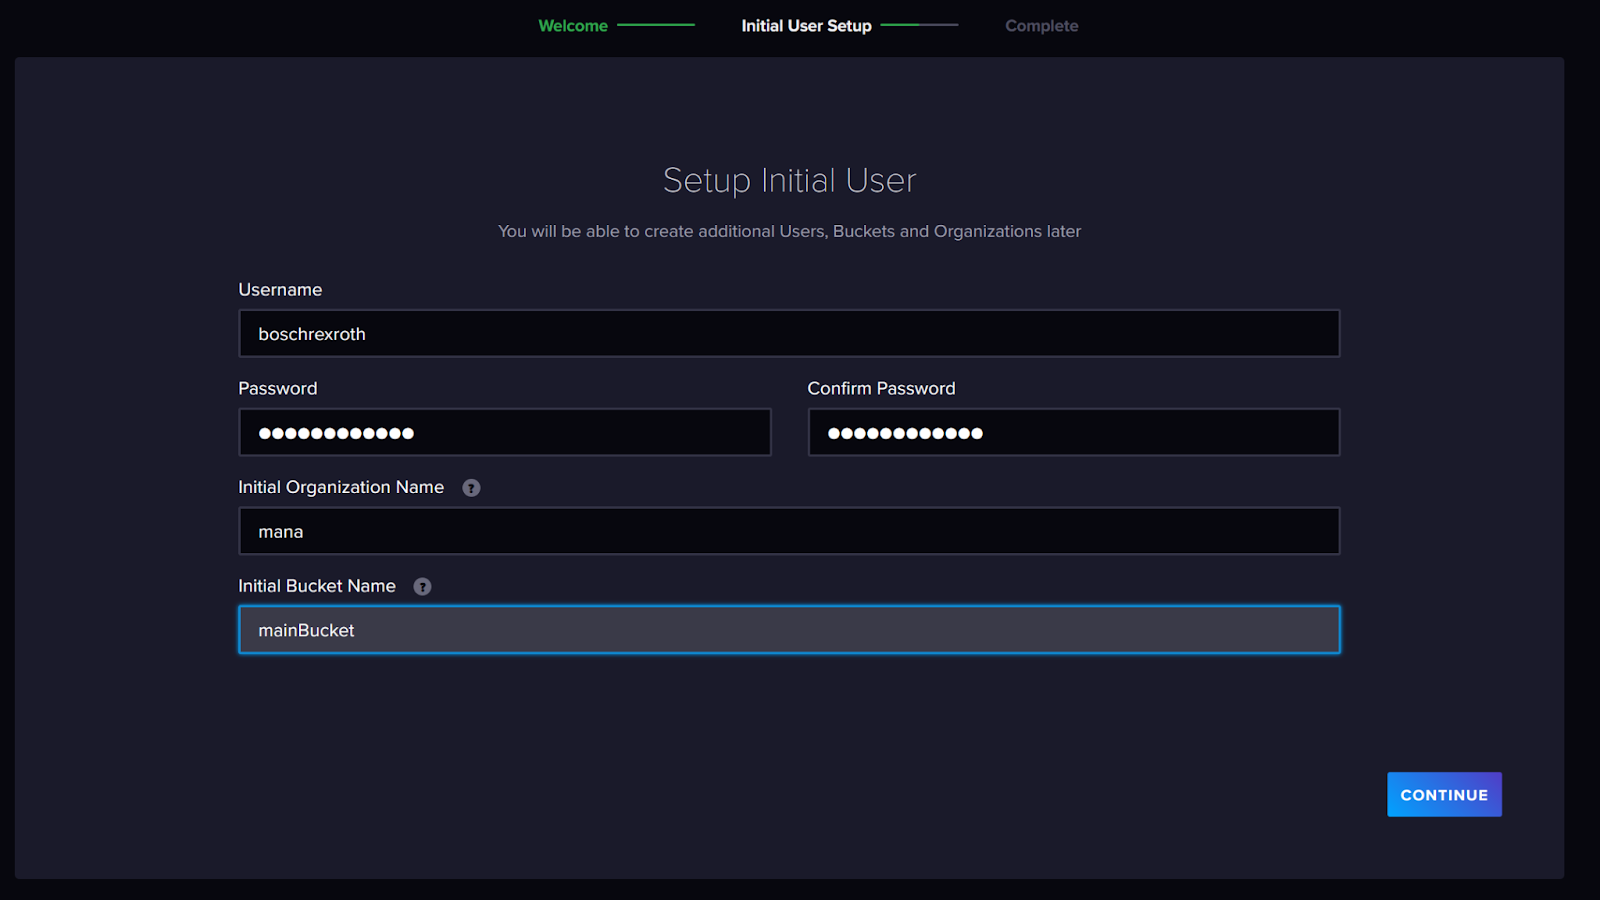
Enter the User and Bucket names and proceed with CONTINUE.
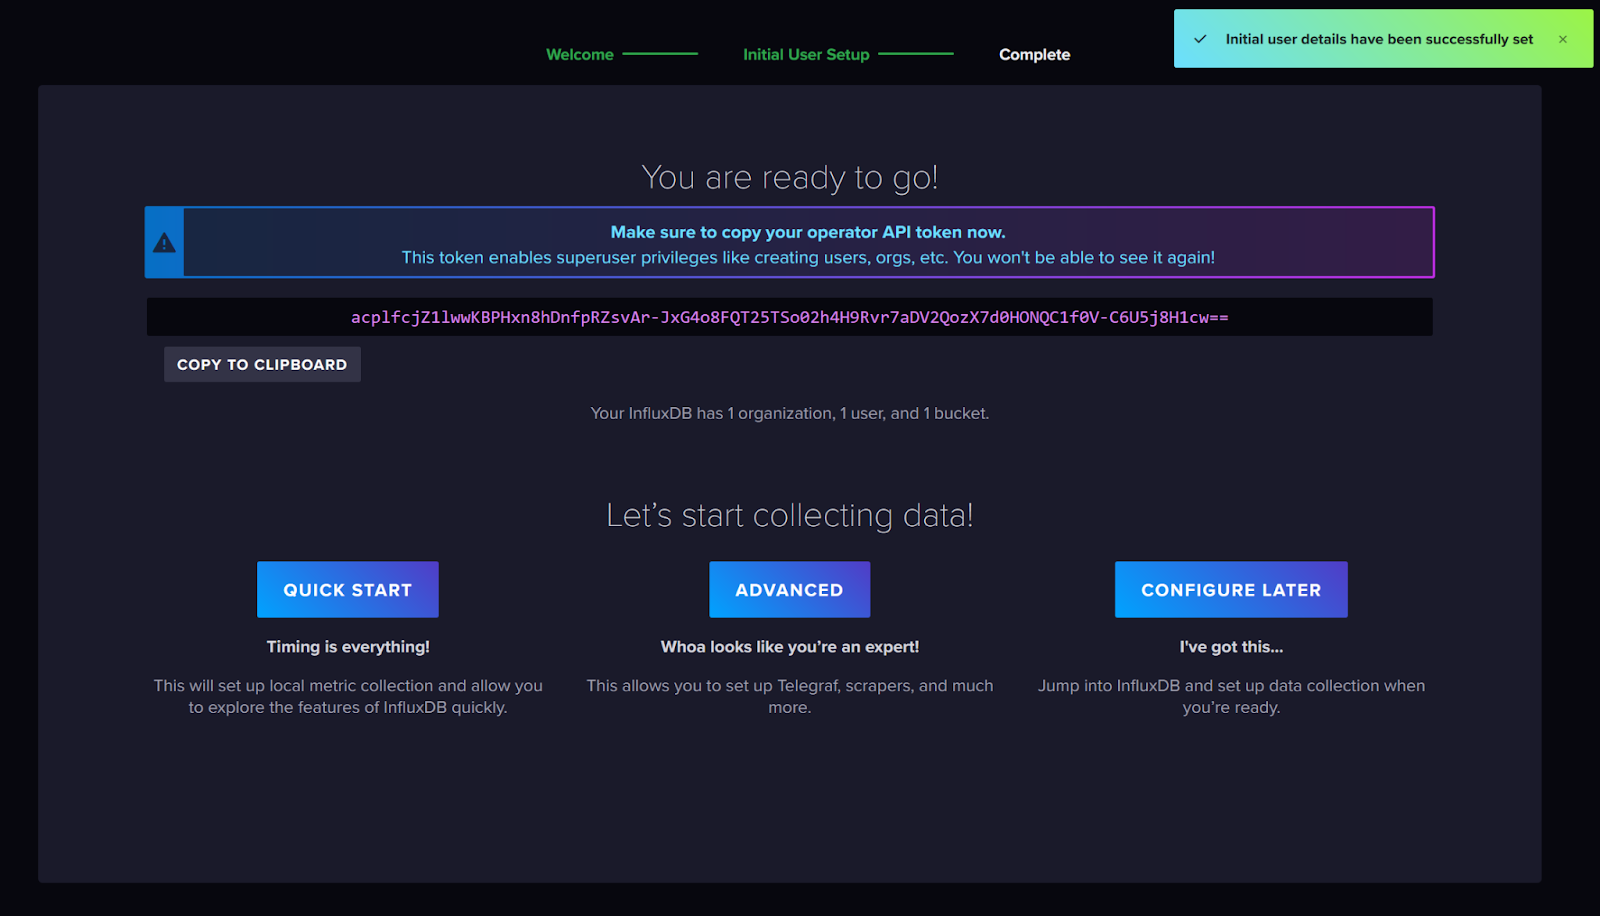
Done!An API Token is displayed, which is required to access the InfluxDB App from an external device, and can be copied and pasted on Notepad or similar.
Done!This is the first InfluxDB App screen.
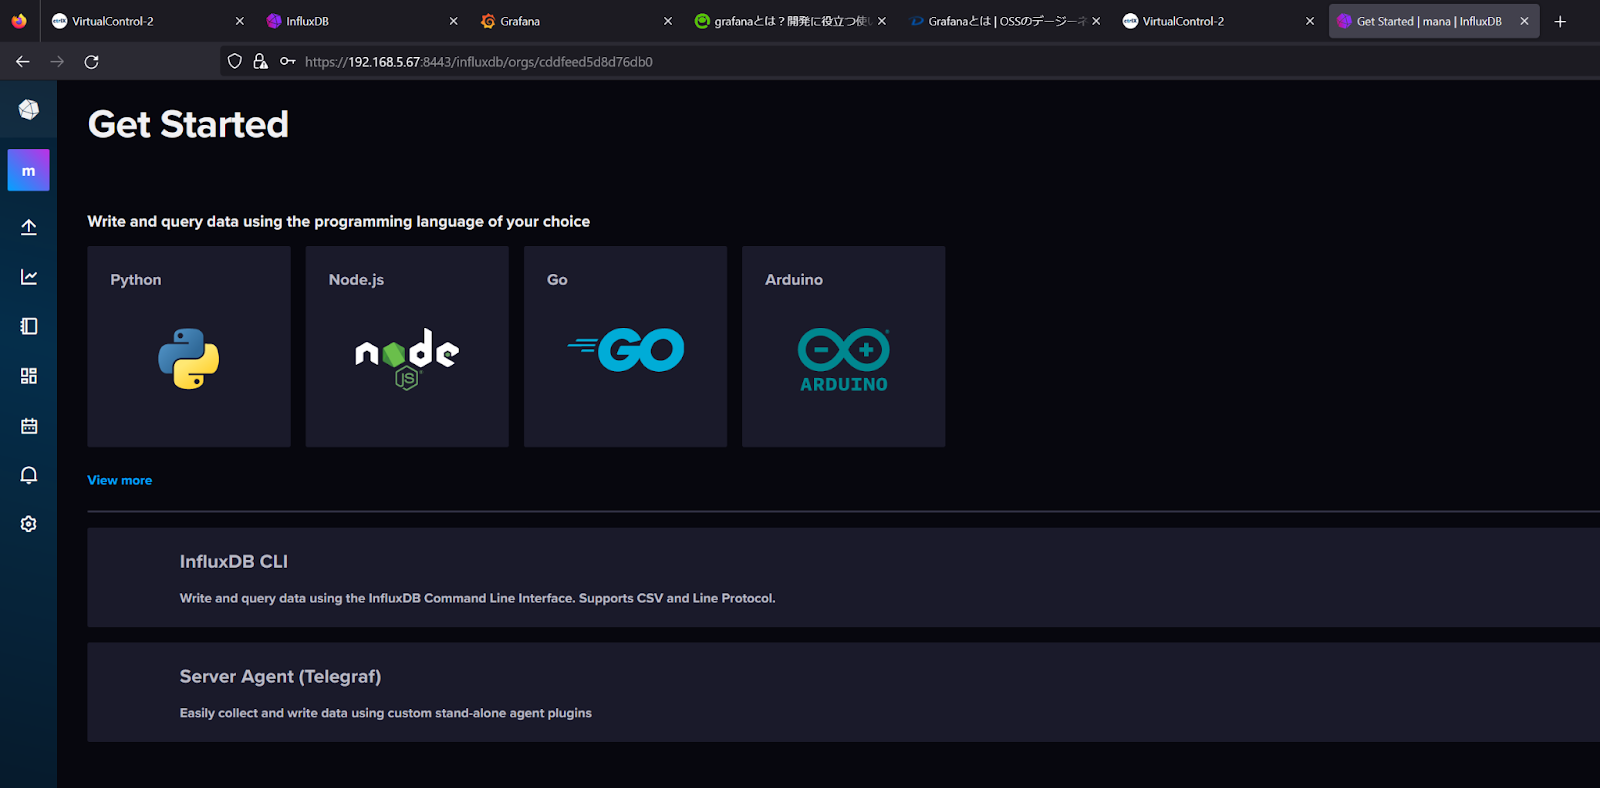
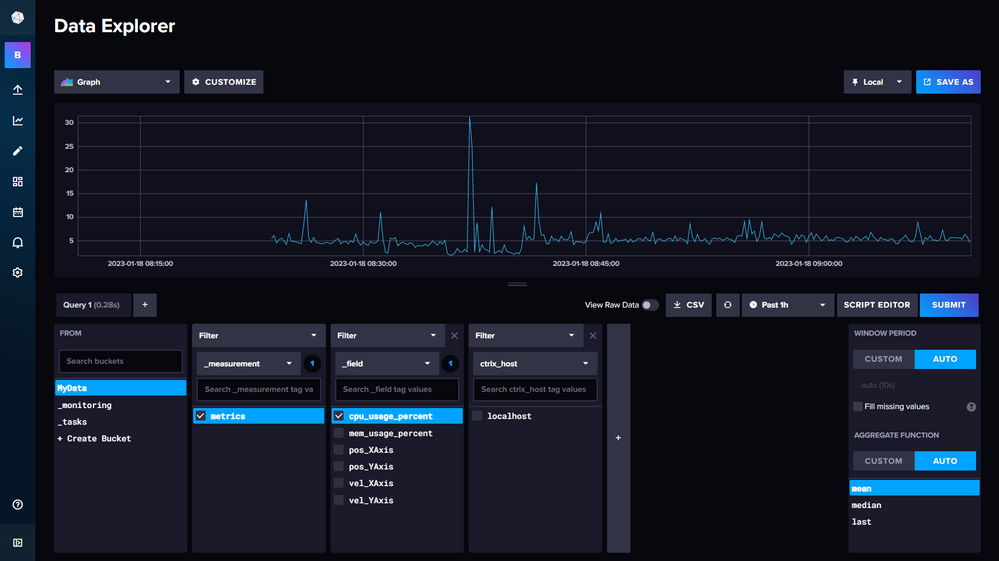
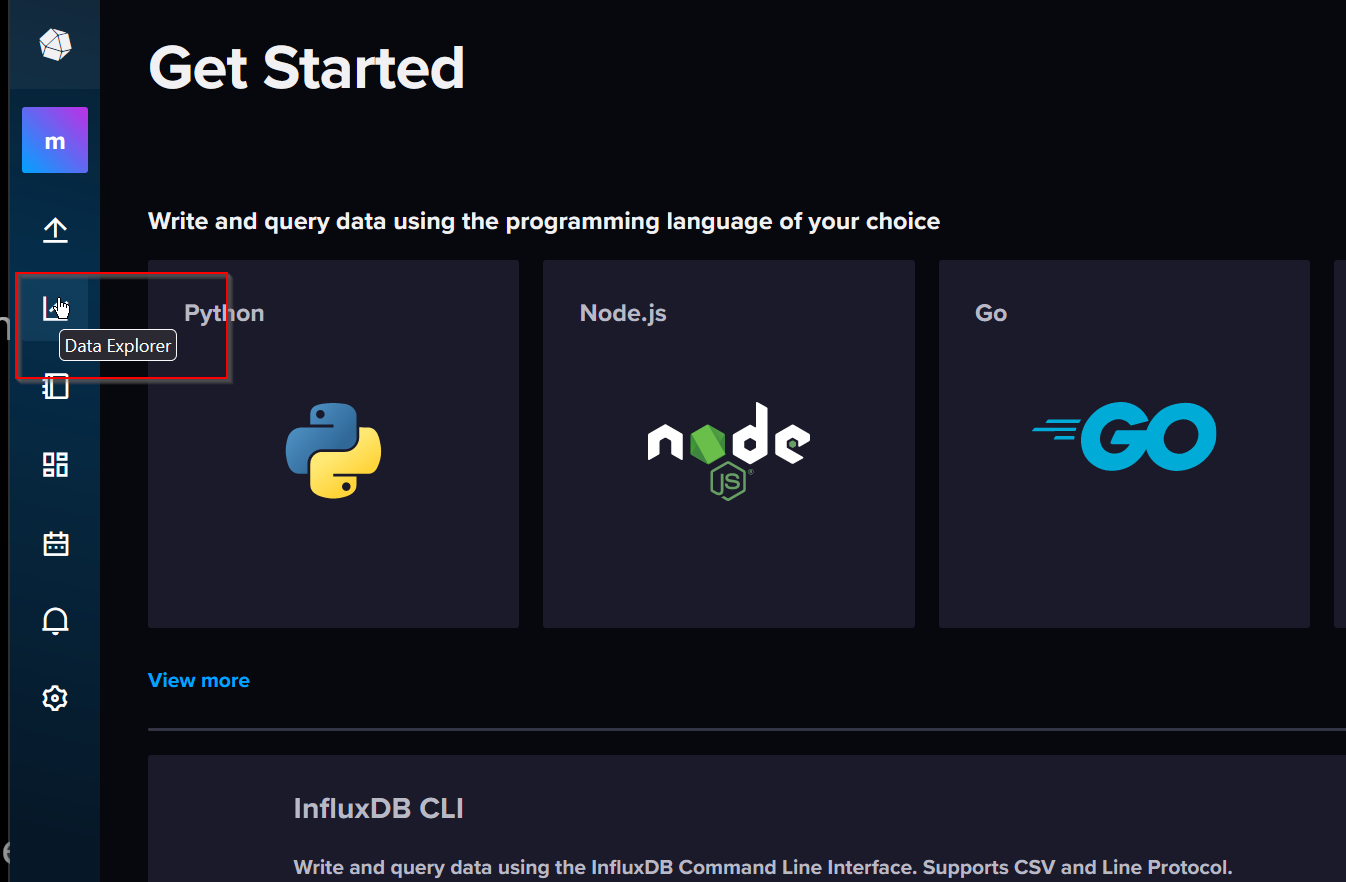
Click on ‘Data Explorer’ in the right-hand Slide Bar.
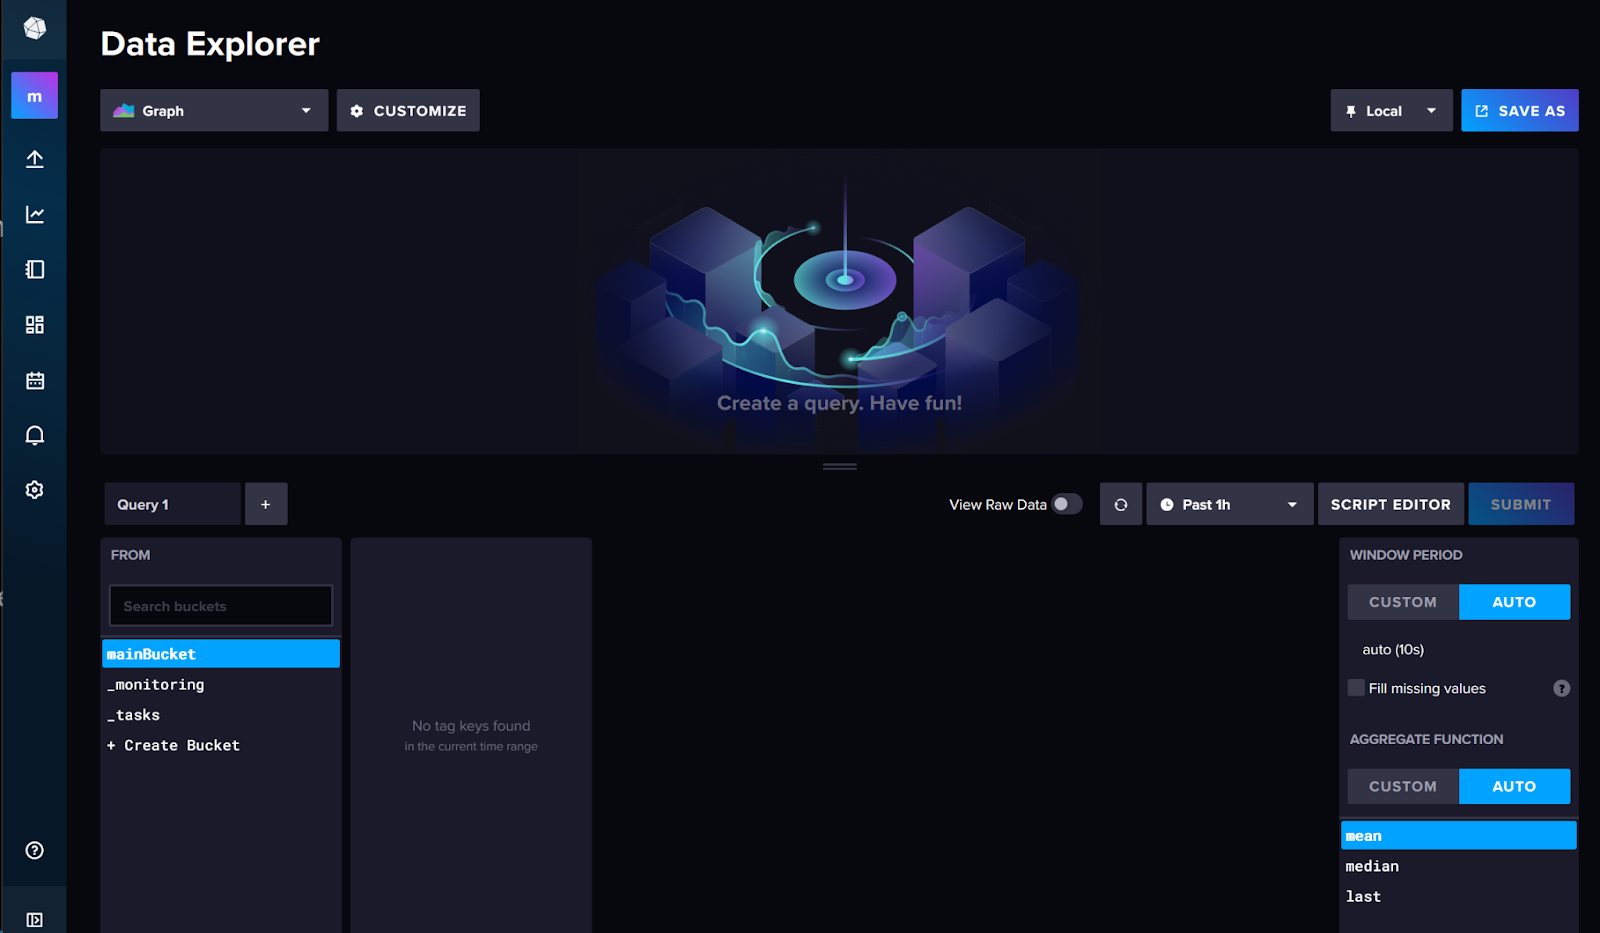
This is the Data Explorer screen, which allows you to visualise the time series data stored in InfluxDB.
Reference Video
This is the video description Version for this article.
Reference Link
Implementation From Node Red
Before connecting to the Beckhoff TwinCAT3 TF6420, a communication test is first performed from Node-Red.
This is the library used in this article to test the communication between Node-Red and the ctrlX InfluxDB App.
| npm install node-red-contrib-influxdb |
You can find more information on the relevant Node from the Link below.
https://flows.nodered.org/node/node-red-contrib-influxdb
Node-Red Side
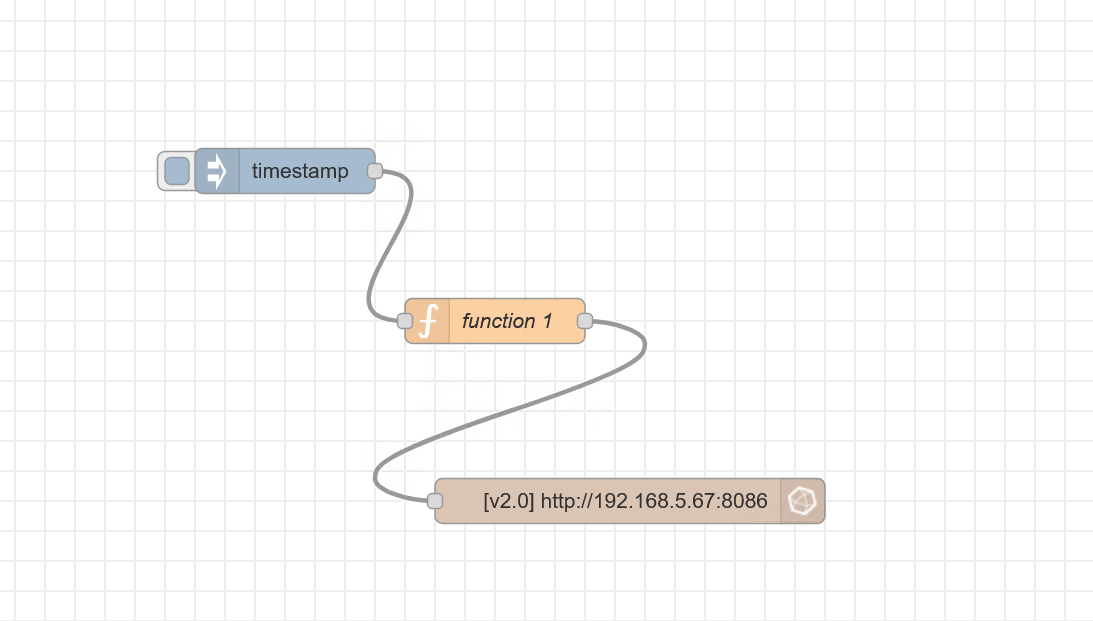
After installing the InfluxDB Node, you will find the InfluxDB-related Node in the Editor screen > Storge item in Node-Red Add Influx bath to Flow.

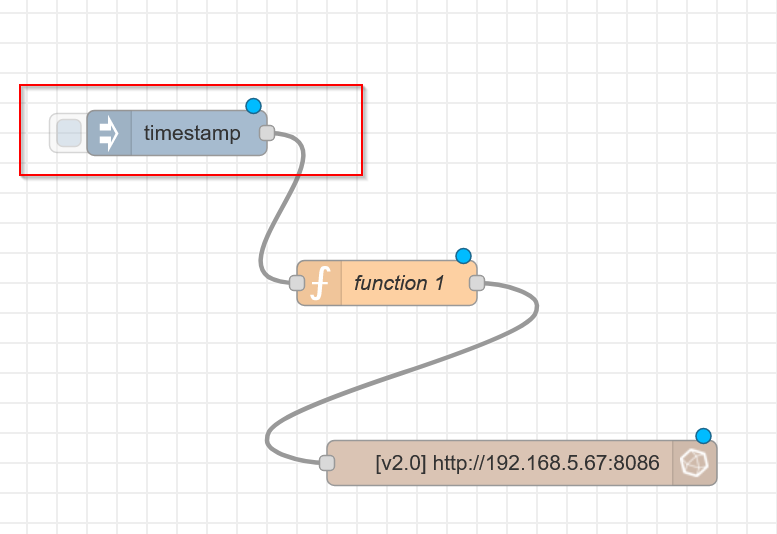
As shown in the diagram below, the Trigger Node of the TimeStamp flows into the input of the Function Node and the output of the Function Node is connected to the Influx batch.
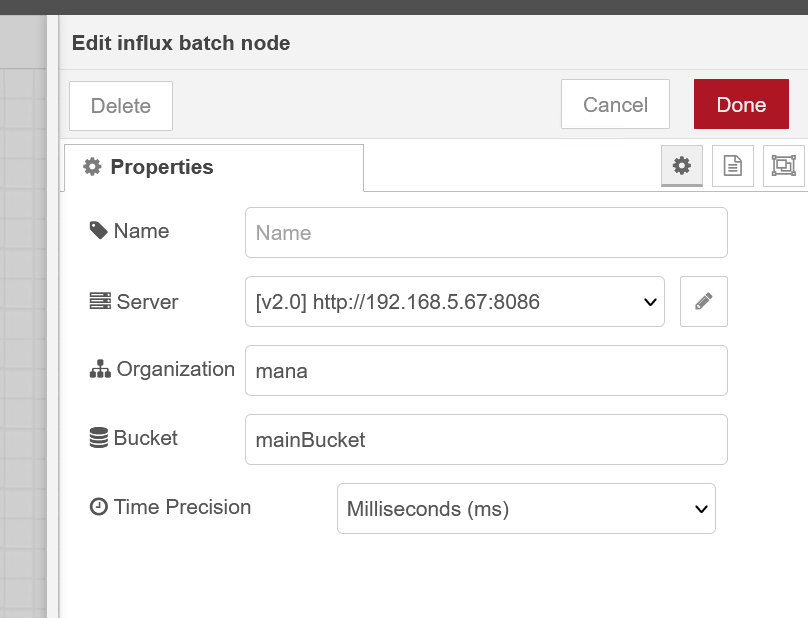
Configure Database Configuration
The next step is to connect InfluxDB.
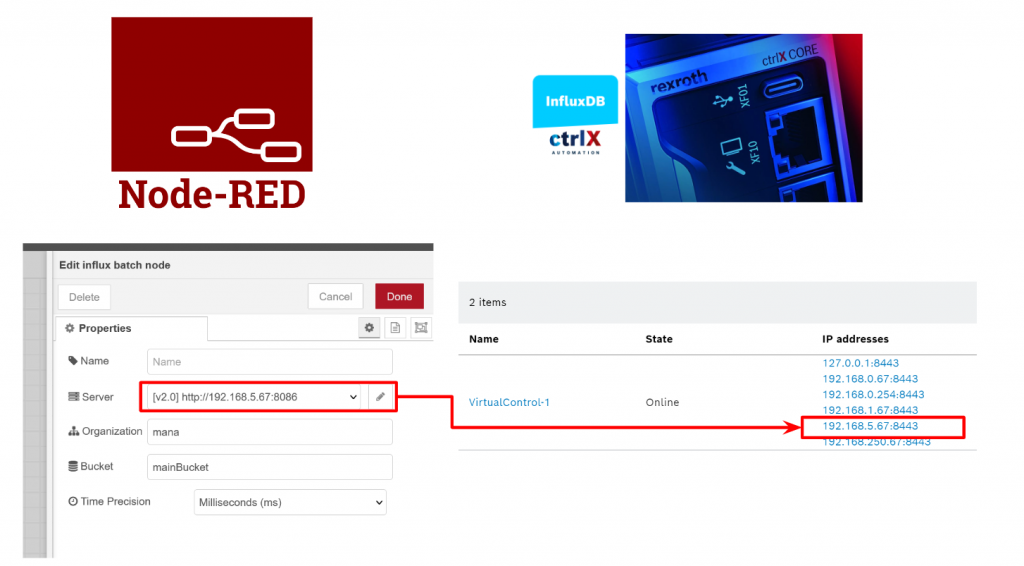
Server
Server is the IP address of the ctrlX OS.
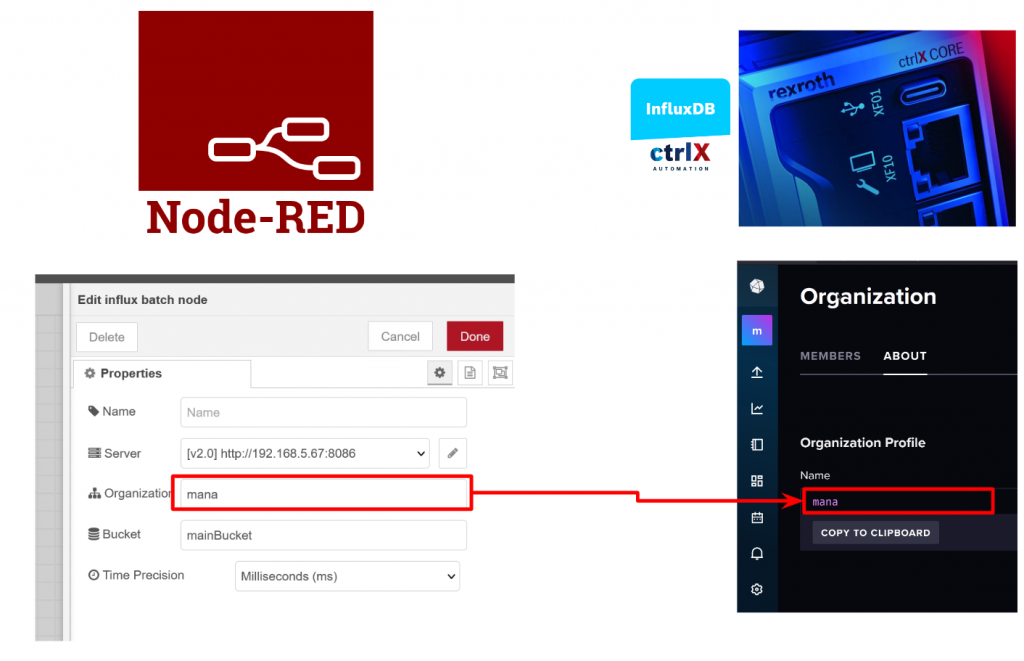
Organization
The Organisation is the name of the organization that was initially set up in ctrlX InfluxDB earlier, in this case “mana”.
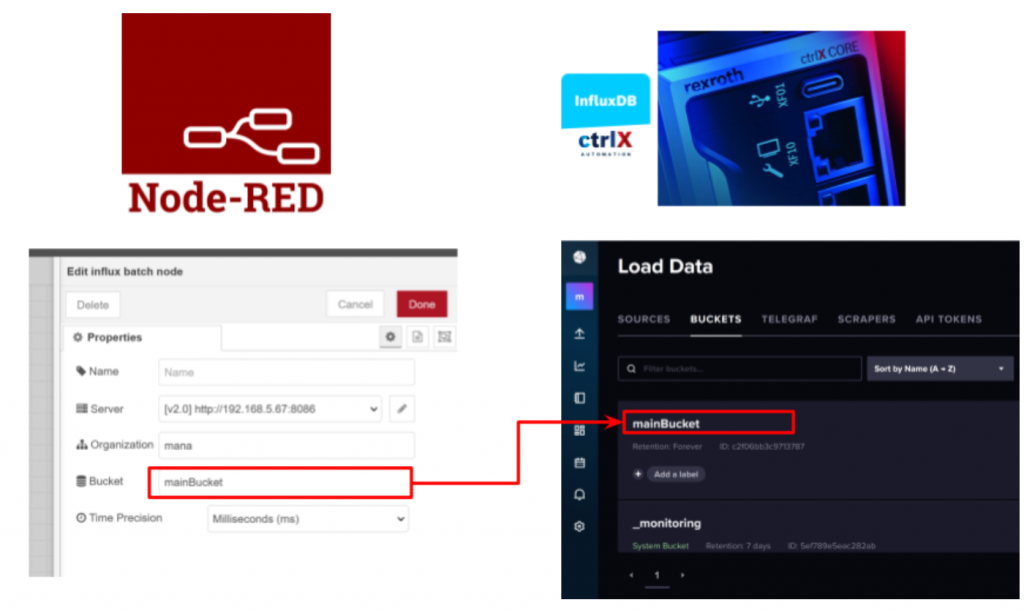
Bucket
The bucket name will be the bucket name initially set in ctrlX InfluxDB earlier, this time “mainBucket”.
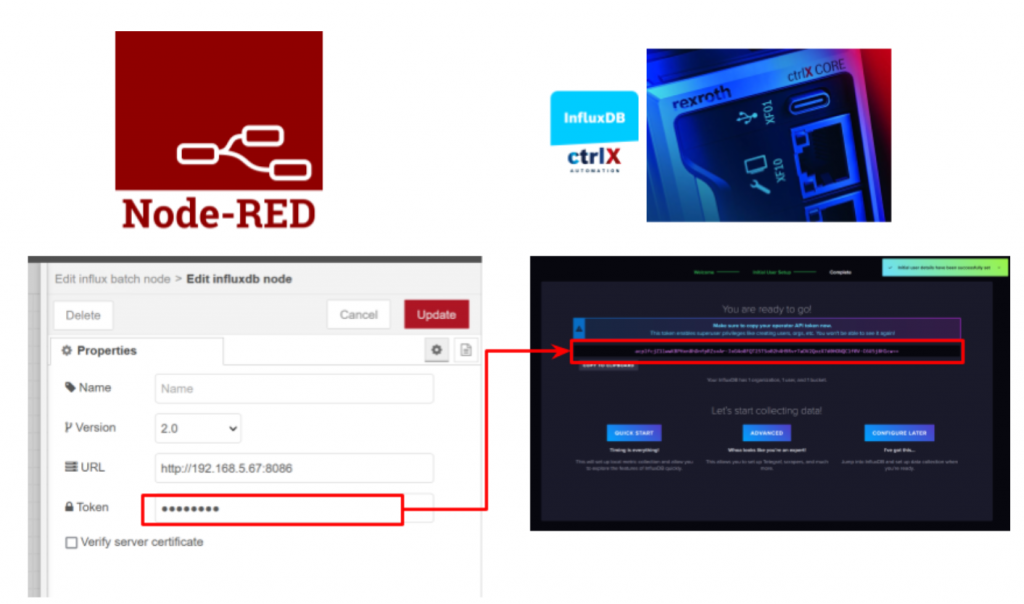
Token
Token is the authentication key that Node-Red needs to access InfluxDB.
Fnction Code Node
| msg.payload = [ { measurement: “weather_sensor”, fields: { temp: 5.5, light: 481, humidity: 51 }, tags:{ location:”garden” }, timestamp: new Date() }, { measurement: “alarm_sensor”, fields: { proximity: 1003, temp: 19.5 }, tags:{ location:”home” }, timestamp: new Date() } ]; return msg; |
Result
Deploy Flow, click on timestamp and send Data to InfluxDB.
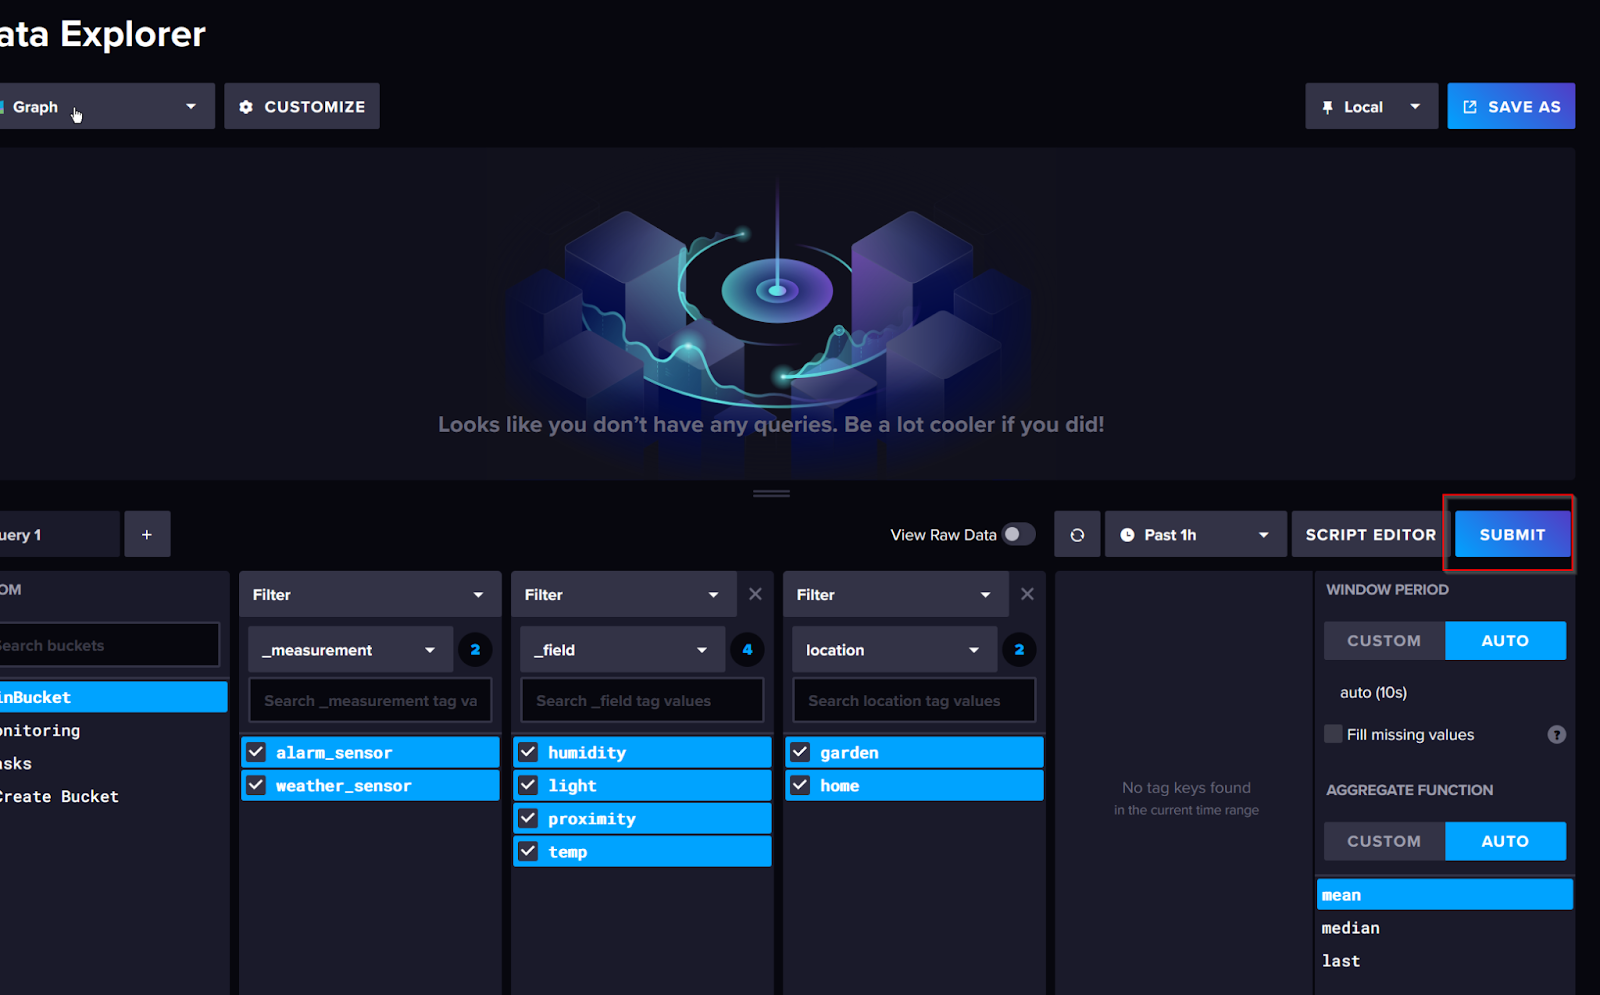
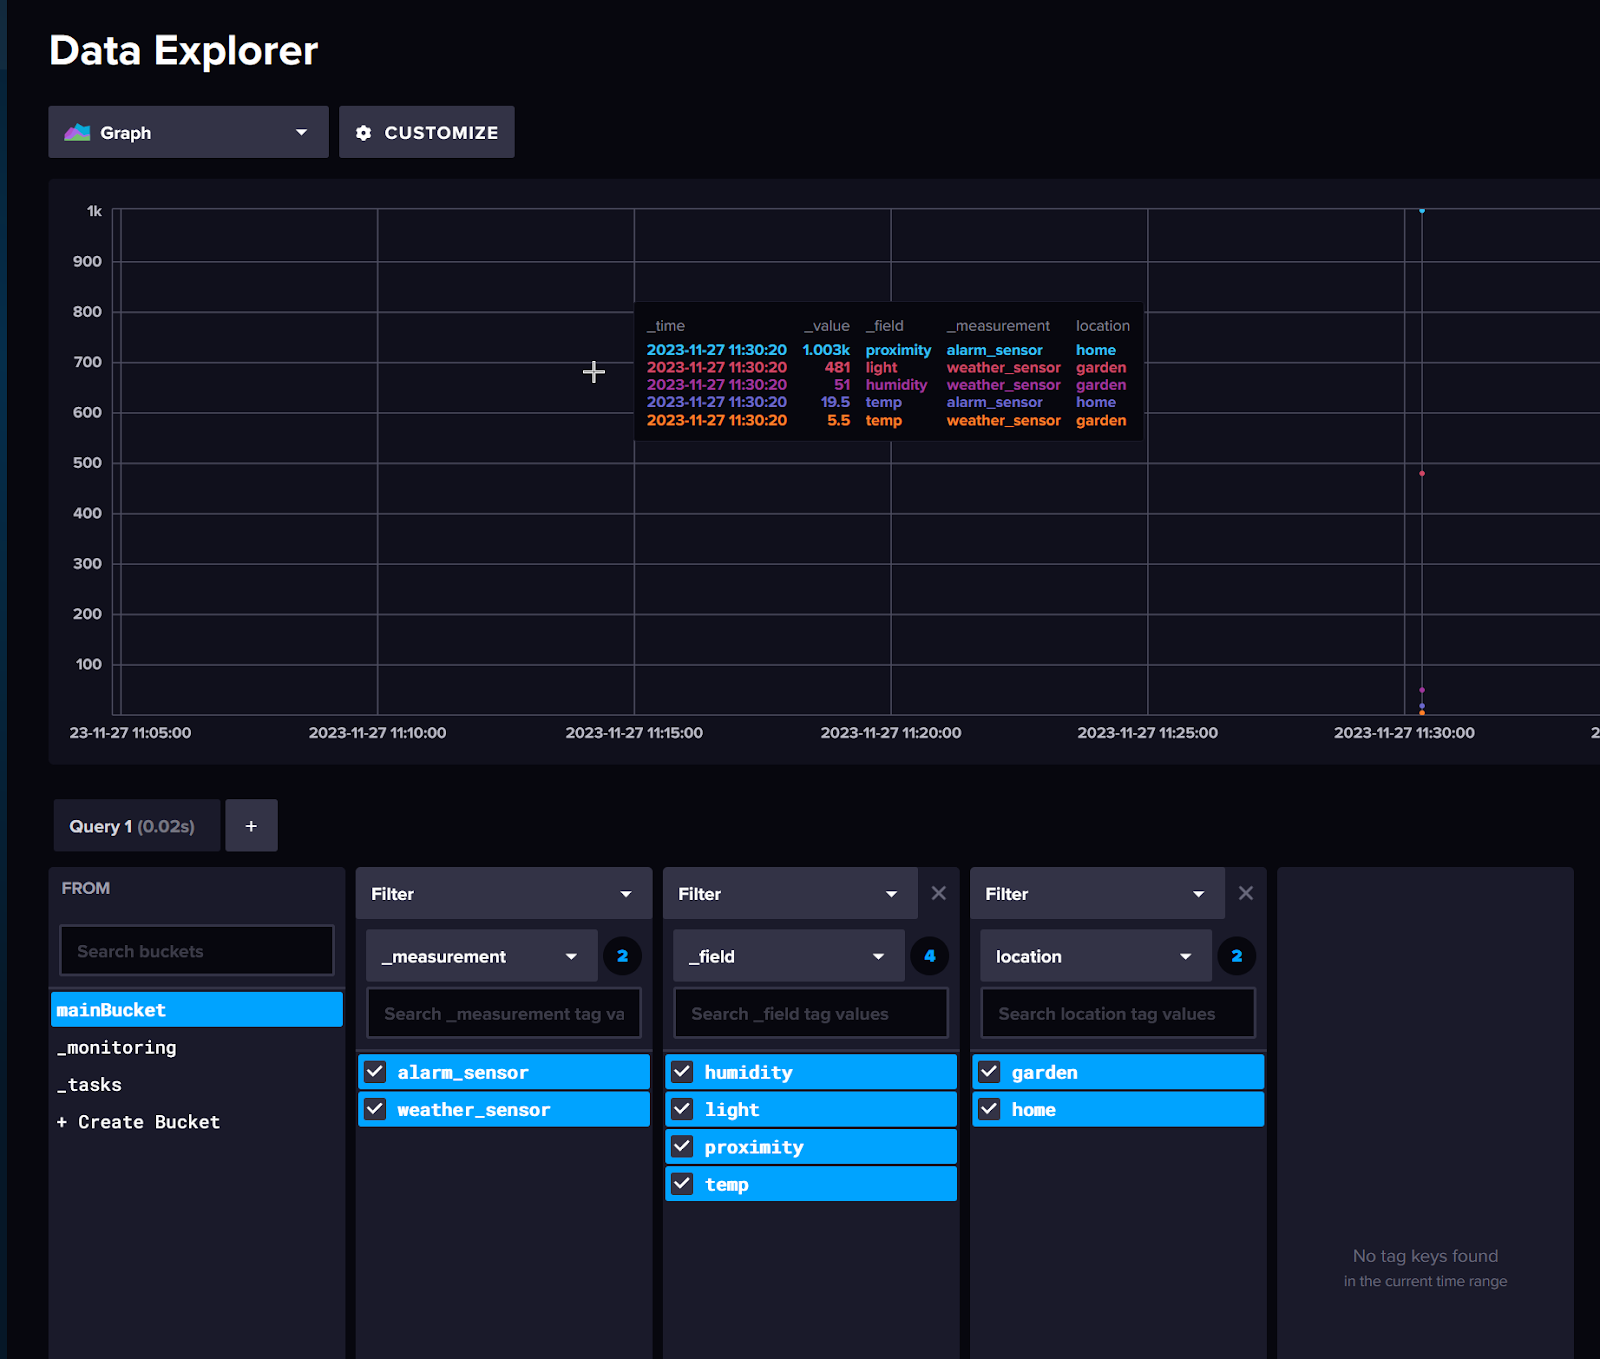
In the Data Explorer screen > mainBucket, you can now see the data you have just published in Node-Red! Select the data you have visualised.
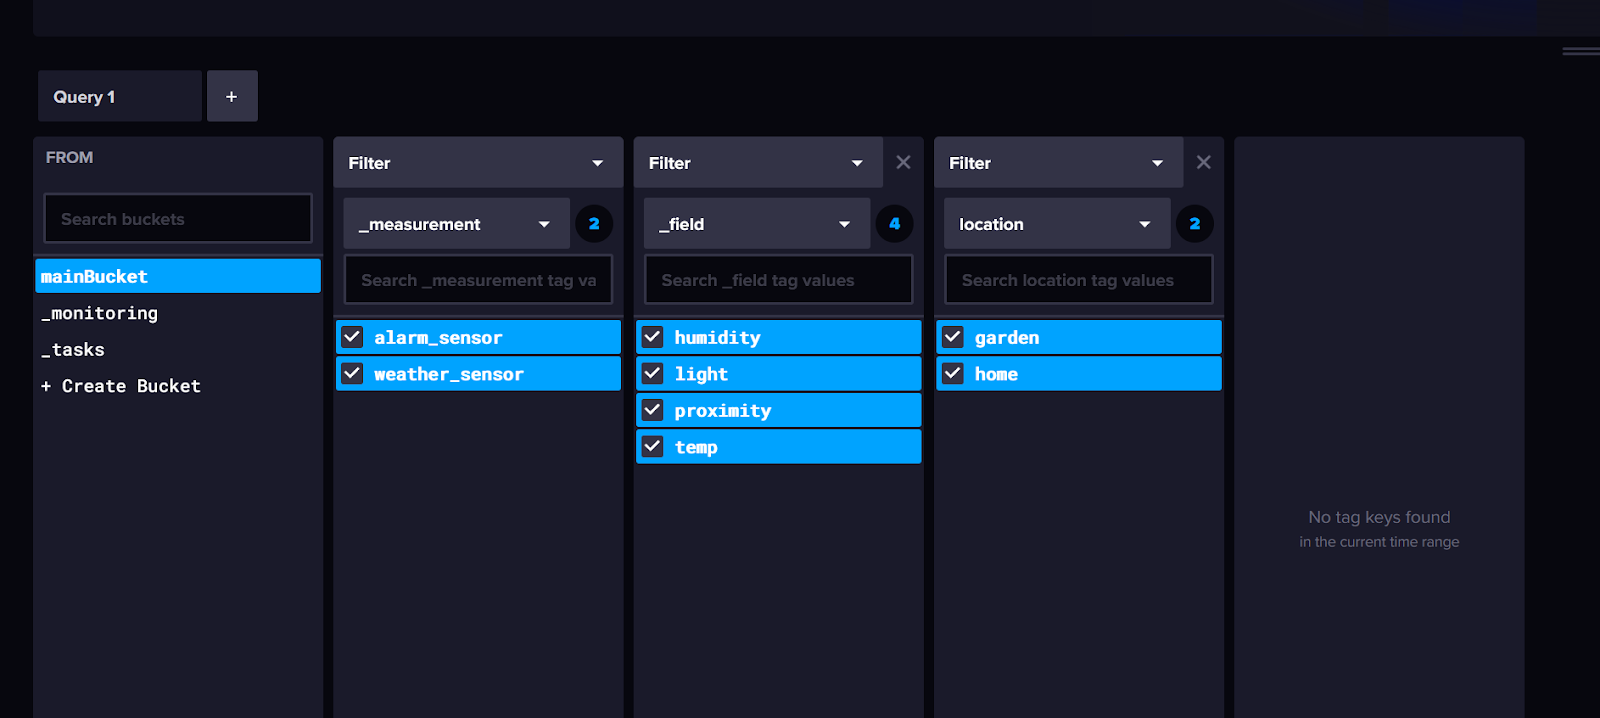
Click on the SUBMIT button on the right.
Done!
Implementation From beckhoff
Now that the communication between Node-Red and ctrlX InfluxDB has been confirmed, the next step is to access it using the TF6420 with the Beckhoff TwinCAT3.
Beckhoff Side
Before proceeding with the actual Tutorial, a brief introduction to the specifications of the TF6420 is in order: the Beckhoff TF6420 also supports InfluxDB versions 1.x and 2.x. The database configuration is done via the “TwinCAT Database Server Configuration of the database is done via the “TwinCAT Database Server Configurator”.
When connecting to InfluxDB 2.x, “InfluxDB2” must be set in the TwinCAT Database Server Configurator and the authentication method can be “None” The authentication method can be “None”, “Username/password” or “Token”.
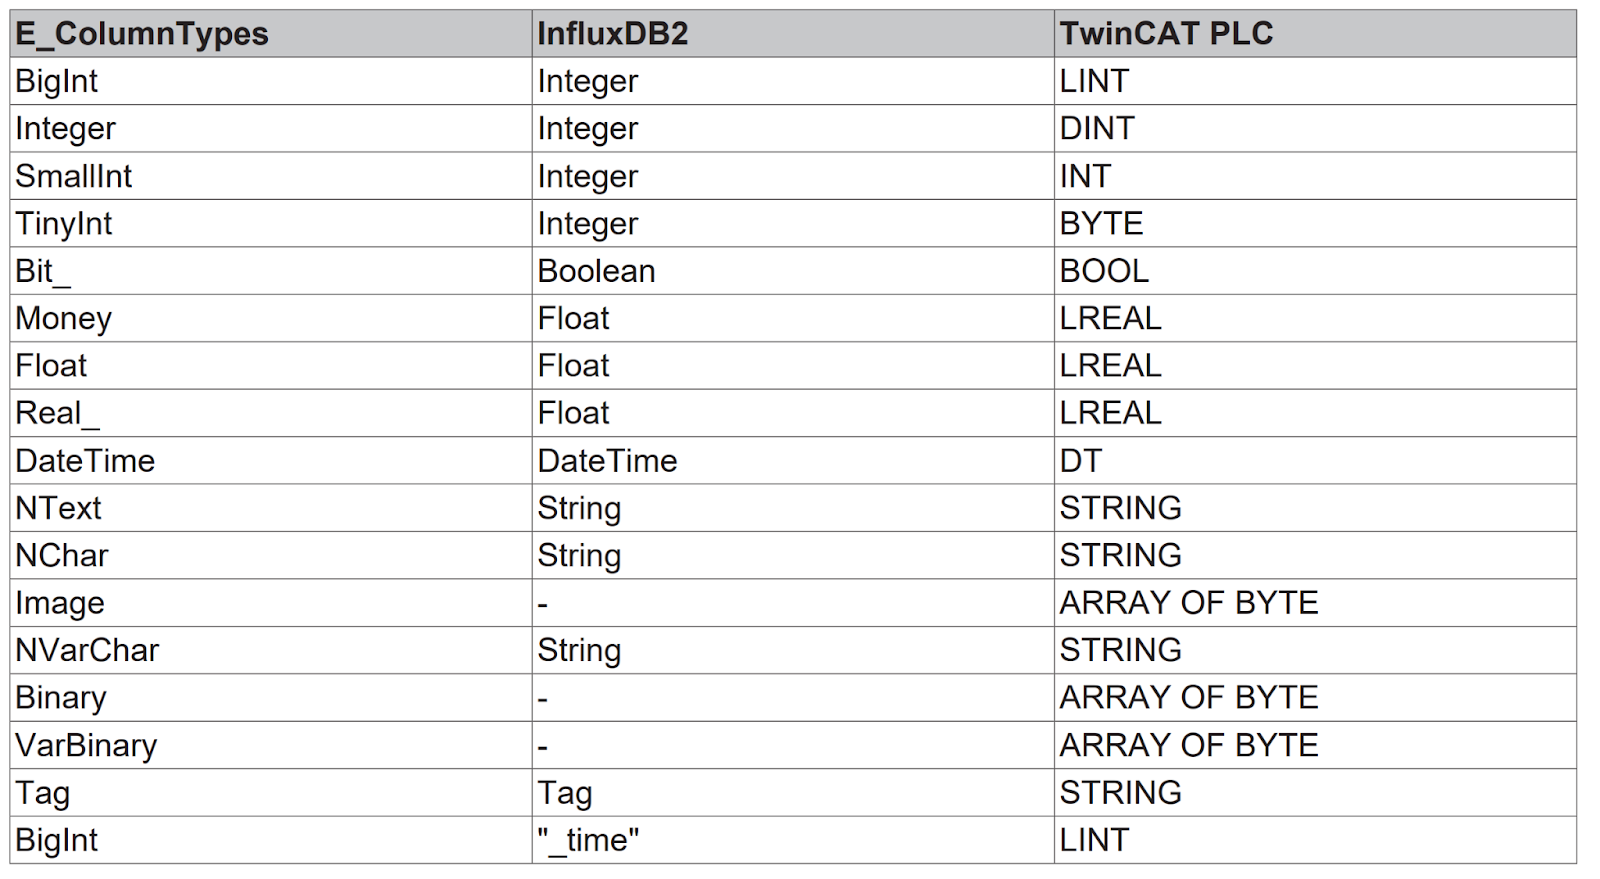
This is the variable type supported by the TwinCAT3 TF6420. (It should be noted that the WSTRING type cannot be supported).
As a time series database, InfluxDB2 has some special features and each measurement of a time series contains the following items
- Time Columns
- Tag Columns
- Field Columns
Time Columns are stored in InfluxDB as UNIX epoch times; the Function Block provided with the TF6420 automatically converts TwinCAT time to UNIX epoch time, so the Programmer can send free TimeStamp Programmer can send a free TimeStamp.
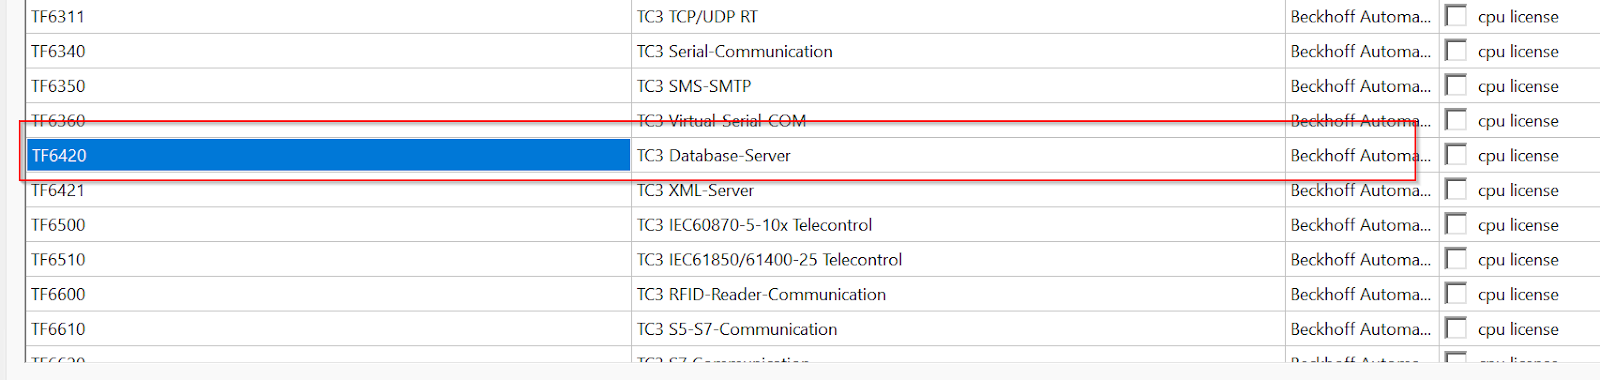
Activate License
To test the connection with the InfluxDB App installed on ctrlX with the TF6420, activate the TF6420 license in advance.
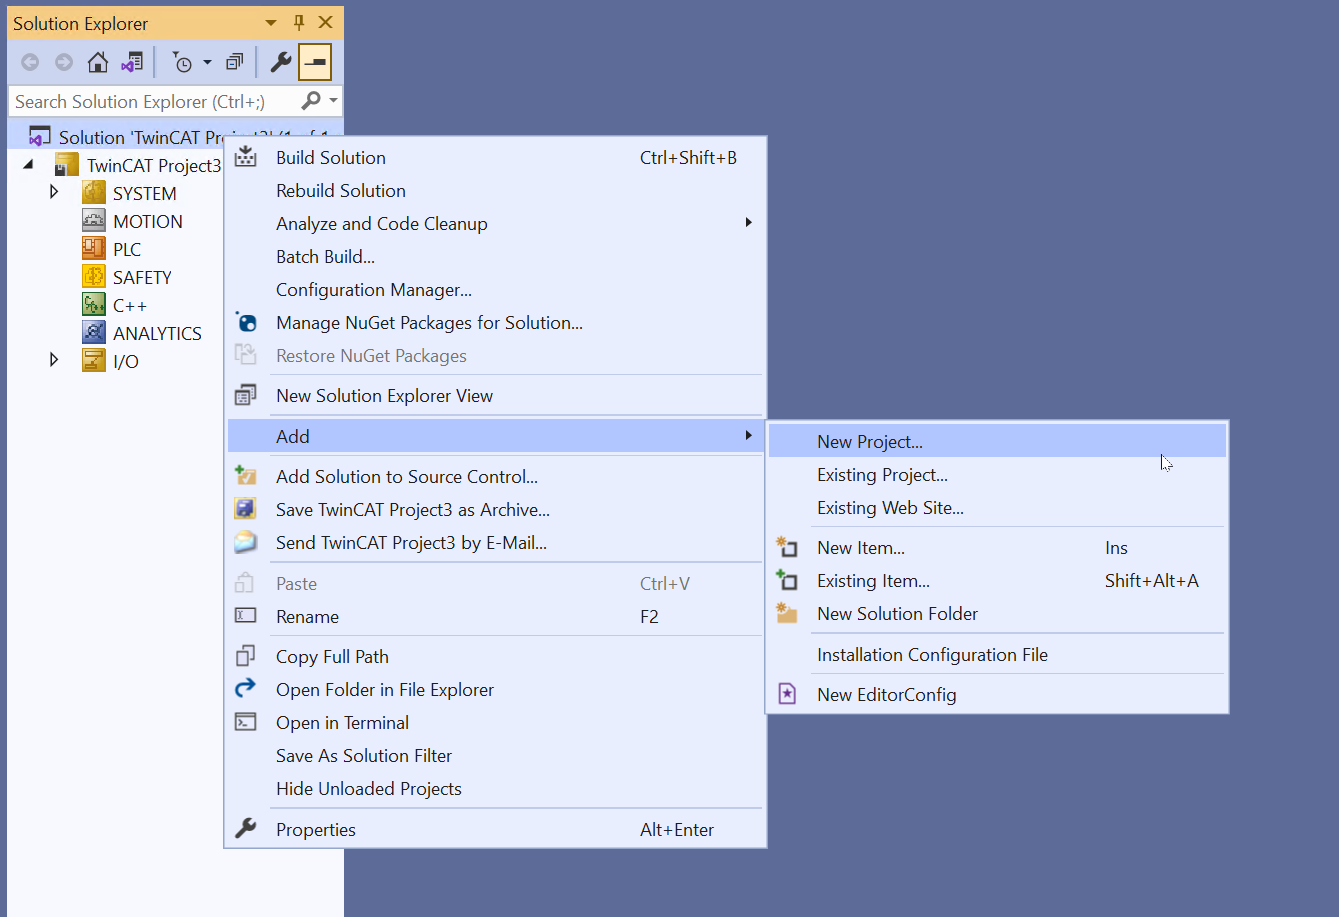
Add Database Configuration
To add a new Database project to the TwinCAT project, click Add>New Project.
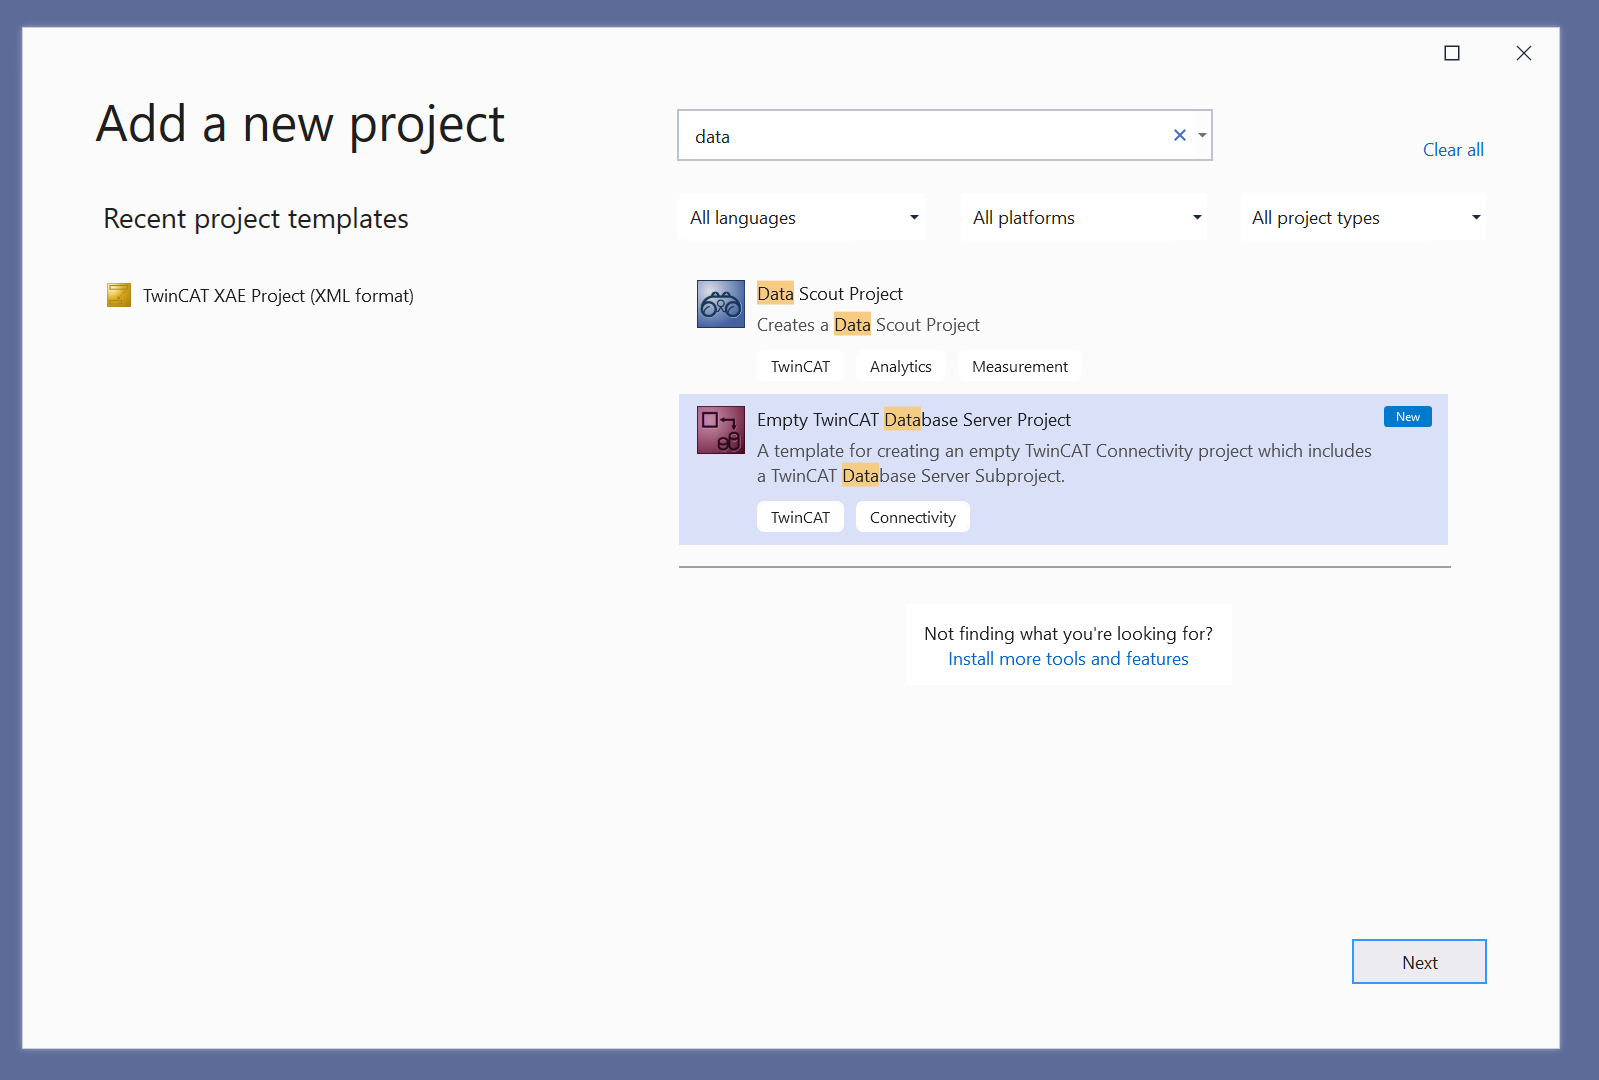
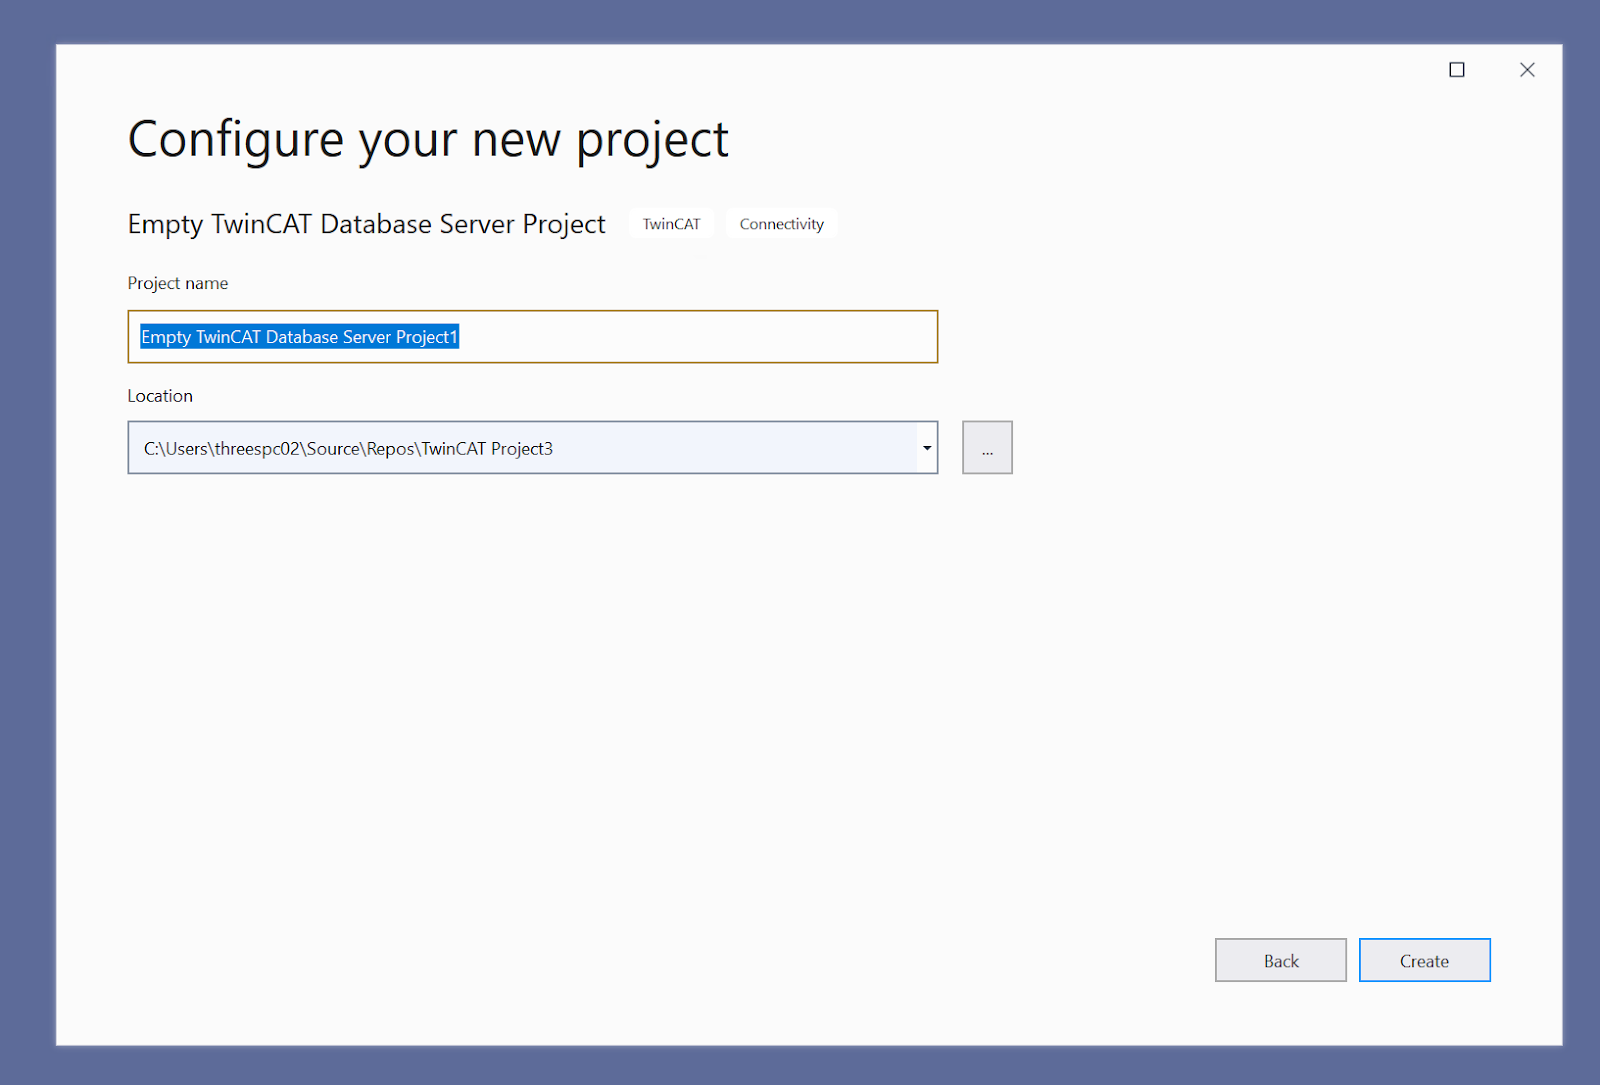
Select Empty TwinCAT Datase Server Project and proceed to Next>.
Enter a Data Server Project name and create the project with Create.
Done!
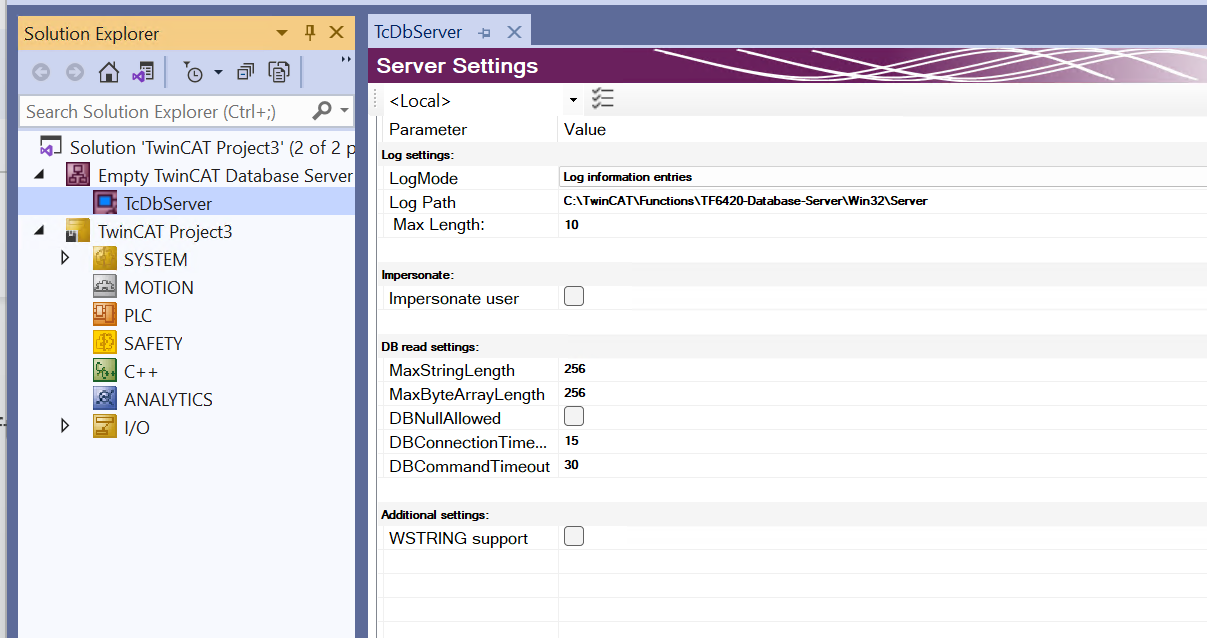
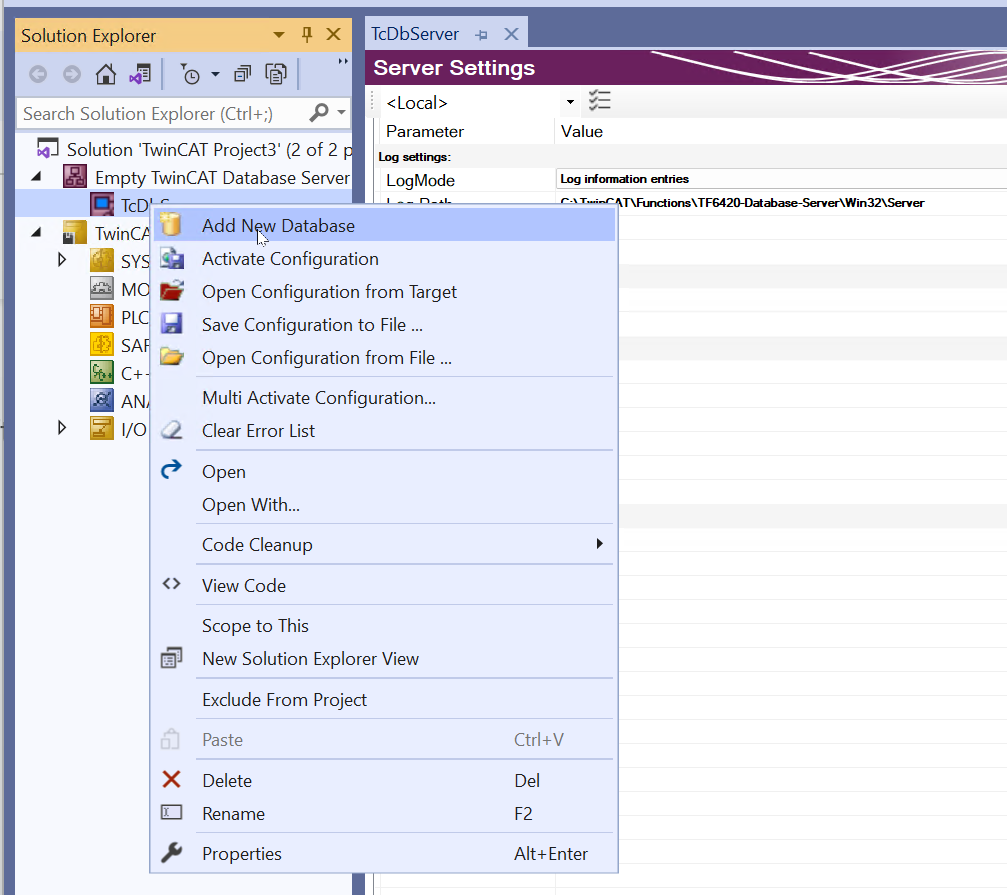
Add New Database Configuration
To add a new database, click Add New Database.
Done!A new DB Configuration has been added.
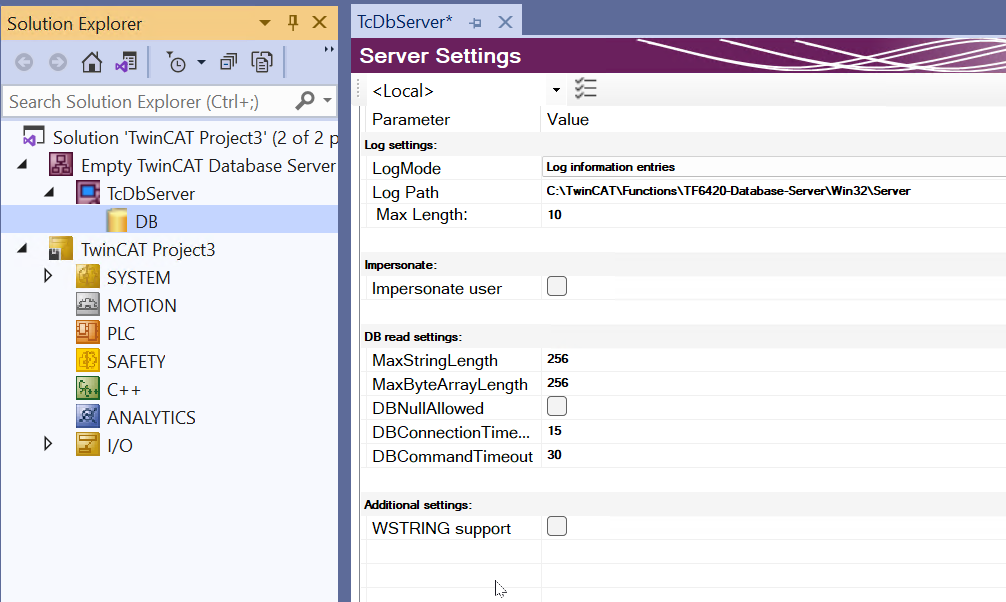
Configure DB
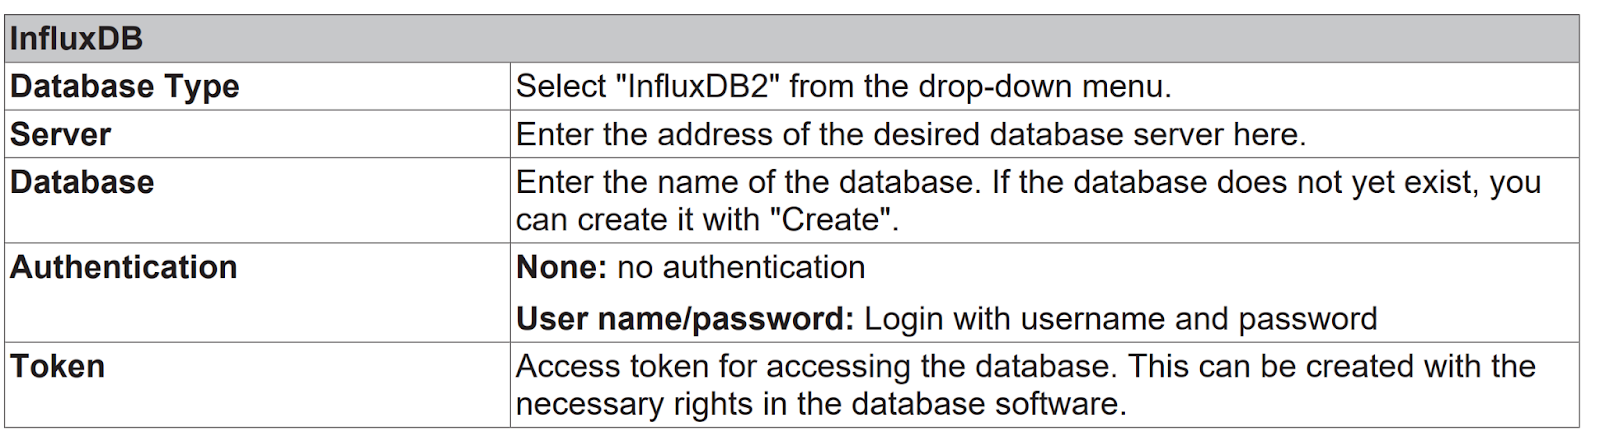
Set Database Type to InfluxDB2.
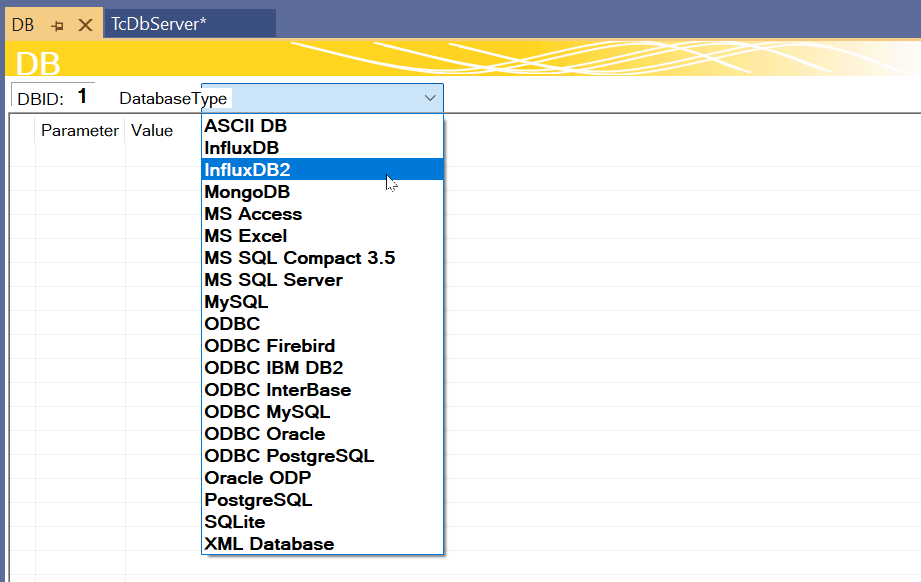
The settings related to InfluxDB2 are now displayed. Note that if you set another Database Type while you are doing the connection settings, the original settings will disappear.
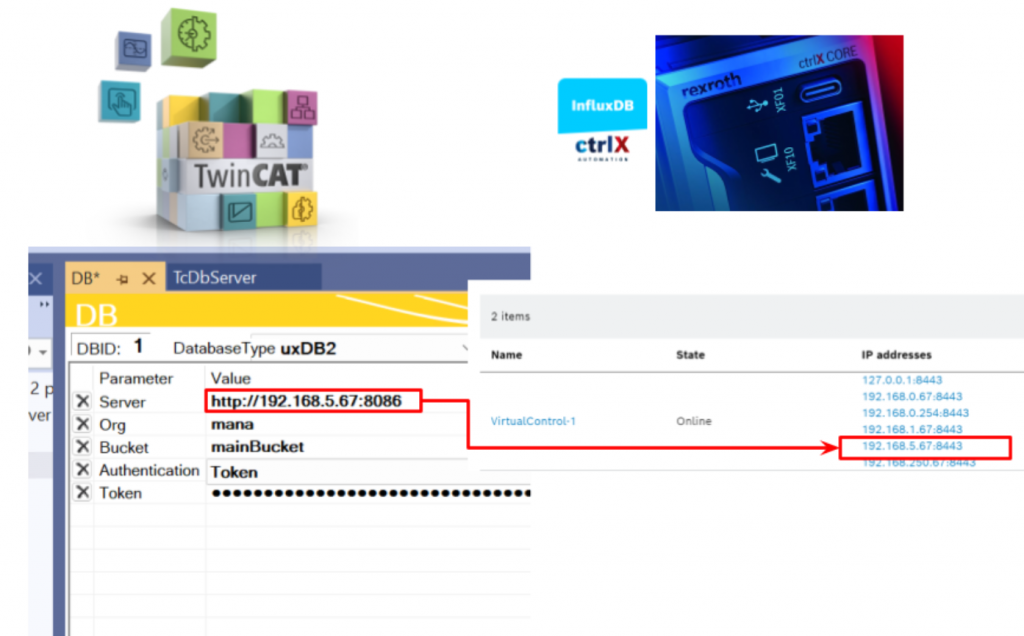
Server
Server is the IP address of the ctrlX OS.
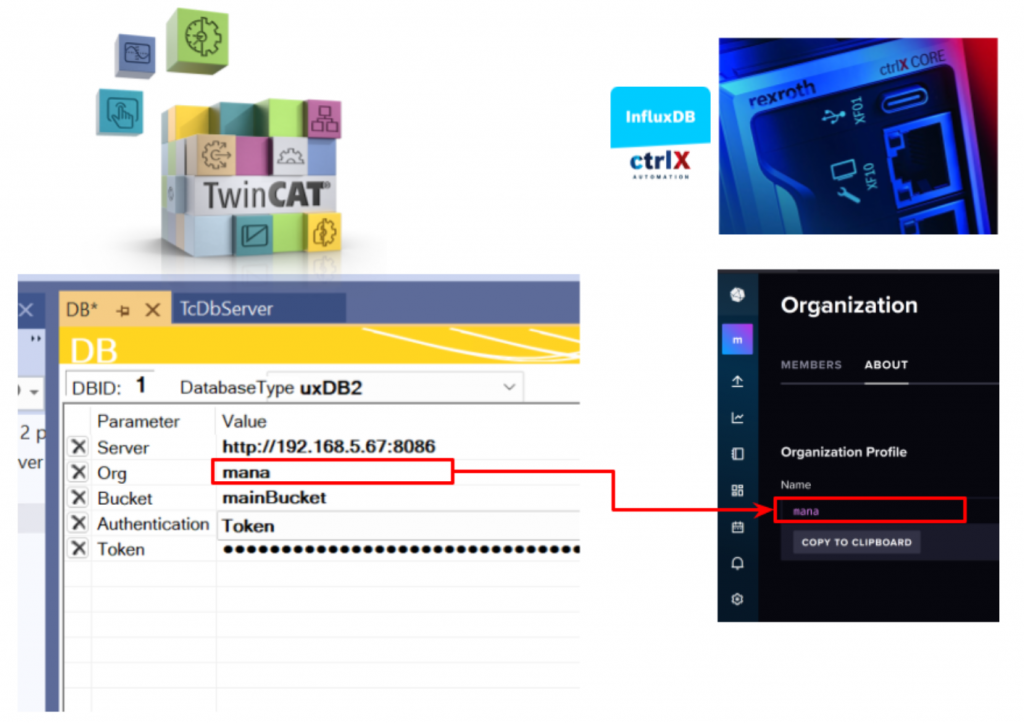
Org
The Organisation is the name of the organization that was initially set up in ctrlX InfluxDB earlier, in this case “mana”.
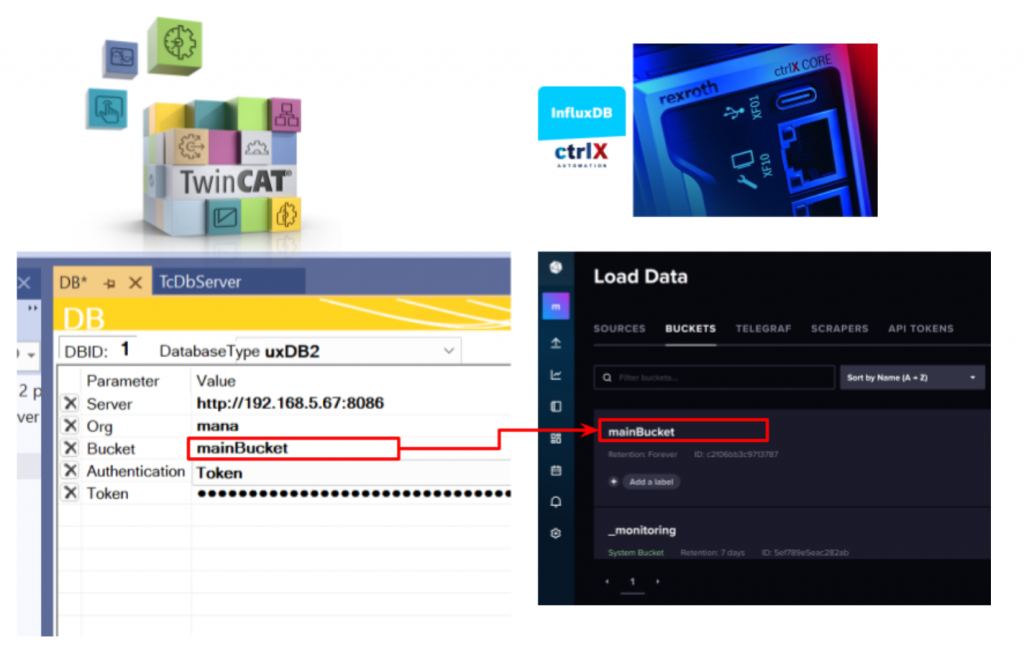
Bucket
The bucket name will be the bucket name initially set in ctrlX InfluxDB earlier, this time “mainBucket”.
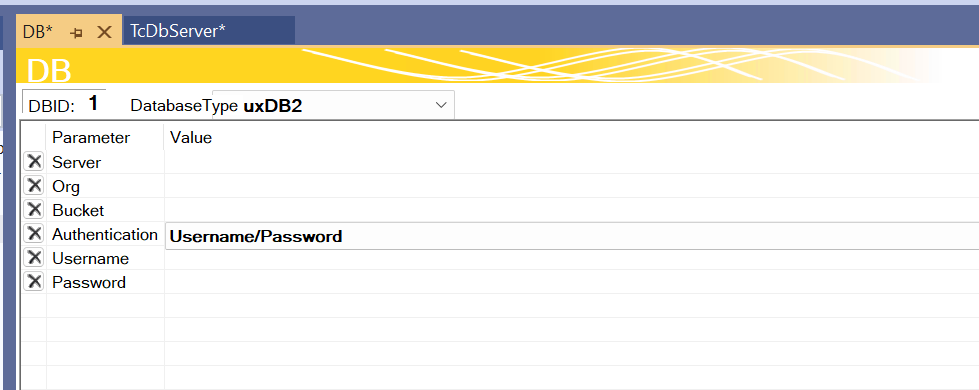
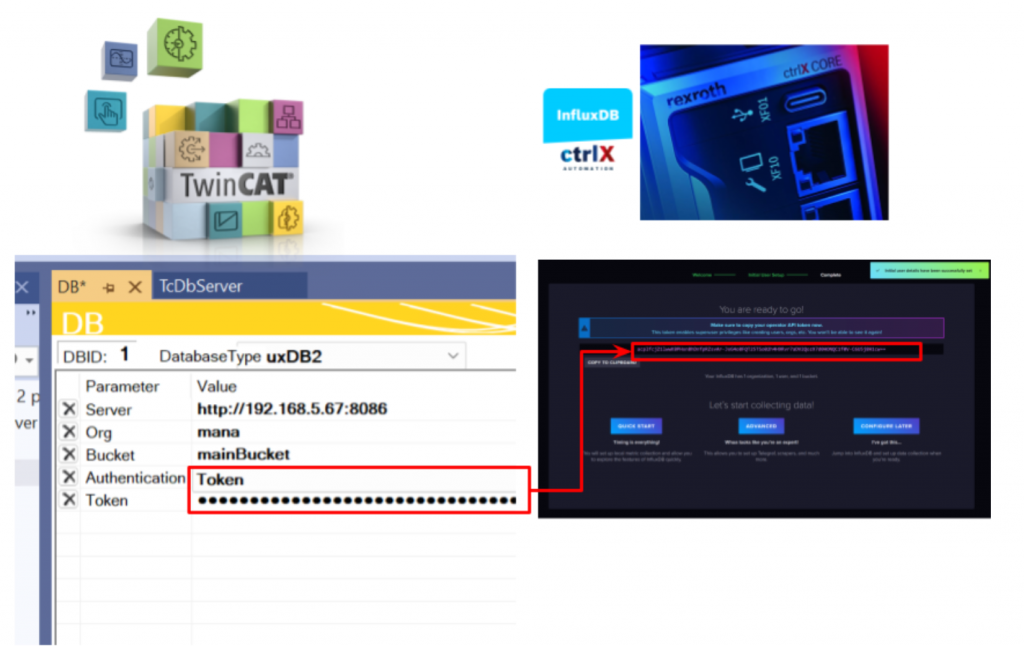
Authentication
Set Authentication to “Token” and paste in the authentication key needed to access InfluxDB.
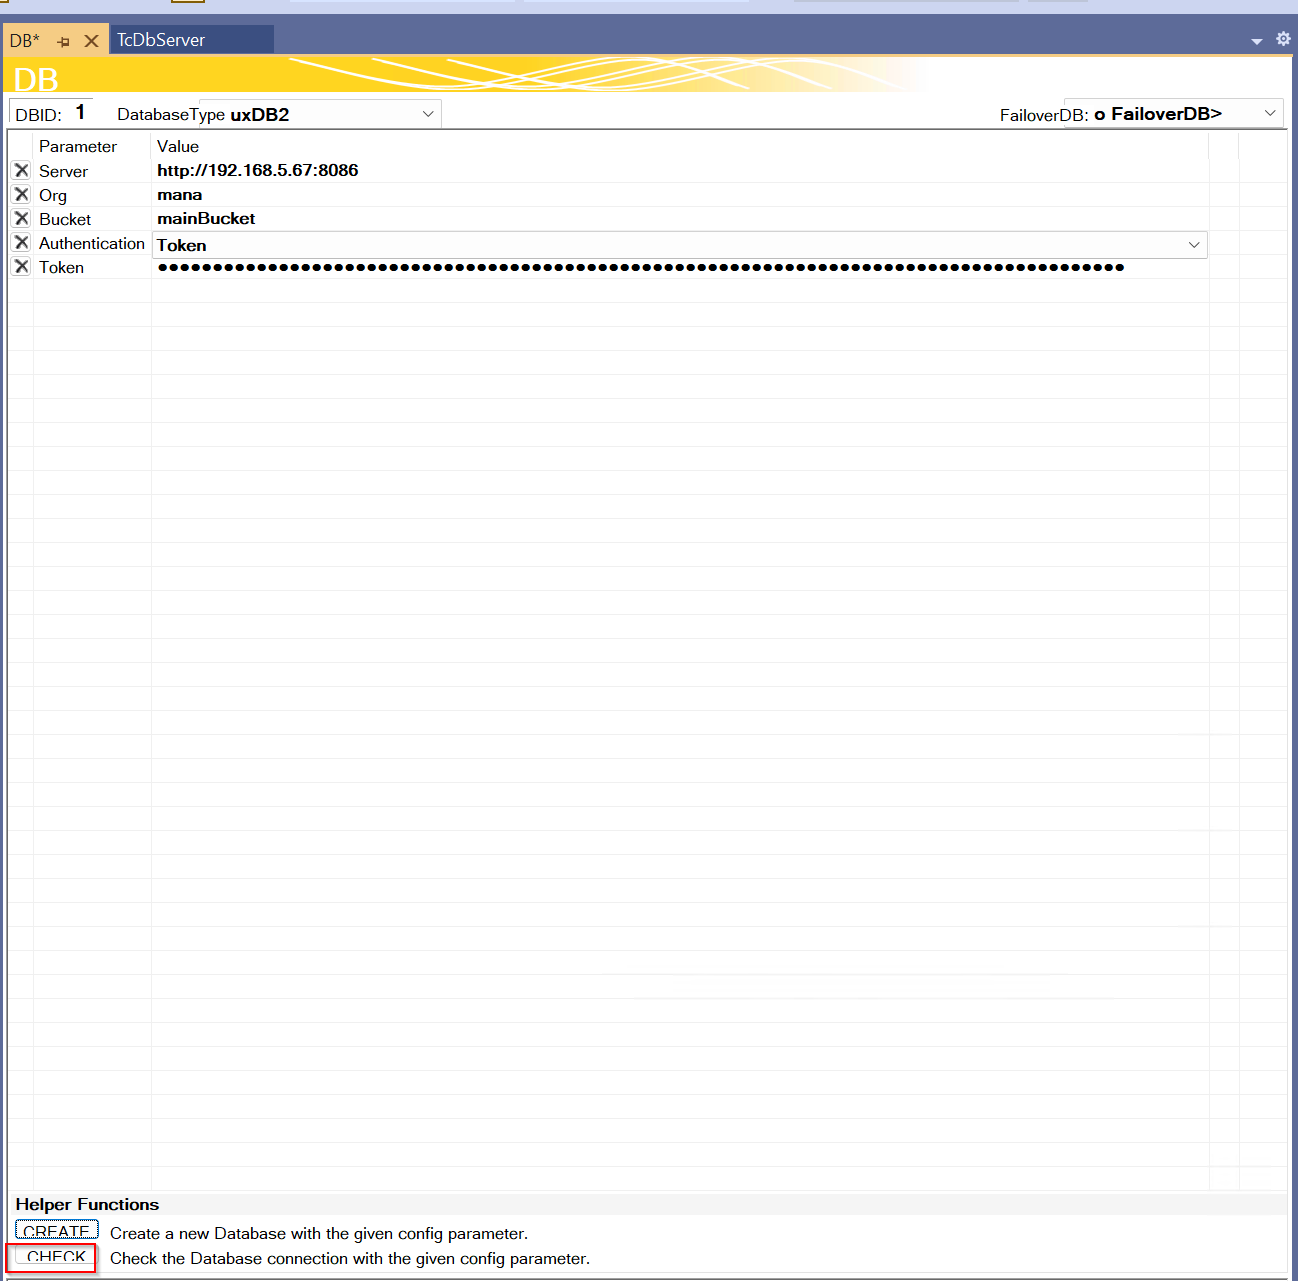
Check
Finally, click the Check button to test the communication.
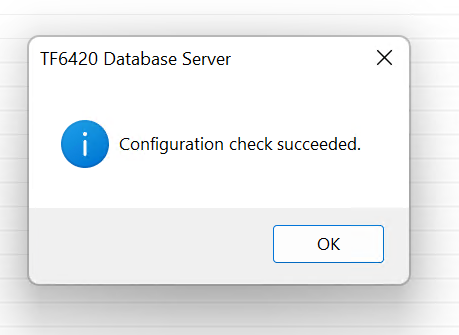
Done!It can be connected to TwinCAT3 and ctrlX InfluxDB App.
Check Sql Query Editor
Before we actually create the programme, let’s take a look at the contents of the ctrlX InfluxDB App database using the Sql Query Editor tool on the TwinCAT TF6420.
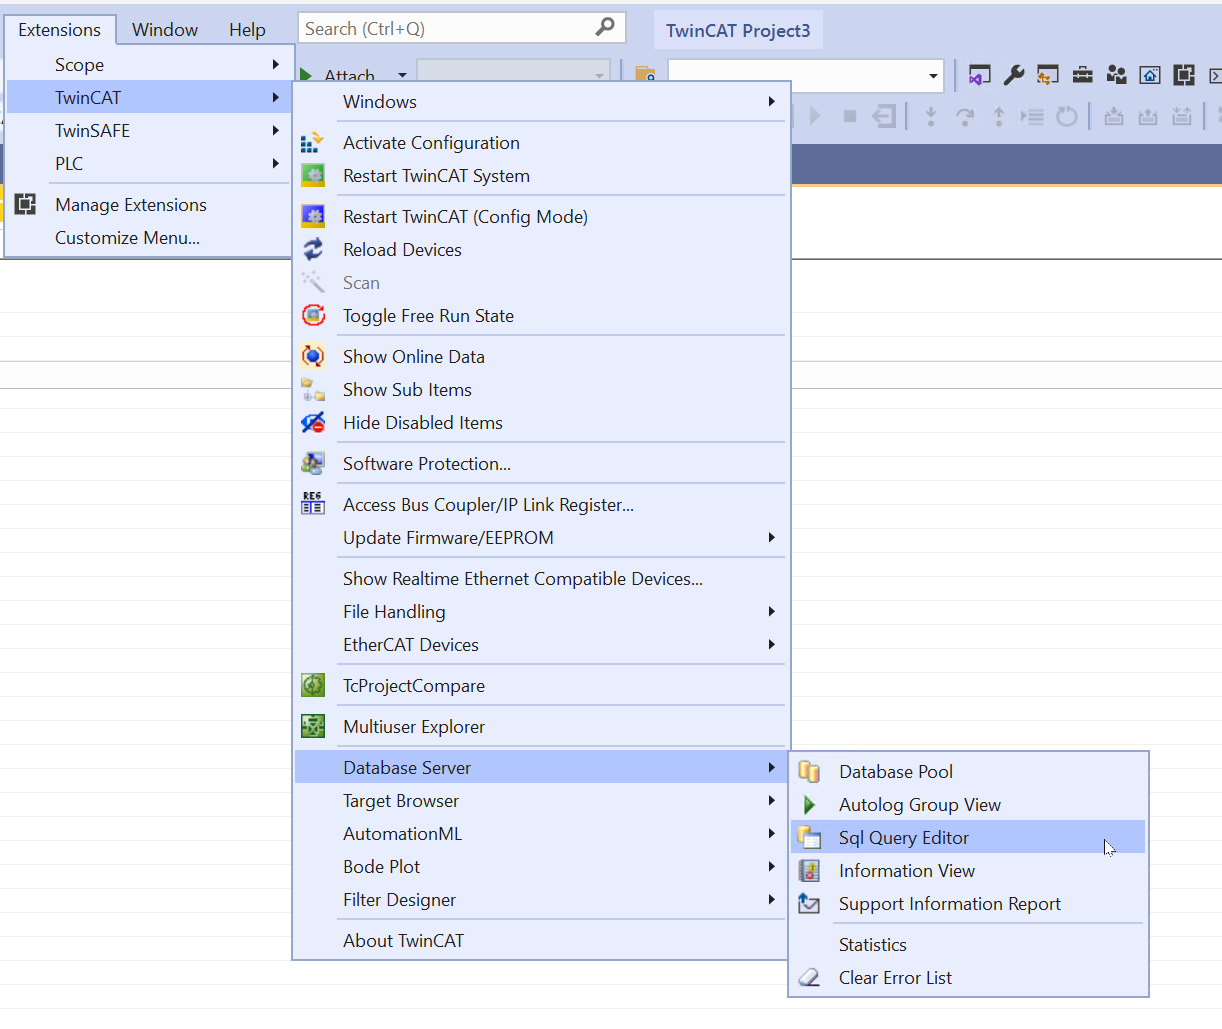
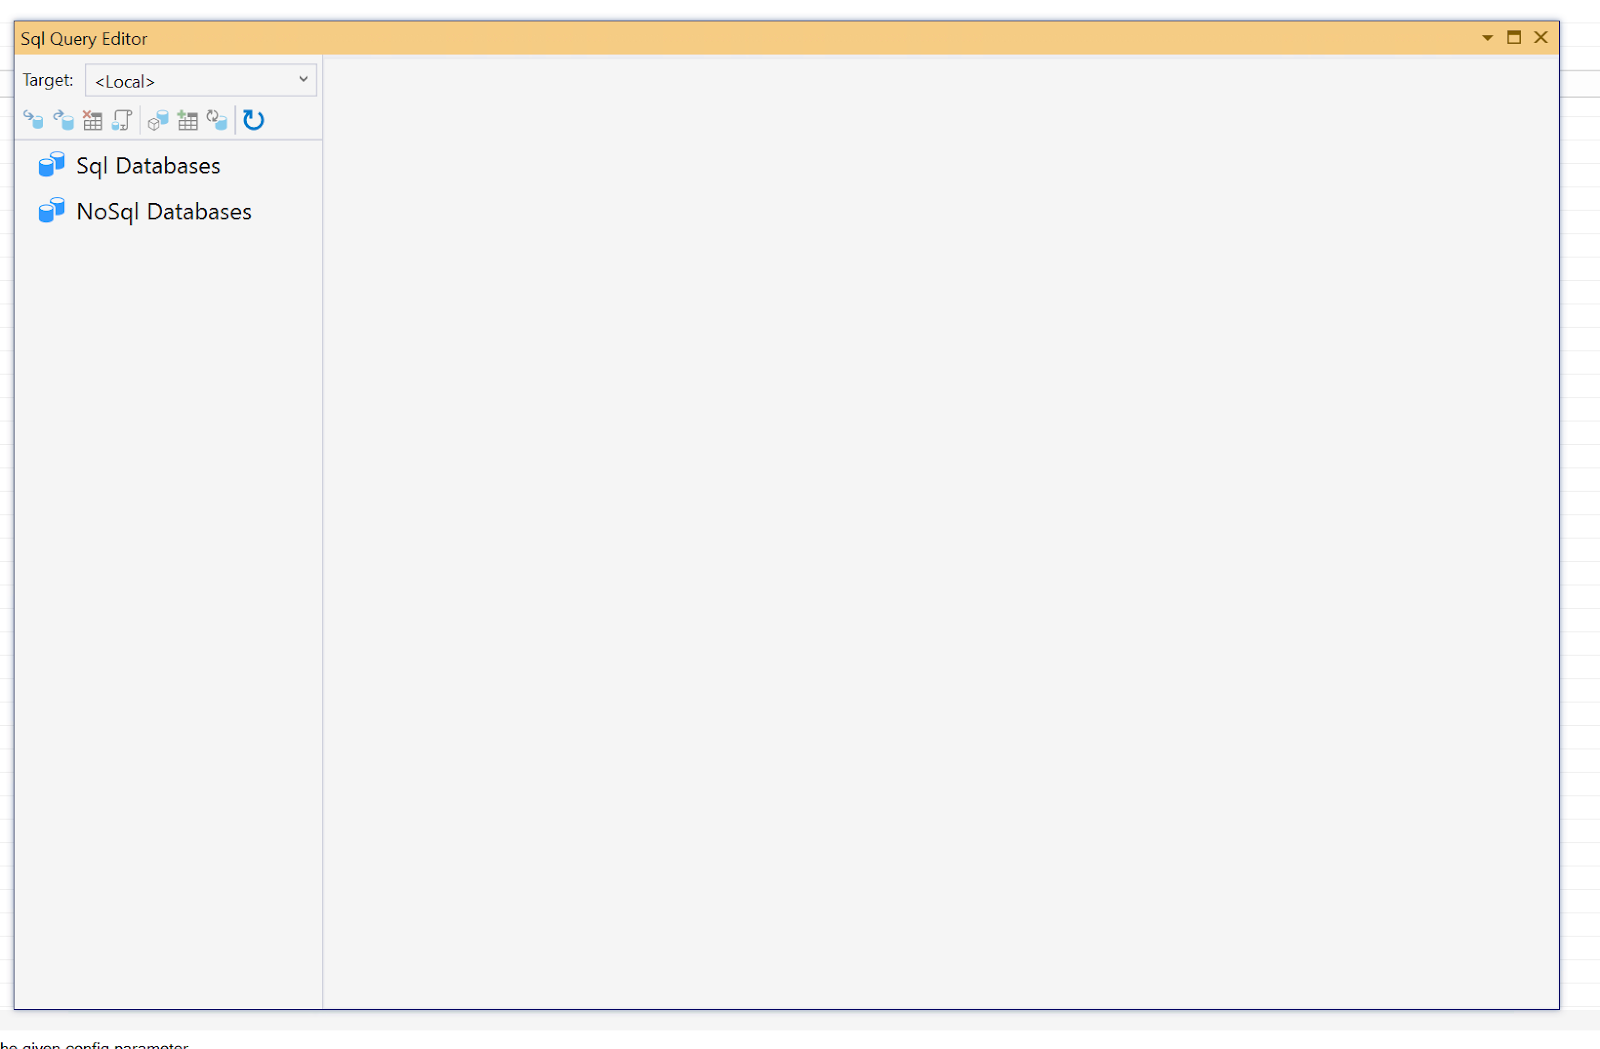
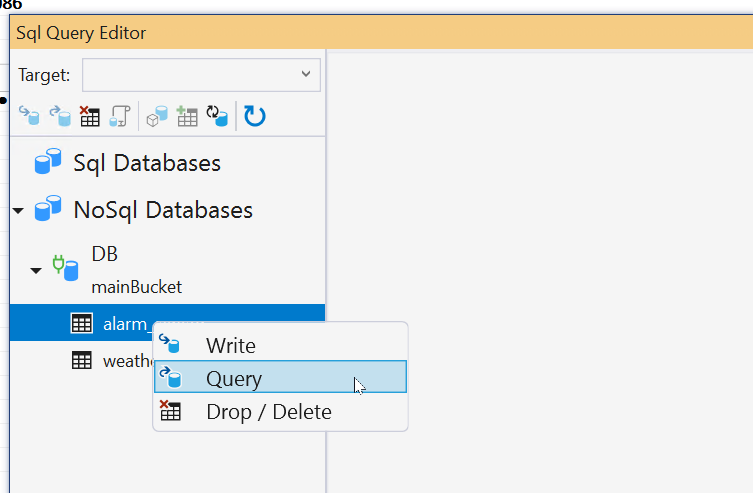
This is the TF6420 Sql Query Editor tool screen.
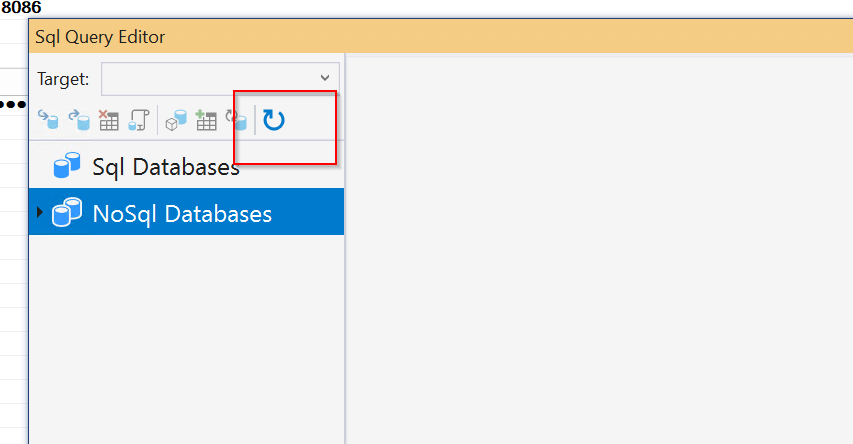
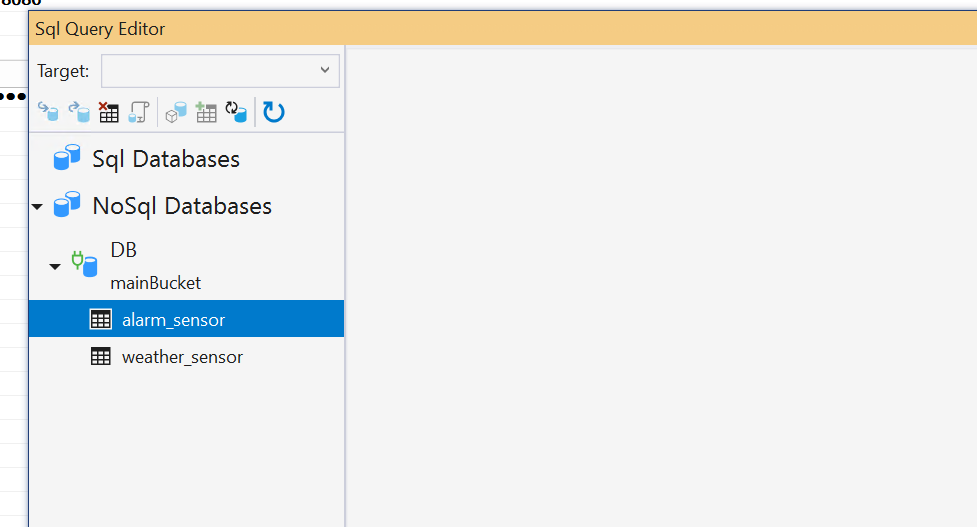
Click the Refresh button.
There was a time series of data that had just been sent by Node-Red.
Right-click>Query to send a Query to the ctrlX InfluxDB App.
By Default, the TF6420 Sql Query Editor also generates the Query already.
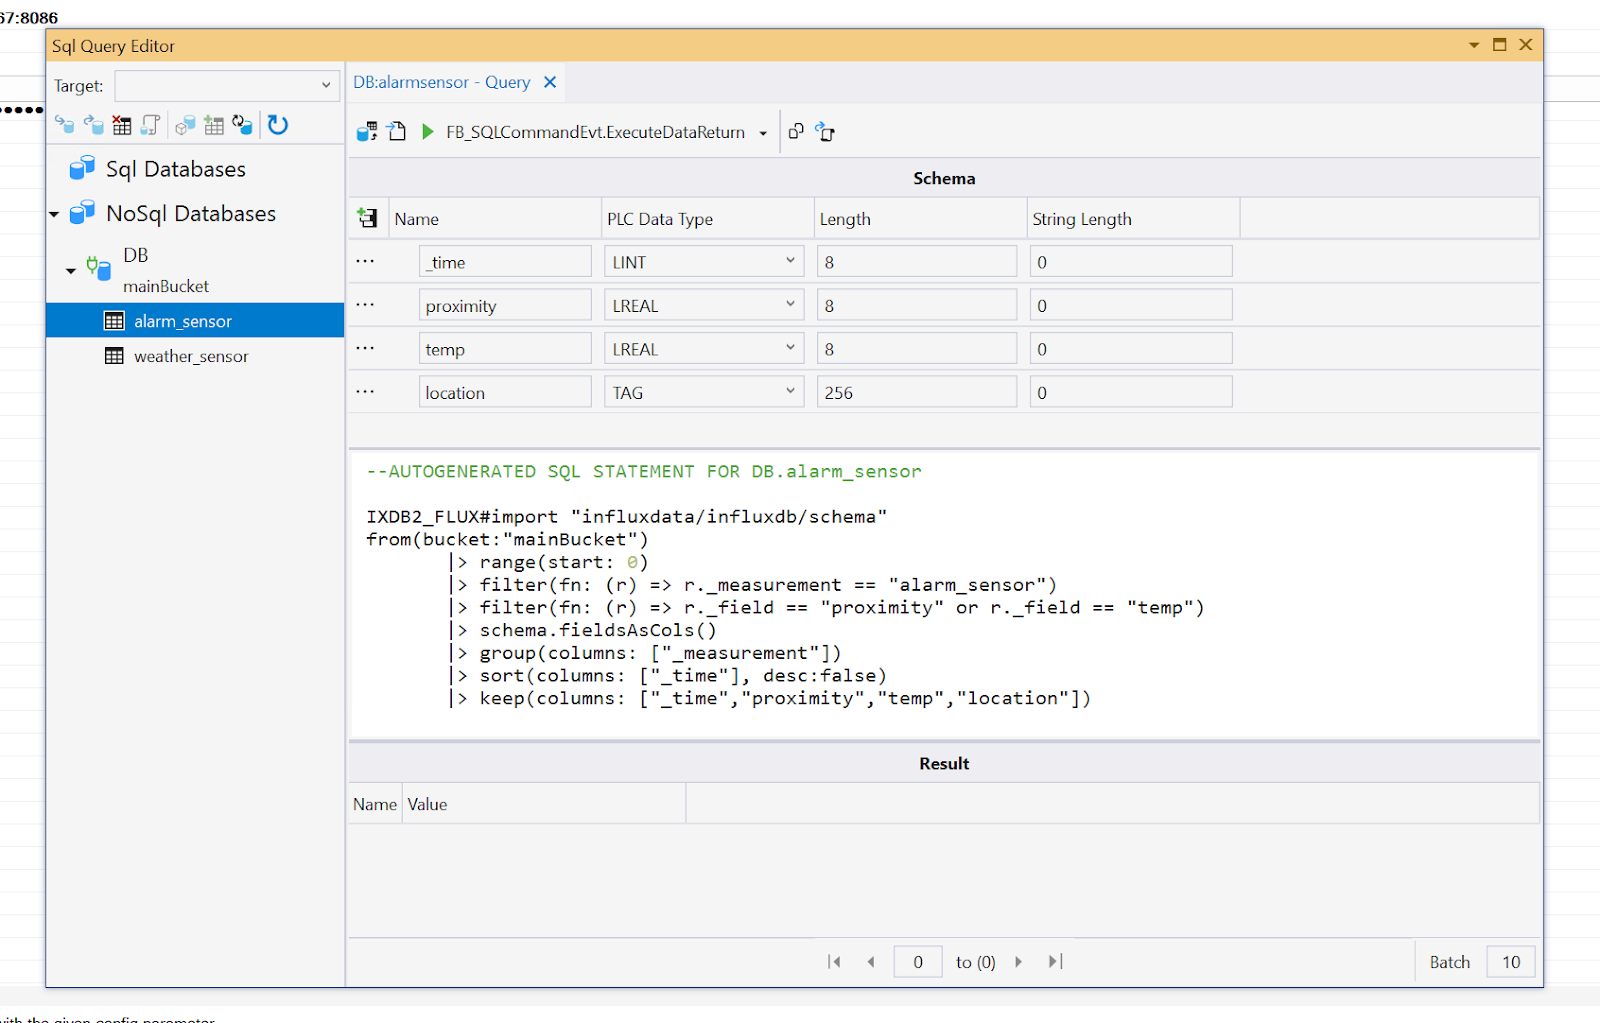
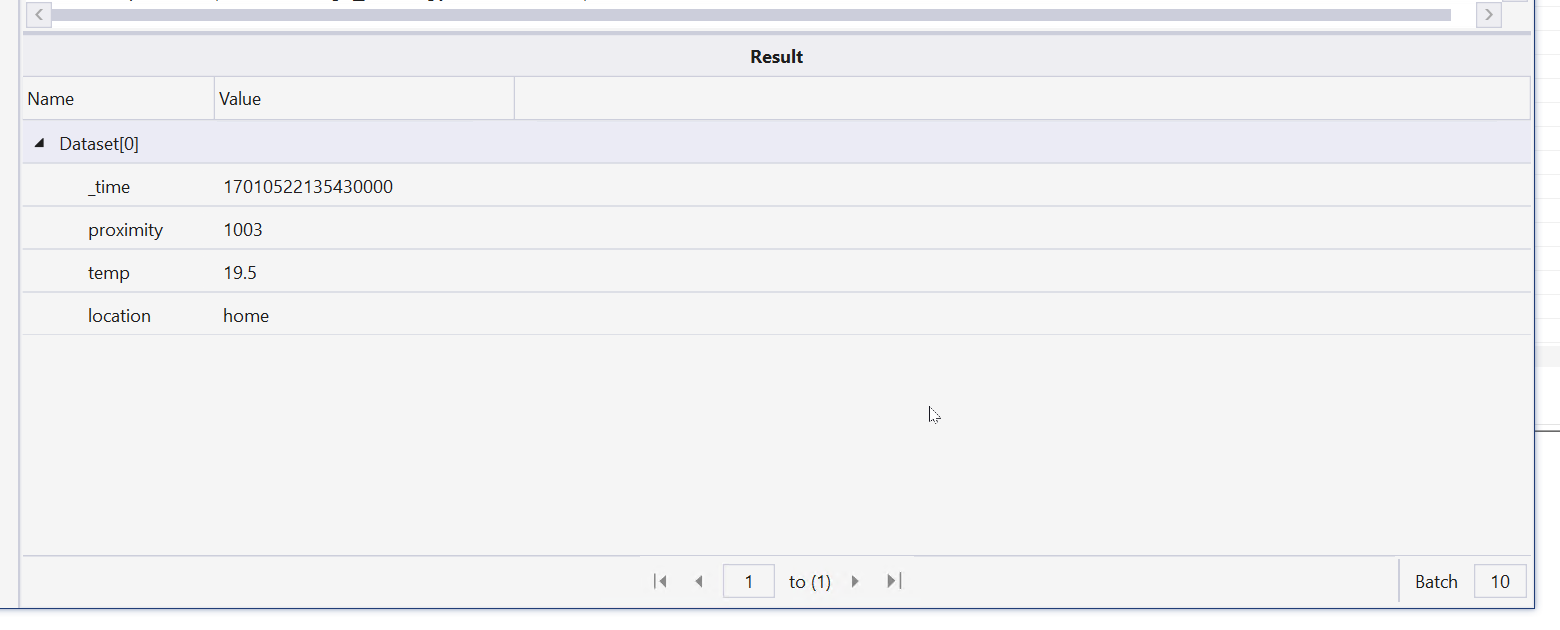
Query and click FB_SQLCommandEvt.ExecuteDataRetrun.
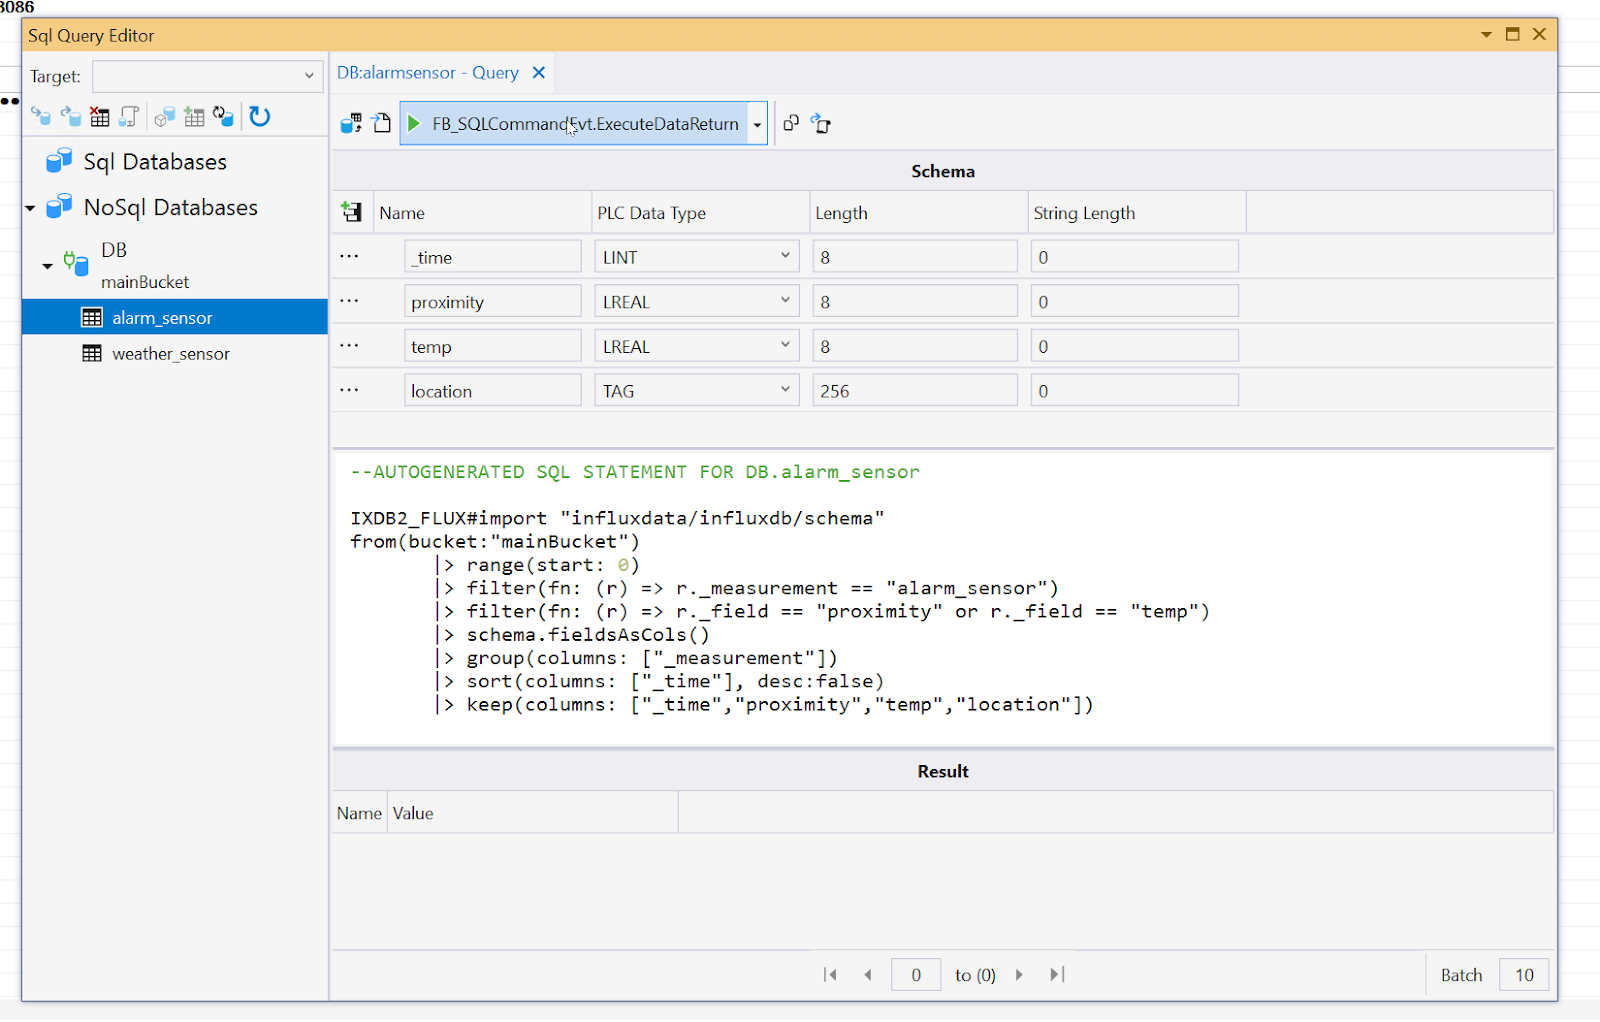
Done!!Data returned from InfluxDB App.
DUT
T_QueryOptionTimeSeriesDB_Insert
This is a structure for writing data to a time series database, and arrays of structures can be specified by symbols. The individual array elements are mapped as Rows with their own TimeStamp in the database and are generated by specifying a start timestamp and a time cycle between data sets.
| TYPE T_QueryOptionTimeSeriesDB_Insert STRUCT pSymbol : PVOID; cbSymbol : UDINT; sDataType : STRING; nDataCount : UDINT := 1; sTableName : T_MaxString; nCycleTime : UDINT := 100000; nStartTimestamp : ULINT := 0; END_STRUCT END_TYPE |
| Variable | Type | Descirption |
| pSymbol | POINTER TO BYTE | Symbol Pointer written to database |
| cbSymbol | UDINT | Length of the specified Symbol Pointer |
| sDataType | STRING | Specified Symbol name |
| nDataCount | UDINT | Number of data sets in the transferred array. |
| sTableName | T_MaxString | Name equivalent to table |
| nCycleTime | UDINT | Time interval of the data set |
| nStartTimestamp | ULINT | Timestamp of the first dataset in TwinCAT time: 100 ns intervals from 1 January 1601. |
Function Block
FB_NoSQLQueryBuilder_TimeSeriesDB
This is a Function Block for defining a Query for a TimeSeries database, and the Query is sent via Function BlockFB_NoSQLQueryEvt.

VAR_INPUT
| Variable | Type | Descirption |
| pQueryOption | POINTER TO BYTE | Address Query Options. |
| cbQueryOptions | UDINT | Length of Query Options. |
Tc3_Eventlogger
Since TwinCAT3 (4022.20), the Database Server TF6420 can now support the TwinCAT3 Eventlogger. This allows the details of the Function Block to be read out via the interface.
RequestEventText
This Method returns the event text.
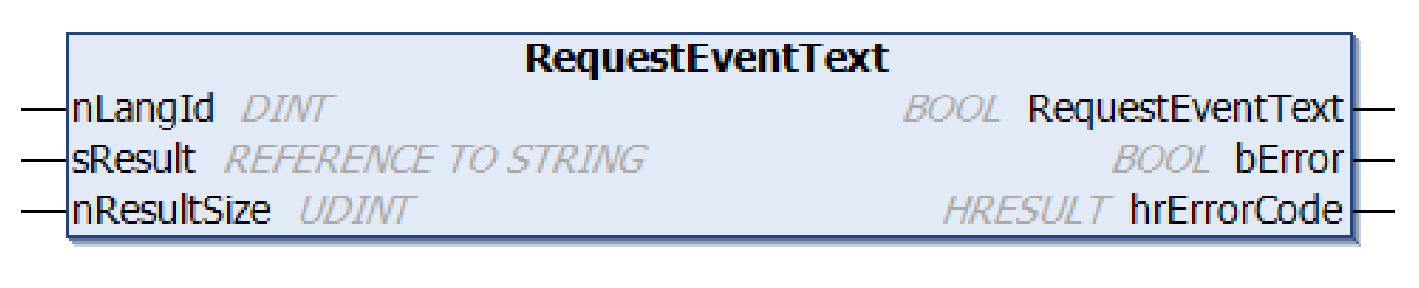
VAR_INPUT
| Variable | Type | Descirption |
| nLangId | DINT | Specifies the language of the event, 1033 = English. |
| sResult | REFERENCE TO STRING | Variable size (in Bytes) where the event text is stored. |
VAR_OUTPUT
| Variable | Type | Descirption |
| bError | BOOL | TRUE = there is an error. |
| hrErrorCode | HRESULT | S_OK=Method execution OK |
Return
| Variable | Type | Descirption |
| RequestTextEvent | BOOL | TRUE = Execution complete. |
Program
This is the program.
| PROGRAM MAIN VAR State: E_DbLogState; bWriting: BOOL; dbid: UDINT := 1; //Queryparameter QueryOption_TSDB_Insert : T_QueryOptionTimeSeriesDB_Insert; //api fbNoSQLQueryBuilder_TimeSeriesDB : FB_NoSQLQueryBuilder_TimeSeriesDB; //execute queries fbNoSqlQueryEvt : FB_NoSQLQueryEvt(sNetID := ”, tTimeout := T#15S); // databuffer for 1 second with 10 ms time delta Data: ARRAY[1..100] OF DUT_Data; // error handling helper values TcResult: Tc3_Database.I_TcMessage; bError: BOOL; sErrorMessage: STRING(255); i: INT; rand : DRAND; nrand: LREAL; TON:TON; END_VAR |
| FOR i := 1 TO 100 BY 1 DO rand(); nrand := rand.Num*5.0; Data[i].Direction := 240.328 + nrand; Data[i].Speed := 1200.3292 + nrand; Data[i].Power := 1500.1975 + nrand; Data[i].ID := ‘Unit13’; END_FOR TON( IN:=State = E_DbLogState.idle AND bWriting ,PT:=T#1S ); CASE State OF E_DbLogState.idle: IF TON.Q THEN //bWriting := FALSE; State := E_DbLogState.init; END_IF E_DbLogState.init: fbNoSQLQueryBuilder_TimeSeriesDB.pQueryOptions := ADR(QueryOption_TSDB_Insert); fbNoSQLQueryBuilder_TimeSeriesDB.cbQueryOptions := SIZEOF(QueryOption_TSDB_Insert); QueryOption_TSDB_Insert.sTableName := ‘ServoMeasurement’; QueryOption_TSDB_Insert.sDataType := ‘DUT_DATA’; QueryOption_TSDB_Insert.pSymbol := ADR(Data); QueryOption_TSDB_Insert.cbSymbol := SIZEOF(Data); QueryOption_TSDB_Insert.nDataCount := 100; QueryOption_TSDB_Insert.nStartTimestamp := F_GetSystemTime(); QueryOption_TSDB_Insert.nCycleTime := 10000; // (in 100 ns) State := E_DbLogState.writing; E_DbLogState.writing: IF fbNoSqlQueryEvt.Execute( hDBID:=dbid ,iNoSQLQueryBuilder:=fbNoSQLQueryBuilder_TimeSeriesDB ) THEN IF fbNoSqlQueryEvt.bError THEN TcResult := fbNoSqlQueryEvt.ipTcResult; State := E_DbLogState.error; ELSE State := E_DbLogState.idle; END_IF END_IF E_DbLogState.error: IF TcResult.RequestEventText( nLangId:=1033 ,sResult:=sErrorMessage ,nResultSize:=SIZEOF(sErrorMessage) ) THEN TcResult.Send(nTimeStamp:=F_GetSystemTime()); State := E_DbLogState.idle; bError := TRUE; END_IF END_CASE |
E_DbLogState.init:
This is the Step when TwinCAT sends the Query to the time series database.
The sTableName is the InfluxDB _Measurement, the sDataType must match the structure of the project by TwinCAT. pSymbol is the data to be sent to InfluxDB.
| E_DbLogState.init: fbNoSQLQueryBuilder_TimeSeriesDB.pQueryOptions := ADR(QueryOption_TSDB_Insert); fbNoSQLQueryBuilder_TimeSeriesDB.cbQueryOptions := SIZEOF(QueryOption_TSDB_Insert); QueryOption_TSDB_Insert.sTableName := ‘ServoMeasurement’; QueryOption_TSDB_Insert.sDataType := ‘DUT_DATA’; QueryOption_TSDB_Insert.pSymbol := ADR(Data); QueryOption_TSDB_Insert.cbSymbol := SIZEOF(Data); QueryOption_TSDB_Insert.nDataCount := 100; QueryOption_TSDB_Insert.nStartTimestamp := F_GetSystemTime(); QueryOption_TSDB_Insert.nCycleTime := 10000; // (in 100 ns) State := E_DbLogState.writing; |
E_DbLogState.writing
This is a program that sends a Query to InfluxDB.
| E_DbLogState.writing: IF fbNoSqlQueryEvt.Execute( hDBID:=dbid ,iNoSQLQueryBuilder:=fbNoSQLQueryBuilder_TimeSeriesDB ) THEN IF fbNoSqlQueryEvt.bError THEN TcResult := fbNoSqlQueryEvt.ipTcResult; State := E_DbLogState.error; ELSE State := E_DbLogState.idle; END_IF END_IF |
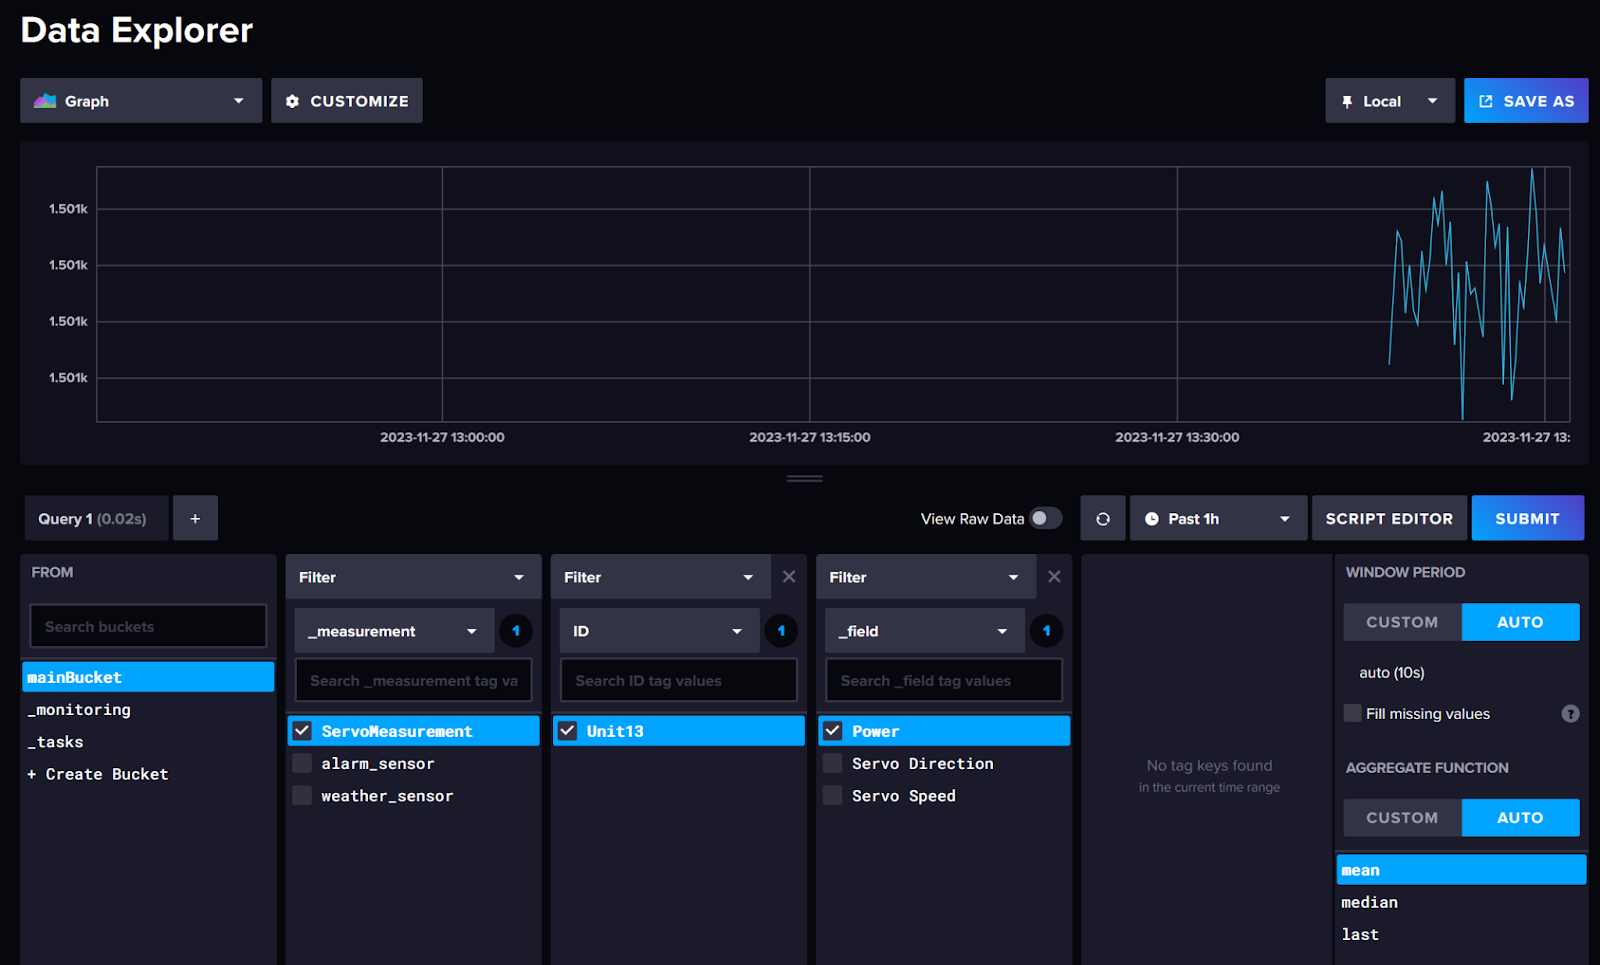
Result
When the InfluxDB APP in ctlX was opened, the TwinCAT3 data was visible!
Dashboard
The final step is to create a Dashboard in the ctrlX InfluxDB APP.
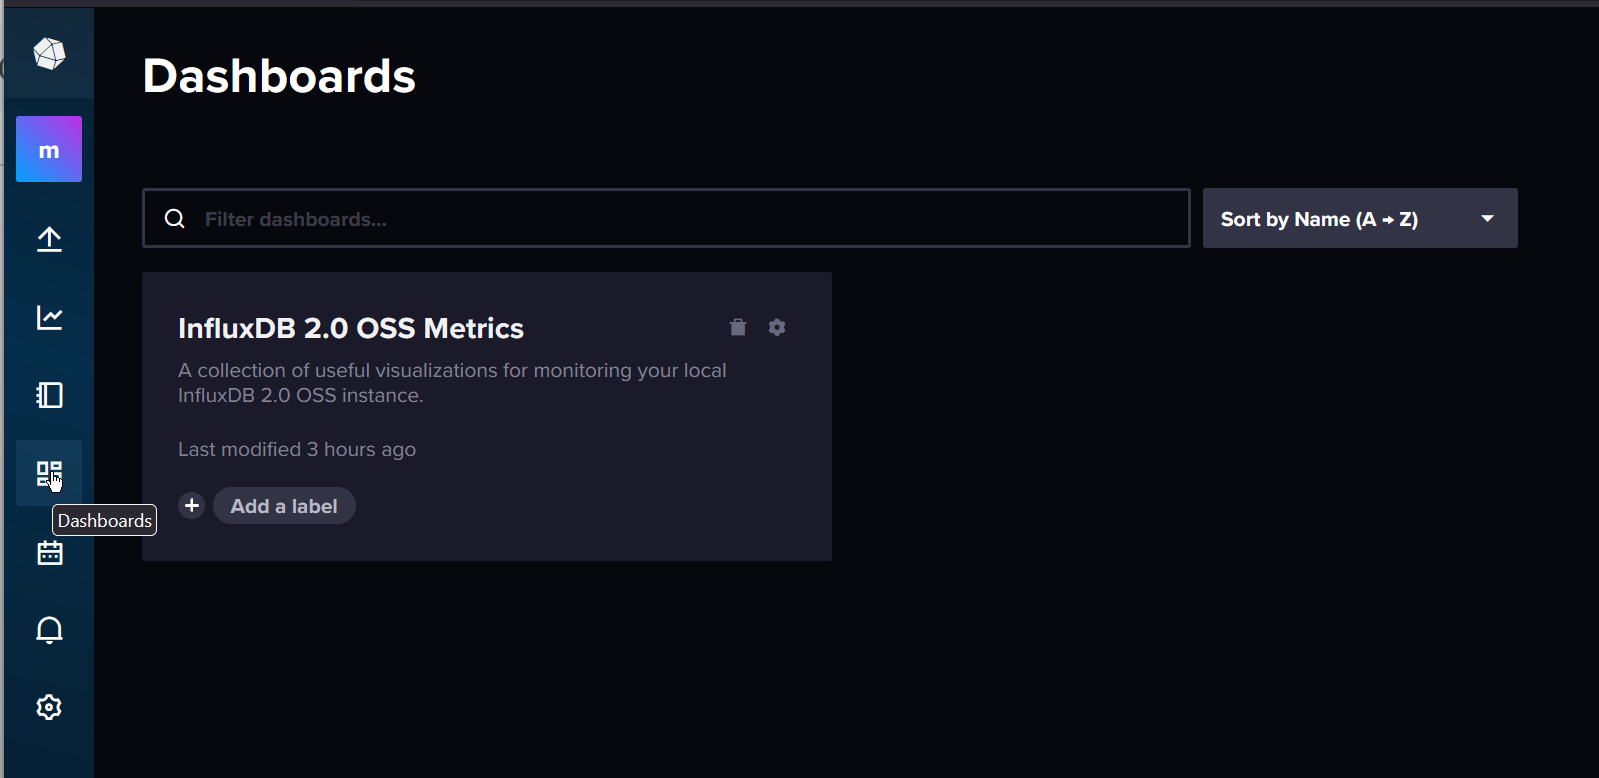
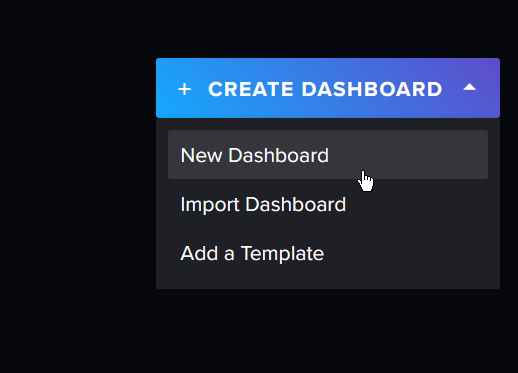
Click CREATE DASHBOARD to create a new Dashboard.
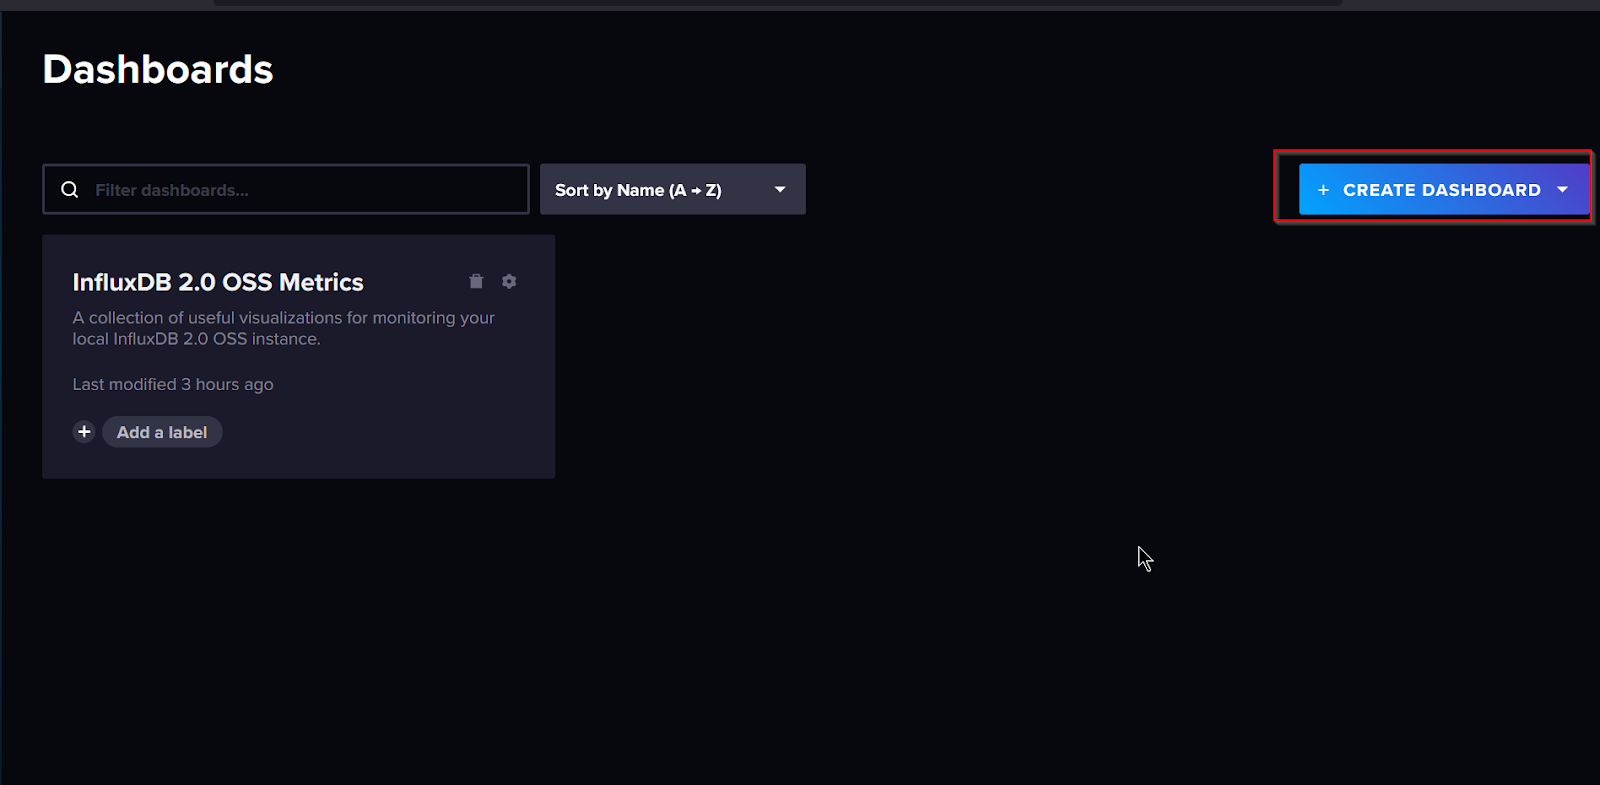
Click New Dashboard.
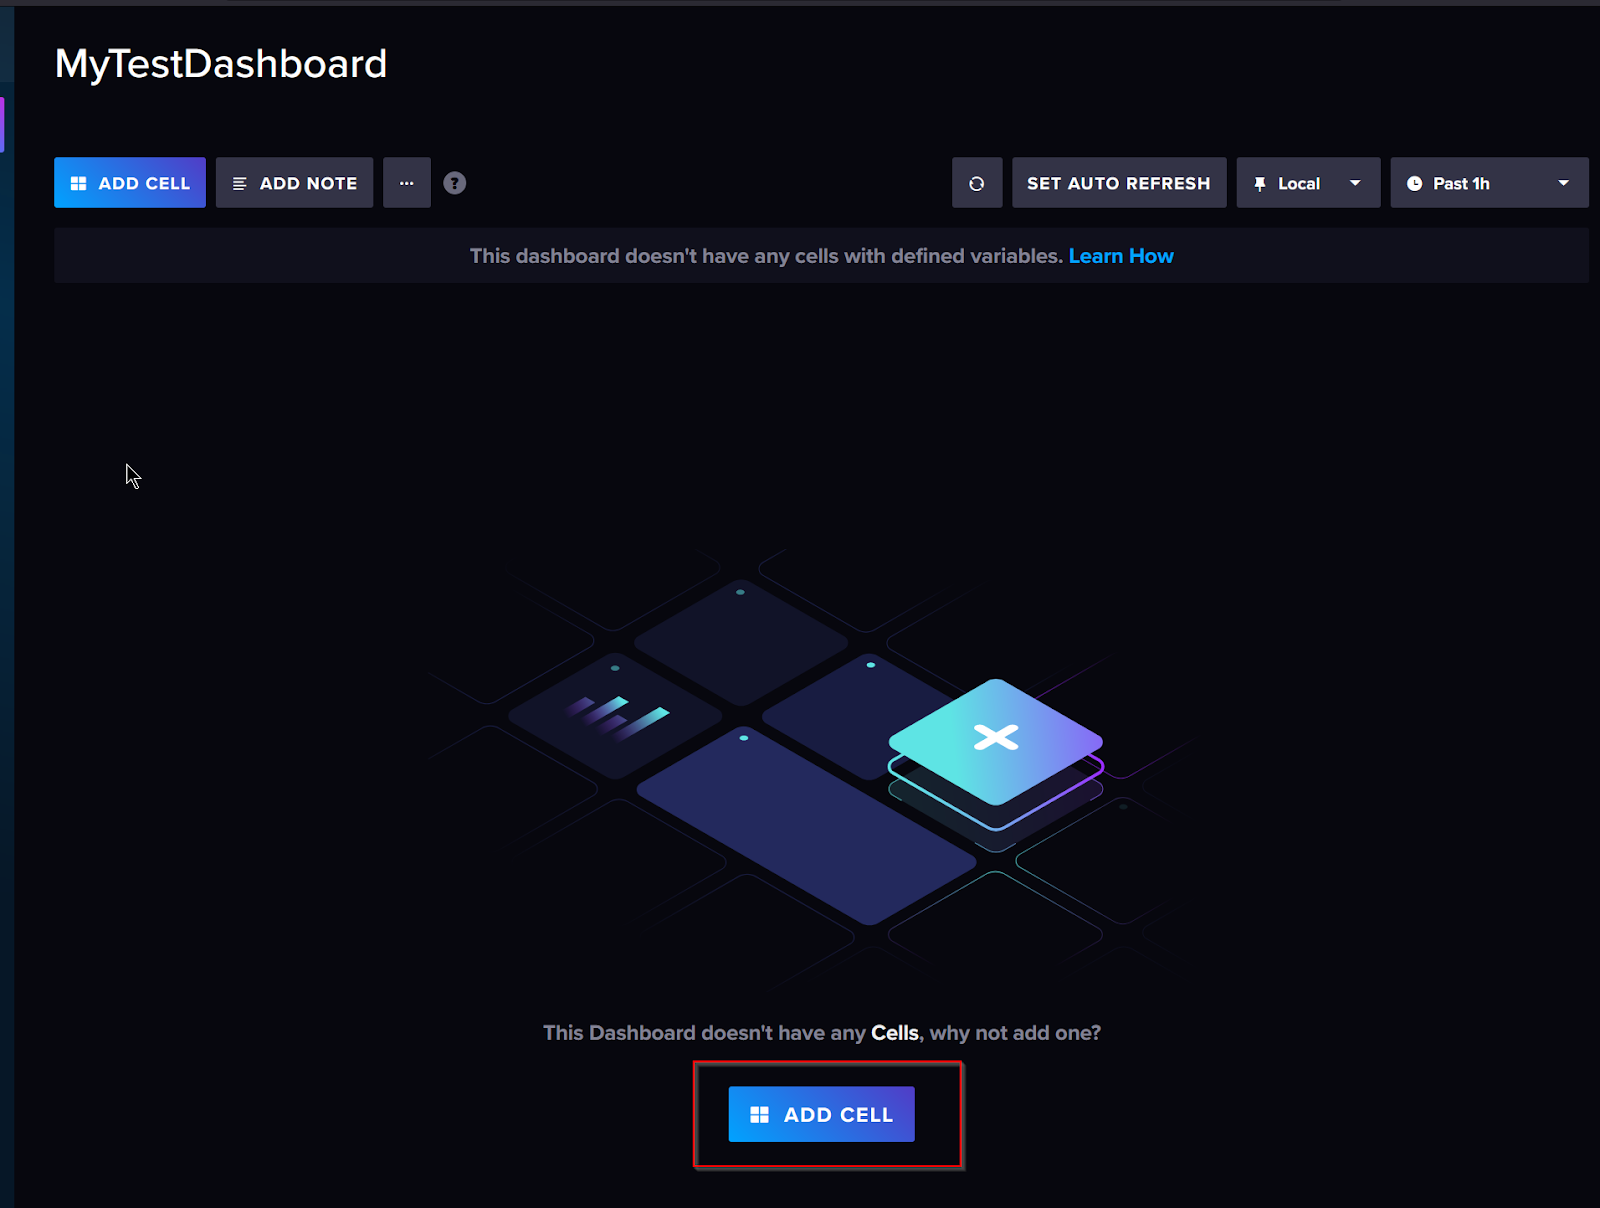
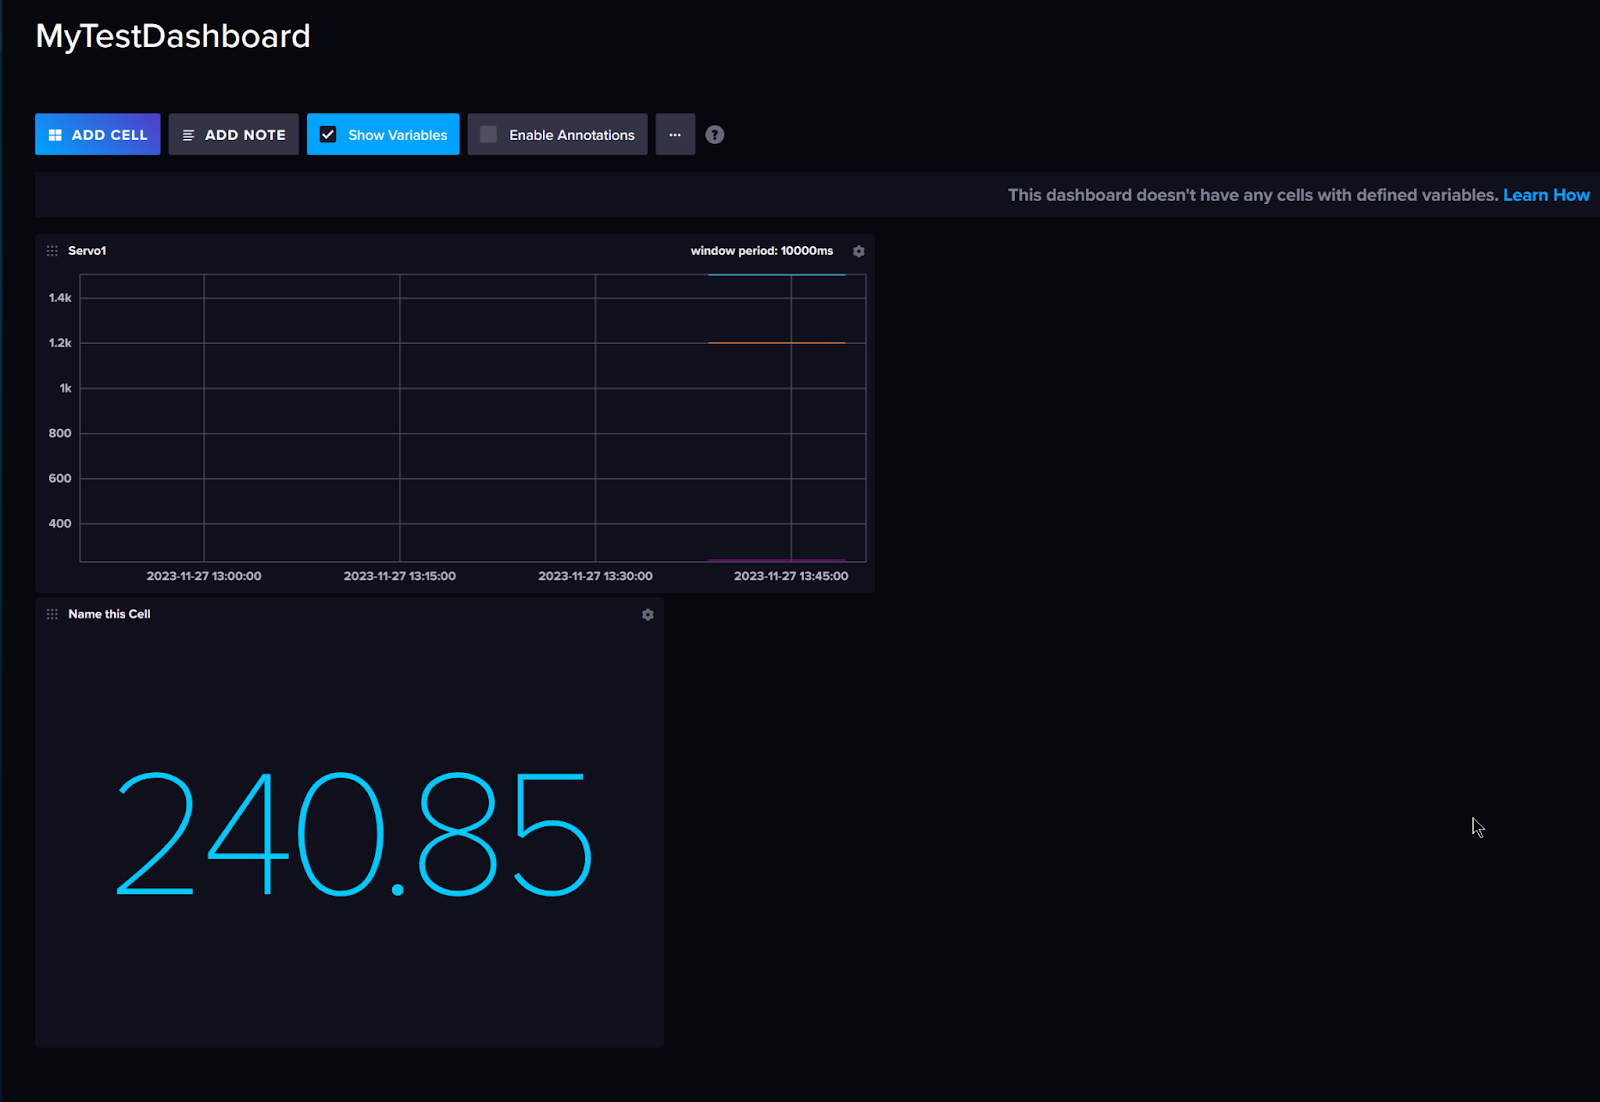
Done!Click ADD CELL to add a new screen.
The Data Exploer screen is now displayed.
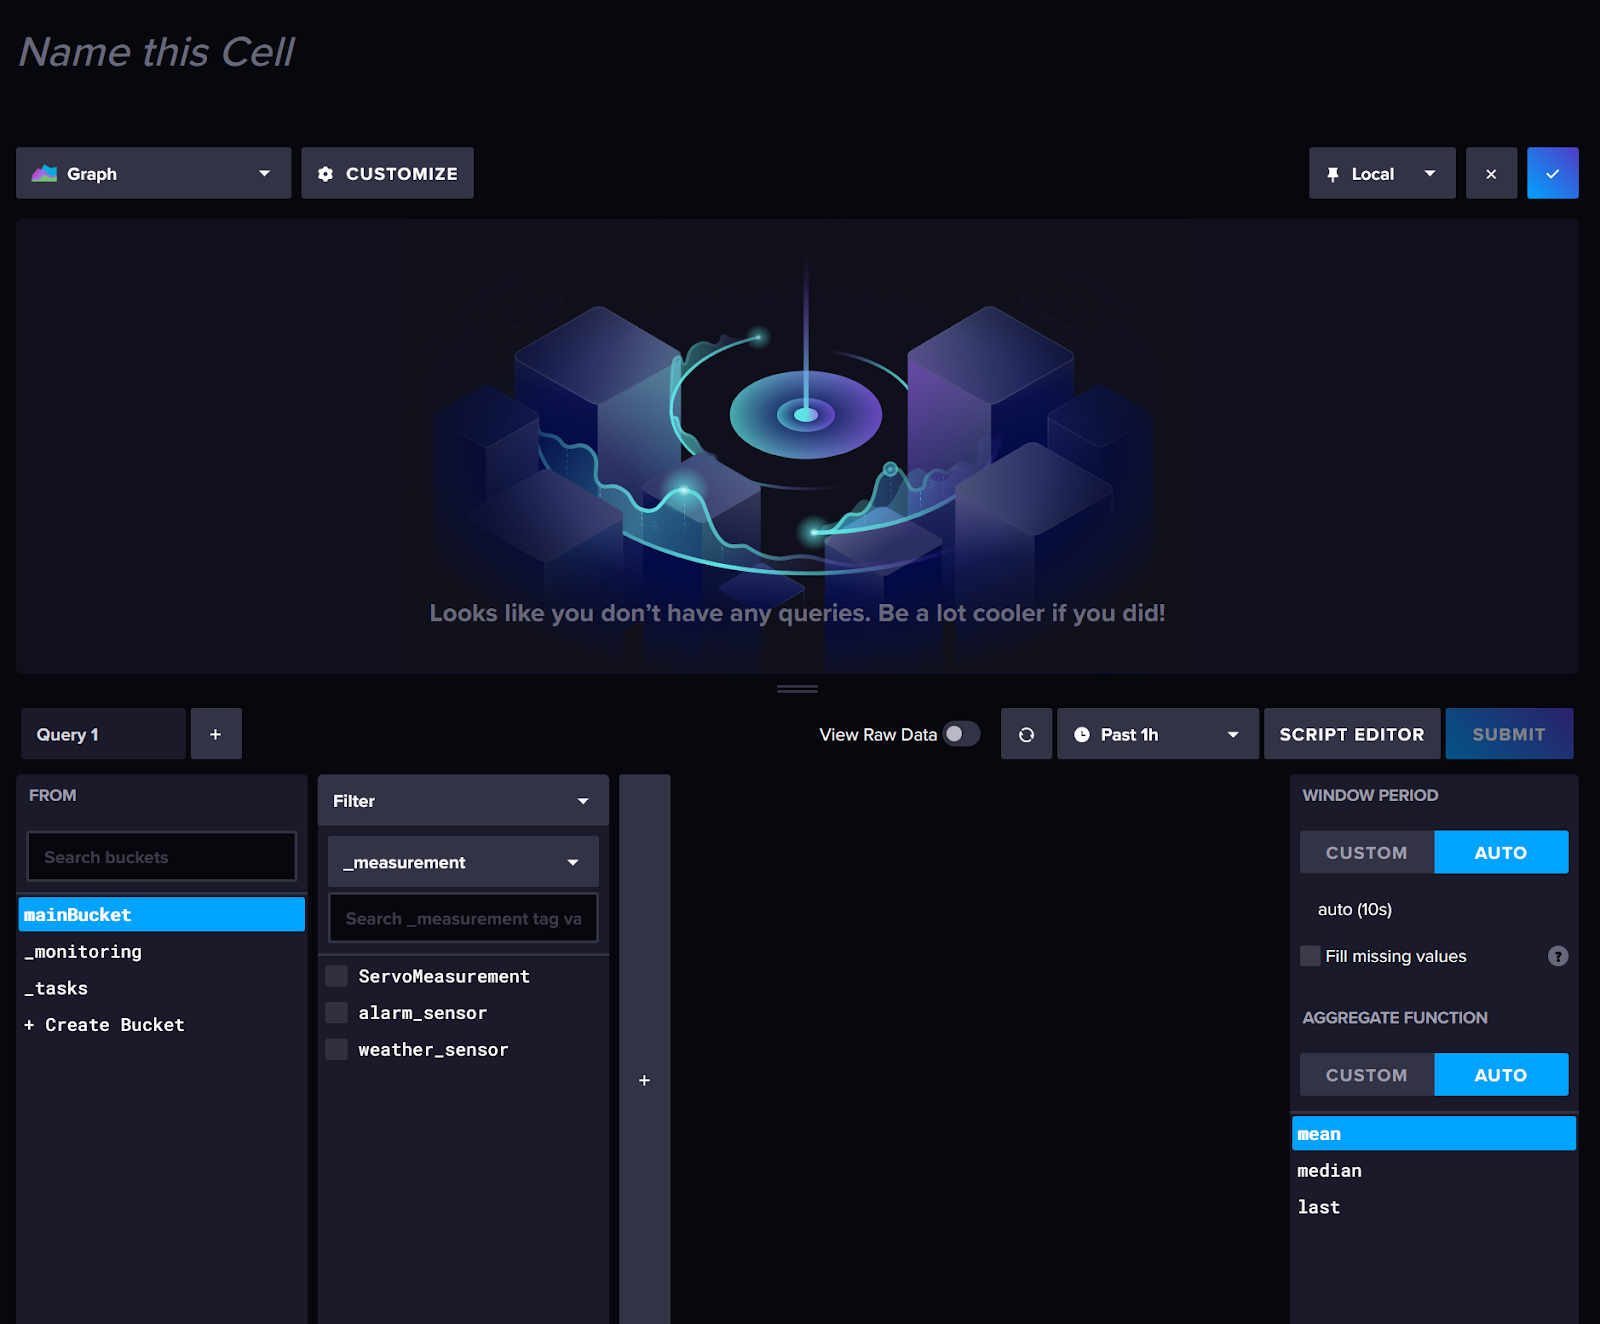
Select the data you want to display in the CELL and click >Check mark to confirm.

Done!
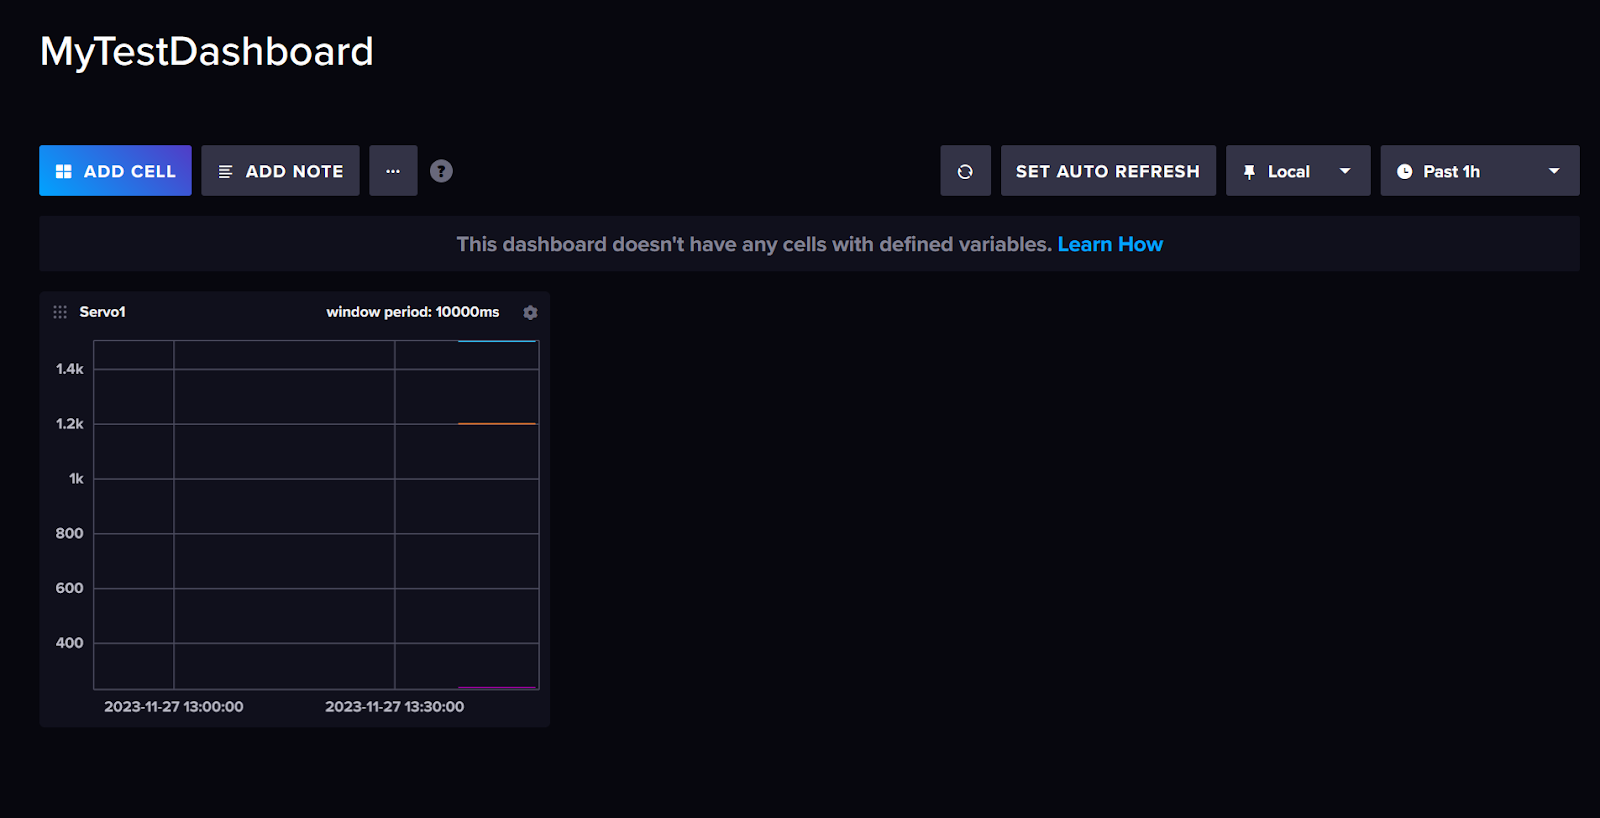
In this way, you can create different Dashboards for your own applications.
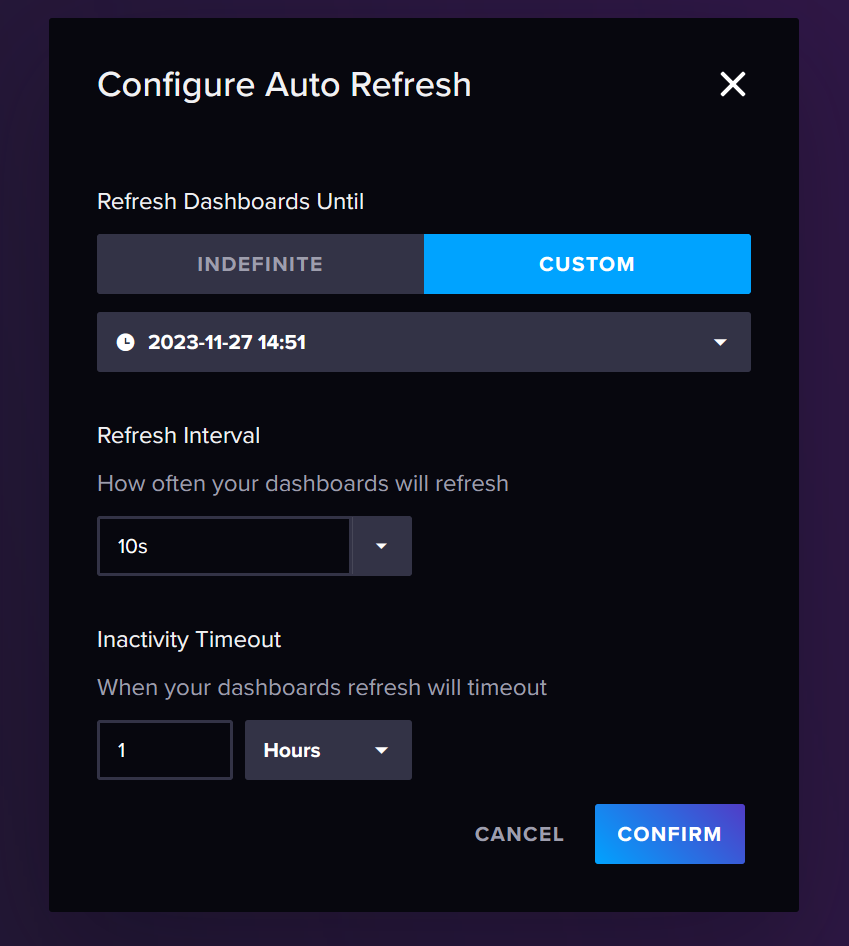
You can also change the Cell update time with SET AUTO REFRESH.
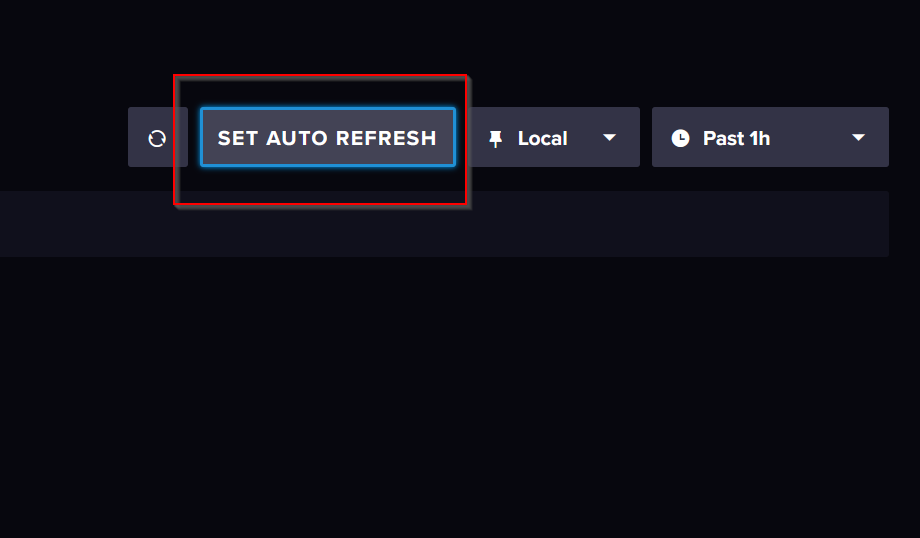
Put the Refresh Interval in line with the application.