In this tutorial I will show you how to play the SIMIT with the ADS External coupling.
SIMIT will communicate to TwinCAT Runtime and implement a Virtual commissioning task.
Point1:SIMIT and TwinCAT must be on the same PC.
Point2:The EtherCAT Device can not simulate.

.
Reference Link
http://soup01.com/en/category/siemens-en/simit-en/
http://soup01.com/en/category/work_en/beckhoff-work_en/
Download
Please download the TwinCAT3 Coupling library from this link.
https://support.industry.siemens.com/cs/document/109780950/simit-twincat-coupling?dti=0&lc=en-BO

A zip file is downloaded from Siemens SIOS to your PC.

Installation
Now we can install this library into your SIMIT.

Let’s Unlock the zip file first.
Right click the zip file>Properties.
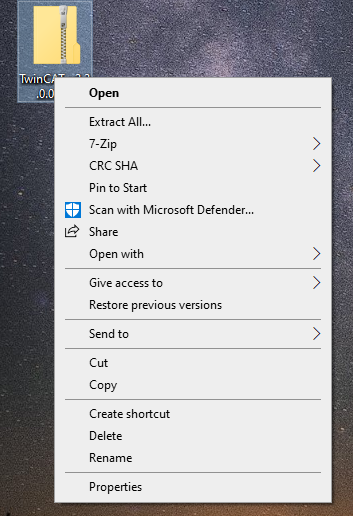
Check the “Unlock” Button in the security field.
(file is unlocked if you can not see this checkbox)

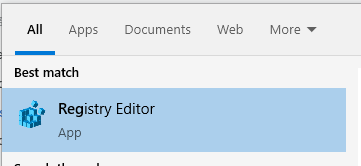
Open the Register Editor.
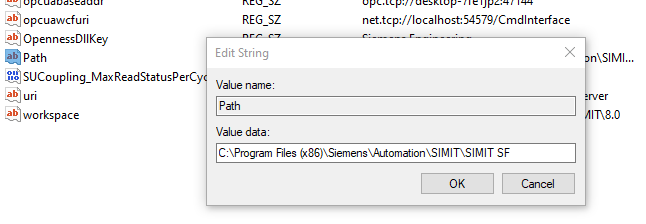
Please access the variables ‘path’ that in Computer\HKEY_LOCAL_MACHINE\SOFTWARE\WOW6432Node\Siemens\SIMIT\8.0

Copy the value of this path value.In my case,
C:\Program Files (x86)\Siemens\Automation\SIMIT\SIMIT SF
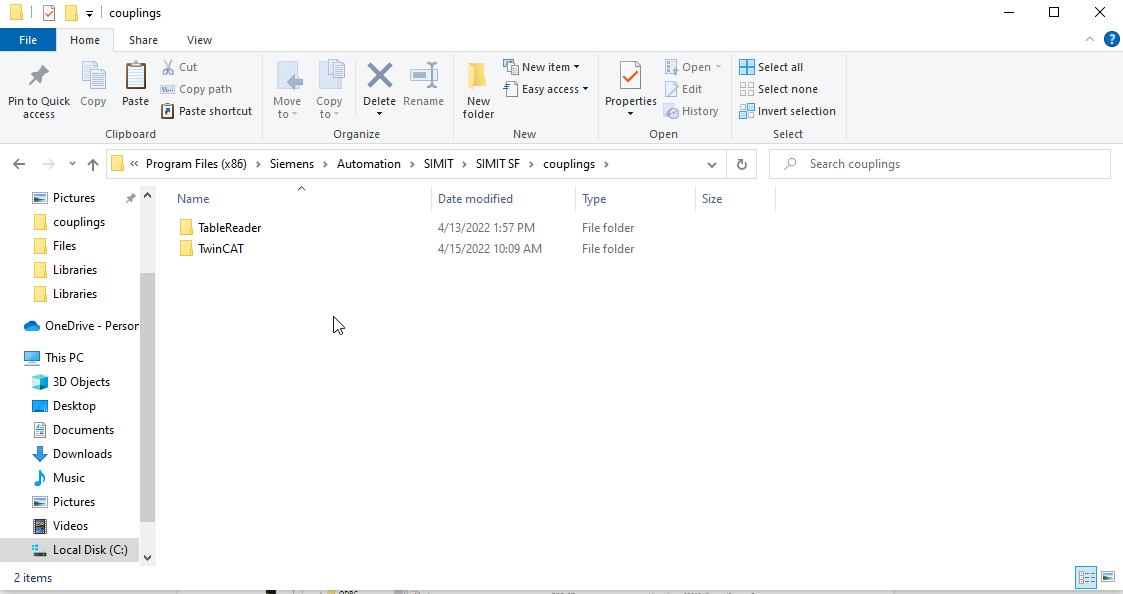
Copy the TwinCAT3 Driver into the Coupling directory based on your path variables.
In my case:
C:\Program Files (x86)\Siemens\Automation\SIMIT\SIMIT SF
Couping Set-up
Start the SIMIT SP.(Extend Coupling can not run in DEMO Version.)

SIMIT is Started and A Size variant popup is shown.
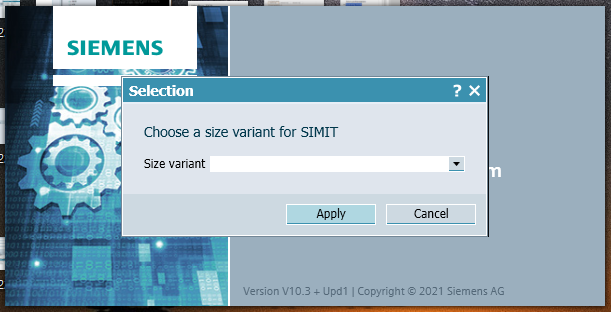
Insert the USB license in your PC, select the license and press “Apply”.

The software will be started if you have a correct license.
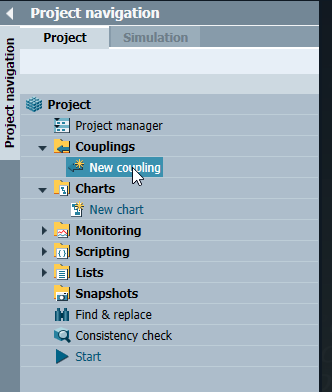
New project screen is shown and we will create a new project.

Create a new coupling by Couplings>New coupling.
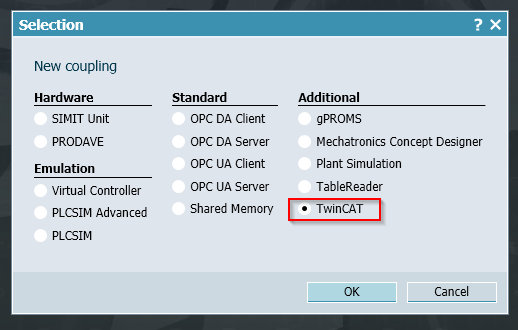
A new option of “TwinCAT” is shown in the Additional field.
Select TwinCAT>OK.
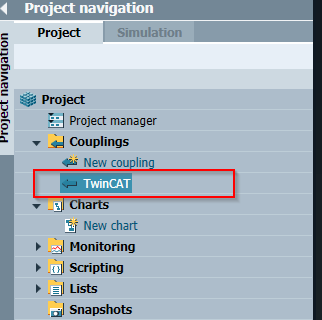
TwinCAT Coupling is inserted.
Importer
We will use the importer features to import the variables from TwinCAT.Please make sure the TwinCAT Runtime and SIMIT are running on the same PC.
The TwinCAT Runtime variables (IO/Global Variable) can be accessed while the ADS Connection is succeeded.
(Only the data-type supported in SIMIT can be imported, it means that we can not directly import the DUT or arrays.)
Output
Import the output signal by click the Importer.

The Importer screen is shown.

We will not assign the IOs in this tutorial, please uncheck the I/Os only checkbox.
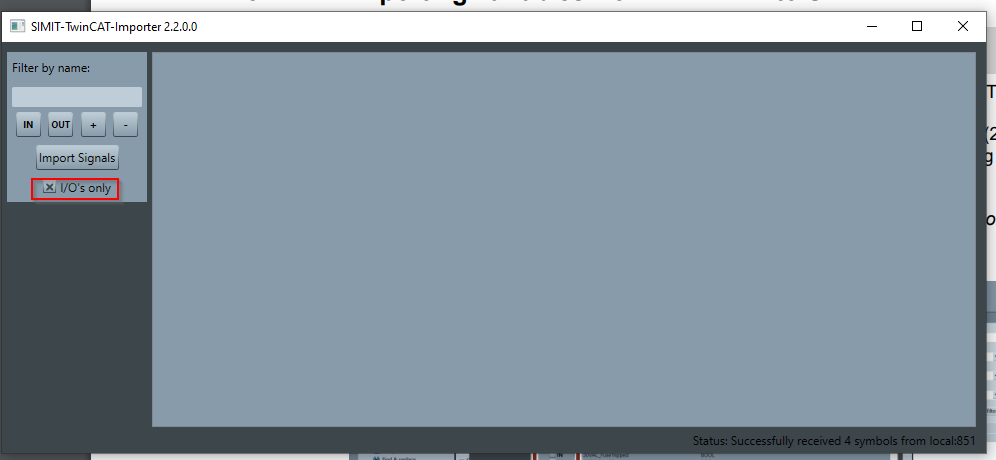
The variables inside TwinCAT Runtime are shown.

As I mentioned before, SIMIT can only import the variables that SIMIT is supported with.
So, Array can not directly import in SIMIT.
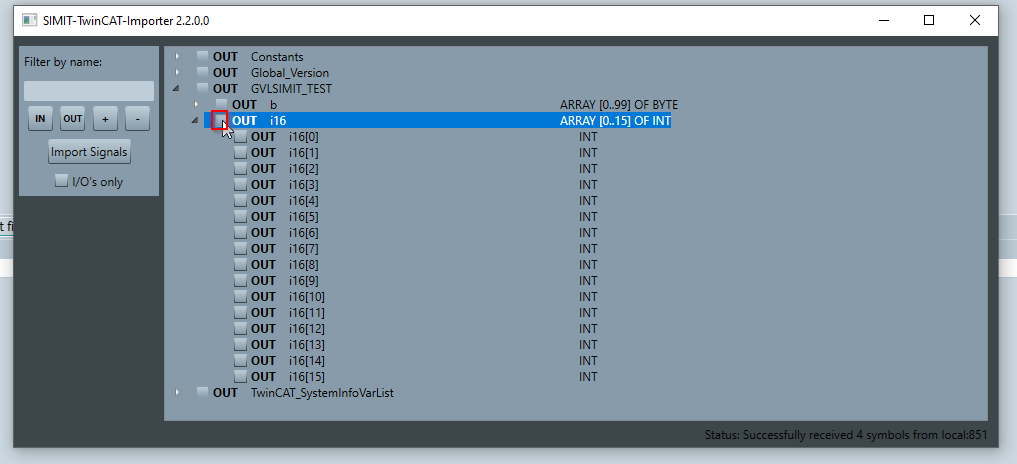
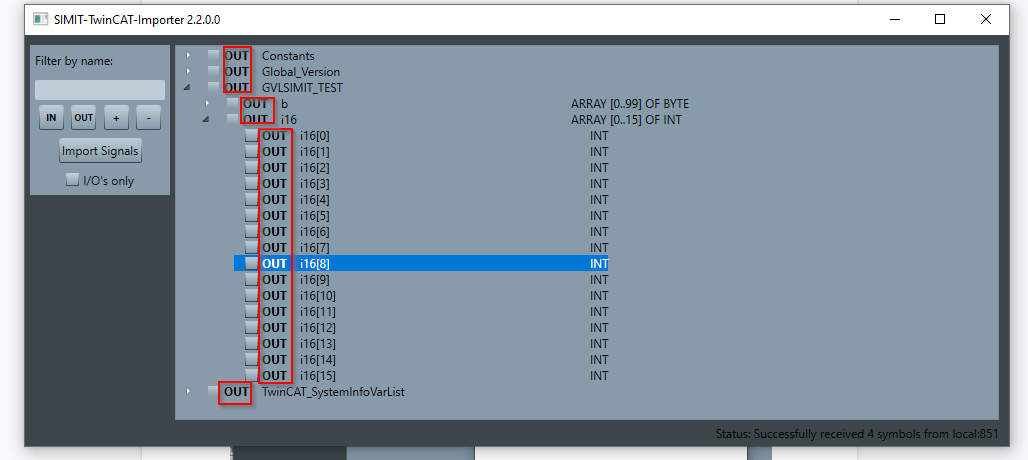
Let’s choose it one by one.
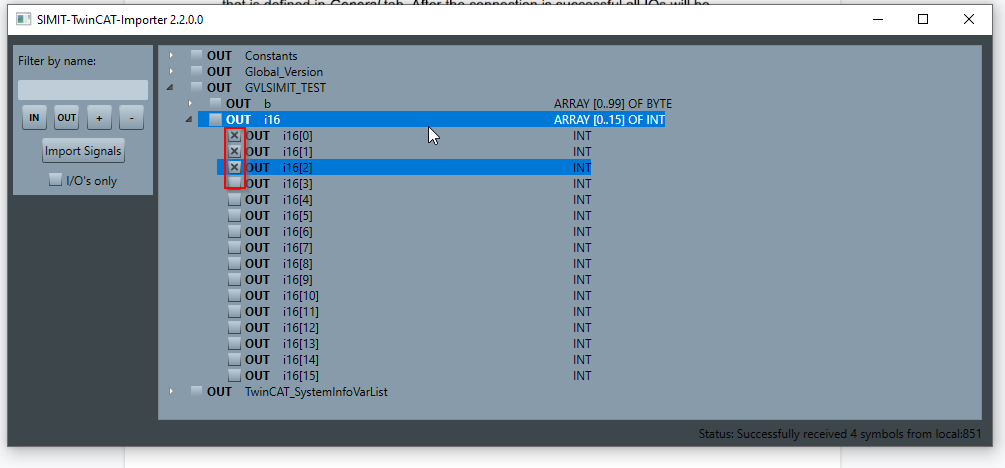
After you select the output signals, press the “Import Signals” button to finish your operation.

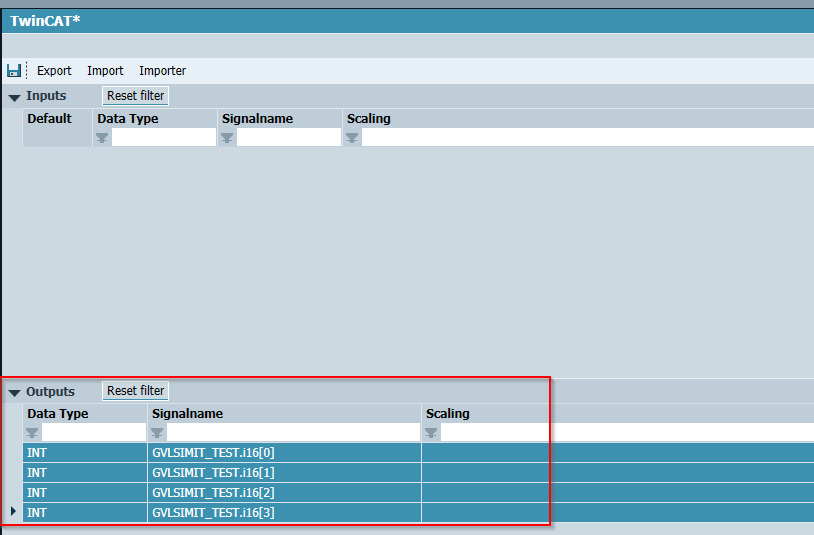
As you see, these output signals are imported.
Input
The operation is the same as the Output signal import.
We only need to press the “IN” button to change the import direction from OUT to IN.

But there is an error while you press the “IN” button without select any variables.

Select the necessary signal that you want and press the “IN” Button to change it.
Or select All and then press “IN” to change it in one time.

Just like this:)
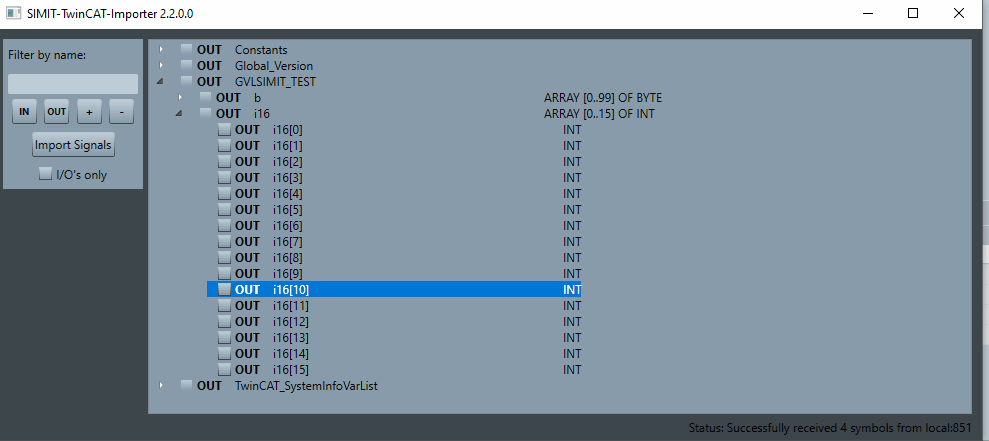
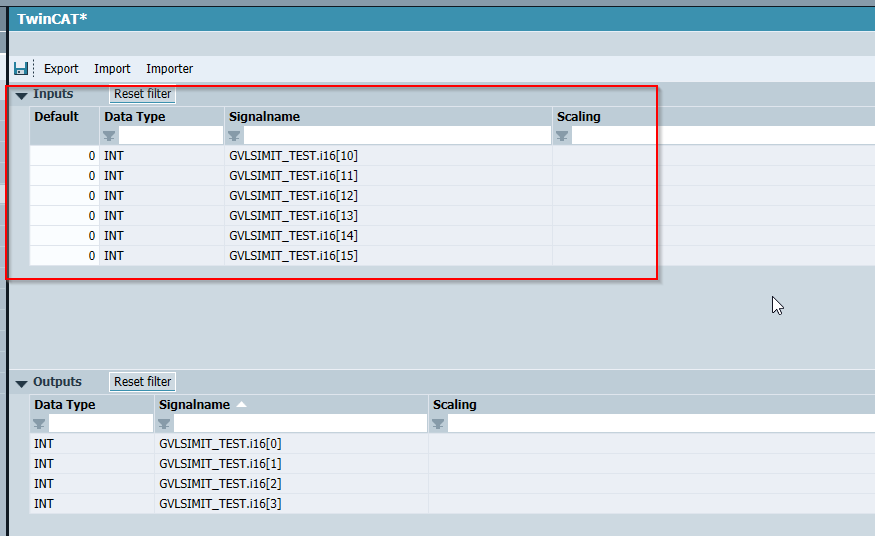
Good, Now the Input signals are imported also.
Test
Now we can check if the communication between TwinCAT is working or not.

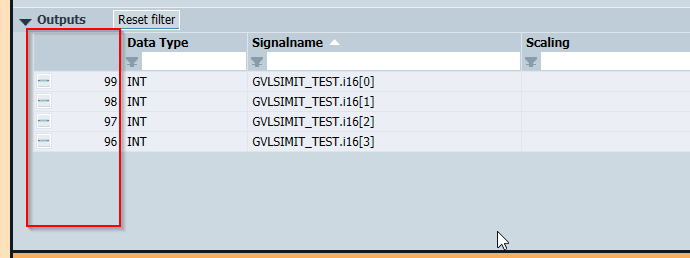
Write 1,2,3,4,5,6 into the Input signals.
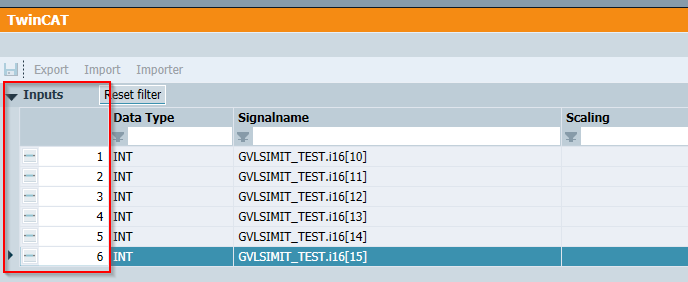
we can see these variables are changed in TwinCAT.

Now we can change some values in TwinCAT.
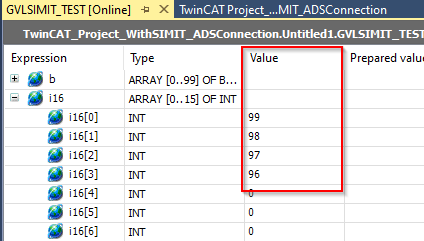
Good! SIMIT can receive these signals.
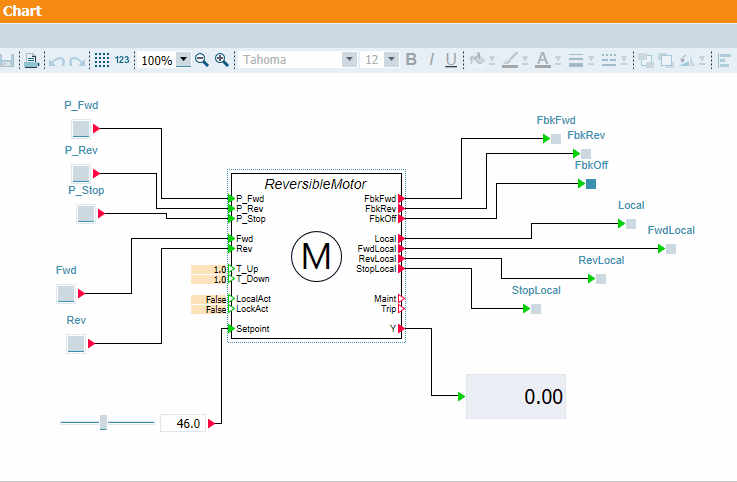
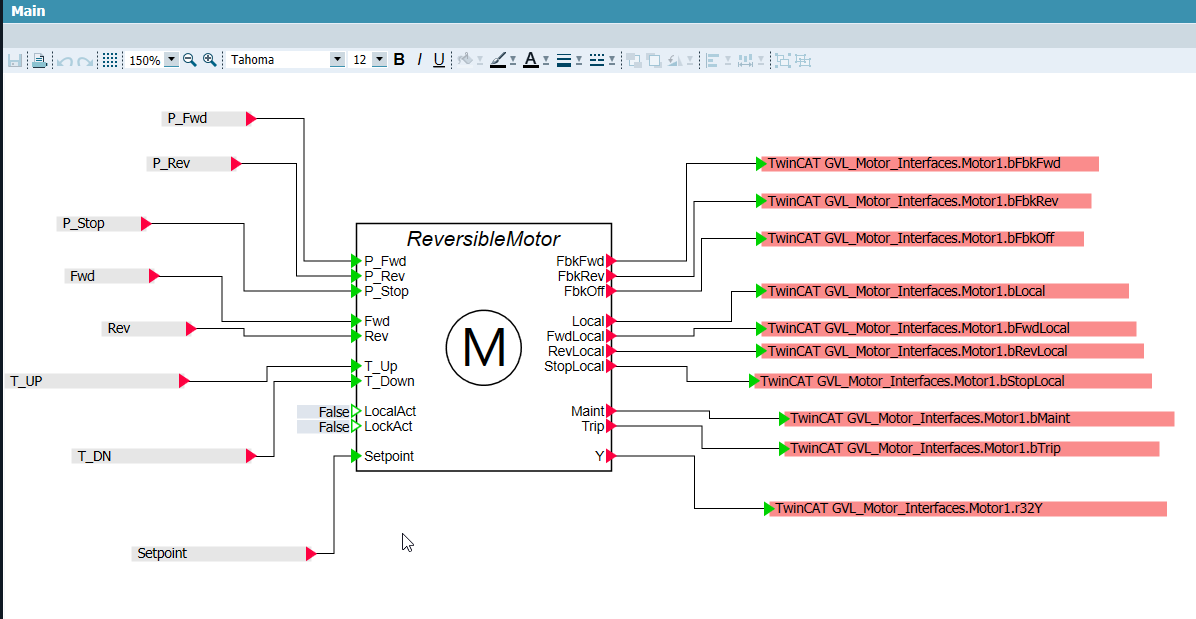
Block-ReversibleMotor
We will use this simulation block in this tutorial to test the TwinCAT3 Simulation.
This ReversibleMotor Drive Unit simulates the Motor Operation with Fwd/Rev signals.

INPUT
| Device | Data Type | Description |
| P_Fwd | Bool | Rise Edge=Forward |
| P_Rev | Bool | Rise Edge=Backward |
| Fwd | Bool | True=Forward |
| Rev | Bool | True=Backward |
| T_Up | Real | Ramp up time |
| T_Down | Real | Ramp down time |
| LocalAct | Bool | |
| LockAct | Bool | |
| Setpoint | Real | Speed setpoint |
OUTPUT
| Device | Data Type | Description |
| FbkFwd | Bool | True=Forwarding |
| FbkRev | Bool | True=Backwarding |
| FbkOff | Bool | True=Off |
| Local | Bool | Drive in Local Mode |
| FwdLocal | Bool | Drive is Forwarding from Local command |
| RevLocal | Bool | Drive is Backwarding from Local command |
| StopLocal | Bool | Drive is Stopped from Local command |
| Maint | Bool | Drive in maintenance mode |
| Trip | Bool | Drive is Tripped |
| Y | Real | Current Speed |
Insert in your Chart
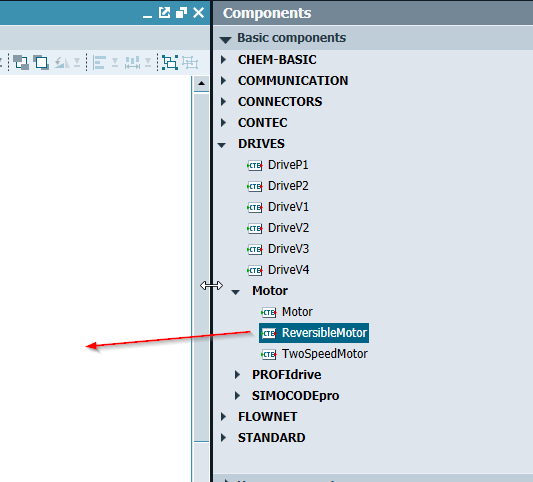
Components>DRIVES>Motor> and select ReverisbleMotor,Insert to your chart.
Insert the Push Button・Slider・Digital Display into your chart and start the test.

Test1- P_Fwd/P_Rev
Here is the operation to trigger the drive by using the P_Fwd/P_Rev.
Test-2 Local
Here is the Local operation.
we can click the block to open the local panel.
Test3-Fwd/Rev
Here is the operation to trigger the drive by using Fwd/Rev Signal.

Project
Now we can use this simulation block and ads driver to create the program.
SIMIT Side
There is no hard job in the simit side and just insert the ReversibleMotor simulation block and connect these coupling signals.
Main
In the Main Chart , I will connect the Input/Output Signal to the ReversibleMotor Block.
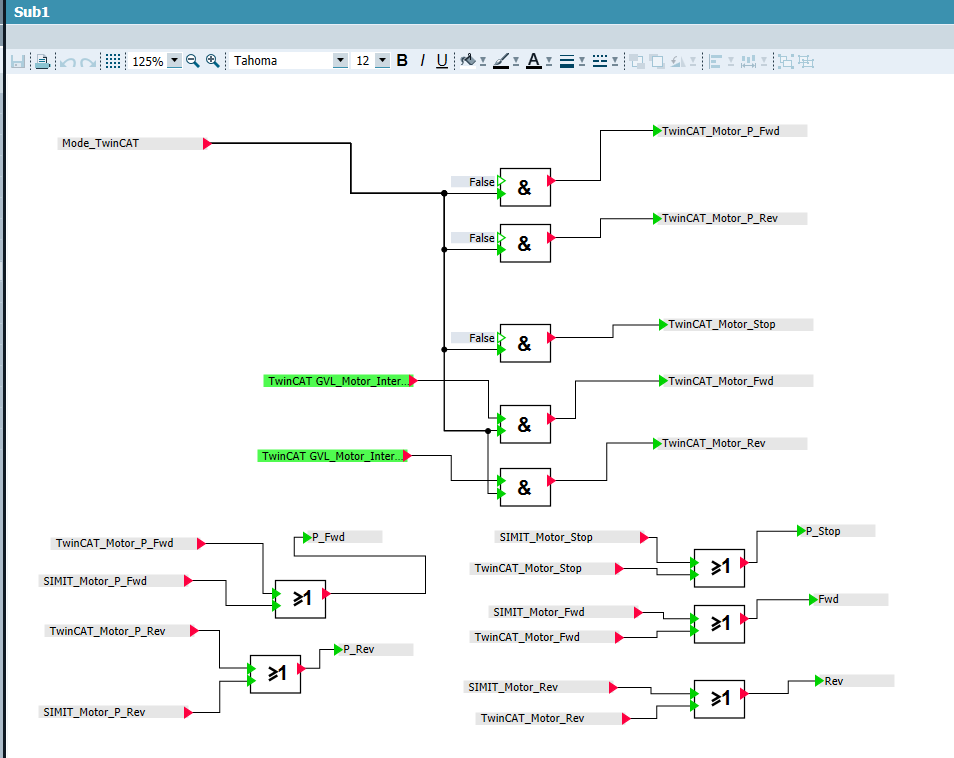
Sub1
Sub1 Chart is the control part to define the current mode – use the signal from SIMIT directly or from TwinCAT.TwinCAT signals are used if Mode_TwinCAT is true.
Sub2
if Mode_SIMIT, the block will be controlled by Local switch.

TwinCAT Side
Now we can create the program on the TwinCAT side.
Here is the UML Diagram of the Function Block.

DUT
DUT_HMI_Motor1_PB
The DUT of HMI Operation.
| TYPE DUT_HMI_Motor1_PB : STRUCT bFW:BOOL; bBw:BOOL; bStop:BOOL; r32Setpoint:REAL; r32AutoSetpoint:REAL; r32T_Up:REAL; r32T_Down:REAL; END_STRUCT END_TYPE |
DUT_HMI_Motor1_PL
The DUT of HMI Display.
| TYPE DUT_HMI_Motor1_PL : STRUCT bFbkFwd:BOOL; bFbkRev:BOOL; bLocal:BOOL; bFwdLocal:BOOL; bRevLocal:BOOL; bStopLocal:BOOL; bMaint:BOOL; bTrip:BOOL; r32Y:REAL; END_STRUCT END_TYPE |
DUT_HMI_Motor1
The Group of HMI with Button and Display.(PL is not used in this time)
| TYPE DUT_HMI_Motor1 : STRUCT PB:DUT_HMI_Motor1_PB; END_STRUCT END_TYPE |
eMode
The current operation Mode.
| TYPE eMode : ( Auto:=1 ,Manual:=0 ); END_TYPE |
DUT_MotorIf
The DUT of the Motor interface that is the same as ReversibleMotor Simulation Block.
All the IN/OUT parameters are defined in here.
| TYPE DUT_MotorIf : STRUCT //Input bFwd:BOOL; bRev:BOOL; r32T_Up:REAL:=1.0; r32T_Down:REAL:=1.0; r32Setpoint:REAL:=0.0; //Output bFbkFwd:BOOL; bFbkRev:BOOL; bFbkOff:BOOL; bLocal:BOOL; bFwdLocal:BOOL; bRevLocal:BOOL; bStopLocal:BOOL; bMaint:BOOL; bTrip:BOOL; r32Y:REAL; END_STRUCT END_TYPE |
GVL
GVL_HMI
The variable that is used in the HMI screen.
| {attribute ‘qualified_only’} VAR_GLOBAL Motor1:DUT_HMI_Motor1; bReset:BOOL; bEnable:BOOL; eMode:eMode; Mode_Manual,Mode_Auto:BOOL; END_VAR |
GVL_Motor_Interfaces
The IOs that will be assigned to the ReversibleMotor Simulation Block.
| {attribute ‘qualified_only’} VAR_GLOBAL Motor1:DUT_MotorIf; END_VAR |
GVLSIMIT_TEST
The Communication Test Variables.
| {attribute ‘qualified_only’} VAR_GLOBAL b:ARRAY[0..99]OF BYTE; i16:ARRAY[0..15]OF INT; END_VAR |
FB_ReverMotor
Here is the Main Function Block to control the ReversibleMotor Simulation.
VAR
| FUNCTION_BLOCK FB_ReverMotor IMPLEMENTS ITF_Motors VAR_INPUT bEnable :BOOL; RefHMI:REFERENCE TO DUT_HMI_Motor1; RefIFs :REFERENCE TO DUT_MotorIf; Mode :eMode; END_VAR VAR_OUTPUT bError:BOOL; wErrorCode:WORD; END_VAR VAR _bRefIsOK :BOOL; _bError :BOOL; END_VAR |
PROPERTY ActSpeed : REAL
Get the current speed.
Get
| IF _bRefIsOK THEN ActSpeed:=RefIFs.r32Y; ELSE ActSpeed:=0.0; END_IF |
PROPERTY Bwing : BOOL
Get the Drive rotation is Backwarding or not.
Get
| Bwing:=FALSE; IF _bRefIsOK THEN Bwing:=RefIFs.bFbkRev; END_IF |
PROPERTY CmdSpeed : REAL
Get the current Command Speed.
Get
| CmdSpeed:=0.0; IF _bRefIsOK THEN CmdSpeed:=RefIFs.r32Setpoint; END_IF |
PROPERTY Fwing : BOOL
Get the Drive rotation is Forwarding or not.
Get
| Fwing:=FALSE; IF _bRefIsOK THEN Fwing:=RefIFs.bFbkFwd; END_IF |
PROPERTY Maint : BOOL
Get the Drive is in maintenance mode or not.
Get
| Maint:=FALSE; IF _bRefIsOK THEN Maint:=RefIFs.bMaint; END_IF |
PROPERTY Stopped : BOOL
Get the Drive stopped or not.
Get
| Stopped:=FALSE; IF _bRefIsOK THEN Stopped:=RefIFs.bFbkOff; END_IF |
PROPERTY Trip : BOOL
Get the Drive is tripped or not.
Get
| Trip:=FALSE; IF _bRefIsOK THEN Trip:=RefIFs.bTrip; END_IF |
METHOD CheckVaild : BOOL
A method to check if all valid Reference variables are passed into a function block or not.
The TwinCAT Runtime will be stopped if invalid reference is passed inside.
| _bRefIsOK:=__ISVALIDREF(RefHMI) AND __ISVALIDREF(RefIFs); |
METHOD Fault : BOOL
A method to check the Trip signal.
| IF _bRefIsOK THEN IF RefIFs.bTrip THEN _bError:=TRUE; wErrorCode.0:=TRUE; END_IF END_IF bError:=_bError; |
METHOD Reset : BOOL
A method to reset the error.
| _bError:=FALSE; bError:=FALSE; wErrorCode:=16#0; |
METHOD Run : BOOL
A method to control the drive to run/Stop.
we will check the Error flag> the Drive will output directly depending on the Speed setpoint in auto mode, or waiting for the command from HMI in manual mode.
| VAR _BW:BOOL; _FW:BOOL; END_VAR IF _bRefIsOK AND bEnable AND NOT _bError THEN IF Mode = eMode.Auto THEN IF RefHMI.PB.r32AutoSetpoint <0.0 THEN RefIFs.r32Setpoint:=RefHMI.PB.r32AutoSetpoint*-1.0; _BW:=TRUE; ELSIF RefHMI.PB.r32AutoSetpoint >0.0 THEN RefIFs.r32Setpoint:=RefHMI.PB.r32AutoSetpoint; _FW:=TRUE; ELSIF RefHMI.PB.r32AutoSetpoint =0.0 THEN RefIFs.r32Setpoint:=RefHMI.PB.r32AutoSetpoint; END_IF ELSIF Mode =eMode.Manual THEN IF RefHMI.PB.bStop THEN RefHMI.PB.bFW:=FALSE; RefHMI.PB.bBw:=FALSE; RefIFs.r32Setpoint:=0.0; ELSIF RefHMI.PB.bFW THEN RefIFs.r32Setpoint:=RefHMI.PB.r32Setpoint; _FW:=TRUE; ELSIF RefHMI.PB.bBw THEN RefIFs.r32Setpoint:=RefHMI.PB.r32Setpoint*1.0; _BW:=TRUE; END_IF; END_IF RefIFs.bFwd:=FALSE; RefIFs.bRev:=FALSE; IF _FW THEN RefIFs.bFwd:=TRUE; ELSIF _BW THEN RefIFs.bRev:=TRUE; END_IF END_IF |
METHOD Stop : BOOL
A method to stop the drive.
| IF _bRefIsOK THEN RefIFs.bFwd:=FALSE; RefIFs.bFbkRev:=FALSE; RefIFs.r32Setpoint:=0.0; END_IF |
POU-MAIN
we will call the Function Block>Check the reference>check the error>Reset>Run only here.
| VAR Motor1:FB_ReverMotor; bEnable:BOOL; END_VAR GVL_HMI.Mode_Manual:=GVL_HMI.eMode=eMode.Manual; GVL_HMI.Mode_Auto:=GVL_HMI.eMode=eMode.Auto; Motor1.CheckVaild(); Motor1.Fault(); IF GVL_HMI.bReset THEN Motor1.Reset(); END_IF; Motor1( bEnable:=bEnable ,RefHMI:=GVL_HMI.Motor1 ,RefIFs:=GVL_Motor_Interfaces.Motor1 ,Mode:=GVL_HMI.eMode ); Motor1.Run(); |
Visualization
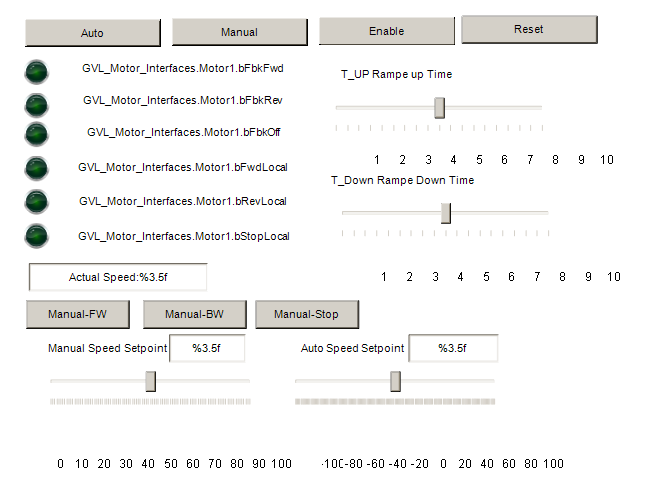
Result
Manual Mode
Here is the Manual Mode.
We can control the drive from HMI Button.

Auto Mode
Here is the Auto Operation.
The drive will change the speed directly from the setpoint.

Source Code Download
Please find the following link to download the SIMIT and TwinCAT project.
https://github.com/soup01Threes/TwinCAT3/blob/main/TwinCAT%20Project_WithSIMIT_ADSConnection.zip