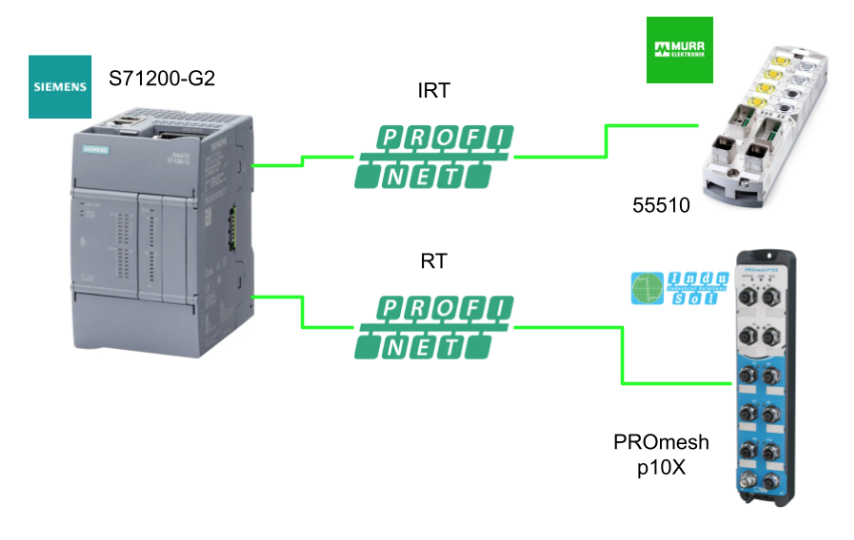
In this article, we will start up a PROFINET controller with S71200-G2 and connect it to murrelektronik 55510 (IRT) and Indusol’s PROmesh p10X (RT).This article only describes the “connection” until it is made, but we will be developing various articles along this line in the future.
Come on, let’s enjoy FA!
Foreword
Thank you from the bottom of my heart for visiting my technical blog and YouTube channel.
We are currently running the “Takahashi Chris” radio show with Full-san (full@桜 八重 (@fulhause) / X) which I deliver every Wednesday night.
Sharing, not hoarding, technical knowledge
We publish technical information related to factory production technology and control systems for free, through blogs and videos.
With the belief that “knowledge should be accessible to everyone,” we share practical know-how and real-world troubleshooting cases from our own field experience.
The reason we keep it all free is simple: to help reduce the number of people who struggle because they simply didn’t know.
If you’ve ever thought:
- “Will this PLC and device combination actually work?”
- “I’m having trouble with EtherCAT communication—can someone test it?”
- “I want to try this remote I/O, but we don’t have the testing environment in-house…”
Feel free to reach out!If lending equipment or sharing your configuration is possible, we’re happy to verify it and share the results through articles and videos.
(We can keep company/product names anonymous if requested.)
How can you support us?
Currently, our activities are nearly all unpaid, but creating articles and videos takes time and a proper testing environment.If you’d like to support us in continuing and expanding this content, your kind help would mean a lot.
Membership (Support our radio show)
This support plan is designed to enhance radio with Mr Full.
https://note.com/fulhause/membership/join
Amazon Gift List (equipment & books for content production)
Lists equipment and books required for content creation.
https://www.amazon.co.jp/hz/wishlist/ls/H7W3RRD7C5QG?ref_=wl_share
Patreon (Support articles & video creation)
Your small monthly support will help to improve the environment for writing and verifying articles.
https://www.patreon.com/user?u=84249391
Paypal
A little help goes a long way.
https://paypal.me/soup01threes?country.x=JP&locale.x=ja_JP
Just trying to share things that could’ve helped someone—if only they’d known.
Your support helps make knowledge sharing more open and sustainable.
Thank you for being with us.
soup01threes*gmail.com
Technical knowledge shouldn’t be kept to ourselves.
Isochronous Real-Time PROFINET (IRT)
The S7-1200 G2 CPU supports Isochronous Real-Time PROFINET (IRT), a transmission method that allows PROFINET devices to be synchronized with very high accuracy.The synchronization master specifies the clock with which the synchronization slaves are synchronized.An IO controller or an IO device can take the role of synchronization master.
The sync master and sync slave are always devices within the sync domain.Bandwidth is reserved for IRT communication within the sync domain.Real-time and non-real-time communication (TCP/IP communication) is possible outside of the reserved bandwidth.
PROFINET with IRT is particularly suitable for,
- High performance for high volume structures with respect to user data communication (productivity data).
- High performance with respect to user data communication (productivity data), even with a large number of devices in the line topology.
- Production data and TCP/IP data are transmitted in parallel over a wired line to ensure transmission bandwidth for large data volumes.

Implementation1
First add the S71200 G2 Controller to the TIA project.

S7-1200G2 added
Add new device to add a new device.

This time, add undefined S71200 G2.

Done!

Detect
Next, click on the Detect button and search for S71200 G2 in the same network.

Configure the Ethernet interface of your PC.

Find S71200 G2 in your network with Start Search.

Done!Next, click on the S71200 G2 you searched for.

Proceed with Connect.

Proceed with Yes.

Security settings related to CPU from TIA V18 must be preconfigured.Since this is not an actual operation, disable all security settings.

Protects the PLC configuration data from the TIA.Uncheck the “Protects the PLC configuration data from the TIA.

Only allow secure… Uncheck the “Only allow secure.” checkbox and click Next>> to proceed.

Set to Full access with no password and press Next>> to proceed.

Check one last time and save the settings with Finish.

Done!

IP address settings
To build the IP address of the S71200 G2, click on Network view.

Click on the Show address labels button in the figure below and set the IP address to match your application.

You can also change the IP address by clicking on the S71200 G2 and going to Properties>PROFINET interterface>Ethernet address.

IP Online Configuration
You can also change the IP address of the S71200 G2 directly on the TIA tool by clicking the button shown below.

Click Start Search.

You can search for S71200 G2 and click Show.

Done!Online Access now shows the S71200 G2 on the network.

Click on Online and Diagnostics.

Open Functions, enter the IP and click “Assign IP addess”.

Done!

Download
Download the project.

Next, let’s proceed with Load.

Please wait a moment…

Done!Finally, select the Start module from the Drop-list and set the CPU to RUN Mode.

Implementation2
The next step is to connect Indusol’s PROmesh P10X to the S71200 G2.

Download GDSML
To connect to Indusol’s PROmesh P10X with Profinet, download the GSDML FILE from the Indusol HP.
https://www.indu-sol.com/en/industrial-ethernet/switch-promesh-p/promesh-p10x/


You can Download by entering your email address and other information.

Installation of GSDML
The next step is to install Indusol’s PROmesh P10X GSDML File on the TIA.

Proceed with Install.

Please wait a moment…

Add Profient devices
The next step is to add the PROmesh PX10X device added earlier to the PROFINET network.

Done!

Profinet network assignment
Assign the Indusol PROmesh P10X and S7-1200G2 to the same PROFINET network.

Done!

Topology configuration
Next, switch to Topology View.

This screen allows you to configure the physical connection paths of the devices in the network, and if the connection paths do not match the actual ones, an air will be generated. This feature is very useful when there are many network devices.

Selecting Port 1 on the PROmesh P10X will also select the corresponding PORT in the list of devices when.

Now that Port 1 of the PROmesh P10X is connected to Port 1 of the S7-1200G2, pull Port 1 of the PROmesh P10X directly to Port 1 of the S7-1200G2.

Done!

That’s how it’s set up OK.

Assigning device names
PROFINET communication requires a device name, so click PROmesh-P10X>Right click>Assign device name.

Click on the Update list button to search for PROFINET devices.

Done!

Download
Now we can download the project.
Next, proceed with Load.
Result.
Done!PROFINET communication could be established between the S7-1200G2 and Indusol’s PROmesh-P10X.

The physical wiring status can also be checked in Topology View.

Implementation3
The last step is to establish IRT communication with the S7-1200G2 also on the IP67 module 55510, which can also support both IRT PROFISAFE and PROFINE from murrelektronik.

Installation of GSDML
Click Options>Manage general station description files (GSD).

The GSDML management screen appears and the … button is clicked.

Select the GSDML Folder that was downloaded earlier.

Done!GSDML File found Install installs the GSDML File.

Done!

Add Profinet device
Add the Murreletronik IP67 module 55510 added earlier to the PROFINET network.

Profient network assignment
Assign it to the same network as Murreletronik’s 55510 IP67 module tpS71200 G2.

Done!

Enabling F-HOST
Next, to enable the F-HOST function of the S71200 G2, select the S71200 G2 and click on “Enable F-activation” under Properties>Fail-safe>F-activation. Click on “Enable F-activation” under Fail-safe>F-activation.

IRT device configuration – Murreletronik 55510
This article is about PROFINET IRT communication between Murreletronik’s 55510 and the S7-1200G2, so click on the 55510 to set up communication.

Click on PROFINET>Advnaced options>Read time settings>Synchronisation and set the RT class to “IRT”.

IRT controller -S7-1200G2 configuration
The next step is to configure the S71200 G2 as a PROFINET IRT controller.

Select as Properties>Real time settings>Synchronisation>Sync master.

topology
The Topology (physical Ethernet wiring) of each IRT device must be configured for the PROFINET IRT network. In this article, the S71200 G2 and P2 will be connected to Port 1 of the Murreletronik 55510, so the same settings should be made in the Topology View.

Assigning device names
Assign a device name to the Murreletronik 55510 in the same way as in the previous Implementation.
Download
At the end of the process, you can download the project.
