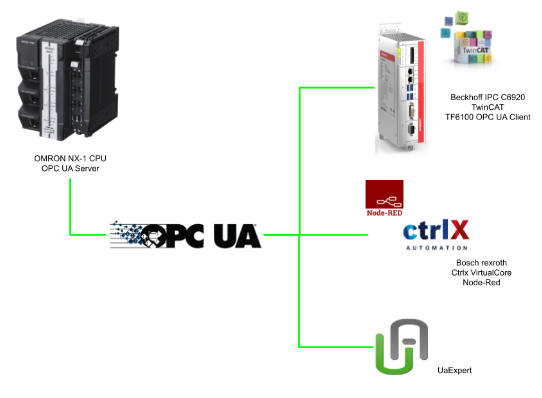
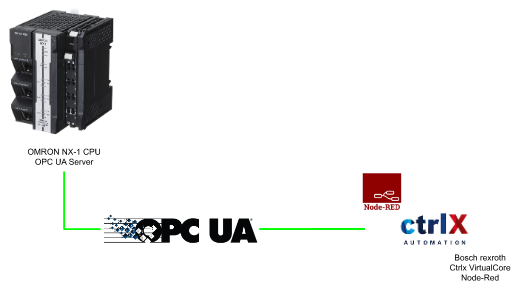
In this article, we will set up an OPC UA Server on the OMRON NX-1 CPU, then access the server using UaExpert, Beckhoff TwinCAT TF6100 PLC OPEN Library, and finally CtrlX Virtual Core and Node Red Apps.Let’s Start!
Implementation1
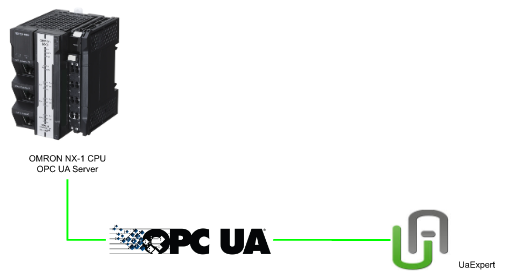
In this implementation, we will startup an OPC UA Server inside Omron NX CPU and use UaExpert to test the connection.
Reference Link
http://soup01.com/en/category/omron/
OMRON Side
Port 1 Configuration
Go to Configuration and Setup>Controller Setup>Operation Settings>Built-in Ethernet/IP Port Settings to change the IP address of port1, and only Port1 can be used as an OPC UA server.

Enable Server
Open the OPC UA Server Settings and set the OPC UA Server as “Use”.

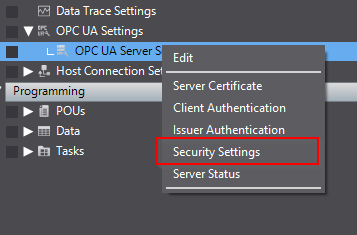
Create User
Then we can configure the user by OPC UA Settings>OPC UA Server Server Settings>right click>Security Settings.
Press the “+” button to create a new user.

Enter the Username and Password.

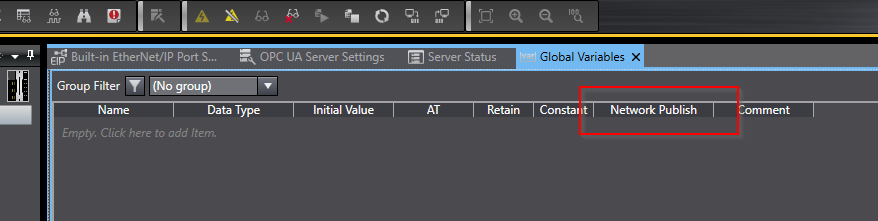
Create Node
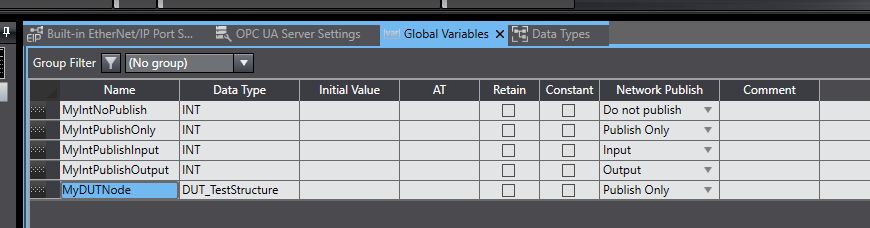
Now we can define the Node inside OPC UA Server.Go to Programming>Data>Global Variables.

There is a Network Publish Field in Global Variables, from which you can set whether to publish the corresponding variable to the OPC UA Server.
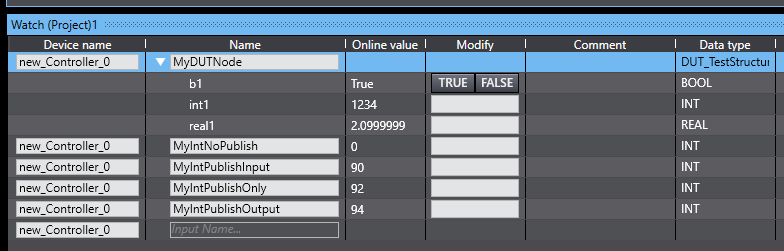
Nodes
Since the Network Publish item from Manual has not been explained in detail, I will add and test these five variables: Do not Publish, Publish Only, Input, Output, and Structure.
Result
Download the project to the CPU and switch the tool to Monitor Mode.
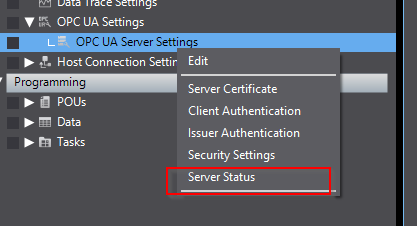
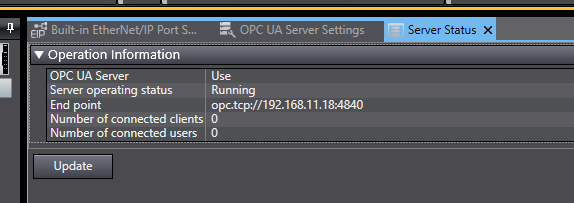
Click OPC UA Settings > OPC UA Server Settings > right click > Server Status.
You can check the current OPC UA Server operation status of the NX CPU.Now OPC UA Server is set to “Use” and Server operating status is Running.Done! OPC UA Server is running.
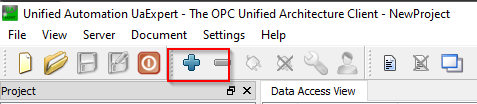
Let’s use UaExpert to check the connection. press the +Button to add an OPC UA Server.
Add a new Server Connection with Custom Discovery>+ <Double click to Add Server>.
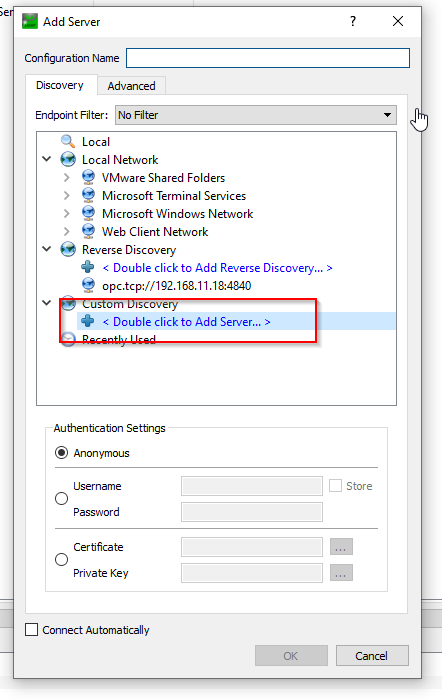
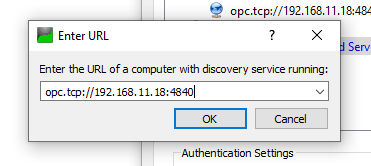
Enter Omron’s IP address in the URL.
Connect to the OPC UA server with None.
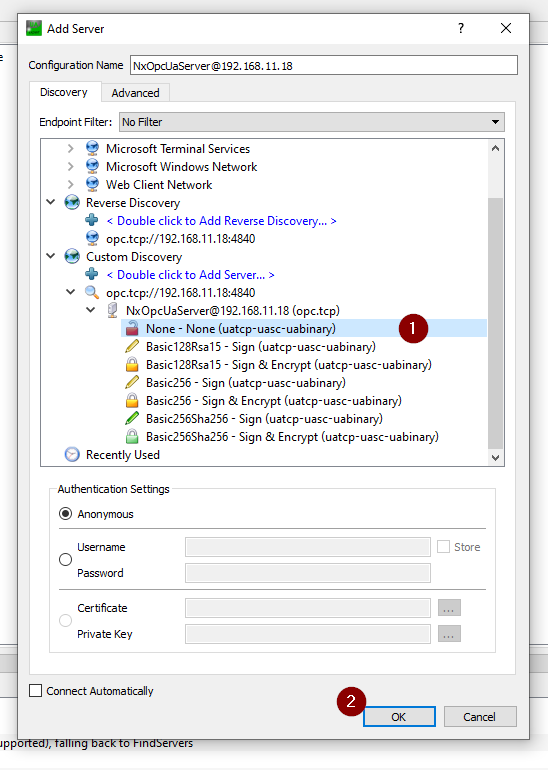
Choose the server that was inserted in the previous step>Connect it.
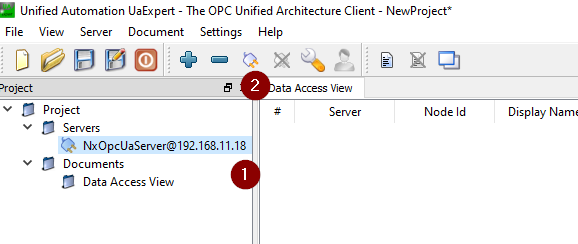
Done! we can expand to Root>Objects>new_Controller_0>GlobalVars and you can check the first added Node. Select those nodes and drop them into the empty space on the right side.

Read OK
First of all, the reading operation seems to be OK. All variables except Do not Publish are accessible.

Write OK
Next is the writing operation. Similarly, you can change all variables except Do not Publish.
Apparently only Do not Publish is relevant.

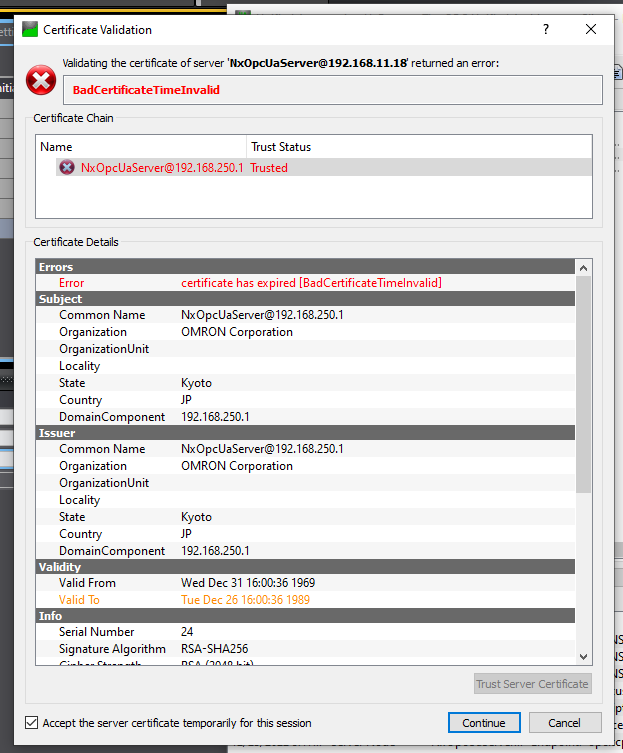
BadCertificate TimeInvalid..?
If you get a BadCertificate TimeInvalid error when accessing from UaExpert, you can’t move the Server’s certificate to the Trusted Folder, and you’ll get the same error every time.
Click from Controller>Controller Clock from sysmac studio.

Controller time adjustment screen is displayed.

Synchronize the time of the Controller with your PC by the “Synchronize with computer”.
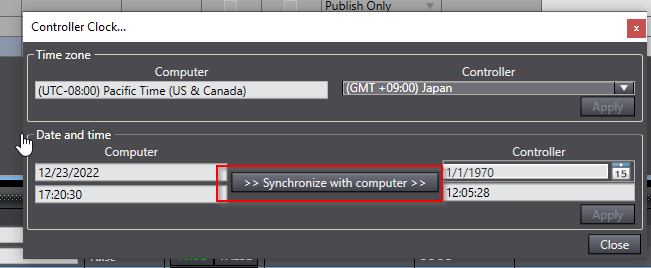
Press Apply to save the setting.

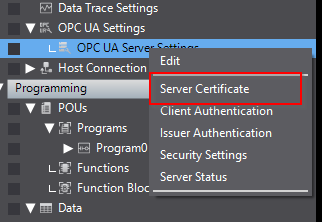
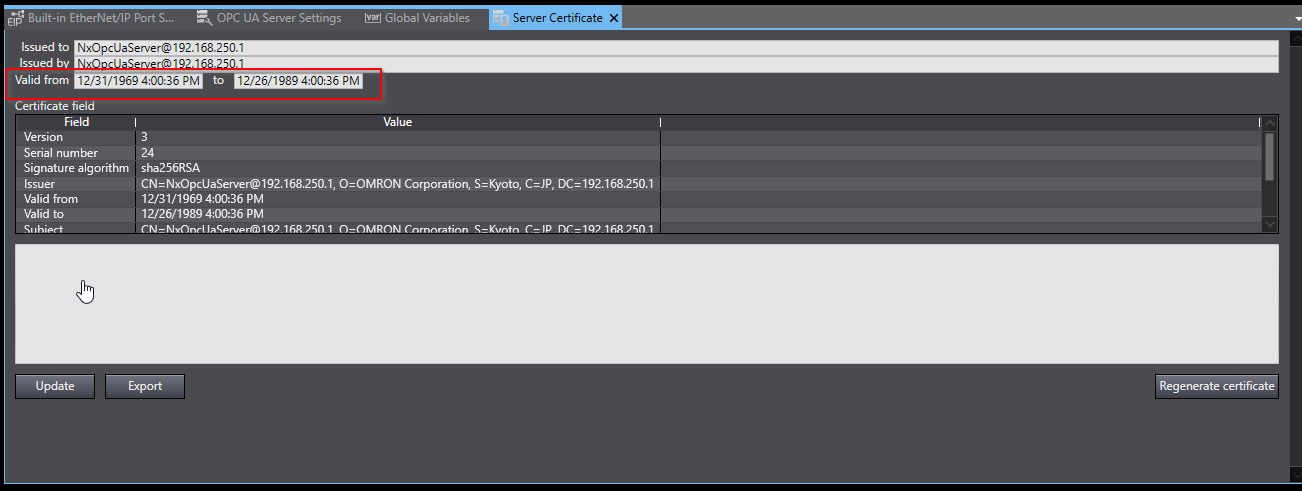
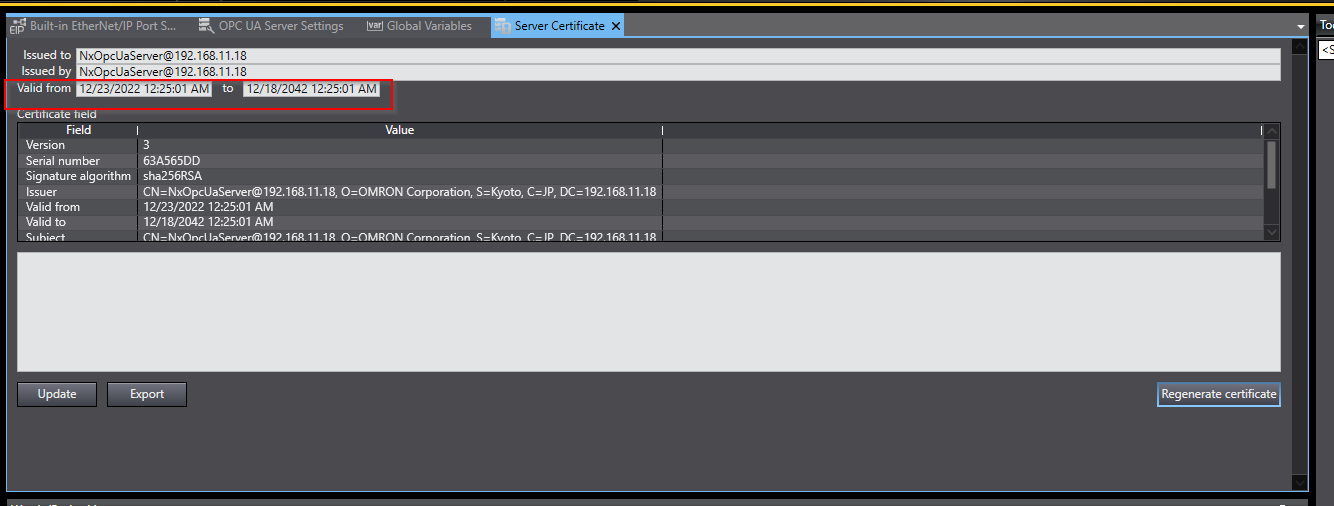
Now we can update the Controller’s Server certificate. Go to OPC UA Settings>OPC UA Server Settings>Right Click>Server Certificate.
The server certificate management screen is displayed.
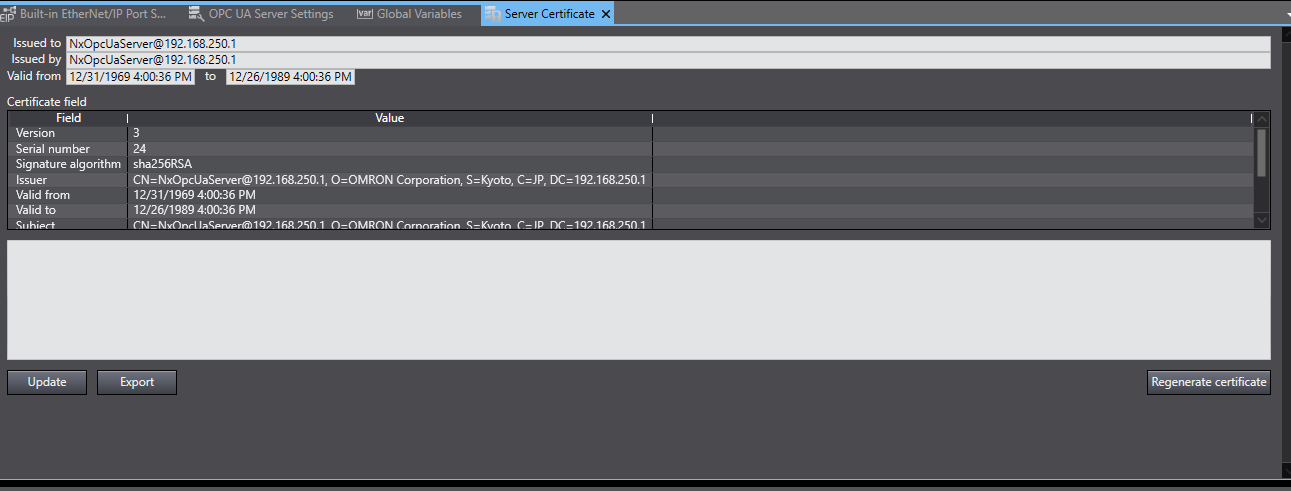
Then you can see that the Server certificate has already expired. Because the controller time is old and the certificate was generated from that old date, UaExpert cannot trust this expired certificate.
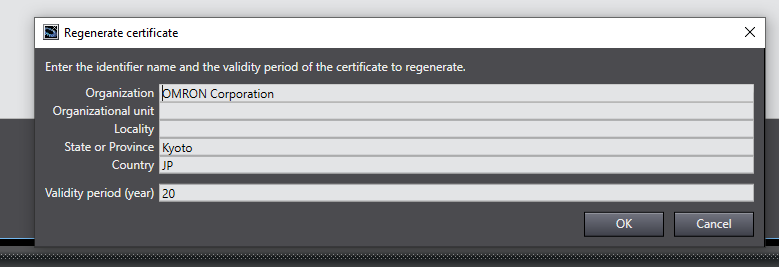
Generate a certificate again from the current time with Regenerate Certificate.

Enter the OPC UA Server certificate information>OK.
Yes.

Please wait a minute..
Done! A new certificate has been issued.
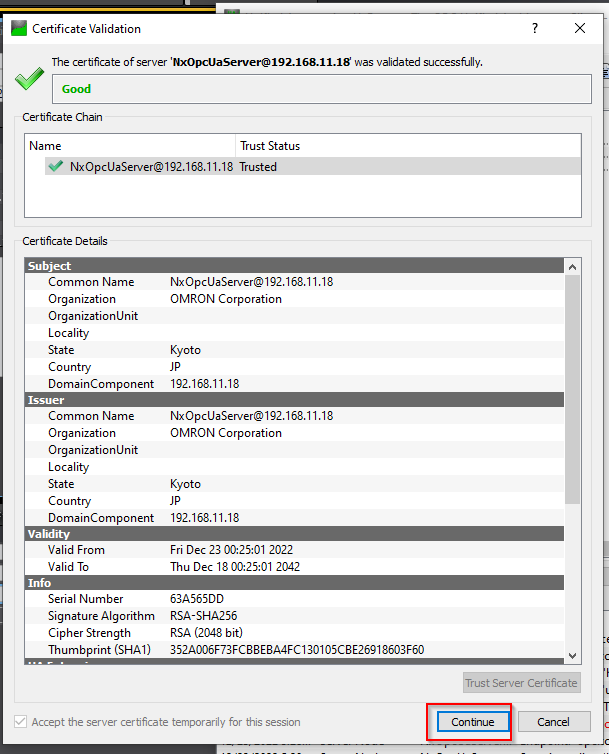
When you access Omron’s OPC UA Server from UaExpert again, you can now press the Trust Server Certificate button.

Press Continue.
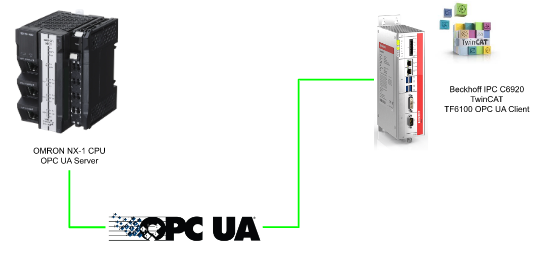
Implementation2
This time, I will try to access OPC UA Server of OMRON NX-1 CPU from PLC OPEN OPC UA Client LibraryI with Beckhoff TwinCAT TF6100.
Reference Link
http://soup01.com/en/2023/01/10/beckhofftwincat3-tf6100-opcua-_part3_plcopen-library-2/
Add PLC
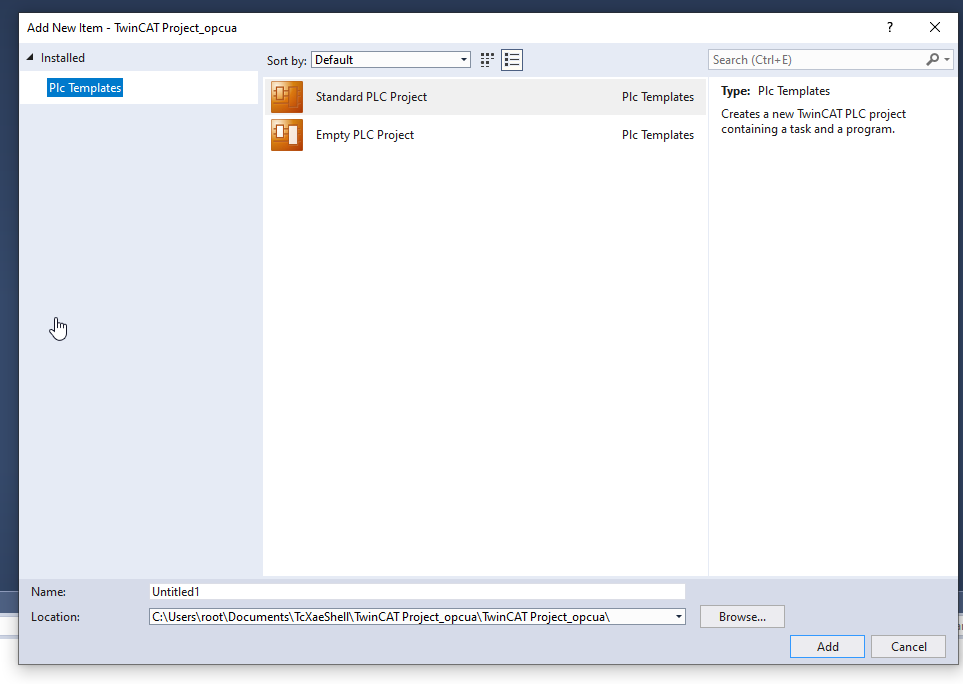
Let’s create a new project in twincat IDE, and PLC>Add New Item to insert a new plc Project.
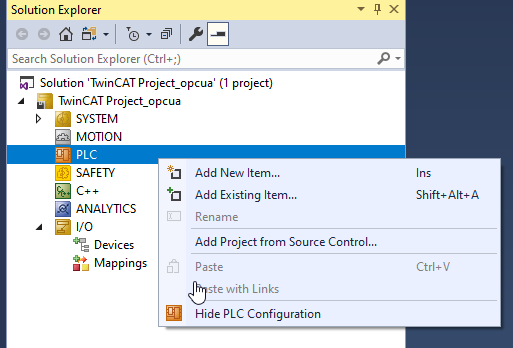
Select the Standard PLC Project and Add it.
Add Library
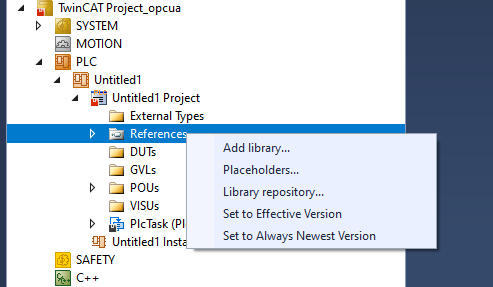
Now we need to add the Tc3_PLCopen_Opcua – the library of PLCopen to access the OPC UA Server.Go to Reference>Add Library.
Search Tc3_PLCOpen_OpcUa and insert it into your project.
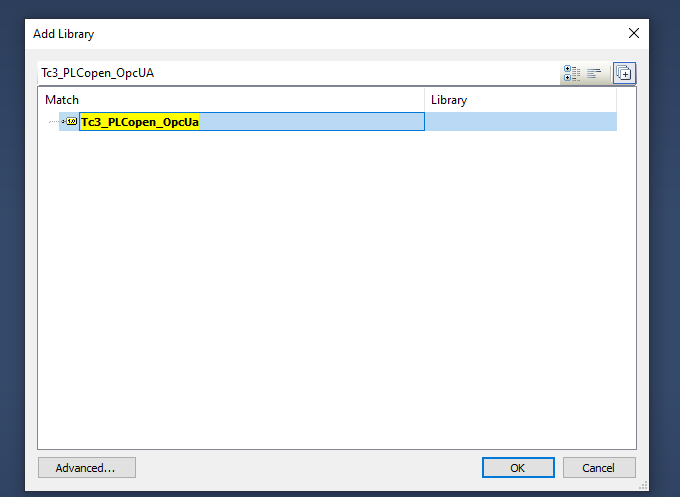
Done!

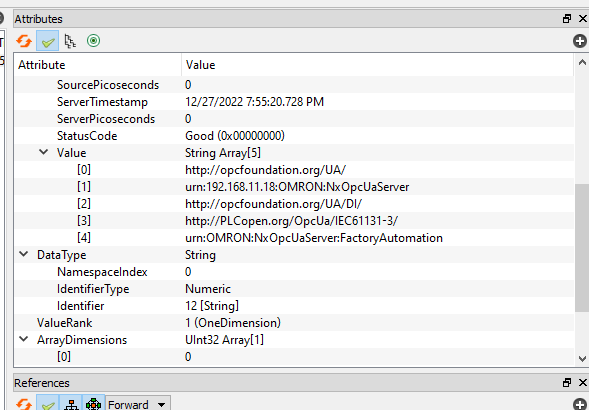
Check Namespace
It is necessary to check the Namespace with the node that you would like to access.In this case,UaExpert is used. Expand the NamespaceArray from Root>Objects>Server>NamespaceArray.

Inside this Namespace Node, there are 5 elements in the String Array.
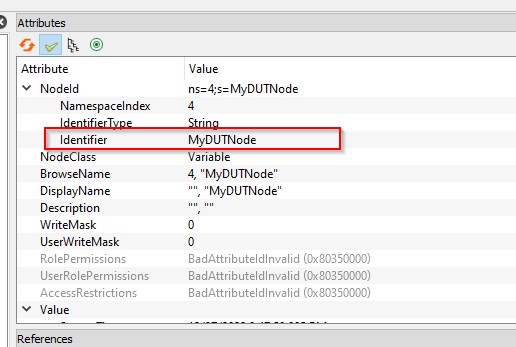
Check identifier
And then we need to check the Identifier of the node that you need to access, and this Identifier is needed while using the plcopen API.
DUT
Let’s Create the DUT to build a clear program.
DUT_OPCUA
Here is the DUT that is the same as the Omron NX1 Structure Node.
| TYPE DUT_OPCUA : STRUCT b1:BOOL; int1:INT; real1:REAL; END_STRUCT END_TYPE |
uDUT_Real
A union variable is also defined as 4 bytes to easily fix the endian problem.
| TYPE uDUT_Real : UNION myReal :REAL; _ar :ARRAY[0..3]OF BYTE; END_UNION END_TYPE |
MAIN
Here is the Main Program.
VAR
The PLC open library instance is defined in the VAR area.
| PROGRAM MAIN VAR //UA Connect UA_Connect:UA_Connect; SessionConnectInfo :ST_UASessionConnectInfo; //UA Disconnect UA_Disconnect:UA_Connect; //Polling Functionlity //Get NameIndex UA_GetNamespaceIndex:UA_GetNamespaceIndex; nNameSpaceIndex :UINT; //Get Handle UA_NodeGetHandle:UA_NodeGetHandle; NodeID :ST_UANodeID; nNodeHdl :DWORD; //UA Read UA_Read :UA_Read; stIndexRange : ARRAY [1..nMaxIndexRange] OF ST_UAIndexRange; nIndexRangeCount : UINT; stNodeAddInfo : ST_UANodeAdditionalInfo; nReadData : INT; cbDataRead : UDINT; //UA Node Release Handle UA_NodeReleaseHandle : UA_NodeReleaseHandle; // iStep :INT; bConnect :BOOL; bDisconnect :BOOL; ConnectionHdl :DWORD; myStructureNode :DUT_OPCUA; cbData_R :UDINT; myInt :INT; myReal :uDUT_Real; _tempByte :BYTE; TON :TON; ErrorMessage :STRING; ErrorID :DWORD; bReset :BOOL; END_VAR VAR CONSTANT cSererUrl :STRING:=’opc.tcp://192.168.11.18:4840′; cNameSpace :STRING:=’urn:OMRON:NxOpcUaServer:FactoryAutomation’; END_VAR |
PROGRAM
We will connect to the Omron NX1 OPC UA Server>get the NameSpaceIndex> get the Handle> read the Node value > Loopback.
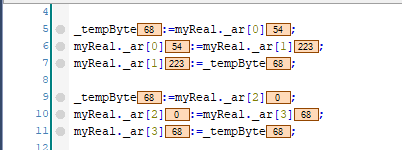
| myInt:=SHL(myStructureNode.int1,8)+SHR(myStructureNode.int1,8); myReal.myReal:=myStructureNode.real1; _tempByte:=myReal._ar[0]; myReal._ar[0]:=myReal._ar[1]; myReal._ar[1]:=_tempByte; _tempByte:=myReal._ar[2]; myReal._ar[2]:=myReal._ar[3]; myReal._ar[3]:=_tempByte; CASE iStep OF 0: IF bConnect THEN UA_Connect(Execute:=FALSE); UA_Disconnect(Execute:=FALSE); UA_GetNameSpaceIndex(Execute:=FALSE); UA_NodeGetHandle(Execute:=FALSE); UA_Read(Execute:=FALSE); UA_NodeReleaseHandle(Execute:=FALSE); SessionConnectInfo.eSecurityMode:=eUASecurityMsgMode_None; SessionConnectInfo.eSecurityPolicyUri:=eUASecurityPolicy_None; SessionConnectInfo.eTransportProfileUri:=eUATransportProfileUri_UATcp; SessionConnectInfo.tConnectTimeout:=T#1M; SessionConnectInfo.tSessionTimeout:=T#1M; IF NOT UA_Connect.Busy AND NOT UA_Disconnect.Busy AND NOT UA_GetNameSpaceIndex.Busy AND NOT UA_NodeGetHandle.Busy AND NOT UA_NodeGetHandle.Busy AND NOT UA_NodeReleaseHandle.Busy THEN iStep:=10; bConnect:=FALSE; end_if; END_IF 10: UA_Connect( Execute:=TRUE ,ServerUrl:=cSererUrl ,SessionConnectInfo:=SessionConnectInfo ,ConnectionHdl=>ConnectionHdl ); IF UA_Connect.Error THEN iStep:=999; END_IF IF UA_Connect.Done AND NOT ua_Connect.Error THEN iStep:=20; UA_Connect(Execute:=FALSE); ELSIF ua_connect.Error THEN iStep:=999; END_IF 20: UA_GetNamespaceIndex( Execute:=TRUE ,ConnectionHdl:=ConnectionHdl ,NamespaceUri :=cNameSpace ,NamespaceIndex=>nNameSpaceIndex ); IF UA_GetNamespaceIndex.Done AND NOT UA_getNamespaceIndex.Error THEN iStep:=30; UA_GetNamespaceIndex(execute:=FALSE); ELSIF UA_getNamespaceIndex.Error THEN iStep:=999; END_IF 30: NodeID.eIdentifierType:=eUAIdentifierType_String; NodeID.nNamespaceIndex:=nNameSpaceIndex; NodeID.sIdentifier:=’MyDUTNode’; UA_NodeGetHandle( Execute:=TRUE ,ConnectionHdl:=ConnectionHdl ,NodeID:=NodeID ,NodeHdl=>nNodeHdl ); IF UA_NodeGetHandle.Done AND NOT UA_NodeGetHandle.Error THEN UA_NodeGetHandle(Execute:=FALSE); iStep:=40; ELSIF UA_NodeGetHandle.Error THEN iStep:=999; END_IF 40: UA_Read( Execute:=TRUE ,ConnectionHdl:=ConnectionHdl ,NodeHdl:=nNodeHdl ,cbData:=SIZEOF(myStructureNode) ,stNodeAddInfo:=stNodeAddInfo ,pVariable:=ADR(myStructureNode) ); IF UA_Read.Done AND NOT UA_Read.Error THEN UA_Read( Execute:=FALSE ,cbData_R=>cbData_R ); iStep:=45; ELSIF UA_Read.Error THEN iStep:=999; END_IF; 45: TON(in:=TRUE,PT:=T#0.2S); IF ton.Q THEN TON(in:=FALSE); IF bdisconnect THEN iStep:=50; ELSE istep:=40; END_IF; END_IF 50: UA_NodeReleaseHandle( Execute:=TRUE ,ConnectionHdl:=ConnectionHdl ,NodeHdl:=nNodeHdl ); IF UA_NodeReleaseHandle.Done AND NOT UA_NodeReleaseHandle.Error THEN UA_NodeReleaseHandle(Execute:=FALSE); iStep:=200; ELSIF UA_NodeReleaseHandle.Error THEN iStep:=999; END_IF 200: IF bDisconnect THEN iStep:=210; bDisconnect:=FALSE; END_IF 210: UA_Disconnect( Execute:=TRUE ,ServerUrl:=cSererUrl ,SessionConnectInfo:=SessionConnectInfo ,ConnectionHdl=>ConnectionHdl ); IF UA_Disconnect.Error THEN iStep:=999; END_IF IF UA_Disconnect.Done AND NOT UA_Disconnect.Error THEN iStep:=0; UA_Disconnect(Execute:=FALSE); END_IF 999: IF UA_Connect.Error THEN ErrorMessage:=’Error in UA_Connect.’; ErrorID :=UA_Connect.ErrorID; ELSIF UA_Disconnect.Error THEN ErrorMessage:=’Error in UA_Disconnect.’; ErrorID :=UA_Disconnect.ErrorID; ELSIF UA_GetNamespaceIndex.Error THEN ErrorMessage:=’Error in UA_GetNamespaceIndex.’; ErrorID :=UA_GetNamespaceIndex.ErrorID; ELSIF UA_NodeGetHandle.Error THEN ErrorMessage:=’Error in UA_NodeGetHandle.’; ErrorID :=UA_NodeGetHandle.ErrorID; ELSIF UA_Read.Error THEN ErrorMessage:=’Error in UA_Read.’; ErrorID :=UA_Read.ErrorID; ELSIF UA_NodeReleaseHandle.Error THEN ErrorMessage:=’Error in UA_NodeReleaseHandle.’; ErrorID :=UA_NodeReleaseHandle.ErrorID; END_IF; IF breset THEN ErrorMessage:=”; ErrorID:=0; END_IF END_CASE |
Result
Done! Data is read from Omron NX1 CPU.

Since we decided to take a variable at once in the structure, the current value will be incorrect if the Little Endian and Big Endian sequences are different. So,we will create a simple Swap program to change the order of Bytes.
Done! Data is correct now.

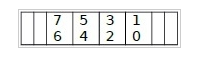
Here is the sequence of Big Endian.
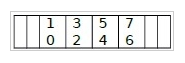
Here is the sequence of Little Endian.
Implementation3
Finally, we will read OPC UA Server Node of Omron Nx-1 CPU by using Bosch rexroth CtrlX and Node Red Apps.
Reference Link
NODE-RED APP?
Node-Red App is Node-Red Framework provided by Bosch Rexroth Ctrlx automation, its Open source tool is Apache2 2.0 license and IBM developed Graphic development environment.
Bosch rexroth Ctrlx Automation’s Node-Red App can be downloaded from Ctrl store, and if installed, Ctrlx Node can also be used, making it easier to exchange data on Ctrlx Core and Data Layer.
- Node-RED Runtime
- Flow Editor
- Dashboard
Omron Side
Now I will create some programs on the Omron side to provide dynamic variables.
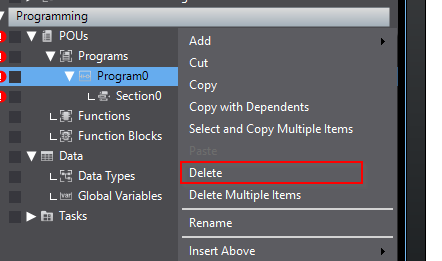
Delete the Ladder program
Go to POUs>Programs to delete the default ladder program.
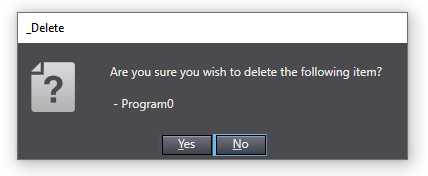
Yes.
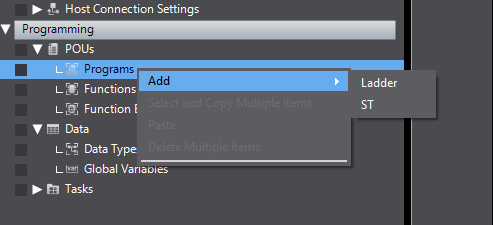
Add ST Program
Go to Program>Right Click>Add>ST to insert a ST program.
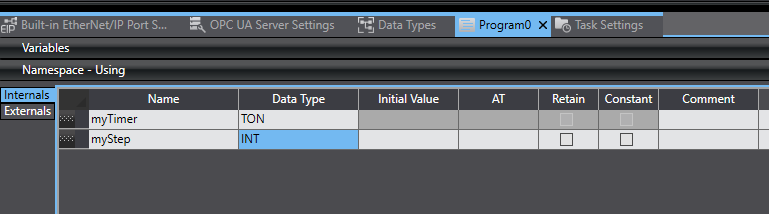
Internals
Here is the area to define the local variable in Omron Tools.
Variable myTimer and MyStep is used to refresh the variable value.
Programs
| MyDUTNode.int1:=MyDUTNode.int1+1; CASE myStep OF 0: MyDUTNode.b1:=TRUE; myTimer(In:=True,PT:=T#1s); IF myTimer.Q THEN myTimer(In:=False); myStep:=1; END_IF; 1: MyDUTNode.b1:=False; myTimer(In:=True,PT:=T#1s); IF myTimer.Q THEN MyDUTNode.real1:=MyDUTNode.real1+1.1; myTimer(In:=False); myStep:=0; END_IF; END_CASE; |
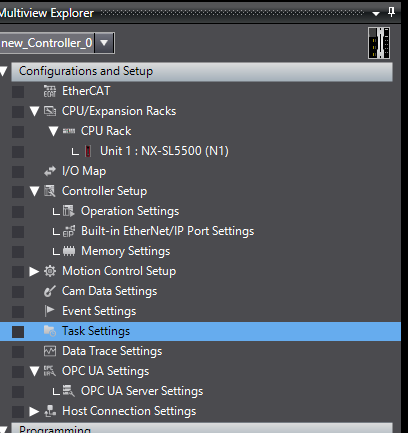
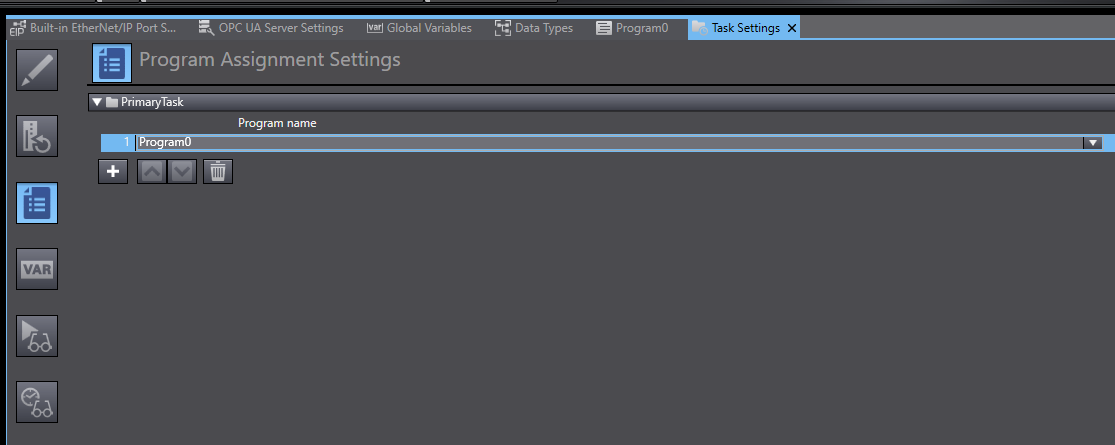
Task Settings
Because a new POU is inserted in the project, we need to configure this POUs to run in the Main Task.Go to Configuration and Setup>Task Settings.
Press the +button to insert a new POU.
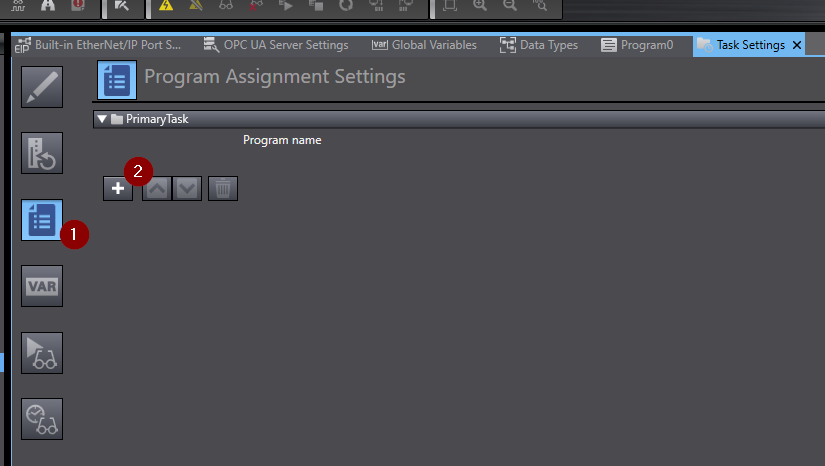
Done!
ctrlx Side
PLC Side
As with the implementation in Twincat, we need to define a structure variable that matches the Omron OPC UA Server.
Add DUT
Go to Application>Add Object>DUT to insert a DUT.

Let’s define a DUT that is the same as Omron NX! CPU Side.
| TYPE DUT_TestFromOPCUA : STRUCT b1:BOOL; int1:INT; real1:REAL; END_STRUCT END_TYPE |
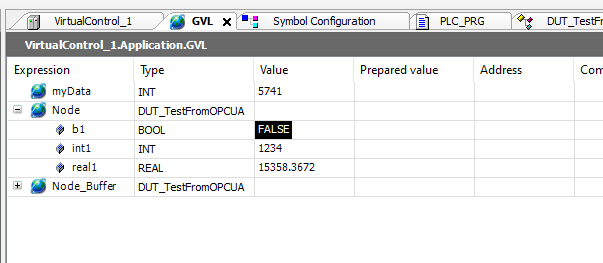
GVL
Define the variable inside GVL.
| {attribute ‘qualified_only’} VAR_GLOBAL myData:INT; Node,Node_Buffer:DUT_TestFromOPCUA; END_VAR |
Node-Red APPs
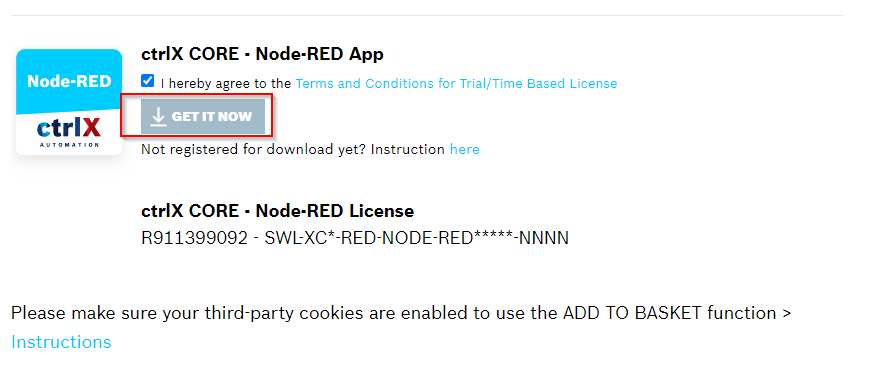
Download the ctlX CORE-NODE-Red app from ctrlX Store, and install it into your VirtualCore.
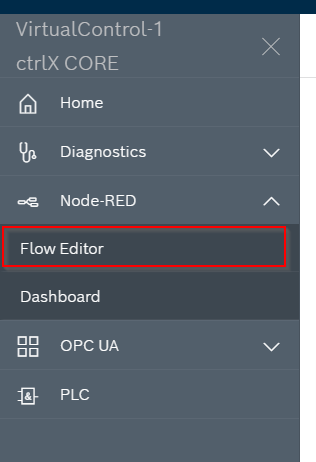
A Node-RED option should be shown in the Slide bar after the installation.

Open the Flow Editor.
The Flow editor is 100% the same as the classic Node-Red.

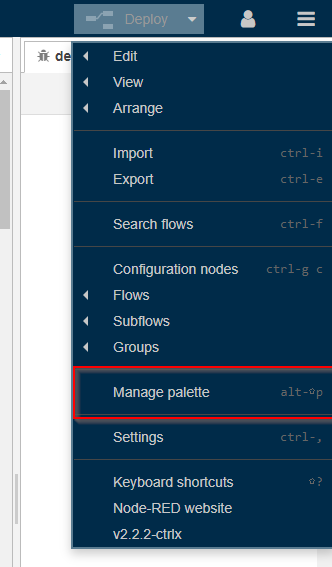
Node Installation
Go to Manage palette to install the OPC UA Node.
Search OPC-UA and install the node-red-contrib-opcua Node node.


Done!OPC UA Nodes are inserted in your Node-Red Runtime.
IF Error..
If you have a DNS error when installing a new Node with Node-red, it may because of
Virtual Core is actually having trouble connecting to the Internet. Because VirtualCore runs in a virtual environment!
| npm ERR! request to https://registry.npmjs.org/express failed, reason: getaddrinfo EAI_AGAIN registry.npmjs.org |
Stop VirtualCore and set Network to Port Forwarding.
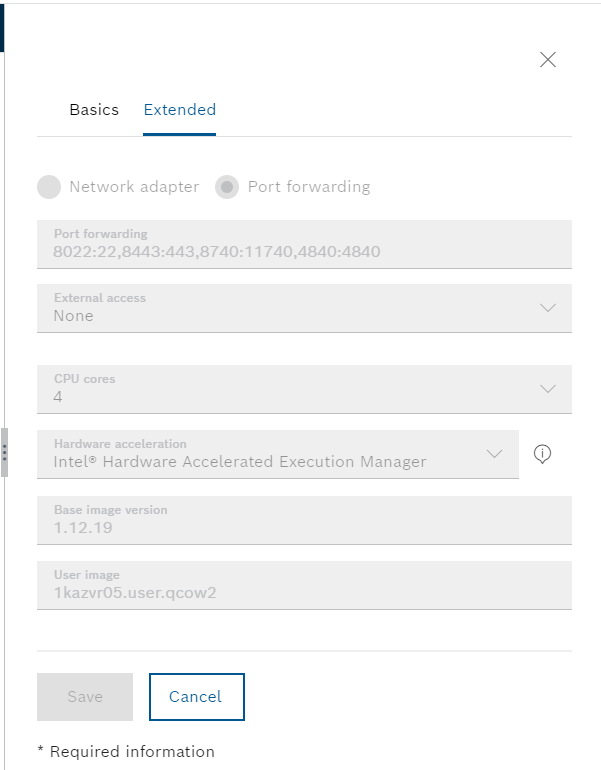
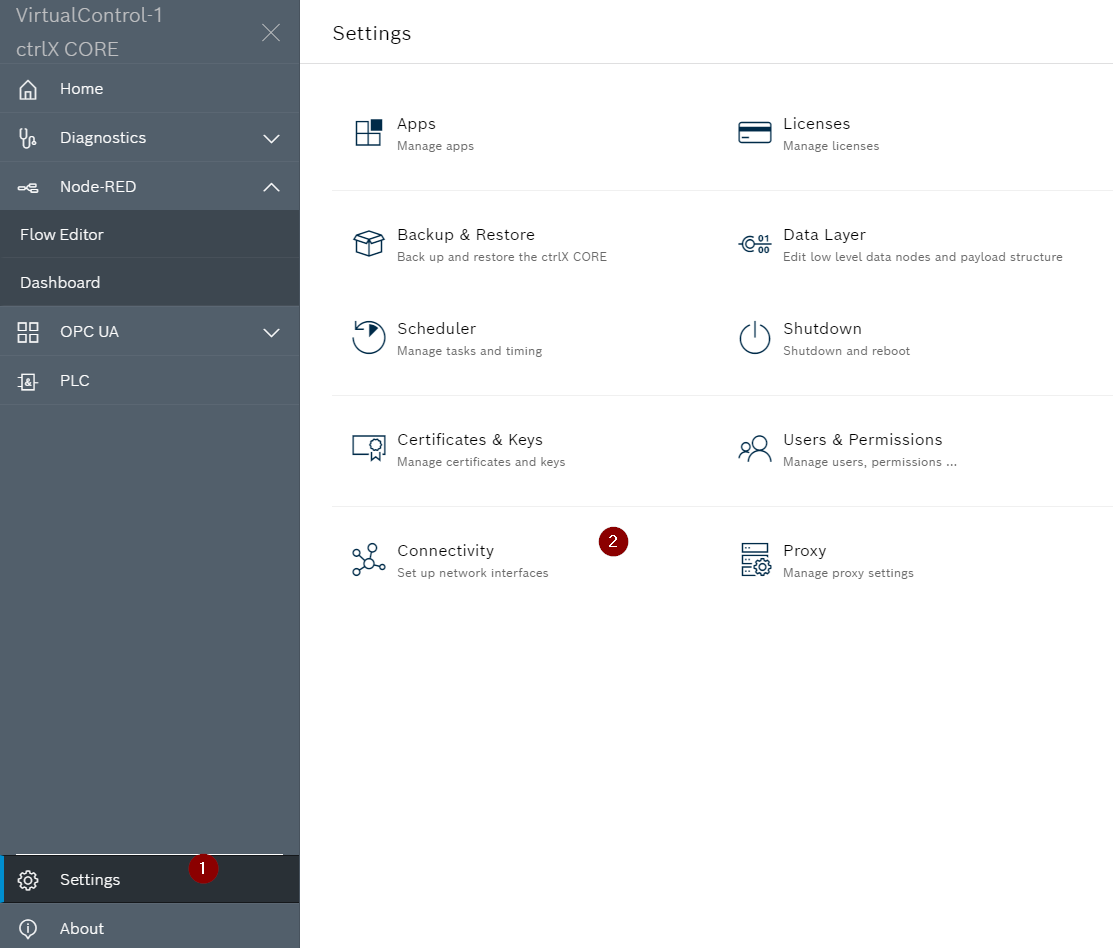
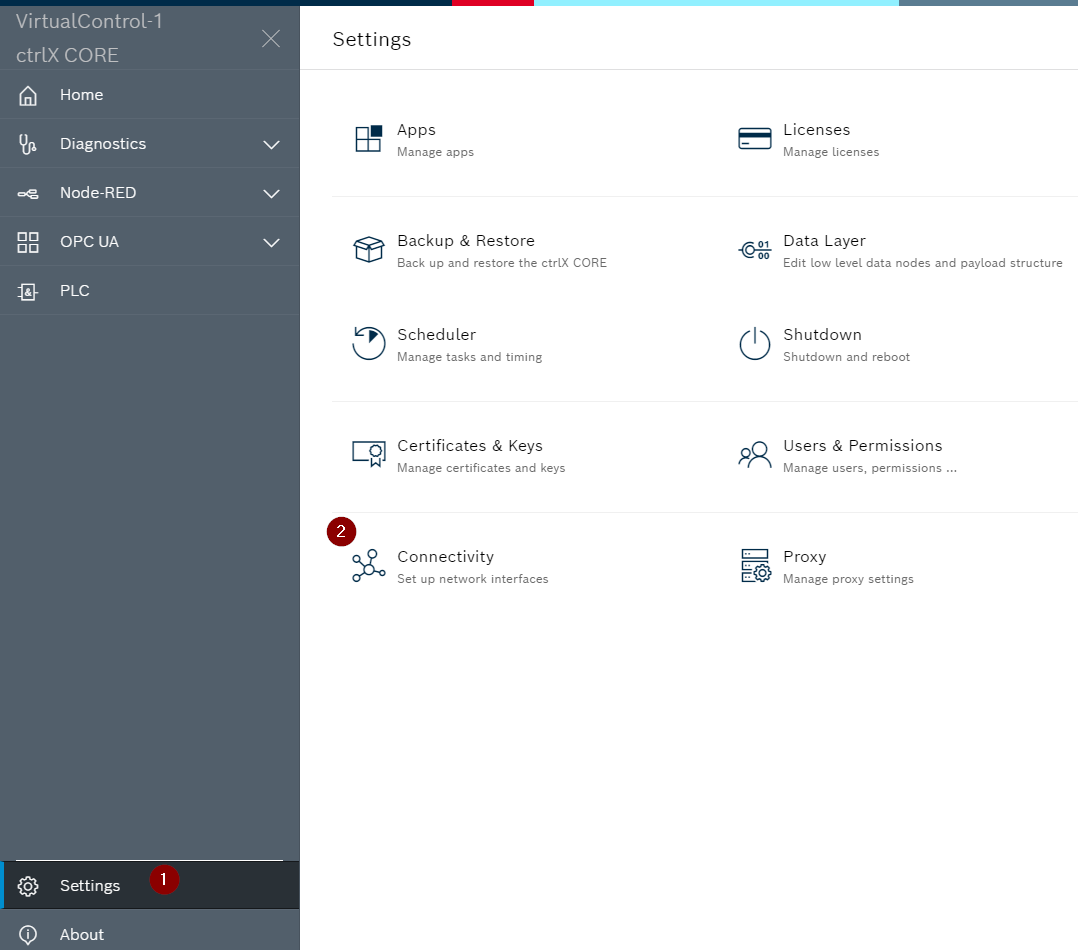
Start the VirtualCore and go to Settings>Connectivity.
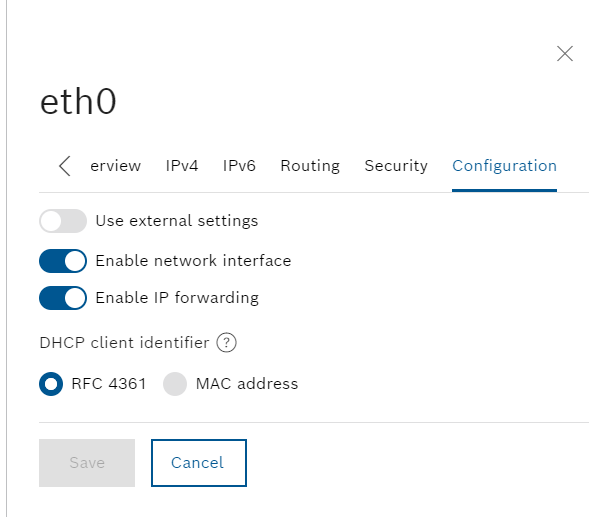
Enable DHCP function of Network interface.

Set Enable IP Forwarding to True. Then you should be able to install Node.
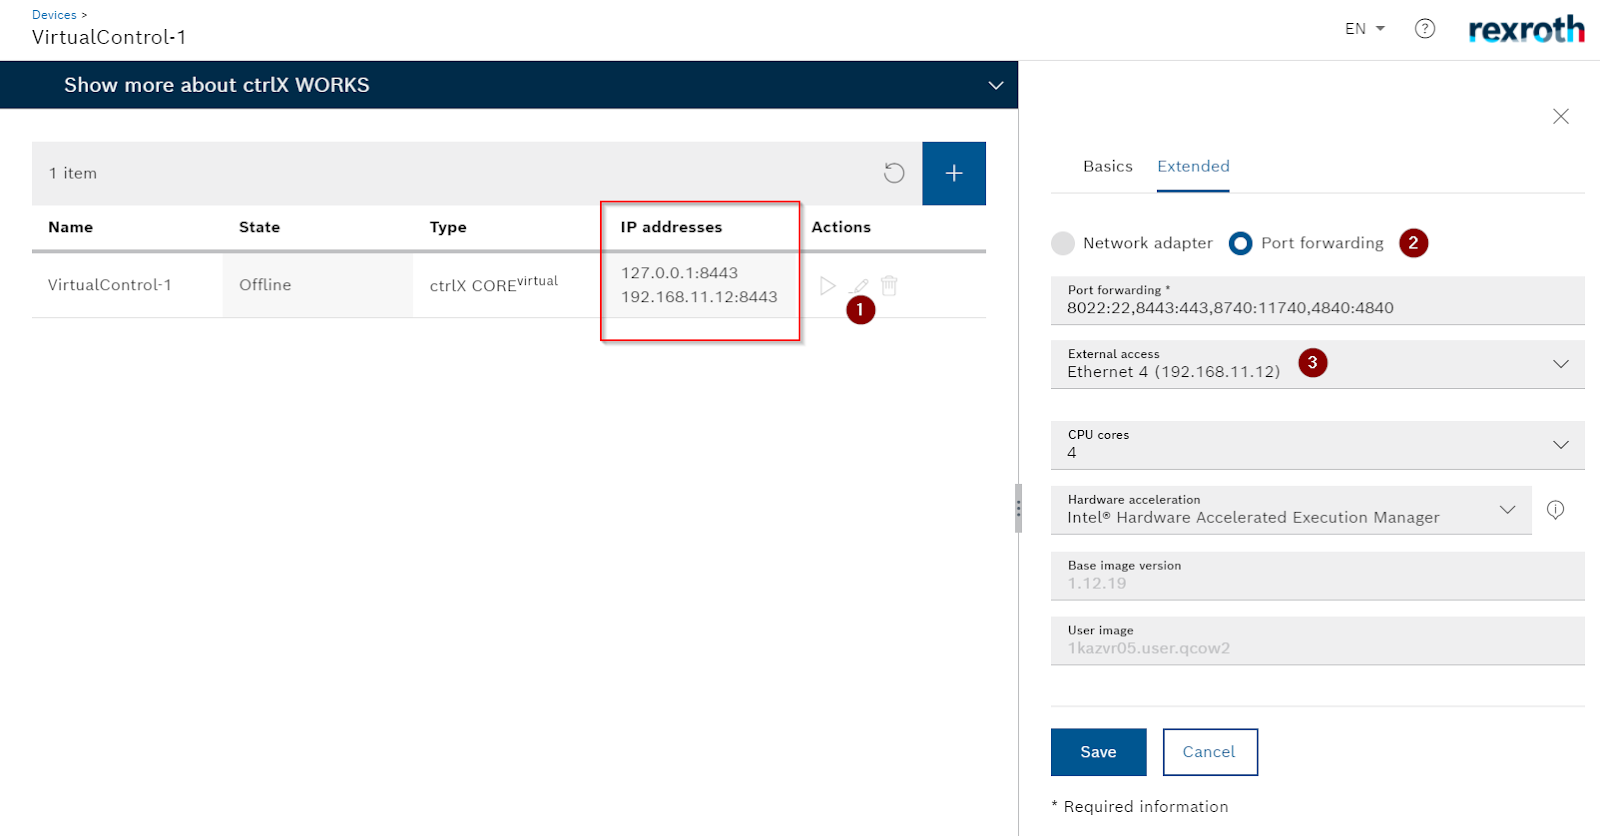
Port Configuration
To connect with NX-CPU, set Port setting to Port Forwarding, and set Extended Access to Interface card that is actually connected to NX-CPU.
The VirtualCore’s IP address will change to the corresponding Interface card:8443.
Next, start VirtualCore and open Settings>Connectivity from Core’s web server.
Enable DHCP.
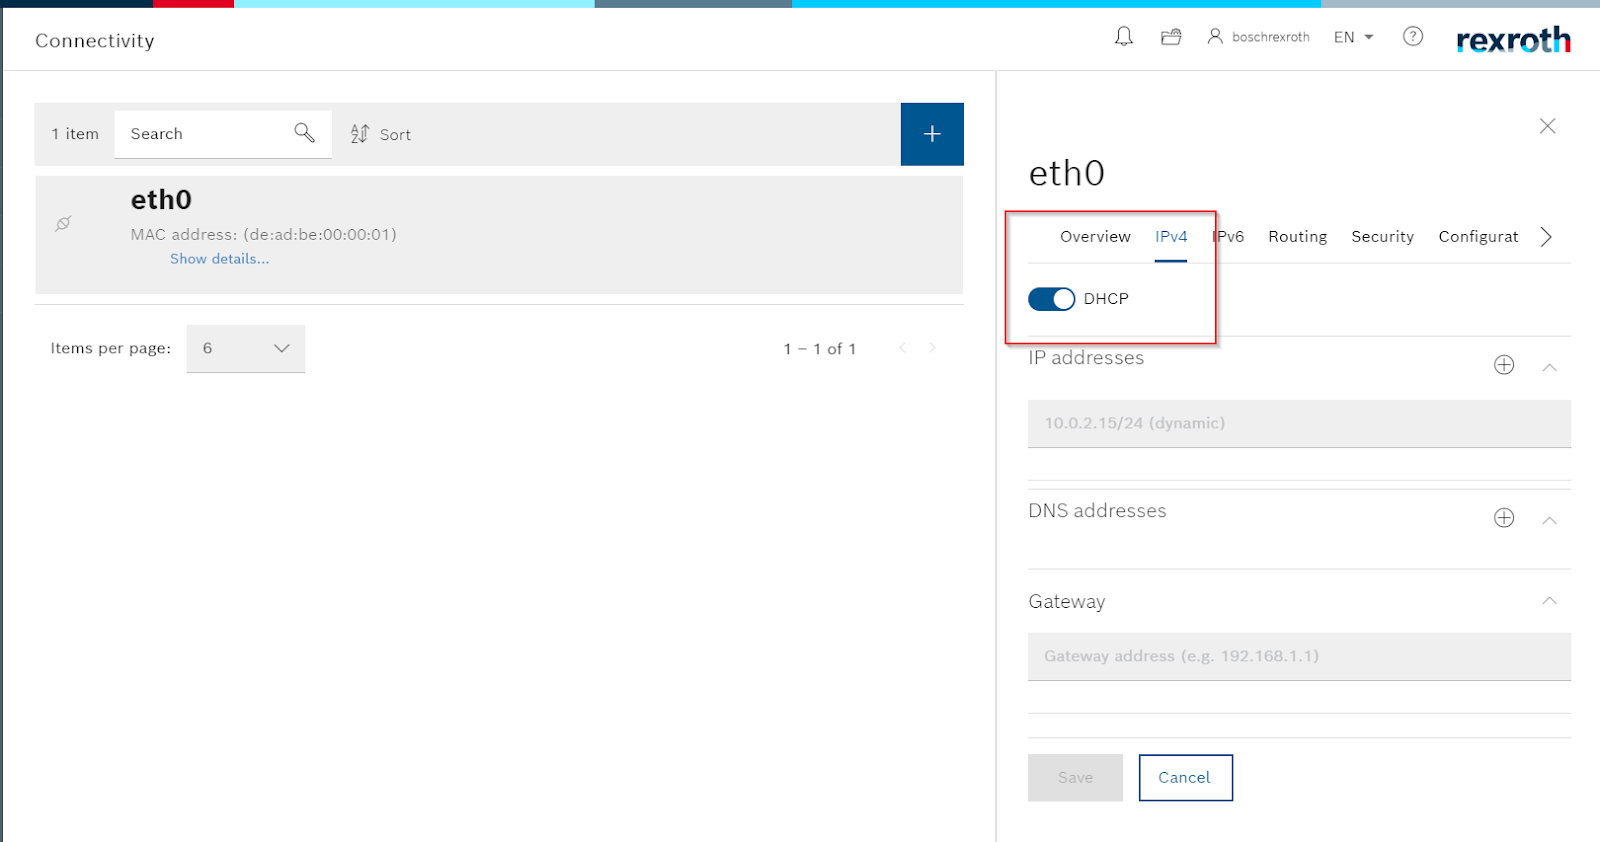
Set Enable IP forwarding to True.

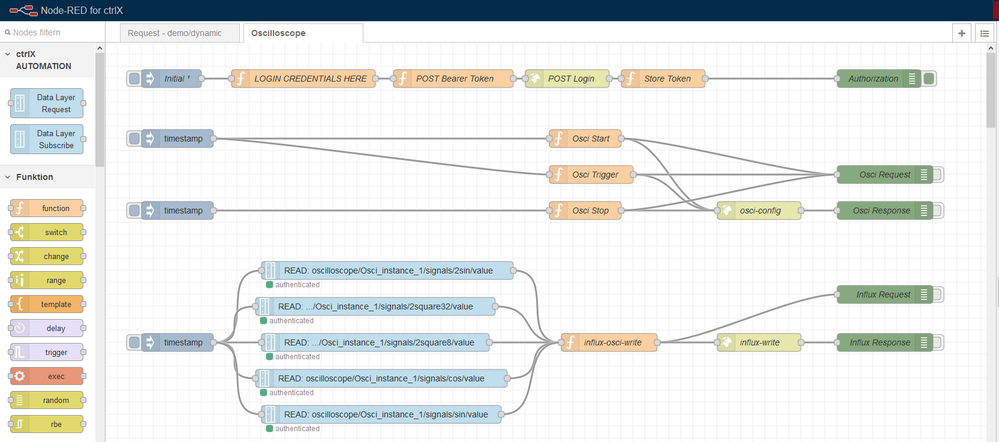
Flow-1Test with ctrlX Node
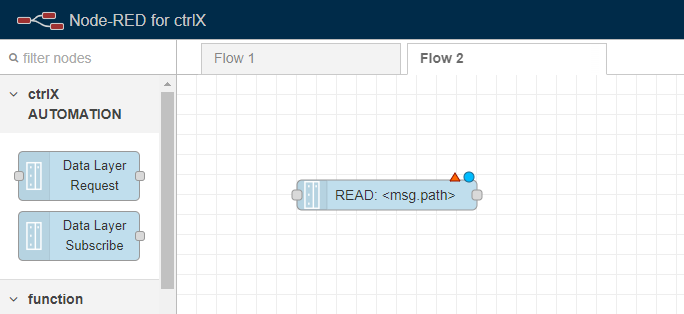
After Setup is finished, we may first test Ctrlx Node. You can easily access the Data Layer of the CtrlX Virtual Core by using that Node.
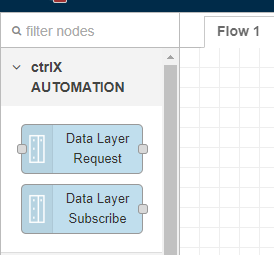
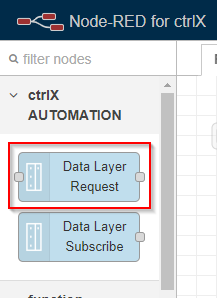
Add a Data Layer Request to your Flow.
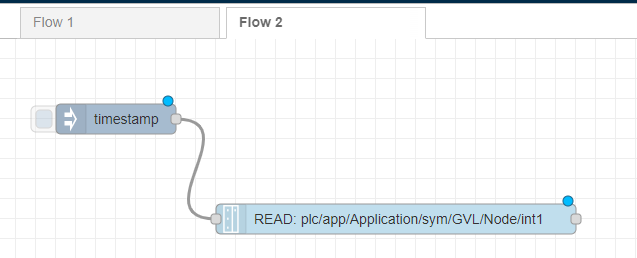
Add Inject Node
Add Inject Node so that CtrlX Request Node can send the request periodically.
Connect the inject Node to the CtrlX Request node.
Add Debug Node
Drop a debug node for us to confirm the ctrlx request ‘s result.
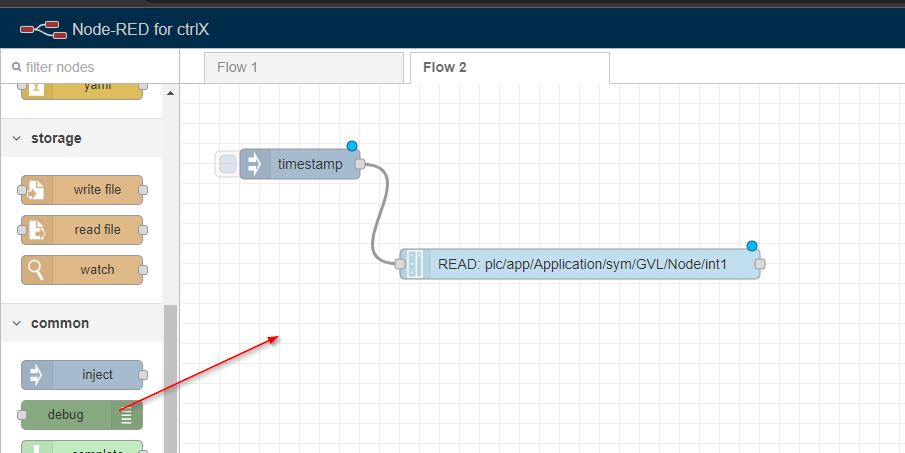
Connect the output of Ctrlx Request to the debug node’s input.
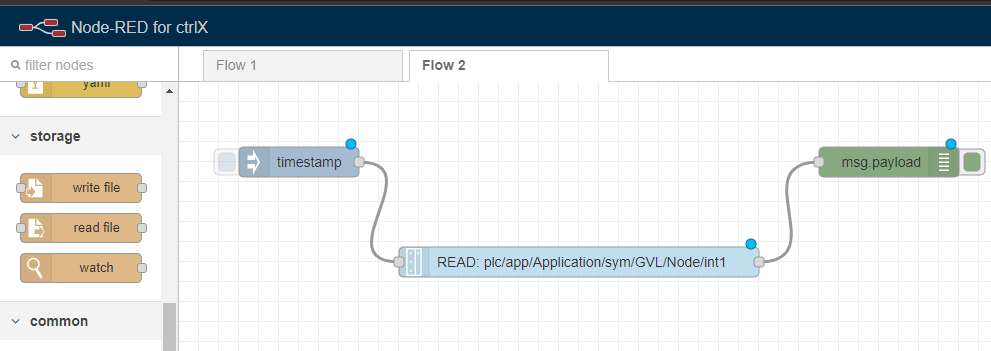
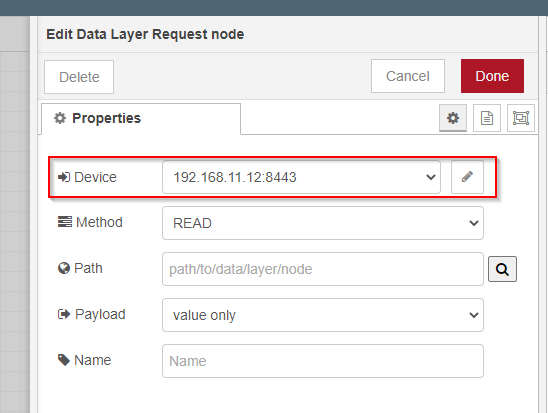
Ctrlx Request Ndoe
Then we need to edit the ctrlx Node, and enter your virtual core ‘s IP:8443 into the Device field.
Path
And also we can confirm the connection with the path field.
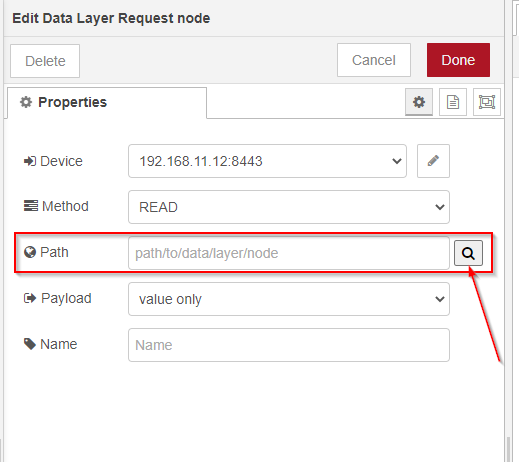
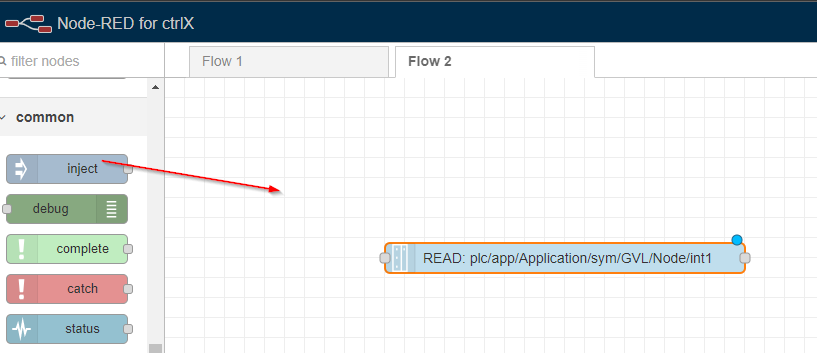
Done!if the connection setting is correct, you can view all nodes in the Data Layer.
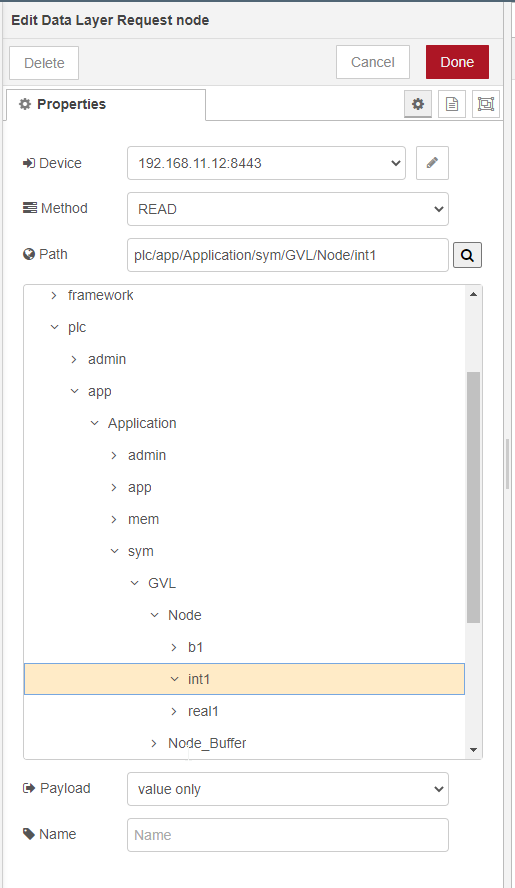
Choose the variables that you would like to access, the ctrlx node will auto generate the full path of that node.

Payload
The payload field can let us configure the Payload format of your request, and the default value is “Value Only”.
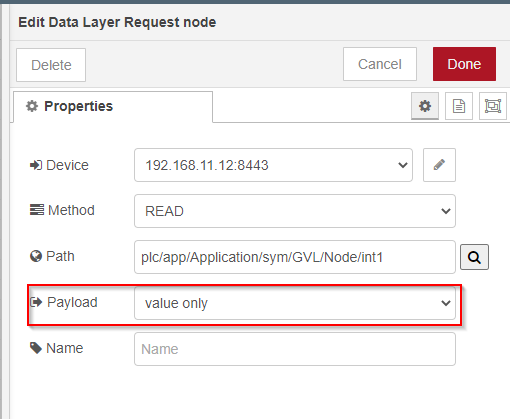
In this tutorial, “Value+Type(Json)” is configured.

Method-Read
There are many methods that can be configured here(SUB/PUB/WRITE/READ..etc).

Choose “Read” to read the actual value of that node.

Press Done to save the setting.

Done! We read the data successfully.
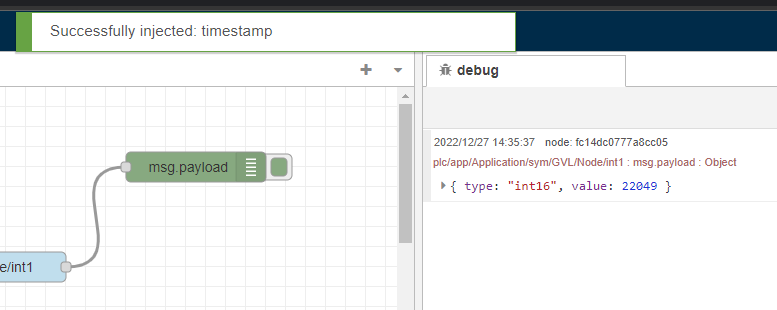
And you can see a small green rectangle and an “authenticated” message is shown.

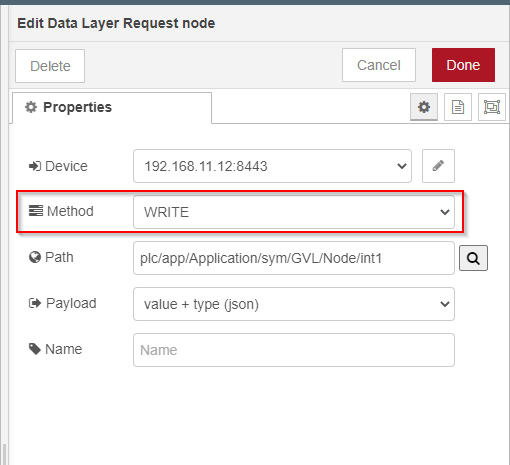
Method-Write
Now we can check the WRITE methods also. Open the Node setting and choose “WRITE” as your method.
Insert a Function Node in your flow and connect the output of this function to the input of ctrlX Node.- and this Node will process the payload data for the ctrlX Request.
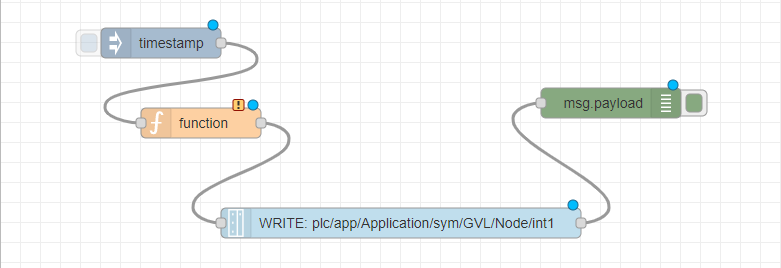
Add a javascript that writes an int16 1234 in the payload.
| var m={}; m.payload={“type”:”int16″,”value”:1234}; |

Run your flow and the data is written into the Node.int1 in the ctrlX data layer.
we did it!

The actual value of Node.int1 is changed to 1234.
Connect with Omron OPC UA Server
After we finish the connection test with ctrlX Node in Node-red, we can try to use the Node-Red app to establish the connection with the Omron NX1 CPU.
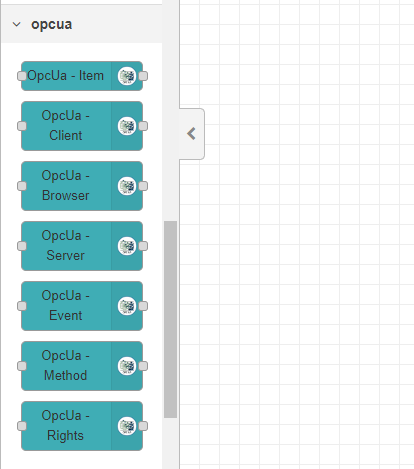
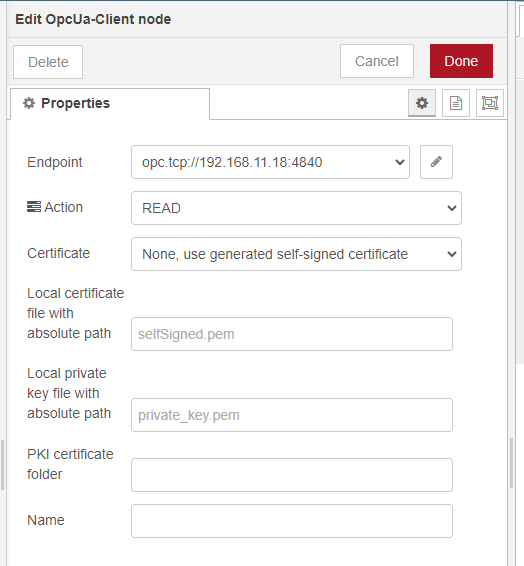
Add OpcUa -Client Node
Node-Red FlowからOpcUa – Client Ndoeを追加します。
Insert OpcUa

Configure the Endpoint url with the Omron NX1 CPU.
you can edit the existing Endpoint URL by clicking the pencil icon.
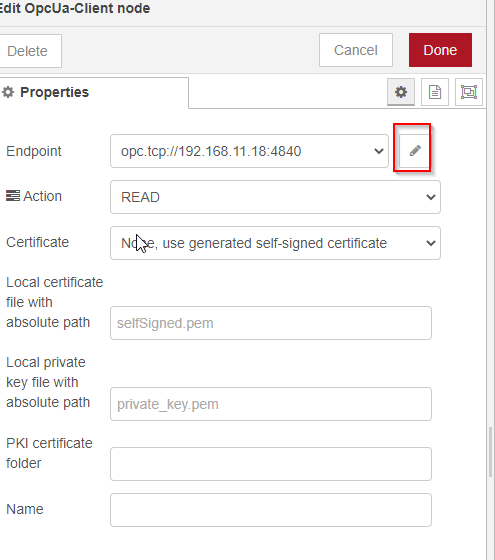
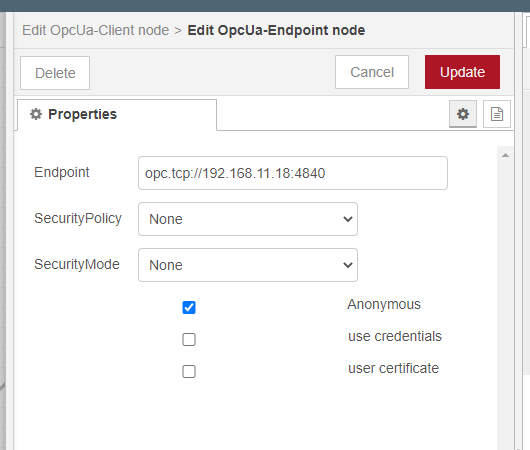
Inside the configuration screen, we can also configure the Security Settings.
Add inject Node
Drop the Inject Node into your Flow.
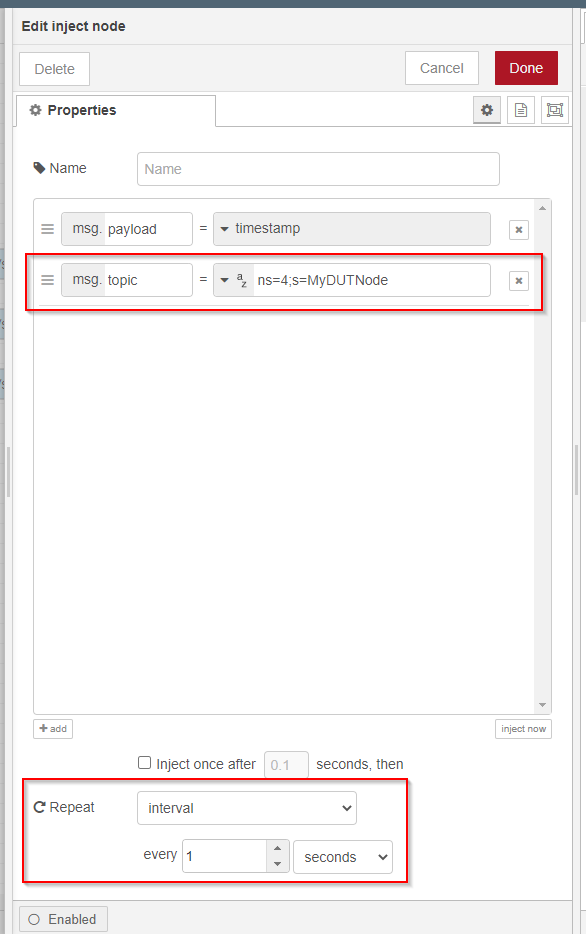
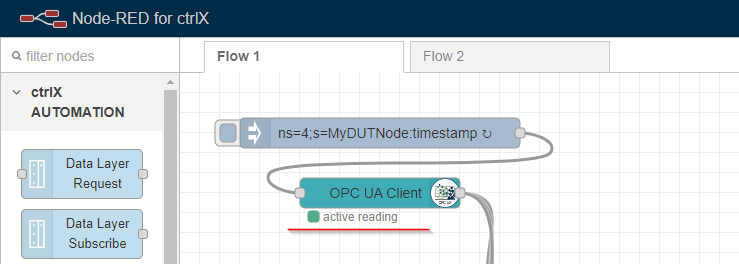
This time, we want to access the structure variable MyDUTNode in the OPC UA Server of the NX-CPU, so check its NodeID from UaExpert.

Add msg.topic to Inject Ndoe and enter the NodeID you checked earlier. Then change the Repeat setting to Interval and set the period to 1s.
Done!
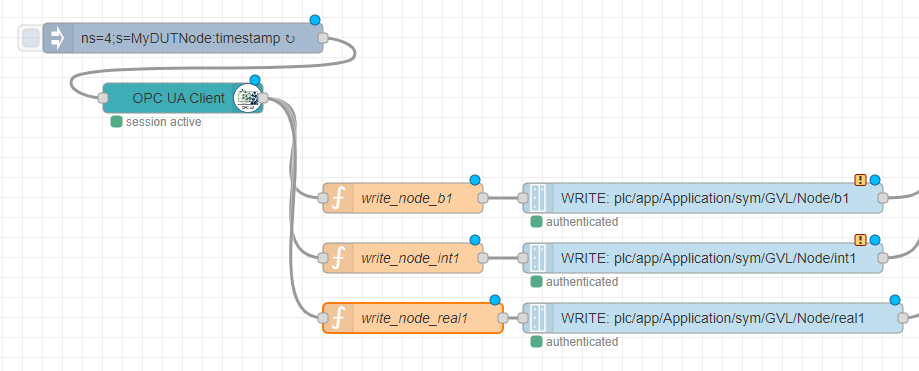
Add Function Node
Drop a function node to preprocess the data before sending the request from CtrlX.

Write_node_b1
| var m = {}; m.payload = { “type”: “bool8”, “value”: msg.payload.b1 }; return m; |
write_node_int1
| var m = {}; m.payload = { “type”: “int16”, “value”: msg.payload.int1 }; return m; |
write_node_real1
| var m = {}; m.payload = { “type”: “float”, “value”: msg.payload.real1 }; return m; |
Add ctrlX Request
Add the CtrlX Node into your flow.
Connect the output of the Function Node to the input of the Ctrlx Node.Let’s refer to Flow-1 Testing for Ctrlx Node for the connection settings.
Add debug Node
add Debug Node so that you can check the results.
configure the msg.payload as the output.

Done!
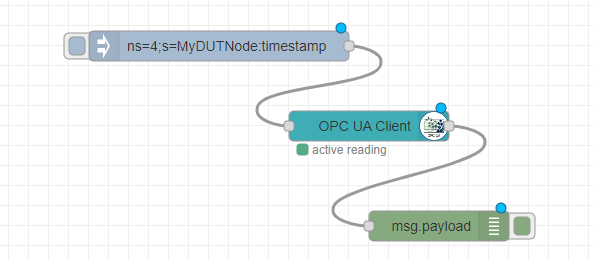
Finally, connect the output of CtrlX Node to the input of Debug.

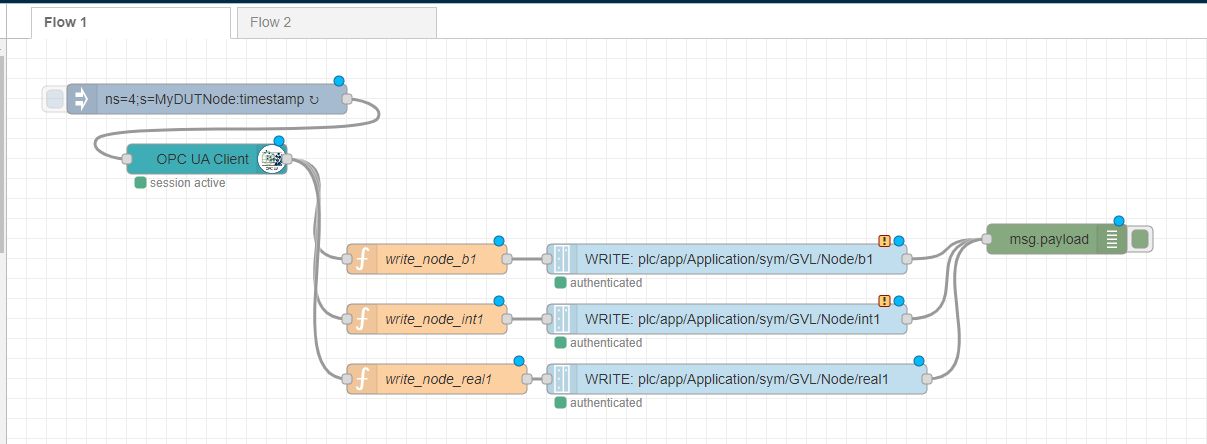
Finally Flow
This is the overall flow.
Result
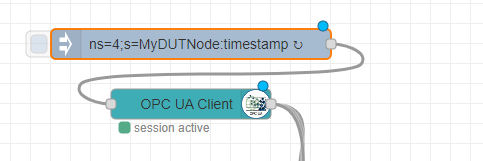
If you see a green square and an Active reading message under OPC UA Client Node, the connection is established!
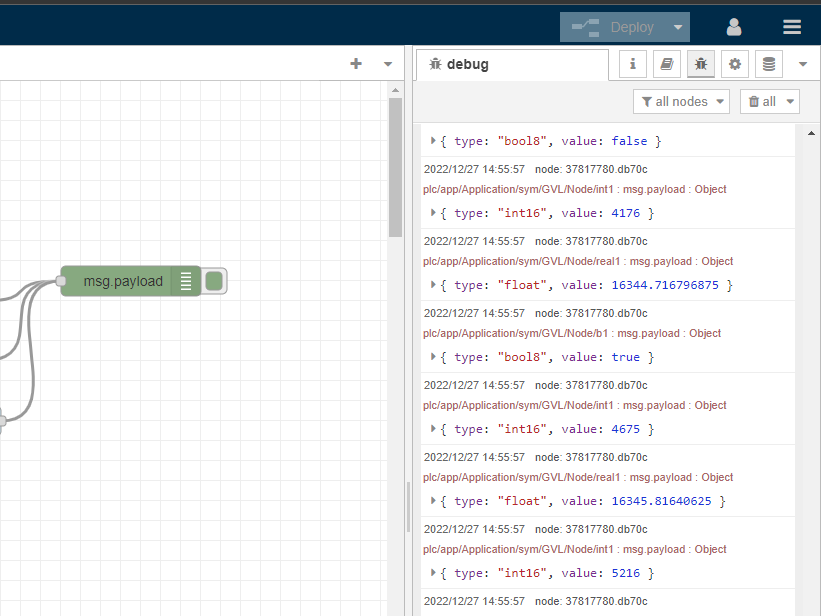
Data is read without problem!
IF can not connect
If you still can’t connect, there may be a problem with your firewall rules.

Enable Port 4840 in Outbound Rules.

Enable Port 4840 in Inbound Rules also.
