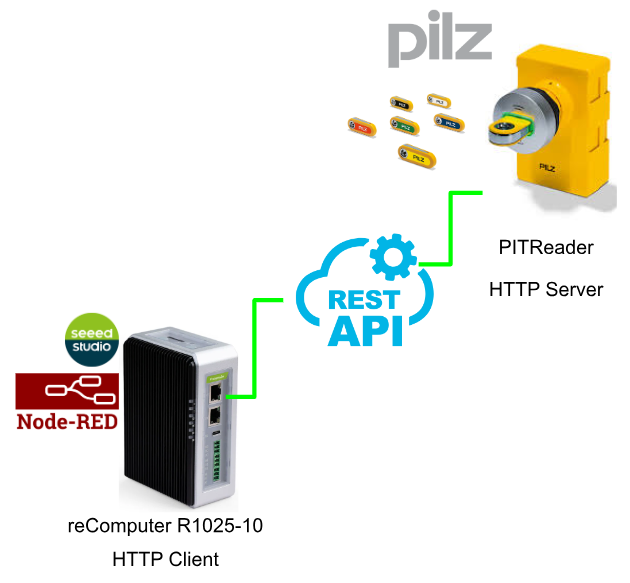
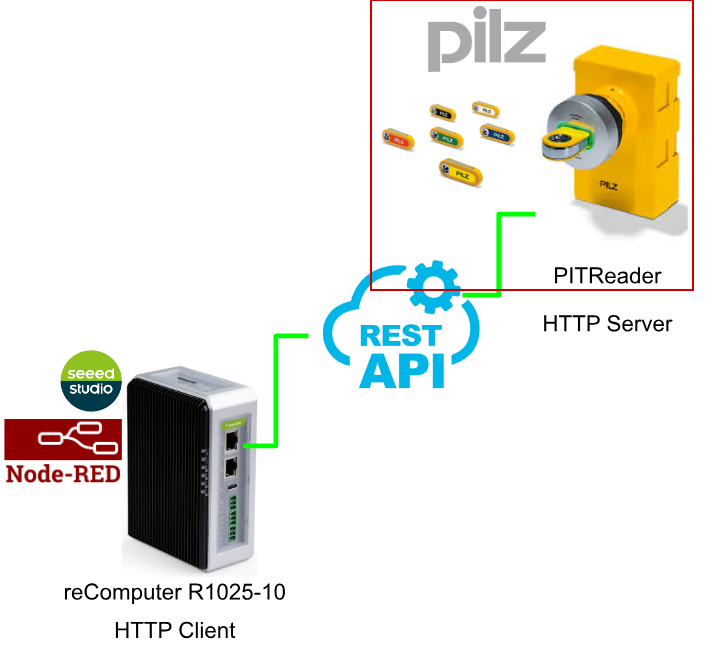
This article introduces the Pilz PITReader device and describes the steps to access the REST API from Node-Red. reComputer R1025-10 from SEEED STUDIO is used for Node-Red.
Let’s enjoy FA.
PITreader?
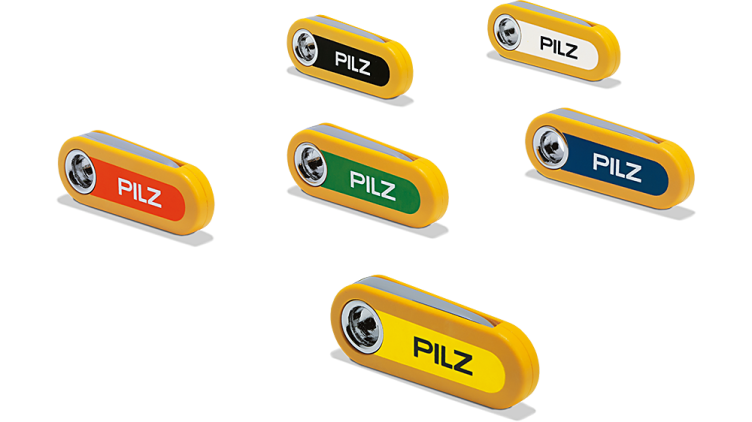
PITreader is a system for the authentication and authorisation of control systems, where authentication is done via transponders.

Security
It is important to note that to protect plants, systems, machines and networks from cyber threats, industrial security concepts need to be introduced (and maintained on an ongoing basis).
Conduct a risk assessment according to VDI/VDE 2182 or IEC 62443-3-2 and plan your security measures carefully.
Web Server
PITTreader’s built-in Web Server is protected against unauthorized access by password prompts.
- Passwords are stored in encrypted form.
- If the password is changed, the user is prompted to enter the old password for authentication.
- Assigning a unique token to the session protects against CSRF attacks (Cross Site Request Forgery).
- After 15 minutes of inactivity, the user is automatically logged out of the web application.
Security measures…
And also there are so many suggestions for security that are written from Pilz.
- PITreader is not protected from physical manipulation and should be installed in a lockable control or operating panel.
- The configuration computer that accesses PITreader should be protected from attack by a firewall or other suitable means, and this configuration computer should have a virus scanner and be updated regularly.
- It is better that the configuration computer accessing PITreader is assigned a password or that users logging on to this configuration computer do not have administrative rights.
- A firewall should be used on the network where PITreader is installed or the product should be protected against unauthorized data exchange over the network. Also, only allow data exchange that is necessary for the application.
- It is important to assign only strong passwords and to treat passwords with care. Follow generally accepted guidelines, for example NIST 800-63b.
- Limit Modbus/TCP connections to the machine’s internal network and protect the connection against external networks.
- API tokens should be treated with the same care as passwords.
- Install the firmware update provided by Pilz as soon as possible.
- Store transponders in a secure location to protect them from unauthorised access.
- Log data may contain personal data. Store exported logs only on suitably protected storage media.
- For network scanning via multicast DNS, the product serial number can be read without authentication. For web applications, it is important to assign a password different from the default password.
- The PITreader configuration backup file contains information on product authentication. Backup files should only be stored on suitably protected storage media.
- During a factory reset, the coding in the device is also reset. As a result, uncoded or differently coded transponders can be accepted by the device again. For this reason, it is recommended that the coding checksum is monitored by a higher controller, HMI or evaluation unit.
こちらはネットワーク分離のExampleになります。

Real-time clock and operating hours counter
PITreader has a real-time clock and an uptime counter, which can be set to new data/time values in the web application. Synchronization with an SNTP server can also be enabled in the web application.
Block list
The Block list can be used to lock the authentication of certain transponders. Once a transponder is on the block list, it can no longer be authorized by PITreader. This feature is useful, for example, if a user has lost a transponder.
It can prevent unauthorized persons from authenticating with PITreader.
- The Block list can contain up to 1000 entries.
- The Block list can be used in any authentication mode.
Authentication types
PITreader supports the following authentication types:
- Transponder data
- Single authentication
- 2-person rule
The authentication type used in this article is Transponder data.
“Transponder data” authentication mode?
The Transponder data authentication mode allows user authentication on safety evaluation units (e.g. PIT m4SEU) and connected control systems by placing the transponder in the read area of the PITreader. Authentication is performed using the permissions stored on the transponder.
The controller (PLC, HMI) can also use Modbus/TCP to read the currently authenticated transponders.
It is important to note that in Transponder data authentication mode, authentication depends solely on possession of the transponder. The loss of a transponder is therefore a security risk.
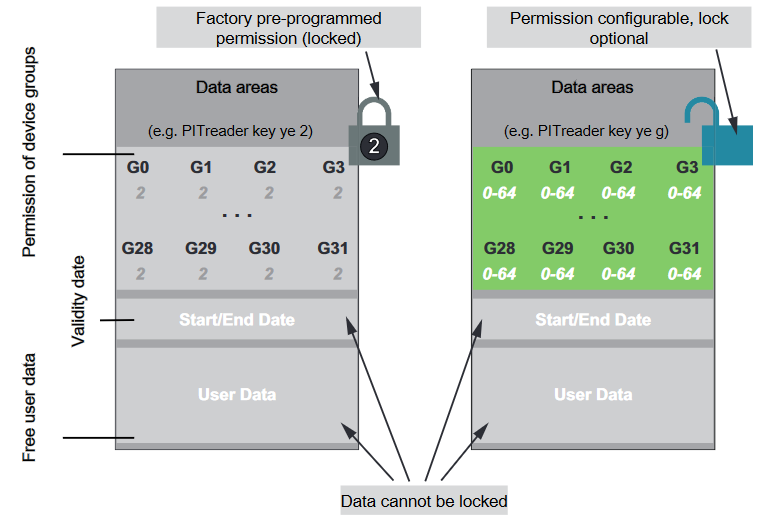
Device groups
There are 32 device groups G0-G31 that can be selected for PITreader; PITreader devices are combined within a device group and one user (one transponder) has the same permissions for all PITreader devices in the group. Another user may have different permissions.
Each device group can have up to 65 different permissions.
- 0: No permission
- 1 to 64: Permission 1 to 64
For example, you can give permissions on the activation of functions that are assigned according to the operator’s level of training.
Only one permission is valid at a time in PITreader. Additional permissions stored in the transponder can be called up via the Modbus/TCP interface of PITreader and used for End-User purposes if required.
Web application
Configuration of PITreader is done via the web application. Configuration is only possible after logging into the web application and is available in German and English.
REST API
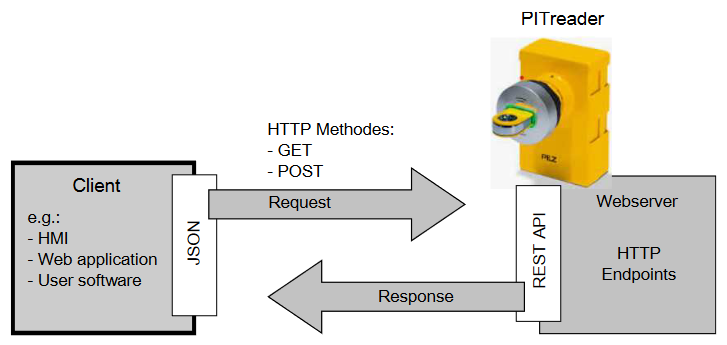
PITreader has a REST API. External clients from user-created applications (HMI, web applications, user software, etc.) can connect to the PITreader web server via the REST API.
To exchange information and data, the external client needs to send a request in JSON format to one of the HTTP endpoints of the web server on PITreader.
The HTTP methods GET and POST are supported for this purpose. The web server sends the appropriate response in JSON format to the external client.
This is the Point for optimal integration into PITreader applications.
- Certificates.
Use server certificates based on Elliptic Curve Cryptography (ECC). This corresponds to the default setting of PITreader.
- TLS Session Tickets
It is recommended to use a REST client that supports TLS session tickets. - Cyclical access to data
It is recommended that a maximum of two requests per second be made to the PITreader web server.
Requests from an API Client
The API client and the machine on the web server are authorised via an API token (API key). This means that requests from API clients must present an API token, which is generated by the PITreader web application and can be created and configured in the web application for this purpose.
Creating an API Client
API clients can be created in web applications.
The client corresponds to a device user with an authentication ‘API token’. The API token is a random value 16 bytes long and its function is equivalent to a password.
Roles must also be assigned to API clients, and roles determine the access rights of API clients.
- Role name: Administrator
Role number: 500 - Role name: Device manager
Role number: 400 - Role name: Transponder manager
Role number: 200 - Role name: Guest (read access only)
Role number: 10
Response format
If the client requests it, the web server sends a response in JSON format. The response always consists of a response header containing the HTTP status code and a ‘Content type’ response field.
The response header is followed by the body and, in the case of a GET request, the body consists of generic response data fields. If the request is OK, the body also contains request-specific response data fields; in the case of a POST request, the body consists of generic response data fields only.
Response format with HTTP status code 200
For OK requests, the web server responds with HTTP status code 200 (OK) in the response header.

Response format with HTTP status code 400
In the case of an invalid request, the web server responds with HTTP status code 400 (bad re-request) in the response header.

Response format with HTTP status code 403
Forbidden requests, the web server responds with HTTP status code 403 (forbidden), which means that the request was sent to the web server without an existing user session or that the API client does not have the required role number, or that the API client does not have the required role number.
Response format with HTTP status code 500
In case of an internal error, the web server responds with HTTP status code 500 (internal server error).
API using in this Tutorial..
This is the API request used in this article. For a detailed explanation, please refer to the instruction manual from PILZ.
HTTP end point /api/status (GET)
Via the HTTP endpoint /api/status, current status information on device status and properties can be read via GET.
HTTP end point /api/status/authentication (GET)
Via the HTTP endpoint /api/status/authentication, current information on the authentication status of the transponder can be read via GET.
HTTP end point /api/transponder (GET)
Data from transponders, e.g. group permissions, validity (valid from/until), locks, etc., can be read using GET via the HTTP endpoint /api/transponder.
HTTP end point /api/led (GET)
Via the HTTP endpoint /api/led, the status of the LEDs and the ‘LED overwrite’ setting can be read via GET.
HTTP end point /api/led (POST)
Via the HTTP endpoint /api/led, an ‘LED overwrite’ configuration can be defined using POST, LED color and blink mode can be configured externally. As a result, the LED color and blink mode are no longer dependent on the state of the internal device.
HTTP end point /api/me (GET)
Via the HTTP endpoint /api/me, information about the currently signed-in user can be read via GET.
HTTP end point /api/status/monitor (GET)
The status of the PITreader can be read via the HTTP endpoint /api/status/monitor and synchronous monitoring can be restarted using GET.
Implementation
PITReader Side
The first step is to set up the PITreader side of PILZ.
Connect to PITreader
Connect to the LAN Port on the PITreader main unit.

establish Ethernet connection
To access PITreader, the IP address of the PC must be in the same subnet as the PITreader IP address.
Here is the default PITreader settings :
- IP address: 192.168.0.12
- Netmask: 255.255.255.0

Log in to the web application
To change the PITreader settings, click on the Login button on the WebServer.
- User name: admin
- Password: <PITreader serial number>.
To note, if Login fails five times, the login is locked for five minutes.

Login to the WebServer.

The Default Password is the serial number printed on the PITreader itself, the serial number of the device used in this case is 100497106.

Done!When actually operating PITreader, the Default Password should be changed absolutely.

Configurations
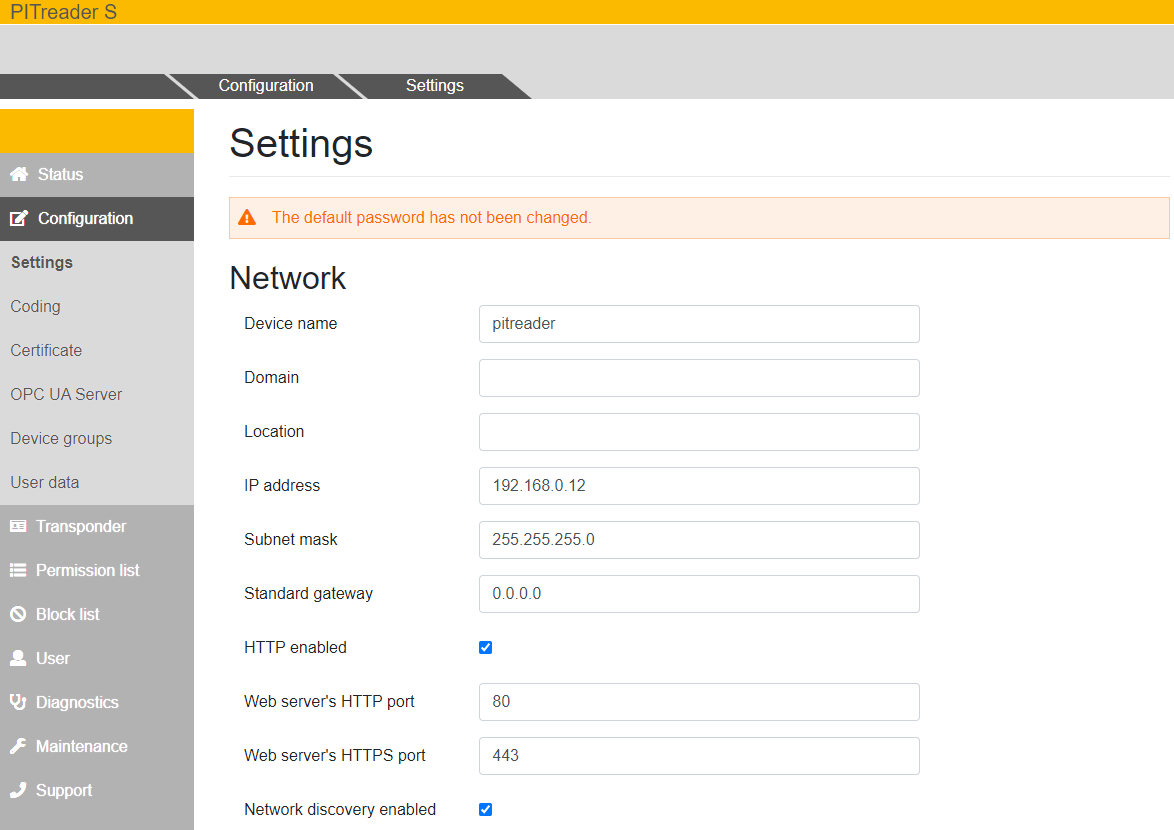
Open Configuration>Settings for basic PITreader settings.

Settings
This is the basic PITreader settings screen.
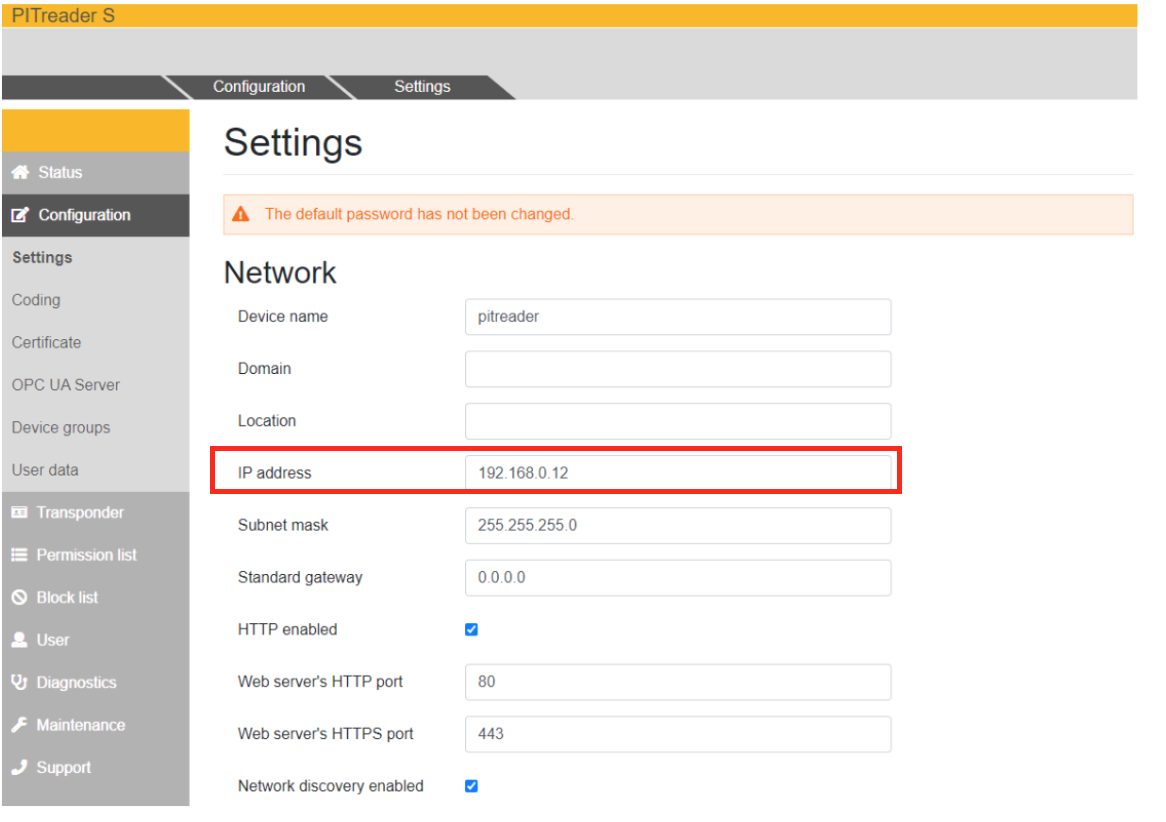
IP address
The IP address should be set according to the application.
Modbus/TCP Server
Although it is not used in this article, you should enable Modbus TCP Server for your application.

Date/time
Next, in the Date/Time section, synchronize with PC time and click ‘Save time and date on device’ to save the settings.

Save
Finally, click the Save button to save the settings.

OK to proceed.

Please wait a moment…

Done!PITreader will restart automatically.

OPC UA Server
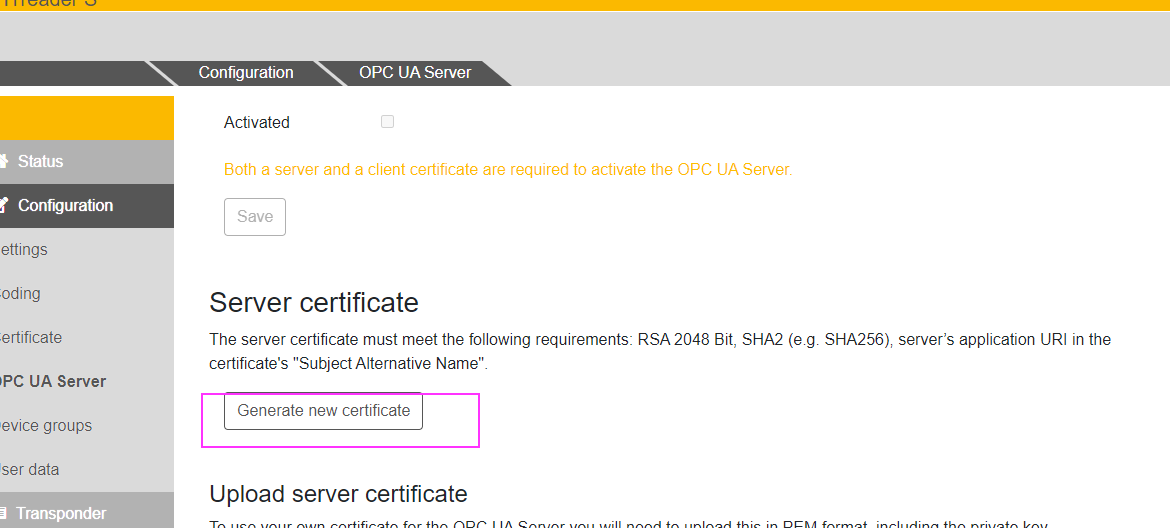
The next step is to configure the OPC UA Server. This article does not use the OPC UA Server, but only explains how to enable the relevant functions.
When you click on OPC UA Server, the PITreader End point is displayed in the WebServer.

Click Generate new certificate to generate a certificate for the OPC UA Server.
Please wait a moment…
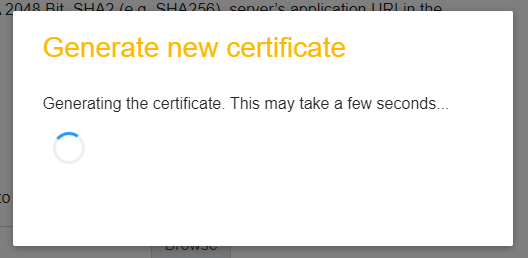
Done!

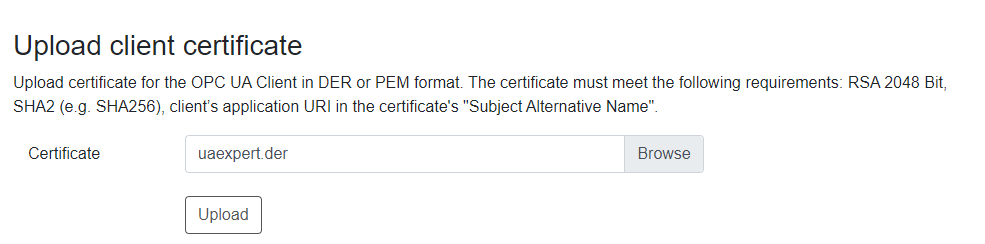
Next, prepare the OPC UA Client certificate. In this article, we will use uaExpert’s OPC UA Client certificate.

Select the certificate you have just prepared for the Upload client certificate and upload it to PITreader.
Done!

The OPC UA Client certificate has been Uploaded.
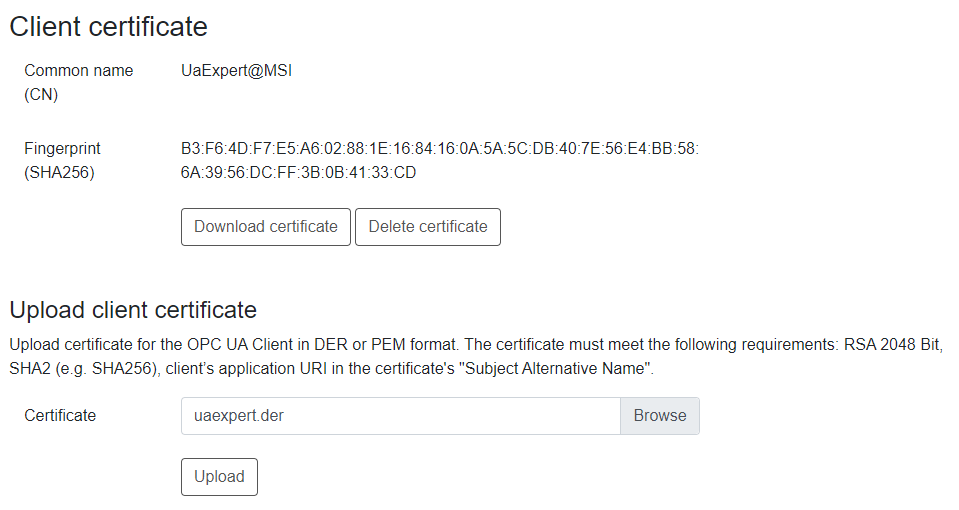
Finally, put in the Activated Check Box and save your settings with Save.

OK to proceed.
Device User
To use the REST API for PITreader, you need to add an API Client User.
Click User>Device User.

Create new user
Enter the User name in the New entry field and click the button next to it.

The screen changes to a screen for creating a new User.

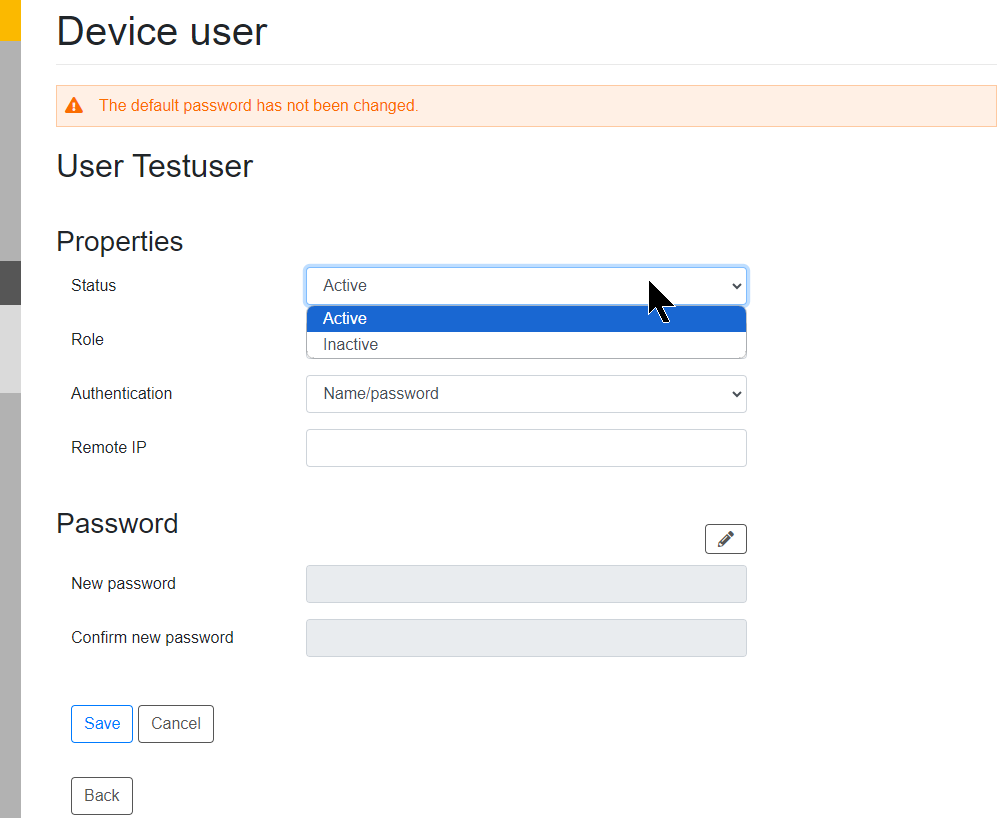
Status
This is an option to enable or disable the relevant User.
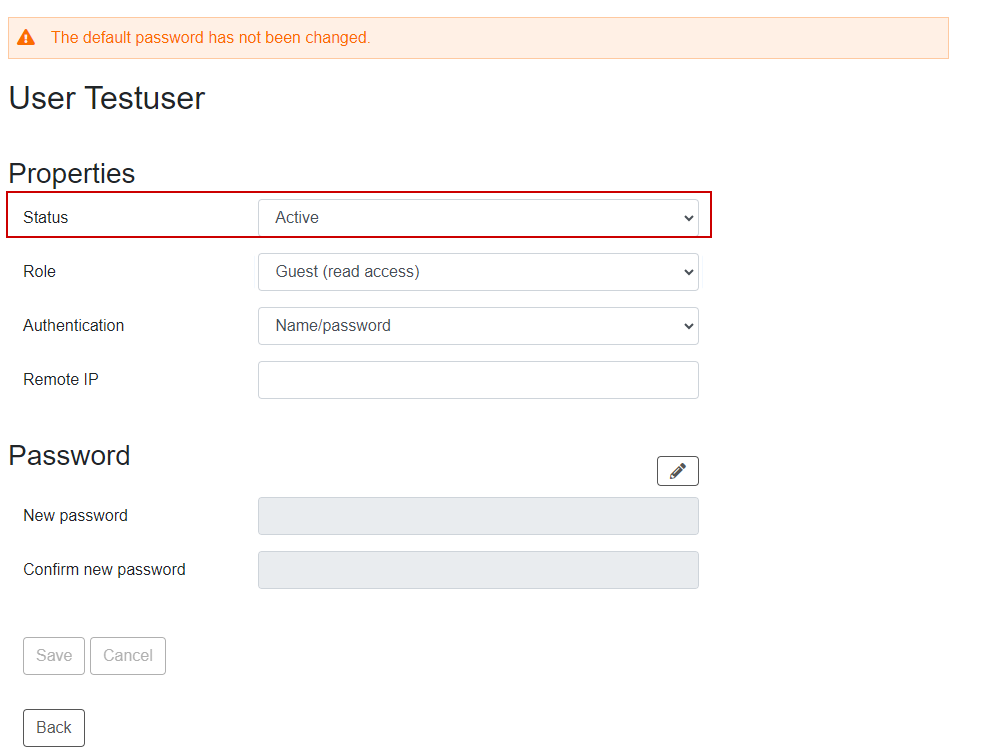
Role
This is the permission setting for the relevant User.
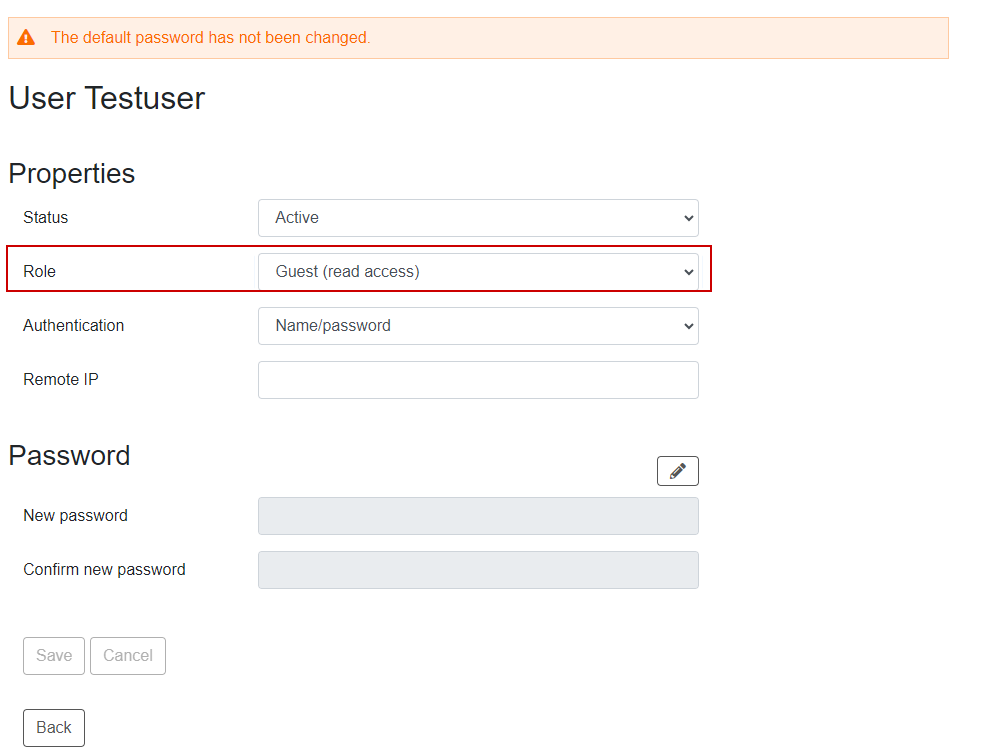
Set the appropriate permissions for your application.

Authentication
The next step is to set the authentication method for the relevant User.

This article uses the REST API, so set ‘API token’ in Authentication and save the settings with Save.

API access
The API Token is displayed in the relevant User’s settings screen and this random number key will later be used by Node-Red, so save it in the Note-Pad.

Block List
The next step is to set up the Block List. Put the key into the PITReader and the Security ID of the corresponding key will be displayed.

Enter a Comment in the Block List and click the Save button, and the corresponding key will be placed in the Block List.

Permission list
Finally, put another key into the PITReader and enter it into the Permission List using the same operation as before.


SeeedStudio Side
The next step is to build the Recomputer R1025 side of SeeedStudio.

Test with Command Line
Use the curl command to send an HTTPS request to PITreader.
| recomputer@reComputer-R100x: $ curl -X GET https://192.168.13.12:443/api/status -H “Authorization: Bearer rnmnJ0yGUVu/JaB+N4Rbhw==” |
But curl: (60) SSL certificate problem: self-signed certificate error is shown.
| curl: (60) SSL certificate problem: self-signed certificate More details here: https://curl.se/docs/sslcerts.html curl failed to verify the legitimacy of the server and therefore could not establish a secure connection to it. To learn more about this situation and how to fix it, please visit the web page mentioned above. |
TLS Certificate Verification?
If curl is built with support for Schannel or Secure Transport, curl uses the system-native CA store for verification. All other TLS libraries use file-based CA stores by default.
All trusted server certificates are digitally signed by a certification authority (CA) and the local CA store contains a collection of certificates from trusted certification authorities that TLS clients such as curl use to validate the server.
curl verifies certificates by default. This is done by verifying the signature and ensuring that the certificate was created for the server name specified in the URL.
If the remote server is using a self-signed certificate, has not installed a CA certificate store, is using a certificate signed by a CA not included in the store used by the server, or the remote host is an imposter impersonating a favourite site then the certificate check will fail and an error will be reported。
Skip verification
There is also a way to instruct curl not to validate with k/–insecure.
Test Again..
Now issue a curl request with the -k option.
| recomputer@reComputer-R100x:~ $ curl -X GET https://192.168.13.12:443/api/status -H “Authorization: Bearer rnmnJ0yGUVu/JaB+N4Rbhw==” -k |
Done!!PITreaderからの返答がきました。
| {“hostName”:”pitreader”,”ipAddress”:”192.168.13.12″,”orderNo”:”402256″,”productType”:”PITreader S”,”serialNo”:100497106,”macAddress”:”9C:69:B4:50:0E:B7″,”seuStatus”:false,”coded”:false,”codedOem”:false,”transponderAuthenticated”:true,”fwVersion”:”02.00.00″,”hwVersion”:”02.00″,”realTimeClock”:”2024-09-28T01:21:24Z”,”hwVariant”:2,”released”:true,”ioPortMode”:”input”,”ioPortValue”:0} |
Install Node-red
Install Node-Red, referring to Node-Red from this Link or the official Node-Red website.
Install Node
The following Nodes will be used in this article, so install them from Node-Red.
| node-red-dashboard node-red-contrib-ui-led |
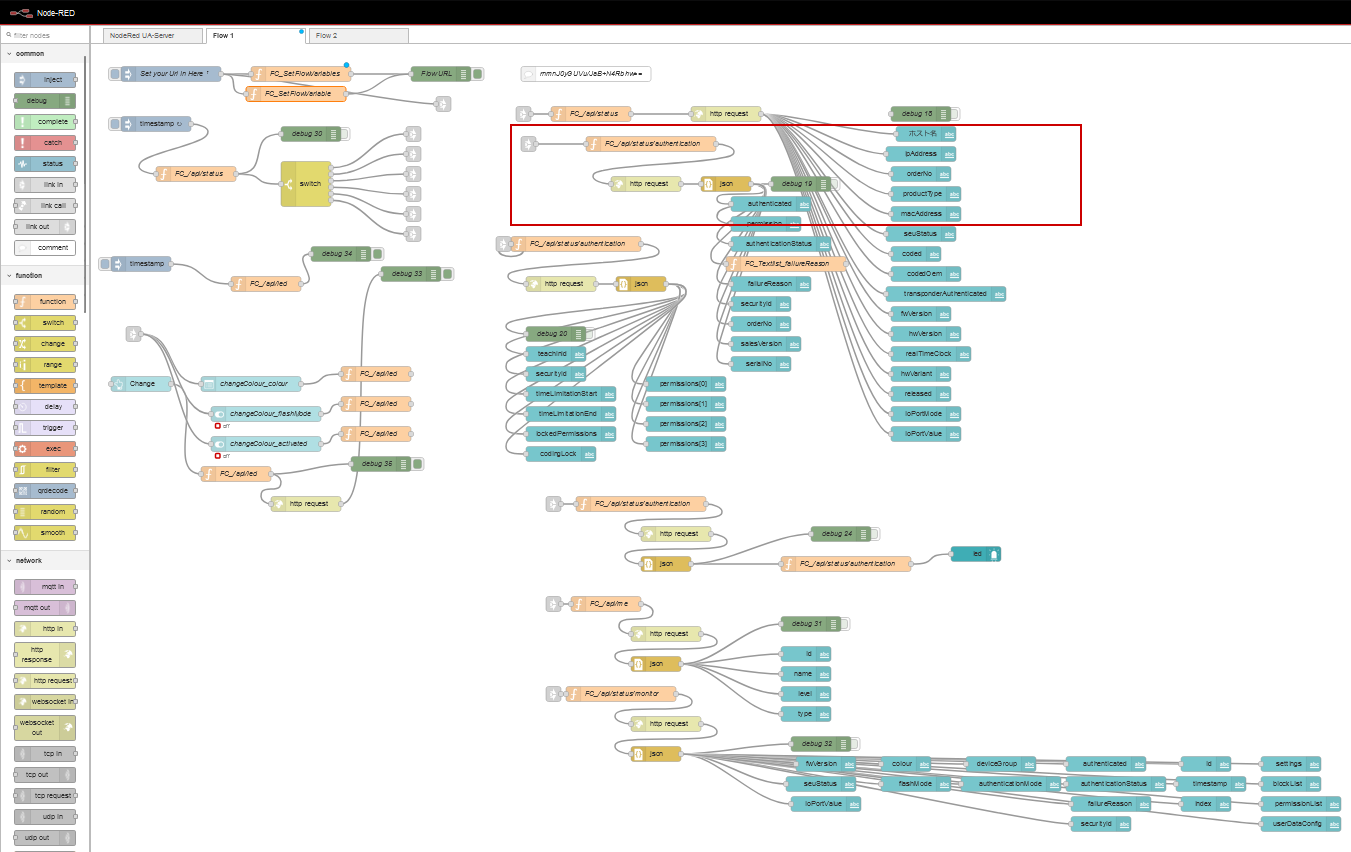
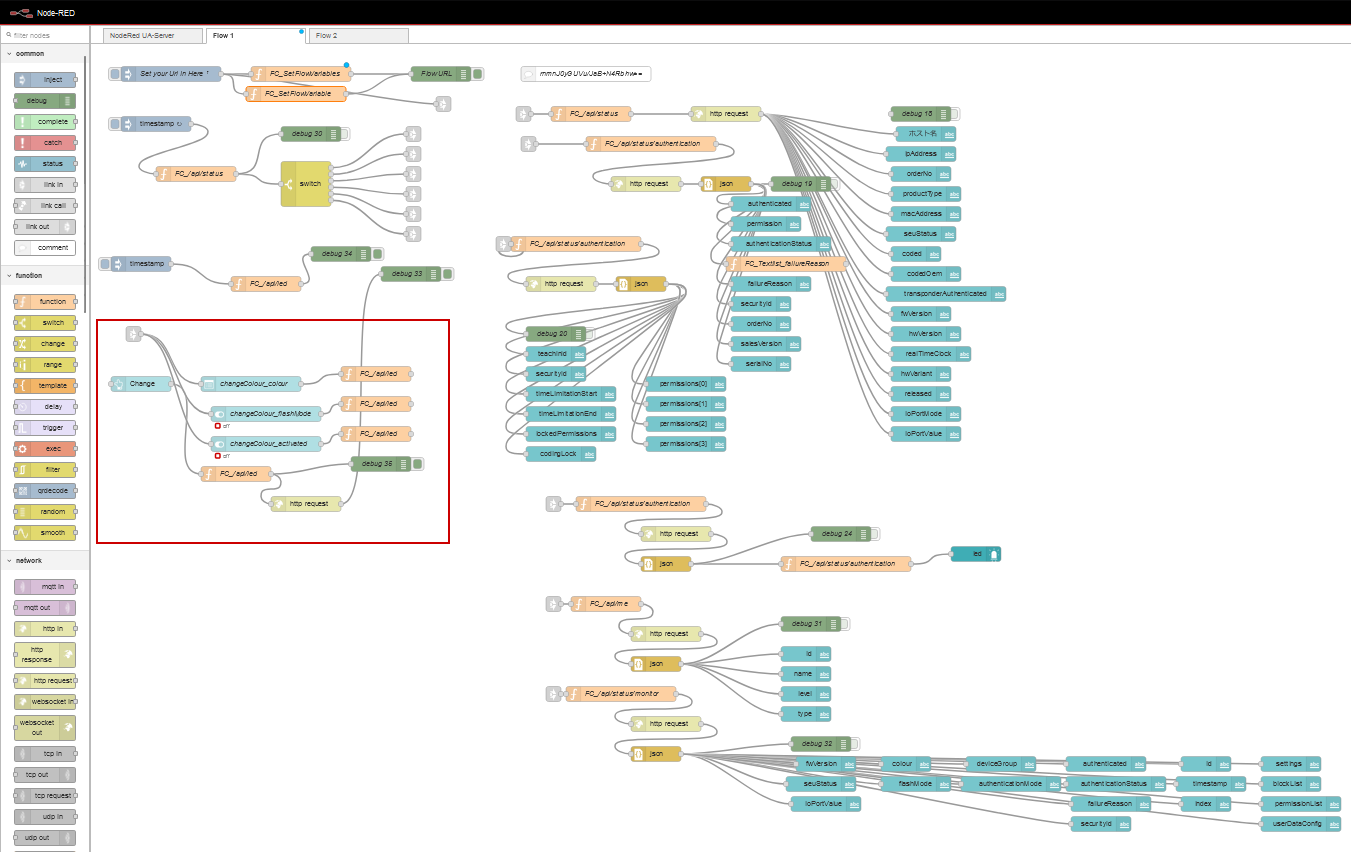
Configure the Flow
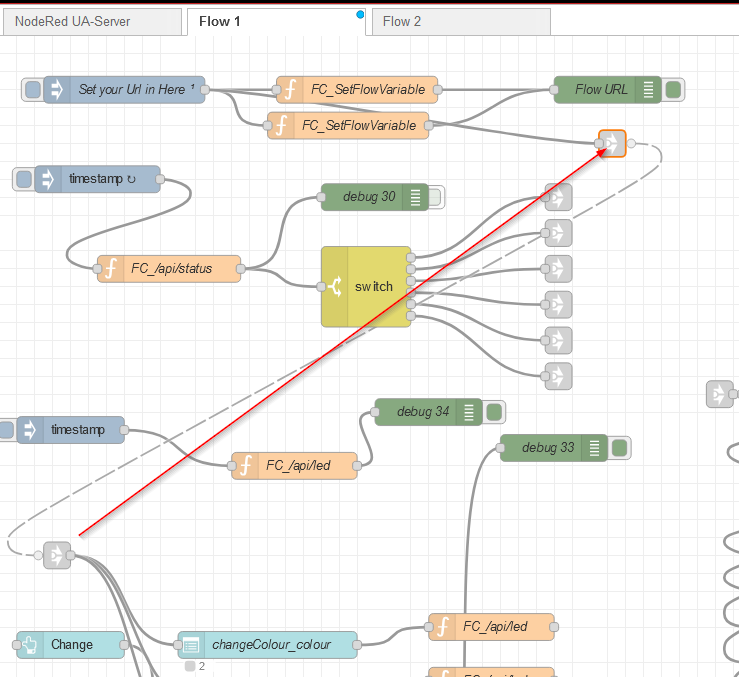
This is the Flow of this article.

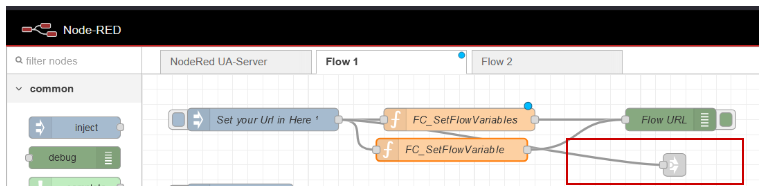
Part01 – Configure FlowVariables
This is a Flow for the initial configuration of FlowVariables and other variables.


inject – Set your Url in Here
The Inject Node here initializes the PITreader url and the variable that controls the Step to send HTTPS.
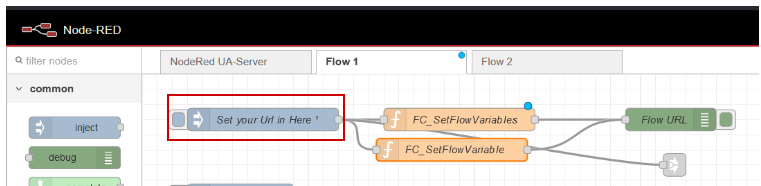

The Flow will also only run once by setting the cycle setting at the bottom of the Inject node to ‘Inject once’.

Function – SetFlowVariables
This function initializes the PITreader URL and button variables.

By using flow.set, the four variables furl, changeColour_colour, changeColour_flashMode and changeColour_activated were initialized as Flow variables.
| flow.set(“furl”,msg.url); flow.set(“changeColour_colour”,0); flow.set(“changeColour_flashMode”,0); flow.set(“changeColour_activated”,false); msg.payload=msg.url; return msg; |
Function – SetFlowVariables2
This function initializes the Step variable.

By using flow.set, the fstep variable is initialized as a Flow variable.
| flow.set(“fstep”,msg.step); msg.payload=msg.step; return msg; |
link out
The initial start-up signal of the Inject Node is used elsewhere, so use the link out Node to transfer the output state.
Part-02 Step Control
This is a program that determines the order of HTTPS requests to PITreader.

inject – timestamp
Inject here triggers every 0.2 seconds.


FC_SetStep
This Function here gets the current value of the Flow variable fstep. It also adds 1 each time the Function itself is triggered.
There are six HTTPS requests to be sent to PITreader in this article, so if fstep is greater than 6, it is reset to 0.

| var step = flow.get(“fstep”); msg.rejectUnauthorized = false; step=step+1; if (step>6){ step=0; } msg.payload=step; flow.set(“fstep”, step); return msg; |
switch
Use the Switch Node here to send out different HTTPS requests depending on the current value of the fstep variable.
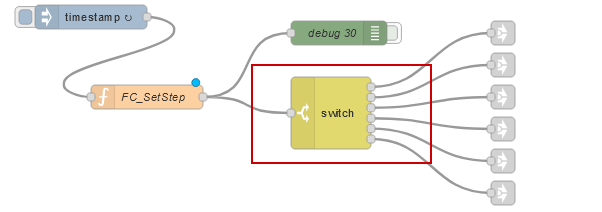

link out
Forward the results of the step and switch decision to the link out Node.


Part03 – Step=1,Send GET Request /api/status
While Step is 1, issue an HTTPS request from Node-red to PITreader for /api/status.

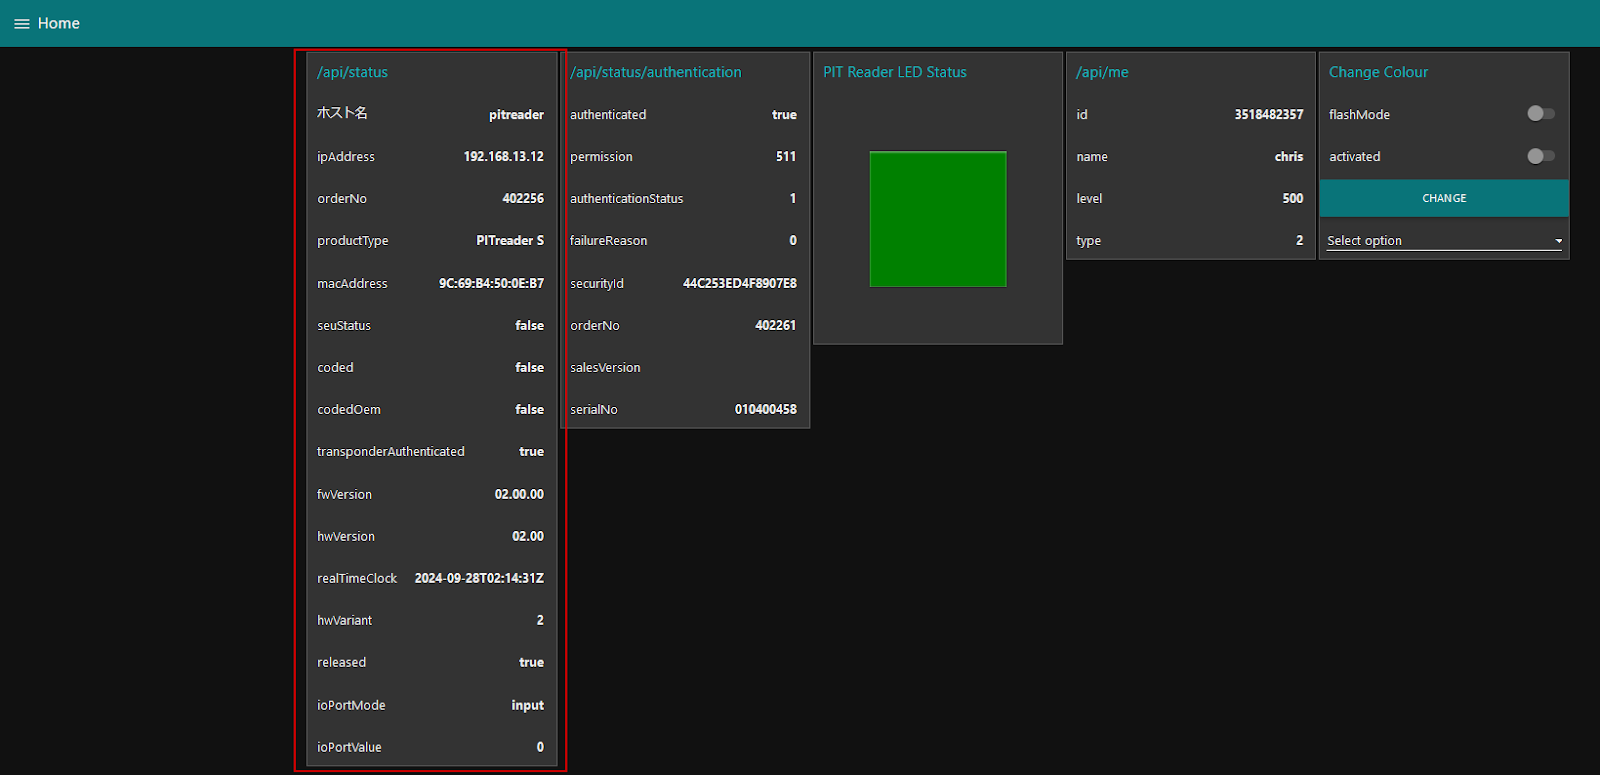
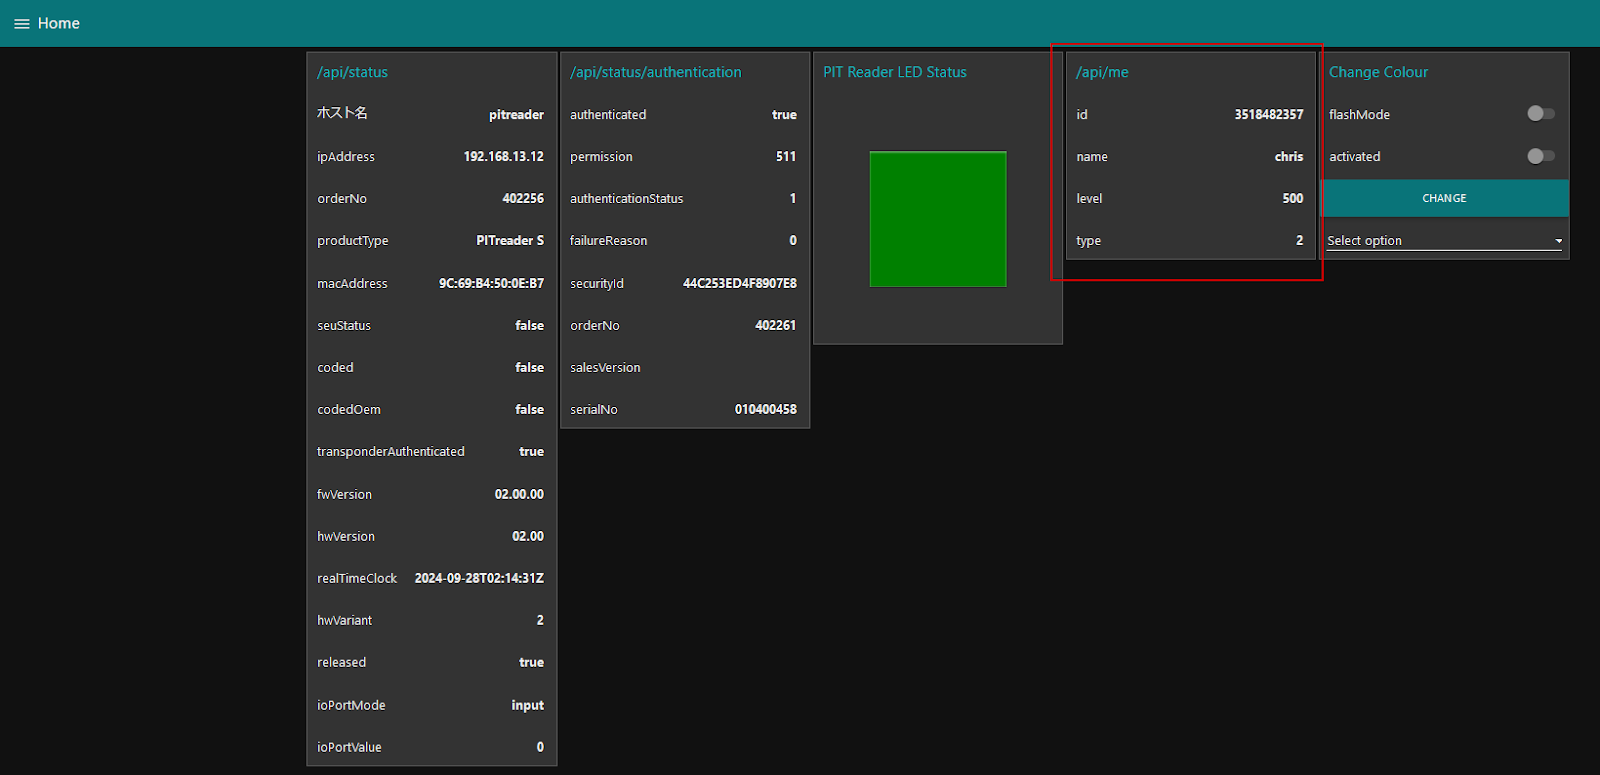
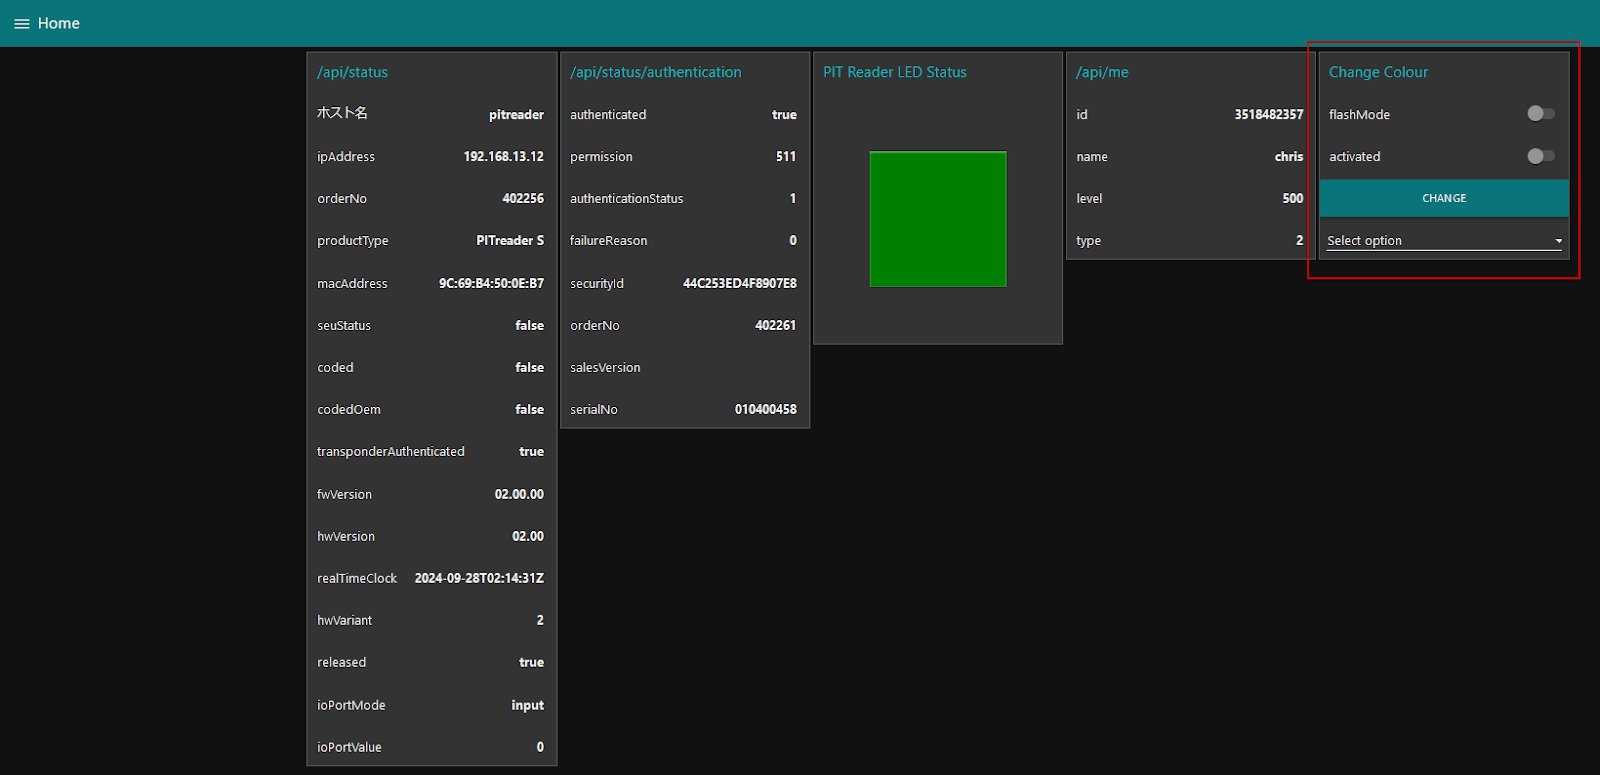
This is the Dashboard section actually created by the relevant programme.
link in node
This program triggers when fstep=1.


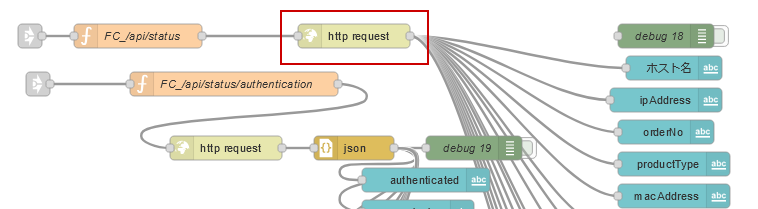
FC_/api/status
This one gets the Flow variable furl and creates an HTTPS request in /api/status.
Also add the setting msg.rejectUnauthorised = false to avoid TLS Certificate Verification errors.

| var url = flow.get(“furl”)+”/api/status”; msg.rejectUnauthorized = false; msg.url=url; return msg; |
http request
Next, add a Node-Red HTTP request Node.

method
This sets the Method to be an HTTP request – GET Request /api/status, so the Method is of course set to GET.

Use authentication
Now that you have created an API Client in PITreader, set the Type to bearer authentication and paste the Token into the API KEY you used when you added the User earlier.
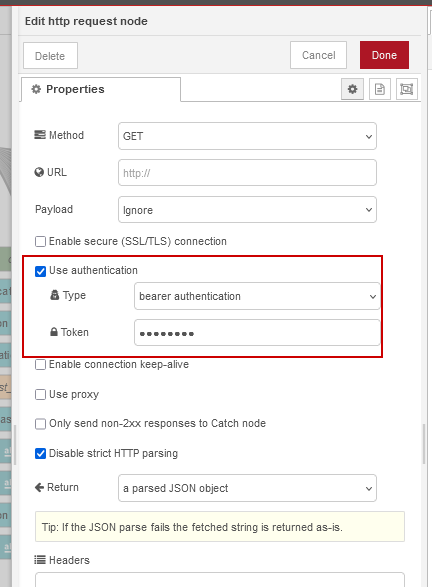
Return
As a JSON OBJECT is returned directly from the PITTreader, the Return field should be set to ‘a parsed JSON object’.

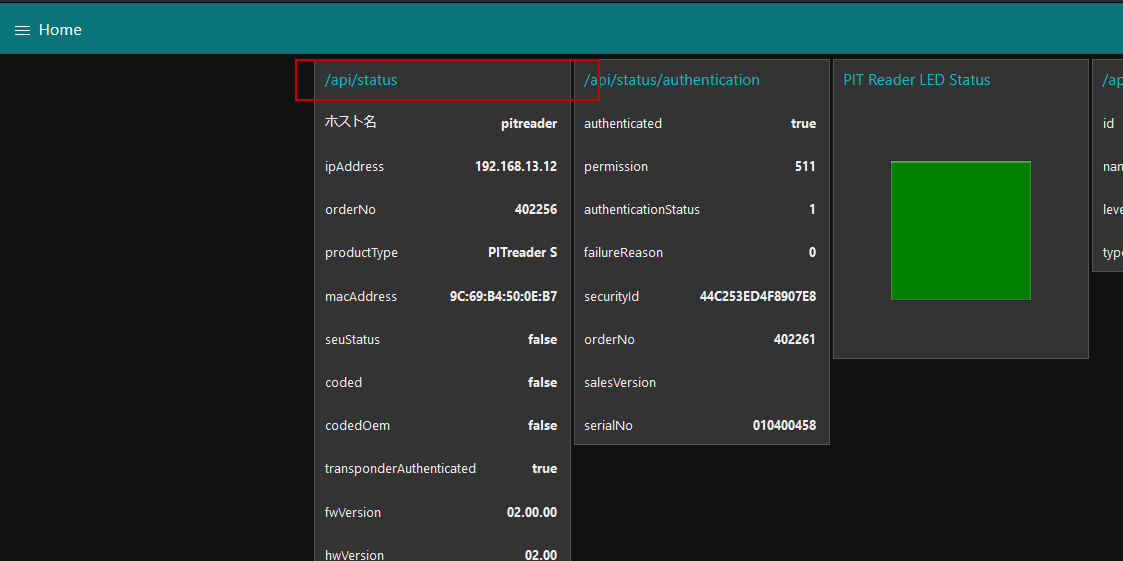
dashboard
The Dashboard is passed from the HTTP JSON Object reply to each component.


Group is set to Home.

A page called Home is automatically generated in the Dashboard.

This is the /api/status display that was added earlier.
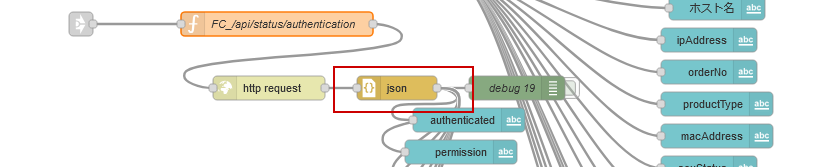
Part04 – Step=2,Send GET Request /api/status/authentication
While Stepは2のとき、Node-redから/api/status/authenticationのHTTPSリクエストをPITreaderに発行します。
link in node
This program triggers when fstep=2.

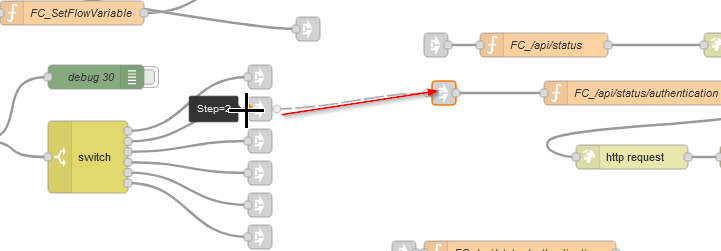
FC_/api/status/authentication
This one gets the Flow variable furl and creates an HTTPS request in /api/status/authentication. Also add the setting msg.rejectUnauthorised = false to avoid TLS Certificate Verification errors.

| var url = flow.get(“furl”) +”/api/status/authentication”; msg.rejectUnauthorized = false; msg.url=url; return msg; |
http request
Next, add a Node-Red HTTP request Node.
Return TypeThis time set to ‘UTF-8 string’. You can use the same Return settings as for the HTTP request, but here we dare to do it in a different way.


json
For the return Type,This time we will set it to ‘UTF-8 string’, so the string returned from the PITreader is converted to a JSON Object using a JSON Node.
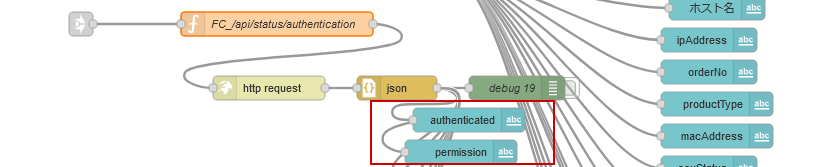
dashboard
The last step is to create a Dashboard for displaying /api/status/authentication.

Part05 – Step=3,Send GET Request /api/transponder
The program will issue an HTTPS request for /api/transponder from Node-red to PITreader when Step=3.

FC_/api/status/transponder
This one gets the Flow variable furl and creates an HTTPS request in /api/transponder. Also add the setting msg.rejectUnauthorised = false to avoid TLS Certificate Verification errors.

| var url = flow.get(“furl”) +”/api/transponder”; msg.rejectUnauthorized = false; msg.url=url; return msg; |
dashboard
The last step is to create a Dashboard for displaying /api/transponder.


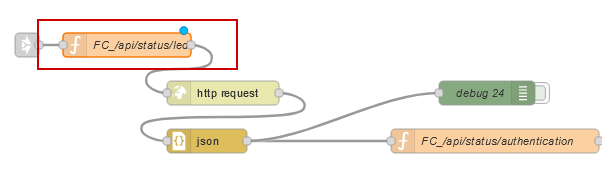
Part06 – Step=4,Send GET Request /api/led
While Step =4, Node-red issues an HTTPS request for /api/led to PITreader.

FC_/api/status/led
This one gets the Flow variable furl and creates an HTTPS request for /api/led. Also add the setting msg.rejectUnauthorised = false to avoid TLS Certificate Verification errors.
| var url = flow.get(“furl”) +”/api/led”; msg.rejectUnauthorized = false; msg.url=url; return msg; |
led
Use the LED Node here to visualize the currently displayed color of the PITReader on the Dashboard.

Separate the colors according to the instructions.

dashboard
The last step is to create a Dashboard for displaying /api/led.

Part07 – Step=5 Send GET Request /api/me
Node red will issue an HTTPS request for /api/me from Node-red to PITreader when Step=5.

FC_/api/me
This one gets the Flow variable furl and creates an HTTPS request for /api/me. Also add the setting msg.rejectUnauthorised = false to avoid TLS Certificate Verification errors.

| var url = flow.get(“furl”) +”/api/me”; msg.rejectUnauthorized = false; msg.url=url; return msg; |
dashboard
The last step is to create a Dashboard for displaying /api/led.
Part08 – Step=6,Send GET Request /api/status/monitor
Node-red will issue an HTTPS request from Node-red to PITreader for /api/status/monitor when step=6.

FC_/api/status/monitor
This one gets the Flow variable furl and creates an HTTPS request for /api/status/monitor. Also add the msg.rejectUnauthorised = false setting to avoid TLS Certificate Verification errors.
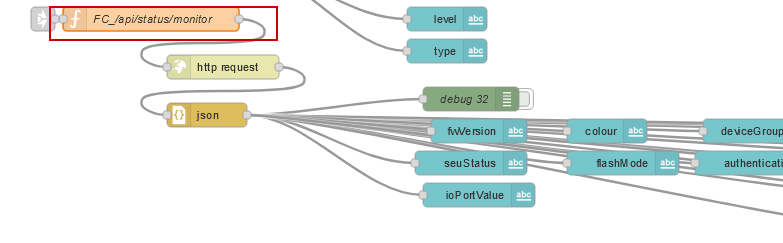
| var url = flow.get(“furl”) +”/api/status/monitor”; msg.rejectUnauthorized = false; msg.url=url; return msg; |
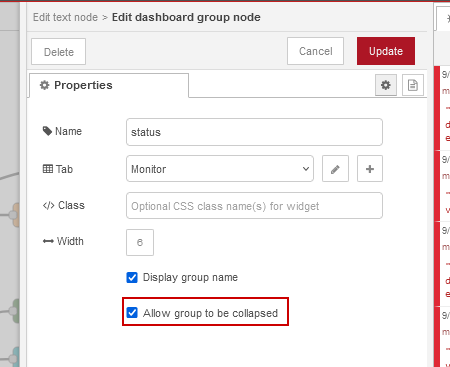
dashboard
Finally, create a Dashboard for the display of /api/led. Select ‘Allow group to be collapsed’ to collapse the display of labels.

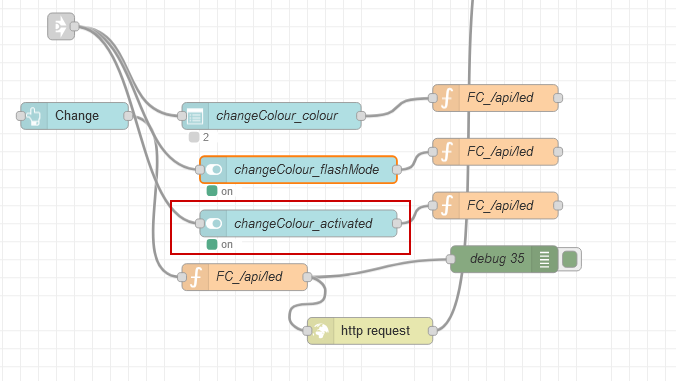
Part09 – change color
This is the part where Node-Red sends a POST request to PITReader to change the colour of the lights.
link in node
As you don’t need to send POST requests all the time, you can trigger POST requests with Link in Node here.
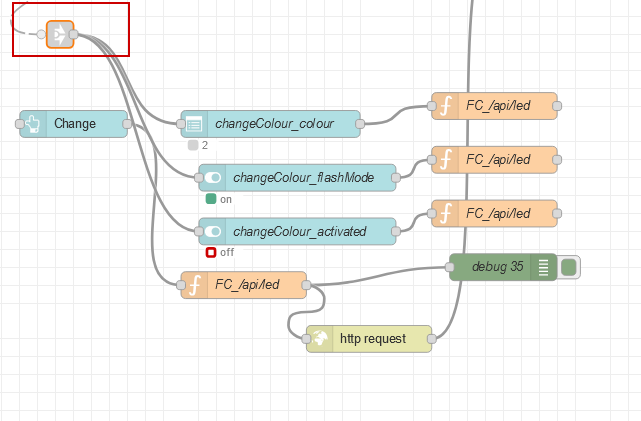
The Link in node is connected to a Link Out node called ‘OB100’.

OB100 is connected to the Node that Flow runs when it starts.
dashboard
The final step is to create a Dashboard that manipulates the LED colors.
button
When the User clicks on the button, it reads the three option values Colour, FlashMode and Activated and sends the request to the PITReader.

color
The Colour setting is Drop-list, and Switch Off/Blue etc. are also labelled according to the Drop List selection.
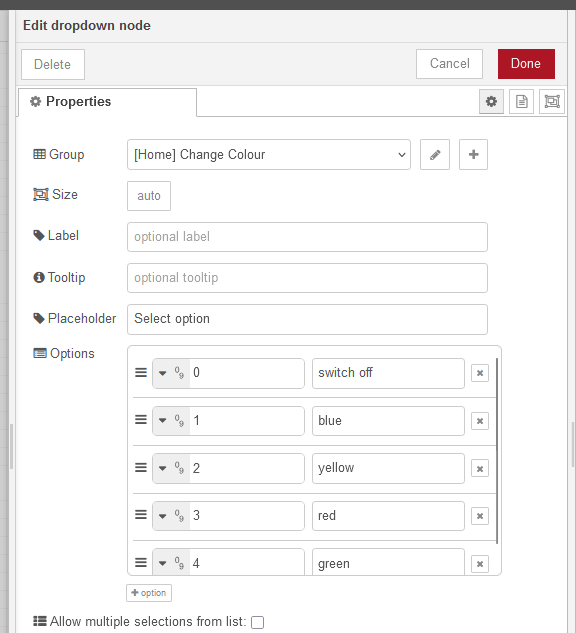
This Function reads the selection from the User’s Drop-list.

| flow.set(“changeColour_colour”,msg.payload); var f=flow.get(“changeColour_colour”); msg.payload=f; return msg; |
flashing mode
Flashing Mode is set by the Radio Button, which changes to ON or OFF depending on the User’s selection.

This Function reads the selection from the User’s Radio Button.


| flow.set(“changeColour_flashMode”,msg.payload); var f=flow.get(“changeColour_flashMode”); msg.payload=f; return msg; |
activated
The activation setting is the Radio Button, which changes to ON or OFF depending on the User’s selection.
This Function reads the selection from the User’s Radio Button.


| flow.set(“changeColour_activated”,msg.payload); var f=flow.get(“changeColour_activated”); msg.payload=f; return msg; |
FC_/api/led
Finally, use this Function here to generate a POST request from the User selection made earlier and send it to the PITReader.
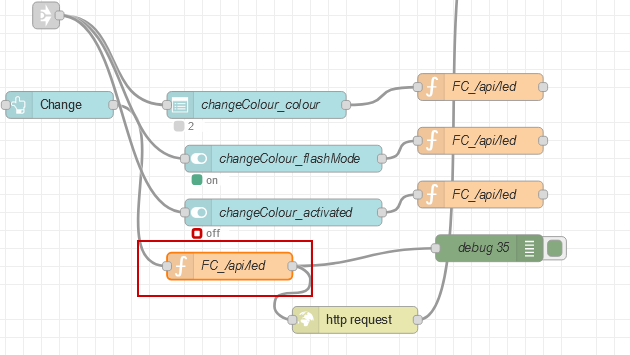
| var url = flow.get(“furl”)+”/api/led”; msg.rejectUnauthorized = false; msg.url=url; var colour=flow.get(“changeColour_colour”); var flashMode=flow.get(“changeColour_flashMode”); var activated=flow.get(“changeColour_activated”); msg.payload = {}; msg.payload = { “colour”: colour, “flashMode”: flashMode, “activated”: activated }; return msg; |
Result
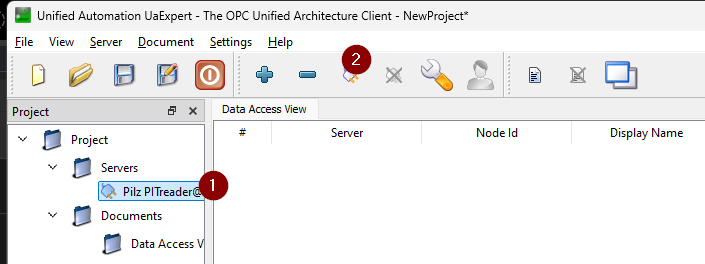
First try using uaExpert to access the OPC UA Server in PITTreader.

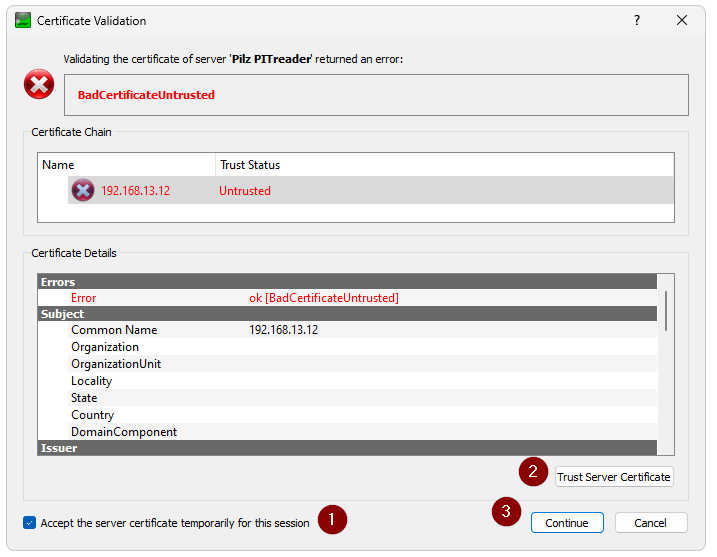
Trust the PITTreader certificate and proceed with Continue.
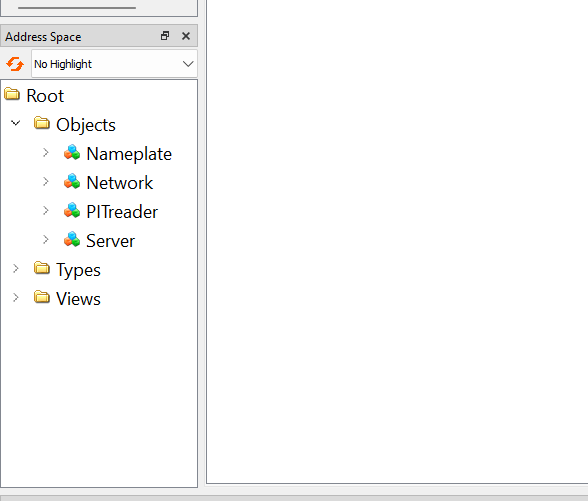
Done!
You can see REST API integration with Node-Red and PITTreader in this video.