This post I will explain how to use Siemens Industrial IOT Gateways CC712 to make a gateway – get the Data from S7-1500 and use MQTT protocol to publish the message to AWS.Here is the outlook of CC712↓
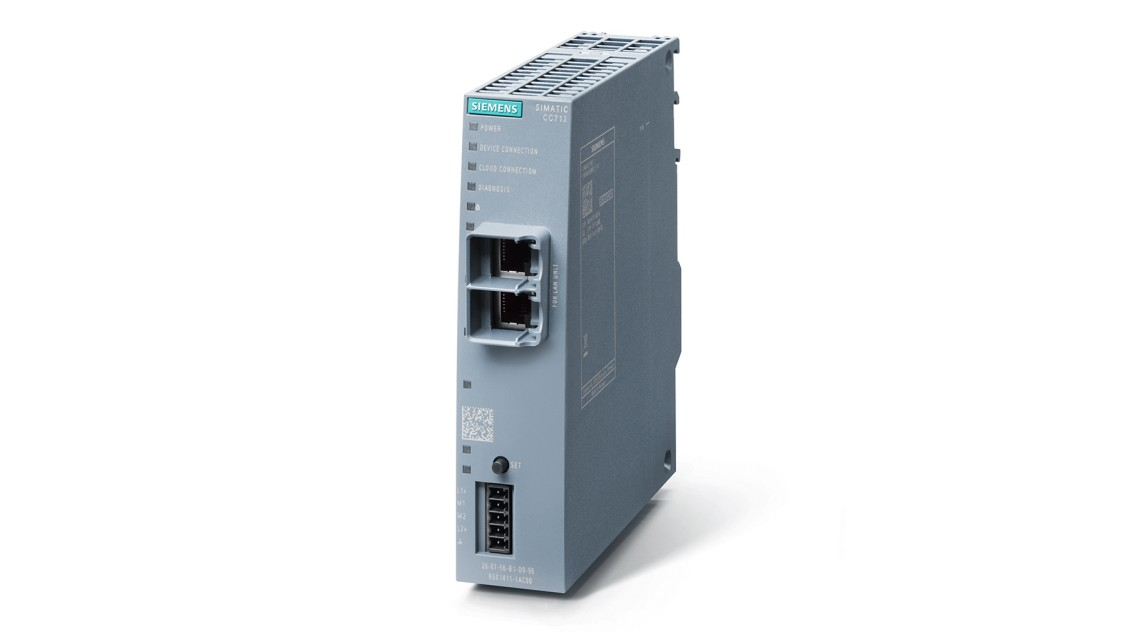
What is CC712?
By using these industrial IOT Gateway Simatic CloudConnect 7 -You can easily build a Gateway between the S7 base Controller and Cloud Connection.(AWS,MindSphere,Aurze,IBM Cloud).
Available Devices
- S7-300
- S7-400
- S7-1200
- S7-1500
- S7-LOGO!
Then, CC712 has 2 interfaces – Process Station and Cloud Connection.
Process station is the port that allows you to connect the local Devices in your plant.
Cloud Connection is the port that allows you to connect to any Cloud Services.
Available Process Stations Protocol
- S7 Communication
- Modbus/TCP
- OPCUA
If you are using CC716, Profibus/MPI is supported also.
Available Cloud Connection Protocol
- MQTT(OASIS standard version 3.1 / 3.1.1)
Available Cloud Services
- MindSphere (Siemens)
- Service: MindConnect IoT Extension
- Function: Publisher
- AWS (Amazon)
- Service: IoT Core
- Function: Publisher and Subscriber
- Azure (Microsoft)
- Service: IoT Hub
- Function: Publisher and Subscriber
- IBM Cloud (IBM)
- Service: Watson IoT Platform
- Function: Publisher and Subscriber
- Other Cloud
- Profile for another cloud system
- Function: Publisher and Subscriber
Limits
CC712
- Max S7 Connections:1
- OPCUA:Client1
- Modbus/TCP:Max 10 Stations
- HTTPS Connection:1
- Variables:Max 500
- MQTT Broker:1
CC716
- Max S7 Connections:7
- OPCUA:Client7
- Modbus/TCP:Max 10Stations
- HTTPS Connection:1
- Variables:Max 3500
- MQTT Broker:1
*Please be careful that the Connections of S7 and OPCUA are Counted by “TOTAL”.
It means that CC716 can Connect the station with S7 and OPCUA with Max Stations.
Outlook
LAN Port
There are two Lan ports – Upper is Port1 and Lower is Port2.
P1 is used for Cloud Connection.
P2 is used for the Process Station.
Here is the 24V DC Connector.
SET Button
We can use the Set button to Factory Reset the device.
- Turn off the power supply.
- Turn on the power supply by pressing the Set Button.
- After 5s, you can see the Diagnosis LED is flashing.
- Release the set button and wait for the LED to not flash.
- CC712 is reset if the LED is turned on.
CLP Slot
there is a CLP Slot behind the CC712/CC716.If you used other types of Siemens Network devices, that is an option for using a plug to save your configurations.
CC712/CC716 can save the current Configuration inside the Plug. If your device is broken,
what you need to do – plug the Plug to your new devices and turn on the power again.

Installation Options
- DIN Rail
- S71500 Standard Rail
- S7300 Standard Rail
- Vertical and horizontal both available

Configuration
Here is my configuration in this post; Because I do not have a “Real” PLC, S7 PLCSIM Advanced is used to simulate the TCP/IP Driver to communicate to CC712 by S7-Protocol.
Then, My Workstation(PC) is using Https to connect with CC712 , Configure all the settings.
Finally,Port1 of CC712 is connected to my home router and using MQTT to publish the message to AWS IOT Core.
AWS Settings
In this point,I will explain how to set-up your AWS IOT Core.
Please click the below link to open the AWS IOT Core.
(apply for the account if you do not have one)
https://console.aws.amazon.com
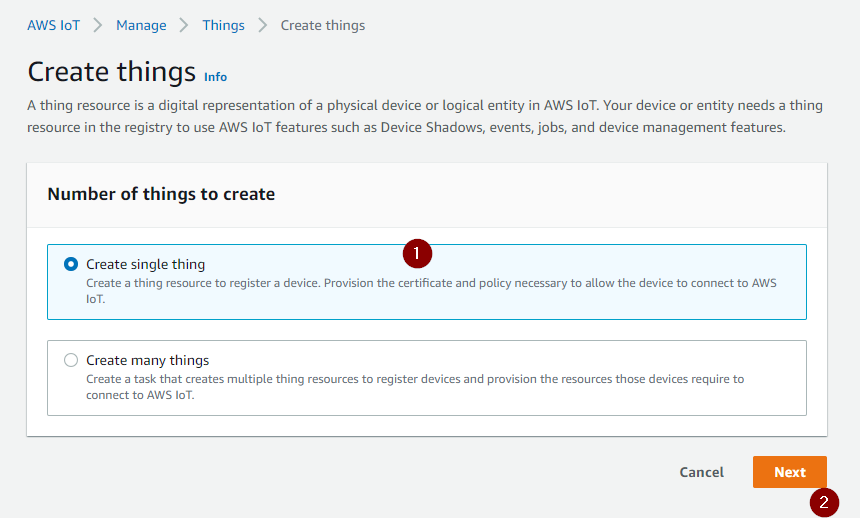
Create the Things
We will create the “Things” .you can image the “Things” is the T of IOT.
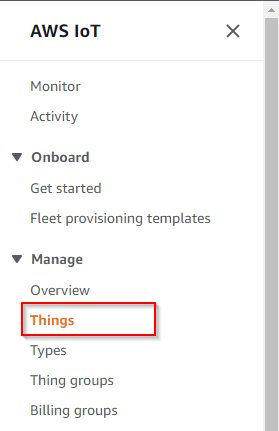
Please click the “Create things” button on the left side.

Select the “Create single thing” ,Then press Next.
Enter your device name in the Thing Name Field.

we do not use shadow.
Press Next.

Create the Certificate and this is a very important step.
Select “Auto-Generate a new certificate” and Press Next.

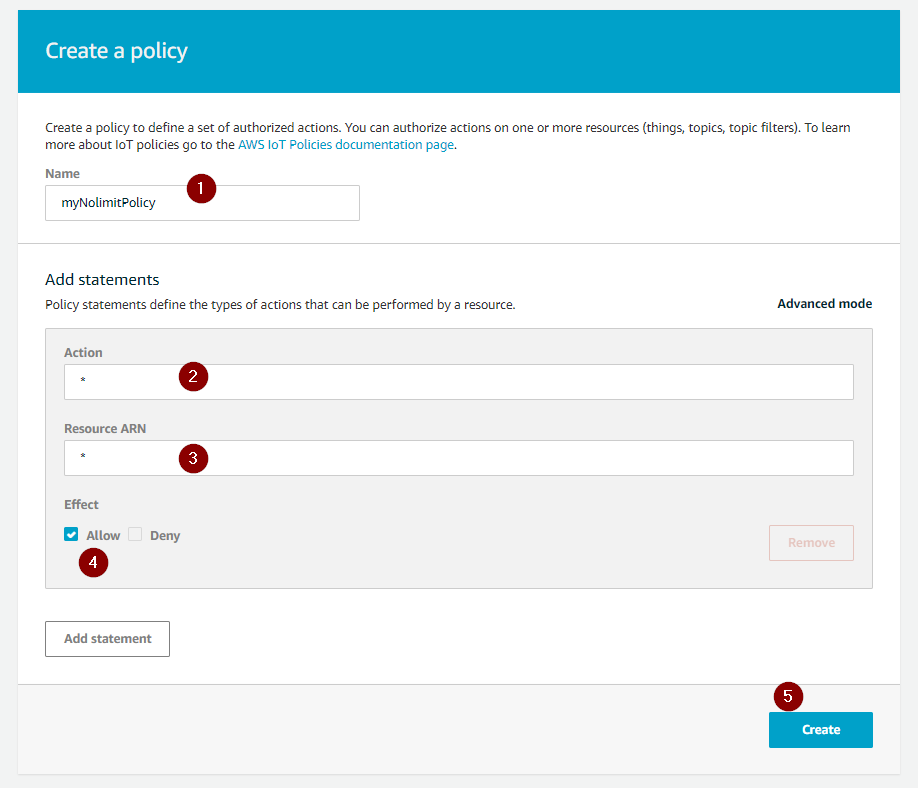
Create the Policy for your device.
This policy will define what your “Things” allow and Deny.
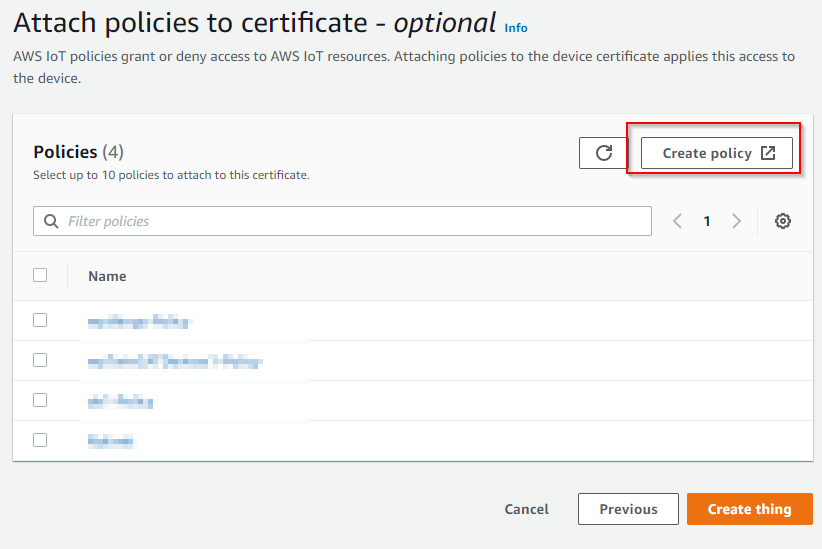
Browser will open a new tab for you to configure your policy.
Enter the Name for your policy, Put * into the Action and Resource ARN field.
Check the Allow Checkbox in the Effect checkbox.
Finally press “Create” to create your policy.
Then you will see the policy is created.
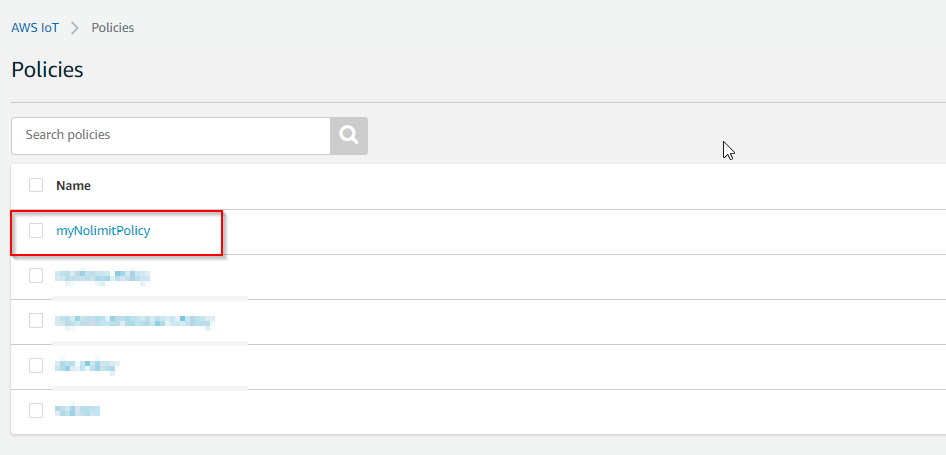
Press the Refresh Button to update your policy.
You will see the policies list is updated.

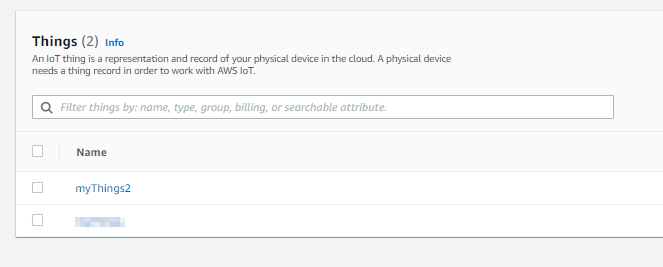
put a check into the policy checkbox, and create the “Create thing” .

Console will ask you to download the Certificates and Key .please download all these items.

The items that you download,a small green text and Checkbox is shown.
Please be careful that Root CA Certificates can be downloaded later but the Public key and Private key can only be downloaded at this moment.

While you click the download button , a new web page is opened. please right click and save as to download it.

Now all the files are ready.

New “Things” is also created.
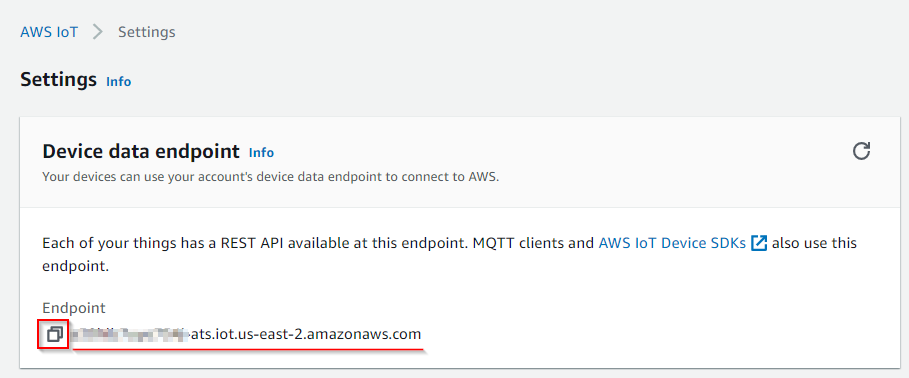
Endpoint
you can image Endpoint as a URL for the Broker/REST API to access your applications.
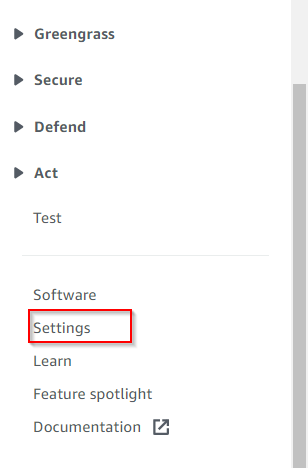
click the settings in the AWS IOT Core Console.
you can see a link in the Device data endpoint.
click the button to copy the link and paste it into your notepad.
CC712 Initial Setup
Firstly, the parameters that you changed do not immediately apply to the CC712. There is a small popup with text”Click here to apply changes” with a yellow check-mark.
The setting is applied after you click the click-mark button.

Connection
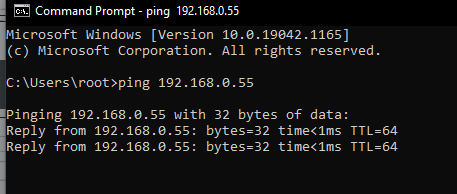
Connect your PC to Port 2 of CC712 with Standard LAN Cable.
CC712/CC716 Port2に初期IPは192.168.0.55/24です。
The factory setting for Port2 is 192.168.0.55/24.

please match your network card ip with the network.

Try to ping the device and test the communications.
Open your browser(I am using chrome) and access https://192.168.0.55.
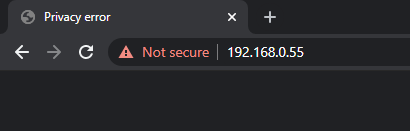
Chrome will ask that your connection is not private.
click the Processed to 192.168.0.55(unsafe) to access the web server.

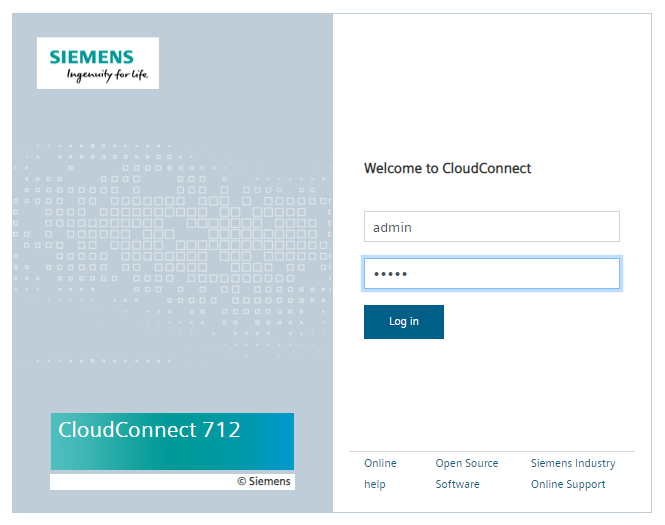
Now you can see the login screen!

Login
Refer to the Manual , the default username and password are both admin.

Enter the username and password, press the login button.
enter admin into the current password field.
Then setup your new user and password.
Please do not forget it!

uumm..you need bigger and lowercase, digits and some special symbols.
Please follow the rules.

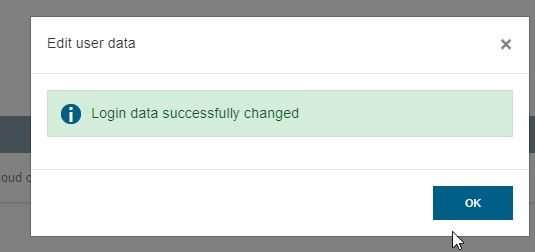
The new login data is set.
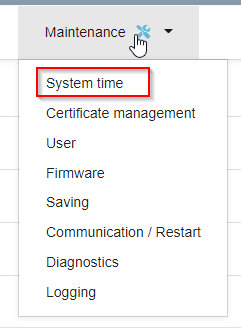
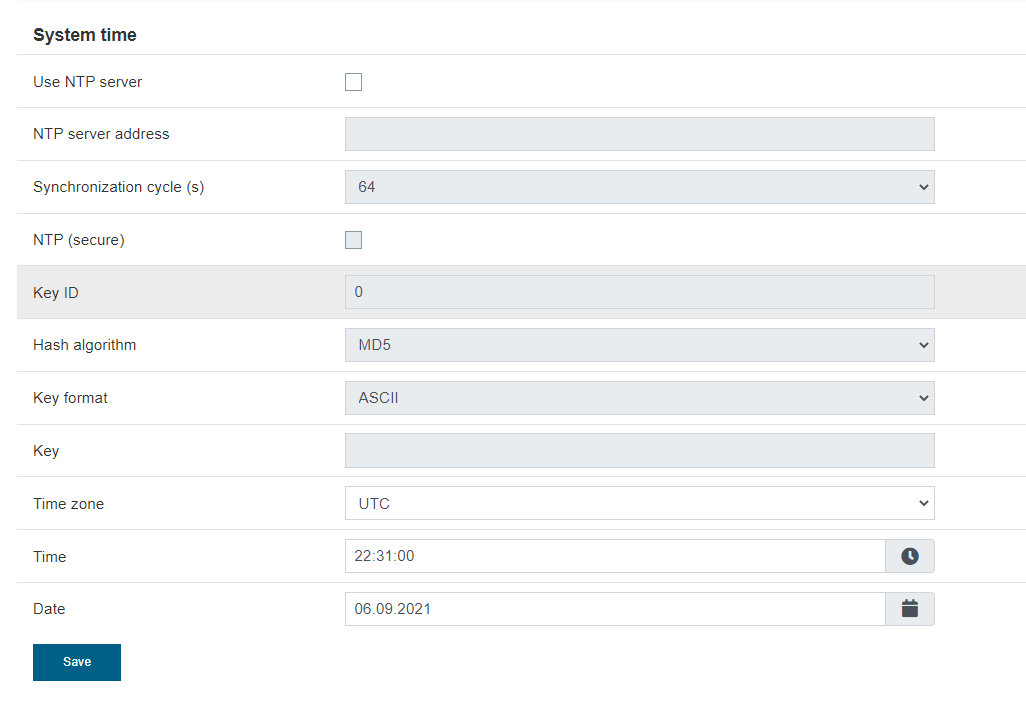
System time
Setting up the right time is very important. When something right happens, you can check the logs and find out the problems.
please click Maintenance>System time.
Setup the time on this page.
TIA Project Configuration
In this post I will configure a S7-1500 station to communicate.
There are a few settings that you need to take care of.
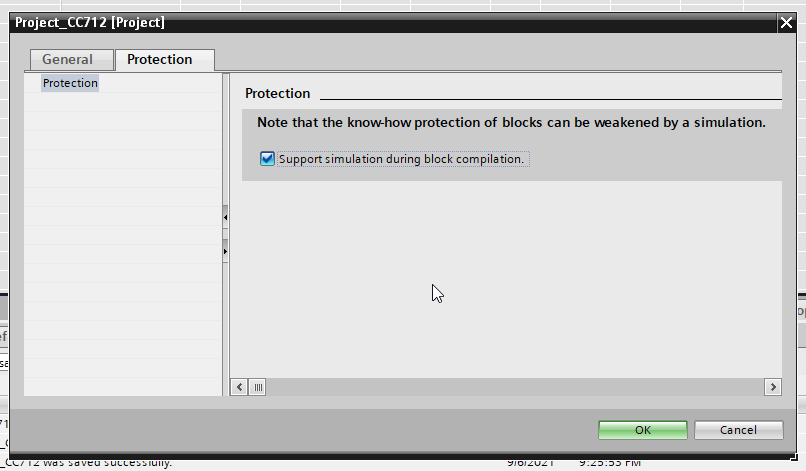
Please check the box of Permit access with PUT/GET Communication from remote partnerのCheckbox in the Protection & Security tab.

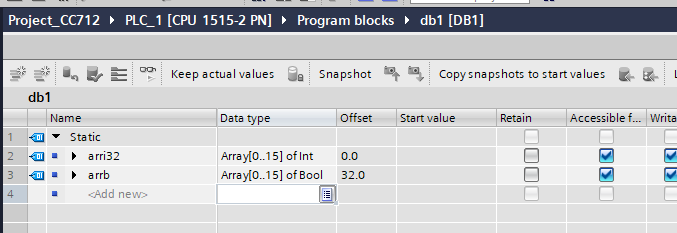
Open the properties of the DB that you need to exchange, un-check the Optimized block access.

you will see “Offset” in the DB.
If you are using Simulation, please check the Support simulation during block compilation also.
CC712 Connection Set-up
Now we will step into the CC712 Device setup.
Process Station Port
Ethernet Setting
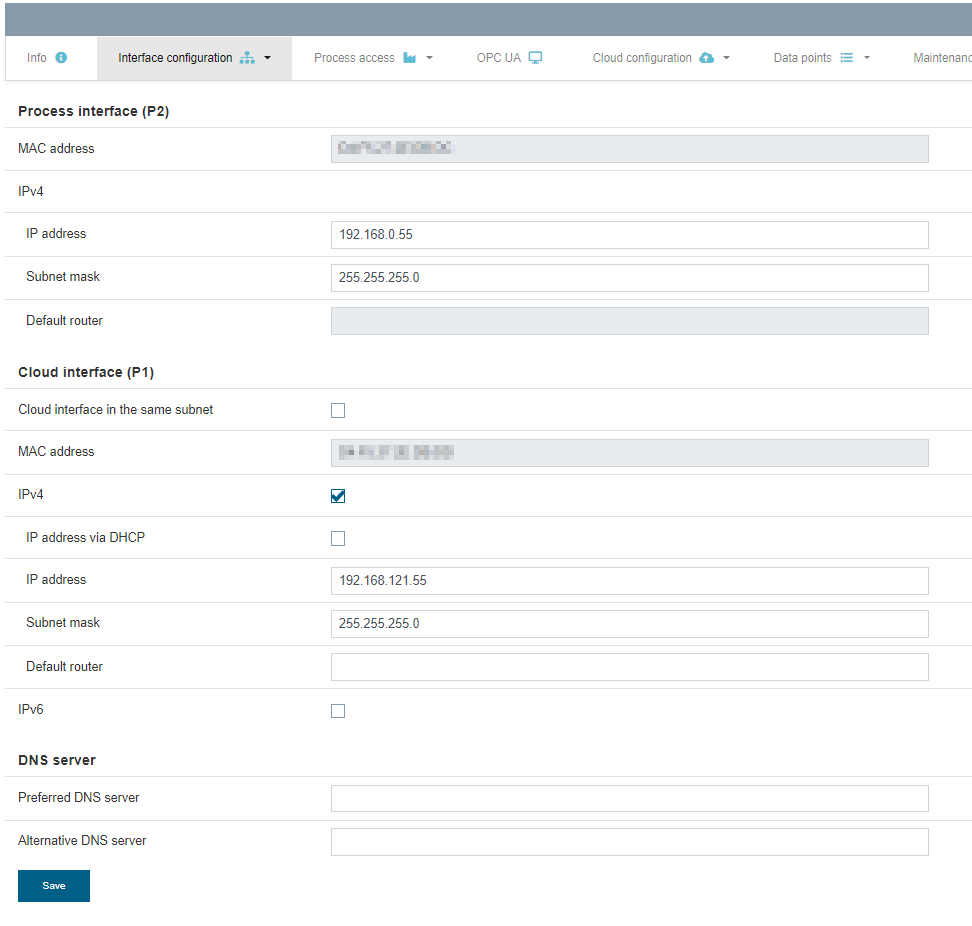
Let’s set up the IP of port2.
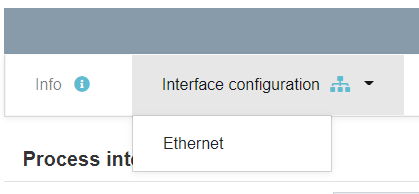
Go to the Interface configuration>Ethernet.

You can setup the Process interface and Cloud interface in the same screen.
This time I will keep the Process Interface to a default setting – 192.168.0.55/24
Process access Setting
Click the Process access in the top title.

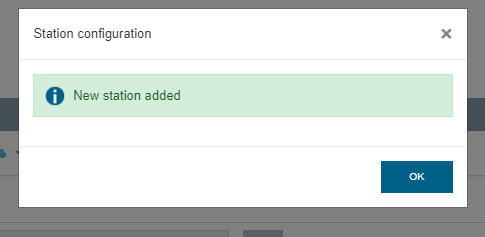
Create your new station and enter the station name, then press Add.

You will see a popup to indicate that the new station has been added.
Select the Station that you created before, and choose S7 Ethernet as the protocol.
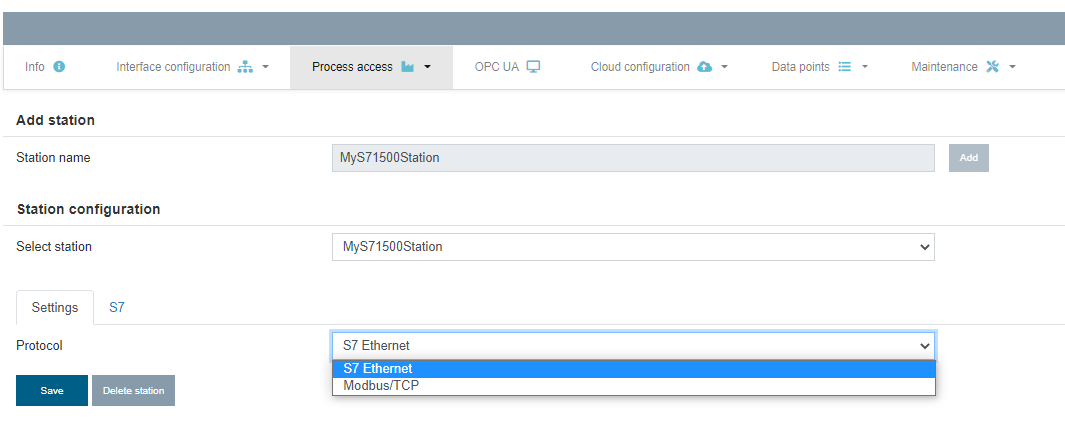
Click the S7 tab to configure the S7 Ethernet setting.
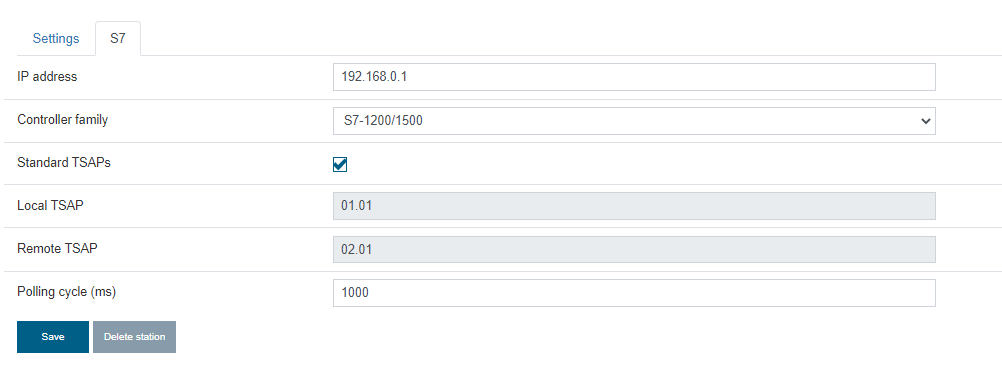
We are using the S7-1500 at this time, so the Controller family setting is S7-1200/1500.
Please adjust the polling cycle(update cycle) depending on your applications.
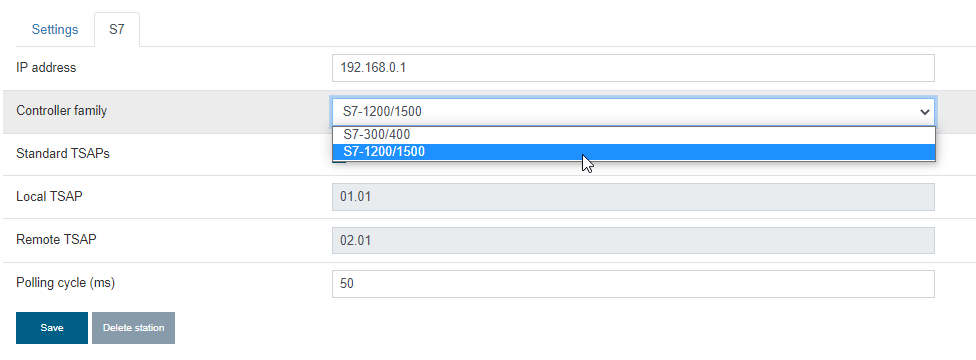
Check the Standard TSAPs to use the Default S7 Connection setting.
Local TSAP is the CC712 and Remote TASP is the S7-PLC.
01.01 = Using Resource1 as Rack 0 Slot 1.
02.01 = Using Resource2 asRock 0 Slot 1.
You can also configure your own S7-Connection in TIA projects , then uncheck the Standard TSAP Checkbox to configure the setting as the same as CC712.
press OK after the setting is finished.
Let’s check the communication status by clicking Maintenance > Diagnostics.
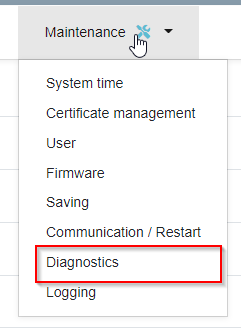
If the message that Connected to PLC:xxx.xxx.xxx.xxx is shown, the CC712 is communicating to the S7station.

Data Point Setting
After the Connection is configured, we need to set up the Data point where variables should be exchanged.
Click the Data Points>Data points Button.

Select stationを先追加したStationを選び、Add data pointをクリックします。
Selection the station that you created before and Click Add data point.

Sure you can import all variables from DB directly – But I will show you how to configure it manually.
Choose “Cloud” in the Target.
Enter your variables name and Data type.
Configure the DB number to 1 and enter 0 in the Address Text Field.
Now the Cloud will read your variable(DB1.DBW0) from the below setting.

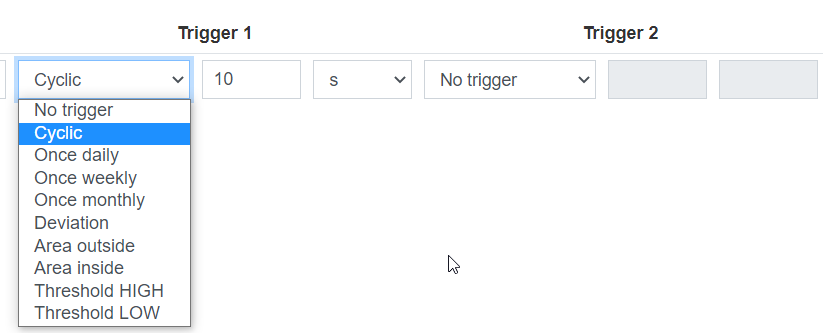
Trigger Setting
Change the Trigger 1 setting from no Trigger to Cyclic, and set it as 10s.
press Add data point to finish your Data point Configuration.

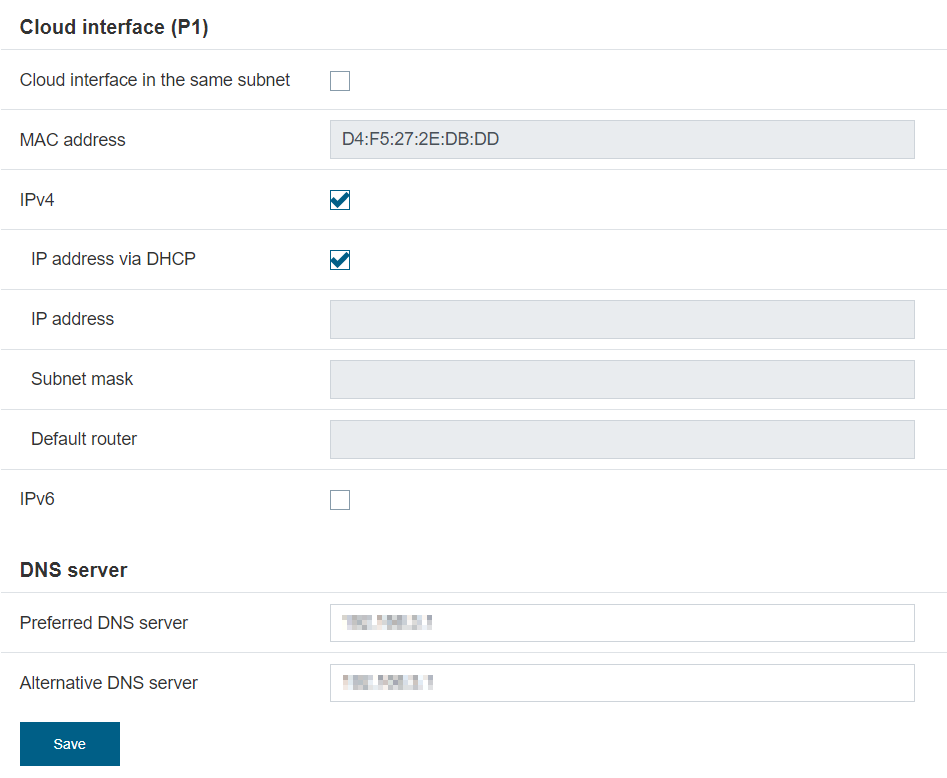
Cloud Connection Port Setting
Go to Interface configuration>Ethernet.
I am using the home router to connect CC712 to the internet.
Check the IPv4 and IP address via DHCP, and configure your DNS Server address.
Cloud configuration
Press Cloud configuration>Profile to set the AWS IOT Core cloud setting.

Profile
Create your new profile to configure the Cloud services.
Enter the Profile name and press Add.

Settings
Select AWS in the Cloud provider and MQTT in the Protocol setting.
Then Check the Enable profile Checkbox to activate it and save.

MQTT Configuration
Click the MQTT configuration to configure the AWS IOT Core Broker.
MQTT Version:V3.1
Broker address:the endpoint that you paste in the notepad in the above step.
Broker Port:8883
Client ID:the “Things” name that you created in the above step.
TLS:Enable
TLS Version:V1.2
then save the setting.

Certificates
Configure the Certificates.
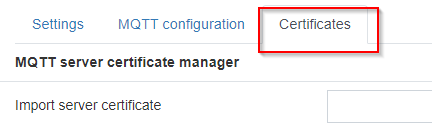
Using the MQTT Server certificate manager to upload the AmazonRootCA1.cer from your PC.

you will see the details of the certificate after it is uploaded.

Check the MQTT Client certificate checkbox.
Upload your certificate that you downloaded from AWS.(xxxx-certificate.pem.crt)
Upload your Private Key that you downloaded from AWS.(xxxx-private.pem.key)
Save it.

Publisher
Finally , we need to configure the Publisher.

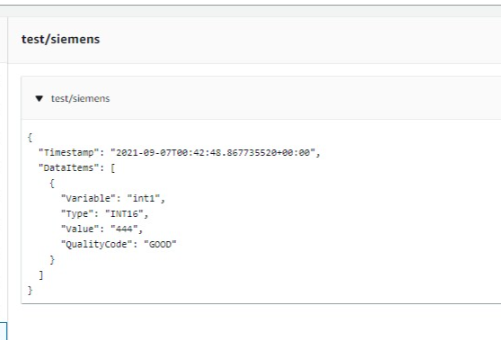
Add Topicでtest/siemensを入れます。(ここは自由です)

Select the station that we created,
Topic:test/siemens,
select all Data points and click “Set for all”.
save it.

Result
The Connection is established while the Cloud connection status changed to CONNECTED. message is displayed.

Access the AWS IOT Core Console, and click the Test.
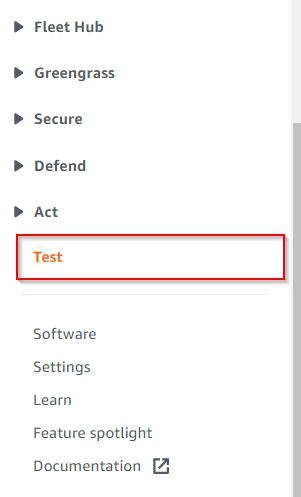
Add the topic test/siemens in the Subscribe to topic tab.

you can see the message that is published from CC712 in every 10s.
Finally
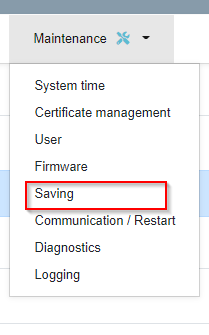
At the end of this post I will show you how to back up the configurations.
Maintenance>Saving.
Click the Export configuration to Download it.
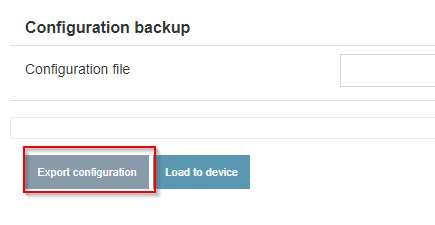
Caution! the certificates and Private key can not backup.

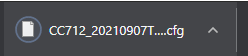
Just press Keep if you are using Chrome.

Here are your backup .cfg files.
Please feel free to comment/twitter/email to us!
Twitter:@3threes2
Mail:soup01threes*gmail.com (* to @)